Software
Houzz Logo Print
westes

Constructing a Base for Retaining Wall Blocks for Small Raised Bed

4 years ago
last modified: 4 years ago
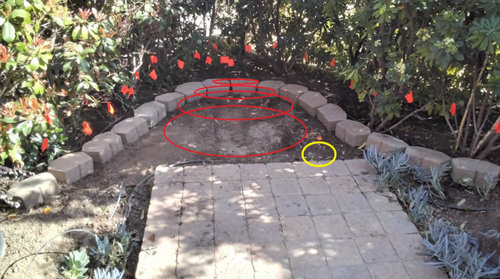
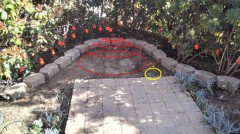
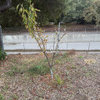
I have a corner area of a garden where we want to build a raised bed as high, as we can get it, in a very limited space. On the side closest to the camera in the photo, we have a cemented paver platform to hold back the new soil. On the hedge side, we want to install retaining wall blocks two to three blocks high. The raised mound is NOT on the plant side of the wall. The raised mound is on the side of the wall closest to the camera. That is why you are seeing the backside of the blocks. That is where the new soil will be pressing.

The retaining wall blocks need a good construction base so that they can be leveled and stay level. The initial plan was to dig a ditch four inches deep, then line that ditch with landscape fabric, and then use about two inches of 1/4 inch gravel as the base. Each block weighs about 25 pounds and is less than 12 inches wide. So even with three of these stacked, we only need to support less than 100 pounds of weight over a 12-inch section. That said, two inches is not much depth for a base.

What is the best way to construct this base? How many inches deep should the trench be? How many inches of 1/4-inch gravel before we lay down the blocks? How many inches of 1/4-inch gravel on the sides of the block as we come up to ground level?


Comments (13)

  • 4 years ago

    Move to landscaping forum.

    westes Zone 9b California SF Bay thanked strategery
  • 4 years ago
    last modified: 4 years ago

    Step one, turn your blocks around, they’re facing the wrong way.

    westes Zone 9b California SF Bay thanked jrb451
  • 4 years ago
    last modified: 4 years ago

    @jrb451 No they are not reversed. The other side of the block is the front facade. The locking latch is on the back side of the stone and requires soil pressure. to stay locked. The retaining blocks are for function and will not be seen.

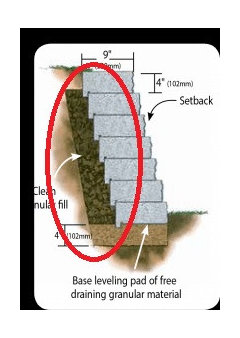
    I circled in red the side of the retaining wall block that takes a load from soil. That is the side that is facing the camera in my photo, and that is the side that will hold soil weight as the raised mound is built.


  • 4 years ago

    @strategery Which Landscape group? I already pointed at Landscape Design.

    How to build a construction base is more of a home building activity than a landscape activity. I am asking about construction principles for establishing a base that will last and stay level with weight on it.

  • 4 years ago

    I believe the small display "mound" you want to fill is within that eyelid shaped area between the blocks and pavers. So the blocks hold in the slope of the mound you see from the patio, not to hold in the existing hedgerow. If so, then the blocks just laid temporarily are facing correct, with another 2 courses to go.

    - Base of gravel, if you choose to use, as per gardengal's #3. If you want solid solid solid, then 8" of 3/4" minus gravel, compacted. But if the 1/4" gravel you reference is chipped limestone, that should compact well enough for a 3-high garden wall.

    - Be cognizant of the "mound" washing back onto the pavers.

    - Be aware that you will get leakage through the blocks, staining the faces with dirt. Hosing off periodically may be more of a challenge through the hedgerow, if you can even see the faces to worry about.

    - The other 2 courses will have to be stepped down to the patio corners, and those blocks aren't the prettiest to do that. You'll need to use landscape block adhesive on at least the step downs and caps if you have them, but part of having a garden wall is knowing they may need be periodically adjusted.

    westes Zone 9b California SF Bay thanked 3onthetree
  • 4 years ago

    @gardengal48 (PNW Z8/9)

    1) Homebuilders add retaining walls and stone walls to homes all the time. And the basic principles used to construct bases for any heavy object are similar. It really is a construction question, but a construction question that is being applied to a landscape addition. Yes, it's a bit lightweight of a problem for a home building group.

    2) You correctly describe the side of the blocks that are facing the camera as the back of the block. That's exactly the side that will handle the raised mound soil. I am unclear on why this is hard for everyone to see. I tried to draw a few concentric red rings where the mound will be placed in this new photo. The soil will be against the back of the blocks with the interlocking feature, just as they are currently oriented.

    3) The wall will be about three blocks high. The blocks currently in the photo are just initial placement ideas and we flagged around those to later build a trench for the base.


  • 4 years ago

    @3onthetree Thanks for understanding where the soil will be placed. I guess I took it for granted that people would imagine the mound placement, but I was wrong and I should have described it better.

    Eight inches of base would support a car driving over a paver. We really need that much material to support 100 pounds of blocks?

    The old style of base - still widely used - is to use sized gravel that goes down to fines, and then compact it. The newer method is called "open-graded base" and uses 3/4" crushed rock without any fines, and then above that 3/8" crushed rock without any fines. Believe it or not, this works fantastically well. It drains far better than material that includes fines. Technically, you are supposed to use a 3/4" base and then an additional layer of support fabric, then 3/8" crushed rock without fines as your bedding layer for pavers or stone blocks. If I were doing something with more serious weight, I have discovered that mixing 3/4" and 1/4" rock together and using that as the bottom of the base works as well or better, then you can put a 1/4" bedding layer on top of that without needing to lay extra fabric layers.

    https://www.youtube.com/watch?v=Ld4VCyHEHt8

    In this case, we do not need to support a lot of weight, so I was hoping to "cheat" and just lay down fabric at the bottom of the ditch and then use however-many inches of 1/4" gravel as both the base and the bedding layer combined.

  • 4 years ago

    @3onthetree So to avoid step downs, it might be better to keep the wall height uniform - probably two blocks high - and approximately at the same level as the paver patio?

  • 4 years ago

    I see this is posted in three different tagged forums. Totally fine and all related to the project for sure.

    What is on the other side of the shrubs? It does have a look of being backwards from our viewpoint even knowing where the soil will go. From where the photo is taken how is that related to the lot and the house?

    westes Zone 9b California SF Bay thanked WestCoast Hopeful
  • 4 years ago

    2 blocks, 3+ blocks, no blocks, just depends on what you are planting on this mound, whether a "volcano" shape will hold the types/sizes of plantings or you need more crown so need the higher wall in back. Your call.

    As far as the gravel base, it's not as much about weight as it is stability. You don't have frost heave, so that is why the 2"-4" gravel would be fine, or even none at all with a garden wall. If you went with a deeper base, is just gives you more stability from possible movement. I mentioned 8" thick as an extra option because you wanted "good construction base so that they can be leveled and stay level."

    As far as your video and using large gravel (with large sieve), that is not the "new" or appropriate base for pavers and retaining walls. The key for a stable foundation is compaction so you get better interlocking and the voids don't collapse over time. The best compaction for foundation base is still 3/4" minus, period, and still has enough sieve for water management (and note it is not hand mixed from combining 3/4" clean and 1/4" clean, it has various defined AASHTO percentages for crushed stone sized from dust to 3/4") and does not require textile to separate bedding layers. What industry behemoths have bent to include in their specs now is what Northeast contractors started to use with their pavers - 1/4" chipped gravel in lieu of a bedding sand, but not in lieu of the standard base.

    westes Zone 9b California SF Bay thanked 3onthetree
  • 4 years ago
    last modified: 4 years ago

    @WestCoast Hopeful Behind the shrubs on the left is a street. Behind the shrubs on the right is the driveway.

    This mound is going to have Agave Foxtails planted on it and will (hopefully) pop out behind a fountain that will go on the pavers. The entire area where this is being done is a secret garden, created from the front yard by hedging it off from any street view.

    In the photo I attached, we are looking into the back of the stone wall. That is exactly right, because the soil will go in the area in between the paver patio and the stone wall. The stone wall is not a decoration, so we do not care that no one will see the front face. The stone wall is a functional way to hold back soil from spilling onto the trunks of the hedge plants.

  • 4 years ago

    @3onthetree I am not trying to convince you to change the material you use for bases. The vast majority of contractors still use 3/4 material that includes smaller particles down to fines.

    Unilock has been a big advocate of using open-graded base for nearly all applications, including stone walls. See pages 18-21 in their Advanced Tech Guide, also page 3 for an illustration of a stone wall that uses only 3/4" gravel without any fines:

    https://unilock.com/wp-content/uploads/2019/11/advanced-tech-guide-en-final-lr.pdf

    The claim is made by advocates of "open-graded base" that it compacts as well - or better - than 3/4 inch with fines.

    If this were a driveway or other large capital investment, then it would be critical to get every detail right. For a disposable small garden wall, it probably can be done many ways, and if it fails the cost is not high.