Software
Houzz Logo Print
socks12345

Sewing on blanket binding

last year
last modified: last year
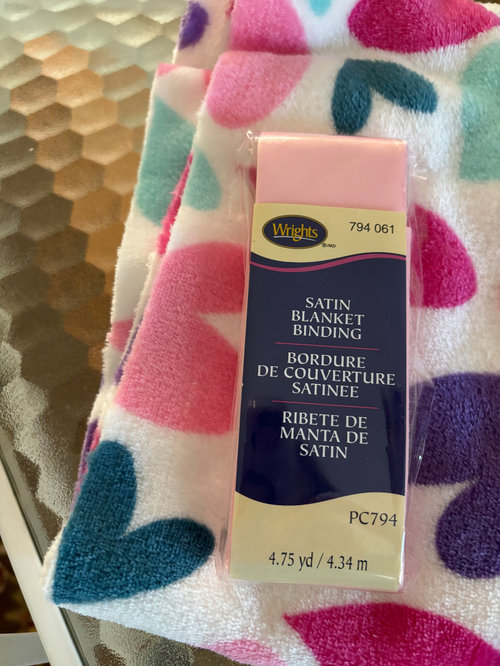
I want to sew this satin blanket binding onto this soft fleecy fabric, and I'm wondering if it's going to be hard to do. Any tips? Thanks.


Comments (13)

  • last year

    Shouldn't be, if you're moderately experienced. I've done it with my own home made binding.

    There are plenty of tutorials on the web - here's one I fouind with a quick search - the corners can be a little tricky, I think

    https://www.fleecefun.com/fleece-blanket-satin-binding-tutorial/

    socks thanked carolb_w_fl_coastal_9/10
  • last year

    That's a very good site. Thank you, Carol.

  • last year

    Are you using a machine or doing it by hand?

  • last year

    Machine, my old Singer, nothin' fancy.

  • last year

    Use LOTS of pins

  • last year
    last modified: last year

    Here's one where she is a bit fussier on mitering the corners, it's a little more work, but yields a nice corner. She also uses clips to hold the fabrics together without making pin holes in the middle of the binding.


    https://www.youtube.com/watch?v=qFG-Hh5AKdc

  • last year

    FWIW, when I want 'perfect' results, I find pinning, then hand-basting before machine stitching to be the most precise.

  • last year

    Ok everyone, thank you so much for the links and suggestions .

  • last year

    Just want to add, use a new needle in your machine.

  • last year
    last modified: last year

    The one in the video is not nicely sewn. It has major glaring drag lines where the binding shifted out of sync with the blanket. In order to do this right, you need to use pins, not clips. Clips are like holding something together by pinching it between your fingertips at one small point. Pinning it along the line of stitching is fully bracing it. The pin goes in and it comes back out. That area between those two points is then held securely in line. That is why the binding in the video looks so bad.


    The fabrics tend to move and shift under the needle at different paces. That is why you need to pin right there along the line where the stitching will go, not along the outer edges. You are not sewing that outer edge. You are trying to hold all of the layers in line together along where the stitching is going. The pins should be placed perpendicular to the line of sewing.


    I see this a lot and peole ask why it turns out so badly with these drag lines in it. That is why. Clips may have some use for some things. but they cant replace good pinning. This is one application where the pins are really needed. Clips are useless for this.

    There is no way that you are going to get a nice application like that without holding all the layers of fabric from shifting around right where you are going to run the stitching.


    That binding in the video was badly done. Dont do that. It looks to be a mess!


    Pins are one of the most important tools that you should have. Pins and needles are at the heart of quality sewing. They are NOT expensive, at all!


    Just to add....the pinholes in the binding fabric will close up. Dont use pins the size of a horse's leg! Use the small regular sewing pins that have been a staple of sewing rooms for generations, for good reason. They dont need to be cute or decorative. Regular ball head pins will do just fine.

    socks thanked jehanne hansen
  • last year

    Your point makes sense for sure! Pins will hold the fabric ”sandwich” in place at the point of sewing. I was thinking of getting clips but willl cancel that plan! I put pins in the binding as a test, and the holes seemed to ”heal” with a fingernail rub.Thank you!

  • last year

    That is exactly how the pinning needs to go. I leave the pins in and take one stitch past each pin before taking out the pin. When you come to the pin you and stop and sew over it by turning the hand wheel until it is just past the pin, then remove the pin. Or, if you are careful, you can usually sew over the pin, slowly. Once you have sewn past the pin, you have locked the position of both of those fabrics. together at that one point.

    This is critical when you have the top and bottom feeding in at different speeds.


    In the example above I would not baste for a simple straight seam, just pin. Basting it in the same direction as the sewing, is not going to do the same for preventing creep. You need to brace/secure the layers perpendicular to the line of stitching. Basting it along teh line of stitching will hold the cut edges in alignment, but the fabric will still shift forwards as it feeds under the needle along the stitching line. You have to prevent that forward creep by holding it in place across the line of stitching.

    Some will pin with the pins running parallel along the stitching line but that is not where the hold needs to be. It needs to intersect the line of stitching.


    Sewing this binding on is a bit like dealing with ease in that you have each of the layers has to be

    "eased" on to one another. The objective is to evenly ease one layer onto another without an obvious little pleat forming or all of those drag lines where it fed in unevenly.

    Basting and pinning are both essential things to practice in sewing.

    I dont do much real basting if I can pin instead. Sometimes you really do need to baste it all together. Good basting is another sewing skill to learn.

    socks thanked Annie Carter