
Search results for "Leaving examination" in Home Design Ideas

 Skill Construction & Design, LLC
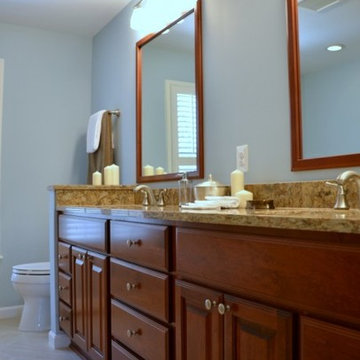
If you are looking for twice your normal bath experience, look no more. This master bath has plenty of room for two with double the storage, double the mirrors, sinks and faucets, and bathing is done two-way. The colors are warm and inviting, but it’s the subtle patterning that caught my eye. The overall effect is of a soft wash, yet on closer examination, the striations travel across the walls and criss-cross on the floor.
This expansive vanity was created with our homeowner’s needs in mind. Each “side” has a bank of drawers and under sink cabinet storage. A large undermount sink dips below the gorgeous stone counter top. Gently arching faucets in brushed nickel adorn each sink with a framed mirror above for reflection. Individual task lighting shine upon each sink and is reflected back into the room. For additional storage and to keep elbows from connecting, a large shared bank of drawers separate the two areas.
The vanities are rich with color and texture, from the swirling grain of the wood, to the raised panels and beading. The subtle beading is repeated on the drawers for a custom look. Our wood color is a deeper, more intense tone of the colors in our tiling.
Whether in a hurry or needing to relax and unwind, this bath can do both. Despite having two substantial pieces in the same area, the open glass panel that separate leaves each feeling open and airy.
This tub was made for soaking. The sides and back gently mold into arm and neck support for a truly relaxing experience. The lineal movement in the tile backsplash lend a long and lean feeling. For easy reach, toiletries are stored in a niche with accent multicolored mosaics.
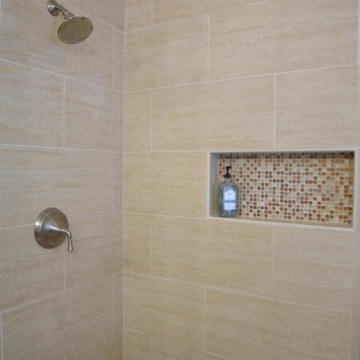
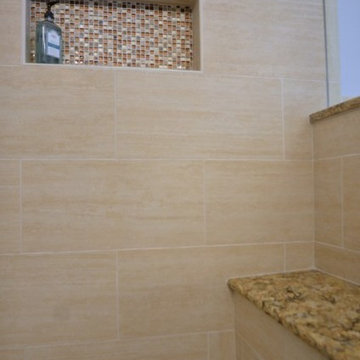
On the other side of the half wall a roomy shower awaits. The long tiles were installed in a brick pattern with striations of color wrapping the walls. The oversized tiles reduce the amount of grout, for a cleaner look. Here too we added a niche for maximum storage and a sprinkle more of the accenting mosaic. We capped the half wall and the generous bench with our vanity’s stone for a rich contrast.
We installed the tile up to the ceiling, which adds to the visual height of the room. We went with clean simple controls and showerhead, enhanced in a brushed nickel finish. So as to not obscure the view, we went frameless on our shower door and panels, using brushed nickel hinges and a simple handle.
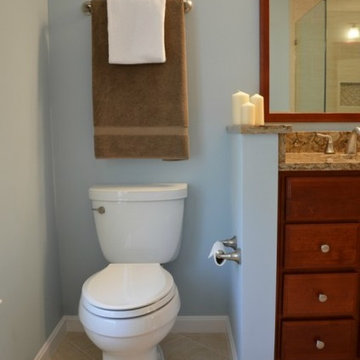
At the end of our vanity, a half wall adds backsplash on the vanity side and a bit of privacy on the other. A simple toilet in crisp white is out of sight but functional in its own “alcove”.
Despite all the patterning, there is nothing busy about the room. For the floor we decided to change things up, using a large square version of the wall tiles. To keep the room from feeling too long, we installed them on the diagonal and then criss-crossed the lines for a dramatic look.
This bath is twice as nice and ready to be shared!
http://www.designsbyskill.com/
http://www.rjkconstructioninc.com/

 Pool & Hot Tub Alliance
Backing up to an amazing golf-course we had no choice other than to remove an existing negative edge swimming pool. The pool was built on a strict budget by the previous owners which forced the builder to slam a pool next to the house leaving them with no room for entertaining. The one challenge we had was how to incorporate more space along with overhead screening without destroying the view from the house or golf course. Due to lack of sitting areas and the extreme Western Sunset this project was carefully examined from every angle assuring its design met all the customers wants and desires. When creating the overhead structure we duplicated one of the house arches multiple times to hold the structure upright. The overall design turned out great and the impossible became possible giving the owners for the first time ever a truly functional backyard.
Find the right local pro for your project
 Skill Construction & Design, LLC
If you are looking for twice your normal bath experience, look no more. This master bath has plenty of room for two with double the storage, double the mirrors, sinks and faucets, and bathing is done two-way. The colors are warm and inviting, but it’s the subtle patterning that caught my eye. The overall effect is of a soft wash, yet on closer examination, the striations travel across the walls and criss-cross on the floor.
This expansive vanity was created with our homeowner’s needs in mind. Each “side” has a bank of drawers and under sink cabinet storage. A large undermount sink dips below the gorgeous stone counter top. Gently arching faucets in brushed nickel adorn each sink with a framed mirror above for reflection. Individual task lighting shine upon each sink and is reflected back into the room. For additional storage and to keep elbows from connecting, a large shared bank of drawers separate the two areas.
The vanities are rich with color and texture, from the swirling grain of the wood, to the raised panels and beading. The subtle beading is repeated on the drawers for a custom look. Our wood color is a deeper, more intense tone of the colors in our tiling.
Whether in a hurry or needing to relax and unwind, this bath can do both. Despite having two substantial pieces in the same area, the open glass panel that separate leaves each feeling open and airy.
This tub was made for soaking. The sides and back gently mold into arm and neck support for a truly relaxing experience. The lineal movement in the tile backsplash lend a long and lean feeling. For easy reach, toiletries are stored in a niche with accent multicolored mosaics.
On the other side of the half wall a roomy shower awaits. The long tiles were installed in a brick pattern with striations of color wrapping the walls. The oversized tiles reduce the amount of grout, for a cleaner look. Here too we added a niche for maximum storage and a sprinkle more of the accenting mosaic. We capped the half wall and the generous bench with our vanity’s stone for a rich contrast.
We installed the tile up to the ceiling, which adds to the visual height of the room. We went with clean simple controls and showerhead, enhanced in a brushed nickel finish. So as to not obscure the view, we went frameless on our shower door and panels, using brushed nickel hinges and a simple handle.
At the end of our vanity, a half wall adds backsplash on the vanity side and a bit of privacy on the other. A simple toilet in crisp white is out of sight but functional in its own “alcove”.
Despite all the patterning, there is nothing busy about the room. For the floor we decided to change things up, using a large square version of the wall tiles. To keep the room from feeling too long, we installed them on the diagonal and then criss-crossed the lines for a dramatic look.
This bath is twice as nice and ready to be shared!
http://www.designsbyskill.com/
http://www.rjkconstructioninc.com/
 Skill Construction & Design, LLC
If you are looking for twice your normal bath experience, look no more. This master bath has plenty of room for two with double the storage, double the mirrors, sinks and faucets, and bathing is done two-way. The colors are warm and inviting, but it’s the subtle patterning that caught my eye. The overall effect is of a soft wash, yet on closer examination, the striations travel across the walls and criss-cross on the floor.
This expansive vanity was created with our homeowner’s needs in mind. Each “side” has a bank of drawers and under sink cabinet storage. A large undermount sink dips below the gorgeous stone counter top. Gently arching faucets in brushed nickel adorn each sink with a framed mirror above for reflection. Individual task lighting shine upon each sink and is reflected back into the room. For additional storage and to keep elbows from connecting, a large shared bank of drawers separate the two areas.
The vanities are rich with color and texture, from the swirling grain of the wood, to the raised panels and beading. The subtle beading is repeated on the drawers for a custom look. Our wood color is a deeper, more intense tone of the colors in our tiling.
Whether in a hurry or needing to relax and unwind, this bath can do both. Despite having two substantial pieces in the same area, the open glass panel that separate leaves each feeling open and airy.
This tub was made for soaking. The sides and back gently mold into arm and neck support for a truly relaxing experience. The lineal movement in the tile backsplash lend a long and lean feeling. For easy reach, toiletries are stored in a niche with accent multicolored mosaics.
On the other side of the half wall a roomy shower awaits. The long tiles were installed in a brick pattern with striations of color wrapping the walls. The oversized tiles reduce the amount of grout, for a cleaner look. Here too we added a niche for maximum storage and a sprinkle more of the accenting mosaic. We capped the half wall and the generous bench with our vanity’s stone for a rich contrast.
We installed the tile up to the ceiling, which adds to the visual height of the room. We went with clean simple controls and showerhead, enhanced in a brushed nickel finish. So as to not obscure the view, we went frameless on our shower door and panels, using brushed nickel hinges and a simple handle.
At the end of our vanity, a half wall adds backsplash on the vanity side and a bit of privacy on the other. A simple toilet in crisp white is out of sight but functional in its own “alcove”.
Despite all the patterning, there is nothing busy about the room. For the floor we decided to change things up, using a large square version of the wall tiles. To keep the room from feeling too long, we installed them on the diagonal and then criss-crossed the lines for a dramatic look.
This bath is twice as nice and ready to be shared!
http://www.designsbyskill.com/
http://www.rjkconstructioninc.com/

 Interior Design Consultants, LLC
Terry P
The dining space is located in the curved window space which provides views of the Atlantic. The table base which depicts Hercules holding up the glass table top has been carved from a single slab of quartz. A close examination of the table base reveals large crystals of quartz which the sculptor left intact. The plaid window dressings are limited to the right side and left side of the windows in order to leave the ocean views unobstructed. The area rug is an unusual combination of pink and yellow tufted wool Savonnerie.

 Lucy Harris Studio
Notable decor elements include: Camerich Lazy Time sectional sofa, Safavieh Zigzag dhurrie rug, Noguchi Akari floor lamp.
Photography: Francesco Bertocci

 SUPERIOR CHIMNEY SERVICES CORPORATION
Standard annual or mechanical Chimney cleaning for gas and wood burning fireplaces typically works to remove any type of buildup as well as checking for the structural integrity of the chimney. Maintaining an annual chimney cleaning will meet the national safety standard set by the NFPA, CSIA, IRC and NCSG, helping homeowners avoid chimney fires and blockages.
Why does safety matter? Did you know that there was a chimney fire in Marengo in January? Or a chimney fire at a Peotone home at the end of March? Or a log cabin fire caused by the chimney in June? That’s just a few that happened in the past 7 months.
Why Does a Chimney Cleaning Matter?
Chimney sweeps also known as chimney cleanings, fireplace cleanings, or fireplace sweeps. Regardless of what you call it, it still means the same thing.
Chimney cleaning for gas and wood burning fireplaces serve 3 key purposes:
confirming structural integrity
removing flammable deposits and
obstruction-free assurance.
Homeowners with gas or wood burning fireplaces benefit from each of these safeguards.
The National Fire Protection Association addresses this directly through NFPA 211, a widely recognized fire safety code. The standard states that chimneys, fireplaces, and vents require inspection at least once a year for soundness, free from deposits, and correct clearances, with cleaning, maintenance, and repairs to be done whenever needed.
This annual requirement applies equally to gas and wood burning fireplaces. Organizations including the Chimney Safety Institute of America, the National Chimney Sweep Guild, International Residential code and the National Fire Protection Association each reference this standard as the requirement for home fire safety.
Free 14-Point Certified Written Inspection
Every chimney sweep completed through Superior Chimney includes a complimentary 14-point certified written inspection along with photo documentation delivered to you by email. This documentation gives homeowners a clear visual record of their chimney system.
The written report covers the condition of the flue liner, smoke chamber, smoke shelf, damper, firebox, chimney crown, and chimney cap, among other components examined during a standard visit. Photo documentation captures each area so homeowners can review the findings independently of the technician’s verbal summary. Written inspection reports allow families to track the condition of their fireplace chimney system over time.
Chimney Cleaning and Structural Integrity
A CSIA Certified Chimney Sweep technician, such as Superior Chimney technicians, visually examines the chimney from the top opening to the firebox below, gaining a full evaluation of the interior.
When chimney rods and brushes pass through the chimney system, loose pieces of fire clay tile, damaged tile joints, or crumbling brick sometimes fall down into the fireplace. This debris can mean there is an integrity problem. By knowing this is a problem, will protect families and their homes. Now it’s time to take care of it and call in a certified chimney technician.
Fireplace Cleaning and Creosote Removal
Creosote, is the technical name for soot. Soot forms as a natural byproduct of burning wood. Smoke traveling upward through the chimney and leaves deposits of creosote along the interior walls. With every fire, a little more gets built up.
The issue with creosote is that it is highly flammable and is the leading cause of chimney fires nationwide. Removing the buildup through regular chimney cleanings keeps a fireplace serviceable for continuous use throughout the spring, fall and winter seasons.
Standard and mechanical chimney cleanings pay close attention to the flue liner, smoke chamber, smoke shelf, damper, and firebox in a single service visit. Superior Chimney performs each fireplace chimney inspection using a no-mess process that protects the home during service. This keeps soot contained within specialized equipment rather than the living room.
An Obstruction Free Chimney
Several conditions create blockages within a chimney system. Bird, squirrel, bat and raccoon nesting material, feces, and debris frequently accumulate inside an unprotected flue, especially during spring and summer months when the fireplace sits unused.
Excessive creosote accumulation or a collapsed chimney liner can restrict proper airflow. Homeowners that address obstructions with a chimney inspection will be able to maintain proper draft and ventilation with their gas or wood burning fireplace. This will reduce the risk of smoke backing into the home.
Gas Chimney Cleaning Compared to Wood burning Chimney Cleaning
Gas and wood burning fireplaces share the same annual chimney inspection requirement. Whether you are burning wood, gas or a “pile of shirts” there is still heat and flame that requires worthy firewalls to protect the home from heat transfer. Fire worthiness and checking the firewall integrity is priority.
Wood burning fireplaces generate creosote that builds along the flue liner with every fire. Gas fireplace systems accumulate lighter deposits along with potential venting obstructions, since gas appliances rely heavily on venting for safe combustion byproduct release. Each system accumulates different residues that need attention.
A CSIA Certified Chimney Sweep technician from Superior Chimney adjusts the specific cleaning approach based on fuel type. However, the same core safety elements apply: structural integrity, deposit removal, and clear airflow.
What Happens During a Chimney Cleaning?
A typical chimney inspection begins with a walkthrough of the fireplace and the chimney on top of the roof, allowing the technician to record any visible concerns the homeowner reported in advance as well as any new findings.
The certified technician then covers the immediate hearth area with protective material before setting up specialized equipment designed to contain creosote throughout the cleaning and inspection.
Chimney rods and brushes pass through the flue liner to loosen and remove creosote deposits along the smoke chamber, smoke shelf, and damper. The certified technician inspects each section closely for loose or crumbling firewall, cracked joints, or other signs of weak structural damage.
A final walkthrough of the firebox and chimney completes the visual inspection. Photo documentation captures each component, and the certified written report is sent to the homeowner by email. This consistent process gives homeowners the documentation they need to compare year to year.
Chimney Cleaning Safety Standards
The table below summarizes the organizations that set national chimney safety standards, along with their specific requirements for fireplace chimney sweeps.
NFPA211
National Fire Protection Association
Annual inspection for soundness, deposit buildup, and correct clearances; cleaning and repairs completed as needed
CSIA
Chimney Safety Institute of America
Certifies technicians through testing on chimney and venting system knowledge
NCSG
National Chimney Sweep Guild
Establishes trade standards and best practices for chimney sweep professionals
How Often Should You Schedule a Chimney Cleaning and Inspection?
CSIA recommends scheduling chimney cleaning and inspection annually by CSIA Certified Chimney Sweeps. This recommendation applies to gas and wood burning fireplaces, regardless of how frequently a household uses the fireplace and especially in freeze/thaw geographic areas.
Regular chimney sweeps save lives, since a clean fireplace chimney rarely catches fire. CSIA encourages homeowners to rely on Certified Chimney Sweeps, as these technicians undergo regular testing on the complexities of chimney and venting systems throughout their careers.
Frequently Asked Questions
What is included in a chimney sweep? A chimney sweep includes the flue liner, smoke chamber, smoke shelf, damper, and firebox, removing creosote while checking for obstructions and structural concerns throughout the chimney system (NOT the ashpit).
How often should gas and wood burning fireplaces receive chimney sweeps? CSIA, NFPA, IRC and NCSG guidelines each call for chimney sweeps at least once a year for gas and wood burning fireplace systems.
Why does creosote removal matter for fireplace safety? Creosote is highly flammable and builds along the interior walls of a fireplace chimney with every fire, creating conditions that lead directly to chimney fires when left in place over time. Creosote is unburned particles from the combustion chamber.
Who should perform a fireplace chimney sweep? CSIA Certified Chimney Sweep technicians complete fireplace chimney sweeps after passing regular testing on chimney and venting system knowledge, meeting the certification standard recognized across the industry.
Does a fireplace chimney sweep remove animal nests and debris? No, a fireplace chimney sweep addresses soot and creosote, while significant nesting material, feces, or collapsed liner debris often calls for dedicated obstruction removal alongside the standard service.
What does the free 14-point inspection include? The complimentary 14-point certified written inspection documents the flue liner, smoke chamber, smoke shelf, damper, firebox, crown, and cap through photo evidence delivered directly by email for homeowner records.
Choose Superior Chimney for Your Certified Chimney Inspection
All service technicians completing chimney sweeps through Superior Chimney hold National Certification through the Chimney Safety Institute of America (CSIA), reflecting the training standard recommended by fire safety organizations nationwide.
Scheduling regular chimney sweeps to clean gas and wood burning fireplace systems protects a home from fire risk, preserves the structural integrity of the chimney, and keeps airflow clear for proper, continuous use throughout the year. Contact us today to schedule a chimney inspection at 877-244-6349.
 Skill Construction & Design, LLC
If you are looking for twice your normal bath experience, look no more. This master bath has plenty of room for two with double the storage, double the mirrors, sinks and faucets, and bathing is done two-way. The colors are warm and inviting, but it’s the subtle patterning that caught my eye. The overall effect is of a soft wash, yet on closer examination, the striations travel across the walls and criss-cross on the floor.
This expansive vanity was created with our homeowner’s needs in mind. Each “side” has a bank of drawers and under sink cabinet storage. A large undermount sink dips below the gorgeous stone counter top. Gently arching faucets in brushed nickel adorn each sink with a framed mirror above for reflection. Individual task lighting shine upon each sink and is reflected back into the room. For additional storage and to keep elbows from connecting, a large shared bank of drawers separate the two areas.
The vanities are rich with color and texture, from the swirling grain of the wood, to the raised panels and beading. The subtle beading is repeated on the drawers for a custom look. Our wood color is a deeper, more intense tone of the colors in our tiling.
Whether in a hurry or needing to relax and unwind, this bath can do both. Despite having two substantial pieces in the same area, the open glass panel that separate leaves each feeling open and airy.
This tub was made for soaking. The sides and back gently mold into arm and neck support for a truly relaxing experience. The lineal movement in the tile backsplash lend a long and lean feeling. For easy reach, toiletries are stored in a niche with accent multicolored mosaics.
On the other side of the half wall a roomy shower awaits. The long tiles were installed in a brick pattern with striations of color wrapping the walls. The oversized tiles reduce the amount of grout, for a cleaner look. Here too we added a niche for maximum storage and a sprinkle more of the accenting mosaic. We capped the half wall and the generous bench with our vanity’s stone for a rich contrast.
We installed the tile up to the ceiling, which adds to the visual height of the room. We went with clean simple controls and showerhead, enhanced in a brushed nickel finish. So as to not obscure the view, we went frameless on our shower door and panels, using brushed nickel hinges and a simple handle.
At the end of our vanity, a half wall adds backsplash on the vanity side and a bit of privacy on the other. A simple toilet in crisp white is out of sight but functional in its own “alcove”.
Despite all the patterning, there is nothing busy about the room. For the floor we decided to change things up, using a large square version of the wall tiles. To keep the room from feeling too long, we installed them on the diagonal and then criss-crossed the lines for a dramatic look.
This bath is twice as nice and ready to be shared!
http://www.designsbyskill.com/
http://www.rjkconstructioninc.com/

 kmjee
kmjeePepper plants are a delightful addition to any garden, offering a vibrant burst of color and spice to your culinary creations. However, even experienced gardeners can encounter challenges when growing pepper plants. In this blog, we'll explore some common issues you might face and provide practical solutions to help your pepper plants thrive.
1. Slow or Stunted Growth
Issue: Slow or stunted growth in pepper plants can be discouraging, but there are specific steps you can take to address this issue effectively.
Solution:
a. Soil Health:
- Well-Draining Soil: Ensure your pepper plants are in well-draining soil to prevent waterlogged roots, which can inhibit growth.
- Organic Matter: Incorporate plenty of organic matter, such as compost or well-rotted manure, into the soil to improve its texture and nutrient content.
- pH Level: Test the soil pH and adjust it to the ideal range between 6.0 and 6.8 using lime or sulfur as needed.
b. Fertilization:
- Balanced Fertilizer: Use a balanced, slow-release fertilizer designed for vegetables to provide essential nutrients steadily throughout the growing season.
- Compost: Amend the soil with compost to enhance nutrient availability and soil structure. This can promote healthier growth.
c. Watering:
- Consistent Moisture: Maintain consistent soil moisture levels by watering your pepper plants regularly but avoid waterlogging. Aim for 1-2 inches of water per week, adjusting based on your local climate and weather conditions.
- Mulching: Apply mulch around the base of the plants to retain soil moisture and regulate temperature.
2. Yellowing Leaves
Issue: Yellowing leaves can be a sign of various underlying problems, but addressing them promptly can restore the vibrancy of your pepper plants.
Solution:
a. Nutrient Deficiencies:
- Balanced Fertilization: Use a well-balanced fertilizer that includes micronutrients to address nutrient deficiencies.
- Specific Nutrients: If you suspect a particular deficiency, such as magnesium, iron, or nitrogen, apply the appropriate nutrient supplement following package instructions.
b. Pest and Disease Control:
- Pest Inspection: Regularly inspect the leaves and stems for common pests like aphids and mites. Remove affected leaves and treat with organic pesticides if necessary.
- Disease Management: Look out for signs of diseases like bacterial leaf spot or fungal issues. Apply organic fungicides or bactericides as recommended.
3. Blossom Drop
Issue: When pepper plants drop their blossoms prematurely, it can hinder fruit development and lead to disappointment.
Solution:
a. Temperature Control:
- Stable Temperatures: Ensure your pepper plants are exposed to consistent temperatures between 70°F and 80°F (21°C to 27°C) during flowering. Avoid sudden temperature fluctuations by providing shelter or using row covers.
b. Pollination:
- Assist with Pollination: If growing peppers indoors or in a greenhouse, help with pollination by gently shaking the plants or using a small brush to transfer pollen between flowers. Outdoor pepper plants are usually pollinated by insects.
4. Wilting Plants
Issue: Wilting or drooping pepper plants can be a sign of various problems, but proper care can revive them.
Solution:
a. Watering:
- Consistent Moisture: Adjust your watering routine to keep the soil consistently moist but not waterlogged. Water early in the day to prevent fungal issues.
- Drainage: Ensure proper soil drainage by amending the soil or using raised beds to prevent waterlogged roots.
b. Pest Control:
- Pest Inspection: Examine the undersides of leaves for signs of pests like aphids, spider mites, or whiteflies. Treat infestations promptly with biological insecticides.
5. Curling Leaves
Issue: Curling or misshapen leaves indicate stress in pepper plants, which can be caused by various factors.
Solution:
a. Environmental Stress:
- Stable Conditions: Ensure your pepper plants are in an environment with stable humidity, temperature, and adequate air circulation. Avoid sudden changes in conditions.
- Proper Ventilation: Adequate air circulation can reduce humidity and prevent fungal issues.
b. Pest and Disease Management:
- Pest Inspection: Regularly inspect your plants for pests and diseases, addressing them promptly with organic remedies as needed.
6. Sunscald
Issue: Sunscald can lead to discolored, leathery patches on pepper fruits when exposed to intense sunlight.
Solution:
a. Shade Cloth:
- Sun Protection: Shield your pepper plants from harsh sunlight during the hottest part of the day using shade cloth or by planting them where they receive some filtered sunlight.
b. Pruning:
- Fruit Shading: Prune excess foliage to allow better fruit shading, reducing the risk of sunscald. Ensure that there's a balance between foliage and fruit.
7. Pepper Plant Pests and Diseases
Issue: Aphids, mites, whiteflies, and various diseases can affect pepper plants, but you can manage them effectively.
Solution:
a. Regular Inspection:
- Vigilant Monitoring: Regularly inspect your pepper plants for signs of pests or diseases, paying close attention to the undersides of leaves and stems.
b. Organic Remedies:
- Pest Control: Use organic remedies like neem oil, insecticidal soap, or diatomaceous earth for pest control.
- Disease Management: Apply organic fungicides or bactericides as recommended to manage diseases like powdery mildew or bacterial spot.
While growing pepper plants can present various challenges, these common issues are manageable with the right knowledge and care. Regular monitoring, proper soil preparation, and timely intervention can help you enjoy a bountiful harvest of vibrant, spicy peppers. Remember that gardening is a learning experience, and each challenge you face is an opportunity to improve your skills and enjoy the rewards of homegrown peppers in your favorite dishes.

 Senergy360, LLC.
Ensuring Home Health in San Diego's Coastal Luxury
Our thorough Healthy Home inspection of this elegant San Diego coastal home examines key factors like EMF levels, mold presence, and air circulation. We leave no stone unturned to ensure homeowners can breathe easy and enjoy a safe, healthy living environment. Experience peace of mind with our expertise in creating healthier homes near the ocean. ? #HealthyLiving #HomeInspection #SanDiegoLuxury

 highland
Ever been out in a park, forest, or even just in your backyard and wanted to see just a small side of the picture? Beauty is in the midst of us, but we are not doing enough to see it—we see only at a superficial level. The reality is that there is an entire universe on a scale that is so miniscule yet all around us, waiting to be discovered.
Put the digital microscope camera on the scope, and that little quantum universe you never knew was there awaits your gaze. Makes everyday outdoor activities exciting adventures and learning experiences with leaves, rocks, and bugs that are all interesting. It used to look just the same, and now it's vibrant with patterns, textures, and stories you didn't know before!
What is a Digital Microscope Camera?
A digital microscope camera is a compact device that magnifies very small objects and can display its real-time image on the screen. This new type of microscope can be taken outside and is much easier to transport than a conventional microscope. It is based on three important technologies: the magnification lenses, digital imaging, and As the name implies, snapping up shots of the objects when you bring them close and displaying them clearly on your smartphone, tablet, or its built-in display. This gives you the power to see details of a microworld anywhere you go, with no special equipment.
How a Digital Microscope Camera Works in Real Life
It is easy and yet powerful to operate a digital microscope camera. It brings very small objects closer by employing a system of lenses, and through a digital sensor, it turns the image into a compelling display. After focusing, the image becomes so big that it displays details that the human eye isn't able to see. Whereas, in an actual setting, an individual can simply place the gadget over an object, such as a leaf, insect, or soil surface. This is then performed to get a focus on the details, clear and sharp. In the blink of an eye, you will be exploring a hidden reality with patterns and structures.
Why Nature Looks Completely Different at the Micro Level
If you watch nature with an unbiased eye, it's all straightforward. Leaves are green; insects are tiny and land on a mere brown earth. However, things look so different through the microscope camera's zoom-in. A leaf is more than a leaf: it is a complex system of veins and cells! However, the insect is not merely a tiny insect anymore, but it gradually turns into an object with wings, eyes, and patterns, all of which seem almost like art. From soils a combination of small particles of rock, organic material, and unseen creatures.
Gaining appreciation for the details in leaves and plants.
Plant life is one of the most interesting objects to be examined under the microscope. The details on the leaves, stems, and petals are amazing and would get lost in the details otherwise. By using a digital microscope camera, the vein network that transports water and nutrients can be readily observed. These veins are naturally occurring and run in patterns that resemble roads and/or rivers in the landscape. Every leaf grows differently and is as individual as a fingerprint.
Discovering the Hidden World of Insects
There is no better thing to see under the microscope than one of the many interesting insects. They may appear at first glance to be quite unassuming and tiny, but magnified, they let one in on the whole other universe. They feature fine patterns in their wings – like those found on glass artworks – that are often difficult to see. They have eyes comprised of multiple repeating units. Even their legs and segments of their bodies have special textures.
The Secret Life Inside Soil and Sand
A microscope camera reveals a soil in which activity is taking place in a lively world in the seemingly lifeless soil. The very small particles of rock, decayed plant material, and micro-living organisms are interacting. Sand grains look similar to miniature crystals; all of them are distinctively shaped and structured. As organic matter decomposes, it forms patterns that illustrate how nature continually recycles itself.
Tree Bark: A Natural Storybook
Another interesting area of interest for micro-focusing is the bark of trees. Apparently, this appears to be rough and simple, but under magnification, it is seen as a highly detailed landscape of cracks, lines, and textures. The bark patterns that can be observed on each branch offer a glimpse of the branch's years of growth, weather, and environmental stresses. It's as if someone wrote the history of a tree on its trunk!
Tips for Getting the Best Microscopic Results Outdoors
A few simple techniques can make a big difference in the variety of images you get before getting clear and detailed images. Always make sure that the hands are stable or have a resting surface so that there is no shaking. Moving, even slightly, can cause the picture to become blurry. Lighting is one of the other important ones. This is because natural soft lighting is best suited, as it doesn't create strong reflections and it does show detail. Minimize exposure to strong sunlight/deep shade when possible.
Conclusion:
The digital microscope camera isn't just a camera; it's a new way of viewing life. Makes routine walks outdoors into thrilling explorations of the scientific world and how minute details make a difference. It can teach us something about living by the rules of nature! It is something that we can contemplate, clarify, and enjoy more.
What is a Digital Microscope Camera?
A digital microscope camera is a compact device that magnifies very small objects and can display its real-time image on the screen. This new type of microscope can be taken outside and is much easier to transport than a conventional microscope. It is based on three important technologies: the magnification lenses, digital imaging, and As the name implies, snapping up shots of the objects when you bring them close and displaying them clearly on your smartphone, tablet, or its built-in display. This gives you the power to see details of a microworld anywhere you go, with no special equipment.
How a Digital Microscope Camera Works in Real Life
It is easy and yet powerful to operate a digital microscope camera. It brings very small objects closer by employing a system of lenses, and through a digital sensor, it turns the image into a compelling display. After focusing, the image becomes so big that it displays details that the human eye isn't able to see. Whereas, in an actual setting, an individual can simply place the gadget over an object, such as a leaf, insect, or soil surface. This is then performed to get a focus on the details, clear and sharp. In the blink of an eye, you will be exploring a hidden reality with patterns and structures.
Why Nature Looks Completely Different at the Micro Level
If you watch nature with an unbiased eye, it's all straightforward. Leaves are green; insects are tiny and land on a mere brown earth. However, things look so different through the microscope camera's zoom-in. A leaf is more than a leaf: it is a complex system of veins and cells! However, the insect is not merely a tiny insect anymore, but it gradually turns into an object with wings, eyes, and patterns, all of which seem almost like art. From soils a combination of small particles of rock, organic material, and unseen creatures.
Gaining appreciation for the details in leaves and plants.
Plant life is one of the most interesting objects to be examined under the microscope. The details on the leaves, stems, and petals are amazing and would get lost in the details otherwise. By using a digital microscope camera, the vein network that transports water and nutrients can be readily observed. These veins are naturally occurring and run in patterns that resemble roads and/or rivers in the landscape. Every leaf grows differently and is as individual as a fingerprint.
Discovering the Hidden World of Insects
There is no better thing to see under the microscope than one of the many interesting insects. They may appear at first glance to be quite unassuming and tiny, but magnified, they let one in on the whole other universe. They feature fine patterns in their wings – like those found on glass artworks – that are often difficult to see. They have eyes comprised of multiple repeating units. Even their legs and segments of their bodies have special textures.
The Secret Life Inside Soil and Sand
A microscope camera reveals a soil in which activity is taking place in a lively world in the seemingly lifeless soil. The very small particles of rock, decayed plant material, and micro-living organisms are interacting. Sand grains look similar to miniature crystals; all of them are distinctively shaped and structured. As organic matter decomposes, it forms patterns that illustrate how nature continually recycles itself.
Tree Bark: A Natural Storybook
Another interesting area of interest for micro-focusing is the bark of trees. Apparently, this appears to be rough and simple, but under magnification, it is seen as a highly detailed landscape of cracks, lines, and textures. The bark patterns that can be observed on each branch offer a glimpse of the branch's years of growth, weather, and environmental stresses. It's as if someone wrote the history of a tree on its trunk!
Tips for Getting the Best Microscopic Results Outdoors
A few simple techniques can make a big difference in the variety of images you get before getting clear and detailed images. Always make sure that the hands are stable or have a resting surface so that there is no shaking. Moving, even slightly, can cause the picture to become blurry. Lighting is one of the other important ones. This is because natural soft lighting is best suited, as it doesn't create strong reflections and it does show detail. Minimize exposure to strong sunlight/deep shade when possible.
Conclusion:
The digital microscope camera isn't just a camera; it's a new way of viewing life. Makes routine walks outdoors into thrilling explorations of the scientific world and how minute details make a difference. It can teach us something about living by the rules of nature! It is something that we can contemplate, clarify, and enjoy more.
1