
Search results for "Additionally established" in Home Design Ideas
 Morpurgo Architects
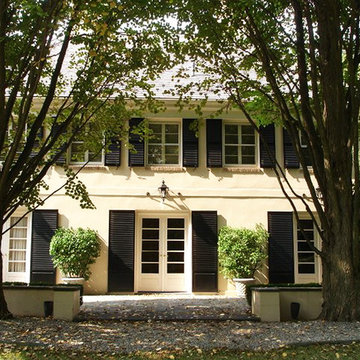
Morpurgo Architects enhanced the approach to this French Provincial home by modifying the long driveway to create a circular courtyard in front of the house, thereby elevating the sense of anticipation prior to entering.
We expanded the undefined front foyer, so that the new vestibule with grand staircase and mosaic flooring would be worthy of this significant home.
In redesigning the kitchen, we concurrently opened the family room wall and extended it to meet a windowed corridor with a floor-to-ceiling glass space that blurs the distinction between the two rooms. The passageway, infused with sunlight, provides expansive views to the verdant landscaped property.
As part of the overall expansion of this home, Morpurgo Architects increased the size of the wing that contains a family room, cabana, playroom and garage space. A new master bedroom wing was constructed as a bookend, establishing a symmetry for the French Provincial façade. This suite contains a sitting room, bedroom area with a tray ceiling, spacious closets and elegant bathrooms.

 Talon Construction Inc.
Designing and building a kitchen addition is a complex process that involves multiple steps and considerations. Here is a general outline to help you get started on your kitchen addition project:
Define Your Goals and Budget:
• Determine the purpose of the kitchen addition. Is it for more cooking space, a dining area, or a combination of both?
• Establish a realistic budget for your project. Consider all costs, including construction, permits, materials, and furnishings.
Hire a Design Professional:
• Seek the services of a design build company who specializes in kitchen additions.
• Discuss your vision, needs, and budget with the design professional to create a design concept.
Site Evaluation:
• Assess the existing space and structural condition of your home to ensure it can support the addition.
• Consider factors like zoning regulations, setbacks, and building codes.
Design Development:
• Collaborate with your design professional to refine the concept, including the layout, size, and architectural style.
• Choose materials, finishes, and fixtures that fit your design and budget.
Obtain Permits:
• Consult with your local design build contractor to determine the necessary permits and approvals.
• Prepare and submit all required documents, including architectural drawings and engineering plans.
Create Construction Documents:
• Work with your design build professional to develop detailed construction drawings and specifications.
• These documents will serve as a guide for contractors during construction.
Hire a design build contractor:
• Check references, credentials, and licenses before selecting a contractor.
• Sign a detailed contract that outlines the scope of work, timeline, and payment schedule.
Construction Phase:
• Demolition: If needed, remove any existing structures or walls.
• Foundation: Construct the foundation for the addition.
• Framing: Build the structural framework of the addition.
• Plumbing, Electrical, and HVAC: Install or update utilities as required.
• Insulation: Ensure proper insulation for energy efficiency.
• Drywall and Finish Work: Complete the walls and ceilings.
• Flooring and Cabinetry: Install flooring and kitchen cabinets.
• Appliances and Fixtures: Add appliances, plumbing fixtures, and lighting.
• Paint and Finish: Apply paint and finishes to achieve the desired look.
• Final Inspection: Schedule inspections to ensure compliance with building codes.
Final Inspections and Approvals:
• Arrange for final inspections to ensure the addition meets all safety and code requirements.
• Obtain any necessary certificates of occupancy or compliance.
Move In and Enjoy:
• Once all inspections and approvals are received, you can move into your new kitchen addition and start enjoying it.
Remember that every kitchen addition project is unique, so adapt this outline to your specific needs and circumstances. Consulting with professionals and obtaining the required permits and inspections is crucial to a successful and safe project.
 Talon Construction Inc.
Designing and building a kitchen addition is a complex process that involves multiple steps and considerations. Here is a general outline to help you get started on your kitchen addition project:
Define Your Goals and Budget:
• Determine the purpose of the kitchen addition. Is it for more cooking space, a dining area, or a combination of both?
• Establish a realistic budget for your project. Consider all costs, including construction, permits, materials, and furnishings.
Hire a Design Professional:
• Seek the services of a design build company who specializes in kitchen additions.
• Discuss your vision, needs, and budget with the design professional to create a design concept.
Site Evaluation:
• Assess the existing space and structural condition of your home to ensure it can support the addition.
• Consider factors like zoning regulations, setbacks, and building codes.
Design Development:
• Collaborate with your design professional to refine the concept, including the layout, size, and architectural style.
• Choose materials, finishes, and fixtures that fit your design and budget.
Obtain Permits:
• Consult with your local design build contractor to determine the necessary permits and approvals.
• Prepare and submit all required documents, including architectural drawings and engineering plans.
Create Construction Documents:
• Work with your design build professional to develop detailed construction drawings and specifications.
• These documents will serve as a guide for contractors during construction.
Hire a design build contractor:
• Check references, credentials, and licenses before selecting a contractor.
• Sign a detailed contract that outlines the scope of work, timeline, and payment schedule.
Construction Phase:
• Demolition: If needed, remove any existing structures or walls.
• Foundation: Construct the foundation for the addition.
• Framing: Build the structural framework of the addition.
• Plumbing, Electrical, and HVAC: Install or update utilities as required.
• Insulation: Ensure proper insulation for energy efficiency.
• Drywall and Finish Work: Complete the walls and ceilings.
• Flooring and Cabinetry: Install flooring and kitchen cabinets.
• Appliances and Fixtures: Add appliances, plumbing fixtures, and lighting.
• Paint and Finish: Apply paint and finishes to achieve the desired look.
• Final Inspection: Schedule inspections to ensure compliance with building codes.
Final Inspections and Approvals:
• Arrange for final inspections to ensure the addition meets all safety and code requirements.
• Obtain any necessary certificates of occupancy or compliance.
Move In and Enjoy:
• Once all inspections and approvals are received, you can move into your new kitchen addition and start enjoying it.
Remember that every kitchen addition project is unique, so adapt this outline to your specific needs and circumstances. Consulting with professionals and obtaining the required permits and inspections is crucial to a successful and safe project.
Find the right local pro for your project
 Talon Construction Inc.
Designing and building a kitchen addition is a complex process that involves multiple steps and considerations. Here is a general outline to help you get started on your kitchen addition project:
Define Your Goals and Budget:
• Determine the purpose of the kitchen addition. Is it for more cooking space, a dining area, or a combination of both?
• Establish a realistic budget for your project. Consider all costs, including construction, permits, materials, and furnishings.
Hire a Design Professional:
• Seek the services of a design build company who specializes in kitchen additions.
• Discuss your vision, needs, and budget with the design professional to create a design concept.
Site Evaluation:
• Assess the existing space and structural condition of your home to ensure it can support the addition.
• Consider factors like zoning regulations, setbacks, and building codes.
Design Development:
• Collaborate with your design professional to refine the concept, including the layout, size, and architectural style.
• Choose materials, finishes, and fixtures that fit your design and budget.
Obtain Permits:
• Consult with your local design build contractor to determine the necessary permits and approvals.
• Prepare and submit all required documents, including architectural drawings and engineering plans.
Create Construction Documents:
• Work with your design build professional to develop detailed construction drawings and specifications.
• These documents will serve as a guide for contractors during construction.
Hire a design build contractor:
• Check references, credentials, and licenses before selecting a contractor.
• Sign a detailed contract that outlines the scope of work, timeline, and payment schedule.
Construction Phase:
• Demolition: If needed, remove any existing structures or walls.
• Foundation: Construct the foundation for the addition.
• Framing: Build the structural framework of the addition.
• Plumbing, Electrical, and HVAC: Install or update utilities as required.
• Insulation: Ensure proper insulation for energy efficiency.
• Drywall and Finish Work: Complete the walls and ceilings.
• Flooring and Cabinetry: Install flooring and kitchen cabinets.
• Appliances and Fixtures: Add appliances, plumbing fixtures, and lighting.
• Paint and Finish: Apply paint and finishes to achieve the desired look.
• Final Inspection: Schedule inspections to ensure compliance with building codes.
Final Inspections and Approvals:
• Arrange for final inspections to ensure the addition meets all safety and code requirements.
• Obtain any necessary certificates of occupancy or compliance.
Move In and Enjoy:
• Once all inspections and approvals are received, you can move into your new kitchen addition and start enjoying it.
Remember that every kitchen addition project is unique, so adapt this outline to your specific needs and circumstances. Consulting with professionals and obtaining the required permits and inspections is crucial to a successful and safe project.
 Talon Construction Inc.
Designing and building a kitchen addition is a complex process that involves multiple steps and considerations. Here is a general outline to help you get started on your kitchen addition project:
Define Your Goals and Budget:
• Determine the purpose of the kitchen addition. Is it for more cooking space, a dining area, or a combination of both?
• Establish a realistic budget for your project. Consider all costs, including construction, permits, materials, and furnishings.
Hire a Design Professional:
• Seek the services of a design build company who specializes in kitchen additions.
• Discuss your vision, needs, and budget with the design professional to create a design concept.
Site Evaluation:
• Assess the existing space and structural condition of your home to ensure it can support the addition.
• Consider factors like zoning regulations, setbacks, and building codes.
Design Development:
• Collaborate with your design professional to refine the concept, including the layout, size, and architectural style.
• Choose materials, finishes, and fixtures that fit your design and budget.
Obtain Permits:
• Consult with your local design build contractor to determine the necessary permits and approvals.
• Prepare and submit all required documents, including architectural drawings and engineering plans.
Create Construction Documents:
• Work with your design build professional to develop detailed construction drawings and specifications.
• These documents will serve as a guide for contractors during construction.
Hire a design build contractor:
• Check references, credentials, and licenses before selecting a contractor.
• Sign a detailed contract that outlines the scope of work, timeline, and payment schedule.
Construction Phase:
• Demolition: If needed, remove any existing structures or walls.
• Foundation: Construct the foundation for the addition.
• Framing: Build the structural framework of the addition.
• Plumbing, Electrical, and HVAC: Install or update utilities as required.
• Insulation: Ensure proper insulation for energy efficiency.
• Drywall and Finish Work: Complete the walls and ceilings.
• Flooring and Cabinetry: Install flooring and kitchen cabinets.
• Appliances and Fixtures: Add appliances, plumbing fixtures, and lighting.
• Paint and Finish: Apply paint and finishes to achieve the desired look.
• Final Inspection: Schedule inspections to ensure compliance with building codes.
Final Inspections and Approvals:
• Arrange for final inspections to ensure the addition meets all safety and code requirements.
• Obtain any necessary certificates of occupancy or compliance.
Move In and Enjoy:
• Once all inspections and approvals are received, you can move into your new kitchen addition and start enjoying it.
Remember that every kitchen addition project is unique, so adapt this outline to your specific needs and circumstances. Consulting with professionals and obtaining the required permits and inspections is crucial to a successful and safe project.
 Talon Construction Inc.
Designing and building a kitchen addition is a complex process that involves multiple steps and considerations. Here is a general outline to help you get started on your kitchen addition project:
Define Your Goals and Budget:
• Determine the purpose of the kitchen addition. Is it for more cooking space, a dining area, or a combination of both?
• Establish a realistic budget for your project. Consider all costs, including construction, permits, materials, and furnishings.
Hire a Design Professional:
• Seek the services of a design build company who specializes in kitchen additions.
• Discuss your vision, needs, and budget with the design professional to create a design concept.
Site Evaluation:
• Assess the existing space and structural condition of your home to ensure it can support the addition.
• Consider factors like zoning regulations, setbacks, and building codes.
Design Development:
• Collaborate with your design professional to refine the concept, including the layout, size, and architectural style.
• Choose materials, finishes, and fixtures that fit your design and budget.
Obtain Permits:
• Consult with your local design build contractor to determine the necessary permits and approvals.
• Prepare and submit all required documents, including architectural drawings and engineering plans.
Create Construction Documents:
• Work with your design build professional to develop detailed construction drawings and specifications.
• These documents will serve as a guide for contractors during construction.
Hire a design build contractor:
• Check references, credentials, and licenses before selecting a contractor.
• Sign a detailed contract that outlines the scope of work, timeline, and payment schedule.
Construction Phase:
• Demolition: If needed, remove any existing structures or walls.
• Foundation: Construct the foundation for the addition.
• Framing: Build the structural framework of the addition.
• Plumbing, Electrical, and HVAC: Install or update utilities as required.
• Insulation: Ensure proper insulation for energy efficiency.
• Drywall and Finish Work: Complete the walls and ceilings.
• Flooring and Cabinetry: Install flooring and kitchen cabinets.
• Appliances and Fixtures: Add appliances, plumbing fixtures, and lighting.
• Paint and Finish: Apply paint and finishes to achieve the desired look.
• Final Inspection: Schedule inspections to ensure compliance with building codes.
Final Inspections and Approvals:
• Arrange for final inspections to ensure the addition meets all safety and code requirements.
• Obtain any necessary certificates of occupancy or compliance.
Move In and Enjoy:
• Once all inspections and approvals are received, you can move into your new kitchen addition and start enjoying it.
Remember that every kitchen addition project is unique, so adapt this outline to your specific needs and circumstances. Consulting with professionals and obtaining the required permits and inspections is crucial to a successful and safe project.
 Worthington Design & Remodeling
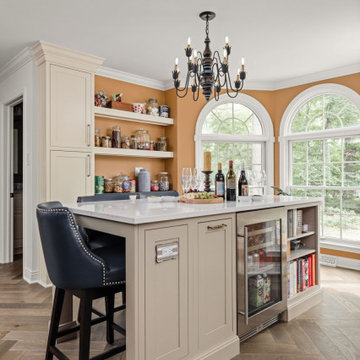
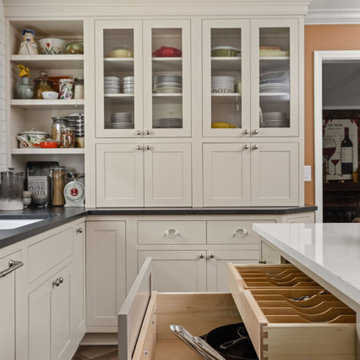
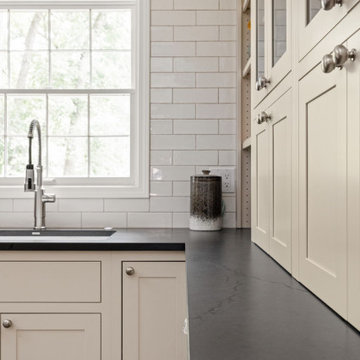
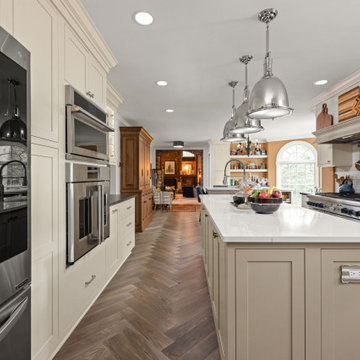
This kitchen remodel blends timeless design with warm, inviting finishes to create a space that is both functional and full of character. Cream-colored cabinetry paired with rich wood accents and herringbone flooring establishes a classic foundation, while layered textures and thoughtful details add depth and personality.
A custom range hood with decorative molding and a pot rail creates a focal point, complemented by a professional-grade range and warm metallic accents. The expansive island offers additional prep space, seating, and integrated storage, while built-in cabinetry and glass-front uppers provide both display and organization.
Designed for everyday living and entertaining, this kitchen balances traditional charm with modern functionality, resulting in a space that feels curated, comfortable, and timeless.
Sponsored
Columbus, OH

Hope Restoration & General Contracting
Columbus Design-Build, Kitchen & Bath Remodeling, Historic Renovations
 Worthington Design & Remodeling
This kitchen remodel blends timeless design with warm, inviting finishes to create a space that is both functional and full of character. Cream-colored cabinetry paired with rich wood accents and herringbone flooring establishes a classic foundation, while layered textures and thoughtful details add depth and personality.
A custom range hood with decorative molding and a pot rail creates a focal point, complemented by a professional-grade range and warm metallic accents. The expansive island offers additional prep space, seating, and integrated storage, while built-in cabinetry and glass-front uppers provide both display and organization.
Designed for everyday living and entertaining, this kitchen balances traditional charm with modern functionality, resulting in a space that feels curated, comfortable, and timeless.
 Worthington Design & Remodeling
This kitchen remodel blends timeless design with warm, inviting finishes to create a space that is both functional and full of character. Cream-colored cabinetry paired with rich wood accents and herringbone flooring establishes a classic foundation, while layered textures and thoughtful details add depth and personality.
A custom range hood with decorative molding and a pot rail creates a focal point, complemented by a professional-grade range and warm metallic accents. The expansive island offers additional prep space, seating, and integrated storage, while built-in cabinetry and glass-front uppers provide both display and organization.
Designed for everyday living and entertaining, this kitchen balances traditional charm with modern functionality, resulting in a space that feels curated, comfortable, and timeless.
 Worthington Design & Remodeling
This kitchen remodel blends timeless design with warm, inviting finishes to create a space that is both functional and full of character. Cream-colored cabinetry paired with rich wood accents and herringbone flooring establishes a classic foundation, while layered textures and thoughtful details add depth and personality.
A custom range hood with decorative molding and a pot rail creates a focal point, complemented by a professional-grade range and warm metallic accents. The expansive island offers additional prep space, seating, and integrated storage, while built-in cabinetry and glass-front uppers provide both display and organization.
Designed for everyday living and entertaining, this kitchen balances traditional charm with modern functionality, resulting in a space that feels curated, comfortable, and timeless.
 Worthington Design & Remodeling
This kitchen remodel blends timeless design with warm, inviting finishes to create a space that is both functional and full of character. Cream-colored cabinetry paired with rich wood accents and herringbone flooring establishes a classic foundation, while layered textures and thoughtful details add depth and personality.
A custom range hood with decorative molding and a pot rail creates a focal point, complemented by a professional-grade range and warm metallic accents. The expansive island offers additional prep space, seating, and integrated storage, while built-in cabinetry and glass-front uppers provide both display and organization.
Designed for everyday living and entertaining, this kitchen balances traditional charm with modern functionality, resulting in a space that feels curated, comfortable, and timeless.
 Talon Construction Inc.
Designing and building a kitchen addition is a complex process that involves multiple steps and considerations. Here is a general outline to help you get started on your kitchen addition project:
Define Your Goals and Budget:
• Determine the purpose of the kitchen addition. Is it for more cooking space, a dining area, or a combination of both?
• Establish a realistic budget for your project. Consider all costs, including construction, permits, materials, and furnishings.
Hire a Design Professional:
• Seek the services of a design build company who specializes in kitchen additions.
• Discuss your vision, needs, and budget with the design professional to create a design concept.
Site Evaluation:
• Assess the existing space and structural condition of your home to ensure it can support the addition.
• Consider factors like zoning regulations, setbacks, and building codes.
Design Development:
• Collaborate with your design professional to refine the concept, including the layout, size, and architectural style.
• Choose materials, finishes, and fixtures that fit your design and budget.
Obtain Permits:
• Consult with your local design build contractor to determine the necessary permits and approvals.
• Prepare and submit all required documents, including architectural drawings and engineering plans.
Create Construction Documents:
• Work with your design build professional to develop detailed construction drawings and specifications.
• These documents will serve as a guide for contractors during construction.
Hire a design build contractor:
• Check references, credentials, and licenses before selecting a contractor.
• Sign a detailed contract that outlines the scope of work, timeline, and payment schedule.
Construction Phase:
• Demolition: If needed, remove any existing structures or walls.
• Foundation: Construct the foundation for the addition.
• Framing: Build the structural framework of the addition.
• Plumbing, Electrical, and HVAC: Install or update utilities as required.
• Insulation: Ensure proper insulation for energy efficiency.
• Drywall and Finish Work: Complete the walls and ceilings.
• Flooring and Cabinetry: Install flooring and kitchen cabinets.
• Appliances and Fixtures: Add appliances, plumbing fixtures, and lighting.
• Paint and Finish: Apply paint and finishes to achieve the desired look.
• Final Inspection: Schedule inspections to ensure compliance with building codes.
Final Inspections and Approvals:
• Arrange for final inspections to ensure the addition meets all safety and code requirements.
• Obtain any necessary certificates of occupancy or compliance.
Move In and Enjoy:
• Once all inspections and approvals are received, you can move into your new kitchen addition and start enjoying it.
Remember that every kitchen addition project is unique, so adapt this outline to your specific needs and circumstances. Consulting with professionals and obtaining the required permits and inspections is crucial to a successful and safe project.
 Talon Construction Inc.
Designing and building a kitchen addition is a complex process that involves multiple steps and considerations. Here is a general outline to help you get started on your kitchen addition project:
Define Your Goals and Budget:
• Determine the purpose of the kitchen addition. Is it for more cooking space, a dining area, or a combination of both?
• Establish a realistic budget for your project. Consider all costs, including construction, permits, materials, and furnishings.
Hire a Design Professional:
• Seek the services of a design build company who specializes in kitchen additions.
• Discuss your vision, needs, and budget with the design professional to create a design concept.
Site Evaluation:
• Assess the existing space and structural condition of your home to ensure it can support the addition.
• Consider factors like zoning regulations, setbacks, and building codes.
Design Development:
• Collaborate with your design professional to refine the concept, including the layout, size, and architectural style.
• Choose materials, finishes, and fixtures that fit your design and budget.
Obtain Permits:
• Consult with your local design build contractor to determine the necessary permits and approvals.
• Prepare and submit all required documents, including architectural drawings and engineering plans.
Create Construction Documents:
• Work with your design build professional to develop detailed construction drawings and specifications.
• These documents will serve as a guide for contractors during construction.
Hire a design build contractor:
• Check references, credentials, and licenses before selecting a contractor.
• Sign a detailed contract that outlines the scope of work, timeline, and payment schedule.
Construction Phase:
• Demolition: If needed, remove any existing structures or walls.
• Foundation: Construct the foundation for the addition.
• Framing: Build the structural framework of the addition.
• Plumbing, Electrical, and HVAC: Install or update utilities as required.
• Insulation: Ensure proper insulation for energy efficiency.
• Drywall and Finish Work: Complete the walls and ceilings.
• Flooring and Cabinetry: Install flooring and kitchen cabinets.
• Appliances and Fixtures: Add appliances, plumbing fixtures, and lighting.
• Paint and Finish: Apply paint and finishes to achieve the desired look.
• Final Inspection: Schedule inspections to ensure compliance with building codes.
Final Inspections and Approvals:
• Arrange for final inspections to ensure the addition meets all safety and code requirements.
• Obtain any necessary certificates of occupancy or compliance.
Move In and Enjoy:
• Once all inspections and approvals are received, you can move into your new kitchen addition and start enjoying it.
Remember that every kitchen addition project is unique, so adapt this outline to your specific needs and circumstances. Consulting with professionals and obtaining the required permits and inspections is crucial to a successful and safe project.

 Architessa
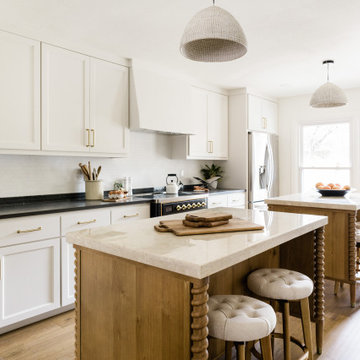
Expertly blending polished and honed marbles, this backsplash introduces a subtle yet striking dimensional effect, aligning seamlessly with the transitional design of the space. The darker marble tones create a cohesive link between the deep-hued countertop and the crisp, white backsplash. This thoughtful combination not only enhances the visual appeal but also establishes a smooth transition across different kitchen elements.
The use of varied marble finishes adds depth and character, making the backsplash a focal point in the kitchen. This design choice is not just about aesthetics; it also offers practical benefits. The honed and polished surfaces are easy to clean and maintain, ensuring the backsplash remains a standout feature in a high-activity area. Whether it's for preparing meals or hosting gatherings, this marble backsplash balances elegance and functionality, making it an ideal addition to any transitional kitchen.
Design: Kim Wolfe
Photography: Madeline Harper Photography
SHOP TILE
Backsplash Tile: 0.187x1.875 Geometric Nero Marquina Polished / Thassos Honed Thin Herringbone Mosaic - inquire with your sales rep.
 Spin Design Limited
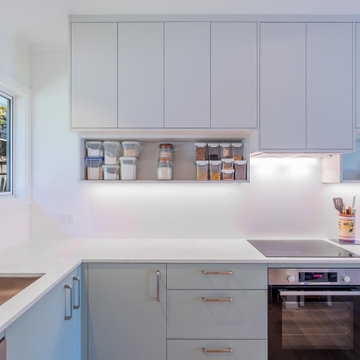
Removing a wall in a small two-bedroom unit has resulted in a significant transformation. By opening up the space, a seamless connection has been established between the kitchen, dining area, and living room, creating a multi-functional and versatile area. The removal of the wall has eliminated the physical barriers that previously separated these spaces, fostering a sense of openness and facilitating better communication and interaction among family members.
The kitchen extension resulting from the removal of the wall has provided several practical benefits. Firstly, it has allowed for the expansion of the bench space, providing more room for meal preparation, cooking, and other kitchen activities. Additionally, the kitchen extension has led to an improvement in storage capacity. This means that kitchen utensils, appliances, and ingredients can be neatly organized and easily accessible, reducing clutter and enhancing efficiency in the kitchen.

 Helix Green Designs
The backyard, fragmented and lacking privacy, suffered from overgrown vegetation and a mismatched pool deck.
Helix Green Designs' vision centered on enhancing functionality while creating a secluded oasis. In the backyard, privacy became paramount. A double hedge of podocarpus and boxwood now surrounds the expanded pool deck, while transplanted deciduous hydrangeas were replaced with an evergreen podocarpus hedge along the fence line. Two strategically placed flowering crape myrtle trees flank a new custom gate, offering additional privacy from the golf course. A stepping stone walkway seamlessly connects the detached guest house, a popular grilling spot for the homeowners. Preserving the existing specimen oak trees was a priority. These established giants provided valuable shade and protection from the hot western sun, contributing significantly to the backyard's character and enjoyment.
 B&P Contracting
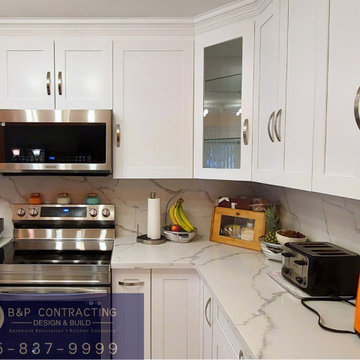
Experience the harmonious blend of classic charm and modern sophistication in this completed kitchen renovation. The white shaker-style cabinets, paired with neutral quartz and stainless steel accents, create a timeless and inviting design. The addition of a glass door corner wall cabinet adds a touch of openness and refinement. White porcelain tile flooring establishes a clean backdrop, while the quartz countertops and backsplash introduce subtle earthy tones. Sleek stainless steel appliances and matching fixtures contribute to the modern aesthetic, creating a cohesive and polished look. The brushed nickel cabinet handles, sink, and faucet provide a nuanced warmth, completing this kitchen as a functional and aesthetically pleasing space that seamlessly integrates classic and contemporary elements.
Sponsored
Columbus, OH

Structural Remodeling
Franklin County's Heavy Timber Specialists | Best of Houzz 2020!
 Shapiro & Company Architects
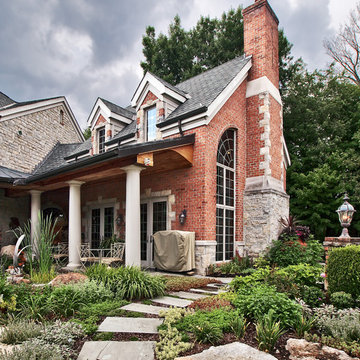
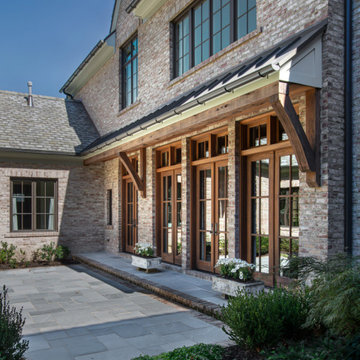
This home was built in an infill lot in an older, established, East Memphis neighborhood. We wanted to make sure that the architecture fits nicely into the mature neighborhood context. The clients enjoy the architectural heritage of the English Cotswold and we have created an updated/modern version of this style with all of the associated warmth and charm. As with all of our designs, having a lot of natural light in all the spaces is very important. The main gathering space has a beamed ceiling with windows on multiple sides that allows natural light to filter throughout the space and also contains an English fireplace inglenook. The interior woods and exterior materials including the brick and slate roof were selected to enhance that English cottage architecture.
Builder: Eddie Kircher Construction
Interior Designer: Rhea Crenshaw Interiors
Photographer: Ross Group Creative
 Deep River Partners
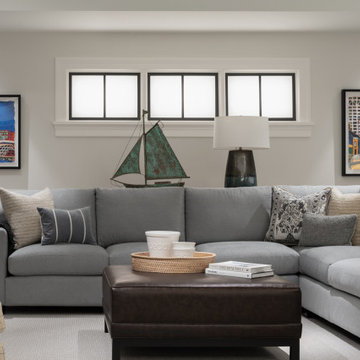
Fulfilling a vision of the future to gather an expanding family, the open home is designed for multi-generational use, while also supporting the everyday lifestyle of the two homeowners. The home is flush with natural light and expansive views of the landscape in an established Wisconsin village. Charming European homes, rich with interesting details and fine millwork, inspired the design for the Modern European Residence. The theming is rooted in historical European style, but modernized through simple architectural shapes and clean lines that steer focus to the beautifully aligned details. Ceiling beams, wallpaper treatments, rugs and furnishings create definition to each space, and fabrics and patterns stand out as visual interest and subtle additions of color. A brighter look is achieved through a clean neutral color palette of quality natural materials in warm whites and lighter woods, contrasting with color and patterned elements. The transitional background creates a modern twist on a traditional home that delivers the desired formal house with comfortable elegance.
 Worthington Design & Remodeling
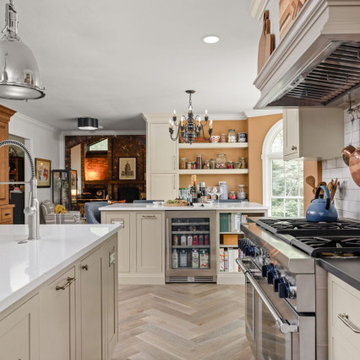
This kitchen remodel blends timeless design with warm, inviting finishes to create a space that is both functional and full of character. Cream-colored cabinetry paired with rich wood accents and herringbone flooring establishes a classic foundation, while layered textures and thoughtful details add depth and personality.
A custom range hood with decorative molding and a pot rail creates a focal point, complemented by a professional-grade range and warm metallic accents. The expansive island offers additional prep space, seating, and integrated storage, while built-in cabinetry and glass-front uppers provide both display and organization.
Designed for everyday living and entertaining, this kitchen balances traditional charm with modern functionality, resulting in a space that feels curated, comfortable, and timeless.
34