
Search results for "Applications fit" in Home Design Ideas
 Rocky Tops Granite & Marble LLC
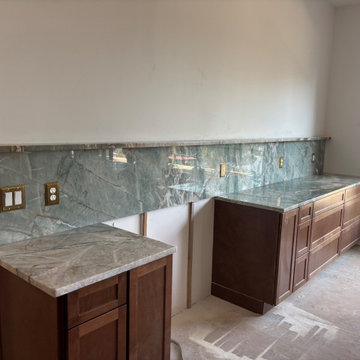
Tiffany Crystal quartzite is one of those stones that earns its keep in a kitchen. It's got that cool, crystalline background, whites and grays moving quietly across the surface with enough sparkle in the light to keep it from feeling flat. It reads clean and bright without going stark, which is why it works so well in a kitchen where people actually cook and gather, not just admire counters from across the room.
Quartzite is real stone, not engineered, so it comes with natural hardness that holds up to daily kitchen abuse. It resists scratching and handles heat well, though we still tell folks to use a trivet, because no counter needs a hot pan set straight on it just to prove a point. Sealing it right after install and keeping up with it over the years keeps the surface performing the way it should, and Tiffany Crystal takes a seal well because of its tight, dense structure.
Fabricating a slab like this takes some care in the layout. We spend real time bookmatching and dry-fitting pieces so the movement in the stone flows across seams instead of fighting itself at the corners. On a kitchen island or a run of perimeter counters, getting that continuity right is what separates a good installation from one that just gets the measurements correct. We kept the edge eased here, which is the right call on a stone with this much personality. It doesn't need extra shaping to draw the eye, the stone's already doing that work.
Day to day, this is a kitchen counter that's going to live hard and look good doing it. Quartzite shrugs off knife marks, stands up to acidic spills, and cleans up with regular dish soap and water. It's the kind of surface you stop babying after the first few months because it simply holds up.
Jobs like this one in Lexington are what we like seeing come through the shop. It's a straightforward kitchen application done with a stone that's got real depth to it, installed by people who care about how the seams and the veining line up when the job's done. That's the kind of work that keeps the Midlands trade honest.
 Rocky Tops Granite & Marble LLC
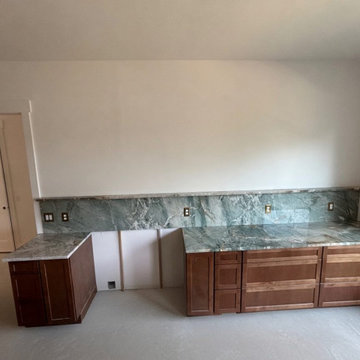
Tiffany Crystal quartzite is one of those stones that earns its keep in a kitchen. It's got that cool, crystalline background, whites and grays moving quietly across the surface with enough sparkle in the light to keep it from feeling flat. It reads clean and bright without going stark, which is why it works so well in a kitchen where people actually cook and gather, not just admire counters from across the room.
Quartzite is real stone, not engineered, so it comes with natural hardness that holds up to daily kitchen abuse. It resists scratching and handles heat well, though we still tell folks to use a trivet, because no counter needs a hot pan set straight on it just to prove a point. Sealing it right after install and keeping up with it over the years keeps the surface performing the way it should, and Tiffany Crystal takes a seal well because of its tight, dense structure.
Fabricating a slab like this takes some care in the layout. We spend real time bookmatching and dry-fitting pieces so the movement in the stone flows across seams instead of fighting itself at the corners. On a kitchen island or a run of perimeter counters, getting that continuity right is what separates a good installation from one that just gets the measurements correct. We kept the edge eased here, which is the right call on a stone with this much personality. It doesn't need extra shaping to draw the eye, the stone's already doing that work.
Day to day, this is a kitchen counter that's going to live hard and look good doing it. Quartzite shrugs off knife marks, stands up to acidic spills, and cleans up with regular dish soap and water. It's the kind of surface you stop babying after the first few months because it simply holds up.
Jobs like this one in Lexington are what we like seeing come through the shop. It's a straightforward kitchen application done with a stone that's got real depth to it, installed by people who care about how the seams and the veining line up when the job's done. That's the kind of work that keeps the Midlands trade honest.
 Rocky Tops Granite & Marble LLC
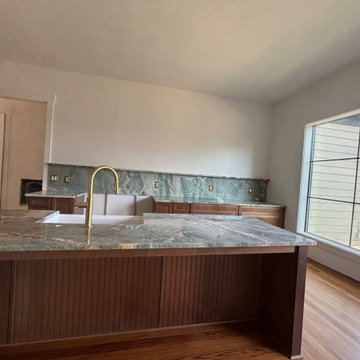
Tiffany Crystal quartzite is one of those stones that earns its keep in a kitchen. It's got that cool, crystalline background, whites and grays moving quietly across the surface with enough sparkle in the light to keep it from feeling flat. It reads clean and bright without going stark, which is why it works so well in a kitchen where people actually cook and gather, not just admire counters from across the room.
Quartzite is real stone, not engineered, so it comes with natural hardness that holds up to daily kitchen abuse. It resists scratching and handles heat well, though we still tell folks to use a trivet, because no counter needs a hot pan set straight on it just to prove a point. Sealing it right after install and keeping up with it over the years keeps the surface performing the way it should, and Tiffany Crystal takes a seal well because of its tight, dense structure.
Fabricating a slab like this takes some care in the layout. We spend real time bookmatching and dry-fitting pieces so the movement in the stone flows across seams instead of fighting itself at the corners. On a kitchen island or a run of perimeter counters, getting that continuity right is what separates a good installation from one that just gets the measurements correct. We kept the edge eased here, which is the right call on a stone with this much personality. It doesn't need extra shaping to draw the eye, the stone's already doing that work.
Day to day, this is a kitchen counter that's going to live hard and look good doing it. Quartzite shrugs off knife marks, stands up to acidic spills, and cleans up with regular dish soap and water. It's the kind of surface you stop babying after the first few months because it simply holds up.
Jobs like this one in Lexington are what we like seeing come through the shop. It's a straightforward kitchen application done with a stone that's got real depth to it, installed by people who care about how the seams and the veining line up when the job's done. That's the kind of work that keeps the Midlands trade honest.
Find the right local pro for your project
 Tile Doctor Ltd
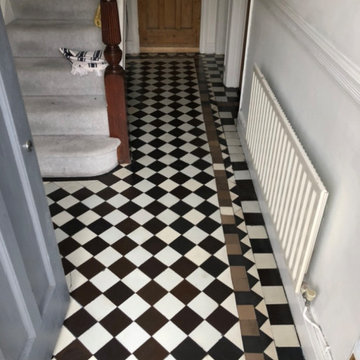
This job was carried out in a terraced property in Llanelli which had a Victorian Tiled Hallway laid in a diamond pattern that looking worse for wear and in need of some attention. The clients were a young couple who had moved in two years previously and had only recently decided they wanted the floor renovated. This was earlier in the year, so I was able to pop over to the property and take a detailed look at the floor before recommending a course of action to renovate the tiles.
Upon arrival the first thing we noticed was that the border had been laid with an inconsistent pattern, non- matching tiles had been patched in essentially filling voids as you can see in the images. The floor wasn’t terribly dirty however it wasn’t very clean either.
I discussed with the client replacing the non-matching tiles, so the floor pattern was uniform however they decided against it and were happy to just to have it cleaned and sealed. We can usually source either reclaimed original tiles or some great reproduction ones, so most floors can be restored if needed. I worked out a quote for the work and they were happy to go ahead.
If you have never been you should know that Llanelli is the largest town in the county of Carmarthenshire and famous for Rugby and the production of Tin. It is located on the Loughor Estuary, some 10 miles from Swansea and 12 miles from Carmarthen.
With no tiling to do the first job was to protect the woodwork such as skirting and staircase with tape. Once done the process of cleaning began with the application of a 400-grit burnishing pad fitted to a buffing machine. The process is lubricated with water and the pad run over the whole floor two to three times to remove dirt and refine the appearance of the tile. Even after the first application of the pad we could see a massive improvement to the appearance of the tiles. To get right into the edges of the tiled floor we use a 400-grit handheld diamond block, this proved especially useful under the stairs where our buffer machine could not reach.
During this process, the water turns into a fine slurry which is rinsed off with more water and extracted with a wet vacuum. On this occasion the floor was not dirty enough to require any chemicals, the use of water and the machine was enough to get the floor cleaned up.
This job was very straight forward, and we did not run into any problems at all. After allowing the floor to dry out for 24 hours we returned to seal the tiles checking first that the floor was sufficiently dry first using a damp meter. Fortunately, the burnishing method uses a lot less water than a chemical clean, so I was able to get straight on with sealing.
The client wanted a satin sheen finish, so I applied four coats of Tile Doctors Seal and Go which works well on Victorian tiles. The sealer really put the life back into the tiles and will protect them from staining going forward. It will also make the floor much easier to maintain and keep it looking good for much longer.
I’m pleased to say the owners were very happy with the floor and recommended us to one of their friends who we also did some work for. For aftercare I recommended the use of Tile Doctor Neutral Tile Cleaner. This is an everyday tile cleaning product that is sealer friendly and not prematurely reduce the life of the sealer which can happen with many household cleaning products which are simply too strong.
Adrian Iacono
Swansea Tile Doctor

 threshold interiors
Location: New York, NY, United States
This Loft was tastefully renovated back in the '90s, but was due for an update and an expansion of the kitchen and dining areas to accommodate the client's cooking skills and entertaining needs. EnlargIing the island and adding cabinetry to delineate the office, bar and dining areas was a priority. The bathroom was updated to feel like a tranquil spa with beautiful new tile, plumbing fixtures and cabinets. Our biggest challenge was coordinating the entire renovation while our client was out of town for the Summer!
Photographed by: James Salomon

 Melanie Rekola Landscape Design
Landscape design and photography by Melanie Rekola
This lovely landscape sports a poured in place concrete slab patio with drought tolerant sedum plants between the slabs. This sedum mix is sold in sheets then cut to fit but it’s actually grown for green-roof application. It works perfectly in this hot environment too as it is extremely drought tolerant and can go a month without water. Because the water runoff is absorbed between the slabs the patio drainage works perfectly and there are no need for drains.The swimming pool is of the fiberglass variety. Though the initial investment is greater than that of vinyl pools the ROI is greater over a 10 year period. Fiberglass pools retains more heat as the pool shell is all one piece and they don’t ever require a new liner.. This fiberglass pool has cool built-in benching and steps. And there is even a swim jet built into one side great for those cardio blasting swims. The pool interior colour is grey though it shows a soft blue/grey when water is added due to the reflection of the sky and other surroundings. The pool coping is natural stone with rock face edge. The steel arbour was custom made. Metal (steel) was chosen for it’s slim strength as wood placed here would have been too chunky. The best rooms (indoors or our) have a subtle layering of textural elements. To me this landscape needed a structure here to define the “rooms” It will look even better in a few years when the vines reach the top and the Miscanthus on either side reaches its 7′ height!The 12′ x 16′ pavilion is also made of steel and houses an alfresco dining table and sofa set. The pavilions built in cupola makes the warm breezes comfortably pass through with no need for a fan. It’s also sunken 2′ from the pool/patio height and nestled nicely in the corner. I must also mention the large slim planters with “Red Shades” Canna lily within. They are the perfect boldness/balance!Step through the arbor and a linear pond with “floating” natural stone step is revealed! Two smooth flow scuppers are responsible for the quiet waterfalls either side. A wood deck overhangs the pond adding softness to the setting. A modern retaining wall with natural stone cap runs the full width of the pond and pool adding interest and dimension. In the covered outdoor living area this wall is the perfect seat wall - adding lots of extra party seating!


Sponsored
Delaware, OH

Buckeye Basements, Inc.
Central Ohio's Basement Finishing ExpertsBest Of Houzz '13-'21
 Melanie Rekola Landscape Design
Landscape design and photography by Melanie Rekola
This lovely landscape sports a poured in place concrete slab patio with drought tolerant sedum plants between the slabs. This sedum mix is sold in sheets then cut to fit but it’s actually grown for green-roof application. It works perfectly in this hot environment too as it is extremely drought tolerant and can go a month without water. Because the water runoff is absorbed between the slabs the patio drainage works perfectly and there are no need for drains.The swimming pool is of the fiberglass variety. Though the initial investment is greater than that of vinyl pools the ROI is greater over a 10 year period. Fiberglass pools retains more heat as the pool shell is all one piece and they don’t ever require a new liner.. This fiberglass pool has cool built-in benching and steps. And there is even a swim jet built into one side great for those cardio blasting swims. The pool interior colour is grey though it shows a soft blue/grey when water is added due to the reflection of the sky and other surroundings. The pool coping is natural stone with rock face edge. The steel arbour was custom made. Metal (steel) was chosen for it’s slim strength as wood placed here would have been too chunky. The best rooms (indoors or our) have a subtle layering of textural elements. To me this landscape needed a structure here to define the “rooms” It will look even better in a few years when the vines reach the top and the Miscanthus on either side reaches its 7′ height!The 12′ x 16′ pavilion is also made of steel and houses an alfresco dining table and sofa set. The pavilions built in cupola makes the warm breezes comfortably pass through with no need for a fan. It’s also sunken 2′ from the pool/patio height and nestled nicely in the corner. I must also mention the large slim planters with “Red Shades” Canna lily within. They are the perfect boldness/balance!Step through the arbor and a linear pond with “floating” natural stone step is revealed! Two smooth flow scuppers are responsible for the quiet waterfalls either side. A wood deck overhangs the pond adding softness to the setting. A modern retaining wall with natural stone cap runs the full width of the pond and pool adding interest and dimension. In the covered outdoor living area this wall is the perfect seat wall - adding lots of extra party seating!

 Caves Kitchens
The cabinetry in this kitchen is made from quarter sawn white oak wood with a chestnut finish and includes oil rubbed bronze knobs and cup pulls.
The wood flooring complements the cabinetry well, while the black quartz counter tops and appliances contrast against the light cabinetry and floors.
- Allison Caves, CKD
Caves Kitchens

 Window Quilt Muskoka
Duette, the most energy efficient and versatile of the Hunter Douglas product line. This great room utilized angled shades operated from below. The lower units are battery operated by remote control. PowerView Motorization by Hunter Douglas now offers preset remote controlled window coverings to simplify your life even when you are not home. Set your blinds to open and close at specific times to lower your heating and cooling costs.
Our exclusive innovations allows these angle shades to be fully operational. A patented honeycomb construction dramatically reduces heat gain and UV radiation while retaining natural filtered light.
Duette, the most energy efficient and versatile of the Hunter Douglas product line. This great room utilized angled shades operated from below. All blinds can be fully operational manually or motorized.
Common in contemporary homes, angled windows bring up some unique challenges in providing privacy and light control and keeping your home energy efficient. Hunter Douglas has taken on these challenges, offering you a wide selection of products that help to enhance the beauty of your angled windows whether the shade is open or closed. Angled windows come in many variations including right triangles, isosceles triangles and top/bottom sloped windows with specific minimums and maximums for each brand.
As with all specialty shapes, you should consult with your local Hunter Douglas dealer Window Quilt (Muskoka) in Huntsville, when deciding which product will work best for your angled window application.
Angled Window Treatments are available on these Hunter Douglas products:
Applause® honeycomb shades
Duette® honeycomb shades
Duette® Architella® honeycomb shades
EverWood® Distinctions™ blinds
EverWood® Renditions™ blinds
EverWood® TruGrain® blinds
Heritance® hardwood shutters
Nantucket™ window shadings
NewStyle® hybrid shutters
Palm Beach™ Polysatin™ shutters
Parkland® Ash Wood blinds
Parkland® Classics™ Wood blinds
Parkland® Scenic™ Wood blinds
Parkland® Textures Wood blinds
Parkland® Weathered Wood blinds
Pirouette® window shadings
Provenance® Woven Wood Shades
Silhouette® window shadings
Somner® Custom Vertical Blinds
The Alustra® Collection of Duette® Architella® honeycomb shades
The Alustra® Collection of Pirouette® window shadings
The Alustra® Collection of Silhouette® window shadings
The Alustra® Collection of Vignette® Modern Roman Shades
The Alustra® Collection of Woven Textures®
Vertical Solutions®
Vignette® Modern Roman Shades
Visit Window Quilt (Muskoka)'s Show Case Showroom in Huntsville, Ontario to see how they exclusively custom fit angled windows with fully operational blinds by Hunter Douglas. Its is simply amazing!!
 Tile Doctor Ltd
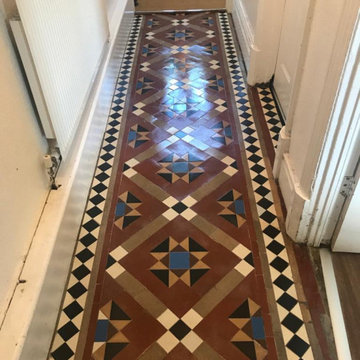
I recently worked on the restoration of a Victorian tiled hallway in Cwmbran Wales which is six miles North of Newport. As you can see from the photographs the floor was in quite a neglected dirty state and many of the the black and white border tiles needed removing and replacing. The worst part was the area by the front door where most of the tiles had been removed and then backfilled with concrete. I can only assume at some point in the past it was deemed to difficult or expensive to restore the floor, so they simply covered it up.
After visiting to survey the floor I did offer to source replacements for the concreted section and restore that as part of the work however my client’s budget would not stretch to that at the time. My quote was therefore focused on the main section of flooring and included replacing border tiles, deep cleaning the whole floor and then sealing the tiles to add protection. Although I did need to check that I could indeed source the replacement tiles before being able to provide the quote which as it turned out would not be an issue.
They were happy to go ahead and we arranged a suitable time to carry out the work which would enable me to work in the property whilst minimising contact with the owners due to the Covid-19 situation.
I spend the first day sorting out the black and white border tiles which needed to be gently prised out of position without upsetting the main part of the floor. The exposed subfloor was then cleaned up to remove old adhesive and replacements were fitted where required and secured into place. The floor would need to be solid before cleaning so that was left for day two so the new adhesive could go off overnight.
On day two I gave the floor an initial clean using a combination of Tile Doctor Pro-Clean and Remove and Go diluted with water. This produces a strong cleaner/stripper that will tackle dirt and remove coatings such as previous sealers. The old tiles had accumulated years of ingrained dirt, so I needed this extra power to remove the years of dirt and contaminates from the tile. It was sprayed onto the tiles and then left to soak in for ten minutes before being actively scrubbed into the tile using a rotary machine fitted with a black scrubbing pad. The soil was then rinsed off with water and extracted with a wet vacuum. The floor was inspected, and the process repeated on the tough stains until I was satisfied all the dirt had been removed.
Next the floor was treated to an acid wash using Tile Doctor Acid Gel using a similar method as before. This is an important treatment for these old Victorian floors that have no damp proof course as it neutralises efflorescent salts trapped in the tile which can appear as white salt deposits later. Once I was happy with the condition of the floor it was given a final rinse and left to dry off. I use a wet vacuum to remove liquids from the floor and on this last extraction I spent extra time to remove as much moisture from the tiles as possible.
I came back a few days later and after checking the tiles were dry using a damp meter, I started the application of the sealer. For this floor I applied seven coats of Tile Doctor Seal and Go for a satin finish. Tile Doctor Seal and Go is a specially formulated water-based sealer that provides both stain resistance and a durable low-sheen finish. It is perfect on a floor of this age where it leaves a lovely finish and will remain durable in what is a essentially a high traffic area.
Although we didn’t manage to sort out the area by the front door the client managed to fit a made to measure coir door mat along with carpet bar which was quite practical and looked fine so they were able to resolve that problem without blowing their budget.
The client was over the moon with results, the floor had a lovely pattern and the colours now shone through. I suggested the use of Tile Doctor Neutral Tile Cleaner to keep the floor clean and in good condition. It is neutral in pH so will ensure that the newly applied sealer stays in place and will ensure maintenance is nice and easy for them.
Paul Wales
Monmouthshire Tile Doctor
 Tile Doctor Ltd
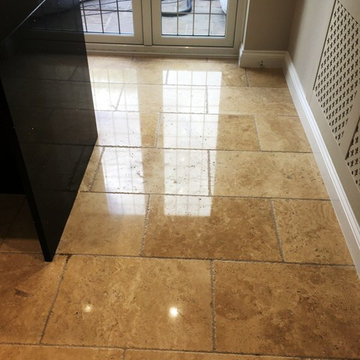
This Tumbled Travertine tiled floor at a beautiful house in Horley had been poorly maintained through the years using the wrong type of sealer which quickly wore down allowing dirt to become ingrained in the stone. The owner had become concerned about the state of the tiles and decided it was time to call in an expert that could restore the tiles to a condition that complimented the environment in which it was situated.
Travertine is known for being very distinctive in character and very durable, making it a very popular choice for tiled flooring in properties worldwide. However, the stone does require regular professional maintenance and polishing to keep it looking it top shape and home owners rarely realise this when they decide to have it installed. Fortunately, in the UK at least you can rely on your local tile doctor to maintain it for you.
The first part of the job involved giving the floor a thorough clean to remove what was left of old sealers and any polishing compounds that remained on the floor. Before beginning that however I brought in all my equipment and products into the house and then prepped the area by taping up the woodwork to protect it during the renovation process.
To remove what was left of the old sealers and other coatings still present on the floor a strong solution of Tile Doctor Remove and Go was applied to the floor and left to soak in for about ten minutes before being actively worked in with a rotary machine fitted with a black scrubbing pad. The solution turned black with the soil as it was lifted out of the pores of the stone and it was then rinsed off with water and extracted with a wet vacuum.
Following this, we moved on to a process we know as burnishing that hones the stone and brings up the polished appearance. Working in sections due to the size of the floor It involves the application of a series of diamond encrusted burnishing pads from coarse through to very fine.
The coarse 400-grit pad fitted to the rotary floor buffer and run over the floor using only water for lubrication. The water turns into a slurry as the pad does its job removing dirt and this has to be rinsed off the floor and extracted with the wet vacuum before applying the next pad. The process was then repeated with medium 800 grit pad for an initial polish followed by the Fine 1500 grit pad for the second polish using water for lubrication and rinsing and extracting in between each pad.
The last pad is a very fine 3000 grit pad for the final polish and is applied with only a little water sprayed onto the floor using a technique we call a Spray Burnish. This last pad really brings up the polished appearance of the stone.
To bring up the appearance of the stone even further and add a really durable polish Tile Doctor Shine Powder was applied. This is a crystallising powder sealer that ensures a very high shine and a tough, durable finish. This powder is applied directly to the tiles in combination with approximately ½ a litre of water and a soft white buffing pad.
Last step was to add to the protection provided by the Shine Powder with two coats of Tile Doctor Ultra-Seal which is a natural look sealer that doesn’t change the look of the stone and is applied to the stone and grout. This sealer works by seeping into the stone, occupying the pores and preventing dirt from becoming ingrained.
The customer was ecstatic with the results, being particularly pleased that she got the floor looking the way she originally wanted without significant expense, not to mention stress.
Michael Conlon
East Surrey Tile Doctor
 Tile Doctor Ltd
Having an effective sealer in place is essential for ensuring the long term condition of tiled floors in fact a lack of sealer can make cleaning the tiles exceptionally difficult as the sealer prevents dirt becoming ingrained in the tile.
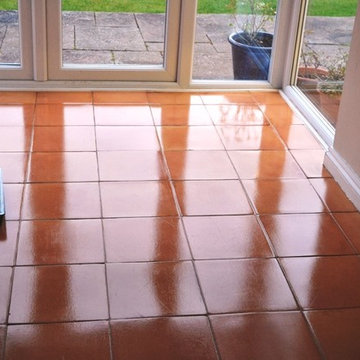
This property owner, living in the former spa town of Matlock in Derbyshire, was experiencing problems with their Terracotta tiled kitchen floor since they had applied some kind of wax to act as a sealer, and this had worn off within a few weeks. After this happened the tiles were not sealed again, making cleaning a big problem. Terracotta is a highly porous stone and thus easily soaks in spillages and stains, and allows dirt to become very easily trapped.
In this situation, the property owner resolved to contact me about some professional maintenance. I suggested that the tiles would need a deep clean followed by the application of a fresh, high quality sealer. The work was agreed on and I made my way down to the property the following week.
When I arrived at the property and saw the tiles first hand it became clear that a professional clean had been in need for a long time: greasy looking stains were particularly prevalent and covered large areas of the kitchen floor.
To remove I mixed a strong solution of Tile Doctor Pro Clean, which is a multi-purpose, high-alkaline cleaner, stripper and degreaser, and, working in small areas, applied it to the floor. Working in small sections was important because the stone is very porous and quickly soaked in any product laid down. I scrubbed the cleaner into the stone using a rotary machine fitted with a black scrubbing pad, with the dirt and stains coming away nicely. Pro Clean is highly versatile and can be used for similar cleaning purposes on most types of natural stone floor.
After cleaning each section, I quickly removed the excess dirty water and chemicals with my wet vax machine. Once the whole floor had been cleaned I rinsed it several times with fresh water just to make sure all cleaning chemicals were gone. I then left the floor to dry completely for 36 hours.
When I returned to the property, I conducted several damp tests to check for any areas of the floor that needed further drying. As is almost always the case, there were a few areas that remained slightly damp, and I set about speeding the drying process along using my heat gun. In fact, it actually took me more than three hours to get the floor completely dry, but this was worth the effort as even the slightest excess moisture can damage the performance of the sealer.
Once the floor was finally dried I began sealing the floor with one coat of Tile a Doctor Colour Grow sealer. Colour Grow is an impregnating sealer that penetrates deep into the pores of the stone, thus acting as a shield against ingrained dirt, and also raises the colour of the tiles to provide an aesthetically appealing appearance. sealer. After sealing with Colour Grow, I left the floor to dry for couple of hours and then applied six coats of Tile Doctor Seal & Go, which is a topical sealer that builds up durable protection on the surface of the tiles.
The combination of through cleaning and the application of not one, but two high quality sealers really did wonders for the appearance of these Terracotta tiles. Looking at the final results you wouldn’t have believed they had been without a proper clean and seal for so long! Needless to say the customer was exceptionally pleased and will surely be able to keep her floor looking great for a long time to come.
Tony Olmet
Derbyshire Tile Doctor


 Melanie Rekola Landscape Design
This lovely landscape sports a poured in place concrete slab patio with drought tolerant sedum plants between the slabs. This sedum mix is sold in sheets then cut to fit but it’s actually grown for green-roof application. It works perfectly in this hot environment too as it is extremely drought tolerant and can go a month without water. Because the water runoff is absorbed between the slabs the patio drainage works perfectly and there are no need for drains.The swimming pool is of the fiberglass variety. Though the initial investment is greater than that of vinyl pools the ROI is greater over a 10 year period. Fiberglass pools retains more heat as the pool shell is all one piece and they don’t ever require a new liner.. This fiberglass pool has cool built-in benching and steps. And there is even a swim jet built into one side great for those cardio blasting swims. The pool interior colour is grey though it shows a soft blue/grey when water is added due to the reflection of the sky and other surroundings. The pool coping is natural stone with rock face edge. The steel arbour was custom made. Metal (steel) was chosen for it’s slim strength as wood placed here would have been too chunky. The best rooms (indoors or our) have a subtle layering of textural elements. To me this landscape needed a structure here to define the “rooms” It will look even better in a few years when the vines reach the top and the Miscanthus on either side reaches its 7′ height!The 12′ x 16′ pavilion is also made of steel and houses an alfresco dining table and sofa set. The pavilions built in cupola makes the warm breezes comfortably pass through with no need for a fan. It’s also sunken 2′ from the pool/patio height and nestled nicely in the corner. I must also mention the large slim planters with “Red Shades” Canna lily within. They are the perfect boldness/balance!Step through the arbor and a linear pond with “floating” natural stone step is revealed! Two smooth flow scuppers are responsible for the quiet waterfalls either side. A wood deck overhangs the pond adding softness to the setting. A modern retaining wall with natural stone cap runs the full width of the pond and pool adding interest and dimension. In the covered outdoor living area this wall is the perfect seat wall - adding lots of extra party seating!
The lesson to be learned here is that good design can be applied to any space. This backyard is only 50′ x 45′ and look what can be achieved! Landscape design and photography by Melanie Rekola
 Tile Doctor Ltd
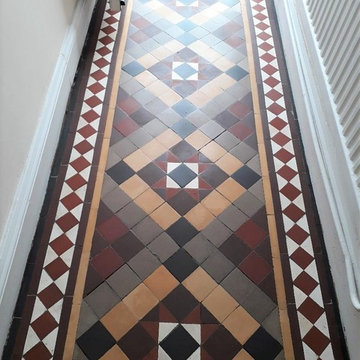
As is often the case in years past and for whatever reason many homeowners covered their decorative Victorian hallway tiles in a variety of products from carpet to laminate flooring. These days the trend has reversed and quite rightly many homeowners now realise the value a tiled floor can bring to a property and look to us to have it restored.
Our client had purchased a property in Norfolk seaport of Kings Lynn and, on lifting the dirty old carpet and decaying underlay in the hallway, discovered a beautiful tiled entrance hall. It was obvious that a previous owner had decided to lay carpet over the tiles as an easy way of hiding the result of careless renovation and decorating which had resulted in a thick coating of plaster, paint, carpet tape glue and various other contaminants which had become firmly stuck to the surface. There were also two small rectangular black and brown tiles missing behind the front door which had been damaged during the removal of some old lead pipes.
This was clearly a job which would need somewhat more than a scrubbing brush and a bottle of Flash!
Our first job was to remove as much of the solid contaminants as possible by hand with floor scrapers and a steamer which softened the more stubborn lumps. We then applied Tile Doctor Remove & Go which is a powerful alkaline stripper to the whole area, left it to dwell on the surface for twenty minutes and then scrubbed it in using a rotary machine fitted with a black scrubbing pad. The resulting slurry was then power rinsed and extracted away using our Ninja machine which is a high-power industrial vacuum. Any remaining patches where the carpet tape had been stuck down were spot treated using Tile Doctor Nanotech HBU which made short work of the hardened glue.
The result was a clean floor, but the surface still felt slightly rough and pitted, a problem which we resolved using the rotary machine fitted with a 200-grit diamond burnishing pad followed by a 400-grit pad with a little 400 grit honing powder which left the surface smooth, silky and ready for the application of a sealer.
Finally, we acid washed the whole area using Tile Doctor Acid Gel, a slow release product which would neutralise any remaining chemicals, improve new sealer adhesion and inhibit the future production of any efflorescence salts. We had used a fair amount of water during the cleaning process, so we left the floor to dry off thoroughly overnight with assistance from our commercial dehumidifier.
On our return the following day, we discussed the sealer options with the client and recommended using microporous Tile Doctor Colour Grow which is an impregnating sealer that seeps into the pores of the stone protecting it from within. It will provide an excellent fluid resistant seal whilst enhancing the natural colours in the stone, additionally it’s fully breathable thereby enabling any moisture trapped under the floor to rise through the floor and evaporate. This is important on old floors like this where no damp-proof membrane was installed. The sealer was applied with a paint pad in tow coats and allowed to dry for an hour before buffing the floor with a hog’s hair pad to give a rich natural-look sheen finish.
The Victorian tiles responded well to the treatments which were completed in two consecutive days. My client was extremely pleased with the results and left the following comment:
“My floor was in poor condition after being buried under carpet as well as many, many years of paint and muck. I enjoyed the time they spent at my home and wouldn’t hesitate to use (or recommend) the Tile Doctor service in the future.”
Nick White
Norfolk Tile Doctor
 Melanie Rekola Landscape Design
Landscape design and photography by Melanie Rekola
This lovely landscape sports a poured in place concrete slab patio with drought tolerant sedum plants between the slabs. This sedum mix is sold in sheets then cut to fit but it’s actually grown for green-roof application. It works perfectly in this hot environment too as it is extremely drought tolerant and can go a month without water. Because the water runoff is absorbed between the slabs the patio drainage works perfectly and there are no need for drains.The swimming pool is of the fiberglass variety. Though the initial investment is greater than that of vinyl pools the ROI is greater over a 10 year period. Fiberglass pools retains more heat as the pool shell is all one piece and they don’t ever require a new liner.. This fiberglass pool has cool built-in benching and steps. And there is even a swim jet built into one side great for those cardio blasting swims. The pool interior colour is grey though it shows a soft blue/grey when water is added due to the reflection of the sky and other surroundings. The pool coping is natural stone with rock face edge. The steel arbour was custom made. Metal (steel) was chosen for it’s slim strength as wood placed here would have been too chunky. The best rooms (indoors or our) have a subtle layering of textural elements. To me this landscape needed a structure here to define the “rooms” It will look even better in a few years when the vines reach the top and the Miscanthus on either side reaches its 7′ height!The 12′ x 16′ pavilion is also made of steel and houses an alfresco dining table and sofa set. The pavilions built in cupola makes the warm breezes comfortably pass through with no need for a fan. It’s also sunken 2′ from the pool/patio height and nestled nicely in the corner. I must also mention the large slim planters with “Red Shades” Canna lily within. They are the perfect boldness/balance!Step through the arbor and a linear pond with “floating” natural stone step is revealed! Two smooth flow scuppers are responsible for the quiet waterfalls either side. A wood deck overhangs the pond adding softness to the setting. A modern retaining wall with natural stone cap runs the full width of the pond and pool adding interest and dimension. In the covered outdoor living area this wall is the perfect seat wall - adding lots of extra party seating!
 Melanie Rekola Landscape Design
Landscape design and photography by Melanie Rekola
This lovely landscape sports a poured in place concrete slab patio with drought tolerant sedum plants between the slabs. This sedum mix is sold in sheets then cut to fit but it’s actually grown for green-roof application. It works perfectly in this hot environment too as it is extremely drought tolerant and can go a month without water. Because the water runoff is absorbed between the slabs the patio drainage works perfectly and there are no need for drains.The swimming pool is of the fiberglass variety. Though the initial investment is greater than that of vinyl pools the ROI is greater over a 10 year period. Fiberglass pools retains more heat as the pool shell is all one piece and they don’t ever require a new liner.. This fiberglass pool has cool built-in benching and steps. And there is even a swim jet built into one side great for those cardio blasting swims. The pool interior colour is grey though it shows a soft blue/grey when water is added due to the reflection of the sky and other surroundings. The pool coping is natural stone with rock face edge. The steel arbour was custom made. Metal (steel) was chosen for it’s slim strength as wood placed here would have been too chunky. The best rooms (indoors or our) have a subtle layering of textural elements. To me this landscape needed a structure here to define the “rooms” It will look even better in a few years when the vines reach the top and the Miscanthus on either side reaches its 7′ height!The 12′ x 16′ pavilion is also made of steel and houses an alfresco dining table and sofa set. The pavilions built in cupola makes the warm breezes comfortably pass through with no need for a fan. It’s also sunken 2′ from the pool/patio height and nestled nicely in the corner. I must also mention the large slim planters with “Red Shades” Canna lily within. They are the perfect boldness/balance!Step through the arbor and a linear pond with “floating” natural stone step is revealed! Two smooth flow scuppers are responsible for the quiet waterfalls either side. A wood deck overhangs the pond adding softness to the setting. A modern retaining wall with natural stone cap runs the full width of the pond and pool adding interest and dimension. In the covered outdoor living area this wall is the perfect seat wall - adding lots of extra party seating!
 Walters Storyk Design Group
ELIMINATING ECHOS IN A LUXURY POOL HOUSE
Innovative & Unobtrusive Acoustic Treatments Engaged By WSDG-Brasil
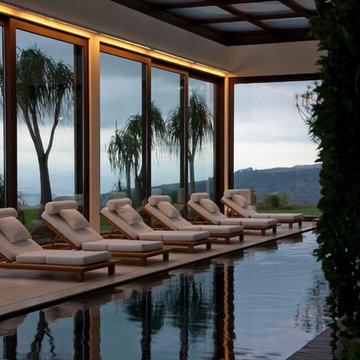
BELO HORIZONTE, BRASIL: How do you keep your pool house from reverberating like a gymnasium? For the owners of a luxurious villa set amidst of one of Brasil’s most breathtaking landscapes, the views and the pastoral silence were priceless. A wide expanse of windows surrounding the infinite lap pool draw attention to the spectacular mountains and gardens framing this opulent weekend residence. Intrusive echoes of laughter and music were unacceptable.
The critical acoustical designs devised by WSDG Brasil for the villa’s home theater and other living spaces were inspired by the firms’ professional recording studio expertise. Inhibiting sound from invading or escaping sensitive listening areas is a WSDG specialty. The enclosed pool and spa area, however presented uniquely troubling waters. Especially challenging was the requirement that the acoustical treatments unobtrusively compliment the sumptuous custom finishes.
In addition to the 46’ long, 10’ wide lap pool, the 2100 sq. ft structure includes a gym, Jacuzzi and wet bar, bounded by three walls of double height windows. A movable glass sealing system was installed to maintain interior warmth during the cool, mountain region evenings. Prognosis? Warm, but noisy. Here, professional recording studio design techniques provided solutions. Each window, including an expansive skylight grid comprised of 24 individual 7’x5’motorized Italian glass panels, was fitted with two layers of Clearsorber™ Foil special micro-perforated transparent foil with 1” of air space separating the layers. Mounting the foil layers 2” below the glass skylight insured optimal sound absorption. Developed in Germany, these innovative translucent plastic sheets absorb medium and high frequency reverberation to resolve sonic reflection issues.
“We have hung panels of this material in front of glass windows in recording studios,” explains WSDG Brasil, GM Renato Cipriano. “They have proved very effective in helping us ‘tune’ rooms without obstructing views. Now they are proving equally helpful in this residential application.” The foil’s full transparency insures unimpeded views and eliminates traditional pool house reverberation. Happily, the product also serves as a UV ray filtering system.
Cipriano reports that special attention was also devoted to the pool house floor which is situated over a large machine room. “A number of generators, pumps and air conditioning units live beneath the pool,” he says. “Thanks to our acoustic treatments, they hum away doing their jobs without making their presence known to the guests.”
Morro do Chapeau was designed by celebrated Brasilian architect Eduarda Correa. The extensive A/V installation was designed and installed by Versao Brasileira, a leading Belo Horizonte-based high-end home theater specialist. “We have participated on a number of challenging projects with Versao Brasileira,” Cipriano concludes. “They are extremely knowledgeable and we welcome the opportunity to collaborated with them.”
###
Photos:
Five views of the Morro do Chapeau pool house in Belo Horizonte, Brasil. All glass windows including the expansive skylight are insulated by a special micro perforated transparent foil to eliminate audio reverberation and also serve as a UV ray filtering system.
Please credit photos by Jomar Braganca

 Direct Tile Warehouse
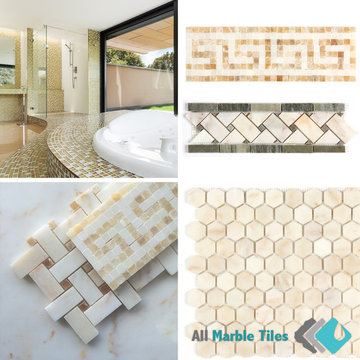
Regent Victorian tiles are a lovely choice for Victorian hall tiles or for creating bathrooms or kitchens in an original style. These are versatile decor floor tiles with borders and angles to facilitate individual designs. Please be aware there are 9 variations for the corner tiles (please see below). Orders will be made up with a mix of corners tiles and we cannot guarantee which tiles will be delivered.
 All Marble Tiles
Afyon Sugar Marble floor and mosaic wall tile
So you decided to re-design some parts of your house. You don’t know where to start and what to choose. One of the more important decisions you will make is your choice of tile. Will it fit your furnishings? Should anyone enter the room, which type of atmosphere should the visitor feel? When they look down, what should they see? You should seriously consider Afyon Sugar marble tiles for your floor.
Afyon Sugar marble, with its origins in the region Afyon, Turkey, is a high quality white or dark white marble with distinctive yellow or dark yellow veins running through it. It breaks the “cold” feeling a pure white marble tile can create or the pure white hygienic look. The veins create warmth and are suitable with basically any color scheme you decide in furnishings, curtains and paint. Imagine waking up in the morning and the sun’s rays lightly playing with the floor or kitchen counter and distinguishing the yellowish hint in the tile. This tile usually comes in polished finishes; although honed and brushed finishes are also widely available.
Afyon Sugar marble mosaic wall tiles are perfect to round off the warmer atmosphere one would like to create in a room. The cleanliness of white with the hint of warmth creates that warmer feeling. Mosaic sizes generally starts at 5cm upwards. Create a pattern between light and dark by designing one first. Ask your specialist tile merchandiser for assistance in this regard. Most should have great pattern ideas. If not, they are not really offering the full service.
Afyon Sugar marble usually comes in 2-3cm thickness, although minimum thickness of 1cm may be found. The grain per cubic centimeter density is 2.70 with an impressive 0.19% water absorption rate. Porosity is at 0.45%. This tile comes in various other edges, not only straight. Talk to your local tile merchandiser.
Afyon Sugar marble tiles have various applications for interior or exterior use, counter tops in the bathroom or kitchen and stone cladding.
So, when deciding on the right tile and you want to create some warmth within a clean finish, why not look at Afyon Sugar marble floor or wall tiles. This tile is an excellent all rounder tile with a soft finish. Talk to your local tile merchandiser who has the knowledge, expertise and necessary skills in providing you with the right advice.
40