
Search results for "Applications fit" in Home Design Ideas
 Twelve Stones Designs, LLC
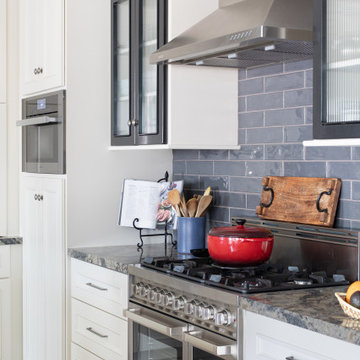
The owners of this kitchen had spent the money to upgrade the finishes in their kitchen upon building the home 12 years ago, but after living in the space for several years they realized how nonfunctional the layout really was. The (then) two preschool aged children had grown into busy, hungry teenagers with many friends who also liked to hang out at the house. So the family needed a more functional kitchen with better traffic flow, space for daily activities revolving around the kitchen at different times of day, and a kitchen that could accommodate cooking for and serving large groups. Furthermore, the dark, traditional finishes no longer reflected the homeowners’ style. They requested a brighter, more relaxed, coastal style that reflected their love of the seaside cities they like to visit.
Originally, the kitchen was U-shaped with a narrow island in the middle. The island created narrow aisles that bottle-necked at the dishwasher, refrigerator, and cooktop areas. There was a pass-through from the foyer into the kitchen, but the owners never liked that the pass-through was also located so close to the powder room. The awkward proximity was unappealing and made guests feel uncomfortable.
The kitchen’s storage was made up of lots of narrow cabinets, apothecary drawers, clipped corner units, and very few drawers. It lacked useful storage for the larger items the family used on a daily basis. And the kitchen’s only pantry was small closet that had only builder-grade, narrow shelving with no illumination to be able to see the contents inside.
Overall, the kitchen’s lighting plan was poorly executed. Only six recessed cans illuminated the entire kitchen and nook areas. The under cabinet lighting was not evenly distributed either. In fact, the builder had mis-placed the under cabinet lighting around the decorative pilasters which made for choppy, dark cubbies. Further, the builder didn’t include any lighting over the sink or the bar area, which meant whoever was doing the dishes was always in their own shadow. That, coupled with the steep overhang of the game room above made the bar area feel like a dim, cavernous space that wasn’t inviting or task oriented. The kitchen looked out into the main living space, but the raised bar and a narrow wall (which held the only large cabinet in the kitchen) created more of a barrier than a relationship to the living room or breakfast nook. In fact, one couldn’t even see the breakfast nook from the cooktop or sink areas due to its orientation. The raised bar top was too narrow to comfortably sit to either dine at or chat from due to the lack of knee space. The the homeowners confided that the kitchen felt more like a dark, dirty prison than place where the family, or their guests, wanted to gather and commune.
The clients' needs and desires were:
➢ to create a kitchen that would be a space the family loved to be in; to relate to the adjacent spaces all around, and to have better flow for entertaining large groups
➢ to remove the walls between the breakfast nook and living area and to be able to utilize the natural light from the windows in both those areas
➢ to incorporate a functional chopping block for prepping fresh food for home cooked meals, an island with a large sink and drain board, 2 pull out trash cans, and seating for at least the 2 teens to eat or do homework
➢ to design a kitchen and breakfast nook with an airy, coastal, relaxed vibe that blended with the rest of the house's coastal theme
➢ to integrate a layered lighting plan which would include ample general illumination, specific task lighting, decorative lighting, and lots of illuminated storage
➢ to design a kitchen with not only more storage for all the husband’s kitchen gadgets and collection of oils and spices, but smart storage, including a coffee/breakfast bar and a place to store and conceal the toaster oven and microwave
➢ to find a way to utilize the large open space between the kitchen, pantry area, and breakfast nook
Twelve Stones Designs achieved the owner's goals by:
➢ removing the walls between the kitchen and living room to allow the natural light to filter in from the adjacent rooms and to create a connection between the kitchen, nook, and living spaces for a sense of unity and communion
➢ removing the existing pantry and designing 3 large pantry style cabinets with LED tape lights and rollout drawers to house lots of kitchen appliances, gadgets, and tons of groceries. We also took the cabinets all the way up to the 9’ ceiling for additional storage for seasonal items and bulk storage.
➢ designing 2 islands - 1 with a gorgeous black walnut chopping block that houses a drawer for chopping and carving knives and a custom double pull out trash unit for point of use utilization - and 1 that houses the dishwasher, a large Blanco Gourmet sink with integrated drain board, woven baskets for fresh root vegetables and kitchen towels, plenty of drawer storage for kitchen items, and bar seating for up to 4 diners.
➢ closing off the space between the kitchen and the powder room to create a beautiful new private alcove for the powder room as well as adding some decorative storage. This also gave us space to include more tall storage near the new range for precision placement of the husband’s extensive oil and spice collection as well as a location for a combo-steam oven the wife wanted for baking and cooking healthy meals.
The project is enhanced functionally by:
➢ incorporated USB and standard receptacles for the kids’ laptops and phone charging in the large island
➢ designing the small island to include additional open shelving for items used on a daily basis such as a variety of bowls, plates, and colanders. This set up also works well for the husband who prefers to “plate” his dinners in restaurant-style fashion before presenting them to the table.
➢ the integration of specific storage units, such as double stacked cutlery drawers, a custom spice pull-out, a Kuerig coffee and tea pod drawer, and custom double stacked utensil drawers
➢ moving the refrigerator to the old oven location - this eliminated the bottle neck as well as created a better relationship to the eating table. It also utilizes the floor space between the pantry, nook, and kitchen
➢ creating a banquet style breakfast nook - this banquette seating not only doubles the amount of seating for large gatherings but it better utilizes the odd space between the kitchen and the previous nook area. It also helps to create a distinct pathway from the mudroom room through the pantry area, kitchen, nook, and living room.
➢ the coffee/breakfast bar area which includes the perfect location for the concealed microwave and toaster oven, convenient storage for the coffee pods and tea accoutrements. Roll-out drawers below also house the smoothie maker, hot water kettle, and a plethora of smoothie-making ingredients such as protein powders, smoothie additives, etc. Furthermore, the drawers below the Keurig house measuring utensil, cutlery, baking supplies and tupperware storage.
➢ incorporating lots of wide drawers and pullouts to accommodate large cookware.
➢ utilizing as much vertical space as possible by building storage to the ceiling which accommodates the family’s abundant amount of serving platters, baking sheets, bakeware, casserole dishes, and additional cutting boards.
The project is enhanced aesthetically by:
➢ new 5-piece Versailles pattern porcelain tile that now seamlessly joins the entire down stairs area together creating a bright, cohesiveness feeling instead of choppy separated spaces - it also adds a coastal feeling
➢ designing a cabinet to conceal the microwave and toaster oven
➢ the coastal influenced light fixtures over the nook table and island
➢ the sandy colors of the Langdon Cambria countertops. The swirling pattern and sparkling quartz pieces remind the homeowner of black-and-tan sandy beaches
➢ the striped banquet seating whose creamy white background and blue-green stripes were the inspiration for the cabinet and wall colors.
➢ All the interior doors were painted black to coordinate with the blacks and grays in the backsplash tile and countertop. This also adds a hint of tailored formality to an otherwise casual space.
➢ the use of WAC's Oculux small aperture LED units for the overhead lighting complimented with Diode LED strips for task lighting under the cabinets and inside the pantry and glass wall cabinets. All of the lighting applications are on separate dimmer switches.
Innovative uses of materials or construction methods by Realty Restoration LLC:
➢ Each 1-1/2” x 3” block of reclaimed end-grain black walnut that makes up the center island chopping block was hand milled and built in the shop. It was designed to look substantial and proportional to the surrounding elements, executed by creating the 4 inch tall top with a solid wood chamfered edge band.
➢ The metal doors on either side of the vent hood were also custom designed for this project and built in the Realty Restoration LLC shop. They are made 1x2, 11-gauge mild steel with ribbed glass. Weighing 60 lbs a piece, heavy duty cabinet hinges were added to support the weight of the door and keep them from sagging.
➢ Under-cabinet receptacles were added along the range wall in order to have a clean, uninterrupted backsplash.
Design obstacles to overcome:
➢ Because we were removing the demising walls between the kitchen and living room, we had to find a way to plumb and vent the new island. We did this by tunneling through the slab (the slab had post tension cables which prevented us from just trenching) to run a new wet vent through a nearby structural wall. We pulled the existing hot and cold lines between upper floor joists and ran them down the structural wall as well and up through a conduit in the tunnel.
➢ Since we were converting from wall overs to a gas range it allowed us to utilize the 220 feed for the wall ovens to provide a new sub panel for all the new kitchen circuits
➢ Due to framing deficiencies inherited from the original build there was a 1-1/2” differential in the floor-to-ceiling height over a 20 foot span; by utilizing the process of cutting and furring coupled with the crown moulding details on the cabinet elevations we were able to mask the problem and provide seamless transitions between the cabinet components.
Evidence of superior craftsmanship:
➢ uniquely designed, one-of-a-kind metal “X” end panels on the large island. The end panels were custom made in the Realty Restoration LLC shop and fitted to the exact dimensions of the island. The welding seams are completely indistinguishable - the posts look like they are cut from a single sheet of metal
➢ square metal posts on the small island were also custom made and designed to compliment and carry through the metal element s throughout the kitchen
➢ the beautiful, oversized end panels on the pantry cabinets which give the breakfast nook a tailored look
➢ integrating a large format 5 piece Versailles tile pattern to seamlessly flow from the existing spaces into the new kitchen space
➢ By constructing a custom cabinet that jogged around a corner we could not remodel (housing the entry way coat closet) we were able to camouflage the adjacent wall offset within the upper and lower cabinets. By designing around the existing jog in the structural walls we accomplished a few things: we were able to find the space to house, and hide, the microwave and toaster oven yet still have a clean cohesive appearance from the kitchen side. Additionally, the owners were able to keep their much needed coat closet and we didn’t have to increase the budget with unnecessary structural work.

 JM Carpets
Example of a mid-sized transitional 3/4 mosaic tile floor bathroom design in Milwaukee with shaker cabinets, white cabinets and yellow walls
 Woodstock Flooring & Design Center
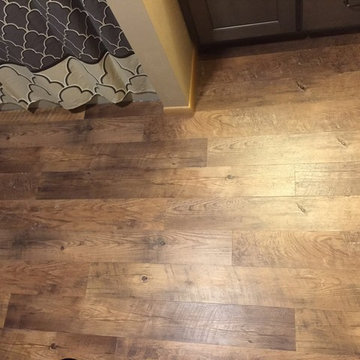
Mannington Luxury Vinyl Plank LockSolid Flooring.
Inspiration for a small modern kids' vinyl floor home design remodel with an undermount sink, flat-panel cabinets, gray cabinets, granite countertops and beige walls
Inspiration for a small modern kids' vinyl floor home design remodel with an undermount sink, flat-panel cabinets, gray cabinets, granite countertops and beige walls
Find the right local pro for your project


 3rd Street Inn
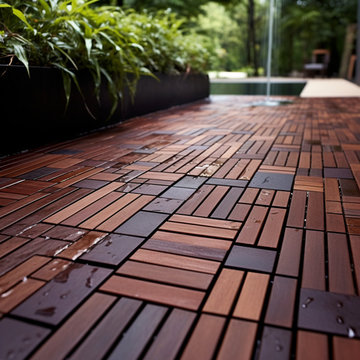
★ 3RD STREET INN® DECK TILES - 3rd Street Inn® Deck Tiles are made from 100% solid acacia hardwood. Acacia is known for its excellent resistance to rot and decay from outdoor elements including rain, sun, mold, mildew, and insects. Each 3rd Street Inn® Interlocking Patio Tile provides 12"x12" (1 Square Foot) of coverage and is available as a 6-pack (6 Square Feet), 10-pack (10 Square Feet), and 20-pack (20 Square Feet).
★ EASY INSTALLATION & NO HARDWARE NEEDED - 3RD STREET INN® interlocking deck flooring features snap-lock connectors for easy DIY installation without the use of tools or hardware. Install our interlocking deck cover tiles in your area by lining them up and then stepping on the seams until you hear an audible "click" to lock them in. All 3rd Street Inn® deck flooring options are made completely hardware free so that there aren't any components to rust and break down in the outdoor elements like other inferior tile patio decking
★ INDOOR AND OUTDOOR DECK FLOORING - 3rd Street Inn® Patio Tiles create a beautiful space both inside and outside. All that is needed is a solid surface and the deck flooring can be laid directly on top of it. Our composite deck tiles can be installed on top of concrete, wood, carpet, pavers, or any other solid surface. Great for decks, patios, balconies, around pools, saunas, showers, sun rooms, mud rooms, bedrooms, and more.
★ DURABLE BEAUTY - 3rd Street Inn® interlocking composite deck tiles are sanded and oiled for a beautiful, scratch resistant finish. All 3rd Street Inn® outdoor patio flooring is non-slip and great for high or low traffic areas inside or outside of the home. To increase the lifespan of your tile decking when used for outdoor applications, standard decking care is recommended. For best results, coat your decking with a UV-rated weatherproofing sealer twice a year and re-stain as needed. The tile decking can also be painted different colors in order to create the look that you want!
★ VERSATILE INSTALLATION OPTIONS- 3rd Street Inn® Interlocking Flooring Tiles not only look great in permanent installations on decks, patios, and around pools, they also offer a great temporary solution for installations in apartments and condos that can easily be removed when needed. For a custom fit, the interlocking patio tiles can be easily cut with a skill saw or jigsaw to accommodate areas of all shapes and sizes. Add 3rd Street Inn® Wooden Deck Flooring to your home and bring your space to life!
We recommend using a UV rated weatherproof sealant twice yearly. This sealant is a crucial step in the life of the decking tiles and can extend the life of the decking tiles, in some cases, pending the climate, by 1 to 2 years.
The life of a decking tile is heavily dependent on the climate of where they are located. Hot, humid climates, rainy climates, and cold, snowy climates can cause the decking tiles to deteriorate faster than using them in a climate controlled environment, like inside of a house or indoor venue.
 Tile Doctor Ltd
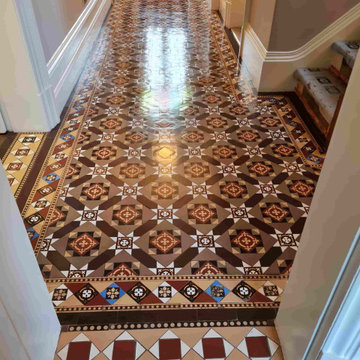
I was recently contacted by a client who had just moved into a large Victorian property in the West Cheshire village of Tarvin about renovating their Victorian tiled hallway. Apparently, the floor was in good condition, and it would just be a case of removing what was left of the old sealer, deep cleaning the tiles and then applying a fresh seal. Unless the floor has been regularly maintained with the same sealer it’s important to remove all traces of old sealers before applying fresh.
Victorian Hallway Before Cleaning Tarvin Cheshire
A lot of the work we do at Tile Doctor can be a lot more involved, often requiring the sourcing of matching replacement tiles and rebuilding large sections of tiled flooring so straight forward clean and seal job is always welcome.
To remove what was left of the sealer and the ingrained dirt from the pores of the Victorian tile I dressed the floor with a strong dilution of Tile Doctor Pro-Clean. On this occasion I used a 1:3 dilution with water and applied it to the floor with a mop. I left it to soak into the tile for fifteen minutes before scrubbing so it could get to work breaking down the old sealer.
During this time, I set up a weighted floor buffer and fitted a black buffing pad, these pads are designed for scrubbing hard floors and lifting out the dirt. I applied a little water as required during this process to ensure the pad was lubricated. Shortly the cleaning solution darkened as the old sealer and dirt was released from the tile.
The soil was rinsed away with water and then removed using a wet vacuum. Once clear the floor was inspected and the process repeated until I was satisfied it was as clean as it could be and free of sealer.
I left the floor to dry off overnight and returned the next day to apply a new sealer. Before doing so however I like to use a damp meter to take moisture readings from the floor. This is needed to ensure it is dry enough to seal which is important as any moisture in the tile can affect the sealer and lead to an inconsistent finish.
To seal I started with the application of a single coat of Tile Doctor Colour Grow which is a colour intensifying breathable impregnator that soaks into the tile improving appearance and adding protection from within. Any excess sealant was removed by wiping the floor with a microfibre cloth and then it was left to dry for an hour.
This was followed with four coats of Tile Doctor Seal and Go Extra which is an acrylic breathable sealer which adds a pleasing subtle shine to the tile. This is an important feature when choosing a sealer for old floors where moisture needs to be allowed to rise through the tile, otherwise it can become trapped under the floor and reach out to the walls causing rising damp.
The customer was very happy with the revamped hallway which made the house a lot brighter and welcoming. Before closing I should mention that for aftercare cleaning I recommend Tile Doctor Neutral cleaner which is designed for the daily cleaning for sealed tiles, this is important as most domestic supermarket cleaners are simply too strong and can prematurely erode the sealer.
Alastair Robb
West Cheshire Tile Doctor
Sponsored
Delaware, OH

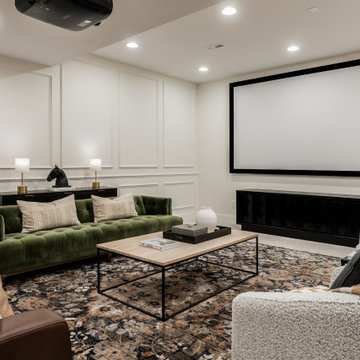
Buckeye Basements, Inc.
Central Ohio's Basement Finishing ExpertsBest Of Houzz '13-'21

 Oakford Home Furnishings
This tower style linen cabinet, was commissioned by a customer looking to finish off their bathroom renovation with a custom made-to-fit linen cabinet that would match with their vanity.
We designed and built this nearly 7 foot tall cabinet for the customer using traditional joinery methods, using rabbets and dados to hold the shelves in place for a very solid finished piece. Decorative molding and trim was added to the bottom of the cabinet and the legs provide a pleasing negative space under the tall cabinet.
Prefabricated molding, that matched the customer's vanity, was added to the top of the piece for added effect.
The piece was sealed and then finished with a white cabinet enamel. Decorative knobs were added to also match the vanity in the bathroom.
 Tile Doctor Ltd
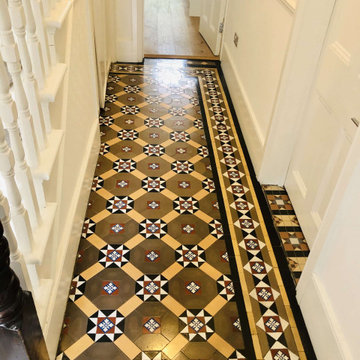
This customer had just moved into a property in Chesham around eighteen months ago. During that time, they had completely renovated the property and in the process had pulled up the hallway carpet to discover a lovely Victorian tiled floor which appeared to be in good condition but very dirty. Period features like these can add a lot of value to a house these days and so they decided to investigate having it professionally cleaned and contacted me for a quote.
Although I can give some indication of price over the phone you never know exactly what to expect so my preference is to visit the property a conduct a test clean. It’s a little trickier to do this now due to COVID-19 but using a combination of PPE, maximum ventilation and social distancing measures I was able to work on the floor. The tiles were in good order with no replacements needed so my focus would be removing carpet adhesive and ingrained dirt. The test went well, and I followed up with a quotation which was accepted, and a date arranged to do the work.
I had worked out previously that the quickest was to deep clean the floor and remove the glue and any old seal was to apply Tile Doctor Remove and Go which as its name suggests is a coatings removed designed for Tiled floors. My method was to spray strong a dilution of Remove and Go onto the Victorian tiles and leave it to soak in for fifteen minutes. Then it was scrubbed in with a black scrubbing pad fitted to a rotary machine. The soil was rinsed off using a minimal of water and extracted with a wet vacuum.
Once the floor had dried, I inspected the tiles and could see more work would be needed to get the white tiles really sparkling. For this I went over the floor using a 200-grit resurfacing pad using water to lubricate the process, I also used handheld burnishing blocks of different grits to do the edges. With this extra effort and another rinse with water to remove the soil the floor looked great, and so I left for the day so it could dry out ready for sealing.
I came back the next day and started by taking moisture readings with a damp meter to ensure the tiles were dry and ready for sealing. This is important as you don’t want to apply sealer to a damp tile and old floors can suffer from damp issues due to the lack of a damp proof membrane.
All was well with the floor, so I was able to move straight onto sealing which started with the application of a single coat of Tile Doctor Colour Grow. This is an impregnating sealer that soaks into the pores of the tile enhancing colour and adding protection. Once this had dried, I followed up with another seven coats of Tile Doctor Seal and Go which adds further protection and leaves a nice subtle sheen to the tiles. This product works really well on old Victorian Tiles like these and being water based it doesn’t leave a smell as it dries.
Andrew Newstead
South Buckinghamshire Tile Doctor
 3rd Street Inn
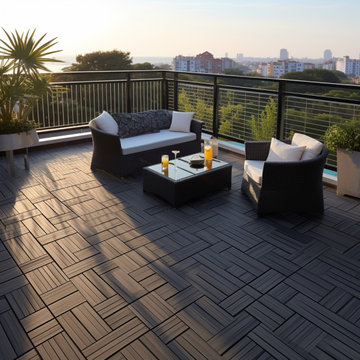
★ 3RD STREET INN® DECK TILES - 3rd Street Inn® Deck Tiles are made from 100% solid acacia hardwood. Acacia is known for its excellent resistance to rot and decay from outdoor elements including rain, sun, mold, mildew, and insects. Each 3rd Street Inn® Interlocking Patio Tile provides 12"x12" (1 Square Foot) of coverage and is available as a 6-pack (6 Square Feet), 10-pack (10 Square Feet), and 20-pack (20 Square Feet).
★ EASY INSTALLATION & NO HARDWARE NEEDED - 3RD STREET INN® interlocking deck flooring features snap-lock connectors for easy DIY installation without the use of tools or hardware. Install our interlocking deck cover tiles in your area by lining them up and then stepping on the seams until you hear an audible "click" to lock them in. All 3rd Street Inn® deck flooring options are made completely hardware free so that there aren't any components to rust and break down in the outdoor elements like other inferior tile patio decking
★ INDOOR AND OUTDOOR DECK FLOORING - 3rd Street Inn® Patio Tiles create a beautiful space both inside and outside. All that is needed is a solid surface and the deck flooring can be laid directly on top of it. Our composite deck tiles can be installed on top of concrete, wood, carpet, pavers, or any other solid surface. Great for decks, patios, balconies, around pools, saunas, showers, sun rooms, mud rooms, bedrooms, and more.
★ DURABLE BEAUTY - 3rd Street Inn® interlocking composite deck tiles are sanded and oiled for a beautiful, scratch resistant finish. All 3rd Street Inn® outdoor patio flooring is non-slip and great for high or low traffic areas inside or outside of the home. To increase the lifespan of your tile decking when used for outdoor applications, standard decking care is recommended. For best results, coat your decking with a UV-rated weatherproofing sealer twice a year and re-stain as needed. The tile decking can also be painted different colors in order to create the look that you want!
★ VERSATILE INSTALLATION OPTIONS- 3rd Street Inn® Interlocking Flooring Tiles not only look great in permanent installations on decks, patios, and around pools, they also offer a great temporary solution for installations in apartments and condos that can easily be removed when needed. For a custom fit, the interlocking patio tiles can be easily cut with a skill saw or jigsaw to accommodate areas of all shapes and sizes. Add 3rd Street Inn® Wooden Deck Flooring to your home and bring your space to life!
We recommend using a UV rated weatherproof sealant twice yearly. This sealant is a crucial step in the life of the decking tiles and can extend the life of the decking tiles, in some cases, pending the climate, by 1 to 2 years.
The life of a decking tile is heavily dependent on the climate of where they are located. Hot, humid climates, rainy climates, and cold, snowy climates can cause the decking tiles to deteriorate faster than using them in a climate controlled environment, like inside of a house or indoor venue.

 Vintage Cellars & Saunas
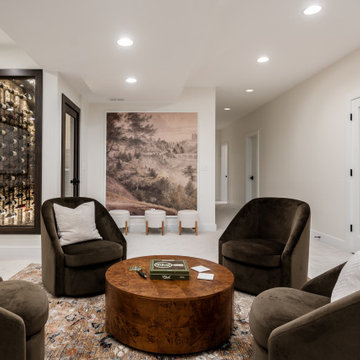
Tucked away within gorgeous Crystal Cove in Newport Beach / Newport Coast in sunny Orange County, California lies this modern luxury home development. Vintage Cellars had the honor and privilege of installing three separate Custom Wine Cellar options within each of the model homes offered. This Custom Wine Room is fitted with floor to ceiling vintage view racking, which allows for the wine bottles to be displayed label forward as well as keeping the wine stored properly. This wine cellar is glass on two separate sides opening up into a dining room as well as acting as a magnificent showpiece in the kitchen. The back wall is single deep wine racking showcasing areas for wine cases, high reveal display rows, and dual heighted horizontal display coved trays. There is enough room in the center of the room for a small wine table to uncork your favorite vintages as well. Master Wine Cellar builders at Vintage Cellars are very thankful for our relationship with this incredible luxury home builder in Newport Beach, California. Wine as art is becoming ever present in modern design features within luxury lifestyles and contemporary high end homes. This custom wine cellar feature in this home in Orange County, California is perfect to show off your incredible wine collection to everyone who comes into your home. Wine Cellar Design, Wine Room preperation, and Wine Cellar installation is what Vintage Cellars of San Diego, California specialize in. We would love to help you make your wine cellar dreams a reality!
A phenomenally designed Custom Wine Cellar such as this truly offers a unique design and selling feature to these model homes in Crystal Cove, Newport Beach / Newport Coast, Orange County, California.
Vintage Cellars has built gorgeous custom wine cellars and wine storage rooms across the United States and World for over 25 years. We are your go-to business for anything wine cellar and wine storage related! Whether you're interested in a wine closet, wine racking, custom wine racks, a custom wine cellar door, or a cooling system for your existing space, Vintage Cellars has you covered!
We carry all kinds of wine cellar cooling and refrigeration systems, incuding: Breezaire, CellarCool, WhisperKool, Wine Guardian, CellarPro and Commercial systems.
We also carry many types of Wine Refrigerators, Wine Cabinets, and wine racking types, including La Cache, Marvel, N'Finity, Transtherm, Vinotheque, Vintage Series, Credenza, Walk in wine rooms, Climadiff, Riedel, Fontenay, and VintageView.
Vintage Cellars also does work in many styles, including Contemporary and Modern, Rustic, Farmhouse, Traditional, Craftsman, Industrial, Mediterranean, Mid-Century, Industrial and Eclectic.
Some locations we cover often include: Agora Hills, Alameda, Albany, Alhambra, Aliso Viejo, Altadena, Anaheim, Angwin, Arcadia, Aromas, Arroyo Grande, Atascadero, Atherton, Avila Beach, Balboa Terrace, Bel Air, Belmont, Belvedere, Benton, Berkeley, Bermuda Dunes, Beverly Hills, Big Sur, Bolinas, Boyle Heights, Bradbury, Bradley, Brea, Brentwood, Bridgeport, Brisbane, Buellton, Buena Park, Burbank, Burlingame, Calabasas, Calistoga, Cambria, Canoga Park, Cardiff, Carlsbad, Carmel, Carmel By The Sea, Carmel Valley, Carnelian Bay, Carpinteria, Casmalia, Castroville, Cathedral City, Cayucos, Chatsworth, Chualar, City of LA, City of SF, Coachella, Coleville, Colma, Corona Del Mar, Coronado, Coronado Island, Corte Madera, Costa Mesa, Coto De Caza, Creston, Crystal Cove, Cupertino, Cypress, Danville, Deer Park, Del Mar, Diablo, Duarte, Eagle Rock, East Palo Alto, East Pasadena, Echo Park, El Granada, El Monte, Emeryville, Encinitas, Encino, Fairfax, Foster City, Fountain Valley, Fremont, Fullerton, Garden Grove, Glendale, Golden Gate Park, Goleta, Gonzales, Granada Hills, Granite Bay, Greenbrae, Greenfield, Grover Beach, Guadalupe, Half Moon Bay, Hancock Park, Harmony, Hidden Hills, Hillsborough, Hollywood, Hollywood Hills, Huntington Beach, Indian Wells, Indio, Industry, Inner Richmond, Inverness, Irvine, Jolon, June Lake, Kentfield, King City, La Canada Flintridge, La Habra, La Honda, La Jolla, La Palma, La Quinta, Ladera Heights, Laguna Beach, Laguna Hills, Laguna Niguel, Laguna Woods, Lake Balboa, Lake Forest, Lake Tahoe, Lake View Terrace, Larkspur, Laurel Canyon, Lee Vining, Lockwood, Lompoc, Long Beach, Los Alamitos, Los Alamos, Los Altos, Los Altos Hills, Los Angeles, Los Gatos, Los Olivos, Los Osos, Malibu, Mammoth Lakes, Manhattan Beach, Marin, Marina, Marshall, Mayflower Village, Menlo Park, Mill Valley, Millbrae, Mission Hills, Mission Viejo, Mono, Monrovia, Montara, Montebello, Monterey, Monterey Park, Morro Bay, Moss Beach, Moss Landing, Mountain View, Napa, New Cuyama, Newark, Newport Beach, Newport Coast, Nicasio, Nipomo, North Hills, Northridge, Novato, Oakland, Oakville, Ocean Beach, Oceano, Orange, Orange County, Pacific Grove, Pacific Palisades, Pacoima, Palm Desert, Palm Springs, Palo Alto, Palos Verdes, Panorama City, Pasadena, Paso Robles, Pebble Beach, Pescadero, Piedmont, Pismo Beach, Placentia, Point Reyes Station, Pope Valley, Portola Valley, Presidio, Presidio Heights, Rancho Mirage, Rancho Santa Fe, Rancho Santa Margarita, Redondo Beach, Redwood City, Reseda, Rosemead, Russian Cliff, Rutherford, Saint Helena, Salinas, San Anselmo, San Ardo, San Bruno, San Carlos, San Clemente, San Diego, San Fernando, San Francisco, San Gabriel, San Gregorio, San Jose, San Juan Capistrano, San Leandro, San Lorenzo, San Lucas, San Luis Obispo, San Marino, San Mateo, San Miguel, San Rafael, San Simeon, Santa Ana, Santa Barbara, Santa Clara, Santa Clarita, Santa Margarita, Santa Maria, Santa Monica, Santa Ynez, Saratoga, Sausalito, Sea Cliff, Seal Beach, Seaside, Shadow Hills, Shandon, Sherman Oaks, Sierra Madre, Silver Lake, Solana Beach, Soledad, Solvang, Sonoma, South El Monte, South Pasadena, South San Gabriel, Spreckels, Squaw Valley, St Helena, Stanford, Stanton, Stinson Beach, Stough Park, Studio City, Summerland, Sun Valley, Sunland, Sunnyvale, Sylmar, Tahoe City, Tahoe Vista, Tarzana, Temple City, Templeton, Thousand Oaks, Thousand Palms, Tiburon, Toluca Lake, Topanga, Topaz, Torrey Pines, Tujanga, Tustin, Union City, Valencia, Verdugo Mountains, Vernon, Villa Park, Walnut, Walnut Creek, West Puente Valley, Westminster, Westwood, Whittier, Woodside, Yorba Linda, Yountville
San Diego Wine Cellars, Rancho Santa Fe Wine Cellars, Beverly Hills Wine Cellars, Bel Air Wine Cellars, Orange County Wine Cellars, Newport Beach Wine Cellars, San Francisco Wine Cellars, Napa Wine Cellars, Sonoma Wine Cellars, Los Angeles Wine Cellars, Santa Barbara Wine Cellars, Palm Desert Wine Cellars, La Jolla Wine Cellars, Del Mar Wine Cellars, Coronado Wine Cellars, Pacific Palisades Wine Cellars, Malibu Wine Cellars, Santa Monica Wine Cellars, Brentwood Wine Cellars, Laguna Wine Cellars, Crystal Cove Wine Cellars, Hollywood Wine Cellars, Bay Area Wine Cellars, South Bay Wine Cellars, LA Wine Cellars, SD Wine Cellars, OC Wine Cellars, SF Wine Cellars, Huntington Beach Wine Cellars, Carlsbad Wine Cellars, Palos Verdes Wine Cellars, Paso Robles Wine Cellars, Encinitas Wine Cellars, Manhattan Beach Wine Cellars, Marin Wine Cellars, Tiburon Wine Cellars, Coto De Caza Wine Cellars, Thousand Oaks Wine Cellars, Cardiff Wine Cellars, RSF Wine Cellars, San Marino Wine Cellars, Ladera Heights Wine Cellars, Westwood Wine Cellars, Hillsborough Wine Cellars, Luxury Wine Cellars, Custom Wine Cellars, High End Wine Cellars, Estate Wine Cellars, Modern Wine Cellars, Contemporary Wine Cellars, Rustic Wine Cellars, Traditional Wine Cellars
Contact Vintage Cellars today with any of your Wine Cellar needs!
(800) 876-8789
Vintage Cellars
904 Rancheros Drive
San Marcos, California 92069
(800) 876-8789


 Tile Doctor Ltd
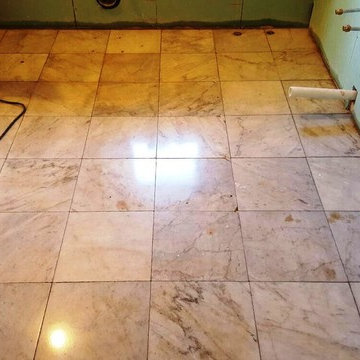
Windlestraw is a picturesque Edwardian manor hotel overlooking the Tweed Valley, near Walkerburn in the Scottish Borders area of Scotland. One of the bathrooms in the manor was in the process of being refurbished when two layers of floor tiles were removed, unveiling an original Marble tiled floor dating back to the 1920s.
After the top layers of tile had been removed the Marble was still covered in old adhesive and cement and although Marble is known for its quality and durability the hotel owner didn’t want the building contractor to proceed any further in case they damaged it. The owner was keen to restore the Marble floor as an original feature so we were called in to set the situation right.
To restore the floor I used two processes known as milling and burnishing. Milling literally involves grinding down uneven or rough surfaces using very coarse, diamond encrusted pads. The pads are usually used to resolve lippage issues on natural stone but in this case we needed to use the very coarse abrasive pads to grind off the adhesive and cement. I used a set of three coarse milling pads rinsing with water between each pad and starting with a 50 grit pad, before moving on to 100 and 200 grit pads. This process was very effective and ground off the cement and adhesive, while also removing any lippage in the tiles to leave a completely flat surface.
Milling leaves the surface of the Marble tiles clean but in a rough condition and this is where the second process Burnishing comes in. Similar to milling, burnishing focuses on achieving a polished finish with the application of ever finer grades of polishing pads and is often used to bring back the polish on Limestone and Travertine as well as Marble. Moving on to the burnishing, I worked my way through the four diamond encrusted pad system lubricating with a little water and again rinsing between each pad to remove the slurry. The grits go from Coarse (400 grit), Medium (800 grit), Fine (1500 grit) and then eventually Very Fine (3000 grit) and come in a 17” pad for use on a rotary floor machine and were applied twice in sequence to achieve a fantastic polished shine.
The floor was given a final rinse and then dried with a wet-vacuum before we proceeded to seal the floor using Tile Doctor Shine Powder which is a crystallizing powder that is applied directly to the floor and worked in using a buffing pad fitted to a rotary machine.
Shine Powder provides a very high shine (as you can see from the photos), along with a tough durable finish. On top of this, it is suitable for sealing all natural stone, including, of course, Marble, along with Limestone, Granite, Slate and Travertine.
The customer was absolutely delighted with the results as were we although it’s now up to them to ensure the bathroom fitters take appropriate care when completing the room which I’m sure will look absolutely fantastic when complete and no doubt add to the allure of this magnificent hotel in the Scottish Borders.
Thomas Wilson
Edinburgh Tile Doctor
Sponsored
Delaware, OH
Buckeye Basements, Inc.
Central Ohio's Basement Finishing ExpertsBest Of Houzz '13-'21
 3rd Street Inn
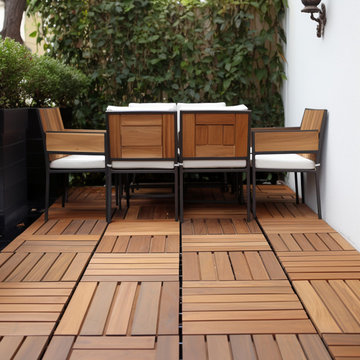
★ 3RD STREET INN® DECK TILES - 3rd Street Inn® Deck Tiles are made from 100% solid acacia hardwood. Acacia is known for its excellent resistance to rot and decay from outdoor elements including rain, sun, mold, mildew, and insects. Each 3rd Street Inn® Interlocking Patio Tile provides 12"x12" (1 Square Foot) of coverage and is available as a 6-pack (6 Square Feet), 10-pack (10 Square Feet), and 20-pack (20 Square Feet).
★ EASY INSTALLATION & NO HARDWARE NEEDED - 3RD STREET INN® interlocking deck flooring features snap-lock connectors for easy DIY installation without the use of tools or hardware. Install our interlocking deck cover tiles in your area by lining them up and then stepping on the seams until you hear an audible "click" to lock them in. All 3rd Street Inn® deck flooring options are made completely hardware free so that there aren't any components to rust and break down in the outdoor elements like other inferior tile patio decking
★ INDOOR AND OUTDOOR DECK FLOORING - 3rd Street Inn® Patio Tiles create a beautiful space both inside and outside. All that is needed is a solid surface and the deck flooring can be laid directly on top of it. Our composite deck tiles can be installed on top of concrete, wood, carpet, pavers, or any other solid surface. Great for decks, patios, balconies, around pools, saunas, showers, sun rooms, mud rooms, bedrooms, and more.
★ DURABLE BEAUTY - 3rd Street Inn® interlocking composite deck tiles are sanded and oiled for a beautiful, scratch resistant finish. All 3rd Street Inn® outdoor patio flooring is non-slip and great for high or low traffic areas inside or outside of the home. To increase the lifespan of your tile decking when used for outdoor applications, standard decking care is recommended. For best results, coat your decking with a UV-rated weatherproofing sealer twice a year and re-stain as needed. The tile decking can also be painted different colors in order to create the look that you want!
★ VERSATILE INSTALLATION OPTIONS- 3rd Street Inn® Interlocking Flooring Tiles not only look great in permanent installations on decks, patios, and around pools, they also offer a great temporary solution for installations in apartments and condos that can easily be removed when needed. For a custom fit, the interlocking patio tiles can be easily cut with a skill saw or jigsaw to accommodate areas of all shapes and sizes. Add 3rd Street Inn® Wooden Deck Flooring to your home and bring your space to life!
We recommend using a UV rated weatherproof sealant twice yearly. This sealant is a crucial step in the life of the decking tiles and can extend the life of the decking tiles, in some cases, pending the climate, by 1 to 2 years.
The life of a decking tile is heavily dependent on the climate of where they are located. Hot, humid climates, rainy climates, and cold, snowy climates can cause the decking tiles to deteriorate faster than using them in a climate controlled environment, like inside of a house or indoor venue.

 User
Vicenza Grigio Limestone
Inspiration for a large coastal backyard concrete paver patio remodel with no cover
Inspiration for a large coastal backyard concrete paver patio remodel with no cover
 Tile Doctor Ltd
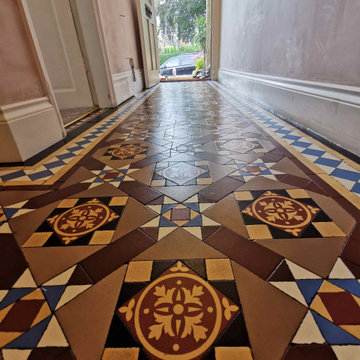
A young couple recently bought a house in Barnsley and were renovating it from top to bottom, included in the plan was the desire to have the previously unloved Victorian floor made beautiful again. The house stands in an area of Barnsley famous for its’ big Victorian villas and quite rightly they felt it was important to ensure period features like this original floor were correctly maintained.
Due to the floor being covered up for many years the floor had developed damp staining, it also had a lot of paint splattered on it. There were also some loose tiles that needed fixing back in place and the layer of old floor polish was present which would need removing.
I started by protecting all the skirting boards, doors and carpets bordering the tiles from splashing. The loose tiles were then cleaned up and then secured back in place using a fast-setting adhesive.
Once the adhesive was set, I turned my attention to stripping and cleaning the floor starting with the application of a coarse 200-grit diamond pad fitted to a weighted rotary buffing machine. The pad was lubricated using a dilution of Tile Doctor Remove & Go which was applied to small sections of the floor and left to soak in for ten minutes first. I run the buffing machine at a slow speed to minimise splashing. Remove & Go is amazing at removing old floor coatings (i.e. sealers), dirt and grime from the floor. When the diamond pad had been used on each section of the floor for five minutes the slurry was vacuumed up using a wet vac machine and I moved onto the next section. Once the whole floor had been cleaned in this way it was time to start the next step.
Old floors like this which don’t have the benefit of a damp proof membrane, and have been covered up for a long time, can suffer from efflorescence issues due to moisture being trapped in the tile. This will result in white salt staining appearing on the tiles for days, weeks and sometimes months afterwards. To counter this the alkaline salts are neutralised by giving the floor an acid rinse using Tile Doctor Acid Gel and leaving it to dwell for five minutes before going over the floor again with the coarse diamond pad. The slurry was again removed with a wet vacuum and the floor was scrubbed clean with damp cloths.
I returned a few days later once the floor had dried to seal the floor. The client wanted a satin finish so knowing the floor had damp and efflorescence issues I opted for Tile Doctor Seal and Go Extra. This is a topical sealer which leaves a lovely satin finish but also allows for the floor to breathe. six coats were required to make the floor look perfect, allowing the lovely colours to come through.
Once complete the floor looked much brighter and the colours really shone through. The owners were really happy with the renovation we carried out and before leaving I took time to discuss how best to maintain the tiles going forward including the use of Neutral Tile cleaner.
Matthew Lovett
South Yorkshire Tile Doctor


Sponsored
Delaware, OH
Buckeye Basements, Inc.
Central Ohio's Basement Finishing ExpertsBest Of Houzz '13-'21

 First State Building & Design
We expanded an existing deck with new stairs, railing, decking, deck board design, lighting, complete with all post and beam wraps. All decking you see is Zuri decking with Timbertech Rail Systems. We installed riser lights up the stairs with post caps on top of all posts.
 Tile Doctor Ltd
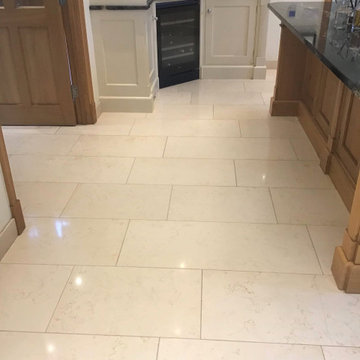
These photos are of a four-year-old Limestone kitchen floor at a property in Boughton that the customer was finding hard to keep clean and maintain a shine. Part of the problem was he owned two dogs and we often warn about the problems of dog urine on sealed tile and stone due to it being high in nitrogen.
On my initial visit I was able to ascertain that the sealer had almost completely worn off, leaving the stone vulnerable to dirt becoming ingrained into the pores of the stone. I come across this problem a lot, in my experience when stone floors are installed by tilers, they generally apply a single coat of sealant which wears off over time, and as discussed earlier can be prematurely degraded by strong chemicals.
My quote to renovate the Limestone floor was accepted and included a deep clean to the stone and grout, stone polish and then re-seal.
I arrived on site on the arranged date and began by scrubbing all the grout lines with Tile Doctor grout brushes and a 3:1 dilution of Tile Doctor Pro-Clean. I then moved on to a small handheld polishing machine to clean around the tile edges using 800 and 1500 grit diamond encrusted burnishing pad to achieve a deep clean.
The process was then repeated throughout the rest of the area using larger 17” burnishing pads fitted to a floor polishing machine. The burnishing pads I used come in a set of four starting with 400-grit and moving up to 800, 1500 and 3000 grit, after each pad is applied the floor is rinsed with water and the soil extracted with a wet vacuum.
It took me much of the day to complete this stage of the renovation and the floor was still damp so once done I left for the day, allowing the floor to dry off overnight.
I returned the following day to complete the final polish using the 3000-grit burnishing pad, this gave a high polished finish which the customer had requested. This last pad is applied dry with only a little water splashed onto the tile, a process we call a spray burnish.
The floor was then sealed with three applications of Tile Doctor Ultra Seal Sealant to protect the newly restored and polished tiles. Ultra-Seal is a penetrating sealer that soaks into those recently cleaned pores in the stone, occupying the space and preventing any dirt from becoming ingrained there. It’s also a natural look sealer so it doesn’t change the colour of the stone in anyway and is almost indetectable once applied.
“Hard work from Philip has left us with a kitchen floor brought back to life – cleaned and sealed in little over 24 hours – brilliant job – Thanks”
Before leaving I gave the customer some tips on maintenance and a complimentary bottle of Tile Doctor Stone Soap to enable him to keep the floor looking its best, this product works well with the sealant we applied and is PH neutral so won’t degrade the new sealer.
Phil Vissian
Northamptonshire Tile Doctor
 3rd Street Inn
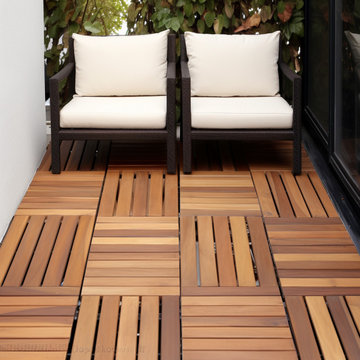
★ 3RD STREET INN® DECK TILES - 3rd Street Inn® Deck Tiles are made from 100% solid acacia hardwood. Acacia is known for its excellent resistance to rot and decay from outdoor elements including rain, sun, mold, mildew, and insects. Each 3rd Street Inn® Interlocking Patio Tile provides 12"x12" (1 Square Foot) of coverage and is available as a 6-pack (6 Square Feet), 10-pack (10 Square Feet), and 20-pack (20 Square Feet).
★ EASY INSTALLATION & NO HARDWARE NEEDED - 3RD STREET INN® interlocking deck flooring features snap-lock connectors for easy DIY installation without the use of tools or hardware. Install our interlocking deck cover tiles in your area by lining them up and then stepping on the seams until you hear an audible "click" to lock them in. All 3rd Street Inn® deck flooring options are made completely hardware free so that there aren't any components to rust and break down in the outdoor elements like other inferior tile patio decking
★ INDOOR AND OUTDOOR DECK FLOORING - 3rd Street Inn® Patio Tiles create a beautiful space both inside and outside. All that is needed is a solid surface and the deck flooring can be laid directly on top of it. Our composite deck tiles can be installed on top of concrete, wood, carpet, pavers, or any other solid surface. Great for decks, patios, balconies, around pools, saunas, showers, sun rooms, mud rooms, bedrooms, and more.
★ DURABLE BEAUTY - 3rd Street Inn® interlocking composite deck tiles are sanded and oiled for a beautiful, scratch resistant finish. All 3rd Street Inn® outdoor patio flooring is non-slip and great for high or low traffic areas inside or outside of the home. To increase the lifespan of your tile decking when used for outdoor applications, standard decking care is recommended. For best results, coat your decking with a UV-rated weatherproofing sealer twice a year and re-stain as needed. The tile decking can also be painted different colors in order to create the look that you want!
★ VERSATILE INSTALLATION OPTIONS- 3rd Street Inn® Interlocking Flooring Tiles not only look great in permanent installations on decks, patios, and around pools, they also offer a great temporary solution for installations in apartments and condos that can easily be removed when needed. For a custom fit, the interlocking patio tiles can be easily cut with a skill saw or jigsaw to accommodate areas of all shapes and sizes. Add 3rd Street Inn® Wooden Deck Flooring to your home and bring your space to life!
We recommend using a UV rated weatherproof sealant twice yearly. This sealant is a crucial step in the life of the decking tiles and can extend the life of the decking tiles, in some cases, pending the climate, by 1 to 2 years.
The life of a decking tile is heavily dependent on the climate of where they are located. Hot, humid climates, rainy climates, and cold, snowy climates can cause the decking tiles to deteriorate faster than using them in a climate controlled environment, like inside of a house or indoor venue.
43