
Search results for "Assessed" in Home Design Ideas
 ARDO Contracting, Inc.
(C) Alain Jaramillo
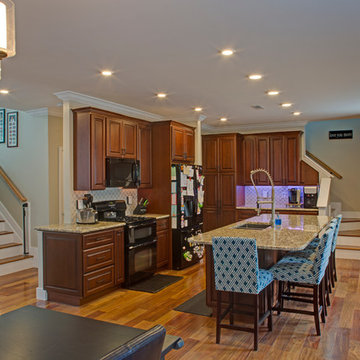
Inspiration for a large transitional l-shaped light wood floor eat-in kitchen remodel in Baltimore with an undermount sink, raised-panel cabinets, medium tone wood cabinets, granite countertops, beige backsplash, ceramic backsplash, black appliances and an island
Inspiration for a large transitional l-shaped light wood floor eat-in kitchen remodel in Baltimore with an undermount sink, raised-panel cabinets, medium tone wood cabinets, granite countertops, beige backsplash, ceramic backsplash, black appliances and an island
 Kathleen Jennison
An Arts & Crafts Bungalow is one of my favorite styles of homes. We have quite a few of them in our Stockton Mid-Town area. And when C&L called us to help them remodel their 1923 American Bungalow, I was beyond thrilled.
As per usual, when we get a new inquiry, we quickly Google the project location while we are talking to you on the phone. My excitement escalated when I saw the Google Earth Image of the sweet Sage Green bungalow in Mid-Town Stockton. "Yes, we would be interested in working with you," I said trying to keep my cool.
But what made it even better was meeting C&L and touring their home, because they are the nicest young couple, eager to make their home period perfect. Unfortunately, it had been slightly molested by some bad house-flippers, and we needed to bring the bathroom back to it "roots."
We knew we had to banish the hideous brown tile and cheap vanity quickly. But C&L complained about the condensation problems and the constant fight with mold. This immediately told me that improper remodeling had occurred and we needed to remedy that right away.
The Before: Frustrations with a Botched Remodel
The bathroom needed to be brought back to period appropriate design with all the functionality of a modern bathroom. We thought of things like marble countertop, white mosaic floor tiles, white subway tile, board and batten molding, and of course a fabulous wallpaper.
This small (and only) bathroom on a tight budget required a little bit of design sleuthing to figure out how we could get the proper look and feel. Our goal was to determine where to splurge and where to economize and how to complete the remodel as quickly as possible because C&L would have to move out while construction was going on.
The Process: Hard Work to Remedy Design and Function
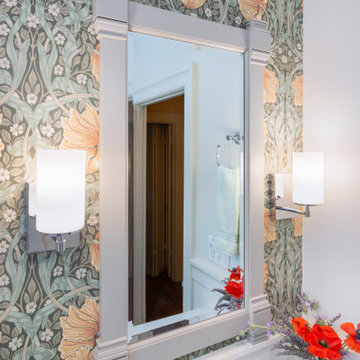
During our initial design study, (which included 2 hours in the owners’ home), we noticed framed images of William Morris Arts and Crafts textile patterns and knew this would be our design inspiration. We presented C&L with three options and they quickly selected the Pimpernel Design Concept.
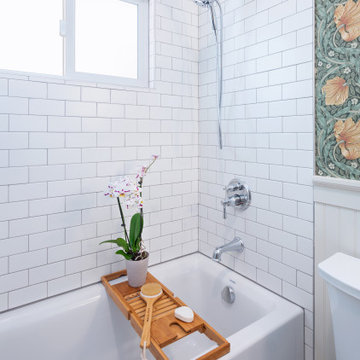
We had originally selected the Black and Olive colors with a black vanity, mirror, and black and white floor tile. C&L liked it but weren’t quite sure about the black, We went back to the drawing board and decided the William & Co Pimpernel Wallpaper in Bayleaf and Manilla color with a softer gray painted vanity and mirror and white floor tile was more to their liking.
After the Design Concept was approved, we went to work securing the building permit, procuring all the elements, and scheduling our trusted tradesmen to perform the work.
We did uncover some shoddy work by the flippers such as live electrical wires hidden behind the wall, plumbing venting cut-off and buried in the walls (hence the constant dampness), the tub barely balancing on two fence boards across the floor joist, and no insulation on the exterior wall.
All of the previous blunders were fixed and the bathroom put back to its previous glory. We could feel the house thanking us for making it pretty again.
The After Reveal: Cohesive Design Decisions
We selected a simple white subway tile for the tub/shower. This is always classic and in keeping with the style of the house.
We selected a pre-fab vanity and mirror, but they look rich with the quartz countertop. There is much more storage in this small vanity than you would think.
The Transformation: A Period Perfect Refresh
We began the remodel just as the pandemic reared and stay-in-place orders went into effect. As C&L were already moved out and living with relatives, we got the go-ahead from city officials to get the work done (after all, how can you shelter in place without a bathroom?).
All our tradesmen were scheduled to work so that only one crew was on the job site at a time. We stayed on the original schedule with only a one week delay.
The end result is the sweetest little bathroom I've ever seen (and I can't wait to start work on C&L's kitchen next).
Thank you for joining me in this project transformation. I hope this inspired you to think about being creative with your design projects, determining what works best in keeping with the architecture of your space, and carefully assessing how you can have the best life in your home.
 OVOLO Interiors
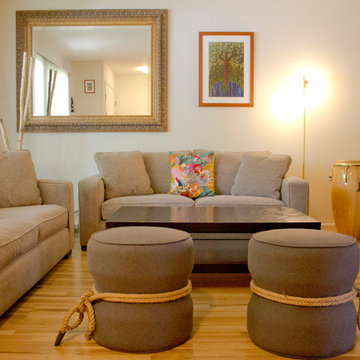
The living room shows off the owner's love of music and some of the eclectic art pieces. This project involved Redecorating and Styling in a San Jose condo to bring together an eclectic mix of furniture, art, and accessories into a cohesive whole. This involved editing the pieces down as needed, purchasing new accessories as needed, and making it a stylish, yet comfortable, home overall.
Find the right local pro for your project

 Alair Homes Plano
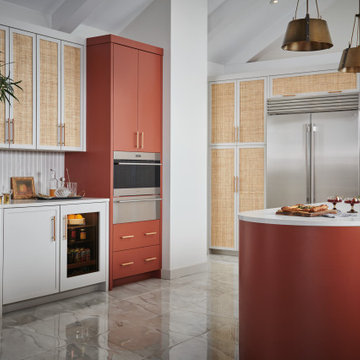
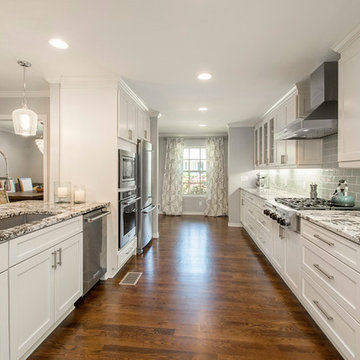
This 1965 home had a cut off layout. We opened up the heart of this home and created an open kitchen/living and dining area where these homeowners can entertain and enjoy comfortably. The sleek updated kitchen and vast storage combined with enhanced lighting and beautiful hardwoods has this remodel looking stunning. Design by Hatfield Builders & Remodelers | Photography by Versatile Imaging
 Housetrends Magazine
Since moving into her Dublin home two and a half years ago, Nancy Sanford has been peeling off the decades—quite literally. Built in the 1980s, the home was “very well-maintained, but very little had been done to it” in terms of updating the finishes or style, Sanford says. Plush white carpet ran from wall-to-wall-to-wall, almond-colored laminate coated the kitchen cabinets and wallpaper ran rampant—even covering some ceilings.
Despite her efforts, Sanford knew it was going to take more than cosmetic editing to shake the ‘80s and make the home her own. Although she lives in the traditional-leaning Muirfield community, Sanford adores a minimalist, contemporary style—and admits to devouring design magazines “ad nauseam.”
To implement her thoroughly modern vision, Sanford turned to Brigid Norton, an interior designer and family friend, and Kristi Youles, a kitchen designer with The JAE Company. Working together, the trio created a carefully considered contemporary design that’s easy on the eyes, and the body.
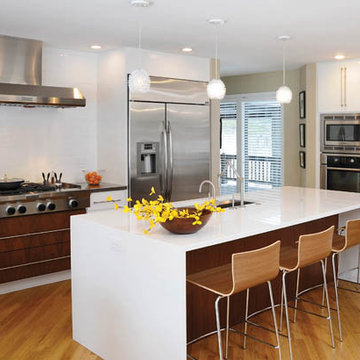
In addition to improving the flow of the kitchen—by removing a V-shaped peninsula that angled out into the room—and adding appliances like a stainless steel refrigerator, Sanford’s short list of must-haves included clean, uncluttered lines and no wall cabinets over the countertops. “I’ve found as I’ve aged, I’ve gotten shorter and just don’t use the upper cabinets,” Sanford explains.
Easy-access, smooth-slide drawers with clean slab fronts were the answer—resulting in strong visual lines, an open, airy feel and enhanced ergonomics. Starting with a “needs assessment,” Youles and Norton designed the space quite literally around Nancy. By looking at factors such as her height and which items she uses most frequently, they were able to determine the optimum placement for everything from canned goods in the pantry to cutlery, pans and plates in the customized drawers, all of which helped to achieve the ultimate kitchen organization.
But there’s more to the kitchen cabinets smooth façade than clean-lined storage. Walnut drawer fronts—found on the oven and the base of the island—are book-matched, allowing the grain to continue from drawer to drawer. And even in spaces where drawers weren’t feasible, beneath the sink and in a desk area, the designers continued the look with cabinet doors crafted to resemble drawers.
The visual continuity of these lines might not be as impactful if it weren’t for the careful selection of contrasting finishes. The designers filled the space with pure, glossy white—using a specific type of quartz, White Cliff by Cambria, to accent the bold rectangular design of the island. Then, to break up the expanse of accompanying white painted drawers, walnut was selected to bring the contrasting warmth and grain of wood without red undertones. It is commonly found in modern furniture design, as well as current productions of mid-century designs like the iconic Eames Lounge Chair from Herman Miller, Youles says.



 Kathleen Jennison
An Arts & Crafts Bungalow is one of my favorite styles of homes. We have quite a few of them in our Stockton Mid-Town area. And when C&L called us to help them remodel their 1923 American Bungalow, I was beyond thrilled.
As per usual, when we get a new inquiry, we quickly Google the project location while we are talking to you on the phone. My excitement escalated when I saw the Google Earth Image of the sweet Sage Green bungalow in Mid-Town Stockton. "Yes, we would be interested in working with you," I said trying to keep my cool.
But what made it even better was meeting C&L and touring their home, because they are the nicest young couple, eager to make their home period perfect. Unfortunately, it had been slightly molested by some bad house-flippers, and we needed to bring the bathroom back to it "roots."
We knew we had to banish the hideous brown tile and cheap vanity quickly. But C&L complained about the condensation problems and the constant fight with mold. This immediately told me that improper remodeling had occurred and we needed to remedy that right away.
The Before: Frustrations with a Botched Remodel
The bathroom needed to be brought back to period appropriate design with all the functionality of a modern bathroom. We thought of things like marble countertop, white mosaic floor tiles, white subway tile, board and batten molding, and of course a fabulous wallpaper.
This small (and only) bathroom on a tight budget required a little bit of design sleuthing to figure out how we could get the proper look and feel. Our goal was to determine where to splurge and where to economize and how to complete the remodel as quickly as possible because C&L would have to move out while construction was going on.
The Process: Hard Work to Remedy Design and Function
During our initial design study, (which included 2 hours in the owners’ home), we noticed framed images of William Morris Arts and Crafts textile patterns and knew this would be our design inspiration. We presented C&L with three options and they quickly selected the Pimpernel Design Concept.
We had originally selected the Black and Olive colors with a black vanity, mirror, and black and white floor tile. C&L liked it but weren’t quite sure about the black, We went back to the drawing board and decided the William & Co Pimpernel Wallpaper in Bayleaf and Manilla color with a softer gray painted vanity and mirror and white floor tile was more to their liking.
After the Design Concept was approved, we went to work securing the building permit, procuring all the elements, and scheduling our trusted tradesmen to perform the work.
We did uncover some shoddy work by the flippers such as live electrical wires hidden behind the wall, plumbing venting cut-off and buried in the walls (hence the constant dampness), the tub barely balancing on two fence boards across the floor joist, and no insulation on the exterior wall.
All of the previous blunders were fixed and the bathroom put back to its previous glory. We could feel the house thanking us for making it pretty again.
The After Reveal: Cohesive Design Decisions
We selected a simple white subway tile for the tub/shower. This is always classic and in keeping with the style of the house.
We selected a pre-fab vanity and mirror, but they look rich with the quartz countertop. There is much more storage in this small vanity than you would think.
The Transformation: A Period Perfect Refresh
We began the remodel just as the pandemic reared and stay-in-place orders went into effect. As C&L were already moved out and living with relatives, we got the go-ahead from city officials to get the work done (after all, how can you shelter in place without a bathroom?).
All our tradesmen were scheduled to work so that only one crew was on the job site at a time. We stayed on the original schedule with only a one week delay.
The end result is the sweetest little bathroom I've ever seen (and I can't wait to start work on C&L's kitchen next).
Thank you for joining me in this project transformation. I hope this inspired you to think about being creative with your design projects, determining what works best in keeping with the architecture of your space, and carefully assessing how you can have the best life in your home.
 Hitech CADD Services
Industry: Building Design and Construction
Location: USA
The Objective
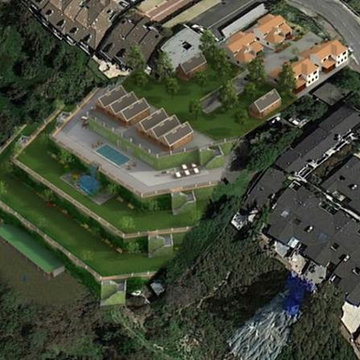
Develop a 3D model for retaining wall design plan meant to block the flood water from a nearby river
The Solution
Several elements as specified by client were incorporated to design a retaining wall and a detailed 3D model was developed.
Technology/Software Used
3Ds Max
An environmental consultant had to assess a site and provide a plan to the client for retaining wall design meant to block the flood water from a nearby river from entering the site. Some old hand drawn sketches of a retaining wall structure and a PPT with landscaping plans, was all that was provided. Improvising the basic design and preparing a well rendered 3D model, to facilitate the consultant to give final presentation of the design to the client, was the task.
Challenges
1. Client expected a design improvement based on a landscape PPT & some handmade designs developed in 2008.
2. Files were without any exact dimensions or additional inputs from the client
3. No plans, elevations and CAD files were given to support the team for further design revisions and 3D modeling
4. Client’s verbal explanations were to be used as a base to analyze and understand the requirements.
5. Numerous brainstorming sessions, repeated iterations and approvals.
6. Client was accessible only through email and conference call
Engineering Solution
Retaining the wall to stop flood water from a nearby river entering the area filling it with debris
1. Hi-Tech team deftly handled the communication, approvals and design development process.
2. Built a retaining wall to extend the useful area towards the flood plain of the river.
3. Retaining wall was designed as a 3 stepped structure with property (7 – 8 homes and a swimming pool) at the top.
4. Terraces with trees and shrubs were included. This design feature made the entire wall look like a natural retaining boulder covered with greenery.
5. Narrow walkways and stairs that led to the terrace were incorporated in the design
6. Subterranean garage under the flat ground surface of the property was also included as a part of the design
Benefits
1. In a short span of one month, the team managed to develop a fully fledged design and plan for the retention wall.
2. Vacant space was effectively utilized; the stepped wall not only stooped the flood water from entering the client’s property, but also created space for 7-8 homes.
3. The designed structure looked very much a part of the natural terrain, and in fact added to the beauty of the surround

 DryHero Water & Mold
Why DryHero Water & Mold for Lincoln Water Damage Restoration?
If you have water damage in Lincoln Nebraska, there is no better flood restoration company for prompt professional service. Water damage restoration isn’t some add-on service at DryHero, it’s our only business! When water damages your property, you don’t get a second chance to prevent mold growth.
We are experienced, knowledgeable and decisive in how to mitigate your water and mold damage…the first time. Nationally trained, certified and based right here in Lincoln, Nebraska, DryHero delivers expertly skilled service with good old-fashioned Nebraska value.
When you’re standing in water, you don’t want a roofing, carpet cleaning or drain cleaning contractor dabbling in flood restoration and learning on-the-job experience on your house (and literally at your expense). Seriously, the batteries in our moisture meters have been around longer than some water damage restoration companies in Lincoln. Call DryHero, the people that even water damage restoration companies call for advice. DryHero, water and mold simply don’t stand a chance!
A water damage event to your property is disruptive and stressful. Can you handle it yourself or are you concerned about hidden structure damage or mold growth? To be candid, only very small water damage incidents can be handled without professional water damage restoration professionals.
DryHero Water & Mold of Lincoln will provide you with expert water damage and mold remediation information and evaluation. From your attic down to your foundation, we will provide you with a free restoration and repair estimate so you can get your household and family back to normal as quickly as possible.
We’ll provide you with a free, honest assessment of your property damage and share any possible risks or potential hazards that may be associated. Oh, we'll even let you know if you don't require professional service. We will document your damage and help navigate the insurance claims process. After all, that’s what we would want in a hero.
 Masaya Homes
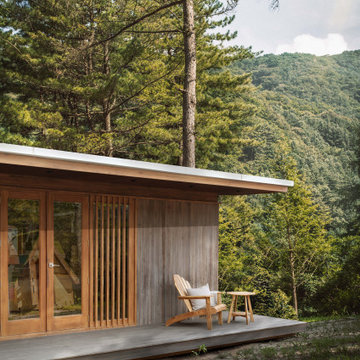
The Portland 560 Prefabricated ADU (Accessory Dwelling Unit) is an efficiently designed modern 1 bedroom/1 bathroom home built completely out of teak grown on deforested cattle lands through reforestation efforts.
The structure, floors, exterior cladding, interior walls, ceilings, doors, millwork, and cabinetry are all made out of sustainably grown teak. You are capturing carbon and reducing your footprint while gaining rental income and increasing the value of your property.
 Levite Construction Co
?✨ Transforming Dreams: From Damage to Elegance in Capitol Hill, Seattle ✨?
At Levite Construction, we believe in turning challenges into opportunities, and that's exactly what we did with this stunning project in Capitol Hill, Seattle, WA. Witness the incredible journey of restoring a beautiful town house that fell victim to water damage, as we share with you the remarkable transformation that showcases our expertise, dedication, and unwavering commitment to excellence.
? Repairing the Aftermath? The story began with a distress call, a plea for help from a water-damaged home in Capitol Hill. Our skilled team swiftly sprang into action, assessing the damage and devising a comprehensive plan for restoration. From minor repairs to major overhauls, we left no stone unturned in bringing this residence back to life.
? A Vision Takes Shape ?
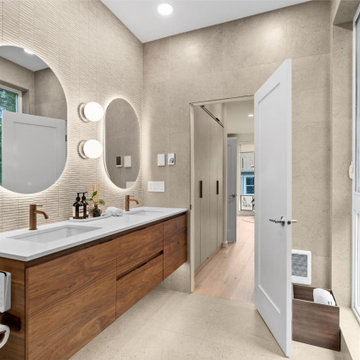
Our creative design team envisioned a space that not only corrected the damage but also elevated the aesthetic to new heights. The challenge was accepted – to create a spa-like haven that exudes luxury and tranquility while maintaining a smart and functional layout.
? A Tranquil Retreat - Smart Bathroom Remodeling ?
Step into our world of ingenuity as you explore the images of the spa-inspired bathrooms. Every detail has been meticulously curated to evoke a sense of serenity. From innovative fixtures to thoughtfully chosen color palettes, this space is a testament to our dedication to crafting exceptional experiences.
? Every Inch Transformed?
Witness the metamorphosis as our skilled team undertook tasks that spanned the spectrum of construction artistry. Admire the seamless new floor installation, where every step taken is now on a canvas of elegance. The rich tapestry of paintwork dances in harmony with carefully crafted cabinetry, breathing life into this once-damaged dwelling.
?♂️ Expertise in Action ?♂️
Our project managers played a pivotal role in orchestrating this symphony of construction. Their meticulous planning, relentless dedication, and unwavering attention to detail ensured that every aspect of this project was executed flawlessly.
? Result: Elegance Redefined ?
As you scroll through the images, you'll witness the culmination of our endeavors – a home that has been resurrected from the ruins and reimagined with elegance. Levite Construction's commitment to quality, innovation, and customer satisfaction shines through every corner of this remodel.
? Capture the Journey?
Explore the photo gallery capturing the transition from devastation to breathtaking beauty. Every image is a testament to the passion and craftsmanship that define Levite Construction.
Thank you for joining us on this remarkable journey from adversity to triumph. We're proud to have turned a challenge into an opportunity and to have brought a smile back to this Capitol Hill home.
At Levite Construction, we don't just build structures; we build dreams.
#LeviteConstruction #FromDamageToElegance #CapitolHillRestoration #CraftingDreamHomes
 Housetrends Magazine
Since moving into her Dublin home two and a half years ago, Nancy Sanford has been peeling off the decades—quite literally. Built in the 1980s, the home was “very well-maintained, but very little had been done to it” in terms of updating the finishes or style, Sanford says. Plush white carpet ran from wall-to-wall-to-wall, almond-colored laminate coated the kitchen cabinets and wallpaper ran rampant—even covering some ceilings.
Despite her efforts, Sanford knew it was going to take more than cosmetic editing to shake the ‘80s and make the home her own. Although she lives in the traditional-leaning Muirfield community, Sanford adores a minimalist, contemporary style—and admits to devouring design magazines “ad nauseam.”
To implement her thoroughly modern vision, Sanford turned to Brigid Norton, an interior designer and family friend, and Kristi Youles, a kitchen designer with The JAE Company. Working together, the trio created a carefully considered contemporary design that’s easy on the eyes, and the body.
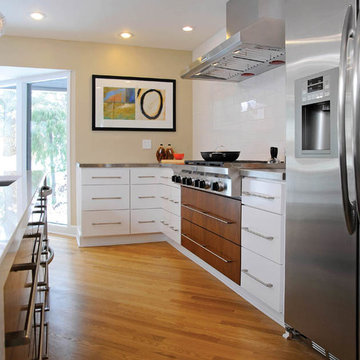
In addition to improving the flow of the kitchen—by removing a V-shaped peninsula that angled out into the room—and adding appliances like a stainless steel refrigerator, Sanford’s short list of must-haves included clean, uncluttered lines and no wall cabinets over the countertops. “I’ve found as I’ve aged, I’ve gotten shorter and just don’t use the upper cabinets,” Sanford explains.
Easy-access, smooth-slide drawers with clean slab fronts were the answer—resulting in strong visual lines, an open, airy feel and enhanced ergonomics. Starting with a “needs assessment,” Youles and Norton designed the space quite literally around Nancy. By looking at factors such as her height and which items she uses most frequently, they were able to determine the optimum placement for everything from canned goods in the pantry to cutlery, pans and plates in the customized drawers, all of which helped to achieve the ultimate kitchen organization.
But there’s more to the kitchen cabinets smooth façade than clean-lined storage. Walnut drawer fronts—found on the oven and the base of the island—are book-matched, allowing the grain to continue from drawer to drawer. And even in spaces where drawers weren’t feasible, beneath the sink and in a desk area, the designers continued the look with cabinet doors crafted to resemble drawers.
The visual continuity of these lines might not be as impactful if it weren’t for the careful selection of contrasting finishes. The designers filled the space with pure, glossy white—using a specific type of quartz, White Cliff by Cambria, to accent the bold rectangular design of the island. Then, to break up the expanse of accompanying white painted drawers, walnut was selected to bring the contrasting warmth and grain of wood without red undertones. It is commonly found in modern furniture design, as well as current productions of mid-century designs like the iconic Eames Lounge Chair from Herman Miller, Youles says.

 Talon Construction Inc.
Designing and building a kitchen addition is a complex process that involves multiple steps and considerations. Here is a general outline to help you get started on your kitchen addition project:
Define Your Goals and Budget:
• Determine the purpose of the kitchen addition. Is it for more cooking space, a dining area, or a combination of both?
• Establish a realistic budget for your project. Consider all costs, including construction, permits, materials, and furnishings.
Hire a Design Professional:
• Seek the services of a design build company who specializes in kitchen additions.
• Discuss your vision, needs, and budget with the design professional to create a design concept.
Site Evaluation:
• Assess the existing space and structural condition of your home to ensure it can support the addition.
• Consider factors like zoning regulations, setbacks, and building codes.
Design Development:
• Collaborate with your design professional to refine the concept, including the layout, size, and architectural style.
• Choose materials, finishes, and fixtures that fit your design and budget.
Obtain Permits:
• Consult with your local design build contractor to determine the necessary permits and approvals.
• Prepare and submit all required documents, including architectural drawings and engineering plans.
Create Construction Documents:
• Work with your design build professional to develop detailed construction drawings and specifications.
• These documents will serve as a guide for contractors during construction.
Hire a design build contractor:
• Check references, credentials, and licenses before selecting a contractor.
• Sign a detailed contract that outlines the scope of work, timeline, and payment schedule.
Construction Phase:
• Demolition: If needed, remove any existing structures or walls.
• Foundation: Construct the foundation for the addition.
• Framing: Build the structural framework of the addition.
• Plumbing, Electrical, and HVAC: Install or update utilities as required.
• Insulation: Ensure proper insulation for energy efficiency.
• Drywall and Finish Work: Complete the walls and ceilings.
• Flooring and Cabinetry: Install flooring and kitchen cabinets.
• Appliances and Fixtures: Add appliances, plumbing fixtures, and lighting.
• Paint and Finish: Apply paint and finishes to achieve the desired look.
• Final Inspection: Schedule inspections to ensure compliance with building codes.
Final Inspections and Approvals:
• Arrange for final inspections to ensure the addition meets all safety and code requirements.
• Obtain any necessary certificates of occupancy or compliance.
Move In and Enjoy:
• Once all inspections and approvals are received, you can move into your new kitchen addition and start enjoying it.
Remember that every kitchen addition project is unique, so adapt this outline to your specific needs and circumstances. Consulting with professionals and obtaining the required permits and inspections is crucial to a successful and safe project.
 SUPERIOR CHIMNEY SERVICES CORPORATION
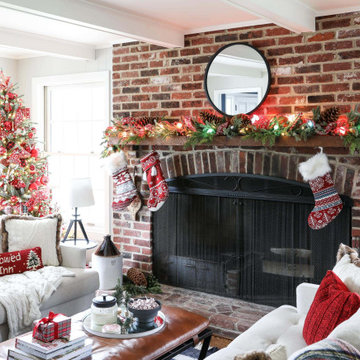
A certified chimney inspection in Illinois is one of the key ‘to-do’s’ for the holidays. The last thing you need are a bunch of complaints because it’s too cold.
There’s a cold draft coming from the fireplace. Or the fire is nice and warm, but the kids playing are starting to cough because there’s a backup of smoke coming into the home. Now you have to open the windows and everyone is cold again. There are enough stresses the host must deal with, do we need to add another one?
What is a Certified Chimney Inspection?
According to the CSIA, a certified chimney inspection is an evaluation of the chimney or venting system to assess its condition and determine if it’s fit for use. Superior Chimney is certified by the CSIA to perform chimney inspections and chimney sweeps as well. What this means for you is that our technicians are trained to adhere to the NFPA 211 standard which states that the chimney and venting systems are to be inspected each year regardless if it’s a woodburning gas or unused fireplace and chimney.
Chimney Inspection Levels
A Level 1 inspection is the minimum required. How do you know this one is for you? A certified chimney inspection is when you have your chimney swept and inspected each year. Nothing has changed, you use it (or don’t use it) any differently than in the past.
A Level 2 inspection is when a change has been made to your system. This can include a change in the type of fuel being used such as changing over from gas to woodburning or from not using the fireplace to using it even if it is only once per year. Another change can also be the change to the shape of the flue or you had a new flue lining installed which is different that what you had prior.
A Level 2 is also necessary if you sold your home or if there’s been a tornado, bad storms or those (once in a few years) earthquakes.
Level 3 inspection is for more serious hazards and issues. The normal technician tools won’t do and they need special tools in order to inspect closed out portions that can’t be viewed easily.
Reason for a Yearly Inspection…
One of the main reason your chimney and fireplace needs an inspection…regardless if you use the fireplace or not…is the winter freeze thaw cycles. This is when the air temperature drops to 32 degrees or below to freeze the rain and/or snow and then goes right back up in temperature for the rain and/or snow to thaw.
As we have all experienced, winter and early spring are the perfect times of year to experience the freeze thaw cycle.
Finally…
Now that you know the stress your chimney and fireplace goes through each year, be sure to get it swept and inspected by a certified chimney technician from Superior Chimney. This will keep the holiday complaints down to a minimum. Contact us today at 877-CHIM-FIX (877-244-6349)
 Levite Construction Co
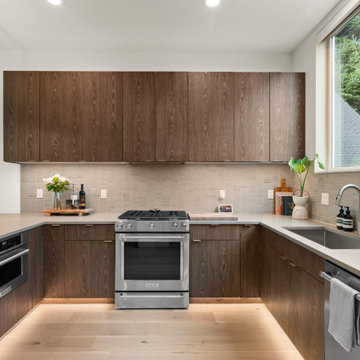
?✨ Transforming Dreams: From Damage to Elegance in Capitol Hill, Seattle ✨?
At Levite Construction, we believe in turning challenges into opportunities, and that's exactly what we did with this stunning project in Capitol Hill, Seattle, WA. Witness the incredible journey of restoring a beautiful town house that fell victim to water damage, as we share with you the remarkable transformation that showcases our expertise, dedication, and unwavering commitment to excellence.
? Repairing the Aftermath? The story began with a distress call, a plea for help from a water-damaged home in Capitol Hill. Our skilled team swiftly sprang into action, assessing the damage and devising a comprehensive plan for restoration. From minor repairs to major overhauls, we left no stone unturned in bringing this residence back to life.
? A Vision Takes Shape ?
Our creative design team envisioned a space that not only corrected the damage but also elevated the aesthetic to new heights. The challenge was accepted – to create a spa-like haven that exudes luxury and tranquility while maintaining a smart and functional layout.
? A Tranquil Retreat - Smart Bathroom Remodeling ?
Step into our world of ingenuity as you explore the images of the spa-inspired bathrooms. Every detail has been meticulously curated to evoke a sense of serenity. From innovative fixtures to thoughtfully chosen color palettes, this space is a testament to our dedication to crafting exceptional experiences.
? Every Inch Transformed?
Witness the metamorphosis as our skilled team undertook tasks that spanned the spectrum of construction artistry. Admire the seamless new floor installation, where every step taken is now on a canvas of elegance. The rich tapestry of paintwork dances in harmony with carefully crafted cabinetry, breathing life into this once-damaged dwelling.
?♂️ Expertise in Action ?♂️
Our project managers played a pivotal role in orchestrating this symphony of construction. Their meticulous planning, relentless dedication, and unwavering attention to detail ensured that every aspect of this project was executed flawlessly.
? Result: Elegance Redefined ?
As you scroll through the images, you'll witness the culmination of our endeavors – a home that has been resurrected from the ruins and reimagined with elegance. Levite Construction's commitment to quality, innovation, and customer satisfaction shines through every corner of this remodel.
? Capture the Journey?
Explore the photo gallery capturing the transition from devastation to breathtaking beauty. Every image is a testament to the passion and craftsmanship that define Levite Construction.
Thank you for joining us on this remarkable journey from adversity to triumph. We're proud to have turned a challenge into an opportunity and to have brought a smile back to this Capitol Hill home.
At Levite Construction, we don't just build structures; we build dreams.
#LeviteConstruction #FromDamageToElegance #CapitolHillRestoration #CraftingDreamHomes
 Talon Construction Inc.
Designing and building a kitchen addition is a complex process that involves multiple steps and considerations. Here is a general outline to help you get started on your kitchen addition project:
Define Your Goals and Budget:
• Determine the purpose of the kitchen addition. Is it for more cooking space, a dining area, or a combination of both?
• Establish a realistic budget for your project. Consider all costs, including construction, permits, materials, and furnishings.
Hire a Design Professional:
• Seek the services of a design build company who specializes in kitchen additions.
• Discuss your vision, needs, and budget with the design professional to create a design concept.
Site Evaluation:
• Assess the existing space and structural condition of your home to ensure it can support the addition.
• Consider factors like zoning regulations, setbacks, and building codes.
Design Development:
• Collaborate with your design professional to refine the concept, including the layout, size, and architectural style.
• Choose materials, finishes, and fixtures that fit your design and budget.
Obtain Permits:
• Consult with your local design build contractor to determine the necessary permits and approvals.
• Prepare and submit all required documents, including architectural drawings and engineering plans.
Create Construction Documents:
• Work with your design build professional to develop detailed construction drawings and specifications.
• These documents will serve as a guide for contractors during construction.
Hire a design build contractor:
• Check references, credentials, and licenses before selecting a contractor.
• Sign a detailed contract that outlines the scope of work, timeline, and payment schedule.
Construction Phase:
• Demolition: If needed, remove any existing structures or walls.
• Foundation: Construct the foundation for the addition.
• Framing: Build the structural framework of the addition.
• Plumbing, Electrical, and HVAC: Install or update utilities as required.
• Insulation: Ensure proper insulation for energy efficiency.
• Drywall and Finish Work: Complete the walls and ceilings.
• Flooring and Cabinetry: Install flooring and kitchen cabinets.
• Appliances and Fixtures: Add appliances, plumbing fixtures, and lighting.
• Paint and Finish: Apply paint and finishes to achieve the desired look.
• Final Inspection: Schedule inspections to ensure compliance with building codes.
Final Inspections and Approvals:
• Arrange for final inspections to ensure the addition meets all safety and code requirements.
• Obtain any necessary certificates of occupancy or compliance.
Move In and Enjoy:
• Once all inspections and approvals are received, you can move into your new kitchen addition and start enjoying it.
Remember that every kitchen addition project is unique, so adapt this outline to your specific needs and circumstances. Consulting with professionals and obtaining the required permits and inspections is crucial to a successful and safe project.
 Levite Construction Co
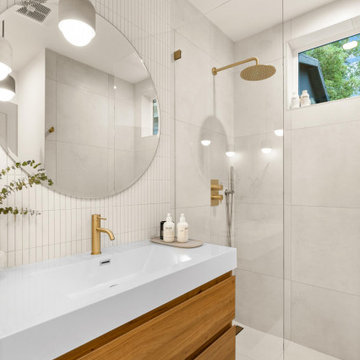
?✨ Transforming Dreams: From Damage to Elegance in Capitol Hill, Seattle ✨?
At Levite Construction, we believe in turning challenges into opportunities, and that's exactly what we did with this stunning project in Capitol Hill, Seattle, WA. Witness the incredible journey of restoring a beautiful town house that fell victim to water damage, as we share with you the remarkable transformation that showcases our expertise, dedication, and unwavering commitment to excellence.
? Repairing the Aftermath? The story began with a distress call, a plea for help from a water-damaged home in Capitol Hill. Our skilled team swiftly sprang into action, assessing the damage and devising a comprehensive plan for restoration. From minor repairs to major overhauls, we left no stone unturned in bringing this residence back to life.
? A Vision Takes Shape ?
Our creative design team envisioned a space that not only corrected the damage but also elevated the aesthetic to new heights. The challenge was accepted – to create a spa-like haven that exudes luxury and tranquility while maintaining a smart and functional layout.
? A Tranquil Retreat - Smart Bathroom Remodeling ?
Step into our world of ingenuity as you explore the images of the spa-inspired bathrooms. Every detail has been meticulously curated to evoke a sense of serenity. From innovative fixtures to thoughtfully chosen color palettes, this space is a testament to our dedication to crafting exceptional experiences.
? Every Inch Transformed?
Witness the metamorphosis as our skilled team undertook tasks that spanned the spectrum of construction artistry. Admire the seamless new floor installation, where every step taken is now on a canvas of elegance. The rich tapestry of paintwork dances in harmony with carefully crafted cabinetry, breathing life into this once-damaged dwelling.
?♂️ Expertise in Action ?♂️
Our project managers played a pivotal role in orchestrating this symphony of construction. Their meticulous planning, relentless dedication, and unwavering attention to detail ensured that every aspect of this project was executed flawlessly.
? Result: Elegance Redefined ?
As you scroll through the images, you'll witness the culmination of our endeavors – a home that has been resurrected from the ruins and reimagined with elegance. Levite Construction's commitment to quality, innovation, and customer satisfaction shines through every corner of this remodel.
? Capture the Journey?
Explore the photo gallery capturing the transition from devastation to breathtaking beauty. Every image is a testament to the passion and craftsmanship that define Levite Construction.
Thank you for joining us on this remarkable journey from adversity to triumph. We're proud to have turned a challenge into an opportunity and to have brought a smile back to this Capitol Hill home.
At Levite Construction, we don't just build structures; we build dreams.
#LeviteConstruction #FromDamageToElegance #CapitolHillRestoration #CraftingDreamHomes
 Talon Construction Inc.
Designing and building a kitchen addition is a complex process that involves multiple steps and considerations. Here is a general outline to help you get started on your kitchen addition project:
Define Your Goals and Budget:
• Determine the purpose of the kitchen addition. Is it for more cooking space, a dining area, or a combination of both?
• Establish a realistic budget for your project. Consider all costs, including construction, permits, materials, and furnishings.
Hire a Design Professional:
• Seek the services of a design build company who specializes in kitchen additions.
• Discuss your vision, needs, and budget with the design professional to create a design concept.
Site Evaluation:
• Assess the existing space and structural condition of your home to ensure it can support the addition.
• Consider factors like zoning regulations, setbacks, and building codes.
Design Development:
• Collaborate with your design professional to refine the concept, including the layout, size, and architectural style.
• Choose materials, finishes, and fixtures that fit your design and budget.
Obtain Permits:
• Consult with your local design build contractor to determine the necessary permits and approvals.
• Prepare and submit all required documents, including architectural drawings and engineering plans.
Create Construction Documents:
• Work with your design build professional to develop detailed construction drawings and specifications.
• These documents will serve as a guide for contractors during construction.
Hire a design build contractor:
• Check references, credentials, and licenses before selecting a contractor.
• Sign a detailed contract that outlines the scope of work, timeline, and payment schedule.
Construction Phase:
• Demolition: If needed, remove any existing structures or walls.
• Foundation: Construct the foundation for the addition.
• Framing: Build the structural framework of the addition.
• Plumbing, Electrical, and HVAC: Install or update utilities as required.
• Insulation: Ensure proper insulation for energy efficiency.
• Drywall and Finish Work: Complete the walls and ceilings.
• Flooring and Cabinetry: Install flooring and kitchen cabinets.
• Appliances and Fixtures: Add appliances, plumbing fixtures, and lighting.
• Paint and Finish: Apply paint and finishes to achieve the desired look.
• Final Inspection: Schedule inspections to ensure compliance with building codes.
Final Inspections and Approvals:
• Arrange for final inspections to ensure the addition meets all safety and code requirements.
• Obtain any necessary certificates of occupancy or compliance.
Move In and Enjoy:
• Once all inspections and approvals are received, you can move into your new kitchen addition and start enjoying it.
Remember that every kitchen addition project is unique, so adapt this outline to your specific needs and circumstances. Consulting with professionals and obtaining the required permits and inspections is crucial to a successful and safe project.
57