
Search results for "Assisted dwelling" in Home Design Ideas
 G. Christianson Construction, Inc.
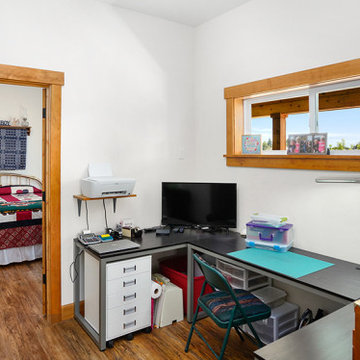
A local Corvallis family contacted G. Christianson Construction looking to build an accessory dwelling unit (commonly known as an ADU) for their parents. The family was seeking a rustic, cabin-like home with one bedroom, a generous closet, a craft room, a living-in-place-friendly bathroom with laundry, and a spacious great room for gathering. This 896-square-foot home is built only a few dozen feet from the main house on this property, making family visits quick and easy. Our designer, Anna Clink, planned the orientation of this home to capture the beautiful farm views to the West and South, with a back door that leads straight from the Kitchen to the main house. A second door exits onto the South-facing covered patio; a private and peaceful space for watching the sunrise or sunset in Corvallis. When standing at the center of the Kitchen island, a quick glance to the West gives a direct view of Mary’s Peak in the distance. The floor plan of this cabin allows for a circular path of travel (no dead-end rooms for a user to turn around in if they are using an assistive walking device). The Kitchen and Great Room lead into a Craft Room, which serves to buffer sound between it and the adjacent Bedroom. Through the Bedroom, one may exit onto the private patio, or continue through the Walk-in-Closet to the Bath & Laundry. The Bath & Laundry, in turn, open back into the Great Room. Wide doorways, clear maneuvering space in the Kitchen and bath, grab bars, and graspable hardware blend into the rustic charm of this new dwelling. Rustic Cherry raised panel cabinetry was used throughout the home, complimented by oiled bronze fixtures and lighting. The clients selected durable and low-maintenance quartz countertops, luxury vinyl plank flooring, porcelain tile, and cultured marble. The entire home is heated and cooled by two ductless mini-split units, and good indoor air quality is achieved with wall-mounted fresh air units.
 G. Christianson Construction, Inc.
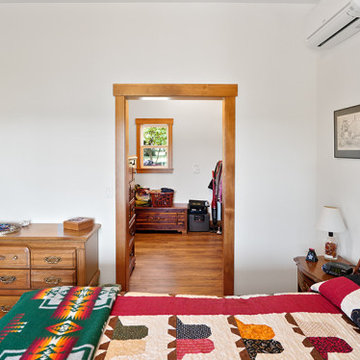
A local Corvallis family contacted G. Christianson Construction looking to build an accessory dwelling unit (commonly known as an ADU) for their parents. The family was seeking a rustic, cabin-like home with one bedroom, a generous closet, a craft room, a living-in-place-friendly bathroom with laundry, and a spacious great room for gathering. This 896-square-foot home is built only a few dozen feet from the main house on this property, making family visits quick and easy. Our designer, Anna Clink, planned the orientation of this home to capture the beautiful farm views to the West and South, with a back door that leads straight from the Kitchen to the main house. A second door exits onto the South-facing covered patio; a private and peaceful space for watching the sunrise or sunset in Corvallis. When standing at the center of the Kitchen island, a quick glance to the West gives a direct view of Mary’s Peak in the distance. The floor plan of this cabin allows for a circular path of travel (no dead-end rooms for a user to turn around in if they are using an assistive walking device). The Kitchen and Great Room lead into a Craft Room, which serves to buffer sound between it and the adjacent Bedroom. Through the Bedroom, one may exit onto the private patio, or continue through the Walk-in-Closet to the Bath & Laundry. The Bath & Laundry, in turn, open back into the Great Room. Wide doorways, clear maneuvering space in the Kitchen and bath, grab bars, and graspable hardware blend into the rustic charm of this new dwelling. Rustic Cherry raised panel cabinetry was used throughout the home, complimented by oiled bronze fixtures and lighting. The clients selected durable and low-maintenance quartz countertops, luxury vinyl plank flooring, porcelain tile, and cultured marble. The entire home is heated and cooled by two ductless mini-split units, and good indoor air quality is achieved with wall-mounted fresh air units.
 Tile Doctor Ltd
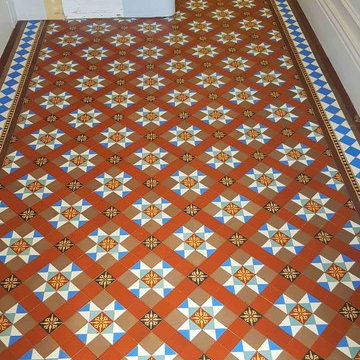
This beautiful Victorian tiled hallway was in desperate need of some TLC. The house had recently changed hands and the new owners of the house were having the entire property renovated. The last part of the renovation plan was to have the Victorian hallway tiles restoring back to their former glory. Floors are always best left until last, especially hallways as last as workmen don’t usually take a lot of care in my experience.
The house was built in the early 1900’s and was situated close to Doncaster town centre a couple of streets away in fact from the famous Doncaster Racecourse which dates to the late 1500’s.
There were a few areas of damage to the floor that would need dealing with first. This is not surprising given the age of the floor which must have seen a lot of comings and goings over the years. Our first task therefore was to repair the damage using replica tiles sourced to be as close a match to the originals as possible. We usually find any slight differences disappear once the floor has been deep cleaned and sealed. Once removing the damaged tile and cleaning the base we use a fast setting adhesive to fix the replacement tiles in place so we can get on with the cleaning as soon as possible.
Once the replacement tiles had set, we unloaded our slow speed rotary floor machine and large wet vacuum which would be used during the cleaning. To start the cleaning the floor was sprayed with Tile Doctor Remove & Go and this was left to dwell on the tiles for twenty minutes. This gives time for the product to break down old floor coatings and grime, this was followed by scrubbing the tiles with a 200-grit diamond pad fitted to the floor machine and assisted with the addition of more water to help lubricate the process. This process generates a lot of slurry as the dirt and old sealers etc are released from the tiles and this is extracted from the surface of the floor using the wet vacuum.
The next step was to give the floor an acid wash using Tile Doctor Acid Gel which is applied to the tiles and left to dwell for fifteen minutes and scrubbed in again with the floor buffer and 200-grit diamond pad. Once done the floor was rinsed with water and then dried using the wet vacuum to extract as much moisture as possible. This last process is designed to counter any alkaline salts that may be present in the floor which may cause efflorescence to appear later. It also removes old mineral deposits and generally get the tiles looking much brighter. Once complete the floor was left to dry off naturally overnight.
I came back the next day to seal the tiles first checking the floor was dry using a moisture meter. Satisfied that the floor was ready for sealing I started to seal the tiles using multiple coats of Tile Doctor Seal and Go Extra which is a fully breathable sealer which is important for old floors like this. Seal and Go Extra also leaves a lovely satin finish which works well on Victorian tiles and brings the floor alive.
This was the last step in this properties renovation, and I think you will agree that the floor responded really well to the restoration process and the colours in the tiles are now very vibrant.
Matthew Lovett
South Yorkshire Tile Doctor
Find the right local pro for your project
 Tile Doctor Ltd
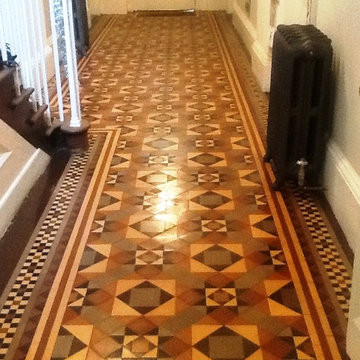
This hallway floor was actually at a house in the town of Stamford which is just over the northern border of Northamptonshire and slightly out of my area; however I was recommended to the owner by another client which is always welcome and a testimonial in itself. I work right across the county so it wasn’t long before I was in the general area and arranged a visit to carry out an inspection of the Victorian Quarry tiled floor and provide a quote for a full restoration.
The owner of the house had just moved in recently and although the floor was in good overall physical, it was in need of a thorough clean and new seal to bring back some life to the tiles. Additionally she was having lots of other building work done to the house and she wanted to retain this as an original feature of the property. My quote was accepted and I was able to book the work in for the following week.
These first photos show how dull the floor looked due to a build-up of builder’s dust and general wear and tear. They also show some of the equipment needed to undertake the following cleaning process.
I used a brush and vacuum to remove as much loose debris and dust from the surface of the floor as possible. I then applied a strong dilution of Tile Doctor Pro Clean to the floor which is a strong alkaline cleaner which can also be used to remove sealers; the solution was left it to dwell for roughly ten minutes before agitating it with scrubbing pads and brushes to remove the muck that was lifted to the surface. This was then wet-vacuumed twice to remove all the slurry and neutralise any chemicals.
As it was such an old property I then used a steamer to heat up the tiles and draw up any contaminants and assist with the drying process. I also chose to install two fans and a dehumidifier to dry the floor even further.
With the cleaning process complete – and achieving a marked difference to the appearance of the floor – I left the tiles to finish drying for 24 hours.
Upon my return to the house, I checked for any excess moisture by running damp tests as this has the potential to affect the performance of the sealer. Once satisfied with the results, I sealed the floor with two coats of Tile Doctor Colour Grow, a colour enhancing sealant which offers both a robust surface seal and an aesthetically pleasing finish.
I also carried out water repellency tests to ensure the sealer was working as expected and the floor had sufficient protection and will be hard-wearing for a hallway which is a high traffic area.
On my client’s return to the house she was very happy with the final results – in fact, she was also in contact about some further work in the New Year!
Phil Vissian
Northamptonshire Tile Doctor
 Tile Doctor Ltd
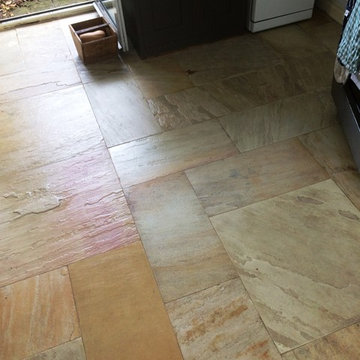
I was recently contacted by a client who had just moved into a house in Crowborough, a town in East Sussex which by the way was once home to Sir Arthur Conan Doyle, the author of the Sherlock Holmes novels and short stories. The riven Slate tiled floor in the kitchen had trapped bits of dirt and also food which had become ingrained in the tile. Needless to say, the new homeowner wanted to give the kitchen floor a thorough clean. However, she had tried every cleaning product she could find in the supermarket, but to no avail. Struggling to find a solution she sought out professional assistance and naturally I was happy to help.
My first task was to mix up a strong solution of Tile Doctor Pro-Clean. The product was only slightly diluted with water, since the floor was quite heavily soiled and a higher concentration of Pro-Clean was needed to help remove several layers of dirt and food waste. Once applied to the floor, the solution was left to dwell for roughly five minutes before I began to work it into the stone with a deck brush. I did the best I could here to clean the floor without using my buffing machine as, since the floor was riven, my black buffing pad would have been ruined by the ridges.
Making up for the lack of a buffing machine, I made sure to scrub the floor with Pro-Clean for several hours to remove as much grime as possible. One the cleaning was finally completed I rinsed the floor several times with clean, hot water. I then used a wet-dry vac machine to remove any excess moisture to clear the floor for sealing when I returned 48 hours later. Upon leaving, I left my client with instructions to avoid spilling anything on the floor as, again, any liquid left on the surface might affect the performance of the sealer.
After a period of two days, I returned to commence the sealing. My choice of sealer was Tile Doctor Seal & Go, which is suitable for use on internal, unsealed surfaces such as Slate, textured Quarry, Victorian tile, and others. Seal and Go is also a water based sealer so you there’s very little smell given off whilst it dries compares to solvent based sealers. In this case, the client did not want the surface of the floor to be too shiny, so I only used two coatings of Seal & Go, whereas for a shinier result I would have used a few more.
My client was exceptionally pleased with the results, which had not only cleaned the floor but brought out the beautiful colours in the stone that had once been hidden under several layers of muck.
 Tile Doctor Ltd
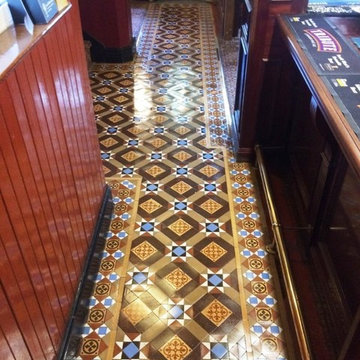
Here’s a really interesting commercial job for you, which I recently completed in the town of Hinckley, Leicestershire. I was asked to take a look at a Victorian Geometric and Encaustic tiled floor in the historic Queen’s Head pub.
This floor is over a century old and although in good condition for its age had suffered significant wear over the years, along with some cracked tiles and slight inherent moisture issues. What the pub landlord requested was a restorative clean to alleviate the aesthetically damaging effect of the wear, and to enhance the natural colours of the stone. I was also asked to seal the floor following the clean to achieve a semi-gloss finish.
The first step in the cleaning process was to mix a strong solution of one part Tile Doctor Pro-Clean to four parts clean water. Pro-Clean is a high alkaline cleaner which also contains stripping properties, allowing it to break down old sealer and tackle heavy soil build-up. The solution was applied to the floor and left to dwell for 15 minutes, giving it times to seep into the stone, get underneath the dirt and lift it to the surface.
I addressed several paint spots and areas suffering from glue contamination by using Tile Doctor Remove & Go, which is specially formulated to break down paint and adhesives on unpolished natural stone floors, amongst others. The entire floor was then scrubbed using a special floor cleaning pad, and the resulting slurry was vacuumed away using a wet-vac machine.
The final issue to deal with was the inherent efflorescence staining. This was treated using Tile Doctor Grout Clean-Up, an acid-based product which removes not just efflorescence but also grout haze, mineral deposits, and rust stains. The solution here was one part Grout Clean-Up diluted with four parts water.
After completing the clean, I thoroughly rinsed the floor with clean water to remove any trace of cleaning product and dried the floor as much as possible with a wet vacuum, then before leaving for the day i installed a couple of air movers to assist with drying overnight.
Upon my return the following day, I checked the floor for any excess moisture before sealing it with our topical, semi-gloss finish sealer, known as Seal & Go Extra which due to its formula is ideal for external or old internal floors where there is unlikely to be damp from membrane.
This unique product provides excellent protection, and allows the tiles to breath where floors are suffering from inherent moisture issues. It is suitable for both internal and external use, on Victorian floor tiles, Sandstone, Flagstones, Terracotta, and rough Slate.
As you can see from the photo, I was able to fulfil my client’s request to a high standard, bringing the pub’s old yet characterful Victorian tiled floor back to life again.
Kay Sylvester
Leicestershire Tile Doctor
 Tile Doctor Ltd
As is often the case in years past and for whatever reason many homeowners covered their decorative Victorian hallway tiles in a variety of products from carpet to laminate flooring. These days the trend has reversed and quite rightly many homeowners now realise the value a tiled floor can bring to a property and look to us to have it restored.
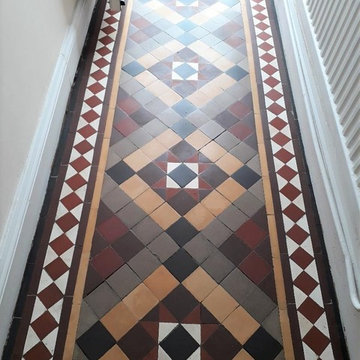
Our client had purchased a property in Norfolk seaport of Kings Lynn and, on lifting the dirty old carpet and decaying underlay in the hallway, discovered a beautiful tiled entrance hall. It was obvious that a previous owner had decided to lay carpet over the tiles as an easy way of hiding the result of careless renovation and decorating which had resulted in a thick coating of plaster, paint, carpet tape glue and various other contaminants which had become firmly stuck to the surface. There were also two small rectangular black and brown tiles missing behind the front door which had been damaged during the removal of some old lead pipes.
This was clearly a job which would need somewhat more than a scrubbing brush and a bottle of Flash!
Our first job was to remove as much of the solid contaminants as possible by hand with floor scrapers and a steamer which softened the more stubborn lumps. We then applied Tile Doctor Remove & Go which is a powerful alkaline stripper to the whole area, left it to dwell on the surface for twenty minutes and then scrubbed it in using a rotary machine fitted with a black scrubbing pad. The resulting slurry was then power rinsed and extracted away using our Ninja machine which is a high-power industrial vacuum. Any remaining patches where the carpet tape had been stuck down were spot treated using Tile Doctor Nanotech HBU which made short work of the hardened glue.
The result was a clean floor, but the surface still felt slightly rough and pitted, a problem which we resolved using the rotary machine fitted with a 200-grit diamond burnishing pad followed by a 400-grit pad with a little 400 grit honing powder which left the surface smooth, silky and ready for the application of a sealer.
Finally, we acid washed the whole area using Tile Doctor Acid Gel, a slow release product which would neutralise any remaining chemicals, improve new sealer adhesion and inhibit the future production of any efflorescence salts. We had used a fair amount of water during the cleaning process, so we left the floor to dry off thoroughly overnight with assistance from our commercial dehumidifier.
On our return the following day, we discussed the sealer options with the client and recommended using microporous Tile Doctor Colour Grow which is an impregnating sealer that seeps into the pores of the stone protecting it from within. It will provide an excellent fluid resistant seal whilst enhancing the natural colours in the stone, additionally it’s fully breathable thereby enabling any moisture trapped under the floor to rise through the floor and evaporate. This is important on old floors like this where no damp-proof membrane was installed. The sealer was applied with a paint pad in tow coats and allowed to dry for an hour before buffing the floor with a hog’s hair pad to give a rich natural-look sheen finish.
The Victorian tiles responded well to the treatments which were completed in two consecutive days. My client was extremely pleased with the results and left the following comment:
“My floor was in poor condition after being buried under carpet as well as many, many years of paint and muck. I enjoyed the time they spent at my home and wouldn’t hesitate to use (or recommend) the Tile Doctor service in the future.”
Nick White
Norfolk Tile Doctor


 Tile Doctor Ltd
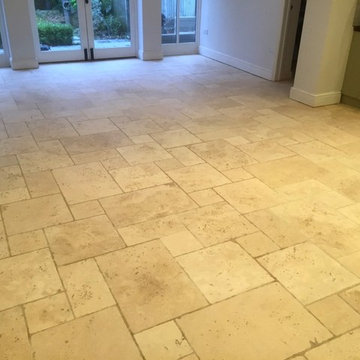
Recently I visited a client in the town of Maidenhead, Berkshire who needed assistance restoring a very dirty pitted Limestone tiled floor which had suffered over the years due to poor maintenance choices. The pressures of a busy family life had, understandably, prevented my client from undertaking regular cleaning and the products and methods used for cleaning were by and large unsuitable for this type of natural stone. In addition, the pits in the tiles had been filled with grout; however, they were not flush to the tile and therefore a large amount of soil had collected in the pockets. The result was a Limestone tiled floor in considerably poor condition that was increasingly difficult to keep clean.
My client had tried and tried to get the floor clean, using methods such as scrubbing with toothbrushes, steam cleaners, and mopping – but they weren’t getting anywhere! I explained to my client that steaming is, in fact, one of the worst cleaning systems to use on natural stone floors. Steam not only damages sealers, it also thins out greasy soils. Some of these soils are absorbed onto the domestic microfiber pads, however a lot of the soil becomes thinner allowing it to penetrate deeper into the pours of the stone and grout. This in itself starts the vicious circle to rapidly soiled and dirty tiles and grout. This happens because the grease soils magnetise dirt!
My first task in the cleaning process was to mix a strong solution of Tile Doctor Pro-Clean, which is a high alkaline cleaner. This solution was applied liberally across the entire Limestone tiled floor and grout. It was allowed to dwell for 30-40 minutes, giving it time to seep into the stone to get underneath and lift the ingrained dirt to the surface. During this time, I scrubbed the grout lines using a specialist stiff grout brush. The Limestone tiles were then scrubbed with heavy mechanical rotary agitation machine.
I then gave the floor a thorough rinse using the latest in cleaning and capture technology, which involves firing hot water at high pressure in a spinning motion across the floor, in effect blasting away the ingrained soils from the grout and pitting in the limestone. The high pressure is delivered from a system mounted inside my van which also contains waste tanks to capture the extracted soiled water.
After being allowed to dry thoroughly for 24 hours, I returned to seal the floor with Tile Doctor Colour Grow which would have brought out the deep colours in the stone, however after discussing the options with the client it became clear that they wanted to keep the floor looking as light as possible so Tile Doctor Ultra Seal was applied. Ultra Seal is a natural look impregnating sealer that soaks into the pores of the stone and protects it from within.
The floor now looks fantastic and the sealer should ensure it remains looking that way for some time to come and before leaving I made sure to provide my client with some professional maintenance advice.
Tim Colenutt
Berkshire Tile Doctor
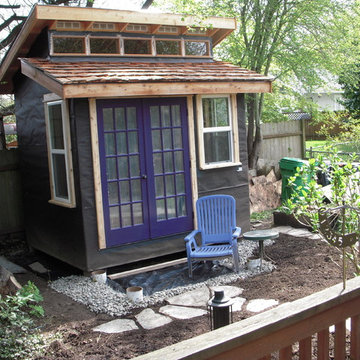
 Kaya Construction
Exterior: ADU Before completion.
Example of a mountain style home design design in Portland
Example of a mountain style home design design in Portland
 G. Christianson Construction, Inc.
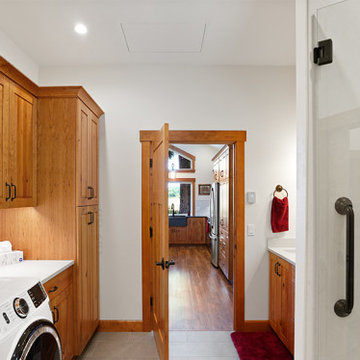
A local Corvallis family contacted G. Christianson Construction looking to build an accessory dwelling unit (commonly known as an ADU) for their parents. The family was seeking a rustic, cabin-like home with one bedroom, a generous closet, a craft room, a living-in-place-friendly bathroom with laundry, and a spacious great room for gathering. This 896-square-foot home is built only a few dozen feet from the main house on this property, making family visits quick and easy. Our designer, Anna Clink, planned the orientation of this home to capture the beautiful farm views to the West and South, with a back door that leads straight from the Kitchen to the main house. A second door exits onto the South-facing covered patio; a private and peaceful space for watching the sunrise or sunset in Corvallis. When standing at the center of the Kitchen island, a quick glance to the West gives a direct view of Mary’s Peak in the distance. The floor plan of this cabin allows for a circular path of travel (no dead-end rooms for a user to turn around in if they are using an assistive walking device). The Kitchen and Great Room lead into a Craft Room, which serves to buffer sound between it and the adjacent Bedroom. Through the Bedroom, one may exit onto the private patio, or continue through the Walk-in-Closet to the Bath & Laundry. The Bath & Laundry, in turn, open back into the Great Room. Wide doorways, clear maneuvering space in the Kitchen and bath, grab bars, and graspable hardware blend into the rustic charm of this new dwelling. Rustic Cherry raised panel cabinetry was used throughout the home, complimented by oiled bronze fixtures and lighting. The clients selected durable and low-maintenance quartz countertops, luxury vinyl plank flooring, porcelain tile, and cultured marble. The entire home is heated and cooled by two ductless mini-split units, and good indoor air quality is achieved with wall-mounted fresh air units.
 G. Christianson Construction, Inc.
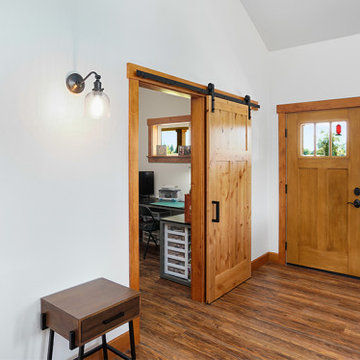
A local Corvallis family contacted G. Christianson Construction looking to build an accessory dwelling unit (commonly known as an ADU) for their parents. The family was seeking a rustic, cabin-like home with one bedroom, a generous closet, a craft room, a living-in-place-friendly bathroom with laundry, and a spacious great room for gathering. This 896-square-foot home is built only a few dozen feet from the main house on this property, making family visits quick and easy. Our designer, Anna Clink, planned the orientation of this home to capture the beautiful farm views to the West and South, with a back door that leads straight from the Kitchen to the main house. A second door exits onto the South-facing covered patio; a private and peaceful space for watching the sunrise or sunset in Corvallis. When standing at the center of the Kitchen island, a quick glance to the West gives a direct view of Mary’s Peak in the distance. The floor plan of this cabin allows for a circular path of travel (no dead-end rooms for a user to turn around in if they are using an assistive walking device). The Kitchen and Great Room lead into a Craft Room, which serves to buffer sound between it and the adjacent Bedroom. Through the Bedroom, one may exit onto the private patio, or continue through the Walk-in-Closet to the Bath & Laundry. The Bath & Laundry, in turn, open back into the Great Room. Wide doorways, clear maneuvering space in the Kitchen and bath, grab bars, and graspable hardware blend into the rustic charm of this new dwelling. Rustic Cherry raised panel cabinetry was used throughout the home, complimented by oiled bronze fixtures and lighting. The clients selected durable and low-maintenance quartz countertops, luxury vinyl plank flooring, porcelain tile, and cultured marble. The entire home is heated and cooled by two ductless mini-split units, and good indoor air quality is achieved with wall-mounted fresh air units.
 G. Christianson Construction, Inc.
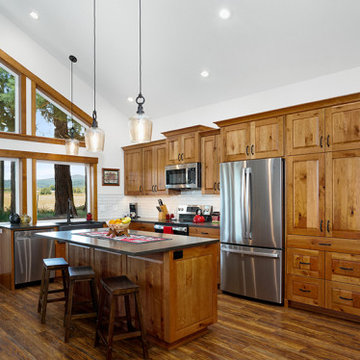
A local Corvallis family contacted G. Christianson Construction looking to build an accessory dwelling unit (commonly known as an ADU) for their parents. The family was seeking a rustic, cabin-like home with one bedroom, a generous closet, a craft room, a living-in-place-friendly bathroom with laundry, and a spacious great room for gathering. This 896-square-foot home is built only a few dozen feet from the main house on this property, making family visits quick and easy. Our designer, Anna Clink, planned the orientation of this home to capture the beautiful farm views to the West and South, with a back door that leads straight from the Kitchen to the main house. A second door exits onto the South-facing covered patio; a private and peaceful space for watching the sunrise or sunset in Corvallis. When standing at the center of the Kitchen island, a quick glance to the West gives a direct view of Mary’s Peak in the distance. The floor plan of this cabin allows for a circular path of travel (no dead-end rooms for a user to turn around in if they are using an assistive walking device). The Kitchen and Great Room lead into a Craft Room, which serves to buffer sound between it and the adjacent Bedroom. Through the Bedroom, one may exit onto the private patio, or continue through the Walk-in-Closet to the Bath & Laundry. The Bath & Laundry, in turn, open back into the Great Room. Wide doorways, clear maneuvering space in the Kitchen and bath, grab bars, and graspable hardware blend into the rustic charm of this new dwelling. Rustic Cherry raised panel cabinetry was used throughout the home, complimented by oiled bronze fixtures and lighting. The clients selected durable and low-maintenance quartz countertops, luxury vinyl plank flooring, porcelain tile, and cultured marble. The entire home is heated and cooled by two ductless mini-split units, and good indoor air quality is achieved with wall-mounted fresh air units.
 G. Christianson Construction, Inc.
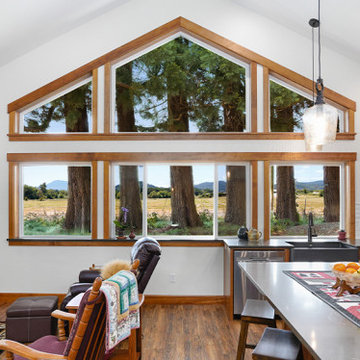
A local Corvallis family contacted G. Christianson Construction looking to build an accessory dwelling unit (commonly known as an ADU) for their parents. The family was seeking a rustic, cabin-like home with one bedroom, a generous closet, a craft room, a living-in-place-friendly bathroom with laundry, and a spacious great room for gathering. This 896-square-foot home is built only a few dozen feet from the main house on this property, making family visits quick and easy. Our designer, Anna Clink, planned the orientation of this home to capture the beautiful farm views to the West and South, with a back door that leads straight from the Kitchen to the main house. A second door exits onto the South-facing covered patio; a private and peaceful space for watching the sunrise or sunset in Corvallis. When standing at the center of the Kitchen island, a quick glance to the West gives a direct view of Mary’s Peak in the distance. The floor plan of this cabin allows for a circular path of travel (no dead-end rooms for a user to turn around in if they are using an assistive walking device). The Kitchen and Great Room lead into a Craft Room, which serves to buffer sound between it and the adjacent Bedroom. Through the Bedroom, one may exit onto the private patio, or continue through the Walk-in-Closet to the Bath & Laundry. The Bath & Laundry, in turn, open back into the Great Room. Wide doorways, clear maneuvering space in the Kitchen and bath, grab bars, and graspable hardware blend into the rustic charm of this new dwelling. Rustic Cherry raised panel cabinetry was used throughout the home, complimented by oiled bronze fixtures and lighting. The clients selected durable and low-maintenance quartz countertops, luxury vinyl plank flooring, porcelain tile, and cultured marble. The entire home is heated and cooled by two ductless mini-split units, and good indoor air quality is achieved with wall-mounted fresh air units.
5