
Search results for "Avoiding last minute" in Home Design Ideas
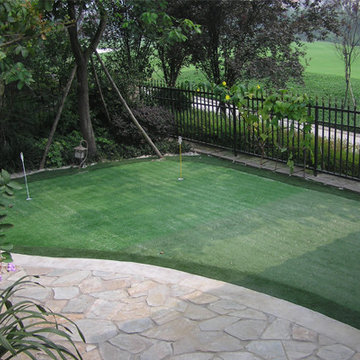
 F.T.B Turf
1.4-5years
2.low maintenance
3.good looking
4.Easy installation
5.no lead
6.no cutting
7.always green
8.reasonable
Want to make your garden or backyard with artificial turf putting green?Contact us.
Email: Info(at)ftbturf.com
Skype: ftbturf
Some questions.
Q Does Artificial Lawn Fade?
A No, all our Carpets are completely UV stable and do not fade.
Q Is the Artificial grass guaranteed?
A Yes, our grasses are guaranteed for five years.
Q How long will Artificial Lawn last?
A Used as a lawn artificial grass will not wear out so you should get 20 years plus out of a top quality product.
Q Does Artificial Lawn require maintenance?
A To keep the grass looking at its best it will benefit from occasional brushing with a stiff brush. Leaves and debris should be removed.
Q Is Artificial Lawn an easy DIY installation?
A Yes, anyone with basic DIY skills can follow our simple installation instructions to successfully lay a new lawn.
Q Does Artificial Lawn allow water through?
A Yes, the grass is porous, holes in the backing allow free draining.
Q Is Artificial Lawn abrasive to skin?
A No, unlike old astro turf our Carpets have soft polyethylene fibres which will not graze young skin.
Q Is Artificial Lawn suitable for both children and dogs?
A Yes children and pets are no problem for the carpet anything the dogs do can be collected and washed away.
Q Will weeds grow through the Carpet?
A No, weeds will not grow in or through the Carpet due to a protective membrane being used under the ground works.
Q Is Artificial Lawn suitable for parking?
A A suitable base is essential and one of our heavier sand filled grasses. Tight turning should be avoided.
Q Will the frost and snow damage the Carpet?
A No those conditions will have no lasting effect on the surface.
Q Can I Vacuum the Carpet
A Yes you can but only when in dry conditions.
More question welcome.!!
 Tile Doctor Ltd
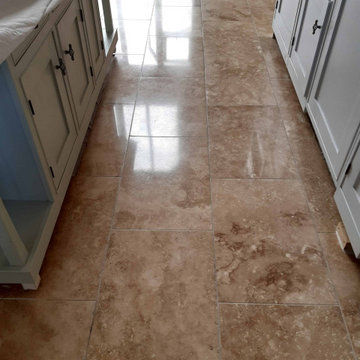
Located in Burgh Castle West of Great Yarmouth, this Travertine stone floor was a classic example of an incomplete installation. By incomplete I mean the tiler had done a fine job of laying and grouting the tiles but had left it at that and not sealed the stone. Natural stone like Travertine is porous and needs a sealer to stop dirt becoming ingrained in its pores, a sealer will also improve its appearance.
Without a sealer this floor now looked very dull, pale, rather damaged with pitting and heavily soiled with ingrained dirt. Pitting in stone like this is a natural feature of Travertine however it can be exacerbated with the use of acid cleaning products. This was a floor in urgent need of a face lift, and I was confident it could be transformed into a very beautiful floor.
I think it is true to say that most tilers will skilfully lay a floor for you but usually don’t have the knowledge, experience or equipment to finish the surface properly and when it comes to sealing many will recommend a product and suggest you take care of it yourself. Naturally if your find yourself in that position don’t insist the tiler does it, better to give us a call and have it done properly.
Our first job was to backfill the larger pits in the stone which as I mentioned are a natural feature of travertine material, but they can trap dirt and so its best if they are plugged with a suitably rigid filler. Also, if left alone the larger holes can quickly become larger as their edges crumble and break up leading to the entire tile becoming unstable. Replacing a tile in a floor like this is possible however its an extremely awkward job to do and it can be difficult to find an exact match for replacement.
Filling was done using a two-part, neutral cream-coloured polyester compound which gels in about fifteen minutes after addition of the catalyst. After this initial period, the excess product is trimmed off level with the surface of the tile before it sets harder than the stone itself in around sixty minutes. The fully cured compound can then be cut and machined as though it were part of the stone structure.
Our second job was to remove deep scratches caused by the unprotected feet of workmen’s ladders. This was done using Tile Doctor 50-grit and 100-grit diamond hand burnishing pads with a little water as a cutting medium. Shallower scratching present across the rest of the floor was removed using a Tile Doctor 200-grit soft milling pad driven by our Klindex 17″ rotary machine.
This abrasive action produces a fine slurry which was then rinsed with water and extracted using our 400psi Ninja machine in preparation for the next stage of the refinishing process. These machines were an expensive investment for our business however they are very robust and effective producing a good result that saves time.
Next task was to restore the polished appearance of the Travertine which was done using the application of a set of Tile Doctor burnishing pads. The process starts by applying a coarse 400-grit diamond pad, again fitted to the Klindex rotary machine. This cleans the tile and improves the matt finish left by the milling pad; again, the slurry was rinse-extracted before moving on to the next pad in the set. Next came the finer diamond polishing stages of 800 grit and 1500 grit, slurry being removed as before between the grades. By this time, all the scratches had been removed and the Travertine floor had visually pleasing even sheen across the whole surface. The last pad in the set is applied dry with a little water sprayed onto the tile so we left the area to dry out thoroughly overnight with the assistance of our large capacity dehumidifier.
Returning the following morning, we found that the floor had dried out perfectly and was ready to be vacuumed and spray burnished with the last pad in the set which is a 3000-grit very fine pad applied using a small amount of water sprayed from a trigger bottle resulting in a deep, rich shine across the floor surface.
Last step in the face lift was to seal the floor with a generous coat of Tile Doctor Ultra-Seal, a premium grade penetrating sealer recommended for use in Kitchens and food preparation areas. Having left the floor to soak up as much of the Tile Doctor Ultra-Seal as it could, the excess product was removed and the whole area allowed to dry completely with the assistance of our industrial air moving fan. Finally, the floor was spray buffed to a deep shine using a white maintenance pad.
The client was extremely pleased with our results and was amazed at the variation of colours within the stone which had never been visible previously.
Nick White
Norfolk Tile Doctor

 Five Star Tree Care
Winter has arrived and this means many months of snow and ice are ahead. When trees shed their leaves and go dormant for the winter, this is like how bears hibernate; they are both sleeping through the cold and waiting until the warm spring weather comes back. But unlike hibernating bears, who are safe and snuggled up in a warm cave somewhere, trees are left to withstand the harsh, cold elements throughout the entire winter. This means that they are more impacted than you might believe.
It is easier for mature trees to be able to handle the long winter months due to their extensive root system and thick bark. But saplings and other newly planted trees are not yet fully equipped with these natural defenses to handle the cold. No matter if you have new or older trees, following our tips will help them prosper during the cold Canadian winter ahead. Our team at Five Star Tree Services has come up with some winter maintenance essentials for your trees that will give them an extra hand over the winter.
One Last Water
Getting one last good watering in before the ground freezes is helpful to newly planted and young trees. Always make sure to water your tree slowly and gently. This allows the water to seep down into the root system as opposed to it running off the top and freezing.
Apply Mulch
When you use mulch, it acts like a barrier between the tree roots and the cold snow, it helps to insulate it. When you are applying mulch, make sure you spread it around the base of the tree so that it is no more than 3 inches deep. You also need to make sure to spread the mulch all the way to the drip line surrounding the tree. Make sure to not exceed 3 inches around your entire tree and keep the mulch away from the trunk of the tree.
Wrap Tree Trunks
There is a condition called sunscalding that can occur during the winter months. This happens when there is a temperature change that happens quickly. You might notice it when the sun warms the trees, which thaws the bark but during the night, when it gets cold again, it causes the melted water in the bark to rupture, causing cracks in the tree’s trunk. Young trees are especially susceptible to this happening. To help stop this from happening, it is best to wrap your trees with tree wraps or a plastic guard. It is advisable to wrap the trunk from the ground up and stop just below the first branch.
Shelter Your Trees
Young or newly planted trees are fairly defenseless for the first handful of years. Older and more mature trees have had time to develop a strong root system and hardy bark that help to protect them against things like animals and the freezing cold. If you want to help your little sapling along this winter, you can build a shelter that can handle having snow piled on it. You can also periodically use a broom to brush off the snow that accumulates on a tree’s branches. But try to avoid breaking off any ice that has formed on the branches, as this can actually end up hurting the tree if you accidentally break one of its branches instead.
Keep Road Salt Away
It’s no big secret that the use of road salt is detrimental to trees. When it gets on them, the end result come springtime is a dead tree, or at least, a severely damaged one. As much as you can, protect your trees and limit their exposure to salt over the winter.
Protect Your Trees
Winter is not only limiting for trees, but for a lot of other animals as well. This includes rabbits, mice, moles, squirrels, and other furry little creatures, who like to use trees as a food source during the summer months. During the winter, this food is now cut off when the trees go dormant. This only leaves the tree’s bark as an alternative food source for these critters. They seem to especially like young tree bark to chew on over the winter. In order to stop this from happening, you need to protect the bark with things like a fence surrounding your tree, wrapping the trunk with a plastic guard or hardware cloth.
Winter Pruning
The best time to prune any tree is during the winter months when the tree is dormant. Pruning allows you to rid the tree of any excess branches and control disease. Winter pruning is highly beneficial and lets your tree improve branch development in the spring.
Don’t Use
Always make sure to avoid products that are known to hurt trees, especially ones containing sodium chloride. Products like that cause negative reactions in trees or any plants, as it hinders their water intake. Instead, look for products that have potassium, calcium, and magnesium chloride.
How Five Star Tree Services Can Help
For newly planted and young trees, it is especially important to help them through the winter as best you can. We here at Five Star Tree Services are here to help you get your trees through the winter. If you require Toronto Tree Care, make sure to give us a call at (416) 990-3355.
Find the right local pro for your project
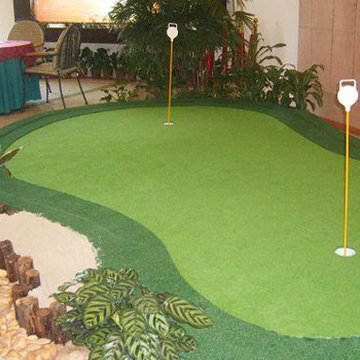 F.T.B Turf
1.4-5years
2.low maintenance
3.good looking
4.Easy installation
5.no lead
6.no cutting
7.always green
8.reasonable
Want to make your office or home with artificial turf putting green?Contact us.
Email: Info(at)ftbturf.com
Skype: ftbturf
Some questions.
Q Does Artificial Lawn Fade?
A No, all our Carpets are completely UV stable and do not fade.
Q Is the Artificial grass guaranteed?
A Yes, our grasses are guaranteed for five years.
Q How long will Artificial Lawn last?
A Used as a lawn artificial grass will not wear out so you should get 20 years plus out of a top quality product.
Q Does Artificial Lawn require maintenance?
A To keep the grass looking at its best it will benefit from occasional brushing with a stiff brush. Leaves and debris should be removed.
Q Is Artificial Lawn an easy DIY installation?
A Yes, anyone with basic DIY skills can follow our simple installation instructions to successfully lay a new lawn.
Q Does Artificial Lawn allow water through?
A Yes, the grass is porous, holes in the backing allow free draining.
Q Is Artificial Lawn abrasive to skin?
A No, unlike old astro turf our Carpets have soft polyethylene fibres which will not graze young skin.
Q Is Artificial Lawn suitable for both children and dogs?
A Yes children and pets are no problem for the carpet anything the dogs do can be collected and washed away.
Q Will weeds grow through the Carpet?
A No, weeds will not grow in or through the Carpet due to a protective membrane being used under the ground works.
Q Is Artificial Lawn suitable for parking?
A A suitable base is essential and one of our heavier sand filled grasses. Tight turning should be avoided.
Q Will the frost and snow damage the Carpet?
A No those conditions will have no lasting effect on the surface.
Q Can I Vacuum the Carpet
A Yes you can but only when in dry conditions.
More question welcome.!!

 Bedding N Bath
1000 TC Best Bed Sheets
Enjoy a restful and comfortable sleep with our 1000 TC best bed sheets that are made from pure and premium Egyptian cotton sheets set. Our exceptional and sustainable products provide you the phenomenal smoothness and calmness. Mix and match these products with other products of bedding n bath to set your temperament and versatile theme of your bedroom. Its softness, sustainability, breathability, and aesthetic style in modern living make it all year round. Available in different gorgeous colors to make your bed setting truly unique. It conjures a classy look to the bedroom while maintaining the coziness in your bedroom. The smooth cotton-rich fabric absorbs all the moisture for a cool and comfortable sleep on your hot summer night.
Thread Count :
Our products are made from higher thread count to give you a long-lasting and durable effect. The more thread count makes it more contented and easy-going.
wash-resistant:
To avoid diminution and destruction, we made our products with high-quality thread that does not become fade and boring over time. Instead, you enjoy our product with long-lasting fabric and unique stylings.
Enjoy the blissful and classic sleepy night as in five-star hotels with our sheet sets. Your findings of better sheet sets now end, because we provide you with the sheets that have soft and prosperous touch, we can help you out for an unspoiled match. Just indulge and cuddle up yourself with our premium quality best bed sheets.
Crafted from sustainable and durable 100% pure Egyptian cotton with the highest thread count of 500 and 1000 TC promises you to have the ideal and next-level comfort sleep sheets set. As comfort comes first in the bedroom, our sheet sets are welcoming, durable, breathable, long-lasting and have high resilience against daily wear and tear.
We at bedding n bath offered sheet sets in different stylings like we offered plain sheet sets, printed sheet sets, flannelette printed sheet sets, and flannelette plain sheet sets in different thread count. We deliver the sheet sets in varied colors and printed designs to make your bedroom look elegant and unique. Do visit our website to make an order online and you can also visit our shops for your comfort. Mix and match them with other bedroom essentials for a complete look. We also offered them in different bed size ranges. For your convenience, we include fitted sheets, flat sheets, and two matching pillowcases as well.
“For your aesthetic bedroom, pick one of them. Have a happy shopping.”
 Tile Doctor Ltd
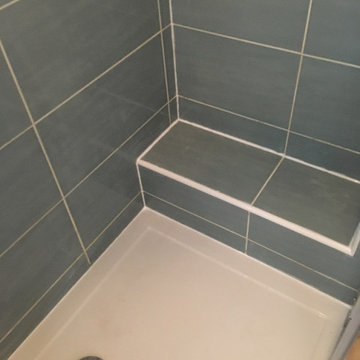
Pictured below is a very mouldy Ceramic Tiled Shower Cubicle at a property in the picturesque market town of Woodstock, which is very close to the famous Blenheim Palace and has a long history that dates to the Domesday Book and have many 17th century buildings.
As you can see mould had really got a grip on the white grout around the bottom of the shower and in most other places the grout had become discoloured. Mould and discolouration are a very common problem and is caused by a lack of ventilation in the bathroom as well as the dyes in soap and shampoos.
Most ceramic tiles have a glazed surface and so are fairly impervious to these problems, grout however is a problem due to its cementitious rough nature. I discussed with the client what could be done to restore the appearance of the shower cubicle for them, and they were pleased to hear we could do something about it. Happy with my quotation it wasn’t long before I got instructed to go ahead with the work.
To resolve the problem, I first sprayed the whole shower with Tile Doctor Duo Clean and left it to soak in. The bottle comes with a spray attachment that combines the product with air making it lighter and easier to stick to vertical surfaces. It is a fast effective cleaner which doubles up as a grout cleaner and mould remover.
Whilst the Tile Doctor Duo Clean was doing its magic I fetched the other tools I would need to complete this job. After about 30 minutes I sprayed the cubicle again and started to hand scrub the grout and tiles to remove the mould and dirt. I then rinsed with water and went over the stubborn stains again until I was happy. The walls where then dried with a clean towelling cloth. It is amazing the difference you can achieve with the right grout cleaning product and a lot of elbow grease.
The last step and “prise de la resistance” was to cut out all the original silicone sealant with a sharp knife and then replace with new white sealant which had an anti-mould formula. I am not convinced these anti-mould products work any better to be honest but with mould being such a problem it is definitely worth giving them a go.
The last step was to spray the grout with Tile Doctor Wall Tile and Grout Sealer to help protect the grout, it forms a protective barrier over the tile and the grout, so water just runs straight off the wall and into the shower tray.
For after care I recommended the use of Tile Doctor Aqua-Pro which is pH neutral cleaner designed for showers and will help the sealer last longer. Stronger supermarket products can actually strip a sealer off the tile over time so we don’t recommend their use.
I think you will agree the shower cubicle looked transformed by the time I had finished, certainly my client was very happy with the work we had carried out.
Barry Woodward
Oxfordshire Tile Doctor
 Tile Doctor Ltd
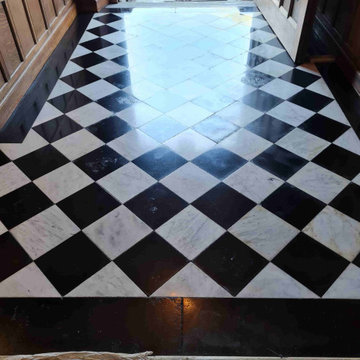
This Black and White Marble tiled hallway floor at a Grade II listed property in the village of Tattenhall has quite a history. The building was constructed in 1865 and at one time it has been the home to the high sheriff of Cheshire, and the family home of Edith Wignall the daughter of Sir Henry Tate the founder of the sugar company Tate and Lyle.
In more recent years the property had been used as a council building and even a nursing home for the elderly. After a long history of decline it has now been restored to a lavish family mansion however the marble floor had suffered over the years and still need attention. The current owner had been in touch as they wanted it restoring and basically brought back to life.
As it turns out I had already planned to go to Tattenhall the following week to work on another listed building which was formerly the village bank. After discussing the Marble floor over the phone, I agreed a date and time to pop over from the bank and inspect the floor in detail. I can provide a rough quote from photographs, which has been especially useful recently, but it’s far better for all concerned if I’m able to properly survey the floor first.
The Marble floor consisted of Black and White Mable tiles laid in a diamond pattern, it wasn’t a very large area perhaps 9 square metres in total. The tiles were well worn as described but also stained and scratched. I would see they would need a deep burnish and polish to bring them back to life and then protected with a fresh sealer. Following on from that visit I was able to provide an accurate quote which was accepted, and a date agreed for my return.
The first job was to protect the surrounding heavy wooden panelling with masking film. The floor was very heavily stained yellow with deep scratches, to remove these I would have to grind the marble back until a clean fresh tile was left. To start I used a 200-grit coarse pad fitted to a weighted buffing machine, the abrasive action of the pad was lubricated with water. After inspection I found that the staining and scratches were still there, so I needed to use stronger pads, so I worked my way through a set of very coarse milling pads starting at a 50, 100 and finishing with a 200-grit pad. Again, water was used to lubricate, and the resultant slurry was removed by a powerful wet vacuum and washed down between each pad.
The milling pads had the desired effect, and I was then able to bring back the polished appearance of the Marble surface using a set of finer burnishing pads with the same process. The 400 and 800-grit pads helped to clean and remove the fine scratches left by the milling pads and then the next 1500-grit pad started to build the shine back on the marble tile.
After finishing with 1500-grit pad I washed the Marble with Tile Doctor Stone Soap and vacuumed up the residue with the wet vacuum. I left an industrial blower in place overnight to dry out the floor ready for the next morning when it would be sealed.
The next morning, I used the last of the four burnishing pads which is a very fine 3000-grit to polish the floor further. This last pad is applied dry with just a spray of water to create a high gloss finish.
When I was happy, I sealed the floor with two coats of Tile Doctor Colour Grow which is an impregnating sealer that soaks into the fine pores of the Marble to protect it from within. This product also improves colour and after application it was left to soak into the tile for five minutes before polishing off and then leaving it to dry.
The last step was to I buff the floor with a white pad. The finish was impressive, and the family were very happy with the work we had carried out. For aftercare I recommended they use Stone Soap as its designed for the regular cleaning of sealed and polished stone, as well as cleaning it also helps build the patina.
Alastair Robb
West Cheshire TIle Doctor
 Bedding N Bath
1000 TC sheet set
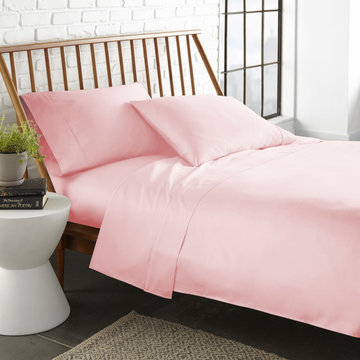
Enjoy a restful and comfortable sleep with our 1000 TC king bed sheet set that is made from pure and premium Egyptian cotton. Our exceptional and sustainable products provide you the phenomenal smoothness and calmness. Mix and match these products with other products of bedding n bath to set your temperament and versatile theme of your bedroom. Its softness, sustainability, breathability, and aesthetic style in modern living make it all year round. Available in different gorgeous colors to make your bed setting truly unique. It conjures a classy look to the bedroom while maintaining the coziness in your bedroom. The smooth cotton-rich fabric absorbs all the moisture for a cool and comfortable sleep on your hot summer night.
Thread Count:
Our products are made from higher thread count to give you a long-lasting and durable effect. The more thread count makes it more contented and easy-going.
Wash resistant:
To avoid diminution and destruction, we made our products with high-quality thread that does not become fade and boring over time. Instead, you enjoy our product with long-lasting fabric and unique stylings.
Enjoy the blissful and classic sleepy night as in five-star hotels with our queen bed sheet. Your findings of better sheet sets now end, because we provide you with the sheets that have soft and prosperous touch, we can help you out for an unspoiled match. Just indulge and cuddle up yourself with our premium quality sheets.
Crafted from sustainable and durable 100% pure Egyptian cotton with the highest thread count of 500 and 1000 TC promises you to have the ideal and next-level comfort sleep. As comfort comes first in the bedroom, our sheet sets are welcoming, durable, breathable, long-lasting and have high resilience against daily wear and tear.
We at bedding n bath offered sheet sets in different stylings like we offered plain sheet sets, printed sheet sets, flannelette printed sheet sets, and flannelette plain sheet sets in different thread count. We deliver the sheet sets in varied colors and printed designs to make your bedroom look elegant and unique. Do visit our website to make an order online and you can also visit our shops for your comfort. Mix and match them with other bedroom essentials for a complete look. We also offered them in different bed size ranges. For your convenience, we include fitted sheets, flat sheets, and two matching pillowcases as well.
“For your aesthetic bedroom, pick one of them. Have a happy shopping.”
 Tile Doctor Ltd
This Tumbled Travertine tiled floor at a beautiful house in Horley had been poorly maintained through the years using the wrong type of sealer which quickly wore down allowing dirt to become ingrained in the stone. The owner had become concerned about the state of the tiles and decided it was time to call in an expert that could restore the tiles to a condition that complimented the environment in which it was situated.
Travertine is known for being very distinctive in character and very durable, making it a very popular choice for tiled flooring in properties worldwide. However, the stone does require regular professional maintenance and polishing to keep it looking it top shape and home owners rarely realise this when they decide to have it installed. Fortunately, in the UK at least you can rely on your local tile doctor to maintain it for you.
The first part of the job involved giving the floor a thorough clean to remove what was left of old sealers and any polishing compounds that remained on the floor. Before beginning that however I brought in all my equipment and products into the house and then prepped the area by taping up the woodwork to protect it during the renovation process.
To remove what was left of the old sealers and other coatings still present on the floor a strong solution of Tile Doctor Remove and Go was applied to the floor and left to soak in for about ten minutes before being actively worked in with a rotary machine fitted with a black scrubbing pad. The solution turned black with the soil as it was lifted out of the pores of the stone and it was then rinsed off with water and extracted with a wet vacuum.
Following this, we moved on to a process we know as burnishing that hones the stone and brings up the polished appearance. Working in sections due to the size of the floor It involves the application of a series of diamond encrusted burnishing pads from coarse through to very fine.
The coarse 400-grit pad fitted to the rotary floor buffer and run over the floor using only water for lubrication. The water turns into a slurry as the pad does its job removing dirt and this has to be rinsed off the floor and extracted with the wet vacuum before applying the next pad. The process was then repeated with medium 800 grit pad for an initial polish followed by the Fine 1500 grit pad for the second polish using water for lubrication and rinsing and extracting in between each pad.
The last pad is a very fine 3000 grit pad for the final polish and is applied with only a little water sprayed onto the floor using a technique we call a Spray Burnish. This last pad really brings up the polished appearance of the stone.
To bring up the appearance of the stone even further and add a really durable polish Tile Doctor Shine Powder was applied. This is a crystallising powder sealer that ensures a very high shine and a tough, durable finish. This powder is applied directly to the tiles in combination with approximately ½ a litre of water and a soft white buffing pad.
Last step was to add to the protection provided by the Shine Powder with two coats of Tile Doctor Ultra-Seal which is a natural look sealer that doesn’t change the look of the stone and is applied to the stone and grout. This sealer works by seeping into the stone, occupying the pores and preventing dirt from becoming ingrained.
The customer was ecstatic with the results, being particularly pleased that she got the floor looking the way she originally wanted without significant expense, not to mention stress.
Michael Conlon
East Surrey Tile Doctor

 cobykane
Last minute een huisje aan zee huren is altijd een goed idee. Of u nu komt uitwaaien in de herfst of winter of gewoon wilt genieten van een heerlijke stranddag tijdens de lente en zomer. In welk seizoen u ook wilt komen, last minute naar de Nederlandse kust biedt voor ieder wat wils. Voor meer informatie, bezoek: https://www.bungalowparkcampanula.nl/last-minute-huisje-aan-zee




 Caliper Farms Nursery and Landscape Services
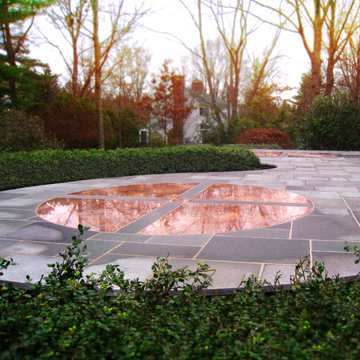
Searching far and wide for that last-minute gift? Look no further than your own backyard! How about the promise of a peachy patio, opulent outdoor kitchen, or fancy fire pit that the entire family will love? ❤️. Give the gift of an outdoor living space that will last forever, can be used year-round, and brings everyone together for family time, fellowship with friends, and fun for all
Contact us today for fresh ideas and inspiration! Proudly serving Central New Jersey for over 35 years! 908.904.9446
#caliperfarms #calipercare #giftgiving #outdoorliving #familyandfriends #landscaping #hardscaping #gardening #montgomerynj #bellemeadnj #princetonnj #hopewellnj #penningtonnj #skillmannj #lawrencevillenj

 McEssay
Regardless of the length of your trip abroad, you should know that packing is an essential step of your stay. This goes doubly so when it comes to students, so you must always keep a few things in mind when you’re getting ready, such as what you need to take. The following list from https://mcessay.com/write-my-essay/ will provide you with some useful tips on what you must do to have a trouble-free packing experience:
You should never be extra picky about your toiletries and personal hygiene products, but you should have a small supply of it if you have a favorite product. Face wash, shampoos and conditioners as well as other products may not be available as the same brands in the new place, so have a spare at least. Always make sure you have your liquids sealed in a plastic bag to avoid issues with airport security.
Make sure you pack some weather-appropriate clothing as part of your luggage. The last thing you’ll want to do is look for clothes in the new location if the climate is extreme, compared to your point of origin. You should look into the weather ahead of time so you can pack accordingly to avoid issues with it.
Use a backpack or a duffel bag that suits the airline requirements so you can haul your luggage with greater ease once you’re off the airport. This will help you be more mobile, while at the same time allowing you a choice between walking on foot without dragging luggage and using a cab or public transport.
Prepare a few international adapters, so you won’t have any issues powering your electronics at the new location. Different countries use different types of plugs, so you must make sure you have what you need. The last thing you’ll want to do is getting stuck in a foreign country without a chance to use your tech.
Prepare a list of things you must do during the semester so you won’t have to deal with the organizational aspects of it. You can start with a checklist, keeping it in a place where you’ll be able to see on a regular basis. You will need the preparation to ensure you do things right and on time.
Take at least two pairs of good walking shoes along, as well as your normal shoes. This will help you greatly if you need to walk around different towns or cities. Not all places have the same policy when it comes to sidewalks and public areas, so having a few pairs of good, comfortable shoes will go a long way.
Taking a cross-shoulder bag alongside your luggage will be a very comfortable option when it comes to urban exploration, travel and study. Its hard to rip off of you, easy to carry and also easy to use. Make sure you keep an eye on it from time to time though, as there’s always the possibility of meeting would-be thieves.
 Grand Homes & Renovations
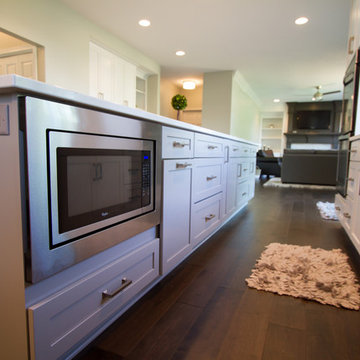
Main floor serenity with four kids? At Grand Homes & Renovations that was our end goal and achievement with this project. Since the homeowner had already completed a renovation on their second floor they were pretty confident how the main floor was going to flow. Removing the kitchen wall that separated a small and private dining room was a last minute and worth while change! Painted cabinets, warm maple floors with marble looking quartz added to the cape cod/beachy feeling the homeowners craved. We also were able to tuck a small mudroom space in just off the kitchen. Stop by and find your serenity!

 Mayflower Construction Group
How to Tell When a Design Trend is Timeless
Design trends come and go, but some styles withstand the test of time. Whether in architecture, interior design, or branding, timeless design is one that remains relevant and appealing for decades. But how can you tell if a trend is truly timeless or just a fleeting fad? Here are key indicators to help you identify designs that will never go out of style.
1. Simplicity Over Complexity
Timeless designs are often clean, simple, and functional. They avoid excessive ornamentation or gimmicky elements that might feel outdated in a few years. Classic materials, neutral color palettes, and well-balanced proportions contribute to a look that remains fresh over time.
2. Rooted in Functionality
If a design prioritizes function as much as form, it is more likely to endure. Practicality and usability should be at the core, ensuring that the design continues to serve its purpose efficiently. In construction, for example, well-planned layouts and durable materials contribute to long-lasting appeal.
3. Inspired by Nature
Natural elements, such as stone, wood, and earth tones, have always been a staple of timeless design. Since nature itself is everlasting, incorporating organic textures and colors helps create a look that never feels outdated.
4. Influenced by History, Not Hype
Timeless designs often take cues from historical influences that have proven their longevity. Architectural styles like mid-century modern, classical, and industrial remain relevant because they have strong foundations in design principles rather than passing fads.
5. Balanced and Harmonious Composition
Good design follows fundamental principles such as symmetry, proportion, and scale. If a trend maintains a sense of balance and harmony, it’s more likely to stand the test of time. Designs that feel chaotic or unbalanced tend to fade quickly as they become overwhelming or impractical.
6. Adaptability Across Different Eras
A timeless design is versatile enough to blend with evolving styles and trends. Whether paired with modern elements or classic details, it should integrate seamlessly without looking out of place.
7. Enduring Materials and Craftsmanship
Materials and craftsmanship play a major role in a design’s longevity. High-quality materials like marble, hardwood, and concrete age beautifully, while cheap, synthetic alternatives often deteriorate and lose appeal. Investing in quality ensures a long-lasting impact.
8. Avoiding Overly Trendy Details
Fads are often characterized by extreme variations in color, form, or material. If a design heavily relies on a specific moment’s aesthetic (like neon colors in the '80s or millennial pink in the 2010s), it will likely feel outdated once the hype fades.
9. Emotional Connection and Comfort
Timeless design tends to evoke a sense of comfort, nostalgia, or familiarity. Whether in architecture, web design, or fashion, people gravitate toward designs that make them feel at ease and connected to something meaningful.
Conclusion
The key to identifying a timeless design trend is recognizing qualities that prioritize longevity, function, and balance over fleeting hype. Whether designing a website, a home, or a brand identity, choosing elements that are simple, high-quality, and adaptable will ensure lasting appeal.
Do you want a design that stands the test of time? Let’s create something that never goes out of style!



9