
Search results for "Boosted problem solving" in Home Design Ideas
 Simply Home Decorating
This beautiful North Vancouver home belongs to a nature-loving and health-conscious couple, Emma and Vince (names changed), their two young children, and their dog, Jasper. When they contacted us about renovating and furnishing their kitchen and family room, we walked in and saw a world of potential waiting to be uncovered.
Before: Larkhall Crescent Home:
Like many original North Vancouver homes, the interior was definitely dated. We encountered late ‘80s finishes in powder pink and teal green, old carpet, and a kitchen that wasn’t maximized to suit this family’s modern-day lifestyle. However, the size of the rooms offered us a ton of space with which to get creative.
Knowing our clients’ love of cooking, need for work spaces (Emma and Vince both work remotely), and growing family, we developed a design concept that would increase usable space, optimize storage, and create intimacy in this large area. As for the style, we were inspired by their European roots, inventing a new and modern take on “Belgian Farmhouse” style. Now, the home is truly one-of-a-kind.
After: Warm & Cozy Family Room:
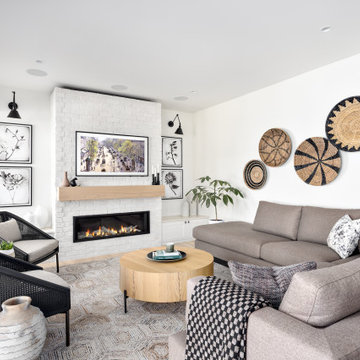
Fresh, bright, and comfortable, this living area has been transformed! We started with the fireplace as a focal point, selecting aged brick tiles for added texture and a crisp wood mantle. The taupe-coloured sectional infuses the room with visual warmth and serves the added purpose of separating the family room from the kitchen.
Emma and Vince were also keen on using non-toxic materials in their home, and we were happy to oblige. To meet their needs, we sourced natural wood elements and sought out Canadian-made products - that adhere to high health standards - whenever possible.
Look closer at the elements of this space, and you will find this stunning, honeycomb-patterned rug in earthy gold, beige, and charcoal tones. It’s plush to the touch and full of visual texture that brings this room’s colour palette together. We sourced these two-tone chairs with caning, petrified wood side table, black sconces, and botanical prints in greyscale from local artist, Heather Johnston.
We topped off the space with this dark wood and rattan console that offers storage facing the kitchen and presents an opportunity to display cherished items. The result is a cozy lounging space brimming with comfort and functionality. It’s perfect for enjoying quality family time, or Emma can simply slide the coffee table away to make room for her morning yoga practice.
Now, let’s turn around and give some attention to the kitchen. Do you remember what the original kitchen looked like? If not, scroll back up, because the transformation is shocking…
Moody & Welcoming Kitchen for Healthy Living:
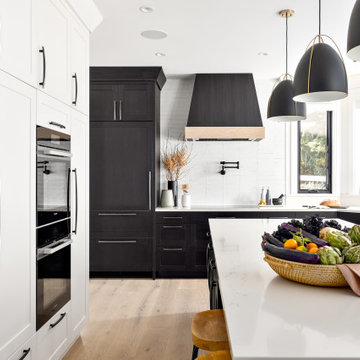
This kitchen looks very different from how it started, right? Though we didn’t touch any walls, the kitchen has almost doubled in usable space! We created a long, extended island with storage, an outlet for small appliances, and seating for comfortable prep, after-school snacking, or mingling among friends.
On the other side of the island, the family has even more storage and an integrated dishwasher within easy reach of the sink, perfect for quick clean-up. From this angle, you can also see the expansive custom Shaker cabinetry in white and the integrated double ovens. These facilitate their cooking experience and gave us the opportunity to add an additional surprise…
A coffee garage station and more hidden storage! Keeping these items located along the perimeter allows them to be accessed by the family or their guests without someone getting under the cook’s feet. These are the little details that make everyday life easier and more enjoyable.
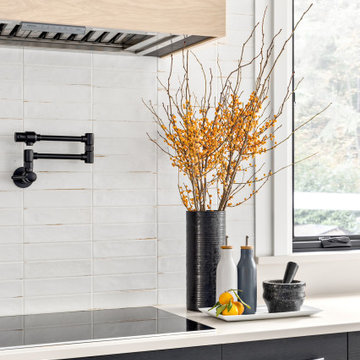
Moving deeper into the kitchen, the seamless induction cooktop topped with a freestanding concealed hood fan commands attention in a soft yet prominent way. The natural wood accent mirrors the fireplace mantle, and the choice of off-black wood-grain cabinets not only continues our black-and-white colour palette but adds a sense of depth and contrast. The corner sink is located to the right and perfectly positioned with a view of their thriving backyard.
To invite more of this family’s character into the space, we mixed metals for interest — matte black, dark pewter, and warm brass — and created open shelves in white oak for their plants and decor. You can also glimpse the tumbled edge of the backsplash tile, which echoes the rustic brick of the fireplace. It adds that farmhouse charm while still feeling timeless and sophisticated.
Last but not least, we designed this dining banquette in the bay window (with integrated bench storage, of course), where the family can share a meal together, the kids can do homework, or Emma and Vince can work and enjoy a change of scenery from their offices. Like the other spaces in the home, it was designed to be beautiful, multi-functional, and long-lasting.
Praise from Our Clients:
It is clear that we love this home, but what did our clients have to say?
“Lori is a visionary and masters execution to the finest detail all at the same time. When she first met us to know more about who we are and how we live, she could right away envision how we could use the space in our kitchen and living room…The results exceeded our expectations.
Lori and her team were also a delight to work with — coordination with all the trades, fast problem-solving, regular updates, professional and friendly attitude of her entire team — made it the dream team. Thank you SHD for making our space so beautiful!”
In turn, we are so grateful for this family’s trust, their open communication, and for being wonderful people with whom to work. (So, thank you!)
 Simply Home Decorating
This beautiful North Vancouver home belongs to a nature-loving and health-conscious couple, Emma and Vince (names changed), their two young children, and their dog, Jasper. When they contacted us about renovating and furnishing their kitchen and family room, we walked in and saw a world of potential waiting to be uncovered.
Before: Larkhall Crescent Home:
Like many original North Vancouver homes, the interior was definitely dated. We encountered late ‘80s finishes in powder pink and teal green, old carpet, and a kitchen that wasn’t maximized to suit this family’s modern-day lifestyle. However, the size of the rooms offered us a ton of space with which to get creative.
Knowing our clients’ love of cooking, need for work spaces (Emma and Vince both work remotely), and growing family, we developed a design concept that would increase usable space, optimize storage, and create intimacy in this large area. As for the style, we were inspired by their European roots, inventing a new and modern take on “Belgian Farmhouse” style. Now, the home is truly one-of-a-kind.
After: Warm & Cozy Family Room:
Fresh, bright, and comfortable, this living area has been transformed! We started with the fireplace as a focal point, selecting aged brick tiles for added texture and a crisp wood mantle. The taupe-coloured sectional infuses the room with visual warmth and serves the added purpose of separating the family room from the kitchen.
Emma and Vince were also keen on using non-toxic materials in their home, and we were happy to oblige. To meet their needs, we sourced natural wood elements and sought out Canadian-made products - that adhere to high health standards - whenever possible.
Look closer at the elements of this space, and you will find this stunning, honeycomb-patterned rug in earthy gold, beige, and charcoal tones. It’s plush to the touch and full of visual texture that brings this room’s colour palette together. We sourced these two-tone chairs with caning, petrified wood side table, black sconces, and botanical prints in greyscale from local artist, Heather Johnston.
We topped off the space with this dark wood and rattan console that offers storage facing the kitchen and presents an opportunity to display cherished items. The result is a cozy lounging space brimming with comfort and functionality. It’s perfect for enjoying quality family time, or Emma can simply slide the coffee table away to make room for her morning yoga practice.
Now, let’s turn around and give some attention to the kitchen. Do you remember what the original kitchen looked like? If not, scroll back up, because the transformation is shocking…
Moody & Welcoming Kitchen for Healthy Living:
This kitchen looks very different from how it started, right? Though we didn’t touch any walls, the kitchen has almost doubled in usable space! We created a long, extended island with storage, an outlet for small appliances, and seating for comfortable prep, after-school snacking, or mingling among friends.
On the other side of the island, the family has even more storage and an integrated dishwasher within easy reach of the sink, perfect for quick clean-up. From this angle, you can also see the expansive custom Shaker cabinetry in white and the integrated double ovens. These facilitate their cooking experience and gave us the opportunity to add an additional surprise…
A coffee garage station and more hidden storage! Keeping these items located along the perimeter allows them to be accessed by the family or their guests without someone getting under the cook’s feet. These are the little details that make everyday life easier and more enjoyable.
Moving deeper into the kitchen, the seamless induction cooktop topped with a freestanding concealed hood fan commands attention in a soft yet prominent way. The natural wood accent mirrors the fireplace mantle, and the choice of off-black wood-grain cabinets not only continues our black-and-white colour palette but adds a sense of depth and contrast. The corner sink is located to the right and perfectly positioned with a view of their thriving backyard.
To invite more of this family’s character into the space, we mixed metals for interest — matte black, dark pewter, and warm brass — and created open shelves in white oak for their plants and decor. You can also glimpse the tumbled edge of the backsplash tile, which echoes the rustic brick of the fireplace. It adds that farmhouse charm while still feeling timeless and sophisticated.
Last but not least, we designed this dining banquette in the bay window (with integrated bench storage, of course), where the family can share a meal together, the kids can do homework, or Emma and Vince can work and enjoy a change of scenery from their offices. Like the other spaces in the home, it was designed to be beautiful, multi-functional, and long-lasting.
Praise from Our Clients:
It is clear that we love this home, but what did our clients have to say?
“Lori is a visionary and masters execution to the finest detail all at the same time. When she first met us to know more about who we are and how we live, she could right away envision how we could use the space in our kitchen and living room…The results exceeded our expectations.
Lori and her team were also a delight to work with — coordination with all the trades, fast problem-solving, regular updates, professional and friendly attitude of her entire team — made it the dream team. Thank you SHD for making our space so beautiful!”
In turn, we are so grateful for this family’s trust, their open communication, and for being wonderful people with whom to work. (So, thank you!)
 Simply Home Decorating
This beautiful North Vancouver home belongs to a nature-loving and health-conscious couple, Emma and Vince (names changed), their two young children, and their dog, Jasper. When they contacted us about renovating and furnishing their kitchen and family room, we walked in and saw a world of potential waiting to be uncovered.
Before: Larkhall Crescent Home:
Like many original North Vancouver homes, the interior was definitely dated. We encountered late ‘80s finishes in powder pink and teal green, old carpet, and a kitchen that wasn’t maximized to suit this family’s modern-day lifestyle. However, the size of the rooms offered us a ton of space with which to get creative.
Knowing our clients’ love of cooking, need for work spaces (Emma and Vince both work remotely), and growing family, we developed a design concept that would increase usable space, optimize storage, and create intimacy in this large area. As for the style, we were inspired by their European roots, inventing a new and modern take on “Belgian Farmhouse” style. Now, the home is truly one-of-a-kind.
After: Warm & Cozy Family Room:
Fresh, bright, and comfortable, this living area has been transformed! We started with the fireplace as a focal point, selecting aged brick tiles for added texture and a crisp wood mantle. The taupe-coloured sectional infuses the room with visual warmth and serves the added purpose of separating the family room from the kitchen.
Emma and Vince were also keen on using non-toxic materials in their home, and we were happy to oblige. To meet their needs, we sourced natural wood elements and sought out Canadian-made products - that adhere to high health standards - whenever possible.
Look closer at the elements of this space, and you will find this stunning, honeycomb-patterned rug in earthy gold, beige, and charcoal tones. It’s plush to the touch and full of visual texture that brings this room’s colour palette together. We sourced these two-tone chairs with caning, petrified wood side table, black sconces, and botanical prints in greyscale from local artist, Heather Johnston.
We topped off the space with this dark wood and rattan console that offers storage facing the kitchen and presents an opportunity to display cherished items. The result is a cozy lounging space brimming with comfort and functionality. It’s perfect for enjoying quality family time, or Emma can simply slide the coffee table away to make room for her morning yoga practice.
Now, let’s turn around and give some attention to the kitchen. Do you remember what the original kitchen looked like? If not, scroll back up, because the transformation is shocking…
Moody & Welcoming Kitchen for Healthy Living:
This kitchen looks very different from how it started, right? Though we didn’t touch any walls, the kitchen has almost doubled in usable space! We created a long, extended island with storage, an outlet for small appliances, and seating for comfortable prep, after-school snacking, or mingling among friends.
On the other side of the island, the family has even more storage and an integrated dishwasher within easy reach of the sink, perfect for quick clean-up. From this angle, you can also see the expansive custom Shaker cabinetry in white and the integrated double ovens. These facilitate their cooking experience and gave us the opportunity to add an additional surprise…
A coffee garage station and more hidden storage! Keeping these items located along the perimeter allows them to be accessed by the family or their guests without someone getting under the cook’s feet. These are the little details that make everyday life easier and more enjoyable.
Moving deeper into the kitchen, the seamless induction cooktop topped with a freestanding concealed hood fan commands attention in a soft yet prominent way. The natural wood accent mirrors the fireplace mantle, and the choice of off-black wood-grain cabinets not only continues our black-and-white colour palette but adds a sense of depth and contrast. The corner sink is located to the right and perfectly positioned with a view of their thriving backyard.
To invite more of this family’s character into the space, we mixed metals for interest — matte black, dark pewter, and warm brass — and created open shelves in white oak for their plants and decor. You can also glimpse the tumbled edge of the backsplash tile, which echoes the rustic brick of the fireplace. It adds that farmhouse charm while still feeling timeless and sophisticated.
Last but not least, we designed this dining banquette in the bay window (with integrated bench storage, of course), where the family can share a meal together, the kids can do homework, or Emma and Vince can work and enjoy a change of scenery from their offices. Like the other spaces in the home, it was designed to be beautiful, multi-functional, and long-lasting.
Praise from Our Clients:
It is clear that we love this home, but what did our clients have to say?
“Lori is a visionary and masters execution to the finest detail all at the same time. When she first met us to know more about who we are and how we live, she could right away envision how we could use the space in our kitchen and living room…The results exceeded our expectations.
Lori and her team were also a delight to work with — coordination with all the trades, fast problem-solving, regular updates, professional and friendly attitude of her entire team — made it the dream team. Thank you SHD for making our space so beautiful!”
In turn, we are so grateful for this family’s trust, their open communication, and for being wonderful people with whom to work. (So, thank you!)
Find the right local pro for your project
 East Spruce design / build
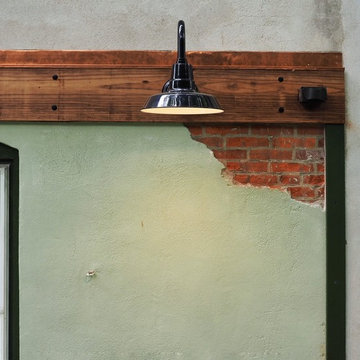
Our client asked for a more functional and visually pleasing backdrop to his outdoor patio space. The result incorporates lighting, fresh paint, and touches of aged wood trim, to give an old-world European feel. The feature of the design solves a problem our client did not realize he had. A broken and leaking downspout led to deterioration of the home’s stucco finish. To solve this problem and route the water away from the outdoor entertaining space, we constructed a large scupper which also serves as a gateway/arbor. Rainwater harvesting and use of thermally modified wood add points for sustainability.

 Free Lancing
Effective residential construction project management is crucial in today’s fast-moving building industry. It means overseeing every step of building a home, from planning to finishing, to ensure projects are completed time, within budget, and with high quality. Unlike commercial projects, residential projects require special attention to meet homeowners' unique needs and wishes, requiring a customized approach from the beginning to the end.
In 2025, the construction sector will use advanced technologies like AI and integrated project delivery (IPD) to streamline processes and improve stakeholder collaboration. However, project managers face significant challenges, including managing risks, maintaining quality control, and ensuring effective communication among team members.
A WIP Report (Work-in-Progress Report) is a key tool that helps track a project's budget, progress, and resource use. It provides clear insights, making managing costs easier, avoiding delays, and making informed decisions.
By adopting best practices and using modern construction management tools, project managers can overcome these challenges and deliver successful residential construction projects that meet client expectations and contribute to a sustainable future.
This article provides a brief overview of residential construction project management, highlights its importance, and touches on the challenges faced by project managers while incorporating the latest trends and technologies in the field.
Types of Residential Construction Management
Here are the different types of Residential Construction Management:
Single-Family Homes: These are standalone houses built for individual families. Managing these projects involves overseeing construction from planning to completion, ensuring that the home meets the owner's preferences and budget.
Multi-Family Housing: This includes apartments, condominiums, and townhouses. Projects of this type require managing multiple units, often with shared facilities, and ensuring compliance with local building codes.
Custom Home Building: This involves constructing homes tailored to specific client needs. Close collaboration with architects and designers is required to ensure the house reflects the owner's personality and preferences.
Home Renovation and Remodeling: These projects focus on updating or expanding existing homes. They often involve working with subcontractors for specialized tasks like electrical or plumbing work.
Components of Residential Construction Project Management
Managing a residential construction project requires carefully coordinating people, materials, and timelines. A well-structured approach ensures efficiency, cost control, and high-quality results.
Roles and Responsibilities
A project manager plays a vital role in residential construction. They oversee every step from planning to completion and ensure the project stays on schedule, within budget, and meets quality standards.
Project Manager’s Role in Home Construction
The project manager is responsible for organizing tasks, managing resources, and solving problems that arise during construction. They coordinate between different teams, track progress, and ensure safety regulations are followed.
Collaboration with Contractors, Architects, and Stakeholders
Successful residential construction requires teamwork. Project managers work closely with architects to bring designs to new heights, coordinate with contractors to manage labor and materials, and keep stakeholders (such as homeowners and investors) informed about project updates.
Client Communication and Expectations Management
Clear communication with clients is essential. The project manager keeps homeowners updated on timelines, changes, and challenges. Setting realistic expectations and providing regular updates, they help avoid misunderstandings and keep the project running smoothly.
Project Scope & Planning
Practical project planning sets the foundation for a successful residential construction project. It ensures clear goals, minimizes risks, and keeps the project on track.
Defining Project Objectives and Deliverables:
Clearly outlining what needs to be done and what the final result should look like is essential. This involves setting specific, measurable goals that align with the homeowner's vision and budget.
Managing Homeowner Expectations and Scope Creep:
Homeowners often have changing needs or ideas. Effective project managers must manage these expectations to prevent "scope creep," which can delay projects and increase costs. This involves open communication and setting clear boundaries.
Ensuring Compliance with Zoning Laws and Permits:
Before construction begins, it's crucial to ensure that all necessary permits are obtained and that the project complies with local zoning laws. This step avoids costly fines and delays, ensuring the project moves forward smoothly.
Budgeting & Cost Control
Proper budgeting is essential for keeping residential construction projects financially viable. Effective cost management prevents overspending and ensures profitability.
Accurate Cost Estimation for Residential Projects
A precise cost estimate considers labor, materials, permits, and unexpected expenses. Using historical data and Sage 300 CRE for financial management improves accuracy and helps set realistic budgets.
Budget Allocation and Tracking
Allocating funds efficiently ensures that each phase of the project receives the necessary resources. Tracking expenses through Construction & Financial Dashboards allows for real-time monitoring and early detection of budget deviations.
Preventing Budget Overruns
Uncontrolled costs can derail a project. Regular financial reviews, automated alerts for overspending, and contingency planning help keep expenses in check and prevent financial strain.
Scheduling & Timeline Management
Timely project completion is crucial in residential construction. Effective scheduling minimizes delays and ensures a smooth workflow.
Creating Detailed Project Schedules
A structured schedule outlines all tasks, deadlines, and dependencies. Breaking down the project into phases, planning, execution, and finishing, helps maintain order and clarity.
Preventing Delays & Meeting Deadlines
Delays can result from labor shortages, weather conditions, or supply chain issues. To avoid problems, it’s good to check for risks ahead of time, add extra time to schedules, and keep everyone on the same page.
Using Gantt Charts and Critical Path Methods
CPM for Construction helps identify critical activities that directly impact project completion, while Gantt charts provide a visual timeline of tasks. Both tools optimize scheduling and improve efficiency.
Residential Construction Project Management Phases
Managing a residential construction project effectively requires a structured approach through various phases. Each phase plays a critical role in ensuring the project's success, from initial planning to completion.
Pre-Construction Phase
The pre-construction phase sets the foundation for a smooth and efficient building process. Proper planning at this stage helps prevent costly changes and delays later.
Site Analysis & Approvals: A thorough site analysis assesses soil conditions, topography, and environmental factors. Feasibility studies evaluate project viability, including costs and regulatory compliance. Obtaining zoning approvals, permits, and other legal clearances is crucial before breaking ground.
Selecting Materials and Procurement Strategies: Choosing the right materials impacts durability, sustainability, and cost efficiency. A well-planned procurement strategy, including bulk purchasing and reliable supplier partnerships, ensures timely delivery and cost savings. Using Sage 300 CRE for procurement management helps streamline material sourcing and financial planning.
Construction Phase
The construction phase transforms plans into reality. Effective coordination and strict quality control ensure a successful build.
Resource Allocation and Workflow Coordination: Efficiently managing labor, equipment, and materials is key to maintaining progress. Using CPM for Construction, project managers can allocate resources strategically, prevent bottlenecks, and optimize workflows for timely completion.
Project Closeout & Handover
The final phase of residential construction project management is crucial for ensuring a smooth transition from construction to occupancy. Proper closeout procedures guarantee quality, client satisfaction, and long-term project success.
Final Inspections and Quality Assurance: Before finishing the project, a final inspection checks that everything meets safety rules and quality standards. Any problems need to be fixed quickly. Using Procore helps make inspections and tracking issues easier, ensuring a high-quality final product.
Client Walkthrough and Support: A final check helps homeowners see the finished work, ask questions, and make sure it meets their expectations. This is also a chance to explain important home features and maintenance tips. Good communication here builds trust and strengthens relationships.
Warranty Management and Feedback: Efficient warranty management ensures clients get quick help for any issues after construction. A clear process for tracking requests and keeping in touch with homeowners boosts satisfaction. Collecting feedback helps improve future projects. Using S-Curve Forecasting tracks performance trends and refines management strategies.
Software for Residential Construction Project Management
The integration of technology in residential construction project management has revolutionized the way projects are planned, executed, and monitored. Digital tools streamline operations, reduce costs, and improve communication, making them essential for modern construction firms.
Importance of Digital Tools
Investing in digital tools is crucial for construction firms as it transforms the industry by enhancing efficiency, accuracy, and collaboration across the entire project lifecycle. They also improve project management by streamlining processes, automating tasks, and facilitating real-time stakeholder communication.
Top Construction Management Software for Residential Projects
Several software solutions are available for managing residential construction projects:
Procore: Known for its comprehensive project management features, including document management and collaboration tools.
Sage 300 CRE: Offers robust accounting and financial management capabilities, ideal for large-scale construction projects.
Buildertrend: Specializes in residential construction, providing tools for project scheduling, budgeting, and client communication.
CoConstruct: Focuses on custom home building and remodeling, offering features for estimating, scheduling, and project management.
WIP Reports: Useful for tracking work-in-progress and managing project finances effectively.
Features Comparison and Best Use Cases:
Procore: Best for large projects requiring extensive collaboration and document management.
Sage 300 CRE: Ideal for firms needing robust financial management.
Buildertrend: Suitable for residential builders focusing on client communication and project scheduling.
CoConstruct: Perfect for custom home builders who need detailed estimating and scheduling tools.
WIP Reports: Useful for firms needing to track project finances closely.
How Software Improves Project Efficiency
Construction management software significantly enhances project efficiency in several ways:
Automating Accounting and Job Costing: Software like Sage 300 CRE automates financial tasks, reducing manual errors and improving budget tracking.
Streamlining Document Management and Communication: Tools like Procore centralize documents and facilitate real-time communication among team members, reducing misunderstandings and delays.
Mobile-Friendly Solutions for Real-Time Tracking: Mobile apps from platforms like Buildertrend allow for on-site access to project data, enabling real-time tracking and decision-making.
These digital tools and software solutions are essential for modern residential construction project management, offering benefits such as improved efficiency, enhanced collaboration, and better financial control.
Challenges in Residential Construction Project Management
Residential construction projects face a variety of challenges that can impact their success. Here are some of the key issues project managers encounter:
Managing Subcontractors and Labor Shortages
One of the biggest challenges in residential construction is managing subcontractors and dealing with labor shortages. Subcontractors often have their own schedules and priorities, which can lead to delays if not coordinated properly. Additionally, labor shortages can slow down projects and increase costs due to the need for overtime or hiring temporary workers.
Budget Overruns and Unexpected Costs
Budget overruns are common in residential construction due to factors like material price fluctuations, unexpected site conditions, or changes in project scope. Effective budget management involves regularly monitoring expenses and having contingency plans for unexpected costs.
Changing Construction and Eco Rules
Construction and Eco Rules are always changing, so project managers need to keep up with the latest regulations. This involves following guidelines for saving energy, protecting the environment, and ensuring safety. Ignoring these rules can lead to fines, delays, or even stopping the project.
Best Practices
To ensure your residential construction projects run smoothly and successfully, follow these essential best practices:
Setting Clear Project Goals and Milestones
Clearly defining what you want to achieve is the first step to success. Set specific, measurable, achievable, relevant, and time-bound (SMART) goals. This helps everyone involved understand what needs to be done and by when. For example, instead of saying "build a house," say "build a house with three bedrooms and two bathrooms within the next nine months."
Stakeholder Collaboration
Good communication is key to keeping everyone on the same page. Regular meetings with contractors, suppliers, and homeowners help prevent misunderstandings and ensure that everyone knows what's happening and what's next. This open dialogue also helps resolve issues quickly, preventing small problems from becoming big delays.
Using Data-Driven Insights for Decision-Making
Making decisions based on facts rather than guesses is crucial. Use data and analytics to understand project progress, identify potential issues early, and make informed decisions. For instance, if data shows that a particular material is consistently causing delays, you can plan ahead to avoid those delays in the future.
Proactive Risk Management Strategies
Things don't always go as planned, so being prepared is essential. Identify potential risks early and have a plan to manage them. This might include having backup suppliers, planning for weather conditions, or setting aside extra funds for unexpected expenses. Being proactive can prevent small issues from turning into major problems.
Conclusion
Effective residential construction project management requires careful planning, clear communication, and the right digital tools. From single-family homes to multi-family housing and custom projects, managing timelines, budgets, and quality is essential for success.
By following best practices, using project management software, and staying ahead of industry trends, project managers can ensure smooth execution and client satisfaction despite challenges like labor shortages, budget overruns, and regulatory compliance; modern technology and strategic planning help mitigate risks.
Construction firms can improve efficiency, enhance collaboration, and maintain financial control by adopting advanced tools like Procore, Sage 300 CRE, and Buildertrend. A well-managed project delivers a quality home and builds trust and long-term success in the industry.
FAQs
What is residential construction project management?
It involves overseeing all aspects of building residential properties, from initial planning and design to construction and completion, ensuring projects are completed on time, within budget, and to the desired quality standards.
How can I prevent budget overruns in my construction project?
Accurate cost estimation, continuous budget tracking, and having contingency plans for unexpected expenses are key strategies to prevent budget overruns.
What are the main stages of a residential construction project?
The primary stages include design, pre-construction, procurement, and construction.
How does construction management software improve project efficiency?
It streamlines processes like scheduling, budgeting, and communication, providing real-time data access and collaboration among stakeholders, which enhances overall project efficiency.
How can I ensure my project complies with local building codes and regulations?
Engage professionals familiar with local laws, obtain all necessary permits before starting, and conduct regular inspections to ensure adherence to building codes and regulations.
 Ralf Poerschke
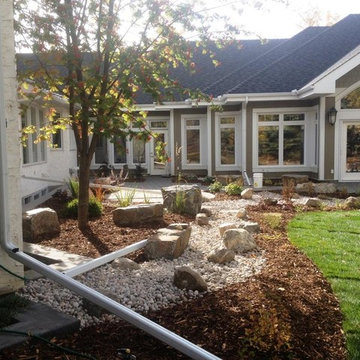
A back yard with only a small exit for the rain water to drain out. The problem got solved with a rainwater catching system. Rocked drainage swales collect the rainwater from the downspouts and feed an underground basin made of Aquascape Aquabloxes. A natural waterfall at the brush line helps keeping the stored water fresh and adds an accent. Planting beds soften the look of the rocks and hard surfaces, unmaintained areas allow nature to get closer to the house.
 Ralf Poerschke
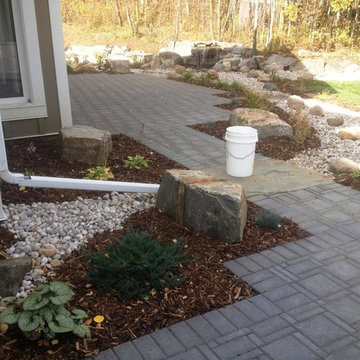
A back yard with only a small exit for the rain water to drain out. The problem got solved with a rainwater catching system. Rocked drainage swales collect the rainwater from the downspouts and feed an underground basin made of Aquascape Aquabloxes. A natural waterfall at the brush line helps keeping the stored water fresh and adds an accent. Planting beds soften the look of the rocks and hard surfaces, unmaintained areas allow nature to get closer to the house.
 Kitchen Solvers of Fort Lauderdale
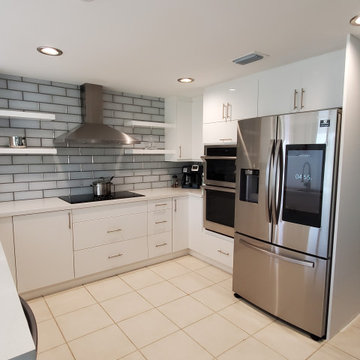
When we got to our client's house, she not only needed to remodel her kitchen but also to solve a serious problem of mold behind her walls due to an old water leak. We checked all the cabinets and determined that they were not affected by mold. We solved the mold problem by removing all the cabinets and drywall and replaced with new drywall. We then took the cabinets to our workshop and refaced all of them. The kitchen cabinets were done in a white gloss level acrylic door while the peninsula was done in a sapphire color. We also made some modifications to the layout by removing the cabinets above the cooktop and installing a hood and floating shelves on both sides. This gave the kitchen more space and a modern and light style. Next we installed a Calacatta quartz countertop and a tile backsplash. Lastly, we added a wine cooler, LED lights under the wall cabinets and in the toe kick and pendant lights over the island.
 Tile Doctor Ltd
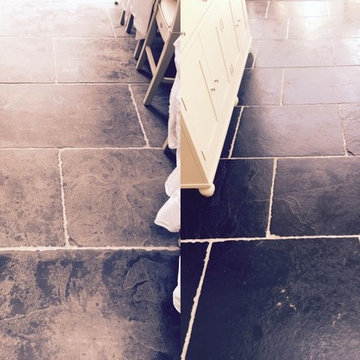
I was recently asked to this property in Wimbledon in to see if there was anything we could do to resolve the problem with a recently laid Black Limestone tiled floor. The builders that had laid the Limestone did not cover or clean the tiles prior to sealing with an impregnating seal thereby trapping in all the dirt from the building works. They then grouted the tiles but didn’t clean the grout off the surface before putting on another two coats of sealer all of which resulted in a very poor finish.
Naturally the customer was not happy so called them back to rectify the problem and so they came back and tried to strip the sealer off with cloths and a chemical stripper. Then without rinsing the stone to remove the chemicals they added another two coats of sealer; in desperation the lady gave up with them and called me in.
To resolve I tried all the sealant strippers available to me but couldn’t budge the mess effectively. The only other option available was to diamond grind the surface so I discussed this with the customer and she agreed to this and left me to carry on.
Initially I started with a coarse 400 grit diamond pad but even that wasn’t having much effect so in the end I had to cut back the surface using a 100 grit pad moving up to 200 grit, then 400 before finally stopping at 800. To lubricate the process you need to use a little water and then rinse away the resultant soil after each pad. If this was a polished stone surface I would have continued with finer and finer grits to restore the surface polish however these tiles were rough limestone and I needed to leave it as near to how it should be.
Once all the Limestone had been stripped back the stone turned an uninviting grey colour, so to bring it back to black I applied two coats of Tile Doctor Stone Oil which enhanced the colour.
I left the floor overnight to allow the Stone Oil to dry out and then returned to seal the Limestone using two coats of Tile Doctor Colour Grow which is an impregnating sealer that enhances the colour in the stone and will protect it from staining going forward.
When the customer saw the final result she was overwhelmed and said she felt like crying with relief, because the floor now looked how she had imagined it to be. It was a great feeling for me to know that I had solved the problems for her.
 Sosna Inc
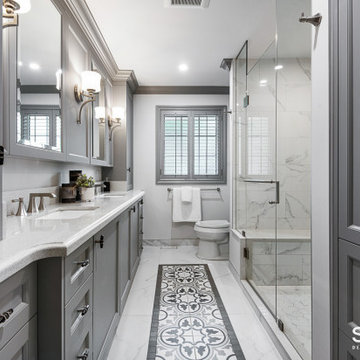
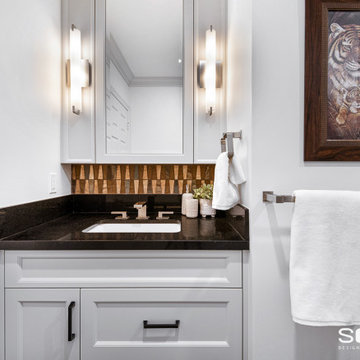
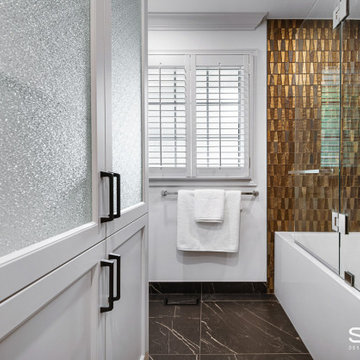
ouble the bathroom trouble in this 1990’s home … solved with this Sosna renovation!
Our clients, empty-nesters desiring the peace and ease of retirement, were instead frustrated and exhausted with leaky bathroom plumbing from a previous renovation that would just not go away.
Their Shared Bathroom, renovated by their friend years ago, was not done correctly, causing repetitive leaking with damage to their Kitchen ceiling below. They had had enough of trying to fix it themselves. To say this couple was leery of hiring another renovator was an understatement.
But they also knew it was time to fix this problem and decided to update their Master Bathroom while they were at it.
Our initial plan included minimal demolition by re-organizing the walls between the 2 Bathrooms and keeping the existing plumbing rough-ins in place, while updating the fixtures.
However, unwelcome surprises are sometimes inevitable in renovations. Even though we conducted a thorough investigation during the planning stage, we were faced with plumbing in the Shared Bathroom that was not done correctly and may even have been illegal.
Because of this, relocating the rough-ins in the Shared Bathroom were necessary after all, which then meant re-planning the walls in between the 2 Bathrooms.
These are exactly the kinds of problems we love to solve. Why? Because we know that we’re not just fixing the physical problems that can be seen; we know we are also restoring this family’s faith in quality craftsmanship and good service, and that it’s possible to enjoy the renovation process.
This is why we don’t vary from our tried and true Renovating the Sosna Way™ process.
Because it works. For everyone.
For the Masons, we ended up renovating two bathrooms and completing a number of smaller projects that were causing them great pain to find a renovator for.
At the end of the day, we have another happy client. The Masons have two new bathrooms that better fit their life stage and style, and the “Honey-Do” list is empty!
When you and your home are ready for an upgrade, we're the Renovator You Can Count On™. It's our promise. Contact us to get started!
 Sosna Inc
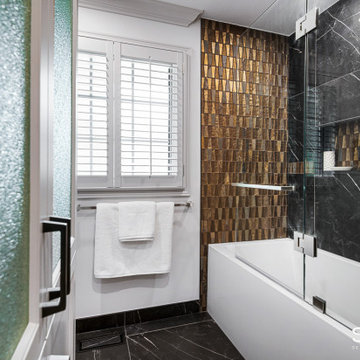
ouble the bathroom trouble in this 1990’s home … solved with this Sosna renovation!
Our clients, empty-nesters desiring the peace and ease of retirement, were instead frustrated and exhausted with leaky bathroom plumbing from a previous renovation that would just not go away.
Their Shared Bathroom, renovated by their friend years ago, was not done correctly, causing repetitive leaking with damage to their Kitchen ceiling below. They had had enough of trying to fix it themselves. To say this couple was leery of hiring another renovator was an understatement.
But they also knew it was time to fix this problem and decided to update their Master Bathroom while they were at it.
Our initial plan included minimal demolition by re-organizing the walls between the 2 Bathrooms and keeping the existing plumbing rough-ins in place, while updating the fixtures.
However, unwelcome surprises are sometimes inevitable in renovations. Even though we conducted a thorough investigation during the planning stage, we were faced with plumbing in the Shared Bathroom that was not done correctly and may even have been illegal.
Because of this, relocating the rough-ins in the Shared Bathroom were necessary after all, which then meant re-planning the walls in between the 2 Bathrooms.
These are exactly the kinds of problems we love to solve. Why? Because we know that we’re not just fixing the physical problems that can be seen; we know we are also restoring this family’s faith in quality craftsmanship and good service, and that it’s possible to enjoy the renovation process.
This is why we don’t vary from our tried and true Renovating the Sosna Way™ process.
Because it works. For everyone.
For the Masons, we ended up renovating two bathrooms and completing a number of smaller projects that were causing them great pain to find a renovator for.
At the end of the day, we have another happy client. The Masons have two new bathrooms that better fit their life stage and style, and the “Honey-Do” list is empty!
When you and your home are ready for an upgrade, we're the Renovator You Can Count On™. It's our promise. Contact us to get started!
 Sosna Inc
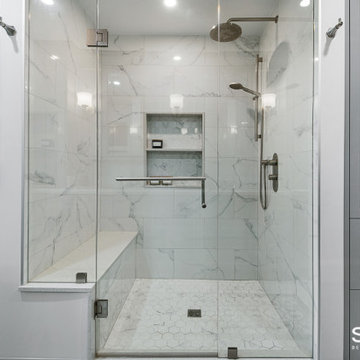
ouble the bathroom trouble in this 1990’s home … solved with this Sosna renovation!
Our clients, empty-nesters desiring the peace and ease of retirement, were instead frustrated and exhausted with leaky bathroom plumbing from a previous renovation that would just not go away.
Their Shared Bathroom, renovated by their friend years ago, was not done correctly, causing repetitive leaking with damage to their Kitchen ceiling below. They had had enough of trying to fix it themselves. To say this couple was leery of hiring another renovator was an understatement.
But they also knew it was time to fix this problem and decided to update their Master Bathroom while they were at it.
Our initial plan included minimal demolition by re-organizing the walls between the 2 Bathrooms and keeping the existing plumbing rough-ins in place, while updating the fixtures.
However, unwelcome surprises are sometimes inevitable in renovations. Even though we conducted a thorough investigation during the planning stage, we were faced with plumbing in the Shared Bathroom that was not done correctly and may even have been illegal.
Because of this, relocating the rough-ins in the Shared Bathroom were necessary after all, which then meant re-planning the walls in between the 2 Bathrooms.
These are exactly the kinds of problems we love to solve. Why? Because we know that we’re not just fixing the physical problems that can be seen; we know we are also restoring this family’s faith in quality craftsmanship and good service, and that it’s possible to enjoy the renovation process.
This is why we don’t vary from our tried and true Renovating the Sosna Way™ process.
Because it works. For everyone.
For the Masons, we ended up renovating two bathrooms and completing a number of smaller projects that were causing them great pain to find a renovator for.
At the end of the day, we have another happy client. The Masons have two new bathrooms that better fit their life stage and style, and the “Honey-Do” list is empty!
When you and your home are ready for an upgrade, we're the Renovator You Can Count On™. It's our promise. Contact us to get started!
 Sosna Inc
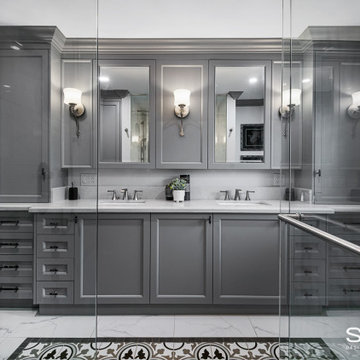
ouble the bathroom trouble in this 1990’s home … solved with this Sosna renovation!
Our clients, empty-nesters desiring the peace and ease of retirement, were instead frustrated and exhausted with leaky bathroom plumbing from a previous renovation that would just not go away.
Their Shared Bathroom, renovated by their friend years ago, was not done correctly, causing repetitive leaking with damage to their Kitchen ceiling below. They had had enough of trying to fix it themselves. To say this couple was leery of hiring another renovator was an understatement.
But they also knew it was time to fix this problem and decided to update their Master Bathroom while they were at it.
Our initial plan included minimal demolition by re-organizing the walls between the 2 Bathrooms and keeping the existing plumbing rough-ins in place, while updating the fixtures.
However, unwelcome surprises are sometimes inevitable in renovations. Even though we conducted a thorough investigation during the planning stage, we were faced with plumbing in the Shared Bathroom that was not done correctly and may even have been illegal.
Because of this, relocating the rough-ins in the Shared Bathroom were necessary after all, which then meant re-planning the walls in between the 2 Bathrooms.
These are exactly the kinds of problems we love to solve. Why? Because we know that we’re not just fixing the physical problems that can be seen; we know we are also restoring this family’s faith in quality craftsmanship and good service, and that it’s possible to enjoy the renovation process.
This is why we don’t vary from our tried and true Renovating the Sosna Way™ process.
Because it works. For everyone.
For the Masons, we ended up renovating two bathrooms and completing a number of smaller projects that were causing them great pain to find a renovator for.
At the end of the day, we have another happy client. The Masons have two new bathrooms that better fit their life stage and style, and the “Honey-Do” list is empty!
When you and your home are ready for an upgrade, we're the Renovator You Can Count On™. It's our promise. Contact us to get started!
 Sosna Inc
ouble the bathroom trouble in this 1990’s home … solved with this Sosna renovation!
Our clients, empty-nesters desiring the peace and ease of retirement, were instead frustrated and exhausted with leaky bathroom plumbing from a previous renovation that would just not go away.
Their Shared Bathroom, renovated by their friend years ago, was not done correctly, causing repetitive leaking with damage to their Kitchen ceiling below. They had had enough of trying to fix it themselves. To say this couple was leery of hiring another renovator was an understatement.
But they also knew it was time to fix this problem and decided to update their Master Bathroom while they were at it.
Our initial plan included minimal demolition by re-organizing the walls between the 2 Bathrooms and keeping the existing plumbing rough-ins in place, while updating the fixtures.
However, unwelcome surprises are sometimes inevitable in renovations. Even though we conducted a thorough investigation during the planning stage, we were faced with plumbing in the Shared Bathroom that was not done correctly and may even have been illegal.
Because of this, relocating the rough-ins in the Shared Bathroom were necessary after all, which then meant re-planning the walls in between the 2 Bathrooms.
These are exactly the kinds of problems we love to solve. Why? Because we know that we’re not just fixing the physical problems that can be seen; we know we are also restoring this family’s faith in quality craftsmanship and good service, and that it’s possible to enjoy the renovation process.
This is why we don’t vary from our tried and true Renovating the Sosna Way™ process.
Because it works. For everyone.
For the Masons, we ended up renovating two bathrooms and completing a number of smaller projects that were causing them great pain to find a renovator for.
At the end of the day, we have another happy client. The Masons have two new bathrooms that better fit their life stage and style, and the “Honey-Do” list is empty!
When you and your home are ready for an upgrade, we're the Renovator You Can Count On™. It's our promise. Contact us to get started!
 Sosna Inc
ouble the bathroom trouble in this 1990’s home … solved with this Sosna renovation!
Our clients, empty-nesters desiring the peace and ease of retirement, were instead frustrated and exhausted with leaky bathroom plumbing from a previous renovation that would just not go away.
Their Shared Bathroom, renovated by their friend years ago, was not done correctly, causing repetitive leaking with damage to their Kitchen ceiling below. They had had enough of trying to fix it themselves. To say this couple was leery of hiring another renovator was an understatement.
But they also knew it was time to fix this problem and decided to update their Master Bathroom while they were at it.
Our initial plan included minimal demolition by re-organizing the walls between the 2 Bathrooms and keeping the existing plumbing rough-ins in place, while updating the fixtures.
However, unwelcome surprises are sometimes inevitable in renovations. Even though we conducted a thorough investigation during the planning stage, we were faced with plumbing in the Shared Bathroom that was not done correctly and may even have been illegal.
Because of this, relocating the rough-ins in the Shared Bathroom were necessary after all, which then meant re-planning the walls in between the 2 Bathrooms.
These are exactly the kinds of problems we love to solve. Why? Because we know that we’re not just fixing the physical problems that can be seen; we know we are also restoring this family’s faith in quality craftsmanship and good service, and that it’s possible to enjoy the renovation process.
This is why we don’t vary from our tried and true Renovating the Sosna Way™ process.
Because it works. For everyone.
For the Masons, we ended up renovating two bathrooms and completing a number of smaller projects that were causing them great pain to find a renovator for.
At the end of the day, we have another happy client. The Masons have two new bathrooms that better fit their life stage and style, and the “Honey-Do” list is empty!
When you and your home are ready for an upgrade, we're the Renovator You Can Count On™. It's our promise. Contact us to get started!
 Fowler Outdoor Co
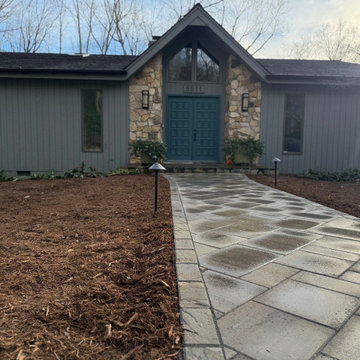
Drainage Solutions & Curb Appeal Transformation
This project focused on solving a persistent drainage issue that was impacting both the usability and appearance of the property. Standing water and poor grading were creating functional problems while diminishing the home’s overall curb appeal—an issue many homeowners face when water isn’t properly directed away from the home.
Fowler Outdoor Co. approached the project with a design-build mindset, addressing the root cause of the drainage problem through proper grading, water management, and structural solutions. By integrating effective drainage systems with thoughtfully designed hardscape elements, the team was able to redirect water flow, protect the property, and create a more stable foundation for the landscape.
Beyond functionality, the transformation elevated the front yard’s appearance with clean lines, intentional materials, and a cohesive layout that complements the home. The result is a space that not only performs better during heavy rain but also delivers a polished, welcoming first impression.
This project is a great example of how solving underlying issues like drainage can completely transform both the look and long-term performance of an outdoor space.
 Ogle Construction & Maintenance Service, Inc.
Problem: Homeowners had a leak in their smelly, damp basement
Solution: Problem solved... and fresh, beautiful living spaces were created!
"The homeowners called us to fix a leak in their basement... which turned out to be a backed up drain, caused by a crack in an obsolete drain tile, and two leaks in their foundation... it sort of snowballed," says Bryan Ogle, owner of Ogle Construction and Maintenance Services.
With small children in the home, the couple decided to invest in solving the problem with a long-
term solution. They wanted to make the basement safe and comfortable for their young family.
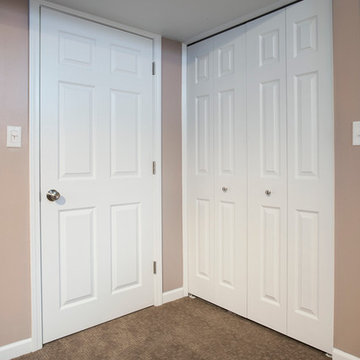
After the drain tile was fixed, the entire area was reinsulated, and finished with new sheetrock, trim, carpet and lighting. The electrical system was updated and a new laundry room (with loads of storage), bedroom and family room were created in the space. What was once a damp, smelly basement (with a dehumidifier running constantly) is now a fresh, clean living space for the family to enjoy.
 Gurchie Designs
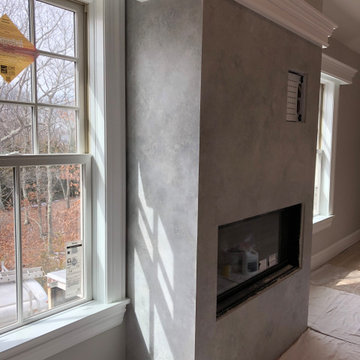
Some of the most important functions of a decorative painter is that of problem solving. For example, the front fireplace is porcelain but the sides are matched in paints.
 Kitchen Solvers of Fort Lauderdale
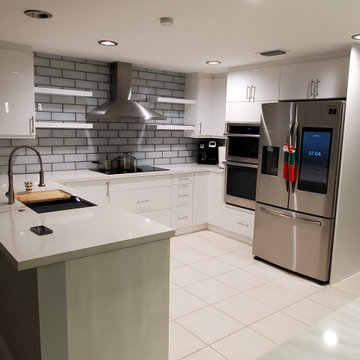
When we got to our client's house, she not only needed to remodel her kitchen but also to solve a serious problem of mold behind her walls due to an old water leak. We checked all the cabinets and determined that they were not affected by mold. We solved the mold problem by removing all the cabinets and drywall and replaced with new drywall. We then took the cabinets to our workshop and refaced all of them. The kitchen cabinets were done in a white gloss level acrylic door while the peninsula was done in a sapphire color. We also made some modifications to the layout by removing the cabinets above the cooktop and installing a hood and floating shelves on both sides. This gave the kitchen more space and a modern and light style. Next we installed a Calacatta quartz countertop and a tile backsplash. Lastly, we added a wine cooler, LED lights under the wall cabinets and in the toe kick and pendant lights over the island.
 Kitchen Solvers of Fort Lauderdale
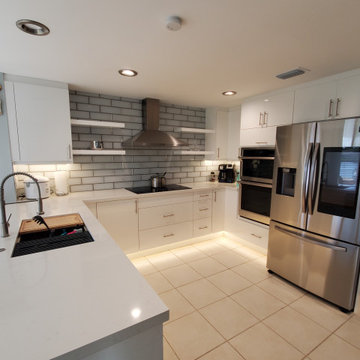
When we got to our client's house, she not only needed to remodel her kitchen but also to solve a serious problem of mold behind her walls due to an old water leak. We checked all the cabinets and determined that they were not affected by mold. We solved the mold problem by removing all the cabinets and drywall and replaced with new drywall. We then took the cabinets to our workshop and refaced all of them. The kitchen cabinets were done in a white gloss level acrylic door while the peninsula was done in a sapphire color. We also made some modifications to the layout by removing the cabinets above the cooktop and installing a hood and floating shelves on both sides. This gave the kitchen more space and a modern and light style. Next we installed a Calacatta quartz countertop and a tile backsplash. Lastly, we added a wine cooler, LED lights under the wall cabinets and in the toe kick and pendant lights over the island.
9