
Search results for "Caused damage" in Home Design Ideas
 Edgewater Design Group
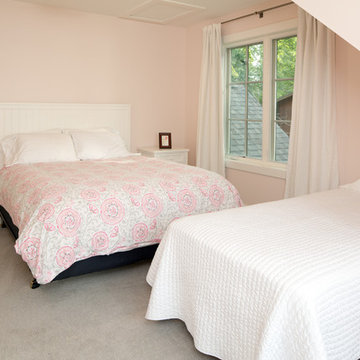
This home started out as a remodel of a family’s beloved summer cottage. A fire started on the work site which caused irreparable damage. Needless to say, a remodel turned into a brand-new home. We were brought on board to help our clients re-imagine their summer haven. Windows were important to maximize the gorgeous lake view. Access to the lake was also very important, so an outdoor shower off the mudroom/laundry area with its own side entrance provided a nice beach entry for the kids. A large kitchen island open to dining and living was imperative for the family and the time they like to spend together. The master suite is on the main floor and three bedrooms upstairs, one of which has built-in bunks allows the kids to have their own area. While the original family cottage is no more, we were able to successfully help our clients begin again so they can start new memories.
- Jacqueline Southby Photography
 Jack Home Construction & Remodeling
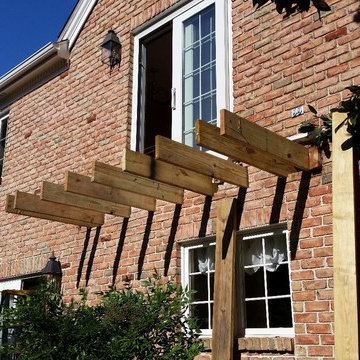
We slid new boards through the holes in the brick alongside the existing joists in the second floor. Like this…
For strength, we had to use lag bolts to secure the new balcony joists to the floor system of the second floor. The problem was to find the least intrusive way to get to those joists inside the second floor of the house. We would have to go inside the house and get to the floor joists from above or below. The ceiling of the room below the balcony was a beautiful finished wood ceiling that really could not be disturbed without causing permanent damage. So getting to the boards inside the second floor through the ceiling of the first floor wasn’t a good option.
The solution was to go into the second floor from above, through the floor of the room and that opens to the balcony. So we moved all the furniture out of the room and pulled back the carpet. We cut out a large section of the plywood and exposed the boards. We were then able to lag bolt the new balcony floor joists to the existing second floor system. We then put down new plywood decking on the floor, then re-stretched the carpet, and moved the furniture back. The room looked just like it did before.
Photo by Shawn Jack.

 Sweet Smiling Landscape Design
When I came to this property not only was the landscape a scrappy mess the property also had some very real grading and drainage issues that were jeopardizing the safety of this house. As recent transplants from New Jerseys to Southern California these clients were in awe of all the plants they were seeing in their neighborhood. Living on the water at the Ventura harbor they wanted to be able to take full advantage or the outdoor lifestyle and cool ocean breeze. Being environmentally conscious citizens, these clients were very concerned that their garden was designed with sustainability as a leading factor. As they said in our initial consultation, “Would want or garden be part of the solution not part of the problem.”
This property is the last house on the bottom of a gently sloping street. All the water from the neighbor’s houses drain onto this property. When I came into this project the back yard sloped into the house. When it would rain the water would pool up against the house causing water damage. To address the drainage we employed several tactics. Firstly, we had to invert the slope in the back yard so that water would not pool against the house. We created a very minor slope going away from the house so that water drains away but so the patio area feels flat.
The back of the back yard had an existing retaining wall made out of shabby looking slump stone. In front of that retaining wall we created a beautiful natural stone retaining wall. This retain wall severs many purposes. One it works as a place to put some of the soil removed from the grading giving this project a smaller carbon foot print (moving soil of a site burns a lot of fossil fuel). The retaining wall also helps obscure the shabby existing retaining wall and allows for planting space above the footing from the existing retaining wall. The soil behind the ne retaining wall is slightly lower than the top of the wall so that when the run on water on from the neighbor’s property flows it is slowed down and absorbed before it has a chance to get near the house. Finally, the wall is at a height designed to serve as overflow seating as these clients intend to have occasional large parties and gatherings.
Other efforts made to help keep the house safe and dry are that we used permeable paving. With the hardscape being comprised of flag stone with gravel in-between water has a chance to soak into the ground so it does not flow into spots where it will pool up.
The final element to help keep the house dry is the addition of infiltration swales. Infiltration swales are depressions in the landscape that capture rain water. The down spouts on the sides of the houses are connected to pipe that goes under the ground and conveys the water to the swales. In this project it helps move rain water away from the house. In general, these Infiltration swales are a powerful element in creating sustainable landscapes. These swales capture pollutants that accumulate on the roof and in the landscape. Biology in the soil in the swales can break down these pollutants. When run of watered is not captured by soil on a property the dirty water flows into water ways and then the ocean were the biology that breaks down the pollutants is not as prolific. This is particularly important in this project as it drains directly into the harbor. The water that is absorbed in to the swales can replenish aquafers as well as increasing the water available to the plants planted in that area recusing the amount of water that is needed from irrigation.
When it came to the planting we went with a California friendly tropical theme. Using lots of succulents and plants with colorful foliage we created vibrant lush landscape that will have year around color. We planted densely (the images in the picture were taken only a month after installation). Taller drought tolerant plants to help regulate the temperature and loss of water from the plants below them. The dense plantings will help keep the garden, the house and even the neighborhood cooler on hot days, will provide spaces for birds to enjoy and will create an illusion of depth in a somewhat narrow space.
Today this garden is a space these homeowners can fully enjoy while having the peace of mind that their house is protected from flooding and they are helping the environment.
Find the right local pro for your project
 Edgewater Design Group
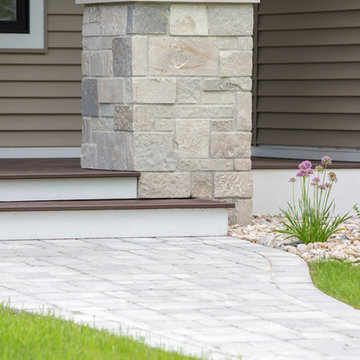
This home started out as a remodel of a family’s beloved summer cottage. A fire started on the work site which caused irreparable damage. Needless to say, a remodel turned into a brand-new home. We were brought on board to help our clients re-imagine their summer haven. Windows were important to maximize the gorgeous lake view. Access to the lake was also very important, so an outdoor shower off the mudroom/laundry area with its own side entrance provided a nice beach entry for the kids. A large kitchen island open to dining and living was imperative for the family and the time they like to spend together. The master suite is on the main floor and three bedrooms upstairs, one of which has built-in bunks allows the kids to have their own area. While the original family cottage is no more, we were able to successfully help our clients begin again so they can start new memories.
- Jacqueline Southby Photography
 Stairworks
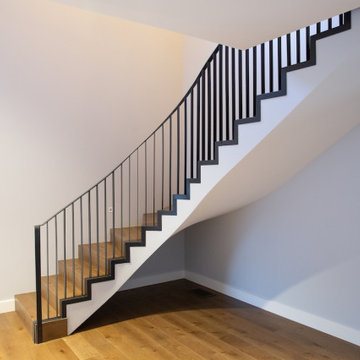
Martins Avenue is a beautiful, curved staircase made out of steel as the base material. Curved stairs are a challenge because you need to get the soffit (the underside of the staircase) curved and twisted around the base of the stairs to get the nice flowing lines. And because the timber work was outsourced to other builders, we had to work closely alongside them in order to get the soffit curved just right and ensure everything matched the flooring.
The other big challenge was that the curved balustrade needed to be an identical match to the staircase and have a nice, smooth, curved line. In order to achieve this, we built both the steel stairs and balustrade in the shop at the same time and match drilled the balustrade through. Therefore when we brought it to site we knew it would fit perfectly. The angle on the bottom of the balustrade was designed to cover the junction or zig zag angle between the steel and the timber.
Because of how this staircase had to be designed and built, it was extremely heavy and a challenging install. Additionally, as the walls of the site were all finished, we had to take all the necessary precautions to get the stairs installed without causing any damage or leaving any markings. Afterwards, the builders covered the underside with gib and closed risers to hide the cladding underneath.
There was absolutely no room for error with this staircase and we at Stairworks, the builders and the clients are all extremely happy with the end result!
 Stairworks
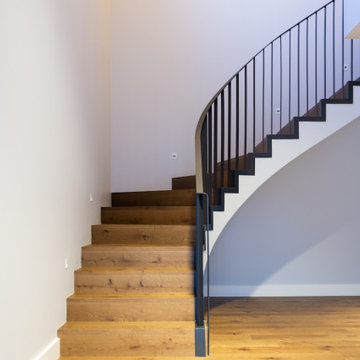
Martins Avenue is a beautiful, curved staircase made out of steel as the base material. Curved stairs are a challenge because you need to get the soffit (the underside of the staircase) curved and twisted around the base of the stairs to get the nice flowing lines. And because the timber work was outsourced to other builders, we had to work closely alongside them in order to get the soffit curved just right and ensure everything matched the flooring.
The other big challenge was that the curved balustrade needed to be an identical match to the staircase and have a nice, smooth, curved line. In order to achieve this, we built both the steel stairs and balustrade in the shop at the same time and match drilled the balustrade through. Therefore when we brought it to site we knew it would fit perfectly. The angle on the bottom of the balustrade was designed to cover the junction or zig zag angle between the steel and the timber.
Because of how this staircase had to be designed and built, it was extremely heavy and a challenging install. Additionally, as the walls of the site were all finished, we had to take all the necessary precautions to get the stairs installed without causing any damage or leaving any markings. Afterwards, the builders covered the underside with gib and closed risers to hide the cladding underneath.
There was absolutely no room for error with this staircase and we at Stairworks, the builders and the clients are all extremely happy with the end result!
 Edgewater Design Group
This home started out as a remodel of a family’s beloved summer cottage. A fire started on the work site which caused irreparable damage. Needless to say, a remodel turned into a brand-new home. We were brought on board to help our clients re-imagine their summer haven. Windows were important to maximize the gorgeous lake view. Access to the lake was also very important, so an outdoor shower off the mudroom/laundry area with its own side entrance provided a nice beach entry for the kids. A large kitchen island open to dining and living was imperative for the family and the time they like to spend together. The master suite is on the main floor and three bedrooms upstairs, one of which has built-in bunks allows the kids to have their own area. While the original family cottage is no more, we were able to successfully help our clients begin again so they can start new memories.
- Jacqueline Southby Photography
 Sweet Smiling Landscape Design
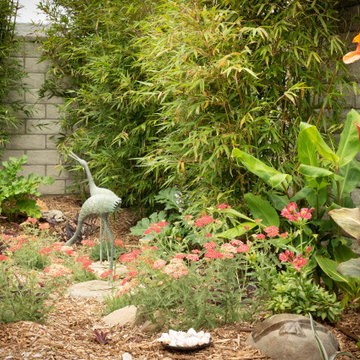
When I came to this property not only was the landscape a scrappy mess the property also had some very real grading and drainage issues that were jeopardizing the safety of this house. As recent transplants from New Jerseys to Southern California these clients were in awe of all the plants they were seeing in their neighborhood. Living on the water at the Ventura harbor they wanted to be able to take full advantage or the outdoor lifestyle and cool ocean breeze. Being environmentally conscious citizens, these clients were very concerned that their garden was designed with sustainability as a leading factor. As they said in our initial consultation, “Would want or garden be part of the solution not part of the problem.”
This property is the last house on the bottom of a gently sloping street. All the water from the neighbor’s houses drain onto this property. When I came into this project the back yard sloped into the house. When it would rain the water would pool up against the house causing water damage. To address the drainage we employed several tactics. Firstly, we had to invert the slope in the back yard so that water would not pool against the house. We created a very minor slope going away from the house so that water drains away but so the patio area feels flat.
The back of the back yard had an existing retaining wall made out of shabby looking slump stone. In front of that retaining wall we created a beautiful natural stone retaining wall. This retain wall severs many purposes. One it works as a place to put some of the soil removed from the grading giving this project a smaller carbon foot print (moving soil of a site burns a lot of fossil fuel). The retaining wall also helps obscure the shabby existing retaining wall and allows for planting space above the footing from the existing retaining wall. The soil behind the ne retaining wall is slightly lower than the top of the wall so that when the run on water on from the neighbor’s property flows it is slowed down and absorbed before it has a chance to get near the house. Finally, the wall is at a height designed to serve as overflow seating as these clients intend to have occasional large parties and gatherings.
Other efforts made to help keep the house safe and dry are that we used permeable paving. With the hardscape being comprised of flag stone with gravel in-between water has a chance to soak into the ground so it does not flow into spots where it will pool up.
The final element to help keep the house dry is the addition of infiltration swales. Infiltration swales are depressions in the landscape that capture rain water. The down spouts on the sides of the houses are connected to pipe that goes under the ground and conveys the water to the swales. In this project it helps move rain water away from the house. In general, these Infiltration swales are a powerful element in creating sustainable landscapes. These swales capture pollutants that accumulate on the roof and in the landscape. Biology in the soil in the swales can break down these pollutants. When run of watered is not captured by soil on a property the dirty water flows into water ways and then the ocean were the biology that breaks down the pollutants is not as prolific. This is particularly important in this project as it drains directly into the harbor. The water that is absorbed in to the swales can replenish aquafers as well as increasing the water available to the plants planted in that area recusing the amount of water that is needed from irrigation.
When it came to the planting we went with a California friendly tropical theme. Using lots of succulents and plants with colorful foliage we created vibrant lush landscape that will have year around color. We planted densely (the images in the picture were taken only a month after installation). Taller drought tolerant plants to help regulate the temperature and loss of water from the plants below them. The dense plantings will help keep the garden, the house and even the neighborhood cooler on hot days, will provide spaces for birds to enjoy and will create an illusion of depth in a somewhat narrow space.
Today this garden is a space these homeowners can fully enjoy while having the peace of mind that their house is protected from flooding and they are helping the environment.
 Edgewater Design Group
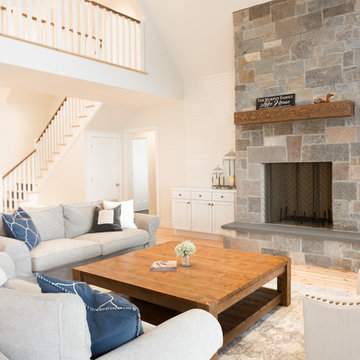
This home started out as a remodel of a family’s beloved summer cottage. A fire started on the work site which caused irreparable damage. Needless to say, a remodel turned into a brand-new home. We were brought on board to help our clients re-imagine their summer haven. Windows were important to maximize the gorgeous lake view. Access to the lake was also very important, so an outdoor shower off the mudroom/laundry area with its own side entrance provided a nice beach entry for the kids. A large kitchen island open to dining and living was imperative for the family and the time they like to spend together. The master suite is on the main floor and three bedrooms upstairs, one of which has built-in bunks allows the kids to have their own area. While the original family cottage is no more, we were able to successfully help our clients begin again so they can start new memories.
- Jacqueline Southby Photography
 Edgewater Design Group
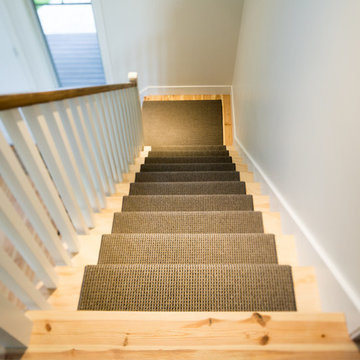
This home started out as a remodel of a family’s beloved summer cottage. A fire started on the work site which caused irreparable damage. Needless to say, a remodel turned into a brand-new home. We were brought on board to help our clients re-imagine their summer haven. Windows were important to maximize the gorgeous lake view. Access to the lake was also very important, so an outdoor shower off the mudroom/laundry area with its own side entrance provided a nice beach entry for the kids. A large kitchen island open to dining and living was imperative for the family and the time they like to spend together. The master suite is on the main floor and three bedrooms upstairs, one of which has built-in bunks allows the kids to have their own area. While the original family cottage is no more, we were able to successfully help our clients begin again so they can start new memories.
- Jacqueline Southby Photography
 LID Landscapes
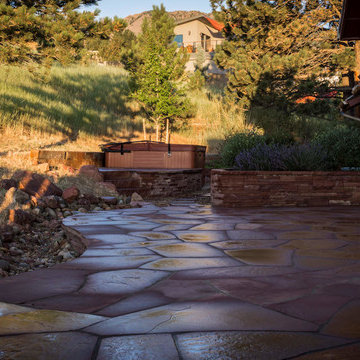
After serious flooding caused water damage at this home, we installed a series of drainage systems to keep water away from the foundation. A large red flagstone patio connects to dry-laid flagstone walls that form garden beds and large block stone steps lead up to a hot tub. This project is located in Boulder, CO.
 Edgewater Design Group
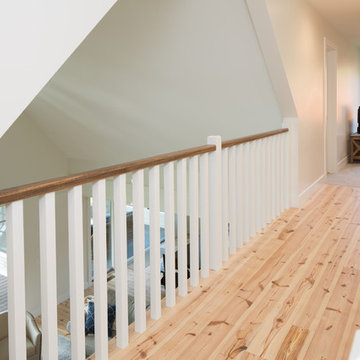
This home started out as a remodel of a family’s beloved summer cottage. A fire started on the work site which caused irreparable damage. Needless to say, a remodel turned into a brand-new home. We were brought on board to help our clients re-imagine their summer haven. Windows were important to maximize the gorgeous lake view. Access to the lake was also very important, so an outdoor shower off the mudroom/laundry area with its own side entrance provided a nice beach entry for the kids. A large kitchen island open to dining and living was imperative for the family and the time they like to spend together. The master suite is on the main floor and three bedrooms upstairs, one of which has built-in bunks allows the kids to have their own area. While the original family cottage is no more, we were able to successfully help our clients begin again so they can start new memories.
- Jacqueline Southby Photography

 SUPERIOR CHIMNEY SERVICES CORPORATION
Standard annual or mechanical Chimney cleaning for gas and wood burning fireplaces typically works to remove any type of buildup as well as checking for the structural integrity of the chimney. Maintaining an annual chimney cleaning will meet the national safety standard set by the NFPA, CSIA, IRC and NCSG, helping homeowners avoid chimney fires and blockages.
Why does safety matter? Did you know that there was a chimney fire in Marengo in January? Or a chimney fire at a Peotone home at the end of March? Or a log cabin fire caused by the chimney in June? That’s just a few that happened in the past 7 months.
Why Does a Chimney Cleaning Matter?
Chimney sweeps also known as chimney cleanings, fireplace cleanings, or fireplace sweeps. Regardless of what you call it, it still means the same thing.
Chimney cleaning for gas and wood burning fireplaces serve 3 key purposes:
confirming structural integrity
removing flammable deposits and
obstruction-free assurance.
Homeowners with gas or wood burning fireplaces benefit from each of these safeguards.
The National Fire Protection Association addresses this directly through NFPA 211, a widely recognized fire safety code. The standard states that chimneys, fireplaces, and vents require inspection at least once a year for soundness, free from deposits, and correct clearances, with cleaning, maintenance, and repairs to be done whenever needed.
This annual requirement applies equally to gas and wood burning fireplaces. Organizations including the Chimney Safety Institute of America, the National Chimney Sweep Guild, International Residential code and the National Fire Protection Association each reference this standard as the requirement for home fire safety.
Free 14-Point Certified Written Inspection
Every chimney sweep completed through Superior Chimney includes a complimentary 14-point certified written inspection along with photo documentation delivered to you by email. This documentation gives homeowners a clear visual record of their chimney system.
The written report covers the condition of the flue liner, smoke chamber, smoke shelf, damper, firebox, chimney crown, and chimney cap, among other components examined during a standard visit. Photo documentation captures each area so homeowners can review the findings independently of the technician’s verbal summary. Written inspection reports allow families to track the condition of their fireplace chimney system over time.
Chimney Cleaning and Structural Integrity
A CSIA Certified Chimney Sweep technician, such as Superior Chimney technicians, visually examines the chimney from the top opening to the firebox below, gaining a full evaluation of the interior.
When chimney rods and brushes pass through the chimney system, loose pieces of fire clay tile, damaged tile joints, or crumbling brick sometimes fall down into the fireplace. This debris can mean there is an integrity problem. By knowing this is a problem, will protect families and their homes. Now it’s time to take care of it and call in a certified chimney technician.
Fireplace Cleaning and Creosote Removal
Creosote, is the technical name for soot. Soot forms as a natural byproduct of burning wood. Smoke traveling upward through the chimney and leaves deposits of creosote along the interior walls. With every fire, a little more gets built up.
The issue with creosote is that it is highly flammable and is the leading cause of chimney fires nationwide. Removing the buildup through regular chimney cleanings keeps a fireplace serviceable for continuous use throughout the spring, fall and winter seasons.
Standard and mechanical chimney cleanings pay close attention to the flue liner, smoke chamber, smoke shelf, damper, and firebox in a single service visit. Superior Chimney performs each fireplace chimney inspection using a no-mess process that protects the home during service. This keeps soot contained within specialized equipment rather than the living room.
An Obstruction Free Chimney
Several conditions create blockages within a chimney system. Bird, squirrel, bat and raccoon nesting material, feces, and debris frequently accumulate inside an unprotected flue, especially during spring and summer months when the fireplace sits unused.
Excessive creosote accumulation or a collapsed chimney liner can restrict proper airflow. Homeowners that address obstructions with a chimney inspection will be able to maintain proper draft and ventilation with their gas or wood burning fireplace. This will reduce the risk of smoke backing into the home.
Gas Chimney Cleaning Compared to Wood burning Chimney Cleaning
Gas and wood burning fireplaces share the same annual chimney inspection requirement. Whether you are burning wood, gas or a “pile of shirts” there is still heat and flame that requires worthy firewalls to protect the home from heat transfer. Fire worthiness and checking the firewall integrity is priority.
Wood burning fireplaces generate creosote that builds along the flue liner with every fire. Gas fireplace systems accumulate lighter deposits along with potential venting obstructions, since gas appliances rely heavily on venting for safe combustion byproduct release. Each system accumulates different residues that need attention.
A CSIA Certified Chimney Sweep technician from Superior Chimney adjusts the specific cleaning approach based on fuel type. However, the same core safety elements apply: structural integrity, deposit removal, and clear airflow.
What Happens During a Chimney Cleaning?
A typical chimney inspection begins with a walkthrough of the fireplace and the chimney on top of the roof, allowing the technician to record any visible concerns the homeowner reported in advance as well as any new findings.
The certified technician then covers the immediate hearth area with protective material before setting up specialized equipment designed to contain creosote throughout the cleaning and inspection.
Chimney rods and brushes pass through the flue liner to loosen and remove creosote deposits along the smoke chamber, smoke shelf, and damper. The certified technician inspects each section closely for loose or crumbling firewall, cracked joints, or other signs of weak structural damage.
A final walkthrough of the firebox and chimney completes the visual inspection. Photo documentation captures each component, and the certified written report is sent to the homeowner by email. This consistent process gives homeowners the documentation they need to compare year to year.
Chimney Cleaning Safety Standards
The table below summarizes the organizations that set national chimney safety standards, along with their specific requirements for fireplace chimney sweeps.
NFPA211
National Fire Protection Association
Annual inspection for soundness, deposit buildup, and correct clearances; cleaning and repairs completed as needed
CSIA
Chimney Safety Institute of America
Certifies technicians through testing on chimney and venting system knowledge
NCSG
National Chimney Sweep Guild
Establishes trade standards and best practices for chimney sweep professionals
How Often Should You Schedule a Chimney Cleaning and Inspection?
CSIA recommends scheduling chimney cleaning and inspection annually by CSIA Certified Chimney Sweeps. This recommendation applies to gas and wood burning fireplaces, regardless of how frequently a household uses the fireplace and especially in freeze/thaw geographic areas.
Regular chimney sweeps save lives, since a clean fireplace chimney rarely catches fire. CSIA encourages homeowners to rely on Certified Chimney Sweeps, as these technicians undergo regular testing on the complexities of chimney and venting systems throughout their careers.
Frequently Asked Questions
What is included in a chimney sweep? A chimney sweep includes the flue liner, smoke chamber, smoke shelf, damper, and firebox, removing creosote while checking for obstructions and structural concerns throughout the chimney system (NOT the ashpit).
How often should gas and wood burning fireplaces receive chimney sweeps? CSIA, NFPA, IRC and NCSG guidelines each call for chimney sweeps at least once a year for gas and wood burning fireplace systems.
Why does creosote removal matter for fireplace safety? Creosote is highly flammable and builds along the interior walls of a fireplace chimney with every fire, creating conditions that lead directly to chimney fires when left in place over time. Creosote is unburned particles from the combustion chamber.
Who should perform a fireplace chimney sweep? CSIA Certified Chimney Sweep technicians complete fireplace chimney sweeps after passing regular testing on chimney and venting system knowledge, meeting the certification standard recognized across the industry.
Does a fireplace chimney sweep remove animal nests and debris? No, a fireplace chimney sweep addresses soot and creosote, while significant nesting material, feces, or collapsed liner debris often calls for dedicated obstruction removal alongside the standard service.
What does the free 14-point inspection include? The complimentary 14-point certified written inspection documents the flue liner, smoke chamber, smoke shelf, damper, firebox, crown, and cap through photo evidence delivered directly by email for homeowner records.
Choose Superior Chimney for Your Certified Chimney Inspection
All service technicians completing chimney sweeps through Superior Chimney hold National Certification through the Chimney Safety Institute of America (CSIA), reflecting the training standard recommended by fire safety organizations nationwide.
Scheduling regular chimney sweeps to clean gas and wood burning fireplace systems protects a home from fire risk, preserves the structural integrity of the chimney, and keeps airflow clear for proper, continuous use throughout the year. Contact us today to schedule a chimney inspection at 877-244-6349.
 Circles Around Maintenance & Construction
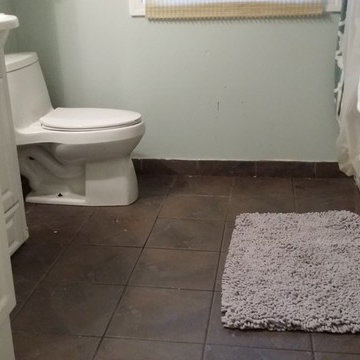
Bathroom before and in progress now. Broken tiles built on top of particle board. The leaking toilet caused water damage and rotting, so the toilet started sinking to the subfloor.
 LID Landscapes
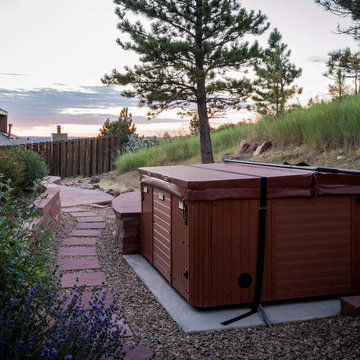
After serious flooding caused water damage at this home, we installed a series of drainage systems to keep water away from the foundation. A large red flagstone patio connects to dry-laid flagstone walls that form garden beds and large block stone steps lead up to a hot tub. This project is located in Boulder, CO.
 Stairworks
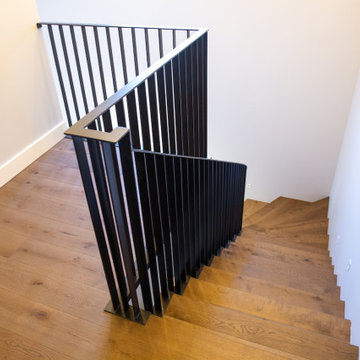
Martins Avenue is a beautiful, curved staircase made out of steel as the base material. Curved stairs are a challenge because you need to get the soffit (the underside of the staircase) curved and twisted around the base of the stairs to get the nice flowing lines. And because the timber work was outsourced to other builders, we had to work closely alongside them in order to get the soffit curved just right and ensure everything matched the flooring.
The other big challenge was that the curved balustrade needed to be an identical match to the staircase and have a nice, smooth, curved line. In order to achieve this, we built both the steel stairs and balustrade in the shop at the same time and match drilled the balustrade through. Therefore when we brought it to site we knew it would fit perfectly. The angle on the bottom of the balustrade was designed to cover the junction or zig zag angle between the steel and the timber.
Because of how this staircase had to be designed and built, it was extremely heavy and a challenging install. Additionally, as the walls of the site were all finished, we had to take all the necessary precautions to get the stairs installed without causing any damage or leaving any markings. Afterwards, the builders covered the underside with gib and closed risers to hide the cladding underneath.
There was absolutely no room for error with this staircase and we at Stairworks, the builders and the clients are all extremely happy with the end result!
 Five Star Tree Care
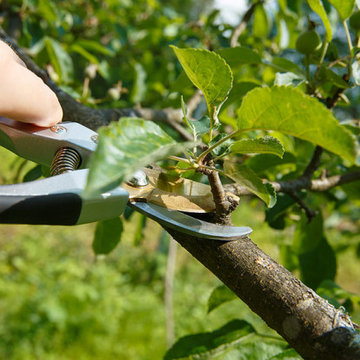
There are a few reasons why it is critical that your trees have a regular schedule for pruning and maintenance. Pruning helps trees to maintain a tree’s health as well as form it to a pleasing aesthetic shape. Furthermore, pests and diseases are also controlled by regular pruning and care. When pruning is properly performed, your trees will be healthy and attractive all year long. Five Star Tree Services has put together a list of seven things you should keep in mind regarding your tree pruning.
Tree Inspection
Before any tree pruning job, the tree should be properly inspected. This will allow you or our tree care service team to determine which branches should be cut. It will also allow any diseases or pests to be identified and dealt with.
Remove Dead, Weak & Crossed Branches
Dead and weak branches are a hazard to your property and those who happen to walk or lounge under the tree. They also suck vital nutrients away from healthy branches and the tree trunk. Removing them will prevent accidents and allow your tree to thrive. Crossed branches can also cause problems later down the line. They affect the airflow to the crown and can also prevent sunlight from passing through the tree.
Pay Attention to Spacing
It’s important to pay attention to branch spacing when pruning your tree. Lateral branches should be spaced evenly, especially when pruning trees that have yet to mature.
Follow the Basic Pruning Rules
It’s important that the 1/4th and 1/3rd rules of pruning are followed. This means that you should never cut more than a third of the total height of the tree. This length is measured from the bottom up. You should also only cut 1/4th or less of a tree’s crown when you prune at any one time.
Get Your Tools Ready
The tools you use to prune should be ready well before you make the first cut. You should start your project equipped with a pole pruner, pruning saws, hedge shears, loppers, and pruning shears. They also need to be properly sharpened before you start your pruning project. Each of these tools will allow you to reach different parts of the tree and prune them in a safe manner. If your tools are dull, they can damage the tree or even cause accidents when you attempt to cut.
Prune on Schedule
There are schedules for pruning that should be followed according to the type of tree you are caring for. Summer blooming trees should be pruned in early spring while evergreens and hedges should be taken care of in the early part of summer. Fruit-bearing trees should be pruned late in winter ahead of the frost. If there is damage to your tree, it doesn’t matter what time of year it may be, correct the problem as soon as possible.
Avoid Protecting Post-Pruning
Pruning leaves behind wounds, but they will heal. Though they may be unsightly for a while, the marks will heal and return back to its natural beauty. Don’t paint the pruning wounds to protect the tree, it actually has no effect on decay prevention. Painting may even trigger diseases or encourage pests to take up residence.
How We Can Help
Tree pruning is a complication job, but with our tips, you can do it right. It is always a good idea to leave the job to the professionals here at Five Star Tree Services instead. Our Toronto tree care experts have the tools, experience, and skills to get the job done right the first time. Get in touch with us at (416) 990-3355 today for more information.
 Ambition Custom Homes, LLC
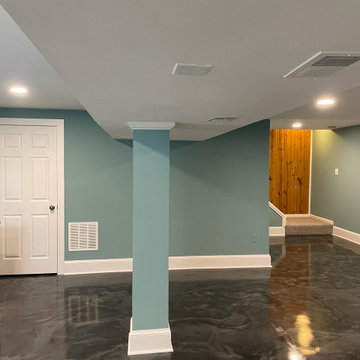
This client of ours came to us with a basement that had recently flooded and caused significant damage. We made some really nice upgrades and changes, including brand new #bathroomrenovations with an awesome new walk-in shower and frameless shower enclosure. We turned this space into a great place for the family to hang out now.
And check out those #elitecrete coated floors!!
 MIDWEST CONSTRUCTION & SUPPLY INC
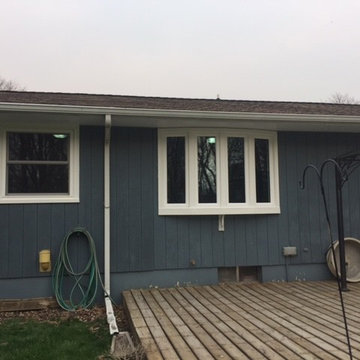
Paul Despenas: The home was built in the late 1970’s and the windows had seen better days. At some point wood just stops holding paint and the exterior sills and casings start to deteriorate. Those are the easy fix. It’s when the window sashes start to deteriorate, it is past the time to start looking for new windows.
When you can see wood rot on the sills, casings and sashes it is allowing water and air to infiltrate into the rough opening of the home causing structural damage and mold. This also allows plenty of the energy to go right out the windows!!
EcoSmart Windows are custom built to fit into the existing opening like a glove.
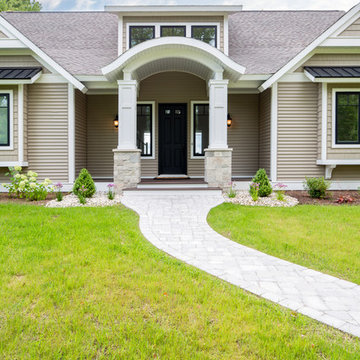 Edgewater Design Group
This home started out as a remodel of a family’s beloved summer cottage. A fire started on the work site which caused irreparable damage. Needless to say, a remodel turned into a brand-new home. We were brought on board to help our clients re-imagine their summer haven. Windows were important to maximize the gorgeous lake view. Access to the lake was also very important, so an outdoor shower off the mudroom/laundry area with its own side entrance provided a nice beach entry for the kids. A large kitchen island open to dining and living was imperative for the family and the time they like to spend together. The master suite is on the main floor and three bedrooms upstairs, one of which has built-in bunks allows the kids to have their own area. While the original family cottage is no more, we were able to successfully help our clients begin again so they can start new memories.
- Jacqueline Southby Photography
18