
Search results for "Caused damage" in Home Design Ideas
 Hammersmith Structures
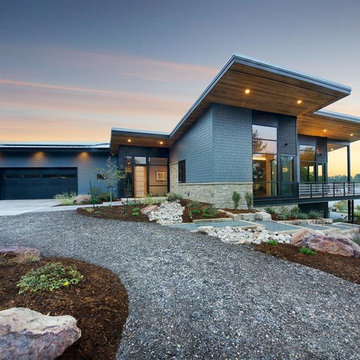
This modern home was a net-zero energy design-build project built in collaboration with a local architecture firm. The owner was living in the Midwest, so other than an in-person, upfront planning meeting and a few visits for walkthroughs along the way, we built the home with him providing input from afar.
One of the homeowner’s goals was to be as close to net-zero in energy usage as possible. The home features solar panels to generate electricity and geothermal heat pumps to power in-floor radiant heating and cooling. Solar panels also heat hot water to augment the heating system and provide hot water for domestic use.
The modern design of the home also helps to save on the energy needed for heating and cooling. Extensions on the roof let the low winter sunlight pour through the windows to provide passive solar heat during the colder months and block the rays in the summer to help keep the house cool.
The home’s foundation and its garage floor sit on concrete piers drilled into the ground. This keeps them away from direct contact with the poor soils the home is built on, allowing the soils to expand without causing any damage.
We commissioned custom furniture, countertops, and other features made from salvaged elm and walnut trees cut down in the area. Custom walnut doors, wardrobes in the master suite, and grain-sequenced cabinet doors and drawer fronts coordinate beautifully with the locally sourced pieces, as do the accents made from beetle-kill pine.
The home nestles into the ground to provide a mid-level walkout basement. Stairs go down from main floor and up from basement to meet in the middle and provide access to the outdoors. Locally sourced Colorado buff stone accents interior walls and transitions to exterior walls, helping to further anchor the home to its beautiful, lakeside location.
 Ambition Custom Homes, LLC
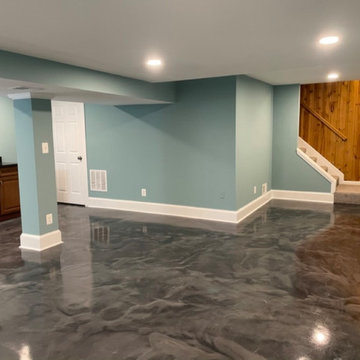
This client of ours came to us with a basement that had recently flooded and caused significant damage. We made some really nice upgrades and changes, including brand new #bathroomrenovations with an awesome new walk-in shower and frameless shower enclosure. We turned this space into a great place for the family to hang out now.
And check out those #elitecrete coated floors!!
 Edgewater Design Group
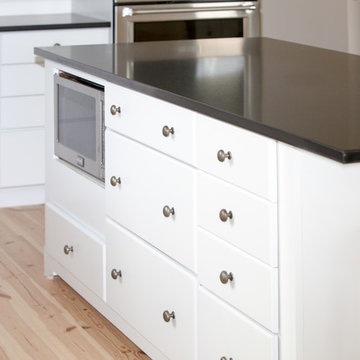
This home started out as a remodel of a family’s beloved summer cottage. A fire started on the work site which caused irreparable damage. Needless to say, a remodel turned into a brand-new home. We were brought on board to help our clients re-imagine their summer haven. Windows were important to maximize the gorgeous lake view. Access to the lake was also very important, so an outdoor shower off the mudroom/laundry area with its own side entrance provided a nice beach entry for the kids. A large kitchen island open to dining and living was imperative for the family and the time they like to spend together. The master suite is on the main floor and three bedrooms upstairs, one of which has built-in bunks allows the kids to have their own area. While the original family cottage is no more, we were able to successfully help our clients begin again so they can start new memories.
- Jacqueline Southby Photography
Find the right local pro for your project
 Edgewater Design Group
This home started out as a remodel of a family’s beloved summer cottage. A fire started on the work site which caused irreparable damage. Needless to say, a remodel turned into a brand-new home. We were brought on board to help our clients re-imagine their summer haven. Windows were important to maximize the gorgeous lake view. Access to the lake was also very important, so an outdoor shower off the mudroom/laundry area with its own side entrance provided a nice beach entry for the kids. A large kitchen island open to dining and living was imperative for the family and the time they like to spend together. The master suite is on the main floor and three bedrooms upstairs, one of which has built-in bunks allows the kids to have their own area. While the original family cottage is no more, we were able to successfully help our clients begin again so they can start new memories.
- Jacqueline Southby Photography
 Tile Doctor Ltd
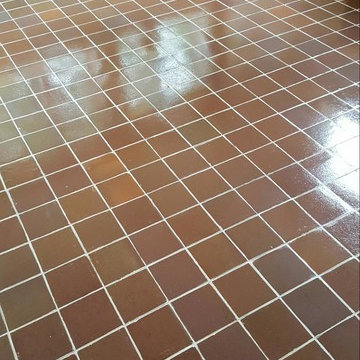
It’s always a good idea to double-check any tile cleaning advice you receive with a professional. Sometimes advice can be inaccurate and cause more problems than good. Such was the case with this customer, who lives in the small town of Appleton near Warrington. He had been advised by his builder to use brick acid to remove carpet glue from a newly discovered Quarry tiled floor. Taking the advice, he had washed the floor several times with a solution of brick acid diluted with water. But while this seemed to successfully remove the carpet glue, it also severely discoloured the grout lines, leaving the entire floor looking grubby and unappealing.
The customer was just about to go on holiday, and asked me to see what could be done to restore the floor’s appearance while he was gone. With the house to myself, I got to work.
My first job was to strip the floor property to remove old sealers present on the tile using a strong dilution of our high alkaline cleaner, Tile Doctor Pro Clean. We use this cleaner on all types of tile and natural stone due to its versatility and consistency.
I spread the solution onto the floor and left to dwell for twenty minutes before scrubbing with a black pad fitted to a floor rotary machine. This process also removed the years of dirt and dust that had penetrated through the recently removed carpet. I also paid attention to the grout lines giving them a good scrub with a stiff grout brush, but the acid staining proved to be impossible to remove completely.
While I’m not sure exactly how long the floor had been covered by carpet, it’s safe to say a deep clean had been long, long overdue. Once I had cleaned the floor to a high standard, I used a wet-vac to remove the now dirty cleaning solution from the floor, before leaving it to dry off completely overnight.
Upon my return to the property the next day, I tested to make sure the floor was dry enough to seal, which is important as excess moisture can cloud the sealer and damage its performance.
Once satisfied, I applied one coat of Tile Doctor Colour Grow, which is our impregnating sealer designed to really bring out the natural colours in the tile, followed by two coats of Tile Doctor Seal and Go to give the tiles a stain resistant, low-sheen finish.
After this was dry I coloured the grout lines with a matching Tile Doctor Grout Colourant to cover and hide the damage the acid had caused to the grout lines. Finally, I gave the floor three more coats of Seal and Go to add the finishing touches.
My customer returned from holiday to find a completely transformed floor. Looking at the before and after photos, it is easy to see why he was more than happy with the result! Another satisfied customer.
Alastair Robb
West Cheshire Tile Doctor
 Marie-Pierre Ayoul Decorative painting
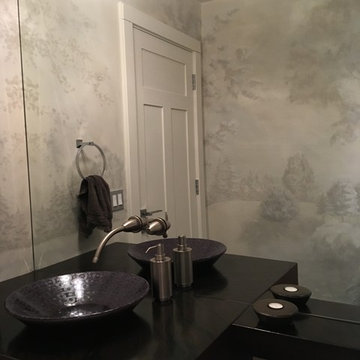
Initially the vanity had been made of veneered presswood and wear and tear had caused water damages that had lifted the veneer in spots. The walls were painted a greenish gray and the light was incorporated into a rectangular mirror fitted above the sink, while a small cabinet made of the same veneer hung above the toilet. A gray tiled backsplash right above the vanity surrounded the tap and ran the length of the wall. The designer decided to remove the backsplash, the mirror and the small cabinet and replace them with a full wall mirror with a new sconce, to enlarge the room and give a better display to the monochrome mural. The mural picks up a nature theme that somewhat reflects the neighbourhood vistas. The vessel sink original to the room has also been used for colour inspiration for the vanity new top, a subtle epoxy finish in dark browns with hints of blue.
Photos by Marie-Pierre Ayoul.
 DCR Northwest
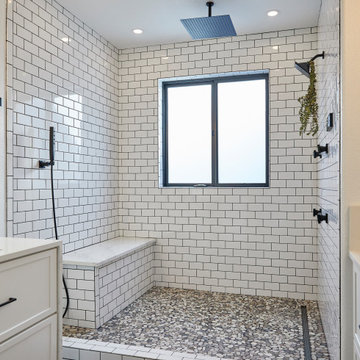
This client had a major water leak which caused serious damage to their master bathroom. The homeowner had already done most of the demo, he told me that he was a pretty savvy DIY-er, but just didn’t have the time to take this project on himself. On top of everything else, he was having trouble finding a contractor. We came to look at the project and clicked right away. Working with some of the homeowners ideas and some of our own, we hammered this thing out in six fun weeks.
Laminate Flooring
We installed all new 100% waterproof laminate.
Master Shower
This was one of the most advanced showers we have ever done. The digital smart controller turns the water on, sets the temperature and selects between: shower head, rain head, body sprayers, hand held sprayer and any combination.
Twin Vanities with Quartz
The homeowner wanted his and her vanities. Bothvanities are semi custom with a quartz backsplash and plumbing drawers. Most vanities come with cabinet doors which is not very functional. These plumbing drawers allow the user to have plenty of storage that can be pulled out in two large drawers.
Delta Wall Mount Faucets

 Sweet Smiling Landscape Design
When I came to this property not only was the landscape a scrappy mess the property also had some very real grading and drainage issues that were jeopardizing the safety of this house. As recent transplants from New Jerseys to Southern California these clients were in awe of all the plants they were seeing in their neighborhood. Living on the water at the Ventura harbor they wanted to be able to take full advantage or the outdoor lifestyle and cool ocean breeze. Being environmentally conscious citizens, these clients were very concerned that their garden was designed with sustainability as a leading factor. As they said in our initial consultation, “Would want or garden be part of the solution not part of the problem.”
This property is the last house on the bottom of a gently sloping street. All the water from the neighbor’s houses drain onto this property. When I came into this project the back yard sloped into the house. When it would rain the water would pool up against the house causing water damage. To address the drainage we employed several tactics. Firstly, we had to invert the slope in the back yard so that water would not pool against the house. We created a very minor slope going away from the house so that water drains away but so the patio area feels flat.
The back of the back yard had an existing retaining wall made out of shabby looking slump stone. In front of that retaining wall we created a beautiful natural stone retaining wall. This retain wall severs many purposes. One it works as a place to put some of the soil removed from the grading giving this project a smaller carbon foot print (moving soil of a site burns a lot of fossil fuel). The retaining wall also helps obscure the shabby existing retaining wall and allows for planting space above the footing from the existing retaining wall. The soil behind the ne retaining wall is slightly lower than the top of the wall so that when the run on water on from the neighbor’s property flows it is slowed down and absorbed before it has a chance to get near the house. Finally, the wall is at a height designed to serve as overflow seating as these clients intend to have occasional large parties and gatherings.
Other efforts made to help keep the house safe and dry are that we used permeable paving. With the hardscape being comprised of flag stone with gravel in-between water has a chance to soak into the ground so it does not flow into spots where it will pool up.
The final element to help keep the house dry is the addition of infiltration swales. Infiltration swales are depressions in the landscape that capture rain water. The down spouts on the sides of the houses are connected to pipe that goes under the ground and conveys the water to the swales. In this project it helps move rain water away from the house. In general, these Infiltration swales are a powerful element in creating sustainable landscapes. These swales capture pollutants that accumulate on the roof and in the landscape. Biology in the soil in the swales can break down these pollutants. When run of watered is not captured by soil on a property the dirty water flows into water ways and then the ocean were the biology that breaks down the pollutants is not as prolific. This is particularly important in this project as it drains directly into the harbor. The water that is absorbed in to the swales can replenish aquafers as well as increasing the water available to the plants planted in that area recusing the amount of water that is needed from irrigation.
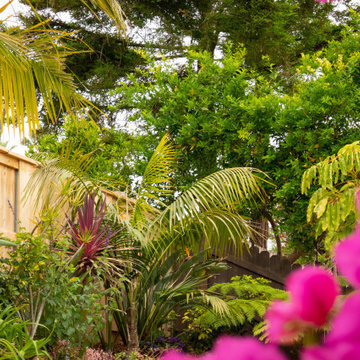
When it came to the planting we went with a California friendly tropical theme. Using lots of succulents and plants with colorful foliage we created vibrant lush landscape that will have year around color. We planted densely (the images in the picture were taken only a month after installation). Taller drought tolerant plants to help regulate the temperature and loss of water from the plants below them. The dense plantings will help keep the garden, the house and even the neighborhood cooler on hot days, will provide spaces for birds to enjoy and will create an illusion of depth in a somewhat narrow space.
Today this garden is a space these homeowners can fully enjoy while having the peace of mind that their house is protected from flooding and they are helping the environment.
 Five Star Tree Care
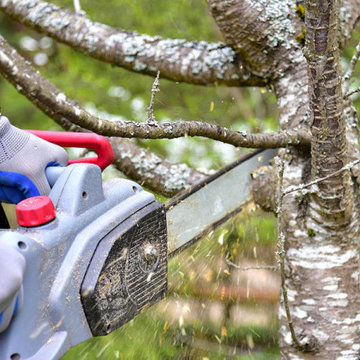
Using a chainsaw is a quick way to make work of fallen branches, damaged trees, and more. However, unless you have been plenty of experience, you may not be able to use this tool safely. For those who have never used a chainsaw before, it is a good idea to start with a lighter saw to prevent injury. It is also a good idea to enroll in a training course. If you plan to use a chainsaw in a professional company, it is even mandatory. Five Star Tree Services has created a quick guide that will help you decide if using a chainsaw is the best option for you.
Chainsaw Maintenance
Before you start using a chainsaw, you need to know if the blades are properly sharpened. Dull blades can cause jagged cuts or even cause injury. A sharp blade allows the saw to cut smoothly and produce straight cuts. The next step is to review is the cutting chain. It should be adjusted to the right tension, so the chain doesn’t move when the engine is idle. Make sure there are no loose screws and that the chain brake is in proper working order.
Operating a Chainsaw
Once you ensure that the chainsaw is safe to operate, it is time to get it started. Do you know the right amount of throttle and pressure to use? What about which cut would be best for your current project? Each type of cut will affect the wood differently, so it is important to keep these factors in mind when using a chainsaw. Situational awareness is also an important part of chainsaw use. No one should be within 10 feet while you are cutting. Also, avoid getting distracted by people seeking your attention since it only takes a second for a grave mistake to occur.
Protection During Chainsaw Operation
Proper protection is essential when operating machinery. When using a chainsaw, you should have on personal protection equipment such as; chainsaw pants, steel toe boots, gloves, ear protection, high visibility clothing, a helmet, and eye protection. All of these items should be in good working order and made from high-quality materials. Protecting your face, neck, chest, and abdomen is critical when working with any type of cutting tool.
The best way to keep yourself protected while wearing your personal protective equipment (PPE) is to maintain control over the chainsaw. Gloves may reduce control for many people, but a firm stance and proper balance can work wonders for maintaining control. PPE usage is very important, but it is equally important not to get lulled into a false sense of security by wearing it.
Practice Makes Perfect
It is best to practice using your chainsaw before taking on big projects. This will help you learn to move your body and your head in a safe way and a way that supports a clean cut. Most often, work with chainsaws is completed on ground that is uneven or covered in obstacles. Practicing will ensure that you can adapt to your environment without risking damage to your property or bodily harm.
How We Can Help
Working with chainsaws can make tree care simpler, but without the proper training and protection, it can be hazardous. Instead of taking the risk, hire the professionals here at Five Star Tree Services for all of your Richmond Hill tree removal and tree care needs. Give us a call at (416) 990-3355 to find out more about our rates and services.
 Sweet Smiling Landscape Design
When I came to this property not only was the landscape a scrappy mess the property also had some very real grading and drainage issues that were jeopardizing the safety of this house. As recent transplants from New Jerseys to Southern California these clients were in awe of all the plants they were seeing in their neighborhood. Living on the water at the Ventura harbor they wanted to be able to take full advantage or the outdoor lifestyle and cool ocean breeze. Being environmentally conscious citizens, these clients were very concerned that their garden was designed with sustainability as a leading factor. As they said in our initial consultation, “Would want or garden be part of the solution not part of the problem.”
This property is the last house on the bottom of a gently sloping street. All the water from the neighbor’s houses drain onto this property. When I came into this project the back yard sloped into the house. When it would rain the water would pool up against the house causing water damage. To address the drainage we employed several tactics. Firstly, we had to invert the slope in the back yard so that water would not pool against the house. We created a very minor slope going away from the house so that water drains away but so the patio area feels flat.
The back of the back yard had an existing retaining wall made out of shabby looking slump stone. In front of that retaining wall we created a beautiful natural stone retaining wall. This retain wall severs many purposes. One it works as a place to put some of the soil removed from the grading giving this project a smaller carbon foot print (moving soil of a site burns a lot of fossil fuel). The retaining wall also helps obscure the shabby existing retaining wall and allows for planting space above the footing from the existing retaining wall. The soil behind the ne retaining wall is slightly lower than the top of the wall so that when the run on water on from the neighbor’s property flows it is slowed down and absorbed before it has a chance to get near the house. Finally, the wall is at a height designed to serve as overflow seating as these clients intend to have occasional large parties and gatherings.
Other efforts made to help keep the house safe and dry are that we used permeable paving. With the hardscape being comprised of flag stone with gravel in-between water has a chance to soak into the ground so it does not flow into spots where it will pool up.
The final element to help keep the house dry is the addition of infiltration swales. Infiltration swales are depressions in the landscape that capture rain water. The down spouts on the sides of the houses are connected to pipe that goes under the ground and conveys the water to the swales. In this project it helps move rain water away from the house. In general, these Infiltration swales are a powerful element in creating sustainable landscapes. These swales capture pollutants that accumulate on the roof and in the landscape. Biology in the soil in the swales can break down these pollutants. When run of watered is not captured by soil on a property the dirty water flows into water ways and then the ocean were the biology that breaks down the pollutants is not as prolific. This is particularly important in this project as it drains directly into the harbor. The water that is absorbed in to the swales can replenish aquafers as well as increasing the water available to the plants planted in that area recusing the amount of water that is needed from irrigation.
When it came to the planting we went with a California friendly tropical theme. Using lots of succulents and plants with colorful foliage we created vibrant lush landscape that will have year around color. We planted densely (the images in the picture were taken only a month after installation). Taller drought tolerant plants to help regulate the temperature and loss of water from the plants below them. The dense plantings will help keep the garden, the house and even the neighborhood cooler on hot days, will provide spaces for birds to enjoy and will create an illusion of depth in a somewhat narrow space.
Today this garden is a space these homeowners can fully enjoy while having the peace of mind that their house is protected from flooding and they are helping the environment.
 Edgewater Design Group
This home started out as a remodel of a family’s beloved summer cottage. A fire started on the work site which caused irreparable damage. Needless to say, a remodel turned into a brand-new home. We were brought on board to help our clients re-imagine their summer haven. Windows were important to maximize the gorgeous lake view. Access to the lake was also very important, so an outdoor shower off the mudroom/laundry area with its own side entrance provided a nice beach entry for the kids. A large kitchen island open to dining and living was imperative for the family and the time they like to spend together. The master suite is on the main floor and three bedrooms upstairs, one of which has built-in bunks allows the kids to have their own area. While the original family cottage is no more, we were able to successfully help our clients begin again so they can start new memories.
- Jacqueline Southby Photography
 Ambition Custom Homes, LLC
This client of ours came to us with a basement that had recently flooded and caused significant damage. We made some really nice upgrades and changes, including brand new #bathroomrenovations with an awesome new walk-in shower and frameless shower enclosure. We turned this space into a great place for the family to hang out now.
And check out those #elitecrete coated floors!!
 SUPERIOR CHIMNEY SERVICES CORPORATION
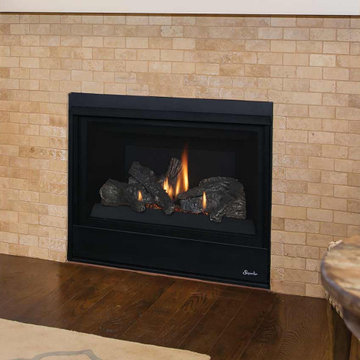
Is it necessary to clean gas fireplace? It’s intuitive that the dark black buildup of combustion needs to be cleaned from a typical wood burning fireplace, but is it needed to clean a gas fireplace? It’s gas…right? Gas fireplaces do not have a visible buildup of combustion, but should be cleaned at least once a year to prevent serious problems with the fireplace.
Gas vs. Wood Burning Fireplaces
When thinking of the inside of a family home, we think about the most comfortable room: the living room or family room. This is where the family meets, watches movies, and plays board games during rainy days, evenings and family time. It usually has a lofty, cozy couch and a wood burning fireplace. Nothing’s more comforting than falling asleep to the dim light of the fireplace and faint smell of burning wood. Nowadays, we have a close alternative to this old fashioned comfort: the gas fireplace. Gas fireplaces don’t leave much creosote behind, however gas fireplaces should be cleaned once a year, per the CSIA, due to dust, pet hair, insects, and other debris that can build up and cause performance problems. Chimney sweep are primarily for firewall worthiness assurance, cleaning and obstruction free assurance.
Gas fireplaces look similar to wood burning fireplaces, with a live flame. The logs inside the gas fireplace look real, but are not actually burning. Oftentimes, they are made of ceramic. A gas fireplace produces much less heat than a wood burning fireplace, but can retain more heat inside your home based on its type and configuration. Gas fireplaces can be low maintenance and energy friendly alternatives to a wood burning fireplace.
Some Signs to Clean Gas Fireplace
1. Buildup: Although gas fireplaces do not produce as much visible flammable and hazardous buildup, it does produce some corrosive substances and flue gasses that may settle inside your home without you knowing. Burning natural gas leaves a residue that must be cleaned annually. Failing to clean the residue may cause health risks if left untouched.
2. Technical Issues: There may be technical problems that are not visible, such as issues with the burner. Gas fireplaces are usually built to last long term but it’s imperative to check if there are any unnoticed technical issues at least once a year.
3. Gas Leaks: Over time, valves and pipes turn weaker and become corroded. It’s important to inspect these valves, as a gas leak is extremely hazardous. A certified chimney specialist must inspect and determine any damage or future damage to prevent this serious problem.
4. Condensation: Due to the high temperatures in the flue, there’s a buildup of condensation when the fireplace vapors are cooled. Natural gas exhaust also contains a high content of water vapor in emissions. The condensation reacts with byproducts and is acidic and corrosive, and must be cleaned at least once a year to not pose a potential health hazard.
It’s just as important to clean a gas fireplace at least once a year to prevent long term issues that could pose health risks if not cared for. A certified chimney professional from Superior Chimney will inspect and sweep the fireplace and ventilation system.
Contact us today to clean gas fireplace at 877-244-6349.
 Edgewater Design Group
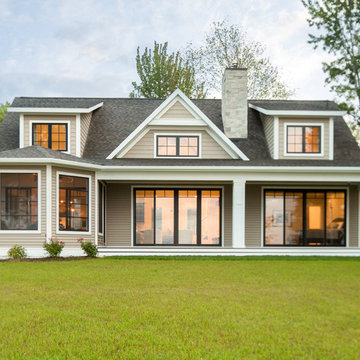
This home started out as a remodel of a family’s beloved summer cottage. A fire started on the work site which caused irreparable damage. Needless to say, a remodel turned into a brand-new home. We were brought on board to help our clients re-imagine their summer haven. Windows were important to maximize the gorgeous lake view. Access to the lake was also very important, so an outdoor shower off the mudroom/laundry area with its own side entrance provided a nice beach entry for the kids. A large kitchen island open to dining and living was imperative for the family and the time they like to spend together. The master suite is on the main floor and three bedrooms upstairs, one of which has built-in bunks allows the kids to have their own area. While the original family cottage is no more, we were able to successfully help our clients begin again so they can start new memories.
- Jacqueline Southby Photography
 Sweet Smiling Landscape Design
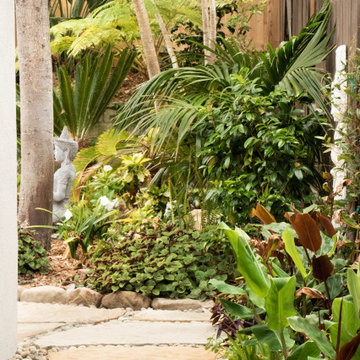
When I came to this property not only was the landscape a scrappy mess the property also had some very real grading and drainage issues that were jeopardizing the safety of this house. As recent transplants from New Jerseys to Southern California these clients were in awe of all the plants they were seeing in their neighborhood. Living on the water at the Ventura harbor they wanted to be able to take full advantage or the outdoor lifestyle and cool ocean breeze. Being environmentally conscious citizens, these clients were very concerned that their garden was designed with sustainability as a leading factor. As they said in our initial consultation, “Would want or garden be part of the solution not part of the problem.”
This property is the last house on the bottom of a gently sloping street. All the water from the neighbor’s houses drain onto this property. When I came into this project the back yard sloped into the house. When it would rain the water would pool up against the house causing water damage. To address the drainage we employed several tactics. Firstly, we had to invert the slope in the back yard so that water would not pool against the house. We created a very minor slope going away from the house so that water drains away but so the patio area feels flat.
The back of the back yard had an existing retaining wall made out of shabby looking slump stone. In front of that retaining wall we created a beautiful natural stone retaining wall. This retain wall severs many purposes. One it works as a place to put some of the soil removed from the grading giving this project a smaller carbon foot print (moving soil of a site burns a lot of fossil fuel). The retaining wall also helps obscure the shabby existing retaining wall and allows for planting space above the footing from the existing retaining wall. The soil behind the ne retaining wall is slightly lower than the top of the wall so that when the run on water on from the neighbor’s property flows it is slowed down and absorbed before it has a chance to get near the house. Finally, the wall is at a height designed to serve as overflow seating as these clients intend to have occasional large parties and gatherings.
Other efforts made to help keep the house safe and dry are that we used permeable paving. With the hardscape being comprised of flag stone with gravel in-between water has a chance to soak into the ground so it does not flow into spots where it will pool up.
The final element to help keep the house dry is the addition of infiltration swales. Infiltration swales are depressions in the landscape that capture rain water. The down spouts on the sides of the houses are connected to pipe that goes under the ground and conveys the water to the swales. In this project it helps move rain water away from the house. In general, these Infiltration swales are a powerful element in creating sustainable landscapes. These swales capture pollutants that accumulate on the roof and in the landscape. Biology in the soil in the swales can break down these pollutants. When run of watered is not captured by soil on a property the dirty water flows into water ways and then the ocean were the biology that breaks down the pollutants is not as prolific. This is particularly important in this project as it drains directly into the harbor. The water that is absorbed in to the swales can replenish aquafers as well as increasing the water available to the plants planted in that area recusing the amount of water that is needed from irrigation.
When it came to the planting we went with a California friendly tropical theme. Using lots of succulents and plants with colorful foliage we created vibrant lush landscape that will have year around color. We planted densely (the images in the picture were taken only a month after installation). Taller drought tolerant plants to help regulate the temperature and loss of water from the plants below them. The dense plantings will help keep the garden, the house and even the neighborhood cooler on hot days, will provide spaces for birds to enjoy and will create an illusion of depth in a somewhat narrow space.
Today this garden is a space these homeowners can fully enjoy while having the peace of mind that their house is protected from flooding and they are helping the environment.


 Elite Construction and Remodel Corp
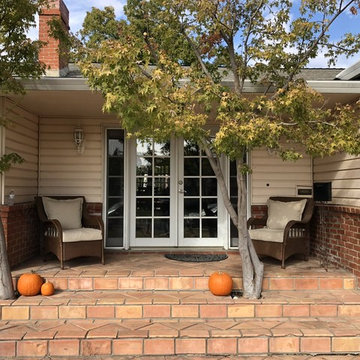
Damage noted to the exterior trim, is visible at the garage and pedestrian door jambs, and to the soffit caused by uncontrollable exterior moisture sources.
https://www.eliteconstructioncorp.com/projects/melrose-avenue
 Edgewater Design Group
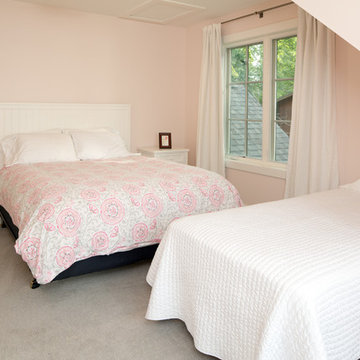
This home started out as a remodel of a family’s beloved summer cottage. A fire started on the work site which caused irreparable damage. Needless to say, a remodel turned into a brand-new home. We were brought on board to help our clients re-imagine their summer haven. Windows were important to maximize the gorgeous lake view. Access to the lake was also very important, so an outdoor shower off the mudroom/laundry area with its own side entrance provided a nice beach entry for the kids. A large kitchen island open to dining and living was imperative for the family and the time they like to spend together. The master suite is on the main floor and three bedrooms upstairs, one of which has built-in bunks allows the kids to have their own area. While the original family cottage is no more, we were able to successfully help our clients begin again so they can start new memories.
- Jacqueline Southby Photography
 Jack Home Construction & Remodeling
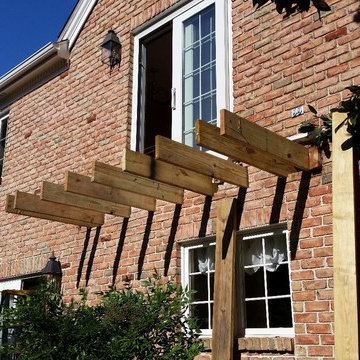
We slid new boards through the holes in the brick alongside the existing joists in the second floor. Like this…
For strength, we had to use lag bolts to secure the new balcony joists to the floor system of the second floor. The problem was to find the least intrusive way to get to those joists inside the second floor of the house. We would have to go inside the house and get to the floor joists from above or below. The ceiling of the room below the balcony was a beautiful finished wood ceiling that really could not be disturbed without causing permanent damage. So getting to the boards inside the second floor through the ceiling of the first floor wasn’t a good option.
The solution was to go into the second floor from above, through the floor of the room and that opens to the balcony. So we moved all the furniture out of the room and pulled back the carpet. We cut out a large section of the plywood and exposed the boards. We were then able to lag bolt the new balcony floor joists to the existing second floor system. We then put down new plywood decking on the floor, then re-stretched the carpet, and moved the furniture back. The room looked just like it did before.
Photo by Shawn Jack.
 Sweet Smiling Landscape Design
When I came to this property not only was the landscape a scrappy mess the property also had some very real grading and drainage issues that were jeopardizing the safety of this house. As recent transplants from New Jerseys to Southern California these clients were in awe of all the plants they were seeing in their neighborhood. Living on the water at the Ventura harbor they wanted to be able to take full advantage or the outdoor lifestyle and cool ocean breeze. Being environmentally conscious citizens, these clients were very concerned that their garden was designed with sustainability as a leading factor. As they said in our initial consultation, “Would want or garden be part of the solution not part of the problem.”
This property is the last house on the bottom of a gently sloping street. All the water from the neighbor’s houses drain onto this property. When I came into this project the back yard sloped into the house. When it would rain the water would pool up against the house causing water damage. To address the drainage we employed several tactics. Firstly, we had to invert the slope in the back yard so that water would not pool against the house. We created a very minor slope going away from the house so that water drains away but so the patio area feels flat.
The back of the back yard had an existing retaining wall made out of shabby looking slump stone. In front of that retaining wall we created a beautiful natural stone retaining wall. This retain wall severs many purposes. One it works as a place to put some of the soil removed from the grading giving this project a smaller carbon foot print (moving soil of a site burns a lot of fossil fuel). The retaining wall also helps obscure the shabby existing retaining wall and allows for planting space above the footing from the existing retaining wall. The soil behind the ne retaining wall is slightly lower than the top of the wall so that when the run on water on from the neighbor’s property flows it is slowed down and absorbed before it has a chance to get near the house. Finally, the wall is at a height designed to serve as overflow seating as these clients intend to have occasional large parties and gatherings.
Other efforts made to help keep the house safe and dry are that we used permeable paving. With the hardscape being comprised of flag stone with gravel in-between water has a chance to soak into the ground so it does not flow into spots where it will pool up.
The final element to help keep the house dry is the addition of infiltration swales. Infiltration swales are depressions in the landscape that capture rain water. The down spouts on the sides of the houses are connected to pipe that goes under the ground and conveys the water to the swales. In this project it helps move rain water away from the house. In general, these Infiltration swales are a powerful element in creating sustainable landscapes. These swales capture pollutants that accumulate on the roof and in the landscape. Biology in the soil in the swales can break down these pollutants. When run of watered is not captured by soil on a property the dirty water flows into water ways and then the ocean were the biology that breaks down the pollutants is not as prolific. This is particularly important in this project as it drains directly into the harbor. The water that is absorbed in to the swales can replenish aquafers as well as increasing the water available to the plants planted in that area recusing the amount of water that is needed from irrigation.
When it came to the planting we went with a California friendly tropical theme. Using lots of succulents and plants with colorful foliage we created vibrant lush landscape that will have year around color. We planted densely (the images in the picture were taken only a month after installation). Taller drought tolerant plants to help regulate the temperature and loss of water from the plants below them. The dense plantings will help keep the garden, the house and even the neighborhood cooler on hot days, will provide spaces for birds to enjoy and will create an illusion of depth in a somewhat narrow space.
Today this garden is a space these homeowners can fully enjoy while having the peace of mind that their house is protected from flooding and they are helping the environment.
21