
Search results for "Causing damage" in Home Design Ideas
 Five Star Tree Care
Trees are an object of supreme beauty that brings a sense of pride and character to any property. In addition to being aesthetically pleasing, they also offer a wealth of additional benefits. They can help reduce the cost of heating and cooling as well as increase the curb appeal of a property. Trees also benefit the environment by reducing pollution and providing refuge to local wildlife. If you happen to have oak trees on your property, it is especially important to make sure your trees undergo general maintenance and tree care. One of the most common problems landowners with oak trees face is oak wilt. Five Star Tree Services is here to let you know how to spot and protect your green friends from this debilitating tree ailment.
What Is Oak Wilt?
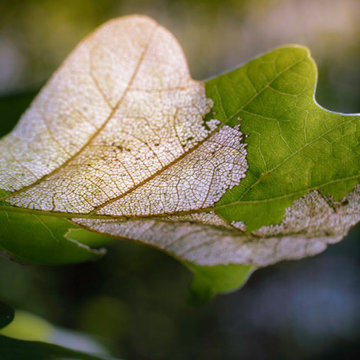
Oak wilt is a very aggressive form of tree fungus that attacks the oak species in particular. It grows on the outer sapwood of the tree and slowly starts to sap away nutrients and water from the tree itself. Left untreated, oak wilt can cause the tree to dieback or even expire completely. Oak wilt targets healthy oak trees, mature oak trees, and stressed oak trees in equal measure. It is easiest to spot the symptoms of oak wilt in the early spring or summer. The most common signs of oak wilt are bronze and wilting foliage.
Where Does Oak Wilt Start?
Most oak wilt will start along the tips of the branches and the top of the oak tree. One reason it may take so long to spot a problem is that it begins out of the usual line of sight. Most homeowners will notice a sudden decline in the health of a usually healthy tree that starts along its crown.
Another sign of oak wilt is when the outer side of the tree bark starts to develop gum. This gum attracts other pests such as birds, insects, and squirrels who then carry the fungus from sick trees to healthy trees. Along with spores, the fungus can also spread through the root system of one oak tree to the other, but it is hard to notice unless you happen to be digging around the trees for another reason.
When Are Oak Trees Most Susceptible?
Healthy and stressed oak trees are equally prone to catching oak wilt, but is it more likely to occur in the spring. It is always best to avoid pruning oak trees in the spring to reduce the chance of new fungal infections or for infections from other trees being spread to healthy trees. Wounds or environmental damage during the spring should be cared for by professionals to help reduce the chances of oak wilt infection.
Is There A Cure For Oak Wilt?
There is no cure for oak wilt, so the best method is prevention. Avoid pruning and damage during growing seasons and stick to winter pruning in Richmond Hill to cut down on infection rates. If you do have an oak tree that is showing signs of oak wilt, the best course of action is to have it removed to prevent the fungus from spreading to other trees. If you think your oak trees may be showing signs of oak wilt, give Five Star Tree Services a call at (416) 990-3355 for an in-person assessment today.

 Northworks Architects + Planners
Nestled along the base of the Snake River, this house in Jackson, WY, is surrounded by nature. Design emphasis has been placed on carefully located views to the Grand Tetons, Munger Mountain, Cody Peak and Josie’s Ridge. This modern take on a farmhouse features painted clapboard siding, raised seam metal roofing, and reclaimed stone walls. Designed for an active young family, the house has multi-functional rooms with spaces for entertaining, play and numerous connections to the outdoors.
Photography & Styling: Leslee Mitchell

 Tile Doctor Ltd
At first sight, this Victorian tiled pathway in Palmers Green, N13 did not appear to need too many repairs, with just a few obvious broken and loose tiles to be fixed. On closer inspection however it became clear it was in need of a deep clean and fresh seal.
To start, we applied Tile Doctor Remove & Go across the entire length of the pathway to break down and strip off the old sealer and provide an initial clean. In the more stubborn and difficult to reach areas where we saw the buildup of efflorescence, we applied Tile Doctor Acid Gel to neutralise the alkaline salts.
Acid Gel, as the name indicates, is a pH1 blend of Phosphoric and Hydrochloric acid in gel form, making it easier to apply to tricky areas, including sloped or vertical surfaces. Users should be aware not to use this type of product on acid-sensitive stone such as Limestone, as this can cause etching if left on too long.
Once the dirt and efflorescence buildups had been dealt with, I focused my attention towards the tile repairs, quickly realising that the extent of damage was greater than initially thought. Firstly, the numerous loose and broken tiles were removed and individually cleaned in a similar way to the rest of the floor. We then repaired the sub base ready for the existing and newly sourced tiles to be re-laid, before leaving the floor to set and dry overnight.
The next day, the pathway was grouted, before being sealed with Tile Doctor’s colour enhancing, impregnating sealer, Colour Grow to bring back the life and character to the Victorian tiles.
I was also asked to renovate the Edwardian hallway tiles in the house so once finished with the pathway they were deep cleaned using a strong dilution of Tile Doctor Pro Clean. This also helped to break down the old sealers and waxes – followed by a careful cleaning of the grout lines using Tile Doctor Grout Clean Up in combination with 3m black pads and detail brushes.
To ensure any pre existing sealer was completely removed, I followed up with a steam clean and left the tiles to dry overnight.
Upon my return to the property the next day, I completed re-grouting in the necessary areas, before sealing the tiles with five coats of Tile Doctor Seal & Go, providing an aesthetically pleasing satin finish. Seal & Go is a topical, solvent-based sealer which forms a layer of durable protection on the surface of the tiles, protecting against dirt and stains.
The hard work invested in restoring these two floors certainly paid off, as the client was exceptionally pleased with the results, going as far as to leave the following feedback:
“I wanted to restore my tired Edwardian tiled hallway and was given Rob Voyce’s
contact details. I was very impressed with Rob and his team; they were very
professional and friendly. Rob explained the stages of the work to be carried out and
we agreed a date and the job was completed much to my satisfaction. Very pleased.”
Nigel Voyce
North London Tile Doctor
Find the right local pro for your project
 Tile Doctor Ltd
Here’s a job I completed just before Christmas last year, at a house in Northampton which has a rich history and mix of architectural styles. The run up to Christmas is always popular as people try to get their household projects finished off in time for celebrating the festive season with family so this is always a busy time for Tile Doctor.
The photos below show a neglected Victorian Quarry tiled floor in need of repair, with cracked tiles along the edges. These were caused by somebody in the past using brute force to remove carpet gripper rods which had been glued to the tiles. These cracks were present around the edges of the entire hallway, however; this particular type of tile is very hard to get hold of. Furthermore, it is a costly process to replace the tiles as the skirting boards would have had to have been removed.
As well as the physical issues the floor had a dull appearance due to the build-up of builder’s dust and the general wearing down of the paintwork over time. I agreed with the client that the best course of action would be to fill the tiles, and paint the damaged tiles using a colour that matched as close as possible. Many of my Tile Doctor colleagues would disagree with this approach opting to source the correct tile and rebuild the damaged section however unfortunately in this case we didn’t have the time or the budget.
My first action was to use a brush and vacuum to remove as much loose debris and dust as possible. I followed this by agitating the tiles with a dilution of Tile Doctor Pro Clean which is a strong alkaline product and safe to use on tile and stone. I use a combination of a coarse burnishing pad fitted to a rotary machine and hand held brushes, in order to get the floor clean. The resulting slurry was then rinsed and removed using a wet vacuum. This process was repeated twice followed by a thorough rinse to ensure any trace of cleaning agent had been removed and the floor neutralised.
As this was such an old property, I then used a steamer to heat up the tiles in order to draw out any contaminants and assist with the drying process. I installed a fan to dry the floor before starting repairs, mixing up some coloured grout and filling all holes and cracks along the edges, including the doormat area.
I allowed the coloured grout to dry overnight, before hand painting the black and Terracotta tiles. These were then given time to dry (about a couple of hours). Following this, I carefully painted in the other colours: brown and cream. The overall effect was quite convincing and you had to look very closely to notice.
Due to the fact that there were other tradesmen working in the house at the time, the floors were sheeted up to protect from additional dust and muck. I then left the house for a week, allowing the floor ample time to dry completely in preparation for sealing.
Upon my return, I took damp meter readings, and once satisfied with the dryness of the tiles, I began the sealing process with the impregnating, colour-enhancing sealer Tile Doctor Colour Grow. The sealer provides both durable surface protection and an aesthetically pleasing matte finish.
The below photos show how the product has enriched the colours with the two coats applied.
The process of restoring this wonderful Victorian Quarry tiled floor was certainly time consuming, but very rewarding. I am exceptionally pleased with the results myself, and my client couldn’t have been happier and I’m sure the newly revitalised hallway will have been a talking point for all their visitors during the Christmas break.
Phil Vissian
Northamptonshire Tile Doctor
 Cochrane Floors & More
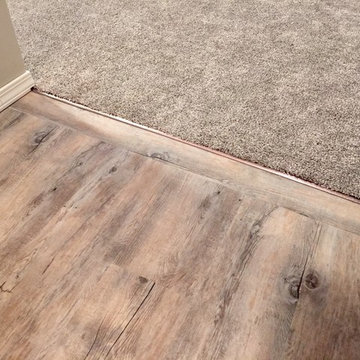
This renovation was completed with the primary goal of removed the carpet in the stairs which was not only difficult to clean but constantly looking worn in this very busy household. Ideally they wanted a durable, low maintenance flooring solution that still added character and coziness. The solution: Luxury vinyl planks! The unique and discreet metal nosings we used respect the clean lines and richness of this amazing plank in a non-commercial way. NOTE: While not all vinyl planks are created equal - the good ones are worth paying a little extra for!

 highland
Plumbing issues rarely occur at a convenient moment. When selecting whom to install plumbing in Melbourne homes, one must find someone who is licensed, readily available and has the right to tell you the costs upfront before work is commenced. This guide includes what to look at prior to hiring a plumber melbourne and common hiring mistakes to avoid.
Explaining how to choose the right plumber Melbourne homeowners
Why choosing the right plumber matters
Poor plumbing repair may be more expensive to repair than the original problem. Experience, licensing, and communication are also all issues that impact on a job being done right the first time round. A few minutes checking credentials will save later on down the line. Difficult hiring choices may result in:
● Repeat callouts: Incomplete repairs, which fail once again in the matter of weeks, necessitate a visit by another tradesperson, and additional expense. ● Hidden charges: Unclear price estimates that become unexpected bills after the project has begun. ● Property damage: Rushing or unlicensed work that causes damage to pipes, fittings and adjacent walls and floors.
Check licensing and qualifications first
All plumbers operating in Victoria have to have the valid licence issued by the Building and Plumbing Commission. Licensing validates the formal training as well as legal responsibility of the work done. This is checked within a few minutes prior to securing any job. Pre-hiring ensure the following before the hiring:
● Licence number: A registered plumber is able to issue a licence number which is confirmed by the appropriate authority. ● Insurance coverage: Public liability insurance insures the property in the case of damage at the time of plumbing work. ● Trade specialization: Gas fitting and hot water work need to be covered by certain qualifications other than, in general, a plumbing licence. ● Membership bodies: The association with established industry organizations is usually an indication of continued training and accountability benchmarks.
Ask about availability and response time
Plumbing emergencies do not follow business hours. An explosion of a pipe or gas break should be addressed immediately, irrespective of the days or the time of the day. Skill is no more crucial than availability in the matter of picking a plumber. Some useful questions to ask before making a reservation are:
● Emergency availability: Checking that the callouts are not provided on weekends, evenings or during public holidays with long delays. ● Response time: Inquiring about the speed at which a plumber can commonly arrive to address an emergency in the house under contact. ● Call-out fee: An explanation of whether or not a call-out fee is charged and whether or not the fee is waived when the work is carried out. ● Service area: In this case, it will be necessary to check whether the plumber visits the given suburb of Melbourne on a regular basis.
Understand pricing before work begins
The most frustrating aspect among the plumbing customers is unclear pricing. An honest plumber discusses prices and alternatives with him/her prior to commencing any job. Written quotes insure the homeowner and the tradesperson. Fair pricing practices normally involve:
● Fixed quotes: An open quote properly quoted and then inspected, not an hourly estimate. ● Written breakdowns: Detailed expenses showing labour, materials as well as any other expenses prior to beginning of work. ● No pressure tactics: Time to study the options without requesting a decision to be made immediately on-site. ● Transparent extras: All other costs including after-hours costs would be explicitly known prior to the job.
Common errors one should not make when employing a plumber
Hasty judgments made in the plumbing crisis tended to come back to bite. The failure to do basic checks may lead to low-quality workmanship or high prices. Most frequent hiring issues are avoided with a brief wait before making a booking. Frequent mistakes include:
● Skipping licence checks: Recruiting solely on price without first ensuring they are properly licensed and insured. ● Accepting verbal quotes only: Accepting oral estimates rather than writing down, making itemised price explanations. ● Ignoring reviews: Finding a plumber without examining customer feedback in the past few reviews on different independent review sites. ● Overlooking guarantees: Not enquiring of work done, whether it comes with any part or labour warranty.
A look at the frequently asked questions
What is the average price of a Melbourne plumber?
Prices are depending on the type of job hence a written estimate is always advisable.
Is a call-out fee always charged?
Not necessarily; lots of plumbers cancel a charge after the job is done.
Is there a plumber who can do gas fitting?
No, the other licence qualification is a separate gas fitting licence qualification.
Is it necessary to base a hiring decision on reviews?
Yes, there are some patterns in the quality of reliability and workmanship according to recent reviews.
Is emergency plumbing available on weekends?
There are numerous certified plumbers who have emergency services available on weekends and after hours.
Explaining how to choose the right plumber Melbourne homeowners
Why choosing the right plumber matters
Poor plumbing repair may be more expensive to repair than the original problem. Experience, licensing, and communication are also all issues that impact on a job being done right the first time round. A few minutes checking credentials will save later on down the line. Difficult hiring choices may result in:
● Repeat callouts: Incomplete repairs, which fail once again in the matter of weeks, necessitate a visit by another tradesperson, and additional expense. ● Hidden charges: Unclear price estimates that become unexpected bills after the project has begun. ● Property damage: Rushing or unlicensed work that causes damage to pipes, fittings and adjacent walls and floors.
Check licensing and qualifications first
All plumbers operating in Victoria have to have the valid licence issued by the Building and Plumbing Commission. Licensing validates the formal training as well as legal responsibility of the work done. This is checked within a few minutes prior to securing any job. Pre-hiring ensure the following before the hiring:
● Licence number: A registered plumber is able to issue a licence number which is confirmed by the appropriate authority. ● Insurance coverage: Public liability insurance insures the property in the case of damage at the time of plumbing work. ● Trade specialization: Gas fitting and hot water work need to be covered by certain qualifications other than, in general, a plumbing licence. ● Membership bodies: The association with established industry organizations is usually an indication of continued training and accountability benchmarks.
Ask about availability and response time
Plumbing emergencies do not follow business hours. An explosion of a pipe or gas break should be addressed immediately, irrespective of the days or the time of the day. Skill is no more crucial than availability in the matter of picking a plumber. Some useful questions to ask before making a reservation are:
● Emergency availability: Checking that the callouts are not provided on weekends, evenings or during public holidays with long delays. ● Response time: Inquiring about the speed at which a plumber can commonly arrive to address an emergency in the house under contact. ● Call-out fee: An explanation of whether or not a call-out fee is charged and whether or not the fee is waived when the work is carried out. ● Service area: In this case, it will be necessary to check whether the plumber visits the given suburb of Melbourne on a regular basis.
Understand pricing before work begins
The most frustrating aspect among the plumbing customers is unclear pricing. An honest plumber discusses prices and alternatives with him/her prior to commencing any job. Written quotes insure the homeowner and the tradesperson. Fair pricing practices normally involve:
● Fixed quotes: An open quote properly quoted and then inspected, not an hourly estimate. ● Written breakdowns: Detailed expenses showing labour, materials as well as any other expenses prior to beginning of work. ● No pressure tactics: Time to study the options without requesting a decision to be made immediately on-site. ● Transparent extras: All other costs including after-hours costs would be explicitly known prior to the job.
Common errors one should not make when employing a plumber
Hasty judgments made in the plumbing crisis tended to come back to bite. The failure to do basic checks may lead to low-quality workmanship or high prices. Most frequent hiring issues are avoided with a brief wait before making a booking. Frequent mistakes include:
● Skipping licence checks: Recruiting solely on price without first ensuring they are properly licensed and insured. ● Accepting verbal quotes only: Accepting oral estimates rather than writing down, making itemised price explanations. ● Ignoring reviews: Finding a plumber without examining customer feedback in the past few reviews on different independent review sites. ● Overlooking guarantees: Not enquiring of work done, whether it comes with any part or labour warranty.
A look at the frequently asked questions
What is the average price of a Melbourne plumber?
Prices are depending on the type of job hence a written estimate is always advisable.
Is a call-out fee always charged?
Not necessarily; lots of plumbers cancel a charge after the job is done.
Is there a plumber who can do gas fitting?
No, the other licence qualification is a separate gas fitting licence qualification.
Is it necessary to base a hiring decision on reviews?
Yes, there are some patterns in the quality of reliability and workmanship according to recent reviews.
Is emergency plumbing available on weekends?
There are numerous certified plumbers who have emergency services available on weekends and after hours.
 Five Star Tree Care
Winter has arrived and this means many months of snow and ice are ahead. When trees shed their leaves and go dormant for the winter, this is like how bears hibernate; they are both sleeping through the cold and waiting until the warm spring weather comes back. But unlike hibernating bears, who are safe and snuggled up in a warm cave somewhere, trees are left to withstand the harsh, cold elements throughout the entire winter. This means that they are more impacted than you might believe.
It is easier for mature trees to be able to handle the long winter months due to their extensive root system and thick bark. But saplings and other newly planted trees are not yet fully equipped with these natural defenses to handle the cold. No matter if you have new or older trees, following our tips will help them prosper during the cold Canadian winter ahead. Our team at Five Star Tree Services has come up with some winter maintenance essentials for your trees that will give them an extra hand over the winter.
One Last Water
Getting one last good watering in before the ground freezes is helpful to newly planted and young trees. Always make sure to water your tree slowly and gently. This allows the water to seep down into the root system as opposed to it running off the top and freezing.
Apply Mulch
When you use mulch, it acts like a barrier between the tree roots and the cold snow, it helps to insulate it. When you are applying mulch, make sure you spread it around the base of the tree so that it is no more than 3 inches deep. You also need to make sure to spread the mulch all the way to the drip line surrounding the tree. Make sure to not exceed 3 inches around your entire tree and keep the mulch away from the trunk of the tree.
Wrap Tree Trunks
There is a condition called sunscalding that can occur during the winter months. This happens when there is a temperature change that happens quickly. You might notice it when the sun warms the trees, which thaws the bark but during the night, when it gets cold again, it causes the melted water in the bark to rupture, causing cracks in the tree’s trunk. Young trees are especially susceptible to this happening. To help stop this from happening, it is best to wrap your trees with tree wraps or a plastic guard. It is advisable to wrap the trunk from the ground up and stop just below the first branch.
Shelter Your Trees
Young or newly planted trees are fairly defenseless for the first handful of years. Older and more mature trees have had time to develop a strong root system and hardy bark that help to protect them against things like animals and the freezing cold. If you want to help your little sapling along this winter, you can build a shelter that can handle having snow piled on it. You can also periodically use a broom to brush off the snow that accumulates on a tree’s branches. But try to avoid breaking off any ice that has formed on the branches, as this can actually end up hurting the tree if you accidentally break one of its branches instead.
Keep Road Salt Away
It’s no big secret that the use of road salt is detrimental to trees. When it gets on them, the end result come springtime is a dead tree, or at least, a severely damaged one. As much as you can, protect your trees and limit their exposure to salt over the winter.
Protect Your Trees
Winter is not only limiting for trees, but for a lot of other animals as well. This includes rabbits, mice, moles, squirrels, and other furry little creatures, who like to use trees as a food source during the summer months. During the winter, this food is now cut off when the trees go dormant. This only leaves the tree’s bark as an alternative food source for these critters. They seem to especially like young tree bark to chew on over the winter. In order to stop this from happening, you need to protect the bark with things like a fence surrounding your tree, wrapping the trunk with a plastic guard or hardware cloth.
Winter Pruning
The best time to prune any tree is during the winter months when the tree is dormant. Pruning allows you to rid the tree of any excess branches and control disease. Winter pruning is highly beneficial and lets your tree improve branch development in the spring.
Don’t Use
Always make sure to avoid products that are known to hurt trees, especially ones containing sodium chloride. Products like that cause negative reactions in trees or any plants, as it hinders their water intake. Instead, look for products that have potassium, calcium, and magnesium chloride.
How Five Star Tree Services Can Help
For newly planted and young trees, it is especially important to help them through the winter as best you can. We here at Five Star Tree Services are here to help you get your trees through the winter. If you require Toronto Tree Care, make sure to give us a call at (416) 990-3355.

 safe ZOnea
Maintaining a pest-free home requires attention throughout the year. Seasonal changes affect pest behavior, and understanding these patterns can save homeowners from costly damage and health hazards. In this guide, we will explore practical strategies for spring pest prevention tips, ensuring your property stays protected through every season. From spotting early signs to implementing proactive measures, these steps empower homeowners to take control before infestations occur.
Understanding Seasonal Pest Patterns
Pests adapt to changing weather, and knowing their patterns helps prevent infestations effectively.
Spring: Awakening Pests
Spring signals the end of winter dormancy for many pests. Rodents, ants, and termites start seeking food and warmth. Effective spring pest prevention tips include:
● Cleaning gutters and removing debris
● Sealing cracks and gaps in exterior walls
● Inspecting wood piles and compost areas
● Monitoring early signs of termite activity
Pro Tip: Conduct a termite inspection or a professional evaluation to catch infestations early before they spread.
Summer: Peak Pest Season
Warm temperatures accelerate pest breeding cycles. For a comprehensive summer pest prevention guide:
● Maintain lawns and trim vegetation away from homes
● Check window and door screens for tears
● Store food in sealed containers
● Inspect water sources that attract mosquitoes
Do You Know? Mosquitoes can lay eggs in a teaspoon of water. Eliminating stagnant water is crucial to reducing their population.
Fall: Preparing for Winter
As temperatures drop, pests search for warm indoor spaces. Key actions include:
● Inspecting for winter rodent entry points
● Sealing attic vents, crawl spaces, and foundation gaps
● Cleaning storage areas to minimize hiding spots
● Checking chimney and fireplace openings
Quick Fact: Rodents can enter homes through openings as small as ¼ inch.
Seasonal Pest Checklist for Homeowners
Creating a structured seasonal pest checklist simplifies preventive measures and ensures nothing is overlooked.
Season
Key Actions
Spring
Inspect for termites, seal exterior gaps, clean gutters, and check compost
Summer
Repair screens, trim vegetation, remove standing water, and secure food
Fall
Seal entry points, inspect attic/crawlspace, clear debris, and prepare storage
Winter
Monitor indoor activity, keep firewood away from walls, and maintain traps
Inspection & Maintenance Tips
● Schedule annual pest inspections by professional Virginia pest control consultation to detect hidden problems
● Keep a log of pest sightings and treatment dates
● Regularly replace weather stripping and caulk cracks
Note: Even small preventive steps, when consistently applied, drastically reduce infestations.
Common Pests and Their Seasonal Behaviors
Understanding how different pests behave each season helps homeowners take timely action to protect their property.
● Ants and Termites: Ants emerge in spring seeking food, while termites become active and can damage wood unnoticed. Early detection is critical.
● Rodents and Mice: Fall and winter increase rodent intrusions. Block all entry points and keep food sealed.
● Mosquitoes and Flies: Summer creates the ideal breeding environment for mosquitoes. Eliminate standing water and use physical barriers like nets.
● Spiders and Other Insects: Seasonal shifts cause spiders to move indoors. Regular vacuuming and decluttering reduce hiding spots.
Eco-Friendly Prevention Methods
● Use natural repellents like peppermint oil or diatomaceous earth
● Encourage beneficial insects, such as ladybugs, to reduce pest populations
● Plant pest-deterring plants near home boundaries, like marigolds or lavender
Integrated Pest Management (IPM)
Adopt an IPM approach by combining physical barriers, monitoring, and environmentally safe treatments. This minimizes chemical use while maintaining a pest-free home.
Quote: “Prevention is the most effective form of pest control.” – National Pest Management Association
Seasonal Pest Prevention Tools
● Snap traps and humane rodent traps
● Sticky traps for insects
● Outdoor perimeter sprays (eco-friendly)
● Moisture meters to detect early termite or mold problems
Pro Tip: Keep tools organized and accessible to act quickly when pest activity is noticed.
Planning: Annual Pest Calendar
Month
Recommended Action
March-April
Spring pest prevention tips: Inspect, seal, clean gutters
June-July
Summer pest prevention guide: Screens, standing water, food storage
September
Seasonal pest checklist: Seal entries, declutter, prep storage
November
Winter rodent entry points: Monitor indoors, maintain traps
Key Takeaways
● Seasonal awareness prevents infestations and property damage
● Consistent inspections and maintenance are essential
● Simple eco-friendly measures can significantly reduce pests
● Use a structured checklist and calendar for effective prevention
Conclusion
Homeowners who stay proactive and follow spring pest prevention tips, along with year-round monitoring, ensure their properties remain safe and comfortable. Using a summer pest prevention guide, checking winter rodent entry points, and maintaining a seasonal pest checklist ensure your home remains safe and comfortable. Remember to combine inspections, physical barriers, and environmentally friendly methods for the best results.
FAQs
Q1: How often should I perform a termite inspection?
A1: Conduct inspections annually, especially in spring, to detect early signs of termite activity and prevent extensive damage.
Q2: Can pests enter my home during winter?
A2: Yes, rodents and insects seek warmth and shelter indoors. Sealing entry points and monitoring for activity is crucial.
Q3: What is the most effective eco-friendly method for pest prevention?
A3: Using natural repellents, encouraging beneficial insects, and eliminating water sources effectively reduces pest populations without chemicals.
Ensure your home is ready for every season. Schedule a professional Virginia pest control consultation or a termite inspection in Suffolk, VA, today and stay ahead of potential infestations.

 Custom Surface Solutions
Custom Surface Solutions (www.css-tile.com) - Owner Craig Thompson (512) 430-1215. This project shows new 12 x 24 tile installed vertically with offset layout pattern on wall and floor. Includes shower box with linear glass accent tile back and vertical glass accent band. Tile edges are finished with Schluter Jolly satin aluminum profile edge trim.
 Tile Doctor Ltd
Pontcanna is a popular residential area in the western district of Cardiff, in South East Wales. Known for its rather large houses and spectacular foliage, interestingly enough roughly a quarter of the population are English folk.
I was called down to a property in the area to take a look at a Victorian tiled floor which was in quite poor condition. Along with the typical amount of dirt and muck seen on poorly maintained tiles, there were a number of missing tiles and a fair bit of cement caked on the surface of the floor.
It would require a robust clean, fresh seal, and several repairs to get this floor back into optimum condition.
To begin, I checked for excess moisture problems using a damp meter in various places of the hallway floor and, thankfully, it was showing dry results. Any dampness could have potentially caused problems later on in the restoration process, so it was s good idea to run tests before starting.
Next, I manually scraped as much of the dry paint and cement off the tiles as possible, with no lubrication necessary. I then proceeded to clean the floor with a solution I mixed early, consisting of equal parts Tile Doctor NanoTech HBU and Tile Doctor Pro Clean, rinsing as I went. Both products are designed to tackle heavy soil build-up, with the former uniquely using nano-sized particles (as the product name suggests) to penetrate deep into difficult to reach areas in the tiles in order to lift out ingrained muck.
Following the initial clean, I removed all of the loose tiles and those heavily affected by cement, before retiling as necessary with fresh Victorian tiles, and grouting the whole floor. Of course, these replacement tiles were carefully sourced to ensure consistency, as far as possible, with the original pattern of the floor.
The next day, I went over the whole floor with an application of the acid-based Tile Doctor Grout Clean Up, diluted with a little alkaline Pro Clean to form a cleaning solution. I then used a black pad to scrub the cleaner into the tiles, similarly to the previous day’s cleaning. This was followed by a through rinse with water to neutralise the floor.
It was at this point that I noticed some stubborn cement stains remained so I set about breaking them down using a 60 grade hand held diamond polishing block, and this technique proved successful.
After completing the clean, I left the floor to dry out for roughly 24 hours. Upon my return to the property to seal the tiles, I tested again for moisture. It is recommended to run damp tests before sealing, as excess moisture can cloud the sealer, affecting its performance in the long run.
Fortunately, no dampness was detected and I was proceeded to seal the floor with seven coats of Tile Doctor Seal & Go, which enhances the natural colours in the stone and provides a nice satin gloss appearance, as requested by the customer.
I was extremely pleased with the results of this restoration, as was the customer. The extent of the soil build up and damage was such before the restoration that, after completion, the floor looked like it had been newly laid!
Julian Iancono
South East Wales Tile Doctor
 House Doctors of Scotch Plains-Fanwood, NJ
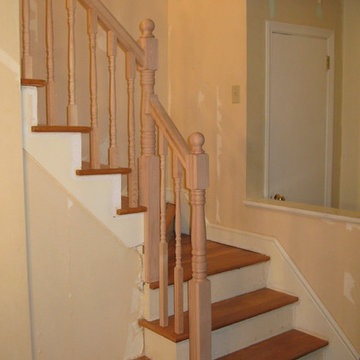
Stairways that have a baluster add beauty to a home. However, if the baluster is broken, then this can cause the stairs to look bad. Fortunately, it is not that difficult to replace a broken baluster. Below are some of the steps you will need to take:
Remove The End Cap
It is important to be very careful when you are replacing the baluster. You will need to keep the baluster intact so that a wood turner will be able to make an exact copy of it. You will most likely need to remove the end cap from the stairs. Break the seal that is between the tread and the end cap using a sturdy knife or pry bar.
Breaking The Baluster
If you do not want to salvage the baluster, then you do have other options. You can use a hammer to loosen the nails at the top of the baluster. Make sure that you do not damage the adjacent balusters or handrail. You can use your hands to loosen the bottom half of the baluster. Make sure you use gentle force.
Create A New Baluster
Unless you are fortunate enough to have the same baluster at a local home center, you are going to need a wood turner to make a new baluster. Make sure you tell your wood turner the specific type of wood you need. If you are not concerned about the original color, then you will need to select the wood that is the hardest. Ask the wood turner to leave the spindles intact. This may make it harder for you to fit the baluster into the staircase. However, this reduces the chances of getting a misfit from the wood turner.
Prepare The Stairs
It will likely take one or two weeks to turn a baluster. You can prepare the stairs during this time. Clean up the area around the stairs. Put the end cap back on the stair tread. Measure the tread to where the new baluster and handrail will meet on the upstairs side.
Prepare The Baluster
You can prepare the baluster by sanding it smooth. Measure from the bottom of the baluster to the bottom of the tenon joint. Cut the top end of the baluster so that it matches the handrail's slope. Hold a T-Bevel against the handrail's underside where the new baluster will go. Mark the angle with a pencil.
Install The Bottom Of The Baluster
Insert the tenon inside of the mortise. After that, position the top of it in the middle of the handrail's underside.
Install The Top Of The Baluster
Make sure the tenon is straight by using a carpenter's level. Have someone hold it in place in order to ensure that it matches the angle of the other balusters. Place one nail into the baluster's upstairs side. You most likely will not need more than two finishing nails. Remove dust by wiping off the baluster. Use painter's tape to mask off the handrail and stair tread. Stain or paint the new baluster.
Since this project involves a lot of work, you can save a lot of time and stress by contacting House Doctors to help. Thanks to our highly experienced team, you can depend on us to get the work done promptly and properly.
by Ken Benedetto, Owner of House Doctors of Scotch Plains - Fanwood

 Goodall Custom Cabinetry
Living room - traditional formal dark wood floor living room idea in Phoenix with beige walls, a standard fireplace and a media wall


 Shade And Shutter Systems, Inc
Rolling Shutters are the ultimate solution when you want to protect what’s behind your windows and doors. With Rolling Shutters, enjoy peace of mind knowing that your home has a sturdy layer of hurricane protection and storm protection. Rolling shutters shield against wind-blown debris, sand blasting and water penetration. Strong, secure, and durable, our Rolling Hurricane Shutters are proven to reduce energy and maintenance costs while making your home more comfortable to live in.
Hurricane Shutters
Hurricane Shutters are the premier protection against snow and ice storms, driving rain, high winds, and flying debris. We have huge selection of Hurricane Protection products for all types of applications. We specialize in new construction, retrofit projects and custom applications designed around more complex installations.
Hurricane Shutters protect your windows and doors from water penetration and breakage during hurricanes and Nor’easters bringing you comfort and protection. Even when you are not physically at the location of the storm, rolling shutters can offer you peace of mind. Homes and businesses not equipped with rolling shutters may experience glass breakage and door failures during high winds. Ultimately, those openings in the structure’s envelope can cause complete devastation to the home or business. Once the air pressure enters a building, no matter the type of construction, the likelihood of other windows and doors failing rises. If the pressure grows beyond a certain point, walls and and roof components begin to fail.
Security Shutters
Security Shutters are one of the best ways to discourage intruders from attempting to enter your home or business. This deterrent measure is just where rolling shutters start. While in the down position, rolling shutters can be locked in place by a motor, a gear, a keyed switch or by a separate locking device.
Rolling Shutters have been used as security shutters all over the world for decades with incredible success. Sometimes labeled as metal shutters and metal security shutters, they all have subtle differences, and the differences can’t be seen with the rolling shutter in the down position.
Security Shutters typically have end-retention pins that lock into the guide rails from the top. These pins are located throughout the entire curtain and are protected from manipulation while the curtain is in the close position.
Storm Shutters
Storm Shutters are the broad category of Storm Protection products. Of course, they come in all types of sizes, features and functionality. We have a full line of rolling shutters, hinged storm shutters and storm panels for you to to explore on our website or we would love for you to swing by one of our showrooms to see live demo models.
Storm Shutters are specifically engineered and designed for high hinds, flying debris protection and ultimately given a rating for Hurricane Protection. A little known fact: The most damaging type of wind value is not the force of the wind blowing directly on your home. This force is called positive pressure, and typically, many believe this is the strongest force against their home or business. Believe it or not, the negative pressure, or, the air passing by your windows and doors, has far greater power. Many low-grade storm shutters and hurricane protection products fail under this pressure.
Solar Shutters
Solar Shutters have a double wall construction and filled with a specialized polyurethane foam designed to increase R-factor and deflect solar penetration. Many rolling shutters can perform this function, but not all are created equal. The energy efficiency of exterior rolling shutters is up to 95% more effective than interior solar shades.
Solar Shutters have many unique and positive “side effects” from their dense foam-filled curtain profile. Many homeowners have taken advantage of energy savings by using these types of rolling shutters in both the summer and winter seasons. Reducing heating and air conditioning expenses throughout the entire year is not always our first thought, but many home and business owners have expressed massive savings. Not only do they block up to 90% of heat gain and loss, they also provide incredible noise control opportunities.
Privacy Shutters
Privacy Shutters are a great way to close of areas of your home or business from others. Some rolling shutters are equipped with perforations allowing ambient light to pass through when needed.
Privacy Shutters have many uses and are creatively used throughout the world in homes and businesses for all kinds of reasons. Close off food preparation areas, work shops, stock rooms, gun safes, closets, liquor cabinets and bars. Some business owners use rolling shutters to close off the outside world after working hours, to protect the last few employees as they finish money counts, paperwork, and prepare bank deposits.
If you have any questions or need additional information, our Product Specialists are available 800-522-1599
 Tile Doctor Ltd
This was a substantial engagement at a luxury rental apartment in Brighton rejuvenating the Limestone tiles in two bathrooms and a hallway taking six days of hard work. In addition, I would be working around two decorators, making for even more testing work conditions.
I first set to work on the smallest bathroom, which featured limestone tiles from floor to ceiling, as well as a large bath, copper sink and a tiled surround. Limestone is a very popular choice for interior and exterior decoration, but the tiles in this bathroom were in need of some care to get them looking their best again. My initial task was to strip away any previous sealer by hand; this was done using a mixture of warm water and Tile Doctor Pro-Clean which, along with Limestone, is also suitable for use on other types of natural stone, such as Granite, Slate and Travertine. Pro-Clean serves both as an effective stripper and cleaner, meaning that once the sealer had been stripped away, the tiles also received a thorough clean. Once I had cleaned the tiles, I sucked up any excess water and residue using a Wet-Dry Vac machine.
Since the tiles would have to be left to dry for a couple of days, I offered to restore the copper sink for the customer, even though this was not actually part of my job description. After conducting some research into copper cleaning, I opted to use a combination of lemon juice, vinegar and salt. The research paid off as, once I began to apply the solution to the sink, the bright orange and brown colours of the copper quickly rose to the surface. Within the space of an hour, I had transformed what initially appeared to be a ruined sink into a lovely, shimmering copper feature for the bathroom. Both the decorators and I were truly amazed at the results – but all credit goes to Google!
The larger of the two bathrooms was a much stiffer test for the Tile Doctor products. It had not been left in great condition, as the shower area had clearly not been sealed correctly, and the tiles had been left in such a manner that soap scum from shampoos, soaps and shower gels had built up on the window sill. In fact, the damage was significant enough that I had to explain to the customer before starting the work that whilst I could greatly improve the appearance of the tiles, I would not be able to restore them to new. This is because many shampoo and body wash products are acidic and can cause permanent damage to stone work especially when left to dwell for a long time.
My choice of product was Tile Doctor Mould Away, a formula which, over time, seeps deeply into the pores of the stone, effectively lifting away the muck. In cases of particularly stubborn areas, it is necessary to apply another covering of Mould Away and leave it for an extended period of time. This is exactly what I did over the next few days, leaving the product overnight to work its magic. The change was certainly drastic, if not perfect.
As both bathrooms required extended periods of drying, I spent two days working on the hallway, which had been partially covered with a plastic sealing for the previous six months due to building work. Needless to say, the hallway was in need of a good clean. I set about cleaning the hallway with a solution of warm water and Tile Doctor Pro-Clean, before once again using a Wet-Dry Vac machine to remove any excess water to prepare the floor for sealing at a later point. It is very important to remove any residue of cleaning solution before sealing, as this may impact the performance of the sealer. Following this, I left the hallway to dry for two days, providing the builders with strict instructions to cover it with blankets for protection while they were working.
While the floor was drying, I sealed the bathrooms – both now fully dried – with Tile Doctor Colour Grow Sealer, a solvent-based sealer that was highly effective at enhancing the colour of the brown tiles around the sinks. The product will also provide durable surface protection. I spent the final of the six days sealing the hallway floor with Tile Doctor Seal & Go, which provides both a stain-resistant surface seal and a durable, low-sheen finish. This was an ideal choice of product, as the customer requested a hard-wearing, yet shiny finish.
The hard work really paid off, as both the customer and the decorators were very impressed with the final results in the two bathrooms and the hallway. I was extremely pleased that I was able to complete this big job to the highest possible standards.
 Tile Doctor Ltd
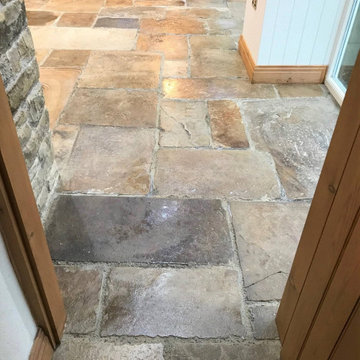
We had been to maintain this Sandstone floor about two years previously at a property in the pretty area of Windermere in the English Lake District. The client had run out of our Tile Doctor Neutral Tile Cleaner that we left after completing the job and had started using a standard cleaner instead (a well-known ecological cleaner). Unfortunately, this product has a 5% non-ionic surfactant in its chemical structure, which will strip a coat of stone sealer off the surface within 6 months, once that topcoat has been removed the sealed surface is only 50% as strong as it should be.
Readers of this article should be aware that even washing up liquid which is a degreaser will strip sealers although it will take many months of regular use before you will start to notice an issue. Stronger bleach-based cleaning products such as Flash and Domestos will cause instant damage to stone sealer which will often go an off-white colour as a result. So, the importance of using the right cleaner is imperative. Having used our services on this floor previously he client knew what to expect and was happy to go ahead with our quote.
My first task would be to clean the floor and completely remove what was left of the old sealer to ensure the floor would have a consistent appearance. On this occasion I used a strong 1:3 dilution of Tile Doctor Pro-Clean worked into the floor with a Black buffing pad fitted to a rotary buffing machine. The Sandstone floor was then rinsed with water, scrubbed again and then the waste extracted using a wet vacuum.
This was followed with acid rinse using a 1:5 dilution of Tile Doctor Grout Clean-Up, this is a Phosphoric Acid (not a Brick Acid). After being scrubbed into the tile it was rinsed off the floor as before using water and the wet vacuum. This process further cleans the stone and neutralises the floor after the use of the strong alkaline Pro-Clean used earlier.
Before leaving for the day I gave the floor one final rinse with water and then dried the floor as much as possible with the wet vacuum. The floor was now clean and free of sealer and left to fully dry off overnight.
I came back the following morning and started by testing the floor with the moisture meter. I always do this as I know from experience how important it is to ensure the floor is dry before applying a sealer.
Happy the Sandstone was dry I then proceed to apply the first of what would be four coats of sealer. For this I used Tile Doctor Seal and Go which leaves a nice low sheen finish. This product is specially formulated blend of acrylic polymers that provides will protect the floor from ingrained dirt and staining; it will make the floor easy to clean and has the added advantage of being water based so it doesn’t leave a solvent smell as it dries.
The client was left another complimentary bottle of Tile Doctor Neutral cleaner and hopefully the seal will last a long longer the 2nd time around. The client was pleased the floor had been restored and vowed to use nothing but Tile Doctor products on it in the future.
Heidi Taylor
South Cumbria Tile Doctor
 Tom Brzoskwinia
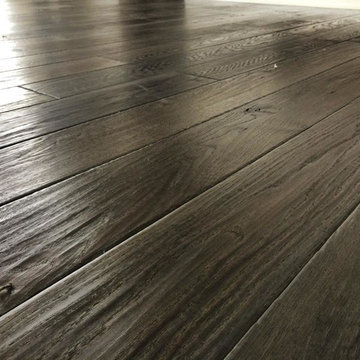
One of the most popular hardwood floor finishing which offers Tom & Peter Flooring is provided by WOCA. If you’ve decided that you want a natural looking wooden floor that is lacquer-free, then the likelihood is that you’ve chosen oil as your way of protecting your wood and making your floor look great at the same time. WOCA for wood flooring comes in various forms and is a great way of making sure that your wood is protected, but at the same time looks natural. A highly popular as well as effective way of treating wood floors, oils effectively penetrate into the wood and in some cases harden into the surface of the floor to stop damage and to maintain the wood in its optimum condition.
WOCA Oil finish hardwood flooring has taken the United States market by in 2014 and shows no signs of slowing down in 2016 and now. Here are some of the most common questions we have regarding this type of finish which we will I’m to answer in today’s my blog:
Is oil finish as durable as traditional factory urethane finishes with aluminum oxide?
When it comes to durability, oil finish flooring tackles the issue with a completely different method. The penetrating oil serves as protection from moisture and wear while allowing the user to feel the wood grains in their bare feet. If compared directly to factory finished aluminum oxide finish, the oil finish flooring will not perform as well to abrasion and impact. However, the beauty of this finish is the fact that it will camouflage any scratches which will inevitably accumulate over time.
Will this finish evaporate over time and will this be harmful for indoor air quality?
Another concern for oil finished floors its effect on indoor air quality. For on-site applications, some varieties suggest several coats which typically require the residents to be out of the home due to mild odors. However, there are factory finished UV-cured or single coat applications which lessen the downtime. Despite the odors produced during the drying process, oil finish floors rank amongst the lowest for VOC (volatile organic compound) emissions. Certain brands even boast true zero VOC. This fact alone makes oil finished floors one of the best options for green building solutions.
“WOCA products are certified by independent laboratories, the German Institute for Biological Building Materials, and are in accordance with DIN–Norm 53–160. WOCA WoodCare Denmark products meet or exceed the most stringent U.S. standards for volatile organic compounds.” –WOCA Oil Finish Manufacture
Does this type of finish require additional maintenance which I am not familiar with?
For weekly cleaning, oiled floors use a special cleaner which contains an oil and soap mixture. After a period of 12-18 months some oil may evaporate causing the wood grains to appear dry. An additional layer of oil can be reapplied to keep the floor looking fresh. Although oil finished floors require more involvement in periodic maintenance in high traffic areas, this maintenance can be done much easier than the equivalent of an onsite sand and refinish.
WOCA Master Color Oil contains pigment, which provides a single-step hardwood floor staining process. Laying down the stain and the finish in one step.
This product comes 14 different colors, from Black to Extra White, and you can mix them freely to create various color palettes that will meet the demands of any job.
Below are some pictures of the finished job…
 Shade And Shutter Systems, Inc
Rolling Shutters are the ultimate solution when you want to protect what’s behind your windows and doors. With Rolling Shutters, enjoy peace of mind knowing that your home has a sturdy layer of hurricane protection and storm protection. Rolling shutters shield against wind-blown debris, sand blasting and water penetration. Strong, secure, and durable, our Rolling Hurricane Shutters are proven to reduce energy and maintenance costs while making your home more comfortable to live in.
Hurricane Shutters
Hurricane Shutters are the premier protection against snow and ice storms, driving rain, high winds, and flying debris. We have huge selection of Hurricane Protection products for all types of applications. We specialize in new construction, retrofit projects and custom applications designed around more complex installations.
Hurricane Shutters protect your windows and doors from water penetration and breakage during hurricanes and Nor’easters bringing you comfort and protection. Even when you are not physically at the location of the storm, rolling shutters can offer you peace of mind. Homes and businesses not equipped with rolling shutters may experience glass breakage and door failures during high winds. Ultimately, those openings in the structure’s envelope can cause complete devastation to the home or business. Once the air pressure enters a building, no matter the type of construction, the likelihood of other windows and doors failing rises. If the pressure grows beyond a certain point, walls and and roof components begin to fail.
Security Shutters
Security Shutters are one of the best ways to discourage intruders from attempting to enter your home or business. This deterrent measure is just where rolling shutters start. While in the down position, rolling shutters can be locked in place by a motor, a gear, a keyed switch or by a separate locking device.
Rolling Shutters have been used as security shutters all over the world for decades with incredible success. Sometimes labeled as metal shutters and metal security shutters, they all have subtle differences, and the differences can’t be seen with the rolling shutter in the down position.
Security Shutters typically have end-retention pins that lock into the guide rails from the top. These pins are located throughout the entire curtain and are protected from manipulation while the curtain is in the close position.
Storm Shutters
Storm Shutters are the broad category of Storm Protection products. Of course, they come in all types of sizes, features and functionality. We have a full line of rolling shutters, hinged storm shutters and storm panels for you to to explore on our website or we would love for you to swing by one of our showrooms to see live demo models.
Storm Shutters are specifically engineered and designed for high hinds, flying debris protection and ultimately given a rating for Hurricane Protection. A little known fact: The most damaging type of wind value is not the force of the wind blowing directly on your home. This force is called positive pressure, and typically, many believe this is the strongest force against their home or business. Believe it or not, the negative pressure, or, the air passing by your windows and doors, has far greater power. Many low-grade storm shutters and hurricane protection products fail under this pressure.
Solar Shutters
Solar Shutters have a double wall construction and filled with a specialized polyurethane foam designed to increase R-factor and deflect solar penetration. Many rolling shutters can perform this function, but not all are created equal. The energy efficiency of exterior rolling shutters is up to 95% more effective than interior solar shades.
Solar Shutters have many unique and positive “side effects” from their dense foam-filled curtain profile. Many homeowners have taken advantage of energy savings by using these types of rolling shutters in both the summer and winter seasons. Reducing heating and air conditioning expenses throughout the entire year is not always our first thought, but many home and business owners have expressed massive savings. Not only do they block up to 90% of heat gain and loss, they also provide incredible noise control opportunities.
Privacy Shutters
Privacy Shutters are a great way to close of areas of your home or business from others. Some rolling shutters are equipped with perforations allowing ambient light to pass through when needed.
Privacy Shutters have many uses and are creatively used throughout the world in homes and businesses for all kinds of reasons. Close off food preparation areas, work shops, stock rooms, gun safes, closets, liquor cabinets and bars. Some business owners use rolling shutters to close off the outside world after working hours, to protect the last few employees as they finish money counts, paperwork, and prepare bank deposits.
If you have any questions or need additional information, our Product Specialists are available 800-522-1599
 Five Star Tree Care
During the summer, certain tree pests are particularly active and bent on the destruction of your beloved trees. Spider mites are one of these pests that like to make themselves at home all over your plants. Their only goal in life is to eat plant leaves. A great way to stop their destruction is being able to recognize the warning signs of their infestation. Once you have identified them, you can take care of them and put in precautions in order to keep them away and stop any future problems from them. We here at Five Star Tree Services have come up with ways that you can identify this pest and get rid of it before it’s too late for your precious plants.
Some Info on Spider Mites
You might have seen these little pests before but didn’t know what they were. They are these tiny creatures that are related to ticks and spiders.
What They Look Like
In order to see them properly, you will need to look at them through a magnifying glass. These little bugs come in a number of different patterns and colours. Being so incredibly small, they are roughly a millimeter at the most. For reverence, that’s about as thick as your credit card. Trying to look at them without a magnifying glass, all you might see are these tiny moving dots that might be brown, red, black, or yellow.
Causes of Spider Mites
Due to their shier tininess, these little invaders can waltz right into your gardens undetected. It’s even possible that you have bought a plant for a nursery or garden center that has had spider mites on them. They can even be brought into your garden by the wind. These little pests have the ability to spread very quickly due to their ability to eat a number of different plants. They are not very picky when it comes to eating your plants. They like outdoor and indoor plants, deciduous and evergreen, virtually nothing is safe from them.
How To Tell You Have Spider Mites
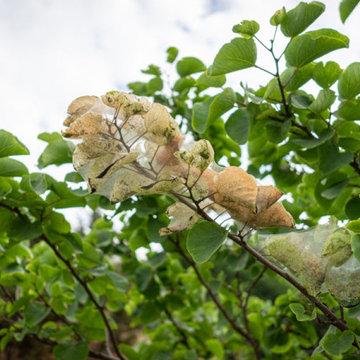
Spider mites prefer to cut and feed on the bottoms of tree leaves, however, the damage they do can be seen at the top of the leaf. Three key things to look for that indicate you have a spider mite infestations are:
Yellowing or bronze look to your tree in one or many different areas (common with a big infestation)
Silky webs that are woven around the leaves and stems
Little yellow or white spots appearing at the top of the leaves/needles
If you are suspicious that your plant has spider mites, one way to know for sure is holding a sheet of paper under an infected branch and shaking it. You will be able to see the little mites on the paper.
Rid Your Plants of Spider Mites
Whether it’s the summer or winter, follow these tips for treating spider mites.
Summer:
You can use a forceful water spray to knock them off of your tree. Once they are gone, periodically use your hose to rinse your trees for the season. Make sure to get the bottom of the leaves because this is where the mites like to live.
Winter:
This also includes any time before the buds come out in the spring. If your tree has spider mites, during this time, you will only see the eggs settled on the branches of your tree. Apply dormant oil to all the eggs before they hatch.
It is also handy to know what natural predators eat spider mites. Certain rival insects such as lacewings and predator beetles will aid in getting rid of your pesky mites.
Preventing Spider Mites
Spider mites are most active during drought season. When trees are stressed, this is when they attack. If you are experiencing extended hot days and long dry periods, it is important to keep your trees hydrated. This means giving them at least an inch of water a week and making sure you have enough mulch around them.
How Five Star Tree Service Can Help
Spider mites are a pest. Catching them before they do any permanent damage is important. If using the dormant oil or spraying your tree with water doesn’t seem to be working, you can give us at Five Star Tree Services a call at (416) 990-3355 and we will come and help take care of them. Visit our website to see a full list of our available tree care services in Toronto!
 Five Star Tree Care
Taking care of plants, trees or shrubs may seem easy, but for many homeowners, the task is riddled with complications. For those who have no previous experience with plant or tree care, mistakes can cause damage or even death to the trees. A lack of proper training or a lack of proper information about tree care can do much more harm than good.
We care about your trees and shrubs as much as you care about your property. To help you avoid common mistakes, our team at Five Star Tree Services has created an easy to follow quick start guide for shrubs and tree maintenance. Following this guide will help you take care of your trees and shrubs in-between visits from our trained arborist.
Hire Help
Professional arborists are qualified and the best to trim, plant, maintain trees and to preform shrub trimming in just about any environment. Not only does a professional arborist have the experience, but they also are specially trained in the care and diagnosis of various plant species and diseases. In addition to taking care of your plant life, they will also offer you instructions on how to care for your plants when they are unavailable.
Make sure to take care in who you decide to hire. Instead of choosing the first company you find or the lowest priced plant care service, first you should research their qualifications by asking about how they usually care for trees, what their pruning style is, and how often they plan to visit for seasonal care. If they are not willing to answer your questions or educate you on the proper tree and plant care, keep searching.
Proper Tree Care Starts With You
Tree care starts with the property owner. The moment you chose a tree and how you care for it once it has been planted, will shape its health for the rest of its life. Proper care in the early years will ensure that it grows into a healthy shape and has a long life ahead of it. Working with a certified arborist will ensure that you choose the right trees for your area and that they are planted and care for properly during the early years.
There are many different species and types of plants, shrubs, and trees. Understanding how to care for each one will give you the knowledge needed to help them thrive. Speaking with a skilled professional will allow you to take care of your property effectively and efficiently.
Listen Carefully
As tedious or as boring as tree care instructions may be, it is important to pay close attention and take notes. Understanding the responsibilities you have as a property owner towards the shrubs and trees on your property is the best way to ensure they are well cared for. In the event that you are unsure about what to do or how to care for your plant life, you can always reach out to one of our certified arborists here at Five Star Tree Services.
How We Can Help
Whenever you have any Toronto tree care questions, Five Star Tree Services is here to help. We care about your plant life and are dedicated to offering each of our client’s comprehensive care so that your trees and shrubs will thrive. For more information or to get some tips on taking care of the trees on your property, give us a call at (416) 990-3355 to find out more.
36