
Search results for "Continue reading" in Home Design Ideas
 Kitchen Design Concepts
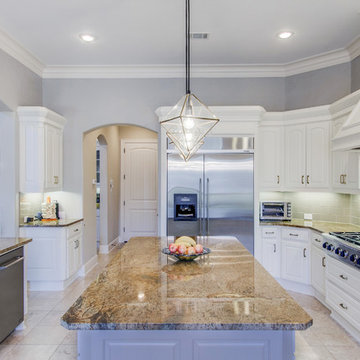
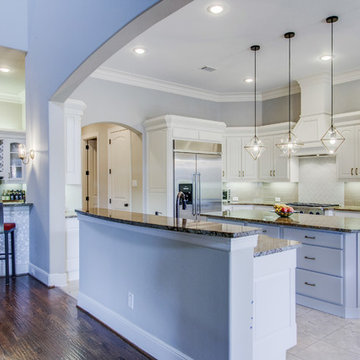
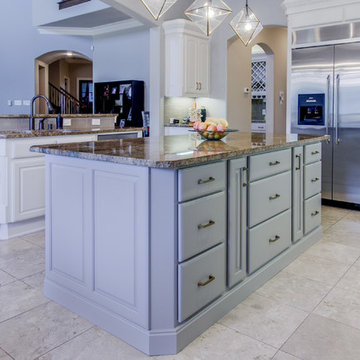
One of the biggest investments you can make in your home is in your kitchen. Now with the Revive model, you don’t have to break the bank to get an updated kitchen with new finishes and a whole new look! This powder blue kitchen we are sharing today is a classic example of such a space! The kitchen had a great layout, the cabinets had good bones, and all it needed were some simple updates. To learn more about what we did, continue reading below!
Cabinets
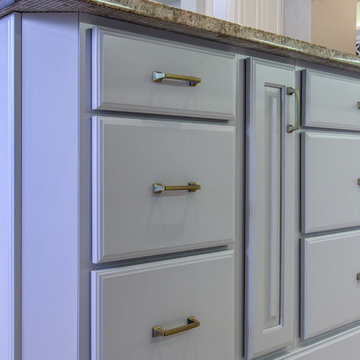
As previously mentioned, the kitchen cabinetry already had great bones. So, in this case, we were able to refinish them to a painted cream on the perimeter. As for the island, we created a new design where new cabinetry was installed. New cabinets are from WWWoods Shiloh, with a raised panel door style, and a custom painted finish for these powder blue cabinets.
Countertops
The existing kitchen countertops were able to remain because they were already in great condition. Plus, it matched the new finishes perfectly. This is a classic case of “don’t fix it if it ain’t broke”!
Backsplash
For the backsplash, we kept it simple with subway tile but played around with different sizes, colors, and patterns. The main backsplash tile is a Daltile Modern Dimensions, in a 4.5×8.5 size, in the color Elemental Tan, and installed in a brick-lay formation. The splash over the cooktop is a Daltile Rittenhouse Square, in a 3×6 size, in the color Arctic White, and installed in a herringbone pattern.
Fixtures and Finishes
The plumbing fixtures we planned to reuse from the start since they were in great condition. In addition, the oil-rubbed bronze finish went perfectly with the new finishes of the kitchen. We did, however, install new hardware because the original kitchen did not have any. So, from Amerock we selected Muholland pulls which were installed on all the doors and drawers.
 Page 2 Design
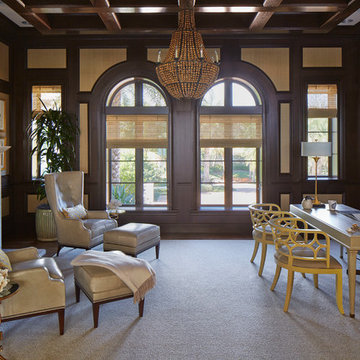
The open study is arguably one of the most stunning rooms in Vero Beach. Not a single design detail was overlooked. The wrought-iron 44" tall chandelier boasts a stately, old bronze finish with hand-carved beads. It immediately commands attention. Wingback chairs covered in dove gray leather are perfect transitional pieces while the custom desk chairs in soft yellow attract attention to their exquisite silk fabric.
Continue reading here: https://issuu.com/taac/docs/elements_summerfall_2016_digital?e=3252448/40095581
 Kitchen Design Concepts
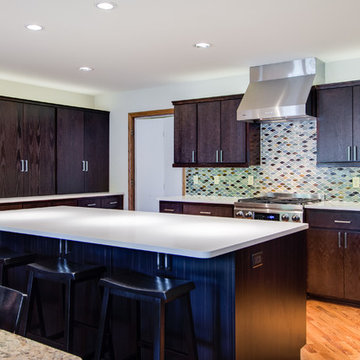
With a home on the lake, our clients were looking for a kitchen revival to match their love of a coastal modern look. Their original kitchen was monotone and bland with cabinets matching their flooring, and no pops of color. But with views overlooking the lake, bringing some of those natural elements inside along with a pop of color is just what this kitchen needed. As a result, we did a little minor demo, replaced door and drawer fronts, and incorporated new appliances, countertops, and backsplash. To learn more about this kitchen, continue reading below!
Cabinets
To revive this kitchen, we replaced the door and drawer fronts with brand new oak slab fronts from Woodmont to give it a modern look. We then incorporated new cabinetry on the island from Crestwood in a Metro door style and Ebony stain finish giving this kitchen a unified look and great functionality.
Appliances
New appliances include a Zephyr Tempest II hood in stainless steel, a 24" Dacor microwave drawer, and a 30" Dacor Distinctive dual-fuel range.
Countertops
As a contrast to the new darker stained cabinetry, we installed a bright quartz countertop from Caesarstone in the color Blizzard, giving this kitchen a balanced feel.
Backsplash
The backsplash is a reflection of the beautiful views our clients have of the lake. The shimmering and vibrant backsplash is a Hirsch Glass, in hourglass shape, and iridescent finish (XM0006).
Fixtures and Finishes
To complete this space, a new sink from Blanco (515824), a new pull-down faucet, also from Blanco (440616), and cabinet hardware from Top Knobs in brushed nickel (M1158) become the last elements that tie this space together.
Find the right local pro for your project
 Kitchen Design Concepts
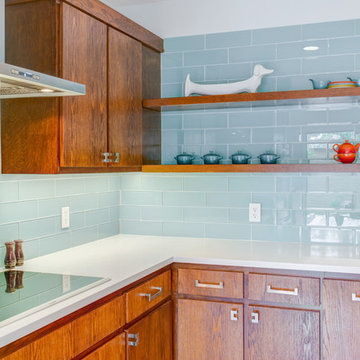
we wanted to preserve the mid-century modern feel (talk about a real flashback!), and boy, do we love the results! This kitchen is another perfect example of a project where we did the “lipstick and make-up” – another term for replacing the more cosmetic features such as countertops, backsplash, and the door and drawer fronts. Even doing so, the resulting kitchen leaves us with a breath of fresh air! To learn more about this space, continue reading below:
Cabinetry
To start, we removed the soffit in the kitchen making the space look taller. Next, we did not rip out the cabinetry boxes, because we were inspired by the finish and look of what existed. Maintaining the finish of the cabinets helped preserve the retro feel and is a good example of repurposing what you already have! As a result, we replaced the door and drawer fronts with a new slab style in a matching medium stain. In addition to the cabinetry fronts, we installed floating shelves – a perfect spot to display!
Countertops
For countertops we wanted something light and bright, and also something that would look good with the other finishes. As a result, we kept it simple with a light and bright surface from Caesarstone in the color “Blizzard”
Backsplash
Now for a little fun and a pop of color, the tile. The tile we selected is fresh, exciting, and also ties everything together giving that mid-century modern feel. In a brick-lay installation, we have a Glazzio Crystile Series, in a 4×12 size, with a finish of Soft Mint.
Fixtures and Fittings
Completing the space, we finished the cabinetry with U-Turn knob’s on the doors, and U-turn pulls on the drawers. Then from Blanco, we have a Quatrus stainless steel sink and a Culina mini faucet in satin nickel.
 RAJ Kitchen and Bath, LLC
 “Full apartment design”.
IF you have not yet seen this apartment conversion before, we strongly urge you to go to the bottom left of this page and click on the short 2-minutes video. It would put a lot of things into perspective when you come back and continue reading this.
It is true we were literally handed the keys and told a list of things that they wanted to have happen and we were to go into the apartment, look at the space and come up with a design that would satisfy all of that need. UNTIL we showed up! The unit had really seen some better days but we knew we had to look past that and come up with a concept that would work for them.
The immediate challenges were centered around 3 big ideas:
1. Adding a second bedroom to the already small footprint
2. Figuring out a way to make the kitchen bigger, better and brighter
3. Creating a master room walk in closet
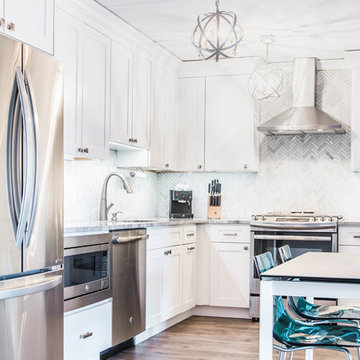
It’s always difficult to add new rooms into existing footprint without expanding out or up and not incurring any opportunity cost. In this case, that was exactly what we had to do. Item one and two above had to be tackled as one. We went ahead and switched out the location of the dining room and eliminating an area where there was a “nook” type eat-in area. By doing so, we were able to cut right into that footprint and change the layout of the kitchen.
That one move allowed us to dig into the kitchen design because it was now the main focal point in the apartment. It was no longer an option to keep it in that tiny hole where it was, so we had to ensure that this design was functional and aesthetically pleasing at the same time. By adding the table into the space where an Island typically would go, we were able to both cut cost and still provide a dining experience. The Table serves as an Island as well when cooking.
We then proceeded to block in the existing doorway to the dining room. By doing this, we were able to create a full room which allowed us to put a door on the other side and called that room Bedroom #2. This was easier to do because all of the mechanicals were already in that space (light, heater and windows). By shifting things around, we also achieved a huge wall to wall closet from inside. PERFECT!
Then we moved into the Single bedroom. We thought it was a big room with a small closet, so by creatively adding an L shaped wall and steal some footprint into the bedroom side, we were able to put a door on that new room and design it for the walk-in closet. Even after this, the bedroom still holds a queen size bed with 2 night stands, a TV on the wall, a sitting chair and plenty of room to walk around. This was done by rethinking the location for the bed and night stands.
The bathroom was gutted to make sure there was no leaks and rebuild from the ground up. We kept all of the plumbing where it was, added a new vanity, medicine cabinet, tiles and lighting and it was done.
From there, the rest of the unit had new flooring all throughout, paint, and lighting. After completion and walk through, this project was handed over back to the clients.
Execution and collaboration between all the trades were: Reggie and his team from Premier Interiors and Rohan from RD Mechanical Services.
p.s. Please see our website to see the video.
 Kitchen Design Concepts
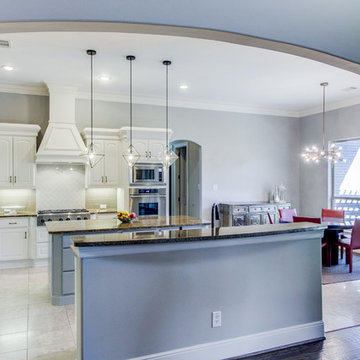
One of the biggest investments you can make in your home is in your kitchen. Now with the Revive model, you don’t have to break the bank to get an updated kitchen with new finishes and a whole new look! This powder blue kitchen we are sharing today is a classic example of such a space! The kitchen had a great layout, the cabinets had good bones, and all it needed were some simple updates. To learn more about what we did, continue reading below!
Cabinets
As previously mentioned, the kitchen cabinetry already had great bones. So, in this case, we were able to refinish them to a painted cream on the perimeter. As for the island, we created a new design where new cabinetry was installed. New cabinets are from WWWoods Shiloh, with a raised panel door style, and a custom painted finish for these powder blue cabinets.
Countertops
The existing kitchen countertops were able to remain because they were already in great condition. Plus, it matched the new finishes perfectly. This is a classic case of “don’t fix it if it ain’t broke”!
Backsplash
For the backsplash, we kept it simple with subway tile but played around with different sizes, colors, and patterns. The main backsplash tile is a Daltile Modern Dimensions, in a 4.5×8.5 size, in the color Elemental Tan, and installed in a brick-lay formation. The splash over the cooktop is a Daltile Rittenhouse Square, in a 3×6 size, in the color Arctic White, and installed in a herringbone pattern.
Fixtures and Finishes
The plumbing fixtures we planned to reuse from the start since they were in great condition. In addition, the oil-rubbed bronze finish went perfectly with the new finishes of the kitchen. We did, however, install new hardware because the original kitchen did not have any. So, from Amerock we selected Muholland pulls which were installed on all the doors and drawers.
 Kitchen Design Concepts
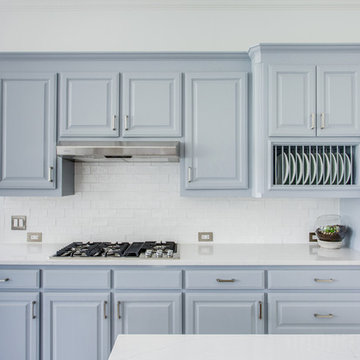
Many times, a kitchen does not need a complete gut, rather more of a cosmetic redo. Which is exactly what we’ve done here! This particular kitchen already had great bones and beautiful sky blue cabinetry, it just needed some finishing touches to get that make-over look. To learn more, continue reading below!
Countertops
With cabinetry already having a fresh sky blue color, we didn’t have to touch the cabinets. However, by lowering the pony wall, and dropping it to cabinet-height, really helped to open up the kitchen. The original countertops were a dark and outdated tile application that needed a redo. So out with the old and in with the new 3 cm Cambria Quartz in Ella. The brightness of the new countertops was a much-needed cosmetic change for this kitchen space to liven up!
Backsplash
The original backsplash was an outdated light-brown 4×4″ square installed in a mixture of straight and diamond lay. The new backsplash was a Daltile Artigiano 3×6 glazed ceramic wall tile in Italian Alps. This tile has a hand-painted look with irregular edges, giving it a hand-made look.
Fixtures and Fittings
To complete this kitchen, a new sink, faucet, and hardware is a must! From Blanco, we have a Diamond super single bowl in a granite composite sink in the color Truffle (441765), and Meridian semi-professional faucet in Satin Nickel (440557). Lastly, the new hardware on the cabinetry are Amerock Blackrock pulls in Satin Nickel (BP55276-G10).

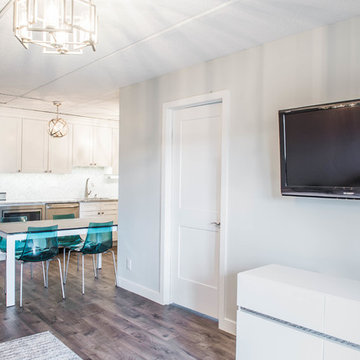 RAJ Kitchen and Bath, LLC
 “Full apartment design”.
IF you have not yet seen this apartment conversion before, we strongly urge you to go to the bottom left of this page and click on the short 2-minutes video. It would put a lot of things into perspective when you come back and continue reading this.
It is true we were literally handed the keys and told a list of things that they wanted to have happen and we were to go into the apartment, look at the space and come up with a design that would satisfy all of that need. UNTIL we showed up! The unit had really seen some better days but we knew we had to look past that and come up with a concept that would work for them.
The immediate challenges were centered around 3 big ideas:
1. Adding a second bedroom to the already small footprint
2. Figuring out a way to make the kitchen bigger, better and brighter
3. Creating a master room walk in closet
It’s always difficult to add new rooms into existing footprint without expanding out or up and not incurring any opportunity cost. In this case, that was exactly what we had to do. Item one and two above had to be tackled as one. We went ahead and switched out the location of the dining room and eliminating an area where there was a “nook” type eat-in area. By doing so, we were able to cut right into that footprint and change the layout of the kitchen.
That one move allowed us to dig into the kitchen design because it was now the main focal point in the apartment. It was no longer an option to keep it in that tiny hole where it was, so we had to ensure that this design was functional and aesthetically pleasing at the same time. By adding the table into the space where an Island typically would go, we were able to both cut cost and still provide a dining experience. The Table serves as an Island as well when cooking.
We then proceeded to block in the existing doorway to the dining room. By doing this, we were able to create a full room which allowed us to put a door on the other side and called that room Bedroom #2. This was easier to do because all of the mechanicals were already in that space (light, heater and windows). By shifting things around, we also achieved a huge wall to wall closet from inside. PERFECT!
Then we moved into the Single bedroom. We thought it was a big room with a small closet, so by creatively adding an L shaped wall and steal some footprint into the bedroom side, we were able to put a door on that new room and design it for the walk-in closet. Even after this, the bedroom still holds a queen size bed with 2 night stands, a TV on the wall, a sitting chair and plenty of room to walk around. This was done by rethinking the location for the bed and night stands.
The bathroom was gutted to make sure there was no leaks and rebuild from the ground up. We kept all of the plumbing where it was, added a new vanity, medicine cabinet, tiles and lighting and it was done.
From there, the rest of the unit had new flooring all throughout, paint, and lighting. After completion and walk through, this project was handed over back to the clients.
Execution and collaboration between all the trades were: Reggie and his team from Premier Interiors and Rohan from RD Mechanical Services.
p.s. Please see our website to see the video.
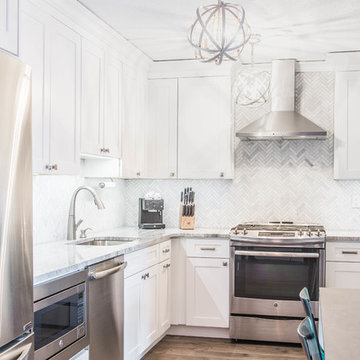 RAJ Kitchen and Bath, LLC
 “Full apartment design”.
IF you have not yet seen this apartment conversion before, we strongly urge you to go to the bottom left of this page and click on the short 2-minutes video. It would put a lot of things into perspective when you come back and continue reading this.
It is true we were literally handed the keys and told a list of things that they wanted to have happen and we were to go into the apartment, look at the space and come up with a design that would satisfy all of that need. UNTIL we showed up! The unit had really seen some better days but we knew we had to look past that and come up with a concept that would work for them.
The immediate challenges were centered around 3 big ideas:
1. Adding a second bedroom to the already small footprint
2. Figuring out a way to make the kitchen bigger, better and brighter
3. Creating a master room walk in closet
It’s always difficult to add new rooms into existing footprint without expanding out or up and not incurring any opportunity cost. In this case, that was exactly what we had to do. Item one and two above had to be tackled as one. We went ahead and switched out the location of the dining room and eliminating an area where there was a “nook” type eat-in area. By doing so, we were able to cut right into that footprint and change the layout of the kitchen.
That one move allowed us to dig into the kitchen design because it was now the main focal point in the apartment. It was no longer an option to keep it in that tiny hole where it was, so we had to ensure that this design was functional and aesthetically pleasing at the same time. By adding the table into the space where an Island typically would go, we were able to both cut cost and still provide a dining experience. The Table serves as an Island as well when cooking.
We then proceeded to block in the existing doorway to the dining room. By doing this, we were able to create a full room which allowed us to put a door on the other side and called that room Bedroom #2. This was easier to do because all of the mechanicals were already in that space (light, heater and windows). By shifting things around, we also achieved a huge wall to wall closet from inside. PERFECT!
Then we moved into the Single bedroom. We thought it was a big room with a small closet, so by creatively adding an L shaped wall and steal some footprint into the bedroom side, we were able to put a door on that new room and design it for the walk-in closet. Even after this, the bedroom still holds a queen size bed with 2 night stands, a TV on the wall, a sitting chair and plenty of room to walk around. This was done by rethinking the location for the bed and night stands.
The bathroom was gutted to make sure there was no leaks and rebuild from the ground up. We kept all of the plumbing where it was, added a new vanity, medicine cabinet, tiles and lighting and it was done.
From there, the rest of the unit had new flooring all throughout, paint, and lighting. After completion and walk through, this project was handed over back to the clients.
Execution and collaboration between all the trades were: Reggie and his team from Premier Interiors and Rohan from RD Mechanical Services.
p.s. Please see our website to see the video.
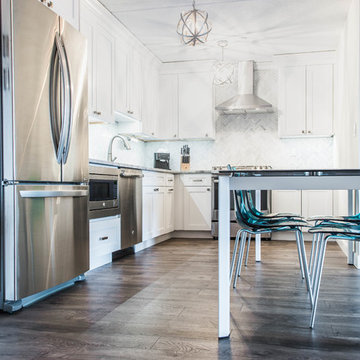 RAJ Kitchen and Bath, LLC
 “Full apartment design”.
IF you have not yet seen this apartment conversion before, we strongly urge you to go to the bottom left of this page and click on the short 2-minutes video. It would put a lot of things into perspective when you come back and continue reading this.
It is true we were literally handed the keys and told a list of things that they wanted to have happen and we were to go into the apartment, look at the space and come up with a design that would satisfy all of that need. UNTIL we showed up! The unit had really seen some better days but we knew we had to look past that and come up with a concept that would work for them.
The immediate challenges were centered around 3 big ideas:
1. Adding a second bedroom to the already small footprint
2. Figuring out a way to make the kitchen bigger, better and brighter
3. Creating a master room walk in closet
It’s always difficult to add new rooms into existing footprint without expanding out or up and not incurring any opportunity cost. In this case, that was exactly what we had to do. Item one and two above had to be tackled as one. We went ahead and switched out the location of the dining room and eliminating an area where there was a “nook” type eat-in area. By doing so, we were able to cut right into that footprint and change the layout of the kitchen.
That one move allowed us to dig into the kitchen design because it was now the main focal point in the apartment. It was no longer an option to keep it in that tiny hole where it was, so we had to ensure that this design was functional and aesthetically pleasing at the same time. By adding the table into the space where an Island typically would go, we were able to both cut cost and still provide a dining experience. The Table serves as an Island as well when cooking.
We then proceeded to block in the existing doorway to the dining room. By doing this, we were able to create a full room which allowed us to put a door on the other side and called that room Bedroom #2. This was easier to do because all of the mechanicals were already in that space (light, heater and windows). By shifting things around, we also achieved a huge wall to wall closet from inside. PERFECT!
Then we moved into the Single bedroom. We thought it was a big room with a small closet, so by creatively adding an L shaped wall and steal some footprint into the bedroom side, we were able to put a door on that new room and design it for the walk-in closet. Even after this, the bedroom still holds a queen size bed with 2 night stands, a TV on the wall, a sitting chair and plenty of room to walk around. This was done by rethinking the location for the bed and night stands.
The bathroom was gutted to make sure there was no leaks and rebuild from the ground up. We kept all of the plumbing where it was, added a new vanity, medicine cabinet, tiles and lighting and it was done.
From there, the rest of the unit had new flooring all throughout, paint, and lighting. After completion and walk through, this project was handed over back to the clients.
Execution and collaboration between all the trades were: Reggie and his team from Premier Interiors and Rohan from RD Mechanical Services.
p.s. Please see our website to see the video.
 Castro Lighting
Surroundings have the power to significantly impact the perception of reality and influence whether or not we return to it, and cafés and restaurants are no different. Commercial design plays a fundamental role in creating a complete and memorable experience for the consumer, which can often influence the customer's decision to buy or whether they will return to your space.
If you’re the owner of a café or bistro and want to remodel your space continue reading this article so that you can be inspired by this aesthetic, which draws a little from French café vibes, and which will make even the most demanding coffee lovers not want to leave your café.
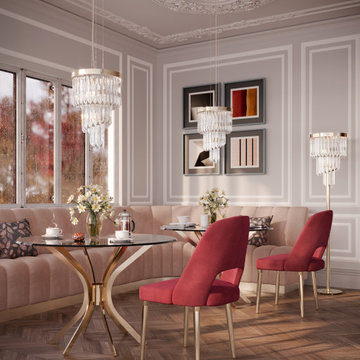
To provide you with the maximum comfort and bring you the unique feelings that autumn provides, the Anna Chair is customised in scarlet tones, just like the leaves that fall delicately in the street it’s the perfect bistro chair. This sumptuous upholstery piece is inspired by the classic style up-to-date influences to create a furniture masterpiece of timeless elegance. The bespoke Anna chair brings a feeling of mystery and irresistible luxury, providing maximum cosiness and allure to the most exquisite spaces.
Keeping up with the Art Déco Style, the Haring Table is in this space to serve as a support for the hot drinks typical of this season, which will be followed by the long conversations between friends, lovers or family members that will be shared in this space. With a delicate nature, Haring is the perfect decorative piece to a luxurious place like this one, giving an exclusive touch to the surrounding area. Surrender to this gorgeous statement piece as it will make any room complete.
Immediately above the table is the Royal Pendant. As Belgium is a country linked to royal customs, we wanted to bring a little of this heritage to this space by incorporating this lighting collection into it. Composed of brass and glass, the different levels of this handmade pendant are a remarkable display of how a modern touch can elevate a traditional design.
In order to complement the space, bringing a cosy ambient light, much needed now that the days are getting shorter, the Floor Lamp, from the same collection, was also incorporated to make the space comfier for those who visit it.
Be inspired to decorate your own aesthetic café inspired by the French café vibes, while incorporating the colours of this magical season and creating a welcoming space that is sure to catch the eye of everyone who passes by, making them come back again and again.
 Kitchen Design Concepts
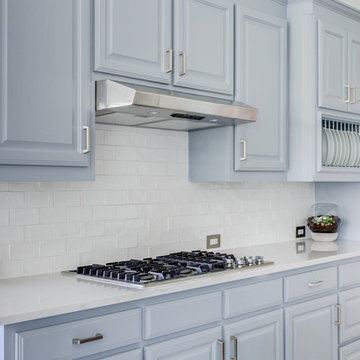
Many times, a kitchen does not need a complete gut, rather more of a cosmetic redo. Which is exactly what we’ve done here! This particular kitchen already had great bones and beautiful sky blue cabinetry, it just needed some finishing touches to get that make-over look. To learn more, continue reading below!
Countertops
With cabinetry already having a fresh sky blue color, we didn’t have to touch the cabinets. However, by lowering the pony wall, and dropping it to cabinet-height, really helped to open up the kitchen. The original countertops were a dark and outdated tile application that needed a redo. So out with the old and in with the new 3 cm Cambria Quartz in Ella. The brightness of the new countertops was a much-needed cosmetic change for this kitchen space to liven up!
Backsplash
The original backsplash was an outdated light-brown 4×4″ square installed in a mixture of straight and diamond lay. The new backsplash was a Daltile Artigiano 3×6 glazed ceramic wall tile in Italian Alps. This tile has a hand-painted look with irregular edges, giving it a hand-made look.
Fixtures and Fittings
To complete this kitchen, a new sink, faucet, and hardware is a must! From Blanco, we have a Diamond super single bowl in a granite composite sink in the color Truffle (441765), and Meridian semi-professional faucet in Satin Nickel (440557). Lastly, the new hardware on the cabinetry are Amerock Blackrock pulls in Satin Nickel (BP55276-G10).
 Kitchen Design Concepts
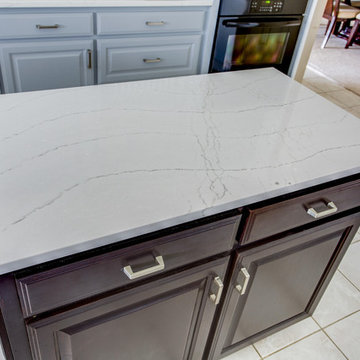
Many times, a kitchen does not need a complete gut, rather more of a cosmetic redo. Which is exactly what we’ve done here! This particular kitchen already had great bones and beautiful sky blue cabinetry, it just needed some finishing touches to get that make-over look. To learn more, continue reading below!
Countertops
With cabinetry already having a fresh sky blue color, we didn’t have to touch the cabinets. However, by lowering the pony wall, and dropping it to cabinet-height, really helped to open up the kitchen. The original countertops were a dark and outdated tile application that needed a redo. So out with the old and in with the new 3 cm Cambria Quartz in Ella. The brightness of the new countertops was a much-needed cosmetic change for this kitchen space to liven up!
Backsplash
The original backsplash was an outdated light-brown 4×4″ square installed in a mixture of straight and diamond lay. The new backsplash was a Daltile Artigiano 3×6 glazed ceramic wall tile in Italian Alps. This tile has a hand-painted look with irregular edges, giving it a hand-made look.
Fixtures and Fittings
To complete this kitchen, a new sink, faucet, and hardware is a must! From Blanco, we have a Diamond super single bowl in a granite composite sink in the color Truffle (441765), and Meridian semi-professional faucet in Satin Nickel (440557). Lastly, the new hardware on the cabinetry are Amerock Blackrock pulls in Satin Nickel (BP55276-G10).
Sponsored
Sunbury, OH

J.Holderby - Renovations
Franklin County's Leading General Contractors - 2X Best of Houzz!
 Glow Lighting
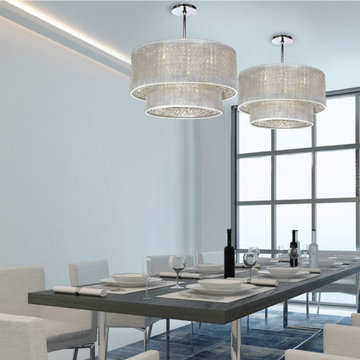
Crystal Dining Room Chandeliers
Summer is just around the corner, now is the time to spring into action and update your dining space.
Be it a classic dining room or a modern open concept great room, the ideas are endless in lighting design. Styles range from elegant crystal arm chandeliers to contemporary drum shade crystal chandeliers to coastal Capiz shell fixtures...
**Continue reading by clicking the link above**
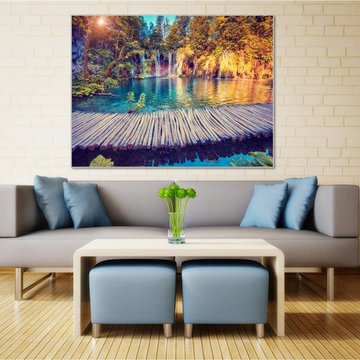
 Dezinerwallz
While a great deal of the research that has been conducted to measure the physical and emotional benefits of incorporating biophilic design elements as part of the interior design of a space has been done in the healthcare environment , and to a lesser degree, in the corporate environment, it is completely reasonable to assume that the extraordinary benefits that are experienced by patients, doctors, nurses and support staff working in the healthcare environment, as well as by employees working in a corporate environment will extend to families that introduce biophilic design elements into their own personal spaces.
Click on the next picture to continue reading………..
 The Turett Collaborative
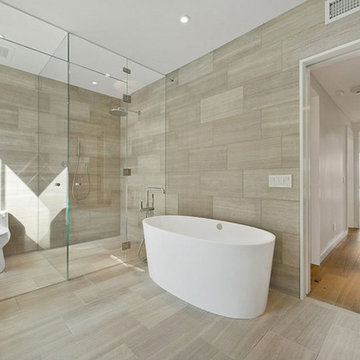
Rustic and luxurious blends in West Village townhouse. Aged oak flooring runs through the master suite. Warm gray marble lines the floors and walls of this master bath. The clear glass partitions allow the continuous read of stone on all walls of the bathroom, heightening the sense of open space.
 RAJ Kitchen and Bath, LLC
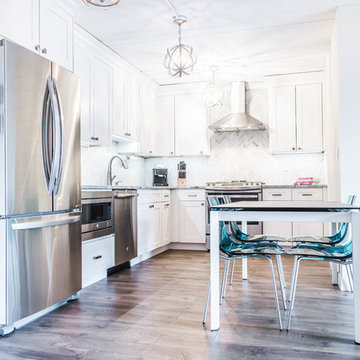
 “Full apartment design”.
IF you have not yet seen this apartment conversion before, we strongly urge you to go to the bottom left of this page and click on the short 2-minutes video. It would put a lot of things into perspective when you come back and continue reading this.
It is true we were literally handed the keys and told a list of things that they wanted to have happen and we were to go into the apartment, look at the space and come up with a design that would satisfy all of that need. UNTIL we showed up! The unit had really seen some better days but we knew we had to look past that and come up with a concept that would work for them.
The immediate challenges were centered around 3 big ideas:
1. Adding a second bedroom to the already small footprint
2. Figuring out a way to make the kitchen bigger, better and brighter
3. Creating a master room walk in closet
It’s always difficult to add new rooms into existing footprint without expanding out or up and not incurring any opportunity cost. In this case, that was exactly what we had to do. Item one and two above had to be tackled as one. We went ahead and switched out the location of the dining room and eliminating an area where there was a “nook” type eat-in area. By doing so, we were able to cut right into that footprint and change the layout of the kitchen.
That one move allowed us to dig into the kitchen design because it was now the main focal point in the apartment. It was no longer an option to keep it in that tiny hole where it was, so we had to ensure that this design was functional and aesthetically pleasing at the same time. By adding the table into the space where an Island typically would go, we were able to both cut cost and still provide a dining experience. The Table serves as an Island as well when cooking.
We then proceeded to block in the existing doorway to the dining room. By doing this, we were able to create a full room which allowed us to put a door on the other side and called that room Bedroom #2. This was easier to do because all of the mechanicals were already in that space (light, heater and windows). By shifting things around, we also achieved a huge wall to wall closet from inside. PERFECT!
Then we moved into the Single bedroom. We thought it was a big room with a small closet, so by creatively adding an L shaped wall and steal some footprint into the bedroom side, we were able to put a door on that new room and design it for the walk-in closet. Even after this, the bedroom still holds a queen size bed with 2 night stands, a TV on the wall, a sitting chair and plenty of room to walk around. This was done by rethinking the location for the bed and night stands.
The bathroom was gutted to make sure there was no leaks and rebuild from the ground up. We kept all of the plumbing where it was, added a new vanity, medicine cabinet, tiles and lighting and it was done.
From there, the rest of the unit had new flooring all throughout, paint, and lighting. After completion and walk through, this project was handed over back to the clients.
Execution and collaboration between all the trades were: Reggie and his team from Premier Interiors and Rohan from RD Mechanical Services.
p.s. Please see our website to see the video.
Sponsored
Columbus, OH

Snider & Metcalf Interior Design, LTD
Leading Interior Designers in Columbus, Ohio & Ponte Vedra, Florida
 Kitchen Design Concepts
One of the biggest investments you can make in your home is in your kitchen. Now with the Revive model, you don’t have to break the bank to get an updated kitchen with new finishes and a whole new look! This powder blue kitchen we are sharing today is a classic example of such a space! The kitchen had a great layout, the cabinets had good bones, and all it needed were some simple updates. To learn more about what we did, continue reading below!
Cabinets
As previously mentioned, the kitchen cabinetry already had great bones. So, in this case, we were able to refinish them to a painted cream on the perimeter. As for the island, we created a new design where new cabinetry was installed. New cabinets are from WWWoods Shiloh, with a raised panel door style, and a custom painted finish for these powder blue cabinets.
Countertops
The existing kitchen countertops were able to remain because they were already in great condition. Plus, it matched the new finishes perfectly. This is a classic case of “don’t fix it if it ain’t broke”!
Backsplash
For the backsplash, we kept it simple with subway tile but played around with different sizes, colors, and patterns. The main backsplash tile is a Daltile Modern Dimensions, in a 4.5×8.5 size, in the color Elemental Tan, and installed in a brick-lay formation. The splash over the cooktop is a Daltile Rittenhouse Square, in a 3×6 size, in the color Arctic White, and installed in a herringbone pattern.
Fixtures and Finishes
The plumbing fixtures we planned to reuse from the start since they were in great condition. In addition, the oil-rubbed bronze finish went perfectly with the new finishes of the kitchen. We did, however, install new hardware because the original kitchen did not have any. So, from Amerock we selected Muholland pulls which were installed on all the doors and drawers.
 Kitchen Design Concepts
One of the biggest investments you can make in your home is in your kitchen. Now with the Revive model, you don’t have to break the bank to get an updated kitchen with new finishes and a whole new look! This powder blue kitchen we are sharing today is a classic example of such a space! The kitchen had a great layout, the cabinets had good bones, and all it needed were some simple updates. To learn more about what we did, continue reading below!
Cabinets
As previously mentioned, the kitchen cabinetry already had great bones. So, in this case, we were able to refinish them to a painted cream on the perimeter. As for the island, we created a new design where new cabinetry was installed. New cabinets are from WWWoods Shiloh, with a raised panel door style, and a custom painted finish for these powder blue cabinets.
Countertops
The existing kitchen countertops were able to remain because they were already in great condition. Plus, it matched the new finishes perfectly. This is a classic case of “don’t fix it if it ain’t broke”!
Backsplash
For the backsplash, we kept it simple with subway tile but played around with different sizes, colors, and patterns. The main backsplash tile is a Daltile Modern Dimensions, in a 4.5×8.5 size, in the color Elemental Tan, and installed in a brick-lay formation. The splash over the cooktop is a Daltile Rittenhouse Square, in a 3×6 size, in the color Arctic White, and installed in a herringbone pattern.
Fixtures and Finishes
The plumbing fixtures we planned to reuse from the start since they were in great condition. In addition, the oil-rubbed bronze finish went perfectly with the new finishes of the kitchen. We did, however, install new hardware because the original kitchen did not have any. So, from Amerock we selected Muholland pulls which were installed on all the doors and drawers.
 Kitchen Design Concepts
One of the biggest investments you can make in your home is in your kitchen. Now with the Revive model, you don’t have to break the bank to get an updated kitchen with new finishes and a whole new look! This powder blue kitchen we are sharing today is a classic example of such a space! The kitchen had a great layout, the cabinets had good bones, and all it needed were some simple updates. To learn more about what we did, continue reading below!
Cabinets
As previously mentioned, the kitchen cabinetry already had great bones. So, in this case, we were able to refinish them to a painted cream on the perimeter. As for the island, we created a new design where new cabinetry was installed. New cabinets are from WWWoods Shiloh, with a raised panel door style, and a custom painted finish for these powder blue cabinets.
Countertops
The existing kitchen countertops were able to remain because they were already in great condition. Plus, it matched the new finishes perfectly. This is a classic case of “don’t fix it if it ain’t broke”!
Backsplash
For the backsplash, we kept it simple with subway tile but played around with different sizes, colors, and patterns. The main backsplash tile is a Daltile Modern Dimensions, in a 4.5×8.5 size, in the color Elemental Tan, and installed in a brick-lay formation. The splash over the cooktop is a Daltile Rittenhouse Square, in a 3×6 size, in the color Arctic White, and installed in a herringbone pattern.
Fixtures and Finishes
The plumbing fixtures we planned to reuse from the start since they were in great condition. In addition, the oil-rubbed bronze finish went perfectly with the new finishes of the kitchen. We did, however, install new hardware because the original kitchen did not have any. So, from Amerock we selected Muholland pulls which were installed on all the doors and drawers.
11