
Search results for "Continuously check" in Home Design Ideas
 Keystone Custom Decks
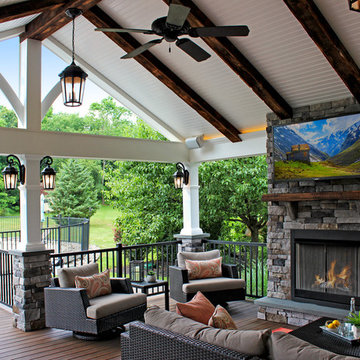
Wow! What a “Great Room!” This phrase, taken in both its literal & literary meanings is one of the best ways to describe this amazing project. “Great room” def: a large room in a house that combines features of a living room with those of a dining room or family room. Check! We designed this project to extend the livable space of the house. With its wide A Frame porch, it allows for ample space to gather around the fireplace, relax in the mid-day heat or simply sit & marvel at the craftsmanship. We held nothing back on the detail, using reclaimed barn wood to create gorgeous beams, crown molding that wraps around the room, and custom curved detailing in the open gable. Reaching out to the side, we enter an intimate dining space featuring a built-in kitchen, a vinyl pergola & continued the stonework over, tying everything together! Lighting throughout the job was picked out by the homeowner & installed by our tech’s Plus, we built it with low maintenance products; Timbertech decking & Keylink aluminum railing – meaning, there is no sanding or staining!

 SUPERIOR CHIMNEY SERVICES CORPORATION
Standard annual or mechanical Chimney cleaning for gas and wood burning fireplaces typically works to remove any type of buildup as well as checking for the structural integrity of the chimney. Maintaining an annual chimney cleaning will meet the national safety standard set by the NFPA, CSIA, IRC and NCSG, helping homeowners avoid chimney fires and blockages.
Why does safety matter? Did you know that there was a chimney fire in Marengo in January? Or a chimney fire at a Peotone home at the end of March? Or a log cabin fire caused by the chimney in June? That’s just a few that happened in the past 7 months.
Why Does a Chimney Cleaning Matter?
Chimney sweeps also known as chimney cleanings, fireplace cleanings, or fireplace sweeps. Regardless of what you call it, it still means the same thing.
Chimney cleaning for gas and wood burning fireplaces serve 3 key purposes:
confirming structural integrity
removing flammable deposits and
obstruction-free assurance.
Homeowners with gas or wood burning fireplaces benefit from each of these safeguards.
The National Fire Protection Association addresses this directly through NFPA 211, a widely recognized fire safety code. The standard states that chimneys, fireplaces, and vents require inspection at least once a year for soundness, free from deposits, and correct clearances, with cleaning, maintenance, and repairs to be done whenever needed.
This annual requirement applies equally to gas and wood burning fireplaces. Organizations including the Chimney Safety Institute of America, the National Chimney Sweep Guild, International Residential code and the National Fire Protection Association each reference this standard as the requirement for home fire safety.
Free 14-Point Certified Written Inspection
Every chimney sweep completed through Superior Chimney includes a complimentary 14-point certified written inspection along with photo documentation delivered to you by email. This documentation gives homeowners a clear visual record of their chimney system.
The written report covers the condition of the flue liner, smoke chamber, smoke shelf, damper, firebox, chimney crown, and chimney cap, among other components examined during a standard visit. Photo documentation captures each area so homeowners can review the findings independently of the technician’s verbal summary. Written inspection reports allow families to track the condition of their fireplace chimney system over time.
Chimney Cleaning and Structural Integrity
A CSIA Certified Chimney Sweep technician, such as Superior Chimney technicians, visually examines the chimney from the top opening to the firebox below, gaining a full evaluation of the interior.
When chimney rods and brushes pass through the chimney system, loose pieces of fire clay tile, damaged tile joints, or crumbling brick sometimes fall down into the fireplace. This debris can mean there is an integrity problem. By knowing this is a problem, will protect families and their homes. Now it’s time to take care of it and call in a certified chimney technician.
Fireplace Cleaning and Creosote Removal
Creosote, is the technical name for soot. Soot forms as a natural byproduct of burning wood. Smoke traveling upward through the chimney and leaves deposits of creosote along the interior walls. With every fire, a little more gets built up.
The issue with creosote is that it is highly flammable and is the leading cause of chimney fires nationwide. Removing the buildup through regular chimney cleanings keeps a fireplace serviceable for continuous use throughout the spring, fall and winter seasons.
Standard and mechanical chimney cleanings pay close attention to the flue liner, smoke chamber, smoke shelf, damper, and firebox in a single service visit. Superior Chimney performs each fireplace chimney inspection using a no-mess process that protects the home during service. This keeps soot contained within specialized equipment rather than the living room.
An Obstruction Free Chimney
Several conditions create blockages within a chimney system. Bird, squirrel, bat and raccoon nesting material, feces, and debris frequently accumulate inside an unprotected flue, especially during spring and summer months when the fireplace sits unused.
Excessive creosote accumulation or a collapsed chimney liner can restrict proper airflow. Homeowners that address obstructions with a chimney inspection will be able to maintain proper draft and ventilation with their gas or wood burning fireplace. This will reduce the risk of smoke backing into the home.
Gas Chimney Cleaning Compared to Wood burning Chimney Cleaning
Gas and wood burning fireplaces share the same annual chimney inspection requirement. Whether you are burning wood, gas or a “pile of shirts” there is still heat and flame that requires worthy firewalls to protect the home from heat transfer. Fire worthiness and checking the firewall integrity is priority.
Wood burning fireplaces generate creosote that builds along the flue liner with every fire. Gas fireplace systems accumulate lighter deposits along with potential venting obstructions, since gas appliances rely heavily on venting for safe combustion byproduct release. Each system accumulates different residues that need attention.
A CSIA Certified Chimney Sweep technician from Superior Chimney adjusts the specific cleaning approach based on fuel type. However, the same core safety elements apply: structural integrity, deposit removal, and clear airflow.
What Happens During a Chimney Cleaning?
A typical chimney inspection begins with a walkthrough of the fireplace and the chimney on top of the roof, allowing the technician to record any visible concerns the homeowner reported in advance as well as any new findings.
The certified technician then covers the immediate hearth area with protective material before setting up specialized equipment designed to contain creosote throughout the cleaning and inspection.
Chimney rods and brushes pass through the flue liner to loosen and remove creosote deposits along the smoke chamber, smoke shelf, and damper. The certified technician inspects each section closely for loose or crumbling firewall, cracked joints, or other signs of weak structural damage.
A final walkthrough of the firebox and chimney completes the visual inspection. Photo documentation captures each component, and the certified written report is sent to the homeowner by email. This consistent process gives homeowners the documentation they need to compare year to year.
Chimney Cleaning Safety Standards
The table below summarizes the organizations that set national chimney safety standards, along with their specific requirements for fireplace chimney sweeps.
NFPA211
National Fire Protection Association
Annual inspection for soundness, deposit buildup, and correct clearances; cleaning and repairs completed as needed
CSIA
Chimney Safety Institute of America
Certifies technicians through testing on chimney and venting system knowledge
NCSG
National Chimney Sweep Guild
Establishes trade standards and best practices for chimney sweep professionals
How Often Should You Schedule a Chimney Cleaning and Inspection?
CSIA recommends scheduling chimney cleaning and inspection annually by CSIA Certified Chimney Sweeps. This recommendation applies to gas and wood burning fireplaces, regardless of how frequently a household uses the fireplace and especially in freeze/thaw geographic areas.
Regular chimney sweeps save lives, since a clean fireplace chimney rarely catches fire. CSIA encourages homeowners to rely on Certified Chimney Sweeps, as these technicians undergo regular testing on the complexities of chimney and venting systems throughout their careers.
Frequently Asked Questions
What is included in a chimney sweep? A chimney sweep includes the flue liner, smoke chamber, smoke shelf, damper, and firebox, removing creosote while checking for obstructions and structural concerns throughout the chimney system (NOT the ashpit).
How often should gas and wood burning fireplaces receive chimney sweeps? CSIA, NFPA, IRC and NCSG guidelines each call for chimney sweeps at least once a year for gas and wood burning fireplace systems.
Why does creosote removal matter for fireplace safety? Creosote is highly flammable and builds along the interior walls of a fireplace chimney with every fire, creating conditions that lead directly to chimney fires when left in place over time. Creosote is unburned particles from the combustion chamber.
Who should perform a fireplace chimney sweep? CSIA Certified Chimney Sweep technicians complete fireplace chimney sweeps after passing regular testing on chimney and venting system knowledge, meeting the certification standard recognized across the industry.
Does a fireplace chimney sweep remove animal nests and debris? No, a fireplace chimney sweep addresses soot and creosote, while significant nesting material, feces, or collapsed liner debris often calls for dedicated obstruction removal alongside the standard service.
What does the free 14-point inspection include? The complimentary 14-point certified written inspection documents the flue liner, smoke chamber, smoke shelf, damper, firebox, crown, and cap through photo evidence delivered directly by email for homeowner records.
Choose Superior Chimney for Your Certified Chimney Inspection
All service technicians completing chimney sweeps through Superior Chimney hold National Certification through the Chimney Safety Institute of America (CSIA), reflecting the training standard recommended by fire safety organizations nationwide.
Scheduling regular chimney sweeps to clean gas and wood burning fireplace systems protects a home from fire risk, preserves the structural integrity of the chimney, and keeps airflow clear for proper, continuous use throughout the year. Contact us today to schedule a chimney inspection at 877-244-6349.

 Industrial Projects
Creating a comfortable outdoor living space is a priority for many homeowners and DIY enthusiasts. With rising summer temperatures, installing a shade tarp in your backyard offers an affordable and effective solution for sun protection. We’ve developed this detailed, step-by-step guide to help you confidently install a shade tarp that not only shields you from the sun but also adds aesthetic appeal to your outdoor area.
Benefits of Installing a Backyard Shade Tarp
Before diving into the installation process, let’s explore the key benefits of having a backyard shade tarp:
Provides UV Protection: Keeps your family and guests safe from harmful sun exposure.
Reduces Outdoor Temperatures: Creates a cooler, more enjoyable outdoor space.
Protects Outdoor Furniture: Extends the life of patio furniture by reducing sun damage.
Enhances Outdoor Aesthetics: Adds a modern, stylish look to your yard.
Budget-Friendly: More affordable compared to permanent structures like pergolas.
Materials and Tools You’ll Need
To begin your DIY backyard shade project, gather the following materials and tools:
Materials:
Shade tarp (UV-resistant and breathable)
Sturdy posts or existing structures (trees, fences, walls)
Mounting hardware (eye bolts, D-rings, turnbuckles, snap hooks)
Nylon or polyester rope, or stainless-steel wire
Concrete (if installing new posts)
Tools:
Power drill
Measuring tape
Level
Ladder
Wrench or adjustable spanner
Post hole digger (if installing new posts)
Step 1: Plan Your Shade Tarp Layout
The first step in installing your backyard shade tarp is careful planning. Take time to assess your outdoor area and answer these key questions:
Where is the sun’s path throughout the day?
What size and shape of tarp best suits your space?
Will you anchor the tarp to existing structures or install new posts?
What height do you want the tarp to sit at for maximum shade and airflow?
Pro Tip: Use string or garden hoses to visualize the tarp layout on the ground before making permanent decisions.
Step 2: Measure and Mark Anchor Points
Once you’ve determined the tarp’s location and orientation:
Measure the tarp dimensions.
Mark the exact points where each corner of the tarp will be anchored.
Ensure that the anchor points are at least 5–10% longer than the tarp size to allow for tensioning and slight adjustments.
Consider slope angles for water runoff. Aim for at least a 20-degree angle to prevent water pooling on the tarp.
Step 3: Install Support Posts (If Necessary)
If your backyard lacks existing anchor points like trees or fences, you’ll need to install sturdy support posts:
Dig post holes at least 24 inches deep and 8-12 inches wide for stability.
Set posts in concrete, making sure they remain plumb and level.
Allow the concrete to cure for at least 24–48 hours before applying tension from the tarp.
We recommend using pressure-treated wood, galvanized steel poles, or aluminum posts for longevity and strength.
Step 4: Install Mounting Hardware
With your anchor points ready, it’s time to install the necessary hardware:
Attach eye bolts or pad eyes securely into walls, posts, or other fixed structures.
For added flexibility and adjustability, install turnbuckles or tensioners to fine-tune the tarp’s tightness.
Connect snap hooks, D-rings, or carabiners to make assembly and disassembly easier.
Make sure all hardware is rated for outdoor use to prevent rust and corrosion.
Step 5: Attach and Tension the Shade Tarp
Now it’s time for the most satisfying part—mounting the shade tarp:
Begin by attaching one corner of the tarp to an anchor point.
Gradually attach the remaining corners, moving diagonally for even tension.
Adjust each connection point using your turnbuckles, ropes, or cables.
Pull the tarp tight enough to avoid sagging, but not so tight that it risks tearing.
Check that the tarp maintains the desired slope for rainwater runoff and adjust tension as needed.
Step 6: Final Adjustments and Safety Check
Before enjoying your new shaded area:
Inspect all anchor points and hardware for stability.
Test the tarp’s tension and make adjustments for even distribution.
Ensure that no sharp edges or loose connections remain that could damage the tarp or pose a safety hazard.
Confirm that the tarp is secure in windy conditions by giving it a gentle tug.
If you live in an area with frequent high winds, consider removing the tarp during storms to prevent damage.
Step 7: Enjoy Your Shaded Backyard Oasis
Once installed, your backyard shade tarp provides a comfortable and protective space for outdoor gatherings, relaxation, or family activities. You can decorate underneath with outdoor furniture, string lights, or potted plants to create a personalized outdoor retreat.
Maintenance Tips for Long-Lasting Shade Tarp Performance
To extend the life of your shade tarp, follow these maintenance guidelines:
Regularly check for wear and tear, especially around anchor points and seams.
Clean the tarp periodically with mild soap and water to prevent mildew buildup.
Store the tarp indoors during harsh weather seasons if it's not designed for year-round use.
Tighten hardware as needed to maintain proper tension and avoid sagging.
By following these simple care steps, your shade tarp will continue to deliver years of sun protection and outdoor comfort.
Conclusion: Upgrade Your Outdoor Space with a DIY Shade Tarp
Installing a shade tarp in your backyard is a cost-effective and rewarding DIY project. With careful planning, quality materials, and proper installation techniques, you’ll enjoy cool, shaded outdoor living all season long. This step-by-step guide ensures your project goes smoothly from start to finish.
Find the right local pro for your project
 Ashleys Building and Construction, LLC.
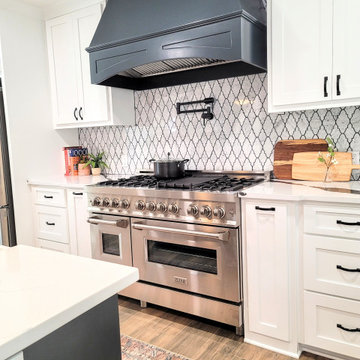
Our clients desperately needed a bigger kitchen and dining area as their home is the hub for all holiday get togethers and family dinners.
What was on the wish list?
Storage, storage, STORAGE! ☑️You got it!
Get rid of the peninsula. ☑️Check!
Black and white pleeeeease. ☑️Yes ma'am!
Separate utility area. ☑️Check!
Bigger cooking area. ☑️Double check!
We gave these fun homeowners everything on their wish list and more.
We moved the water heater out of the way by going thankless, and relocated the electrical panel so we had plenty of room to expand the kitchen.
This allowed for a beautiful island so their grandson can do homework, and eat snacks.
Now they have not one, but two pantries and a HUGE cooking area with all the black and white they can handle.
Side story, the homeowner really wanted to keep her brick wall and was hesitant to paint it. After seeing the rendering we presented her and what could come of that area, she was sold.
She now has the black and white kitchen she has always dreamed of and wished for over 20 years.
These clients give so much of themselves to our community, their family and friends and are so deserving of a beautiful home when they come home from a long day working on the front line.
Honored to work with them and may God continue to give them the strength and energy so they may continue to help others.
 Drury Design
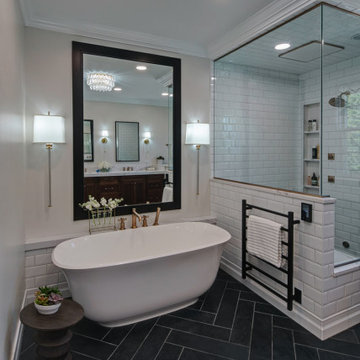
The couple each had their own wish lists. Hers was focused on aesthetics and was very clear: a contrasting combo of dark and crisp-white tile along with warm wood, soft bronze plumbing finishes, and an elegant soaking tub. His list was all about the shower. He wanted to match the experience of a luxury hotel shower.
Design objectives:
-Open up the space and omit heavy millwork details
-Furniture-style vanity in a warm wood finish
-Classic neutral palette
-Ample storage for toiletries and towels
-Luxurious modern technology, especially in the shower
THE REMODEL
“I’m not good at coming up with ideas,” the homeowner focused on the shower told us. “I like it when someone taps into my idea and gives me the options of what I’m looking for. That’s what Diana did for me and the shower while making my wife’s clear vision for everything else happen.”
Once the goals were clear, Diana identified the project’s challenges and solutions so the Drury Design installation team could make the remodel a reality.
Design challenges:
-Expand and open up the shower in a way that lets in more light
-Continue crown molding from the rest of the home – solve for how this could work around the shower
-More storage solutions in the same space
-Create an elegant, streamlined look that unifies all of the new elements
Design solutions:
-Adding a soffit above the shower area allows crown molding to flow continuously
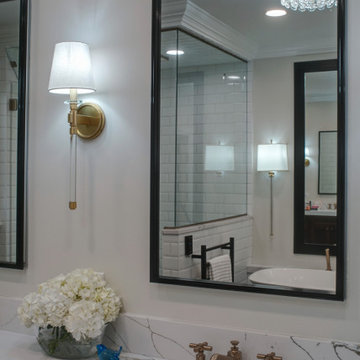
-Large Robern medicine cabinets offer convenient eye-level storage while freeing up vanity space. The mirrors on both sides of the inner medicine cabinet make them bright and sleek without having to be lit.
-Open elegance – spacious tone and feel created by free-standing tub highlighted by a large wall mirror and oversized sconces
-White quartz with black and bronze veining ties all the materials together
-Warm, contrasting character of walnut adds a nice infusion of nature into the spa-like space
THE RENEWED SPACE
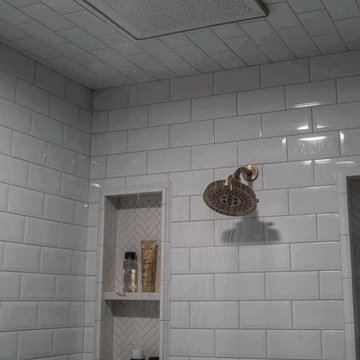
This elegant bathroom is all about symmetry and well-thought-out details. A classic, spa-like appeal emanates from simple beveled subway tile, herringbone patterns in the floor and shower niches, and the gorgeous walnut vanity. The result is a beautiful bathroom that checks all the boxes from the homeowners’ original wish lists.
 SUPERIOR CHIMNEY SERVICES CORPORATION
Out of sight, out of mind. That’s what happens with the poor chimney. It stands up there, straight and tall, each day taking a beating from the sun, wind, rain, snow and freeze/thaw cycles of winter. Yet, we rely on the chimney each day to take away the smoke and gasses from the fireplace, furnace and water heater appliances.
What can we do as homeowners to ensure it continues to do its job without fail?
Sweep & Check the Chimney and Fireplace
A Certified Technician performs sweep and/or inspection of nearly/over a thousand chimneys annually. You may be familiar with the 14-point certified chimney inspection accompanied by photo documentation - I’ve shown you this graphic before, but it sure is a good one. It gives you the “what and where” of the overall condition of your chimney(s). If you have any questions, you can point to the picture and the certified technician can elaborate on the relative chimney inspection-point results.
Exterior Chimney
Part of the inspection, as you will see in the picture, is to inspect the exterior of the chimney. The Certified Chimney Technician will inspect the full chimney including the chimney flashing, bricks and mortar joints, chimney crown and cap. Let’s take a look at each one.
Chimney Flashing
Chimney flashing plays a vital role to the protection of your home. It’s the piece of material that protects where chimney protrude out of the roof. To prevent water leaks and damage, the technician will inspect for any loose, missing, cracked or damaged flashing.
Brick & Mortar Joints
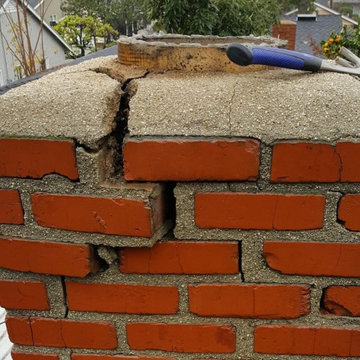
This is key. To prevent any type of major repairs, take care of minor repairs now. The technician will check for loose, cracked or spalling (chipped) bricks. If there are loose bricks and numerous cracks and chips, we’ll inspect further for any type of water leaks or water damage problems.
Chimney Crown
The concrete slab on top of the chimney is the chimney crown. It serves a very important purpose. The concrete slab acts like your chimney’s own personal roof. The technician will check if there are cracks, loose or missing pieces from the crown.
Chimney Cap
Chimney caps are also a critical component of the chimney - Every chimney needs a chimney cap for the same reasons every home needs a roof! It covers the opening of the flue. It prevents animals, debris and water from entering the chimney. The material of a chimney cap is usually made of stainless steel, as it will not rust.
Overall
If you’ve put-off getting the chimney inspected for some time, it’s best to get it checked. We’ve had some challenging weather this summer, and winter is not too far off. Take the time to give us a call and we’ll come out to give you a complete 14-point inspection with supporting photo documentation. If you don’t have a problem, fantastic, you’re ready for winter! If not, get the repairs done now so you don’t experience further damage to the interior or exterior of your home during the high-use months of winter.
Give us a call today at 877-CHIM-FIX (877-244-6349)
 Drury Design
The couple each had their own wish lists. Hers was focused on aesthetics and was very clear: a contrasting combo of dark and crisp-white tile along with warm wood, soft bronze plumbing finishes, and an elegant soaking tub. His list was all about the shower. He wanted to match the experience of a luxury hotel shower.
Design objectives:
-Open up the space and omit heavy millwork details
-Furniture-style vanity in a warm wood finish
-Classic neutral palette
-Ample storage for toiletries and towels
-Luxurious modern technology, especially in the shower
THE REMODEL
“I’m not good at coming up with ideas,” the homeowner focused on the shower told us. “I like it when someone taps into my idea and gives me the options of what I’m looking for. That’s what Diana did for me and the shower while making my wife’s clear vision for everything else happen.”
Once the goals were clear, Diana identified the project’s challenges and solutions so the Drury Design installation team could make the remodel a reality.
Design challenges:
-Expand and open up the shower in a way that lets in more light
-Continue crown molding from the rest of the home – solve for how this could work around the shower
-More storage solutions in the same space
-Create an elegant, streamlined look that unifies all of the new elements
Design solutions:
-Adding a soffit above the shower area allows crown molding to flow continuously
-Large Robern medicine cabinets offer convenient eye-level storage while freeing up vanity space. The mirrors on both sides of the inner medicine cabinet make them bright and sleek without having to be lit.
-Open elegance – spacious tone and feel created by free-standing tub highlighted by a large wall mirror and oversized sconces
-White quartz with black and bronze veining ties all the materials together
-Warm, contrasting character of walnut adds a nice infusion of nature into the spa-like space
THE RENEWED SPACE
This elegant bathroom is all about symmetry and well-thought-out details. A classic, spa-like appeal emanates from simple beveled subway tile, herringbone patterns in the floor and shower niches, and the gorgeous walnut vanity. The result is a beautiful bathroom that checks all the boxes from the homeowners’ original wish lists.

Sponsored
Columbus, OH

Snider & Metcalf Interior Design, LTD
Leading Interior Designers in Columbus, Ohio & Ponte Vedra, Florida
 Drury Design
The couple each had their own wish lists. Hers was focused on aesthetics and was very clear: a contrasting combo of dark and crisp-white tile along with warm wood, soft bronze plumbing finishes, and an elegant soaking tub. His list was all about the shower. He wanted to match the experience of a luxury hotel shower.
Design objectives:
-Open up the space and omit heavy millwork details
-Furniture-style vanity in a warm wood finish
-Classic neutral palette
-Ample storage for toiletries and towels
-Luxurious modern technology, especially in the shower
THE REMODEL
“I’m not good at coming up with ideas,” the homeowner focused on the shower told us. “I like it when someone taps into my idea and gives me the options of what I’m looking for. That’s what Diana did for me and the shower while making my wife’s clear vision for everything else happen.”
Once the goals were clear, Diana identified the project’s challenges and solutions so the Drury Design installation team could make the remodel a reality.
Design challenges:
-Expand and open up the shower in a way that lets in more light
-Continue crown molding from the rest of the home – solve for how this could work around the shower
-More storage solutions in the same space
-Create an elegant, streamlined look that unifies all of the new elements
Design solutions:
-Adding a soffit above the shower area allows crown molding to flow continuously
-Large Robern medicine cabinets offer convenient eye-level storage while freeing up vanity space. The mirrors on both sides of the inner medicine cabinet make them bright and sleek without having to be lit.
-Open elegance – spacious tone and feel created by free-standing tub highlighted by a large wall mirror and oversized sconces
-White quartz with black and bronze veining ties all the materials together
-Warm, contrasting character of walnut adds a nice infusion of nature into the spa-like space
THE RENEWED SPACE
This elegant bathroom is all about symmetry and well-thought-out details. A classic, spa-like appeal emanates from simple beveled subway tile, herringbone patterns in the floor and shower niches, and the gorgeous walnut vanity. The result is a beautiful bathroom that checks all the boxes from the homeowners’ original wish lists.
 W.L. Heating & Cooling LLC
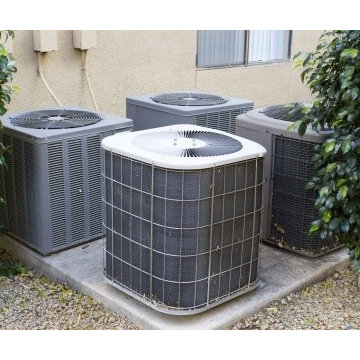
Air Conditioning System Installation And Repair, Heating Unit Installation And Repair, Ventilation Services, Refrigerator Installation And Repair, HVAC Maintenance Services, Air Quality Services, Refrigerator Maintenance, Ice Machine Repair, Freezer Services, Cooler Repairs And Replacements, Air Quality Testing, Custom Work, Estimates, Inspections, System Cleaning, Custom Work, Humidifier Installation
 Mayflower Construction Group
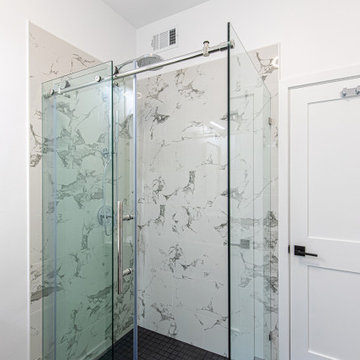
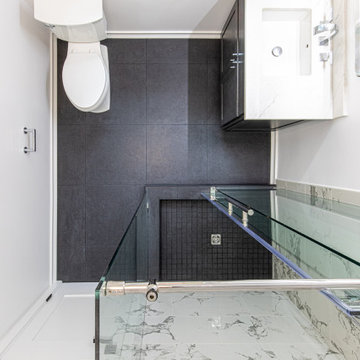
This guest bathroom continues the contemporary design trend we shared a few weeks prior. The space also has black floor tiles and bright white amenities that make the space aesthetically modern and clean.
We already expressed how much we loved the black floor tiling, but what we believe really shines in this layout is the shower. This walk-in shower has a full wall marble tiling job that gives it a luxurious and clean aesthetic. The black floor tiling also continues into the shower bay with charcoal mosaic tiles which keeps the full design seamless.
Let us know your thoughts on this master bathroom. Check out the walkthrough video of this home on our channel where you can get a full view of this home's design and aesthetic.
Link: https://youtu.be/KI0VEdQ-R0g

 Business_Name_Placeholder
?? 24/7 Support
⭐️ Top-Rated Service
? Fast Response
? Premium Quality
✈️◆► Telegram: @Pvatopzone
?◆► WhatsApp: +1 (579) 550-8030
?◆► Discord: accountservice
✈️◆► https://t.me/Pvatopzone
?◆► Email: Pvatopzone@gmail.com

 Mayflower Construction Group
This guest bathroom continues the contemporary design trend we shared a few weeks prior. The space also has black floor tiles and bright white amenities that make the space aesthetically modern and clean.
We already expressed how much we loved the black floor tiling, but what we believe really shines in this layout is the shower. This walk-in shower has a full wall marble tiling job that gives it a luxurious and clean aesthetic. The black floor tiling also continues into the shower bay with charcoal mosaic tiles which keeps the full design seamless.
Let us know your thoughts on this master bathroom. Check out the walkthrough video of this home on our channel where you can get a full view of this home's design and aesthetic.
Link: https://youtu.be/KI0VEdQ-R0g
Sponsored
Westerville, OH

Custom Home Works
Franklin County's Award-Winning Design, Build and Remodeling Expert

 Free Lancing
Effective residential construction project management is crucial in today’s fast-moving building industry. It means overseeing every step of building a home, from planning to finishing, to ensure projects are completed time, within budget, and with high quality. Unlike commercial projects, residential projects require special attention to meet homeowners' unique needs and wishes, requiring a customized approach from the beginning to the end.
In 2025, the construction sector will use advanced technologies like AI and integrated project delivery (IPD) to streamline processes and improve stakeholder collaboration. However, project managers face significant challenges, including managing risks, maintaining quality control, and ensuring effective communication among team members.
A WIP Report (Work-in-Progress Report) is a key tool that helps track a project's budget, progress, and resource use. It provides clear insights, making managing costs easier, avoiding delays, and making informed decisions.
By adopting best practices and using modern construction management tools, project managers can overcome these challenges and deliver successful residential construction projects that meet client expectations and contribute to a sustainable future.
This article provides a brief overview of residential construction project management, highlights its importance, and touches on the challenges faced by project managers while incorporating the latest trends and technologies in the field.
Types of Residential Construction Management
Here are the different types of Residential Construction Management:
Single-Family Homes: These are standalone houses built for individual families. Managing these projects involves overseeing construction from planning to completion, ensuring that the home meets the owner's preferences and budget.
Multi-Family Housing: This includes apartments, condominiums, and townhouses. Projects of this type require managing multiple units, often with shared facilities, and ensuring compliance with local building codes.
Custom Home Building: This involves constructing homes tailored to specific client needs. Close collaboration with architects and designers is required to ensure the house reflects the owner's personality and preferences.
Home Renovation and Remodeling: These projects focus on updating or expanding existing homes. They often involve working with subcontractors for specialized tasks like electrical or plumbing work.
Components of Residential Construction Project Management
Managing a residential construction project requires carefully coordinating people, materials, and timelines. A well-structured approach ensures efficiency, cost control, and high-quality results.
Roles and Responsibilities
A project manager plays a vital role in residential construction. They oversee every step from planning to completion and ensure the project stays on schedule, within budget, and meets quality standards.
Project Manager’s Role in Home Construction
The project manager is responsible for organizing tasks, managing resources, and solving problems that arise during construction. They coordinate between different teams, track progress, and ensure safety regulations are followed.
Collaboration with Contractors, Architects, and Stakeholders
Successful residential construction requires teamwork. Project managers work closely with architects to bring designs to new heights, coordinate with contractors to manage labor and materials, and keep stakeholders (such as homeowners and investors) informed about project updates.
Client Communication and Expectations Management
Clear communication with clients is essential. The project manager keeps homeowners updated on timelines, changes, and challenges. Setting realistic expectations and providing regular updates, they help avoid misunderstandings and keep the project running smoothly.
Project Scope & Planning
Practical project planning sets the foundation for a successful residential construction project. It ensures clear goals, minimizes risks, and keeps the project on track.
Defining Project Objectives and Deliverables:
Clearly outlining what needs to be done and what the final result should look like is essential. This involves setting specific, measurable goals that align with the homeowner's vision and budget.
Managing Homeowner Expectations and Scope Creep:
Homeowners often have changing needs or ideas. Effective project managers must manage these expectations to prevent "scope creep," which can delay projects and increase costs. This involves open communication and setting clear boundaries.
Ensuring Compliance with Zoning Laws and Permits:
Before construction begins, it's crucial to ensure that all necessary permits are obtained and that the project complies with local zoning laws. This step avoids costly fines and delays, ensuring the project moves forward smoothly.
Budgeting & Cost Control
Proper budgeting is essential for keeping residential construction projects financially viable. Effective cost management prevents overspending and ensures profitability.
Accurate Cost Estimation for Residential Projects
A precise cost estimate considers labor, materials, permits, and unexpected expenses. Using historical data and Sage 300 CRE for financial management improves accuracy and helps set realistic budgets.
Budget Allocation and Tracking
Allocating funds efficiently ensures that each phase of the project receives the necessary resources. Tracking expenses through Construction & Financial Dashboards allows for real-time monitoring and early detection of budget deviations.
Preventing Budget Overruns
Uncontrolled costs can derail a project. Regular financial reviews, automated alerts for overspending, and contingency planning help keep expenses in check and prevent financial strain.
Scheduling & Timeline Management
Timely project completion is crucial in residential construction. Effective scheduling minimizes delays and ensures a smooth workflow.
Creating Detailed Project Schedules
A structured schedule outlines all tasks, deadlines, and dependencies. Breaking down the project into phases, planning, execution, and finishing, helps maintain order and clarity.
Preventing Delays & Meeting Deadlines
Delays can result from labor shortages, weather conditions, or supply chain issues. To avoid problems, it’s good to check for risks ahead of time, add extra time to schedules, and keep everyone on the same page.
Using Gantt Charts and Critical Path Methods
CPM for Construction helps identify critical activities that directly impact project completion, while Gantt charts provide a visual timeline of tasks. Both tools optimize scheduling and improve efficiency.
Residential Construction Project Management Phases
Managing a residential construction project effectively requires a structured approach through various phases. Each phase plays a critical role in ensuring the project's success, from initial planning to completion.
Pre-Construction Phase
The pre-construction phase sets the foundation for a smooth and efficient building process. Proper planning at this stage helps prevent costly changes and delays later.
Site Analysis & Approvals: A thorough site analysis assesses soil conditions, topography, and environmental factors. Feasibility studies evaluate project viability, including costs and regulatory compliance. Obtaining zoning approvals, permits, and other legal clearances is crucial before breaking ground.
Selecting Materials and Procurement Strategies: Choosing the right materials impacts durability, sustainability, and cost efficiency. A well-planned procurement strategy, including bulk purchasing and reliable supplier partnerships, ensures timely delivery and cost savings. Using Sage 300 CRE for procurement management helps streamline material sourcing and financial planning.
Construction Phase
The construction phase transforms plans into reality. Effective coordination and strict quality control ensure a successful build.
Resource Allocation and Workflow Coordination: Efficiently managing labor, equipment, and materials is key to maintaining progress. Using CPM for Construction, project managers can allocate resources strategically, prevent bottlenecks, and optimize workflows for timely completion.
Project Closeout & Handover
The final phase of residential construction project management is crucial for ensuring a smooth transition from construction to occupancy. Proper closeout procedures guarantee quality, client satisfaction, and long-term project success.
Final Inspections and Quality Assurance: Before finishing the project, a final inspection checks that everything meets safety rules and quality standards. Any problems need to be fixed quickly. Using Procore helps make inspections and tracking issues easier, ensuring a high-quality final product.
Client Walkthrough and Support: A final check helps homeowners see the finished work, ask questions, and make sure it meets their expectations. This is also a chance to explain important home features and maintenance tips. Good communication here builds trust and strengthens relationships.
Warranty Management and Feedback: Efficient warranty management ensures clients get quick help for any issues after construction. A clear process for tracking requests and keeping in touch with homeowners boosts satisfaction. Collecting feedback helps improve future projects. Using S-Curve Forecasting tracks performance trends and refines management strategies.
Software for Residential Construction Project Management
The integration of technology in residential construction project management has revolutionized the way projects are planned, executed, and monitored. Digital tools streamline operations, reduce costs, and improve communication, making them essential for modern construction firms.
Importance of Digital Tools
Investing in digital tools is crucial for construction firms as it transforms the industry by enhancing efficiency, accuracy, and collaboration across the entire project lifecycle. They also improve project management by streamlining processes, automating tasks, and facilitating real-time stakeholder communication.
Top Construction Management Software for Residential Projects
Several software solutions are available for managing residential construction projects:
Procore: Known for its comprehensive project management features, including document management and collaboration tools.
Sage 300 CRE: Offers robust accounting and financial management capabilities, ideal for large-scale construction projects.
Buildertrend: Specializes in residential construction, providing tools for project scheduling, budgeting, and client communication.
CoConstruct: Focuses on custom home building and remodeling, offering features for estimating, scheduling, and project management.
WIP Reports: Useful for tracking work-in-progress and managing project finances effectively.
Features Comparison and Best Use Cases:
Procore: Best for large projects requiring extensive collaboration and document management.
Sage 300 CRE: Ideal for firms needing robust financial management.
Buildertrend: Suitable for residential builders focusing on client communication and project scheduling.
CoConstruct: Perfect for custom home builders who need detailed estimating and scheduling tools.
WIP Reports: Useful for firms needing to track project finances closely.
How Software Improves Project Efficiency
Construction management software significantly enhances project efficiency in several ways:
Automating Accounting and Job Costing: Software like Sage 300 CRE automates financial tasks, reducing manual errors and improving budget tracking.
Streamlining Document Management and Communication: Tools like Procore centralize documents and facilitate real-time communication among team members, reducing misunderstandings and delays.
Mobile-Friendly Solutions for Real-Time Tracking: Mobile apps from platforms like Buildertrend allow for on-site access to project data, enabling real-time tracking and decision-making.
These digital tools and software solutions are essential for modern residential construction project management, offering benefits such as improved efficiency, enhanced collaboration, and better financial control.
Challenges in Residential Construction Project Management
Residential construction projects face a variety of challenges that can impact their success. Here are some of the key issues project managers encounter:
Managing Subcontractors and Labor Shortages
One of the biggest challenges in residential construction is managing subcontractors and dealing with labor shortages. Subcontractors often have their own schedules and priorities, which can lead to delays if not coordinated properly. Additionally, labor shortages can slow down projects and increase costs due to the need for overtime or hiring temporary workers.
Budget Overruns and Unexpected Costs
Budget overruns are common in residential construction due to factors like material price fluctuations, unexpected site conditions, or changes in project scope. Effective budget management involves regularly monitoring expenses and having contingency plans for unexpected costs.
Changing Construction and Eco Rules
Construction and Eco Rules are always changing, so project managers need to keep up with the latest regulations. This involves following guidelines for saving energy, protecting the environment, and ensuring safety. Ignoring these rules can lead to fines, delays, or even stopping the project.
Best Practices
To ensure your residential construction projects run smoothly and successfully, follow these essential best practices:
Setting Clear Project Goals and Milestones
Clearly defining what you want to achieve is the first step to success. Set specific, measurable, achievable, relevant, and time-bound (SMART) goals. This helps everyone involved understand what needs to be done and by when. For example, instead of saying "build a house," say "build a house with three bedrooms and two bathrooms within the next nine months."
Stakeholder Collaboration
Good communication is key to keeping everyone on the same page. Regular meetings with contractors, suppliers, and homeowners help prevent misunderstandings and ensure that everyone knows what's happening and what's next. This open dialogue also helps resolve issues quickly, preventing small problems from becoming big delays.
Using Data-Driven Insights for Decision-Making
Making decisions based on facts rather than guesses is crucial. Use data and analytics to understand project progress, identify potential issues early, and make informed decisions. For instance, if data shows that a particular material is consistently causing delays, you can plan ahead to avoid those delays in the future.
Proactive Risk Management Strategies
Things don't always go as planned, so being prepared is essential. Identify potential risks early and have a plan to manage them. This might include having backup suppliers, planning for weather conditions, or setting aside extra funds for unexpected expenses. Being proactive can prevent small issues from turning into major problems.
Conclusion
Effective residential construction project management requires careful planning, clear communication, and the right digital tools. From single-family homes to multi-family housing and custom projects, managing timelines, budgets, and quality is essential for success.
By following best practices, using project management software, and staying ahead of industry trends, project managers can ensure smooth execution and client satisfaction despite challenges like labor shortages, budget overruns, and regulatory compliance; modern technology and strategic planning help mitigate risks.
Construction firms can improve efficiency, enhance collaboration, and maintain financial control by adopting advanced tools like Procore, Sage 300 CRE, and Buildertrend. A well-managed project delivers a quality home and builds trust and long-term success in the industry.
FAQs
What is residential construction project management?
It involves overseeing all aspects of building residential properties, from initial planning and design to construction and completion, ensuring projects are completed on time, within budget, and to the desired quality standards.
How can I prevent budget overruns in my construction project?
Accurate cost estimation, continuous budget tracking, and having contingency plans for unexpected expenses are key strategies to prevent budget overruns.
What are the main stages of a residential construction project?
The primary stages include design, pre-construction, procurement, and construction.
How does construction management software improve project efficiency?
It streamlines processes like scheduling, budgeting, and communication, providing real-time data access and collaboration among stakeholders, which enhances overall project efficiency.
How can I ensure my project complies with local building codes and regulations?
Engage professionals familiar with local laws, obtain all necessary permits before starting, and conduct regular inspections to ensure adherence to building codes and regulations.
 Fox Mowing & Gardening
Lawn care maintenance by the seasons is a year long, continuous affair. To keep your lawn healthy and looking its best all through the year requires a considerable effort. Lawn care maintenance differs from season to season so here are some tips to get you started:
Lawn Care Maintenance in Summer
1 Proper watering is important in this season so that the soil does not dry out.
2 In summer the grass grows faster, so you'll need to mow it more often. However ensure that you don't cut off more than 1/3rd portion of the grass blades.
3 Just like the grass, weeds also thrive in warmer climates. Make sure to do some timely weeding in this season so that weed growth does not go out of hand.
4 During summer insects and pests are very active. Check the lawn soil for grubs, larvae of beetles and other insects that cause bare or dry patches. Go for pest control if you find an infestation. Re-seed the bare patches if needed.
Lawn Care Maintenance in the Fall
1 Falling leaves must be cleared more often during fall. This allows the grass to breathe and utilise the sunlight in preparation for the coming winter.
2 Clear any dead grass and other debris from the lawn in this season.
3 It is important to fertilise your lawn during the fall so that it gets the nourishment required for the dormant wintertime.
Lawn Care Maintenance in Winter
1 Leave the grass level as short as possible in preparation for the winter. This will prevent the blades from bending under the weight of the snow.
2 Just before the onset of winter is a good time to prune the shrubs and trees to encourage new growth and flowering as spring approaches.
3 It is a good idea to clear the lawn and yard of all outdoor furniture, pots, planters, logs, etc. This prevents the formation of dead patches as the snow vanishes.
4 Try to keep the side-walks and other spaces free of snow as much as possible.
Lawn Care Maintenance in Spring
1 Clean up the lawn of debris like leaves, twigs and other dead material that has collected over the winter.
2 Early spring is the time to fertilise the lawn which helps in its growth.
3 To get ready for mowing, begin by tuning up your lawn mower. Now is the time for a routine maintenance check.
4 Check for weed growth and de-weed your lawn so that it not only looks neat, but also ensures healthy growth.
You can follow these lawn care maintenance tips and do it all yourself or you could hire a professional lawn maintenance service like Fox Mowing to keep up the schedules. Fox Mowing( http://foxmowing.com.au/) takes up lawn and Garden Maintenance Professionals contracts along with other jobs like weeding and pest control, fertilising, mulching, debris removal, pruning, hedge maintenance, etc.
Lawn Care Maintenance in Summer
1 Proper watering is important in this season so that the soil does not dry out.
2 In summer the grass grows faster, so you'll need to mow it more often. However ensure that you don't cut off more than 1/3rd portion of the grass blades.
3 Just like the grass, weeds also thrive in warmer climates. Make sure to do some timely weeding in this season so that weed growth does not go out of hand.
4 During summer insects and pests are very active. Check the lawn soil for grubs, larvae of beetles and other insects that cause bare or dry patches. Go for pest control if you find an infestation. Re-seed the bare patches if needed.
Lawn Care Maintenance in the Fall
1 Falling leaves must be cleared more often during fall. This allows the grass to breathe and utilise the sunlight in preparation for the coming winter.
2 Clear any dead grass and other debris from the lawn in this season.
3 It is important to fertilise your lawn during the fall so that it gets the nourishment required for the dormant wintertime.
Lawn Care Maintenance in Winter
1 Leave the grass level as short as possible in preparation for the winter. This will prevent the blades from bending under the weight of the snow.
2 Just before the onset of winter is a good time to prune the shrubs and trees to encourage new growth and flowering as spring approaches.
3 It is a good idea to clear the lawn and yard of all outdoor furniture, pots, planters, logs, etc. This prevents the formation of dead patches as the snow vanishes.
4 Try to keep the side-walks and other spaces free of snow as much as possible.
Lawn Care Maintenance in Spring
1 Clean up the lawn of debris like leaves, twigs and other dead material that has collected over the winter.
2 Early spring is the time to fertilise the lawn which helps in its growth.
3 To get ready for mowing, begin by tuning up your lawn mower. Now is the time for a routine maintenance check.
4 Check for weed growth and de-weed your lawn so that it not only looks neat, but also ensures healthy growth.
You can follow these lawn care maintenance tips and do it all yourself or you could hire a professional lawn maintenance service like Fox Mowing to keep up the schedules. Fox Mowing( http://foxmowing.com.au/) takes up lawn and Garden Maintenance Professionals contracts along with other jobs like weeding and pest control, fertilising, mulching, debris removal, pruning, hedge maintenance, etc.

 Rohan singh
Mukesh Baghel Hospital is the best pediatric child care, where every little one matters. From the first moment of life to adulthood, we understand the needs of children, and we have a full range of pediatric services. For our expert team of pediatricians, the best care is routine check-ups, early screening, vaccinations, and treatment for health issues. We believe that every kid deserves the best child care and therefore offer health services, not only expertise, but also a caring, kid-friendly environment that makes kids feel at ease.
Best pediatric child care Apart from that, it also provides specialized care for the most complicated conditions. Even the most challenging health issues are met, more so in personalized solutions. The scope of child health has not ended in the treatment; it goes also for preventing health problems, taking remedial action, and continuous monitoring, all of which ensure a more extended happy life. The development of a plan of care for every family, especially with each child’s unique need and concern, is also targeted. Thus, with an uncompromised commitment to excellence, we offer the highest affordable standard in quality child care: the physical and emotional aspects. Mukesh Baghel is a step forward in the provision of best pediatric child care routine or specialized care at a single point. This is how every little one grows up strong and healthy
he Mukesh Baghel Hospital has the largest best children’s physician for every age of childhood. The health needs of your child are cared for by expertise and care. From newborn to adolescence, it covers such routine check-ups, vaccinations, preventive measures, and treatment of complex health issues. This team, experienced and trained in the unique needs of all developmental stages, provides personalized care to promote wellness and works together with families in achieving this. Then, we have early detection and intervention, so we can treat some things before they get worse. You can be sure that we combine the best in medical treatment with the warmest environment for each child. Quality and compassionate care will prove, in the end, an inevitable protector for families with children in terms of a good name for them.
Email:connect@drmbhospital.com
Contact no…+91-7505910637

 Trendy Blinds & Closets
Custom Valances for Window Blinds and Shades
When do we need Custom Valances?
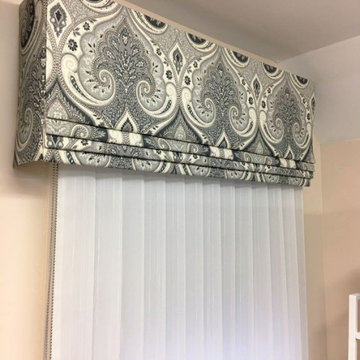
One of a valance's primary functions is to cover up hardware, curtain rods, and anything else at the top of a window you might want to adorn. A valance gives a continuous look and feel to any window covering. They can even tie together different window coverings in the same room. If you have thick trim around your windows, a valance is actually a good way to soften up its sharp lines. And if you're worried that the valance will cover the trim around your windows, then get an inside-mounted valance. It won't hide the trim, but it will instead soften the window and make the room cozier.
When it comes to custom valances, there are many options out there that will make it more fit to your own Blinds and Shades of your choice. That’s what our products are for, so feel free to check out our photos to see what others are choosing for their windows.
Check us out for more selection, www.trendyblinds.ca and www.trendyplusdesign.com
Contact us for more info and consultation.
Email: Info@trendyblinds.com
Phone: 905-604-1222 ext. 1
Sponsored
Columbus, OH

Hope Restoration & General Contracting
Columbus Design-Build, Kitchen & Bath Remodeling, Historic Renovations
 Trendy Blinds & Closets
Custom Valances for Window Blinds and Shades
When do we need Custom Valances?
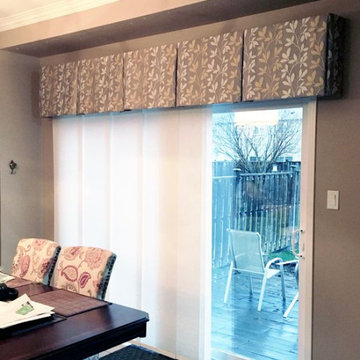
One of a valance's primary functions is to cover up hardware, curtain rods, and anything else at the top of a window you might want to adorn. A valance gives a continuous look and feel to any window covering. They can even tie together different window coverings in the same room. If you have thick trim around your windows, a valance is actually a good way to soften up its sharp lines. And if you're worried that the valance will cover the trim around your windows, then get an inside-mounted valance. It won't hide the trim, but it will instead soften the window and make the room cozier.
When it comes to custom valances, there are many options out there that will make it more fit to your own Blinds and Shades of your choice. That’s what our products are for, so feel free to check out our photos to see what others are choosing for their windows.
Check us out for more selection, www.trendyblinds.ca and www.trendyplusdesign.com
Contact us for more info and consultation.
Email: Info@trendyblinds.com
Phone: 905-604-1222 ext. 1
 Trendy Blinds & Closets
Custom Valances for Window Blinds and Shades
When do we need Custom Valances?
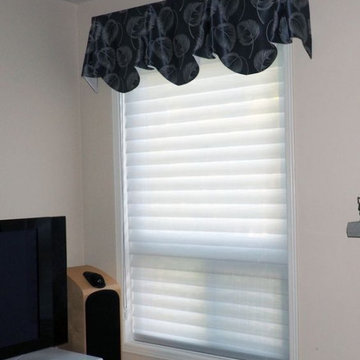
One of a valance's primary functions is to cover up hardware, curtain rods, and anything else at the top of a window you might want to adorn. A valance gives a continuous look and feel to any window covering. They can even tie together different window coverings in the same room. If you have thick trim around your windows, a valance is actually a good way to soften up its sharp lines. And if you're worried that the valance will cover the trim around your windows, then get an inside-mounted valance. It won't hide the trim, but it will instead soften the window and make the room cozier.
When it comes to custom valances, there are many options out there that will make it more fit to your own Blinds and Shades of your choice. That’s what our products are for, so feel free to check out our photos to see what others are choosing for their windows.
Check us out for more selection, www.trendyblinds.ca and www.trendyplusdesign.com
Contact us for more info and consultation.
Email: Info@trendyblinds.com
Phone: 905-604-1222 ext. 1
 Trendy Blinds & Closets
Custom Valances for Window Blinds and Shades
When do we need Custom Valances?
One of a valance's primary functions is to cover up hardware, curtain rods, and anything else at the top of a window you might want to adorn. A valance gives a continuous look and feel to any window covering. They can even tie together different window coverings in the same room. If you have thick trim around your windows, a valance is actually a good way to soften up its sharp lines. And if you're worried that the valance will cover the trim around your windows, then get an inside-mounted valance. It won't hide the trim, but it will instead soften the window and make the room cozier.
When it comes to custom valances, there are many options out there that will make it more fit to your own Blinds and Shades of your choice. That’s what our products are for, so feel free to check out our photos to see what others are choosing for their windows.
Check us out for more selection, www.trendyblinds.ca and www.trendyplusdesign.com
Contact us for more info and consultation.
Email: Info@trendyblinds.com
Phone: 905-604-1222 ext. 1
8