
Search results for "Creative clearance" in Home Design Ideas
 TKS Design Group
Download our free ebook, Creating the Ideal Kitchen. DOWNLOAD NOW
This homeowner’s daughter originally contacted us on behalf of her parents who were reluctant to begin the remodeling process in their home due to the inconvenience and dust. Once we met and they dipped their toes into the process, we were off to the races. The existing bathroom in this beautiful historical 1920’s home, had not been updated since the 70’/80’s as evidenced by the blue carpeting, mirrored walls and dropped ceilings. In addition, there was very little storage, and some health setbacks had made the bathroom difficult to maneuver with its tub shower.
Once we demoed, we discovered everything we expected to find in a home that had not been updated for many years. We got to work bringing all the electrical and plumbing up to code, and it was just as dusty and dirty as the homeowner’s anticipated! Once the space was demoed, we got to work building our new plan. We eliminated the existing tub and created a large walk-in curb-less shower.
An existing closet was eliminated and in its place, we planned a custom built in with spots for linens, jewelry and general storage. Because of the small space, we had to be very creative with the shower footprint, so we clipped one of the walls for more clearance behind the sink. The bathroom features a beautiful custom mosaic floor tile as well as tiled walls throughout the space. This required lots of coordination between the carpenter and tile setter to make sure that the framing and tile design were all properly aligned. We worked around an existing radiator and a unique original leaded window that was architecturally significant to the façade of the home. We had a lot of extra depth behind the original toilet location, so we built the wall out a bit, moved the toilet forward and then created some extra storage space behind the commode. We settled on mirrored mullioned doors to bounce lots of light around the smaller space.
We also went back and forth on deciding between a single and double vanity, and in the end decided the single vanity allowed for more counter space, more storage below and for the design to breath a bit in the smaller space. I’m so happy with this decision! To build on the luxurious feel of the space, we added a heated towel bar and heated flooring.
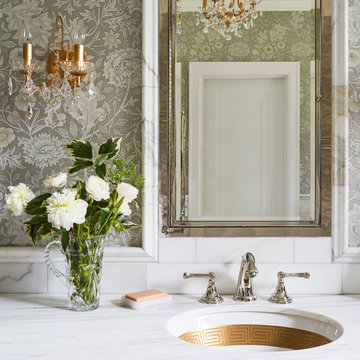
One of the concerns the homeowners had was having a comfortable floor to walk on. They realized that carpet was not a very practical solution but liked the comfort it had provided. Heated floors are the perfect solution. The room is decidedly traditional from its intricate mosaic marble floor to the calacutta marble clad walls. Elegant gold chandelier style fixtures, marble countertops and Morris & Co. beaded wallpaper provide an opulent feel to the space.
The gray monochromatic pallet keeps it feeling fresh and up-to-date. The beautiful leaded glass window is an important architectural feature at the front of the house. In the summertime, the homeowners love having the window open for fresh air and ventilation. We love it too!
The curb-less shower features a small fold down bench that can be used if needed and folded up when not. The shower also features a custom niche for storing shampoo and other hair products. The linear drain is built into the tilework and is barely visible. A frameless glass door that swings both in and out completes the luxurious feel.
Designed by: Susan Klimala, CKD, CBD
Photography by: Michael Kaskel
For more information on kitchen and bath design ideas go to: www.kitchenstudio-ge.com
 Stacey Kocevar Designs, LLC
The existing kitchen layout created tight work aisles, minimal counter and storage space, and utilized only 62% of the overall available space, which was the impetus for the remodel. The clients’ wanted a modern farmhouse feel, but their overall focus was specific: “quality craftsmanship, attention to detail, and a well thought out and creative redesign for the spaces”. They also requested designated areas for baking, entertaining, and family meals, double ovens, better ventilation, island seating, a wet bar, and the addition of mudroom storage.
Creating a design that not only fulfilled their wish list, but felt cohesive, and left as little “unused” space as possible, was the major challenge of this project. A large part of that challenge was not being able to change or eliminate any of the existing entryways and windows. This made the location of the island critical, as it needed to leave clearances for work aisles, seating, and walkways.
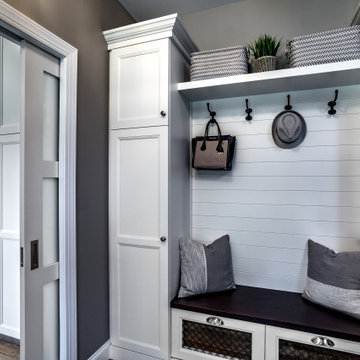
The island seating is provided by a Wenge “Flying W” top that cantilevers out from its corner and is supported by recessed steel supports and waterfall ends, adding interest and dimension to the large rectangular space. Proper ventilation was achieved, along with creating a focal point, by moving the cooktop to the exterior wall and designing a custom wood hood above, that is ducted directly outside. Adding bench seating from the base cabinets to the East wall, created the connection the space needed. Opposite of the bench seats, the wet bar is also connected to the East wall, and is easily accessible from the dining room, kitchen table, and island. To create the modern farmhouse aesthetic, a mix of white and seafoam painted cabinetry were accented with stained cherry interiors, trims, and shelves, which mimicked the cherry hardwoods in the adjacent rooms and staircases. Built-in cabinetry that matched the kitchen was added to the mudroom, which included a bench seat with vented shoe storage, hooks, and a tall cabinet with an outlet for their vacuum.
The addition of a pop-up mixer lift, deep storage drawers, a microwave drawer, and a lower cabinet at the end of the island, with a soapstone top, and includes a stainless-steel baking drawer organizer, makes for the ultimate “baking center”. LED lights inside and under the wall cabinets provide task lighting at the quartzite countertops, as well as mood lighting when dimmed.

Find the right local pro for your project
 Stacey Kocevar Designs, LLC
The existing kitchen layout created tight work aisles, minimal counter and storage space, and utilized only 62% of the overall available space, which was the impetus for the remodel. The clients’ wanted a modern farmhouse feel, but their overall focus was specific: “quality craftsmanship, attention to detail, and a well thought out and creative redesign for the spaces”. They also requested designated areas for baking, entertaining, and family meals, double ovens, better ventilation, island seating, a wet bar, and the addition of mudroom storage.
Creating a design that not only fulfilled their wish list, but felt cohesive, and left as little “unused” space as possible, was the major challenge of this project. A large part of that challenge was not being able to change or eliminate any of the existing entryways and windows. This made the location of the island critical, as it needed to leave clearances for work aisles, seating, and walkways.
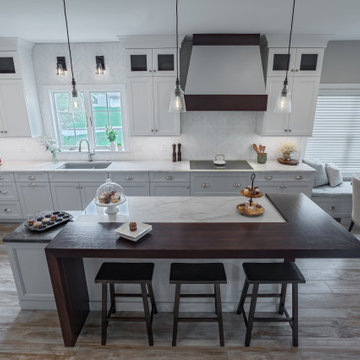
The island seating is provided by a Wenge “Flying W” top that cantilevers out from its corner and is supported by recessed steel supports and waterfall ends, adding interest and dimension to the large rectangular space. Proper ventilation was achieved, along with creating a focal point, by moving the cooktop to the exterior wall and designing a custom wood hood above, that is ducted directly outside. Adding bench seating from the base cabinets to the East wall, created the connection the space needed. Opposite of the bench seats, the wet bar is also connected to the East wall, and is easily accessible from the dining room, kitchen table, and island. To create the modern farmhouse aesthetic, a mix of white and seafoam painted cabinetry were accented with stained cherry interiors, trims, and shelves, which mimicked the cherry hardwoods in the adjacent rooms and staircases. Built-in cabinetry that matched the kitchen was added to the mudroom, which included a bench seat with vented shoe storage, hooks, and a tall cabinet with an outlet for their vacuum.
The addition of a pop-up mixer lift, deep storage drawers, a microwave drawer, and a lower cabinet at the end of the island, with a soapstone top, and includes a stainless-steel baking drawer organizer, makes for the ultimate “baking center”. LED lights inside and under the wall cabinets provide task lighting at the quartzite countertops, as well as mood lighting when dimmed.
 TKS Design Group
Download our free ebook, Creating the Ideal Kitchen. DOWNLOAD NOW
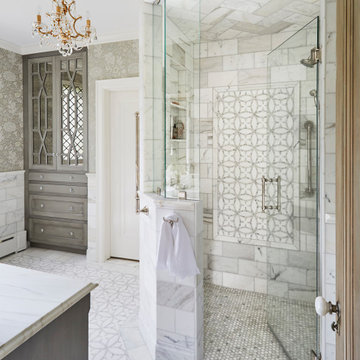
This homeowner’s daughter originally contacted us on behalf of her parents who were reluctant to begin the remodeling process in their home due to the inconvenience and dust. Once we met and they dipped their toes into the process, we were off to the races. The existing bathroom in this beautiful historical 1920’s home, had not been updated since the 70’/80’s as evidenced by the blue carpeting, mirrored walls and dropped ceilings. In addition, there was very little storage, and some health setbacks had made the bathroom difficult to maneuver with its tub shower.
Once we demoed, we discovered everything we expected to find in a home that had not been updated for many years. We got to work bringing all the electrical and plumbing up to code, and it was just as dusty and dirty as the homeowner’s anticipated! Once the space was demoed, we got to work building our new plan. We eliminated the existing tub and created a large walk-in curb-less shower.
An existing closet was eliminated and in its place, we planned a custom built in with spots for linens, jewelry and general storage. Because of the small space, we had to be very creative with the shower footprint, so we clipped one of the walls for more clearance behind the sink. The bathroom features a beautiful custom mosaic floor tile as well as tiled walls throughout the space. This required lots of coordination between the carpenter and tile setter to make sure that the framing and tile design were all properly aligned. We worked around an existing radiator and a unique original leaded window that was architecturally significant to the façade of the home. We had a lot of extra depth behind the original toilet location, so we built the wall out a bit, moved the toilet forward and then created some extra storage space behind the commode. We settled on mirrored mullioned doors to bounce lots of light around the smaller space.
We also went back and forth on deciding between a single and double vanity, and in the end decided the single vanity allowed for more counter space, more storage below and for the design to breath a bit in the smaller space. I’m so happy with this decision! To build on the luxurious feel of the space, we added a heated towel bar and heated flooring.
One of the concerns the homeowners had was having a comfortable floor to walk on. They realized that carpet was not a very practical solution but liked the comfort it had provided. Heated floors are the perfect solution. The room is decidedly traditional from its intricate mosaic marble floor to the calacutta marble clad walls. Elegant gold chandelier style fixtures, marble countertops and Morris & Co. beaded wallpaper provide an opulent feel to the space.
The gray monochromatic pallet keeps it feeling fresh and up-to-date. The beautiful leaded glass window is an important architectural feature at the front of the house. In the summertime, the homeowners love having the window open for fresh air and ventilation. We love it too!
The curb-less shower features a small fold down bench that can be used if needed and folded up when not. The shower also features a custom niche for storing shampoo and other hair products. The linear drain is built into the tilework and is barely visible. A frameless glass door that swings both in and out completes the luxurious feel.
Designed by: Susan Klimala, CKD, CBD
Photography by: Michael Kaskel
For more information on kitchen and bath design ideas go to: www.kitchenstudio-ge.com
 Casa Bella Construction, LLC.
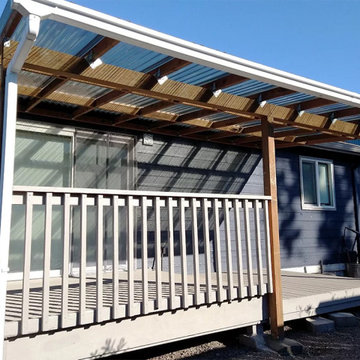
We customize each cover in any way you can imagine. Our standard single-pitch patio covers allow natural light in and have pressure-treated posts for longevity. From there, let your vision go wild. Do you want the trim work to match your house? Are you a fan of accent pieces? We have even made rustic ranch-style a-frame covers.
Types of Patio Covers
A-frame
Patio Roof Risers
Polycarbonate Roofing
Metal Roofing
& More!
Factors & Solutions
Each house is different, and each person has an end-goal in mind. Our job is to determine the best creative solution.
Height – Sometimes, we recommend attaching roof risers for higher clearance so you can walk around freely without worrying about needing to duck.
Lighting – If natural light is important to you, polycarbonate is the best option. But, if you are sold on another roofing aesthetic, we can incorporate lighting.
Ceilings – Open ceilings and rafters give it an understated look. Soffits, or ceilings, can bring the space to life. Several of our customers request a cedar tongue and groove ceiling to have that warm cabin-feel.
Trim – We can wrap with cedar, pine, or even exterior trim. Some customers choose the latter in combination with architectural roofing to match the house.
We invite you to visit our website or call us for a FREE QUOTE
 Stacey Kocevar Designs, LLC
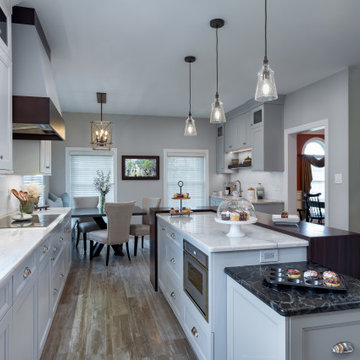
The existing kitchen layout created tight work aisles, minimal counter and storage space, and utilized only 62% of the overall available space, which was the impetus for the remodel. The clients’ wanted a modern farmhouse feel, but their overall focus was specific: “quality craftsmanship, attention to detail, and a well thought out and creative redesign for the spaces”. They also requested designated areas for baking, entertaining, and family meals, double ovens, better ventilation, island seating, a wet bar, and the addition of mudroom storage.
Creating a design that not only fulfilled their wish list, but felt cohesive, and left as little “unused” space as possible, was the major challenge of this project. A large part of that challenge was not being able to change or eliminate any of the existing entryways and windows. This made the location of the island critical, as it needed to leave clearances for work aisles, seating, and walkways.
The island seating is provided by a Wenge “Flying W” top that cantilevers out from its corner and is supported by recessed steel supports and waterfall ends, adding interest and dimension to the large rectangular space. Proper ventilation was achieved, along with creating a focal point, by moving the cooktop to the exterior wall and designing a custom wood hood above, that is ducted directly outside. Adding bench seating from the base cabinets to the East wall, created the connection the space needed. Opposite of the bench seats, the wet bar is also connected to the East wall, and is easily accessible from the dining room, kitchen table, and island. To create the modern farmhouse aesthetic, a mix of white and seafoam painted cabinetry were accented with stained cherry interiors, trims, and shelves, which mimicked the cherry hardwoods in the adjacent rooms and staircases. Built-in cabinetry that matched the kitchen was added to the mudroom, which included a bench seat with vented shoe storage, hooks, and a tall cabinet with an outlet for their vacuum.
The addition of a pop-up mixer lift, deep storage drawers, a microwave drawer, and a lower cabinet at the end of the island, with a soapstone top, and includes a stainless-steel baking drawer organizer, makes for the ultimate “baking center”. LED lights inside and under the wall cabinets provide task lighting at the quartzite countertops, as well as mood lighting when dimmed.
 DreamMaker Bath & Kitchen
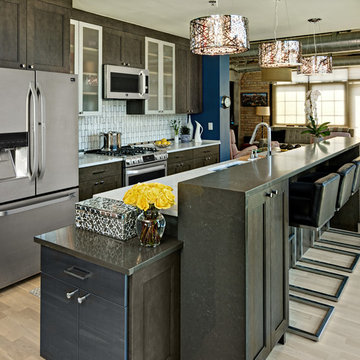
Our reconfigured layout increases clearances to accommodate two cooks. The larger, redesigned island optimizes storage and is bookended by a wine refrigerator and a mail drop/communications center. We swapped out existing builder basic cabinetry with custom dark taupe and deep blue stained maple cabinets, and installed new oak strip flooring over the original concrete floors. Photo by Ehlen Creative.
 Greenwood Cabinets & Stone, Inc.
Ron Ruscio photography
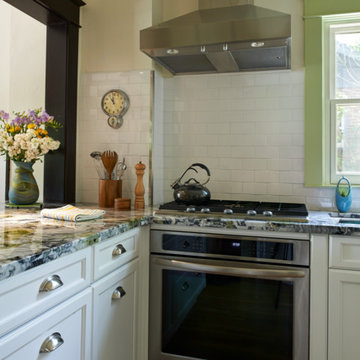
At Greenwood Cabinets & Stone, our goal is to provide a satisfying and positive experience. Whether you’re remodeling or building new, our creative designers and professional installation team will provide excellent solutions and service from start to finish. Kitchens, baths, wet bars and laundry rooms are our specialty. We offer a tremendous selection of the best brands and quality materials. Our clients include homeowners, builders, remodelers, architects and interior designers. We provide American made, quality cabinetry, countertops, plumbing, lighting, tile and hardware. We primarily work in Littleton, Highlands Ranch, Centennial, Greenwood Village, Lone Tree, and Denver, but also throughout the state of Colorado. Contact us today or visit our beautiful showroom on South Broadway in Littleton.
 Casa Bella Construction, LLC.
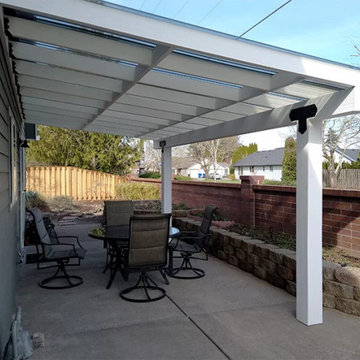
We customize each cover in any way you can imagine. Our standard single-pitch patio covers allow natural light in and have pressure-treated posts for longevity. From there, let your vision go wild. Do you want the trim work to match your house? Are you a fan of accent pieces? We have even made rustic ranch-style a-frame covers.
Types of Patio Covers
A-frame
Patio Roof Risers
Polycarbonate Roofing
Metal Roofing
& More!
Factors & Solutions
Each house is different, and each person has an end-goal in mind. Our job is to determine the best creative solution.
Height – Sometimes, we recommend attaching roof risers for higher clearance so you can walk around freely without worrying about needing to duck.
Lighting – If natural light is important to you, polycarbonate is the best option. But, if you are sold on another roofing aesthetic, we can incorporate lighting.
Ceilings – Open ceilings and rafters give it an understated look. Soffits, or ceilings, can bring the space to life. Several of our customers request a cedar tongue and groove ceiling to have that warm cabin-feel.
Trim – We can wrap with cedar, pine, or even exterior trim. Some customers choose the latter in combination with architectural roofing to match the house.
We invite you to visit our website or call us for a FREE QUOTE
 Kitchen Design Gallery, INC
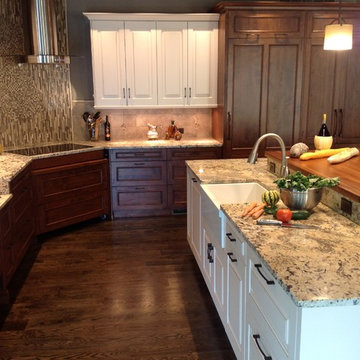
Inspiration for a large contemporary l-shaped dark wood floor and brown floor kitchen remodel in Kansas City with an undermount sink, recessed-panel cabinets, white cabinets, granite countertops, beige backsplash, travertine backsplash, paneled appliances, an island and multicolored countertops
 Kingsgate Construction Ltd.
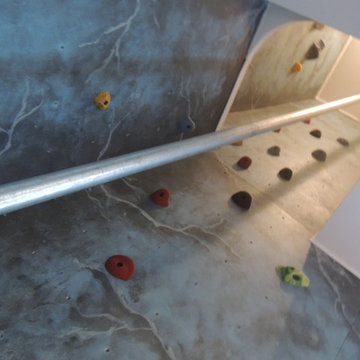
In this basement a custom rock wall was built for the kids to climb and play on. The basement also included a fire pole from the main level that was accessible behind the secret bookcase doors. This picture depicts the fire firepole.
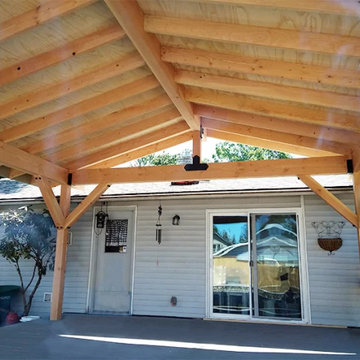 Casa Bella Construction, LLC.
We customize each cover in any way you can imagine. Our standard single-pitch patio covers allow natural light in and have pressure-treated posts for longevity. From there, let your vision go wild. Do you want the trim work to match your house? Are you a fan of accent pieces? We have even made rustic ranch-style a-frame covers.
Types of Patio Covers
A-frame
Patio Roof Risers
Polycarbonate Roofing
Metal Roofing
& More!
Factors & Solutions
Each house is different, and each person has an end-goal in mind. Our job is to determine the best creative solution.
Height – Sometimes, we recommend attaching roof risers for higher clearance so you can walk around freely without worrying about needing to duck.
Lighting – If natural light is important to you, polycarbonate is the best option. But, if you are sold on another roofing aesthetic, we can incorporate lighting.
Ceilings – Open ceilings and rafters give it an understated look. Soffits, or ceilings, can bring the space to life. Several of our customers request a cedar tongue and groove ceiling to have that warm cabin-feel.
Trim – We can wrap with cedar, pine, or even exterior trim. Some customers choose the latter in combination with architectural roofing to match the house.
We invite you to visit our website or call us for a FREE QUOTE
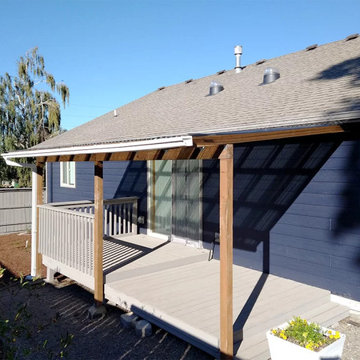 Casa Bella Construction, LLC.
We customize each cover in any way you can imagine. Our standard single-pitch patio covers allow natural light in and have pressure-treated posts for longevity. From there, let your vision go wild. Do you want the trim work to match your house? Are you a fan of accent pieces? We have even made rustic ranch-style a-frame covers.
Types of Patio Covers
A-frame
Patio Roof Risers
Polycarbonate Roofing
Metal Roofing
& More!
Factors & Solutions
Each house is different, and each person has an end-goal in mind. Our job is to determine the best creative solution.
Height – Sometimes, we recommend attaching roof risers for higher clearance so you can walk around freely without worrying about needing to duck.
Lighting – If natural light is important to you, polycarbonate is the best option. But, if you are sold on another roofing aesthetic, we can incorporate lighting.
Ceilings – Open ceilings and rafters give it an understated look. Soffits, or ceilings, can bring the space to life. Several of our customers request a cedar tongue and groove ceiling to have that warm cabin-feel.
Trim – We can wrap with cedar, pine, or even exterior trim. Some customers choose the latter in combination with architectural roofing to match the house.
We invite you to visit our website or call us for a FREE QUOTE
 Morehouse Crafted Interiors
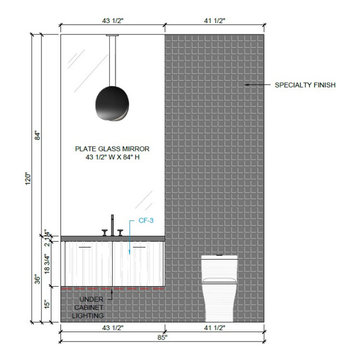
Great design is in the details, and this technical elevation of the Herring Residence powder room highlights the rigorous planning behind our moody, modern aesthetic. To achieve the seamless "floating" effect of the vanity, we specified an exact 15-inch clearance from the floor, integrated with subtle under-cabinet LED lighting to enhance the room’s ambient glow.
The drawing showcases the intentional balance between the expansive 43.5" x 84" plate glass mirror and the dramatic "Specialty Finish" 3D-textured wall. By mapping out the exact placement of the CF-3 cabinetry finish and the high-profile back-to-wall toilet, Morehouse Crafted Interiors ensures that every fixture aligns perfectly with the architectural grid of the space. This level of technical oversight is what allows our boldest creative visions to become functional realities.
 TOC design & construction inc.
DESIGNED BY TOC design
CONSTRUCTION BY TOC design & Construction inc.
PHOTOS BY : Tania Scardellato
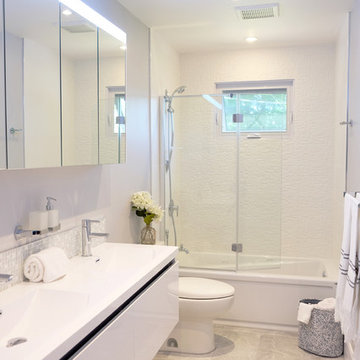
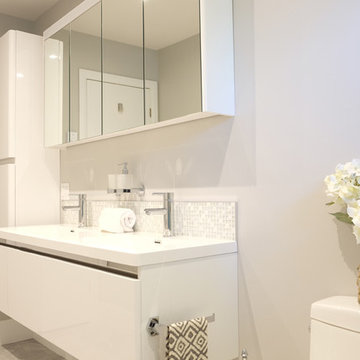
I was fortunate to have a young family approach me in desperate need to renovate there only 3 piece bathroom. This space was In dire need of a remodel, with old brown wall to wall tiles and a dated bulky yellow brown single sink vanity.
Storage was a must, lighting a necessity, and proper accessibility to the shower bath area.
We had a tight budget to respect, but a full gut of this bathroom was required. And a good thing too, once we started doing the demolition we noticed that mildew and rotting floors and walls had accumulated throughout the years. Doing it right the first time is no joke when dealing with water and electrical issues.
We discarded all reminisce of old and built from scratch, new walls, new plumbing, new electrical ,new insulation and a new window, a new fan that actually exhausted outside ( I say this laughing as you would be amazed at how many fans are installed but don’t exhaust outside, and you the client would never know unless you go inside the attic space.
Once all the hard stuff was done, the rest is just a matter of smart design. If you have a small bathroom here are some tips to guide you.
10 tips for making a small bathroom feel larger
Is your tiny bathroom cramping your functionality and style, leaving you longing for the enormous bathrooms gracing the pages of design magazines? Even if your bathroom is a fraction of the size, all it takes is some design savvy to make the most of the space you have. Consider these 10 smart tips that will help your bathroom look, feel and function like those larger contenders.
1-Get creative with corners
Space is at a premium in small bathrooms, so it's important to maximize every inch. Corners, for example, provide extra space for shelving, storage units and even hooks. Get creative and install unique design solutions that are not only functional, but also eye-catching. If you love the airiness of floating cabinets, add baskets or decorative boxes under for extra storage. If you are installing floating cabinets insure that they are installed securely to studs or plywood at wall.
2- Let solid colors shine
Busy patterns have a shrinking effect and make small bathrooms seem even smaller. Conversely, light natural hues make a space feel more open. If you're itching to get creative with design, experiment with textures but keep overpowering patterns to a minimum. Tone on tone is the best to achieve this.
3 - Maximize your bathtub
A bathtub takes up a significant portion of the room, but modern, compact options with curved basins, can make the tub feel larger when in use, all while conserving space.
4 - Select a smaller faucet
A faucet is jewelry for the bathroom. And just as accessories can overpower an outfit, a big bulky faucet isn't flattering in a small bath. Single-handle designs conserve counter space, while a wall-mount installation frees it up all together and can create quite the wow-factor, if the budget can accommodate the required changes to plumbing behind the wall.
5 - Make vanity storage simple
If you're in a storage war with your small bathroom, you're not alone in the battle. Toiletries and personal supplies without a place to call home only add clutter and chaos. Store smart with a space-saving vanity, the dual sink vanity shown here, looks quite simple, but in reality it has 4 sets of full extension drawers, and the vanity tower adds extra storage without overpowering the use of space.
6 - Show off the shower
Shower curtains may be pretty, but they interrupt the visual flow of a bathing space and make it feel significantly smaller. In bathrooms with small footprints, opt for a clear glass sliding shower door that doesn't require the clearance of one with a hinged design. Or as shown in this design and for fraction less expensive a half hinged panel installed on a fixed tempered glass panel. If you're embarking on a big remodel, create the illusion of more space by using same tile in the shower that's used throughout; instead of seeing them as two separate zones, the eye will read them as one.
7 - Discover the treasure of hidden storage
Work with a contractor, and you just might find some serious storage potential hidden behind your walls. Whether it's utilizing space between the studs for shallow shelving or a creating a small linen closet by annexing space from an adjacent room, even small additions can make a big difference.
8 - Focal Point
Tile is a beautiful, durable addition to any bathroom. For dainty spaces, consider installing tile at a diagonal to accentuate the focal point or as in this bathroom I used an oversized textured pattern to bring depth to the space at the window wall.
9 - Choose the right lights
Strategically install light to reflect and brighten a small bathroom to make it appear larger. Recessed lighting is an affordable solution for tiny rooms, offering ample light while taking up little space. Wall sconces alongside a mirror also reflect off the walls and make a room feel bright and airy. I always recommend going with LED lighting at 2800 to 3000K.
10 – Accessorize
This is your time to shine in your decorating skills, have fun with your towels, you can change the color scheme daily just by adding pops of color in your accessories, make sure to get items that serve a dual purpose, like baskets, boxes they can always be used as hampers, storing of towels and even a nice display for your guest.
 TOC design & construction inc.
DESIGNED BY TOC design
CONSTRUCTION BY TOC design & Construction inc.
PHOTOS BY : Tania Scardellato
I was fortunate to have a young family approach me in desperate need to renovate there only 3 piece bathroom. This space was In dire need of a remodel, with old brown wall to wall tiles and a dated bulky yellow brown single sink vanity.
Storage was a must, lighting a necessity, and proper accessibility to the shower bath area.
We had a tight budget to respect, but a full gut of this bathroom was required. And a good thing too, once we started doing the demolition we noticed that mildew and rotting floors and walls had accumulated throughout the years. Doing it right the first time is no joke when dealing with water and electrical issues.
We discarded all reminisce of old and built from scratch, new walls, new plumbing, new electrical ,new insulation and a new window, a new fan that actually exhausted outside ( I say this laughing as you would be amazed at how many fans are installed but don’t exhaust outside, and you the client would never know unless you go inside the attic space.
Once all the hard stuff was done, the rest is just a matter of smart design. If you have a small bathroom here are some tips to guide you.
10 tips for making a small bathroom feel larger
Is your tiny bathroom cramping your functionality and style, leaving you longing for the enormous bathrooms gracing the pages of design magazines? Even if your bathroom is a fraction of the size, all it takes is some design savvy to make the most of the space you have. Consider these 10 smart tips that will help your bathroom look, feel and function like those larger contenders.
1-Get creative with corners
Space is at a premium in small bathrooms, so it's important to maximize every inch. Corners, for example, provide extra space for shelving, storage units and even hooks. Get creative and install unique design solutions that are not only functional, but also eye-catching. If you love the airiness of floating cabinets, add baskets or decorative boxes under for extra storage. If you are installing floating cabinets insure that they are installed securely to studs or plywood at wall.
2- Let solid colors shine
Busy patterns have a shrinking effect and make small bathrooms seem even smaller. Conversely, light natural hues make a space feel more open. If you're itching to get creative with design, experiment with textures but keep overpowering patterns to a minimum. Tone on tone is the best to achieve this.
3 - Maximize your bathtub
A bathtub takes up a significant portion of the room, but modern, compact options with curved basins, can make the tub feel larger when in use, all while conserving space.
4 - Select a smaller faucet
A faucet is jewelry for the bathroom. And just as accessories can overpower an outfit, a big bulky faucet isn't flattering in a small bath. Single-handle designs conserve counter space, while a wall-mount installation frees it up all together and can create quite the wow-factor, if the budget can accommodate the required changes to plumbing behind the wall.
5 - Make vanity storage simple
If you're in a storage war with your small bathroom, you're not alone in the battle. Toiletries and personal supplies without a place to call home only add clutter and chaos. Store smart with a space-saving vanity, the dual sink vanity shown here, looks quite simple, but in reality it has 4 sets of full extension drawers, and the vanity tower adds extra storage without overpowering the use of space.
6 - Show off the shower
Shower curtains may be pretty, but they interrupt the visual flow of a bathing space and make it feel significantly smaller. In bathrooms with small footprints, opt for a clear glass sliding shower door that doesn't require the clearance of one with a hinged design. Or as shown in this design and for fraction less expensive a half hinged panel installed on a fixed tempered glass panel. If you're embarking on a big remodel, create the illusion of more space by using same tile in the shower that's used throughout; instead of seeing them as two separate zones, the eye will read them as one.
7 - Discover the treasure of hidden storage
Work with a contractor, and you just might find some serious storage potential hidden behind your walls. Whether it's utilizing space between the studs for shallow shelving or a creating a small linen closet by annexing space from an adjacent room, even small additions can make a big difference.
8 - Focal Point
Tile is a beautiful, durable addition to any bathroom. For dainty spaces, consider installing tile at a diagonal to accentuate the focal point or as in this bathroom I used an oversized textured pattern to bring depth to the space at the window wall.
9 - Choose the right lights
Strategically install light to reflect and brighten a small bathroom to make it appear larger. Recessed lighting is an affordable solution for tiny rooms, offering ample light while taking up little space. Wall sconces alongside a mirror also reflect off the walls and make a room feel bright and airy. I always recommend going with LED lighting at 2800 to 3000K.
10 – Accessorize
This is your time to shine in your decorating skills, have fun with your towels, you can change the color scheme daily just by adding pops of color in your accessories, make sure to get items that serve a dual purpose, like baskets, boxes they can always be used as hampers, storing of towels and even a nice display for your guest.
 TOC design & construction inc.
DESIGNED BY TOC design
CONSTRUCTION BY TOC design & Construction inc.
PHOTOS BY : Tania Scardellato
I was fortunate to have a young family approach me in desperate need to renovate there only 3 piece bathroom. This space was In dire need of a remodel, with old brown wall to wall tiles and a dated bulky yellow brown single sink vanity.
Storage was a must, lighting a necessity, and proper accessibility to the shower bath area.
We had a tight budget to respect, but a full gut of this bathroom was required. And a good thing too, once we started doing the demolition we noticed that mildew and rotting floors and walls had accumulated throughout the years. Doing it right the first time is no joke when dealing with water and electrical issues.
We discarded all reminisce of old and built from scratch, new walls, new plumbing, new electrical ,new insulation and a new window, a new fan that actually exhausted outside ( I say this laughing as you would be amazed at how many fans are installed but don’t exhaust outside, and you the client would never know unless you go inside the attic space.
Once all the hard stuff was done, the rest is just a matter of smart design. If you have a small bathroom here are some tips to guide you.
10 tips for making a small bathroom feel larger
Is your tiny bathroom cramping your functionality and style, leaving you longing for the enormous bathrooms gracing the pages of design magazines? Even if your bathroom is a fraction of the size, all it takes is some design savvy to make the most of the space you have. Consider these 10 smart tips that will help your bathroom look, feel and function like those larger contenders.
1-Get creative with corners
Space is at a premium in small bathrooms, so it's important to maximize every inch. Corners, for example, provide extra space for shelving, storage units and even hooks. Get creative and install unique design solutions that are not only functional, but also eye-catching. If you love the airiness of floating cabinets, add baskets or decorative boxes under for extra storage. If you are installing floating cabinets insure that they are installed securely to studs or plywood at wall.
2- Let solid colors shine
Busy patterns have a shrinking effect and make small bathrooms seem even smaller. Conversely, light natural hues make a space feel more open. If you're itching to get creative with design, experiment with textures but keep overpowering patterns to a minimum. Tone on tone is the best to achieve this.
3 - Maximize your bathtub
A bathtub takes up a significant portion of the room, but modern, compact options with curved basins, can make the tub feel larger when in use, all while conserving space.
4 - Select a smaller faucet
A faucet is jewelry for the bathroom. And just as accessories can overpower an outfit, a big bulky faucet isn't flattering in a small bath. Single-handle designs conserve counter space, while a wall-mount installation frees it up all together and can create quite the wow-factor, if the budget can accommodate the required changes to plumbing behind the wall.
5 - Make vanity storage simple
If you're in a storage war with your small bathroom, you're not alone in the battle. Toiletries and personal supplies without a place to call home only add clutter and chaos. Store smart with a space-saving vanity, the dual sink vanity shown here, looks quite simple, but in reality it has 4 sets of full extension drawers, and the vanity tower adds extra storage without overpowering the use of space.
6 - Show off the shower
Shower curtains may be pretty, but they interrupt the visual flow of a bathing space and make it feel significantly smaller. In bathrooms with small footprints, opt for a clear glass sliding shower door that doesn't require the clearance of one with a hinged design. Or as shown in this design and for fraction less expensive a half hinged panel installed on a fixed tempered glass panel. If you're embarking on a big remodel, create the illusion of more space by using same tile in the shower that's used throughout; instead of seeing them as two separate zones, the eye will read them as one.
7 - Discover the treasure of hidden storage
Work with a contractor, and you just might find some serious storage potential hidden behind your walls. Whether it's utilizing space between the studs for shallow shelving or a creating a small linen closet by annexing space from an adjacent room, even small additions can make a big difference.
8 - Focal Point
Tile is a beautiful, durable addition to any bathroom. For dainty spaces, consider installing tile at a diagonal to accentuate the focal point or as in this bathroom I used an oversized textured pattern to bring depth to the space at the window wall.
9 - Choose the right lights
Strategically install light to reflect and brighten a small bathroom to make it appear larger. Recessed lighting is an affordable solution for tiny rooms, offering ample light while taking up little space. Wall sconces alongside a mirror also reflect off the walls and make a room feel bright and airy. I always recommend going with LED lighting at 2800 to 3000K.
10 – Accessorize
This is your time to shine in your decorating skills, have fun with your towels, you can change the color scheme daily just by adding pops of color in your accessories, make sure to get items that serve a dual purpose, like baskets, boxes they can always be used as hampers, storing of towels and even a nice display for your guest.
 TOC design & construction inc.
DESIGNED BY TOC design
CONSTRUCTION BY TOC design & Construction inc.
PHOTOS BY : Tania Scardellato
I was fortunate to have a young family approach me in desperate need to renovate there only 3 piece bathroom. This space was In dire need of a remodel, with old brown wall to wall tiles and a dated bulky yellow brown single sink vanity.
Storage was a must, lighting a necessity, and proper accessibility to the shower bath area.
We had a tight budget to respect, but a full gut of this bathroom was required. And a good thing too, once we started doing the demolition we noticed that mildew and rotting floors and walls had accumulated throughout the years. Doing it right the first time is no joke when dealing with water and electrical issues.
We discarded all reminisce of old and built from scratch, new walls, new plumbing, new electrical ,new insulation and a new window, a new fan that actually exhausted outside ( I say this laughing as you would be amazed at how many fans are installed but don’t exhaust outside, and you the client would never know unless you go inside the attic space.
Once all the hard stuff was done, the rest is just a matter of smart design. If you have a small bathroom here are some tips to guide you.
10 tips for making a small bathroom feel larger
Is your tiny bathroom cramping your functionality and style, leaving you longing for the enormous bathrooms gracing the pages of design magazines? Even if your bathroom is a fraction of the size, all it takes is some design savvy to make the most of the space you have. Consider these 10 smart tips that will help your bathroom look, feel and function like those larger contenders.
1-Get creative with corners
Space is at a premium in small bathrooms, so it's important to maximize every inch. Corners, for example, provide extra space for shelving, storage units and even hooks. Get creative and install unique design solutions that are not only functional, but also eye-catching. If you love the airiness of floating cabinets, add baskets or decorative boxes under for extra storage. If you are installing floating cabinets insure that they are installed securely to studs or plywood at wall.
2- Let solid colors shine
Busy patterns have a shrinking effect and make small bathrooms seem even smaller. Conversely, light natural hues make a space feel more open. If you're itching to get creative with design, experiment with textures but keep overpowering patterns to a minimum. Tone on tone is the best to achieve this.
3 - Maximize your bathtub
A bathtub takes up a significant portion of the room, but modern, compact options with curved basins, can make the tub feel larger when in use, all while conserving space.
4 - Select a smaller faucet
A faucet is jewelry for the bathroom. And just as accessories can overpower an outfit, a big bulky faucet isn't flattering in a small bath. Single-handle designs conserve counter space, while a wall-mount installation frees it up all together and can create quite the wow-factor, if the budget can accommodate the required changes to plumbing behind the wall.
5 - Make vanity storage simple
If you're in a storage war with your small bathroom, you're not alone in the battle. Toiletries and personal supplies without a place to call home only add clutter and chaos. Store smart with a space-saving vanity, the dual sink vanity shown here, looks quite simple, but in reality it has 4 sets of full extension drawers, and the vanity tower adds extra storage without overpowering the use of space.
6 - Show off the shower
Shower curtains may be pretty, but they interrupt the visual flow of a bathing space and make it feel significantly smaller. In bathrooms with small footprints, opt for a clear glass sliding shower door that doesn't require the clearance of one with a hinged design. Or as shown in this design and for fraction less expensive a half hinged panel installed on a fixed tempered glass panel. If you're embarking on a big remodel, create the illusion of more space by using same tile in the shower that's used throughout; instead of seeing them as two separate zones, the eye will read them as one.
7 - Discover the treasure of hidden storage
Work with a contractor, and you just might find some serious storage potential hidden behind your walls. Whether it's utilizing space between the studs for shallow shelving or a creating a small linen closet by annexing space from an adjacent room, even small additions can make a big difference.
8 - Focal Point
Tile is a beautiful, durable addition to any bathroom. For dainty spaces, consider installing tile at a diagonal to accentuate the focal point or as in this bathroom I used an oversized textured pattern to bring depth to the space at the window wall.
9 - Choose the right lights
Strategically install light to reflect and brighten a small bathroom to make it appear larger. Recessed lighting is an affordable solution for tiny rooms, offering ample light while taking up little space. Wall sconces alongside a mirror also reflect off the walls and make a room feel bright and airy. I always recommend going with LED lighting at 2800 to 3000K.
10 – Accessorize
This is your time to shine in your decorating skills, have fun with your towels, you can change the color scheme daily just by adding pops of color in your accessories, make sure to get items that serve a dual purpose, like baskets, boxes they can always be used as hampers, storing of towels and even a nice display for your guest.
 TOC design & construction inc.
DESIGNED BY TOC design
CONSTRUCTION BY TOC design & Construction inc.
PHOTOS BY : Tania Scardellato
I was fortunate to have a young family approach me in desperate need to renovate there only 3 piece bathroom. This space was In dire need of a remodel, with old brown wall to wall tiles and a dated bulky yellow brown single sink vanity.
Storage was a must, lighting a necessity, and proper accessibility to the shower bath area.
We had a tight budget to respect, but a full gut of this bathroom was required. And a good thing too, once we started doing the demolition we noticed that mildew and rotting floors and walls had accumulated throughout the years. Doing it right the first time is no joke when dealing with water and electrical issues.
We discarded all reminisce of old and built from scratch, new walls, new plumbing, new electrical ,new insulation and a new window, a new fan that actually exhausted outside ( I say this laughing as you would be amazed at how many fans are installed but don’t exhaust outside, and you the client would never know unless you go inside the attic space.
Once all the hard stuff was done, the rest is just a matter of smart design. If you have a small bathroom here are some tips to guide you.
10 tips for making a small bathroom feel larger
Is your tiny bathroom cramping your functionality and style, leaving you longing for the enormous bathrooms gracing the pages of design magazines? Even if your bathroom is a fraction of the size, all it takes is some design savvy to make the most of the space you have. Consider these 10 smart tips that will help your bathroom look, feel and function like those larger contenders.
1-Get creative with corners
Space is at a premium in small bathrooms, so it's important to maximize every inch. Corners, for example, provide extra space for shelving, storage units and even hooks. Get creative and install unique design solutions that are not only functional, but also eye-catching. If you love the airiness of floating cabinets, add baskets or decorative boxes under for extra storage. If you are installing floating cabinets insure that they are installed securely to studs or plywood at wall.
2- Let solid colors shine
Busy patterns have a shrinking effect and make small bathrooms seem even smaller. Conversely, light natural hues make a space feel more open. If you're itching to get creative with design, experiment with textures but keep overpowering patterns to a minimum. Tone on tone is the best to achieve this.
3 - Maximize your bathtub
A bathtub takes up a significant portion of the room, but modern, compact options with curved basins, can make the tub feel larger when in use, all while conserving space.
4 - Select a smaller faucet
A faucet is jewelry for the bathroom. And just as accessories can overpower an outfit, a big bulky faucet isn't flattering in a small bath. Single-handle designs conserve counter space, while a wall-mount installation frees it up all together and can create quite the wow-factor, if the budget can accommodate the required changes to plumbing behind the wall.
5 - Make vanity storage simple
If you're in a storage war with your small bathroom, you're not alone in the battle. Toiletries and personal supplies without a place to call home only add clutter and chaos. Store smart with a space-saving vanity, the dual sink vanity shown here, looks quite simple, but in reality it has 4 sets of full extension drawers, and the vanity tower adds extra storage without overpowering the use of space.
6 - Show off the shower
Shower curtains may be pretty, but they interrupt the visual flow of a bathing space and make it feel significantly smaller. In bathrooms with small footprints, opt for a clear glass sliding shower door that doesn't require the clearance of one with a hinged design. Or as shown in this design and for fraction less expensive a half hinged panel installed on a fixed tempered glass panel. If you're embarking on a big remodel, create the illusion of more space by using same tile in the shower that's used throughout; instead of seeing them as two separate zones, the eye will read them as one.
7 - Discover the treasure of hidden storage
Work with a contractor, and you just might find some serious storage potential hidden behind your walls. Whether it's utilizing space between the studs for shallow shelving or a creating a small linen closet by annexing space from an adjacent room, even small additions can make a big difference.
8 - Focal Point
Tile is a beautiful, durable addition to any bathroom. For dainty spaces, consider installing tile at a diagonal to accentuate the focal point or as in this bathroom I used an oversized textured pattern to bring depth to the space at the window wall.
9 - Choose the right lights
Strategically install light to reflect and brighten a small bathroom to make it appear larger. Recessed lighting is an affordable solution for tiny rooms, offering ample light while taking up little space. Wall sconces alongside a mirror also reflect off the walls and make a room feel bright and airy. I always recommend going with LED lighting at 2800 to 3000K.
10 – Accessorize
This is your time to shine in your decorating skills, have fun with your towels, you can change the color scheme daily just by adding pops of color in your accessories, make sure to get items that serve a dual purpose, like baskets, boxes they can always be used as hampers, storing of towels and even a nice display for your guest.
3