
Search results for "Damage alongside" in Home Design Ideas
 Mary Hannah Interiors
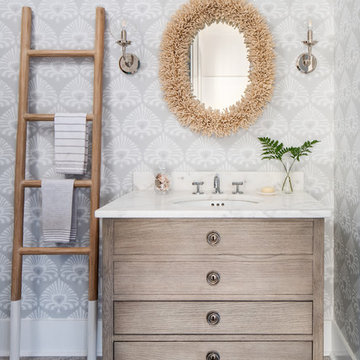
Powder room - coastal travertine floor powder room idea in Other with light wood cabinets, an undermount sink, marble countertops, white countertops, furniture-like cabinets and multicolored walls
 Texas Sun & Shade
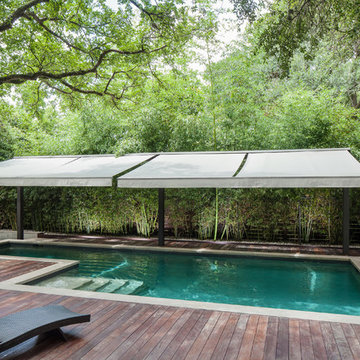
Exterior solar shades and awning systems are the most efficient solution to protect your windows and patio areas from the sun's damaging heat and UV rays.
Blocking up to 99% of UV, motorized retractable shading systems allow you to block the sun and heat or reverse the strategy to allow in natural light and heat as desired.
 Treeland Nursery
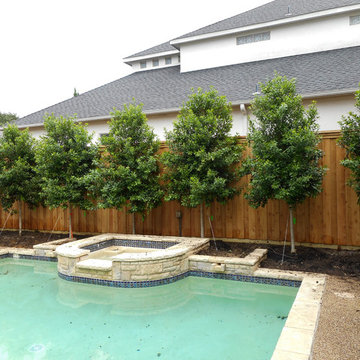
Large Eagleston Hollies make for the perfect backdrop and privacy screen in the backyard by the pool. Trees planted and provided by Treeland Nursery.
Visit our website to learn more. http://www.tree-land.com/trees_eagleston_holly.asp
Find the right local pro for your project
 Swanson Homes
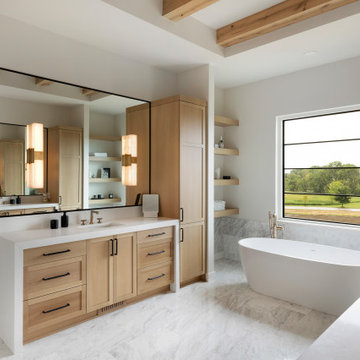
We love how the mix of materials-- dark metals, white oak cabinetry and marble flooring-- all work together to create this sophisticated and relaxing space.


 Jack Home Construction & Remodeling
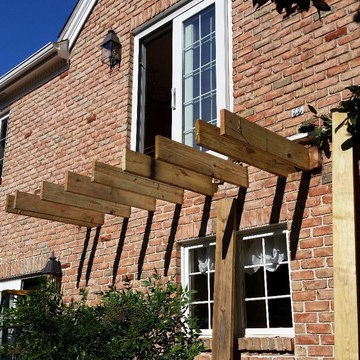
We slid new boards through the holes in the brick alongside the existing joists in the second floor. Like this…
For strength, we had to use lag bolts to secure the new balcony joists to the floor system of the second floor. The problem was to find the least intrusive way to get to those joists inside the second floor of the house. We would have to go inside the house and get to the floor joists from above or below. The ceiling of the room below the balcony was a beautiful finished wood ceiling that really could not be disturbed without causing permanent damage. So getting to the boards inside the second floor through the ceiling of the first floor wasn’t a good option.
The solution was to go into the second floor from above, through the floor of the room and that opens to the balcony. So we moved all the furniture out of the room and pulled back the carpet. We cut out a large section of the plywood and exposed the boards. We were then able to lag bolt the new balcony floor joists to the existing second floor system. We then put down new plywood decking on the floor, then re-stretched the carpet, and moved the furniture back. The room looked just like it did before.
Photo by Shawn Jack.
 Ashton Woods
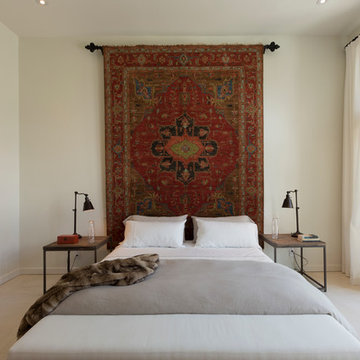
Create a spacious and clean design withcentral track lighting in your master bedroom. Seen in Fiddler's Creek, a Naples community
Bedroom - mid-sized scandinavian master carpeted bedroom idea in Miami with white walls
Bedroom - mid-sized scandinavian master carpeted bedroom idea in Miami with white walls
 SUPERIOR CHIMNEY SERVICES CORPORATION
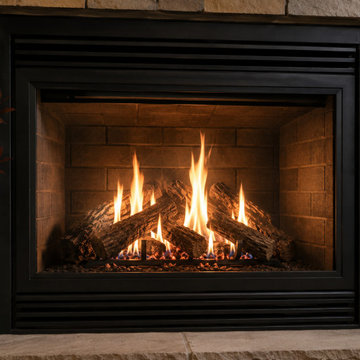
Standard annual or mechanical Chimney cleaning for gas and wood burning fireplaces typically works to remove any type of buildup as well as checking for the structural integrity of the chimney. Maintaining an annual chimney cleaning will meet the national safety standard set by the NFPA, CSIA, IRC and NCSG, helping homeowners avoid chimney fires and blockages.
Why does safety matter? Did you know that there was a chimney fire in Marengo in January? Or a chimney fire at a Peotone home at the end of March? Or a log cabin fire caused by the chimney in June? That’s just a few that happened in the past 7 months.
Why Does a Chimney Cleaning Matter?
Chimney sweeps also known as chimney cleanings, fireplace cleanings, or fireplace sweeps. Regardless of what you call it, it still means the same thing.
Chimney cleaning for gas and wood burning fireplaces serve 3 key purposes:
confirming structural integrity
removing flammable deposits and
obstruction-free assurance.
Homeowners with gas or wood burning fireplaces benefit from each of these safeguards.
The National Fire Protection Association addresses this directly through NFPA 211, a widely recognized fire safety code. The standard states that chimneys, fireplaces, and vents require inspection at least once a year for soundness, free from deposits, and correct clearances, with cleaning, maintenance, and repairs to be done whenever needed.
This annual requirement applies equally to gas and wood burning fireplaces. Organizations including the Chimney Safety Institute of America, the National Chimney Sweep Guild, International Residential code and the National Fire Protection Association each reference this standard as the requirement for home fire safety.
Free 14-Point Certified Written Inspection
Every chimney sweep completed through Superior Chimney includes a complimentary 14-point certified written inspection along with photo documentation delivered to you by email. This documentation gives homeowners a clear visual record of their chimney system.
The written report covers the condition of the flue liner, smoke chamber, smoke shelf, damper, firebox, chimney crown, and chimney cap, among other components examined during a standard visit. Photo documentation captures each area so homeowners can review the findings independently of the technician’s verbal summary. Written inspection reports allow families to track the condition of their fireplace chimney system over time.
Chimney Cleaning and Structural Integrity
A CSIA Certified Chimney Sweep technician, such as Superior Chimney technicians, visually examines the chimney from the top opening to the firebox below, gaining a full evaluation of the interior.
When chimney rods and brushes pass through the chimney system, loose pieces of fire clay tile, damaged tile joints, or crumbling brick sometimes fall down into the fireplace. This debris can mean there is an integrity problem. By knowing this is a problem, will protect families and their homes. Now it’s time to take care of it and call in a certified chimney technician.
Fireplace Cleaning and Creosote Removal
Creosote, is the technical name for soot. Soot forms as a natural byproduct of burning wood. Smoke traveling upward through the chimney and leaves deposits of creosote along the interior walls. With every fire, a little more gets built up.
The issue with creosote is that it is highly flammable and is the leading cause of chimney fires nationwide. Removing the buildup through regular chimney cleanings keeps a fireplace serviceable for continuous use throughout the spring, fall and winter seasons.
Standard and mechanical chimney cleanings pay close attention to the flue liner, smoke chamber, smoke shelf, damper, and firebox in a single service visit. Superior Chimney performs each fireplace chimney inspection using a no-mess process that protects the home during service. This keeps soot contained within specialized equipment rather than the living room.
An Obstruction Free Chimney
Several conditions create blockages within a chimney system. Bird, squirrel, bat and raccoon nesting material, feces, and debris frequently accumulate inside an unprotected flue, especially during spring and summer months when the fireplace sits unused.
Excessive creosote accumulation or a collapsed chimney liner can restrict proper airflow. Homeowners that address obstructions with a chimney inspection will be able to maintain proper draft and ventilation with their gas or wood burning fireplace. This will reduce the risk of smoke backing into the home.
Gas Chimney Cleaning Compared to Wood burning Chimney Cleaning
Gas and wood burning fireplaces share the same annual chimney inspection requirement. Whether you are burning wood, gas or a “pile of shirts” there is still heat and flame that requires worthy firewalls to protect the home from heat transfer. Fire worthiness and checking the firewall integrity is priority.
Wood burning fireplaces generate creosote that builds along the flue liner with every fire. Gas fireplace systems accumulate lighter deposits along with potential venting obstructions, since gas appliances rely heavily on venting for safe combustion byproduct release. Each system accumulates different residues that need attention.
A CSIA Certified Chimney Sweep technician from Superior Chimney adjusts the specific cleaning approach based on fuel type. However, the same core safety elements apply: structural integrity, deposit removal, and clear airflow.
What Happens During a Chimney Cleaning?
A typical chimney inspection begins with a walkthrough of the fireplace and the chimney on top of the roof, allowing the technician to record any visible concerns the homeowner reported in advance as well as any new findings.
The certified technician then covers the immediate hearth area with protective material before setting up specialized equipment designed to contain creosote throughout the cleaning and inspection.
Chimney rods and brushes pass through the flue liner to loosen and remove creosote deposits along the smoke chamber, smoke shelf, and damper. The certified technician inspects each section closely for loose or crumbling firewall, cracked joints, or other signs of weak structural damage.
A final walkthrough of the firebox and chimney completes the visual inspection. Photo documentation captures each component, and the certified written report is sent to the homeowner by email. This consistent process gives homeowners the documentation they need to compare year to year.
Chimney Cleaning Safety Standards
The table below summarizes the organizations that set national chimney safety standards, along with their specific requirements for fireplace chimney sweeps.
NFPA211
National Fire Protection Association
Annual inspection for soundness, deposit buildup, and correct clearances; cleaning and repairs completed as needed
CSIA
Chimney Safety Institute of America
Certifies technicians through testing on chimney and venting system knowledge
NCSG
National Chimney Sweep Guild
Establishes trade standards and best practices for chimney sweep professionals
How Often Should You Schedule a Chimney Cleaning and Inspection?
CSIA recommends scheduling chimney cleaning and inspection annually by CSIA Certified Chimney Sweeps. This recommendation applies to gas and wood burning fireplaces, regardless of how frequently a household uses the fireplace and especially in freeze/thaw geographic areas.
Regular chimney sweeps save lives, since a clean fireplace chimney rarely catches fire. CSIA encourages homeowners to rely on Certified Chimney Sweeps, as these technicians undergo regular testing on the complexities of chimney and venting systems throughout their careers.
Frequently Asked Questions
What is included in a chimney sweep? A chimney sweep includes the flue liner, smoke chamber, smoke shelf, damper, and firebox, removing creosote while checking for obstructions and structural concerns throughout the chimney system (NOT the ashpit).
How often should gas and wood burning fireplaces receive chimney sweeps? CSIA, NFPA, IRC and NCSG guidelines each call for chimney sweeps at least once a year for gas and wood burning fireplace systems.
Why does creosote removal matter for fireplace safety? Creosote is highly flammable and builds along the interior walls of a fireplace chimney with every fire, creating conditions that lead directly to chimney fires when left in place over time. Creosote is unburned particles from the combustion chamber.
Who should perform a fireplace chimney sweep? CSIA Certified Chimney Sweep technicians complete fireplace chimney sweeps after passing regular testing on chimney and venting system knowledge, meeting the certification standard recognized across the industry.
Does a fireplace chimney sweep remove animal nests and debris? No, a fireplace chimney sweep addresses soot and creosote, while significant nesting material, feces, or collapsed liner debris often calls for dedicated obstruction removal alongside the standard service.
What does the free 14-point inspection include? The complimentary 14-point certified written inspection documents the flue liner, smoke chamber, smoke shelf, damper, firebox, crown, and cap through photo evidence delivered directly by email for homeowner records.
Choose Superior Chimney for Your Certified Chimney Inspection
All service technicians completing chimney sweeps through Superior Chimney hold National Certification through the Chimney Safety Institute of America (CSIA), reflecting the training standard recommended by fire safety organizations nationwide.
Scheduling regular chimney sweeps to clean gas and wood burning fireplace systems protects a home from fire risk, preserves the structural integrity of the chimney, and keeps airflow clear for proper, continuous use throughout the year. Contact us today to schedule a chimney inspection at 877-244-6349.
 Cutuli Homes
After a devastating fire destroyed this Woodinville, Washington home, the homeowners faced the unimaginable task of rebuilding their lives and their house from the ground up. Thankfully, no one was hurt, but the home itself could not be saved.
Cutuli Homes had the privilege of walking alongside the homeowners through the rebuilding process—helping transform a heartbreaking loss into an opportunity to create a completely new home designed for the way they wanted to live today.
Rather than simply recreate the dated house that had been lost, the homeowners chose to move forward. Working closely together, we created a home that feels modern, elegant, warm and distinctly Pacific Northwest—a place that acknowledges what came before while giving the family something beautiful to come home to again.
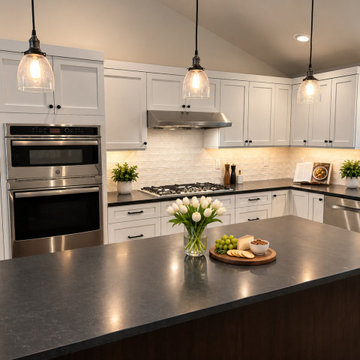
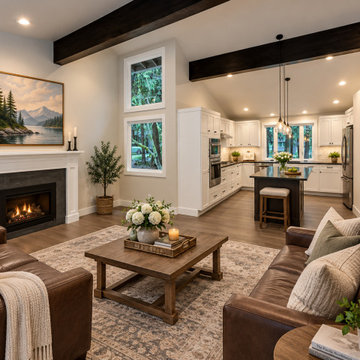
The new open-concept kitchen and family room became the heart of the rebuilt home. A dramatic vaulted ceiling with dark-stained wood beams brings warmth and architectural definition to the light-filled space. The kitchen combines crisp white custom cabinetry, black accents, stainless-steel appliances, dark countertops, a generous contrasting island and contemporary pendant lighting. Large windows bring the surrounding Woodinville landscape into the home and fill the kitchen with natural light.
The adjoining family room continues the home's understated Northwest aesthetic. A beautifully detailed fireplace creates a natural focal point, while the vaulted ceiling and exposed beams give the room a sense of scale without sacrificing warmth. The open relationship between the kitchen and living spaces was designed for everyday family life as well as entertaining.
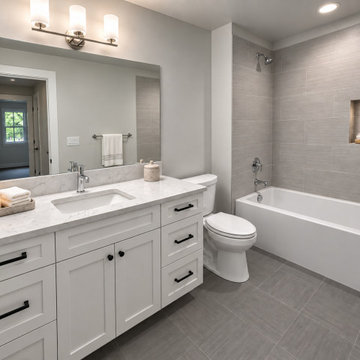
The bathrooms were given the same careful attention to craftsmanship and materials. Custom shaker-style cabinetry, stone countertops, patterned tile, soft gray finishes, oversized mirrors, black hardware and beautifully tiled tub and shower surrounds create spaces that feel sophisticated yet comfortable. Clean lines and a restrained palette give the bathrooms a quiet, spa-like quality that complements the rest of the home.
Throughout the rebuilding process, our goal went far beyond constructing a new house. Losing a home to fire is deeply personal, and rebuilding requires countless decisions at a time when homeowners are already navigating an extraordinarily difficult experience. Cutuli Homes worked closely with the family throughout the process, helping guide the construction and turn their ideas for a fresh beginning into a home that could once again feel like theirs.
The finished residence is not simply a replacement for what was lost. It represents a new chapter: a dated home transformed into a thoughtfully designed custom residence filled with light, craftsmanship and warmth.
From ashes came an opportunity to create something beautiful—and, we hope, a little joy after tragedy.
For more than 30 years, Cutuli Homes has built and remodeled custom homes throughout Woodinville, Seattle, the Eastside, King County, Snohomish County and the greater Puget Sound region, specializing in highly personalized residential construction, major renovations and custom craftsmanship.
 Cutuli Homes
After a devastating fire destroyed this Woodinville, Washington home, the homeowners faced the unimaginable task of rebuilding their lives and their house from the ground up. Thankfully, no one was hurt, but the home itself could not be saved.
Cutuli Homes had the privilege of walking alongside the homeowners through the rebuilding process—helping transform a heartbreaking loss into an opportunity to create a completely new home designed for the way they wanted to live today.
Rather than simply recreate the dated house that had been lost, the homeowners chose to move forward. Working closely together, we created a home that feels modern, elegant, warm and distinctly Pacific Northwest—a place that acknowledges what came before while giving the family something beautiful to come home to again.
The new open-concept kitchen and family room became the heart of the rebuilt home. A dramatic vaulted ceiling with dark-stained wood beams brings warmth and architectural definition to the light-filled space. The kitchen combines crisp white custom cabinetry, black accents, stainless-steel appliances, dark countertops, a generous contrasting island and contemporary pendant lighting. Large windows bring the surrounding Woodinville landscape into the home and fill the kitchen with natural light.
The adjoining family room continues the home's understated Northwest aesthetic. A beautifully detailed fireplace creates a natural focal point, while the vaulted ceiling and exposed beams give the room a sense of scale without sacrificing warmth. The open relationship between the kitchen and living spaces was designed for everyday family life as well as entertaining.
The bathrooms were given the same careful attention to craftsmanship and materials. Custom shaker-style cabinetry, stone countertops, patterned tile, soft gray finishes, oversized mirrors, black hardware and beautifully tiled tub and shower surrounds create spaces that feel sophisticated yet comfortable. Clean lines and a restrained palette give the bathrooms a quiet, spa-like quality that complements the rest of the home.
Throughout the rebuilding process, our goal went far beyond constructing a new house. Losing a home to fire is deeply personal, and rebuilding requires countless decisions at a time when homeowners are already navigating an extraordinarily difficult experience. Cutuli Homes worked closely with the family throughout the process, helping guide the construction and turn their ideas for a fresh beginning into a home that could once again feel like theirs.
The finished residence is not simply a replacement for what was lost. It represents a new chapter: a dated home transformed into a thoughtfully designed custom residence filled with light, craftsmanship and warmth.
From ashes came an opportunity to create something beautiful—and, we hope, a little joy after tragedy.
For more than 30 years, Cutuli Homes has built and remodeled custom homes throughout Woodinville, Seattle, the Eastside, King County, Snohomish County and the greater Puget Sound region, specializing in highly personalized residential construction, major renovations and custom craftsmanship.
 Elite Construction and Remodel Corp
Location: El Dorado Hills, CA
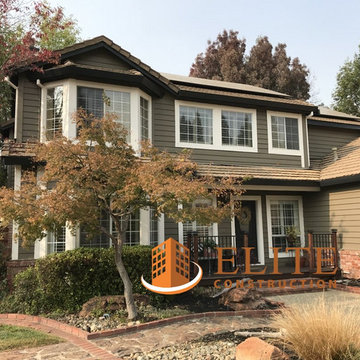
Project Type: The support posts, girders, joists, ledger, decking, and staircases have been damaged by fungus throughout the rear deck.
Description: Damage noted to the support posts, girders, joists, ledger, decking, and staircases have been damaged by fungus throughout the rear deck caused by uncontrollable exterior moisture sources.
RECOMMENDATION:
Remove and replace the end of the damaged rafter tail and install a new sister section alongside for support.
PAINTING:
Prime paint on all exterior surfaces included in this estimate in the event that pre-primed wood is not used. Elite Construction and Remodel
to color match and paint the repaired areas only as discussed with the client. Elite Construction and Remodel is not responsible for color
match due to the age of the old painted surfaces compared to the new painted surface.
https://www.eliteconstructioncorp.com/projects/el-dorado-hills-norwich-ca
 Cutuli Homes
After a devastating fire destroyed this Woodinville, Washington home, the homeowners faced the unimaginable task of rebuilding their lives and their house from the ground up. Thankfully, no one was hurt, but the home itself could not be saved.
Cutuli Homes had the privilege of walking alongside the homeowners through the rebuilding process—helping transform a heartbreaking loss into an opportunity to create a completely new home designed for the way they wanted to live today.
Rather than simply recreate the dated house that had been lost, the homeowners chose to move forward. Working closely together, we created a home that feels modern, elegant, warm and distinctly Pacific Northwest—a place that acknowledges what came before while giving the family something beautiful to come home to again.
The new open-concept kitchen and family room became the heart of the rebuilt home. A dramatic vaulted ceiling with dark-stained wood beams brings warmth and architectural definition to the light-filled space. The kitchen combines crisp white custom cabinetry, black accents, stainless-steel appliances, dark countertops, a generous contrasting island and contemporary pendant lighting. Large windows bring the surrounding Woodinville landscape into the home and fill the kitchen with natural light.
The adjoining family room continues the home's understated Northwest aesthetic. A beautifully detailed fireplace creates a natural focal point, while the vaulted ceiling and exposed beams give the room a sense of scale without sacrificing warmth. The open relationship between the kitchen and living spaces was designed for everyday family life as well as entertaining.
The bathrooms were given the same careful attention to craftsmanship and materials. Custom shaker-style cabinetry, stone countertops, patterned tile, soft gray finishes, oversized mirrors, black hardware and beautifully tiled tub and shower surrounds create spaces that feel sophisticated yet comfortable. Clean lines and a restrained palette give the bathrooms a quiet, spa-like quality that complements the rest of the home.
Throughout the rebuilding process, our goal went far beyond constructing a new house. Losing a home to fire is deeply personal, and rebuilding requires countless decisions at a time when homeowners are already navigating an extraordinarily difficult experience. Cutuli Homes worked closely with the family throughout the process, helping guide the construction and turn their ideas for a fresh beginning into a home that could once again feel like theirs.
The finished residence is not simply a replacement for what was lost. It represents a new chapter: a dated home transformed into a thoughtfully designed custom residence filled with light, craftsmanship and warmth.
From ashes came an opportunity to create something beautiful—and, we hope, a little joy after tragedy.
For more than 30 years, Cutuli Homes has built and remodeled custom homes throughout Woodinville, Seattle, the Eastside, King County, Snohomish County and the greater Puget Sound region, specializing in highly personalized residential construction, major renovations and custom craftsmanship
 Tile Doctor Ltd
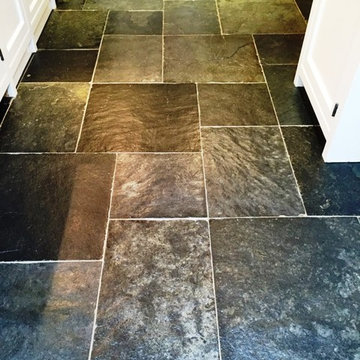
These photographs below are of a Slate Tiled Kitchen floor taken at a customer’s house in Henley-on-Thames which, as its name suggests, sits alongside the River Thames in Oxfordshire. My client’s Slate kitchen floor had recently been cleaned with unsuitable cleaning products which I suspect impacted the sealer leaving it looking dull. Sealers really to improve the look of a stone floor so unsurprisingly once the sealer had been damaged my client had been unable to find a cleaning product that could have any kind of positive effect on the tiles.
It’s fairly well known that many supermarket quality cleaners are only really designed for use on Ceramic or Porcelain tiled floors as they contain acids which strip away at sealers and acid sensitive stone floors, leaving the stone beneath vulnerable. So your select a cleaning product for your floor always read the small print on the back of the label and make sure you avoid anything that mentions not for use on acid sensitive stone; belter still Tile Doctor have a number of products for cleaning tiled floors including Neutral Cleaner and Stone Soap.
To clean the floor and remove any remaining sealer I first made a strong dilution of Tile Doctor Pro Clean which is a strong alkaline cleaner and then spread this over the floor, leaving it to dwell. This allows the cleaner to seep into the slate and get underneath, breakdown sealers and start to lift out ingrained dirt.
Following a dwelling period of roughly ten minutes, I agitated the floor periodically with a rotary machine fitted with a black scrubbing pad and scrubbed along the grout lines with a stiff grout brush. I then used a wet vacuum to extract the resultant slurry away and then followed up by rinsing the floor with clean water, and once again vacuumed up the residue.
Any stubborn areas were retreated until I was happy with the floor and then I left the floor to dry off completely overnight, in preparation for sealing the following day.
Upon my return to the house the following day, I ran some damp tests on different parts of the floor to check for any excess moisture which could potentially damage the performance of the sealer. Once I was satisfied that the floor was completely dry, I proceeded to seal the tiles using Tile Doctor Seal & Go. This will provide a robust surface seal for the future, along with an aesthetically pleasing low-sheen finish.
This sealer works particularly well on Slate tiles and, being a water-based sealant, additionally Seal & Go does not emit an unpleasant smell as it dries. Slate is quite a porous stone so I applied six coats of seal to provide long-lasting protection.
Barry Woodward
Oxfordshire Tile Doctor
 Stairworks
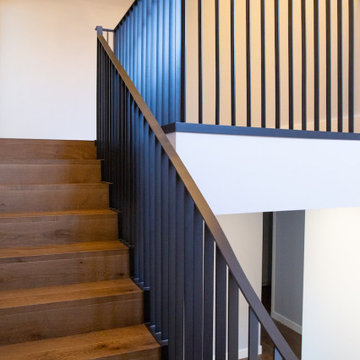
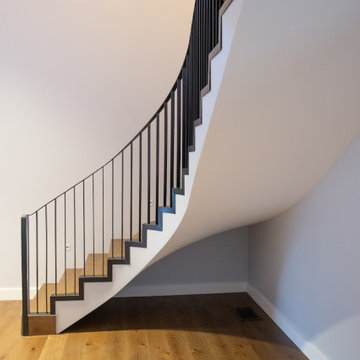
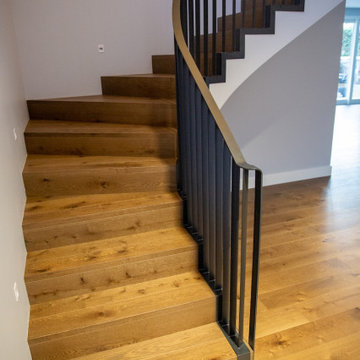
Martins Avenue is a beautiful, curved staircase made out of steel as the base material. Curved stairs are a challenge because you need to get the soffit (the underside of the staircase) curved and twisted around the base of the stairs to get the nice flowing lines. And because the timber work was outsourced to other builders, we had to work closely alongside them in order to get the soffit curved just right and ensure everything matched the flooring.
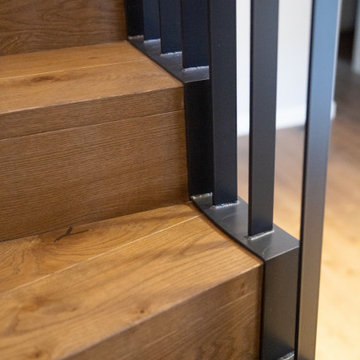
The other big challenge was that the curved balustrade needed to be an identical match to the staircase and have a nice, smooth, curved line. In order to achieve this, we built both the steel stairs and balustrade in the shop at the same time and match drilled the balustrade through. Therefore when we brought it to site we knew it would fit perfectly. The angle on the bottom of the balustrade was designed to cover the junction or zig zag angle between the steel and the timber.
Because of how this staircase had to be designed and built, it was extremely heavy and a challenging install. Additionally, as the walls of the site were all finished, we had to take all the necessary precautions to get the stairs installed without causing any damage or leaving any markings. Afterwards, the builders covered the underside with gib and closed risers to hide the cladding underneath.
There was absolutely no room for error with this staircase and we at Stairworks, the builders and the clients are all extremely happy with the end result!
 Stairworks
Martins Avenue is a beautiful, curved staircase made out of steel as the base material. Curved stairs are a challenge because you need to get the soffit (the underside of the staircase) curved and twisted around the base of the stairs to get the nice flowing lines. And because the timber work was outsourced to other builders, we had to work closely alongside them in order to get the soffit curved just right and ensure everything matched the flooring.
The other big challenge was that the curved balustrade needed to be an identical match to the staircase and have a nice, smooth, curved line. In order to achieve this, we built both the steel stairs and balustrade in the shop at the same time and match drilled the balustrade through. Therefore when we brought it to site we knew it would fit perfectly. The angle on the bottom of the balustrade was designed to cover the junction or zig zag angle between the steel and the timber.
Because of how this staircase had to be designed and built, it was extremely heavy and a challenging install. Additionally, as the walls of the site were all finished, we had to take all the necessary precautions to get the stairs installed without causing any damage or leaving any markings. Afterwards, the builders covered the underside with gib and closed risers to hide the cladding underneath.
There was absolutely no room for error with this staircase and we at Stairworks, the builders and the clients are all extremely happy with the end result!
 Stairworks
Martins Avenue is a beautiful, curved staircase made out of steel as the base material. Curved stairs are a challenge because you need to get the soffit (the underside of the staircase) curved and twisted around the base of the stairs to get the nice flowing lines. And because the timber work was outsourced to other builders, we had to work closely alongside them in order to get the soffit curved just right and ensure everything matched the flooring.
The other big challenge was that the curved balustrade needed to be an identical match to the staircase and have a nice, smooth, curved line. In order to achieve this, we built both the steel stairs and balustrade in the shop at the same time and match drilled the balustrade through. Therefore when we brought it to site we knew it would fit perfectly. The angle on the bottom of the balustrade was designed to cover the junction or zig zag angle between the steel and the timber.
Because of how this staircase had to be designed and built, it was extremely heavy and a challenging install. Additionally, as the walls of the site were all finished, we had to take all the necessary precautions to get the stairs installed without causing any damage or leaving any markings. Afterwards, the builders covered the underside with gib and closed risers to hide the cladding underneath.
There was absolutely no room for error with this staircase and we at Stairworks, the builders and the clients are all extremely happy with the end result!
 Stairworks
Martins Avenue is a beautiful, curved staircase made out of steel as the base material. Curved stairs are a challenge because you need to get the soffit (the underside of the staircase) curved and twisted around the base of the stairs to get the nice flowing lines. And because the timber work was outsourced to other builders, we had to work closely alongside them in order to get the soffit curved just right and ensure everything matched the flooring.
The other big challenge was that the curved balustrade needed to be an identical match to the staircase and have a nice, smooth, curved line. In order to achieve this, we built both the steel stairs and balustrade in the shop at the same time and match drilled the balustrade through. Therefore when we brought it to site we knew it would fit perfectly. The angle on the bottom of the balustrade was designed to cover the junction or zig zag angle between the steel and the timber.
Because of how this staircase had to be designed and built, it was extremely heavy and a challenging install. Additionally, as the walls of the site were all finished, we had to take all the necessary precautions to get the stairs installed without causing any damage or leaving any markings. Afterwards, the builders covered the underside with gib and closed risers to hide the cladding underneath.
There was absolutely no room for error with this staircase and we at Stairworks, the builders and the clients are all extremely happy with the end result!
 Stairworks
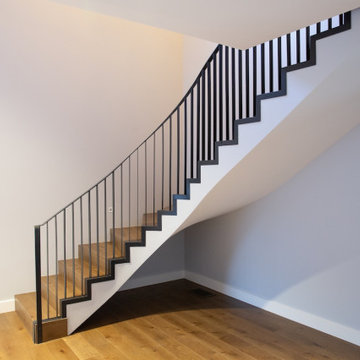
Martins Avenue is a beautiful, curved staircase made out of steel as the base material. Curved stairs are a challenge because you need to get the soffit (the underside of the staircase) curved and twisted around the base of the stairs to get the nice flowing lines. And because the timber work was outsourced to other builders, we had to work closely alongside them in order to get the soffit curved just right and ensure everything matched the flooring.
The other big challenge was that the curved balustrade needed to be an identical match to the staircase and have a nice, smooth, curved line. In order to achieve this, we built both the steel stairs and balustrade in the shop at the same time and match drilled the balustrade through. Therefore when we brought it to site we knew it would fit perfectly. The angle on the bottom of the balustrade was designed to cover the junction or zig zag angle between the steel and the timber.
Because of how this staircase had to be designed and built, it was extremely heavy and a challenging install. Additionally, as the walls of the site were all finished, we had to take all the necessary precautions to get the stairs installed without causing any damage or leaving any markings. Afterwards, the builders covered the underside with gib and closed risers to hide the cladding underneath.
There was absolutely no room for error with this staircase and we at Stairworks, the builders and the clients are all extremely happy with the end result!
 Stairworks
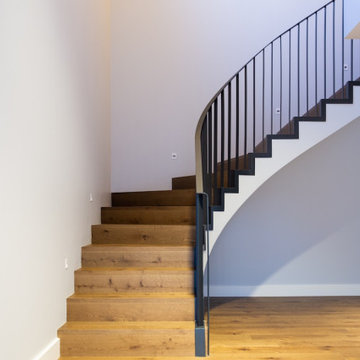
Martins Avenue is a beautiful, curved staircase made out of steel as the base material. Curved stairs are a challenge because you need to get the soffit (the underside of the staircase) curved and twisted around the base of the stairs to get the nice flowing lines. And because the timber work was outsourced to other builders, we had to work closely alongside them in order to get the soffit curved just right and ensure everything matched the flooring.
The other big challenge was that the curved balustrade needed to be an identical match to the staircase and have a nice, smooth, curved line. In order to achieve this, we built both the steel stairs and balustrade in the shop at the same time and match drilled the balustrade through. Therefore when we brought it to site we knew it would fit perfectly. The angle on the bottom of the balustrade was designed to cover the junction or zig zag angle between the steel and the timber.
Because of how this staircase had to be designed and built, it was extremely heavy and a challenging install. Additionally, as the walls of the site were all finished, we had to take all the necessary precautions to get the stairs installed without causing any damage or leaving any markings. Afterwards, the builders covered the underside with gib and closed risers to hide the cladding underneath.
There was absolutely no room for error with this staircase and we at Stairworks, the builders and the clients are all extremely happy with the end result!
 Stairworks
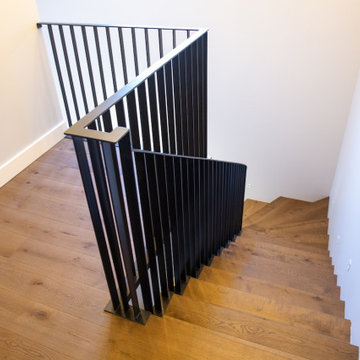
Martins Avenue is a beautiful, curved staircase made out of steel as the base material. Curved stairs are a challenge because you need to get the soffit (the underside of the staircase) curved and twisted around the base of the stairs to get the nice flowing lines. And because the timber work was outsourced to other builders, we had to work closely alongside them in order to get the soffit curved just right and ensure everything matched the flooring.
The other big challenge was that the curved balustrade needed to be an identical match to the staircase and have a nice, smooth, curved line. In order to achieve this, we built both the steel stairs and balustrade in the shop at the same time and match drilled the balustrade through. Therefore when we brought it to site we knew it would fit perfectly. The angle on the bottom of the balustrade was designed to cover the junction or zig zag angle between the steel and the timber.
Because of how this staircase had to be designed and built, it was extremely heavy and a challenging install. Additionally, as the walls of the site were all finished, we had to take all the necessary precautions to get the stairs installed without causing any damage or leaving any markings. Afterwards, the builders covered the underside with gib and closed risers to hide the cladding underneath.
There was absolutely no room for error with this staircase and we at Stairworks, the builders and the clients are all extremely happy with the end result!
1