
Search results for "Deep cleaning" in Home Design Ideas


Find the right local pro for your project

 Tile Doctor Ltd
We received a request to renovate Victorian tiled hallway floor at a house in the London borough of Harlesden NW10. My client had modernised the heating system and this unfortunately required a section of the tiled flooring to be dug up so new pipework could be laid.
After speaking on the phone, I arranged an initial visit to the property so I could properly assess the work required and provide a price for restoring the floor. During my visit I could see there was another section of missing tiles at one of the door thresholds which would need attention. Except for the missing sections of floor I could see that the tiles themselves were in good condition for their age and would respond well to a deep clean and fresh seal.
I was confident on being able to source matching replacements for the missing tiles and reassured my client that we would be able not only repair the floor but also renovate it to a good standard. I gave them a price to do the restoration which they were happy to accept, and the work was booked.
After some research I managed to source replacement tiles from the Vintage Floor Tile Company in Kent; Victorian tiles are still popular so there a few companies that keep stock so we can usually find a match.
With the replacements in hand, work started by removing the cement and loose material from the missing sections of flooring and backfilling with self-levelling compound to bring the exposed base up to the right level for tiling.
The tiles were then cut to shape as required to match the existing patten and fixed into place with a quick setting adhesive and then grouted.
The floor was left to overnight to allow the adhesive to harden fully, and I returned the next day to deep clean the whole floor. To give the tiles are deep clean a strong dilution of Tile Doctor Remove and Go was sprayed onto the floor and left to soak in for ten minutes. It was then scrubbed into the floor using a rotary machine fitted with a with a black pad. This action lifted the dirt out of the tiles and the resulting slurry was removed with the wet vacuum.
It turned out that the pores of the tiles were holding a lot of dirt, so the process was repeated until I was satisfied. Due to the age of the property, there was no damp-proof membrane installed so I do try to minimise the amount of water I use in this process as there is always a chance of exacerbating any latent efflorescence issues.
Efflorescence occurs where moisture rises through the tile bringing with it salts from underneath the floor as it evaporates on the surface. This can lead to unsightly white marks appearing on the tile. To counteract this potential problem the cleaning was followed by an acid wash using Tile Doctor Acid Gel applied with a 100 then 200-grit pad, before finishing on a 400-grit burnishing pad. The floor was again rinsed with water after the application of each pad to remove the slurry and extracted with a wet vacuum.
Once I was satisfied the floor was as clean as possible, we left site and the area was left to dry over the weekend ready for application of a new sealer.
I returned on the Monday and started by taking a few moisture readings to check the floor was dry. The floor was in an acceptable range, so I applied the first of 4 coats of sealer. For this floor I chose Tile Doctor Seal and Go Extra which is specially formulated product that provides stain resistance with a hard wearing low-sheen finish.
This product is also breathable which is an important feature for old floors, anything that blocks moisture from rising through the tile will cause it to become trapped underneath where it will pool and eventually reach out to the walls and result in rising damp.
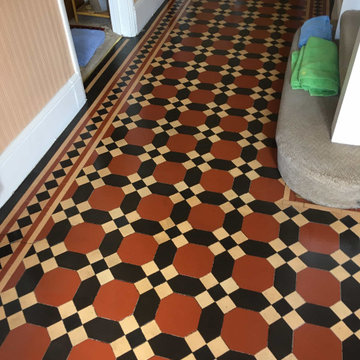
Once complete the floor looked brand new and I’m pleased to say with the deep clean and a fresh sealer applied it was impossible to tell the difference between the original and repaired sections of flooring.
For the aftercare of sealed Victorian tiled floors, I recommend Tile Doctor Neutral Cleaner, it’s a mild day to day cleaner with a neutral pH that won’t damage the sealer. Many of the tile cleaning products you find in supermarkets are simply too strong.
Andrew Newstead
North London Tile Doctor

Sponsored
Columbus, OH

Hope Restoration & General Contracting
Columbus Design-Build, Kitchen & Bath Remodeling, Historic Renovations


 Tile Doctor Ltd
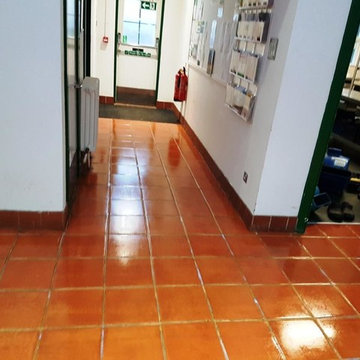
A local cleaning contractor called us in to work on the Terracotta tiled floors at a council building in Amersham. The Terracotta had not been deep cleaned and resealed for about ten years and the sealer had worn off leaving the tile vulnerable to dirt becoming ingrained in the pores of the tile. The grout had also suffered the same fate and had almost gone black in many areas.
This is a common problem with Terracotta which is quite porous and once those pores become ingrained with dirt the tile becomes difficult to clean effectively. The solution is to seal the tile however sealers wear off over time and this was basically the problem.
After discussing the issues we agreed on a plan of action to deep clean the Terracotta tile and grout and then re-seal to protect it. Due to the busy nature of the building we agreed to do the work between Christmas and New Year when we knew the building would be empty.
We started by applying a strong dilution of Tile Doctor Oxy-Gel which is a strong tile cleaning product that being in a gel form ensures it sits on the tile for longer, giving it a longer effective dwell time so it can really eat into and loose the dirt. After approximately twenty minutes the gel was scrubbed into the tile with a black scrubbing pad fitted to a rotary machine. This broke down most of the dirt and removed any remaining sealer. Once the whole floor had been treated in this manner it was rinsed thoroughly with water which was then extracted using a wet vacuum.
With the soiled cleaning solution removed I could see the next step would be to spot clean stubborn staining and clean the grout. For this task I used a strong dilution of Tile Doctor Pro-Clean scrubbing it in by hand using stiff brushes and aided with a hand-held steamer to help treat the stubborn staining. Once done the floor was given a final rinse and then as much moisture as possible removed with the wet vacuum.
We then left the floor to dry off completely and came back a couple of days later to seal the Terracotta tile.
I mentioned earlier that Terracotta is porous; in fact it’s probably the most porous material I deal with, so to fully seal the floor I had to apply eight coats of Tile Doctor Seal and Go which will provide complete and long lasting protection against staining and dirt. Seal and Go also adds an appealing satin sheen to the tile and the new seal will make it much easier to clean in future.
The floor tile and grout now look much healthier and I’m sure the council will be very impressed when they go back to work after the holidays.
Happy New Year…
Andrew Newstead
North Buckinghamshire Tile Doctor

Sponsored
Columbus, OH

Wannemacher Interiors
Customized Award-Winning Interior Design Solutions in Franklin Cnty OH
 Tile Doctor Ltd
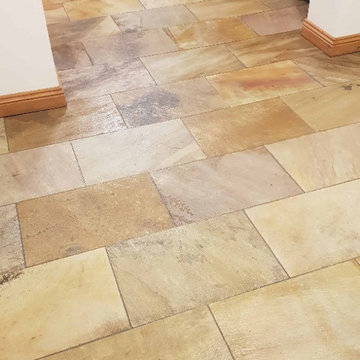
The photos on this page are of a Sandstone Kitchen floor at a house in the High Green suburb of Sheffield. The Sandstone tiles looked grubby and needed some love and attention. Our client was getting fed up trying to keep the stone clean, particularly around the kitchen area where cleaning didn’t seem to make much. You can see how dirty it had become on the before picture below, this is stark contrast to the middle of the of the kitchen where the portable kitchen island normally sits.
I went to the property to get a better look at the problem floor and carried out a small test clean to see which products and methods would have the best impact. The patch came up really clean without much difficulty, so I was confident on being able to restore its appearance.
It was clear to me the original protective sealer had worn off and dirt had become ingrained in the pores of the stone where it was proving difficult to remove. My client was very encouraged by the test clean initial result and agreed to go ahead with the quote. We arranged a suitable time to carry out the work on a day when the family would be out of the way.
I started by taping up the area to make sure the skirting and woodwork were protected from splashing. Once done a strong dilution of Tile Doctor Pro-Clean was sprayed onto Sandstone tile and grout. It was left to dwell for approximately ten minutes to help break down all the grime and dirt and was then worked into the stone using a rotary floor machine fitted with a stiff bristled brush.
This method totally transformed the dull sandstone, the stunning sandstone colours started to leap out and I could see the stone was well on its way to being transformed. The floor was then rinsed several times with water and the now soiled cleaning solution carefully removed with an industrial wet vacuum.
With the floor clean I inspected all the tiles and repeated the process until I was happy the floor was total clean. I should mention It’s not always this easy to clean a stone floor and quite often I find myself having to utilise all sorts of products and methods before I’m totally satisfied it’s as clean as it could possibly be.
With the cleaning done I left the floor to dry out overnight aided with heaters and air blowers.
I returned to seal the floor the next day checking first that the stone was dry with a damp meter. Leaving the blowers on overnight had helped and the readings I took from the floor confirmed it was now ready for sealing.
Earlier I had discussed the different types of sealer available with my clients and they had chosen to have the floor sealed with Tile Doctor Seal & Go. This works really well on Sandstone, enhancing its appearance, improving colour and of course adding protection to the stone to prevent grime and dirt stuck in the pores of the stone. Several coats were applied until I could see if was fully sealed and the right level of finish had been achieved. Sealing a floor can take some time as you need to allow each coat to dry before applying the next.
Once done the floor looked meticulously clean and the new sealer had added a lovely subtle sheen to the stone. My client was very please with the transformation and left the following feedback.
‘Very professional approach, friendly, and offered great advice throughout the job. Very pleased with the finish Cheers Matt we will see you again’
One of the problems we find with many homeowners is that for cleaning they use strong bleach-based cleaning product on their sealed tiles, and this actually strips off the sealer leaving the stone vulnerable to ingrained dirt. As a result, Tile Doctor has developed Tile Doctor Neutral Tile Cleaner, it is pH neutral and gentle enough for everyday use without affecting the sealer.
Matthew Lovett
South Yorkshire Tile Doctor

 Upkeep Cleaning Services
We provide Deep Apartment cleaning services in deira. Book Part time Maids now to get flexible timing to provide our services in your location Upkeep
Home office photo in Other
Home office photo in Other




 Tile Doctor Ltd
This Victorian floor in Twickenham, Middlesex was in good physical condition for its age but needed a good deep clean. Our customer had informed us that they had never cleaned or sealed the floor in the sixteen years that they had lived there so it was well overdue.
I went over to survey the floor and completed a test clean on a small section of tiling to see which products/techniques would work best. I like to do this as it demonstrates to the client what can be done, and it allows me to come up with an accurate price for doing the work.
As you can see from the pictures, there was quite a difference in the test patch compared to the rest of the floor. Years of foot traffic from the street had taken its’ toll and the floor was very dirty. Luckily, the floor was in very good condition and had not worn too badly.
Once they had seen the test patch, they were confident that it would be worth go ahead with my quote. It would ensure that the period feature was retained for many years to come. The colours on the floor were quite faded so it would be nice to get it restored.
I started the cleaning process by first taping up the surrounding skirting boards and doors to ensure they were protected from potential splashing. Cleaning involved spraying the Victorian tiles with a strong dilution of Tile Doctor Pro-Clean which is a dedicated Tile and Grout cleaning product. This was left to soak in for about ten minutes and then scrubbed in using a black pad fitted to a heavy-duty rotary scrubber.
This gives the floor a good mechanical scrub and works wonders releasing the ground-in dirt and soil from the tiles. The strong dilution of Pro-Clean will also remove any remaining sealers from the tile, however after sixteen years I doubted there would much trace of sealer left. Once done the floor was rinsed with water and all the soils removed with a wet vacuum.
Following the initial clean the colours were already much stronger. Next step however was to improve on that by giving the floor an acid rinse using Tile Doctor Grout Clean-Up. This removes mineral deposits and generally brightens up the appearance of the tile. After another round of scrubbing the floor was rinsed with our high-pressure washer and then vacuumed, extracting all of the dirty water and dirt away in one go. The floor was looking a lot better and was left to dry overnight.
After allowing the floor to dry overnight, we returned the next day to seal the floor. First, checking the floor was dry using the damp meter. Floors of this age can take a little longer to dry as there is no damp-proof membrane so it’s always worth checking as applying a sealer to damp tiles is not a good idea.
Once I was satisfied it was dry eight coats of Tile Doctor Seal and Go sheen finish sealer were applied. This takes a while to do as each coat needs to dry before applying the next. The sealer will protect the Victorian tiles for dirt and stains, it also enhanced the colours in the tile and will make it easier to keep the floor clean going forward.
My client was very pleased with the floor and mentioned that they should have called me in sooner! For aftercare cleaning I recommended Tile Doctor Neutral Clean which is an effective cleaner with a neutral pH, its designed for cleaning tiles without degrading the sealer.
Jonathan Oldham
South Middlesex Tile Doctor


8