
Search results for "Difficulties" in Home Design Ideas
 Kitchen & Bath Masters
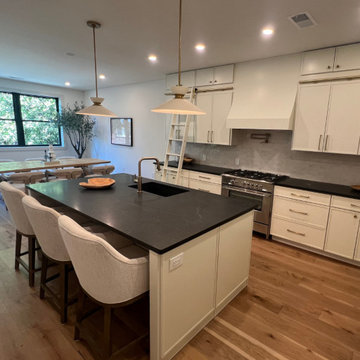
Our investor client, Summit Homes, reached out to us for their renovation project located on C Street in Washington, DC. The scope included a full kitchen installation, custom vanities for the bathrooms, and a custom-built closet for the primary bedroom.
For the kitchen, we designed and installed elegant double-stacked upper cabinets to take full advantage of the vertical space. However, recognizing that the future homeowner might have difficulty reaching the uppermost cabinets, Summit requested a functional solution. We added a custom ladder system that attaches directly to the cabinetry—making upper cabinet access easier while enhancing the kitchen’s overall visual appeal.
The kitchen was also fitted with panel-ready appliances, for which we fabricated matching cabinet panels to ensure a seamless, built-in look. To elevate the design further, we installed natural granite countertops, which bring both durability and timeless beauty to the space. The granite’s organic texture adds warmth and character, perfectly complementing the deep cabinetry and refined finishes.
In the bathrooms, we installed carefully selected modern vanities and coordinated them with granite countertops that match the home’s overall aesthetic. These choices not only enhance the look and feel of the bathrooms but also provide durable, long-lasting surfaces for daily use.
Upstairs, the designated closet area in the primary bedroom was transformed into a fully custom-built closet system designed to optimize functionality and storage. We finished the piece with matte black hardware, giving the space a clean, modern edge.
From kitchen to closet, this project reflects our focus on combining thoughtful design with practical elegance—tailored to meet the needs of both investors and future homeowners.
 Kari P
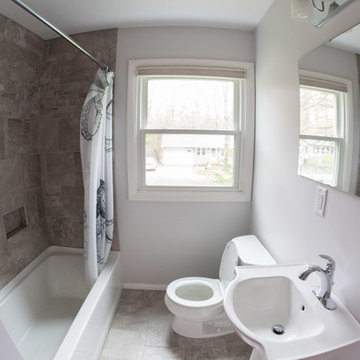
When I bought my house in May 2014, there was one thing I really didn’t like about it – the 1950s bathroom complete with pink tile and mismatched gaudy fixtures was absolutely hideous. I knew redoing the bathroom would be a big, expensive project, so I vowed to just live with it while I fixed up parts of the house that were easier to update, such as putting a fresh coat of paint on the walls and updating the curtains (which I still haven’t done, by the way). Well my first winter in the new house turned out to be a bad one, and in February 2015, I noticed water stains on the walls and ceiling of the second bedroom that only got worse and worse each day. The water damage quickly spread to other rooms, and when contractors came to the house to access and fix the damage, they discovered moisture behind the pink tiled walls of my bathroom. And so started the bathroom remodel.
Start to finish, this project took close to six months, due to going back and forth with insurance and difficulty finding a contractor I liked. I lived without a shower for at least four of those months, showering at the gym where I worked or in a pop-up tent in my backyard once it was warm enough out. My friend Eric and I demoed the bathroom and for the remodel, I picked out all of the design components and had a local contractor, Fred Haas do the work. I kept the original layout – as my bathroom was small to begin with and it was both impractical and expensive to start moving things around – but just about everything else about the bathroom is new, except for maybe the window and door. New tub, sink, and toilet, new tile floor and shower surround, new walls and ceiling, fresh paint, new fixtures and mirror, updated lighting, and a better ventilation system were all added.
Tub – Sterling Vikrell
Toilet – Kohler Wellworth® two-piece round-front dual-flush toilet
Sink – Kohler Veer™ 21" pedestal bathroom sink
Fixtures – Kohler Alteo® line
Tile floor and shower surround – American Olean Laurel Heights ceramic tile in Summit Gray
Lighting – I don't remember... will have to see if I can find it
Ventilation system – NuTone
Mirror – Ikea
Paint – Behr
Shower Curtain – eBay
Here are photos of my project from start to finish. As you can see, I probably still need a thing or two (a toilet paper holder, mini storage shelf, and some art wouldn’t hurt, nor would replacing the door or painting it white), but overall I’m really happy with how my new bathroom came out. I LOVE it, which is the exact opposite of how I felt about the original bathroom.
Photos © Kari Post
 RAJ Kitchen and Bath, LLC
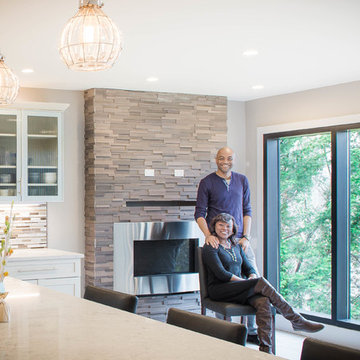
There were a few difficulties in making this kitchen any better than how it was. There was a separate staircase that had access to the second floor which was located in the kitchen. This left just enough room to push the dining room to one side. Then, there was the porch. A really nice panoramic view of the back, but was somehow under-used by the family during the summer months. Then, it was the size of the kitchen. It simply was way too small for a growing family, and while it had a peninsular in place, the flow just didn’t work. I remember watching them one day demonstrating how awkward it was using the kitchen. We got it! We had our marching orders to go and figure out how to make this kitchen work for this family.
Everything in the room was fair play. The design was done to make the kitchen very open. For a few ideas, we incorporated the porch in the kitchen by using the nana wall idea but it ended up being too cost prohibitive to do so. We then decided to do a permanent fix by using a commercial glass wall application. Once we figured that out, we moved back inside and removed the staircase. This gave us two added benefits. One allowed us to really reconfigure the kitchen and the other opened up the second floor for a huge built in closet system.
We relocated the windows, added a fire place with a built In TV above. From there, it was onto the kitchen itself which contained a huge Island with seating, large kitchen sink and built in appliances which was set up in a way to take advantage of the new layout. We re-positioned the kitchen facing the beautiful views outside rather than looking towards a wall. Now, when you enter the house up the entry stairs, the kitchen now draws you into the magnificent new open space. This is now setup for entertaining, relaxation, hanging out and most of all, preparing meals in a room where you only have to leave if you want to.
This one was all about the design. Design was what made this space. Setting this space up for success was crucial, and this kitchen is a great example of how design can cover a multitude of sins in Kitchen designs.
… Just close your eyes for a second and imagine waking up one winter morning and having a cup of coffee and watching the snow fall through those huge windows, leaning up against those 3D feature walls while watching the kids sitting around the table enjoying those warm radiant heated floors in this spacious kitchen…..
Find the right local pro for your project

 Michael Nash Design, Build & Homes
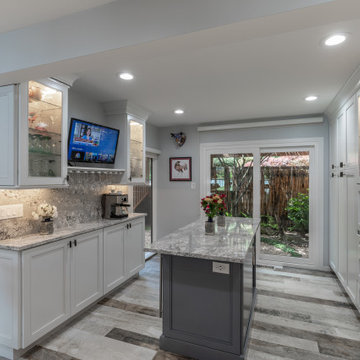
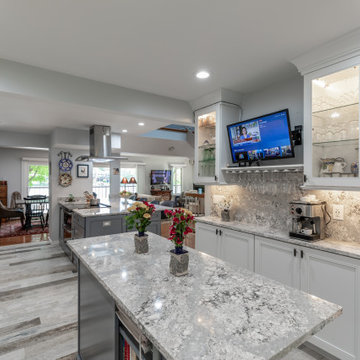
This townhome located on Lake Anna of Reston, VA own into a confined gall kitchen with a very limited cabinet space, short wall cabinets, big closet taking over big portion of kitchen, duct chase creating a big barrier, plumbing chases causing bulkhead and a bearing wall header to name a few of obstacles
Their dream was to walk in from front door and have a clear view of wall to wall scenic view of the lake.
Modernize the kitchen, eliminate bearing walls, lots of storage, upgraded appliances and so much more.
They have been chasing this dream for years and have been turned down by multiple firms due to level of difficulty of the project, budget constraint and as she put it “cleeking with a design firm that can feel her needs”
Our staff spent countless number of hours to hear her and bring her dream to reality.
The main constraint was the bearing wall on corner of foyer and living room, which was a closet, main duct chase and return ducts, obscene amount of plumbing and not to mention structural load.
By the way of re-routing mechanical chases, and reformulating all second-floor plumbing stack to back walls, and then inserting few structural beams that transfer the second-floor joists to front and back wall, we have accomplished the biggest goals of all and created the view open floor plan
Now home to a big island with cooktop and beverage center. The home has front to back clear view of the scenic lake.
¬¬¬With expanding the kitchen into front breakfast area, we have doubled up on storage and cabinet space.
Long line of gorgeous counter top and full backsplash under new Led lighting has glorified this kitchen project.
The linear porcelain floor tile has complimented the counter top and her trophy accessories.
 Robinson's Interiors
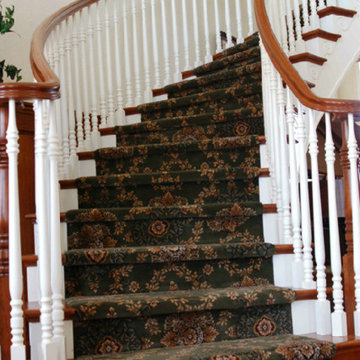
Curved stairs carpet are difficult because the size of each stair changes as it “pies” around curves. Patterned carpeting adds to the project’s difficulty.
Photo: John Coakley
 WineRacks
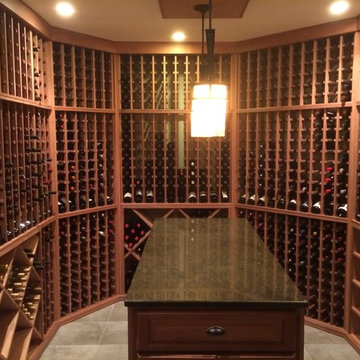
A look at a custom mahogany cellar we built for a customer in Connecticut. His response:
"I found the experience of working with Wineracks.com and Mark Karpinski to be outstanding. As you can see from the photos, my wine cellar was far from standard. There are multiple unusual angles, a center island, and unusually tall ceilings.
Rather than finding these a difficulty, Mark and Wineracks.com became passionate about the space and worked diligently with me to help me get the design I envisioned and made it a reality. At times it felt that Mark was more excited about getting the project done "just right" than I was!
The measurements and layout were nearly perfect, despite the challenges of the space. In addition, Mark was in constant contact throughout the project happily offering tips and advice as we worked through the installation.
Without hesitation, I would give Wineracks.com and Mark Karpinski my highest recommendation.
 Granit Architects + Interiors
The brief:
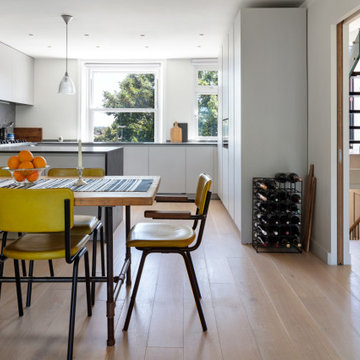
Our clients own an apartment in a mansion block overlooking Clapham Common. They wanted to modernise and bring the apartment up to date and had a few goals:
To change the existing small cellular spaces in the apartment to create a new open-plan room
To extend into the loft and create a new master bedroom suite
To create a roof terrace for some much-needed private outdoor space
The key to the brief was to ensure a good connection between the different levels of the apartment and ensure natural light could flood into all spaces. The apartment is in a conservation area, which was an important consideration.
The solution:
We changed the primary room space to run from the front to the back of the building. This change created the large kitchen dining living space our clients wanted, an area with good natural light throughout and at all times of the day.
We created a master bedroom suite in the loft space, with generous room size and lots of natural light.
The limitations of the building’s form meant that a critical aspect to creating these larger living spaces was carefully considered smaller areas, including the bathrooms and a pocket utility room. The circulation space was carefully considered, too, with the landings used for storage in the form of new joinery.
The stairs were vital in the design. Creating an in-between/half level meant we made the most of the flat roof extension for a bedroom suite and terrace. It also helped natural light get into the centre of the apartment, creating a clear connection between the different floors.
The stairs also help to mark the difference between the existing and the new. We shifted the design from a minimalist take on traditional metal balustraded stairs to open tread steel stairs with a glazed balustrade.
Externally, we kept the design quite simple and in keeping with the context. By adding dormers to the front and back, we created a sculptural and fun loft space.
The result:
A spacious, light and luxurious apartment for our clients Gareth and Mary in a Clapham Common Conservation area.
We asked about their experience with Granit, and we are pleased with their response:
Our experience overall is very good, even with the unexpected difficulties created by Covid.
If you are thinking of appointing an architect and interior design firm, Granit should be seriously considered.
 Kari P
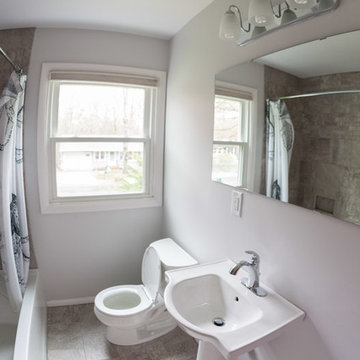
When I bought my house in May 2014, there was one thing I really didn’t like about it – the 1950s bathroom complete with pink tile and mismatched gaudy fixtures was absolutely hideous. I knew redoing the bathroom would be a big, expensive project, so I vowed to just live with it while I fixed up parts of the house that were easier to update, such as putting a fresh coat of paint on the walls and updating the curtains (which I still haven’t done, by the way). Well my first winter in the new house turned out to be a bad one, and in February 2015, I noticed water stains on the walls and ceiling of the second bedroom that only got worse and worse each day. The water damage quickly spread to other rooms, and when contractors came to the house to access and fix the damage, they discovered moisture behind the pink tiled walls of my bathroom. And so started the bathroom remodel.
Start to finish, this project took close to six months, due to going back and forth with insurance and difficulty finding a contractor I liked. I lived without a shower for at least four of those months, showering at the gym where I worked or in a pop-up tent in my backyard once it was warm enough out. My friend Eric and I demoed the bathroom and for the remodel, I picked out all of the design components and had a local contractor, Fred Haas do the work. I kept the original layout – as my bathroom was small to begin with and it was both impractical and expensive to start moving things around – but just about everything else about the bathroom is new, except for maybe the window and door. New tub, sink, and toilet, new tile floor and shower surround, new walls and ceiling, fresh paint, new fixtures and mirror, updated lighting, and a better ventilation system were all added.
Tub – Sterling Vikrell
Toilet – Kohler Wellworth® two-piece round-front dual-flush toilet
Sink – Kohler Veer™ 21" pedestal bathroom sink
Fixtures – Kohler Alteo® line
Tile floor and shower surround – American Olean Laurel Heights ceramic tile in Summit Gray
Lighting – I don't remember... will have to see if I can find it
Ventilation system – NuTone
Mirror – Ikea
Paint – Behr
Shower Curtain – eBay
Here are photos of my project from start to finish. As you can see, I probably still need a thing or two (a toilet paper holder, mini storage shelf, and some art wouldn’t hurt, nor would replacing the door or painting it white), but overall I’m really happy with how my new bathroom came out. I LOVE it, which is the exact opposite of how I felt about the original bathroom.
Photos © Kari Post
 Pacific Garden Design
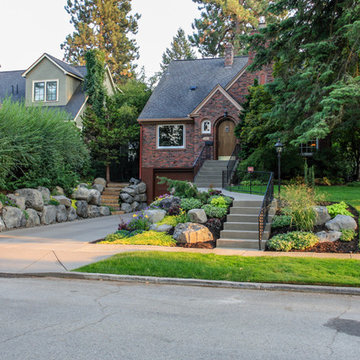
With a narrow driveway and leaning concrete retaining walls, parking was a major challenge at this 1938 brick Tudor on Spokane's South Hill. Crumbling concrete stairs added another layer of difficulty, and after a particularly rough winter, the homeowners were ready for a change. The failing concrete walls were replaced with stacked boulders, which created space for a new, wider driveway. Natural stone steps offer access to the backyard, while the new front stairs and sidewalk provide a safe route to the front door. The original iron railings were preserved and modified to be reused with the new stairs.
 RFK Kitchens
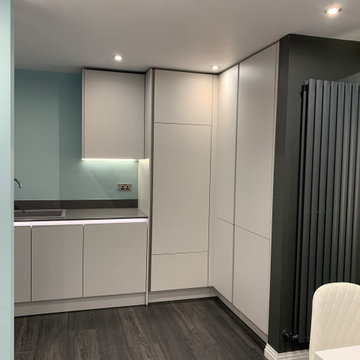
All the way through the design, planning and installation, we felt very comfortable with the team at RFK, especially with the added challenges and difficulties caused by the pandemic. The final result is we now have a fantastic and stunning new kitchen that is exactly what we imagined and hoped.
MALCOM & MICHELE
 Staged to Sell or Dwell
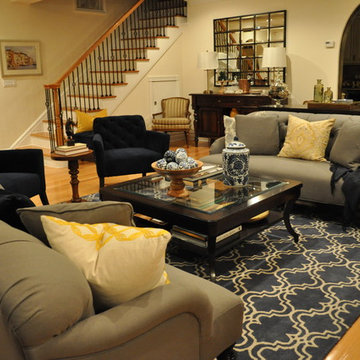
Living Room - Client contacted Staged to Sell or Dwell to redesign a living room. With such a large space, the client had difficulty with scale and quantity of furniture, making the room appear empty.
 Michael Nash Design, Build & Homes
This townhome located on Lake Anna of Reston, VA own into a confined gall kitchen with a very limited cabinet space, short wall cabinets, big closet taking over big portion of kitchen, duct chase creating a big barrier, plumbing chases causing bulkhead and a bearing wall header to name a few of obstacles
Their dream was to walk in from front door and have a clear view of wall to wall scenic view of the lake.
Modernize the kitchen, eliminate bearing walls, lots of storage, upgraded appliances and so much more.
They have been chasing this dream for years and have been turned down by multiple firms due to level of difficulty of the project, budget constraint and as she put it “cleeking with a design firm that can feel her needs”
Our staff spent countless number of hours to hear her and bring her dream to reality.
The main constraint was the bearing wall on corner of foyer and living room, which was a closet, main duct chase and return ducts, obscene amount of plumbing and not to mention structural load.
By the way of re-routing mechanical chases, and reformulating all second-floor plumbing stack to back walls, and then inserting few structural beams that transfer the second-floor joists to front and back wall, we have accomplished the biggest goals of all and created the view open floor plan
Now home to a big island with cooktop and beverage center. The home has front to back clear view of the scenic lake.
¬¬¬With expanding the kitchen into front breakfast area, we have doubled up on storage and cabinet space.
Long line of gorgeous counter top and full backsplash under new Led lighting has glorified this kitchen project.
The linear porcelain floor tile has complimented the counter top and her trophy accessories.
 Pacific Garden Design
With a narrow driveway and leaning concrete retaining walls, parking was a major challenge at this 1938 brick Tudor on Spokane's South Hill. Crumbling concrete stairs added another layer of difficulty, and after a particularly rough winter, the homeowners were ready for a change. The failing concrete walls were replaced with stacked boulders, which created space for a new, wider driveway. Natural stone steps offer access to the backyard, while the new front stairs and sidewalk provide a safe route to the front door. The original iron railings were preserved and modified to be reused with the new stairs.
 Frankel Design Build
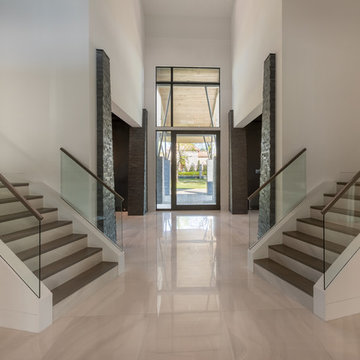
This project, sitting on a little more than 3.5 acres on Rivercrest was completed in 3 years with a total square footage of more than 26,000 square feet.
Typically modern homes are smaller. At a certain size, usually around 4,000 square feet, the difficulty with modern or contemporary architecture becomes scale, and the minimalist idea gets lost. Whenever you get to this scale of house at over 26,000 square feet, this problem adds a layer of complexity.
Connie Anderson Photography
 otile
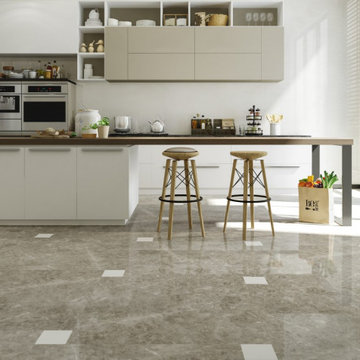
otileyou could choose ceramic tiles for the flooring o the kitchen, that's certainly an exquisite idea. Kitchen flooring is victim of spills every day, which means that the kitchen floor's floor ought to be wiped clean every day. Then again, ceramic tiles have a tendency to be wiped clean without difficulty, and they're a notable option for kitchen flooring. The ceramic tiles do not absorb microorganism and smell, that's critical for the kitchen. Ceramic tiles are also excellent due to their water-resistant nature and are a crucial element for kitchen floors. What are ceramic tiles made up of? Ceramic tiles are defined to be made from clay, and they're also recognized to be very sincere and can be set up easily as kitchen flooring. It must be referred to that every one of the tile must be set up properly over the sub tiles if you choose a higher result at the stop. The subfloor must be very smooth and flat so that while you install the ceramic tiles within the kitchen, you must make certain that every one of the edges are instantly and make the technique of grouting, however, less difficult and quicker. The ceramic kitchen tiles in addition to the porcelain tiles
ceramic tiles and porcelain tiles do have a difference between them, however, the difference is very moderate. The porcelain can soak up water, and the ceramic tiles can take in more water in amount compared to the porcelain. It ought to be brought that the porcelain wood pattern tiles have sand in them, and it's far brought to the clay mixture easily. Those all were made essentially below stress and warmth to produce a robust, tough, and even dense tile with a view to be porous in comparison to the ceramic tiles present. It must be stated that the porcelain timber tiles are suitable for getting used inside the kitchens and bathrooms, and you may even use them exterior as nicely. The unique nature which could stand and tolerate the weather conditions and climate is remarkable. Ceramic tiles and natural stones like marble and slate are extremely good for the kitchen floors as they are very long-lasting and strong. The porcelain is likewise considered to be from the tile family, and as we understand, tiles are an excellent option with regards to kitchen and toilet floorings. What are the advantages of ceramic tiles for kitchen flooring? Ceramic tiles have multiple benefits, and consequently, it's miles considered to be perfect for the kitchen floorings including:
it's miles incredible information that the ceramic kitchen flooring does now not have a tendency to burn. The ceramic tiles can't be charged electrically and purpose no friction. The tiles for the kitchen floors do no longer have any health hazards and are subsequently very safe for people. In the end, it should be said that the ceramic kitchen tiles are very long-lasting and lengthy-lasting. After all those huge benefits and blessings of the ceramic tile kitchens, nevertheless, you are unsure about what to select for the kitchen floor?
 Frankel Design Build
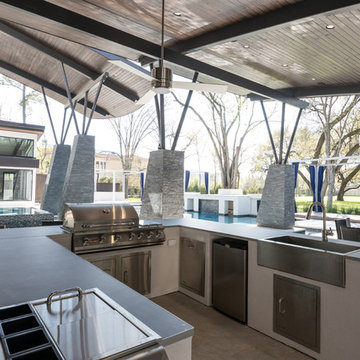
This project, sitting on a little more than 3.5 acres on Rivercrest was completed in 3 years with a total square footage of more than 26,000 square feet.
Typically modern homes are smaller. At a certain size, usually around 4,000 square feet, the difficulty with modern or contemporary architecture becomes scale, and the minimalist idea gets lost. Whenever you get to this scale of house at over 26,000 square feet, this problem adds a layer of complexity.
Connie Anderson Photography
 Lennox Masonry
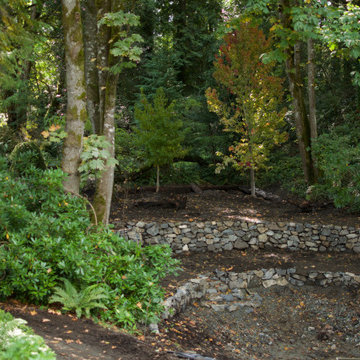
This project entailed the draining of a 200,000 cubic foot pond which was originally constructed in the early 1900s in order to install a water feature. I had previously dammed the lower pond, which was roughly equivalent in size to the upper pond, with stonework to match the existing stone walkways. The lower pond will be utilized as a catch-basin in an effort to keep the upper pond’s water level at a sufficient height through a pump system.
After the removal of over a 100 years worth of sediment, I began constructing several terraces, stone steps, stone walkways, and several stone retaining walls — all stone features were built without the use of mortar so as to allow plant growth, such as vines and flowering plants to grow through the stonework.
The difficulty I faced, oddly enough, was trying to be as random as possible with the placement of the stones, so as to make the stonework appear as though it had been built alongside some of the pre-existing 100-year-old stone walls scattered across other areas of the property. In essence, I forced myself to leave larger gaps in between stones where I typically wouldn’t, as well as leave some stones protruding from the wall, and allowing the wall to slightly fluctuate in height. All of which required me to become a perfectionist of randomness, which was quite trying of me.
The top 2 feet of the 2,000-foot upper pond was then faced and retained with stone.
 Granit Architects + Interiors
The brief:
Our clients own an apartment in a mansion block overlooking Clapham Common. They wanted to modernise and bring the apartment up to date and had a few goals:
To change the existing small cellular spaces in the apartment to create a new open-plan room
To extend into the loft and create a new master bedroom suite
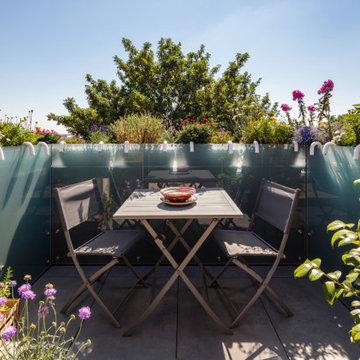
To create a roof terrace for some much-needed private outdoor space
The key to the brief was to ensure a good connection between the different levels of the apartment and ensure natural light could flood into all spaces. The apartment is in a conservation area, which was an important consideration.
The solution:
We changed the primary room space to run from the front to the back of the building. This change created the large kitchen dining living space our clients wanted, an area with good natural light throughout and at all times of the day.
We created a master bedroom suite in the loft space, with generous room size and lots of natural light.
The limitations of the building’s form meant that a critical aspect to creating these larger living spaces was carefully considered smaller areas, including the bathrooms and a pocket utility room. The circulation space was carefully considered, too, with the landings used for storage in the form of new joinery.
The stairs were vital in the design. Creating an in-between/half level meant we made the most of the flat roof extension for a bedroom suite and terrace. It also helped natural light get into the centre of the apartment, creating a clear connection between the different floors.
The stairs also help to mark the difference between the existing and the new. We shifted the design from a minimalist take on traditional metal balustraded stairs to open tread steel stairs with a glazed balustrade.
Externally, we kept the design quite simple and in keeping with the context. By adding dormers to the front and back, we created a sculptural and fun loft space.
The result:
A spacious, light and luxurious apartment for our clients Gareth and Mary in a Clapham Common Conservation area.
We asked about their experience with Granit, and we are pleased with their response:
Our experience overall is very good, even with the unexpected difficulties created by Covid.
If you are thinking of appointing an architect and interior design firm, Granit should be seriously considered.
 Pacific Garden Design
With a narrow driveway and leaning concrete retaining walls, parking was a major challenge at this 1938 brick Tudor on Spokane's South Hill. Crumbling concrete stairs added another layer of difficulty, and after a particularly rough winter, the homeowners were ready for a change. The failing concrete walls were replaced with stacked boulders, which created space for a new, wider driveway. Natural stone steps offer access to the backyard, while the new front stairs and sidewalk provide a safe route to the front door. The original iron railings were preserved and modified to be reused with the new stairs.
18