
Search results for "Diluted" in Home Design Ideas
 Tile Doctor Ltd
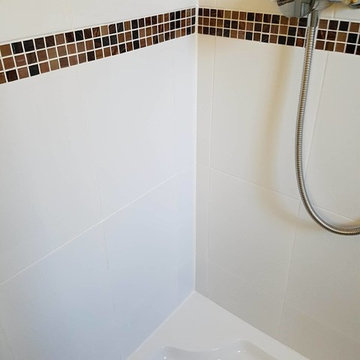
The photographs below are from the bathroom of a house in the Moston area of Manchester which is primarily residential and only 3 miles away from the city centre. My customer had been primarily concerned with the removal of unsightly mould but was also keen to have the grout in the ceramic tiled shower cubicle given a good deep clean.
To clean the Shower Cubicle, I used a strong dilution of Tile Doctor Pro Clean which is a strong alkaline cleaner that works really well on grout. The Pro-Clean solution was decanted into a spray bottle and then sprayed onto the grout lines and left it to dwell. The air in the solution makes it lighter and easier for it to stick to vertical surfaces.
After a few minutes the Pro-Clean was scrubbed in using a stiff grout brush. The tiles were then rinsed with water to remove the soiled solution from the tiles and the process repeated where required.
Although cleaning process was a success there were still a few mould marks left so to tackle these I used Tile Doctor Mould Away spray using the same process of scrubbing and rinsing. The Mould Away spray did the trick for me and I moved on to remove the silicone around the shower cubicle. When removing silicone, you must make sure you get all mouldy silicone out otherwise it can spread from the old to the new.
After I had finished removing the silicone I tidied the shower cubicle and used a bit of gentle heat from my heat gun to dry the grout lines and edges where silicone used to be.
I used my damp tester to make ensure there was no dampness anywhere around the working area and then moved on to colouring the grout which would give the whole shower a fresh and consistent appearance. On this occasion, I used a White colour from the Tile Doctor range of Grout Colourant’s, it’s an epoxy based colourant that protects and rejuvenate the grout lines.
I had to use 2 coats of colourant to get the best result and then moved on to putting new silicone around the shower base with a high-quality mould resistant silicone. When finished adding fresh silicone I tidied up again and the job was complete.
I think you can’t argue the shower cubicle was transformed and customer even said it looks better then when it was new; we also fixed few chips for her whilst there and stripped and replaced the silicone around the sink as a bonus.
Tony Olmet
Greater Manchester Tile Doctor
 Tile Doctor Ltd
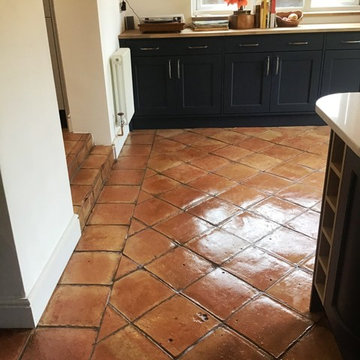
We were contacted by the owner of a property in Moulton with a problematic Terracotta tiled kitchen floor. She was seriously considering ripping up the entire area of tiling and replacing it as she was having a new kitchen installed. Both her and her husband were concerned that unless I could restore this floor to somewhere near to its original condition, they would need to replace it.
I went over to inspect the Terracotta tiles and could see the entire surface was deeply ingrained with soiling and the grout lines were filthy. After carrying out a test it became obvious that the previous sealer had been applied very sparingly and had mostly worn away, leaving the stone prone to staining. Terracotta is a very porous tile and dirt had become ingrained in the pores leaving it looking very dull and difficult to clean.
I completed the test on a small part of the floor and the customer could see the results which could be achieved. Happy with the result they agreed my quote and we set a date for my return to complete the floor.
The tiles turned out to be made of a fairly soft Terracotta which meant that we were able to deep clean them extremely effectively using a strong dilution of Tile Doctor Pro-Clean. We used Tile Doctor Remove and Go in particularly stubborn areas.
The process I use is to spray the Pro-Clean onto the floor and leave it to soak in for about ten minutes before being worked in using a heavy rotary machine fitted with a black scrubbing pad. The resulting slurry is removed using a wet pick up vacuum. All the dirt and virtually all of the old sealer was removed at this stage; the remaining patches around the edges of the area being finished by hand with a 200-grit burnishing block. The grout lines were then cleaned by hand with an angled grout brush.
Finally, the deep-seated oil stains in front of the cooker were brought out using Tile Doctor Oxy-Gel which was left to dwell on the marks for an hour before being agitated with a diamond burnishing pad and rinsed away with a wet pick up machine. The floor was rinsed with water and allowed to dry off overnight.
The following day I inspected the floor and checked it was ready to be sealed. All was well so I applied an initial coat of Tile Doctor Colour Grow which is an impregnating sealer that occupies the pores in the tile enhancing the natural colours of the Terracotta and provide a base layer of protection from staining.
I returned at a convenient time once the kitchen was completely installed to finish the job. This involves carrying out a light maintenance clean with Tile Doctor Neutral Cleaner and once the floor was dry, I applied 5 further coats of Tile Doctor Seal and Go which provides a pleasing satin finish which is really suited to this type of floor.
The customer was very happy with the results and has left the following feedback.
“We were really pleased with the results, thank you!”
Phil Vissian
Northamptonshire Tile Doctor
 Tile Doctor Ltd
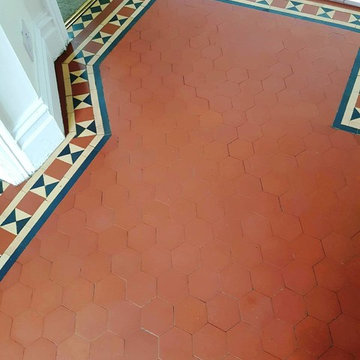
From The 1860s Victorian tiled floors started to appear in public buildings and by the 1890s they had become an essential feature in the most ordinary Victorian terraced houses. Although these floors fell out of fashion during the 1960s and ’70s, when many of them were covered over, they are now being rediscovered by their present owners and this is exactly what happened to my customer in the village of Littleover.
The customer had attempted to clean the floor by themselves but they couldn’t archive the result wanted, fortunately they discovered the Derbyshire Tile Doctor and after their call I went over and did a test for cleaning to make sure I can archive the needed results. They were happy with what they saw, so they booked me in to complete the work.
For cleaning the hallway I used a strong dilution of Tile Doctors Pro Clean which is strong multi-purpose high-alkaline cleaner. I left the Pro Clean to dwell for 10 minutes and then worked it in the tiles by using a strong black scrubbing pad fitted to my rotary machine. After scrubbing I rinsed the floor several times with clean water to remove any trace of cleaning product from the floor.
After successfully cleaning the hall I moved on to the porch which still had some old topical sealer on less walked areas. On these areas I had to use Tile Doctors own very effective stripper Remove and Go. Remove and Go has a long dwell time to remove any given sealer or wax so I left it to soak in for fifteen minutes followed by scrubbing it in with black pad fitted to rotary machine. The next step was to wash off the residue with water which was then removed using a wet vacuum.
Following this the tiles were given a rinse with Tile Doctor Grout Clean-up which is an acid based product that can remove grout smears and mineral deposits. Last step before sealing was to give the floor a thorough wash down with clean water to remove any cleaning product left on the tiles and then I left the floor to dry overnight.
Next day when I returned I used my damp tester to make sure that the floor is completely dry. Luckily for me floor was all dry and I started sealing. For sealing I used Tile Doctors Colour Grow Sealer which is colour enhancing breathable sealer. I applied 2 coats of the sealer and after every coat I polished off the excess with clean cotton cloths.
The result was really good and my customer was very happy with the work and said that now the floor looks transformed.
Tony Olmet
Derbyshire Tile Doctor
Find the right local pro for your project
 Tile Doctor Ltd
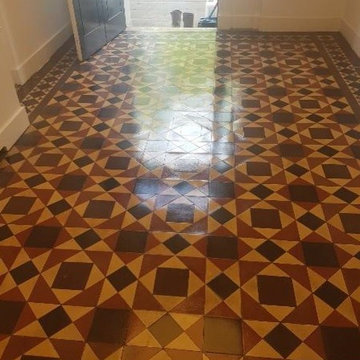
These are photos of a Victorian tiled floor we renovated at the new Scottish head office of the Peoples Postcode Lottery in the centre of Edinburgh City where the building was going through a multi million pound refurbishment. Edinburgh has a lot of Georgian and Victorian architecture, much of which is listed and as a result many still have original Victorian tiled flooring.
I’ve not really looked at the Postcode Lottery until now but put simply you give the lottery £10 a month and your postcode is your winning ticket number, there are prize draws every day and if your postcode comes up every one in the system with that postcode wins; they also give 31% to charity which is impressive.
You can see from the photograph that the floor was in good physical condition but was looking tired and dull. This is not unusual for Victorian tiles as once the sealer wears down dirt can penetrate into the pores of the tile causing it to lose its appearance.
On the first day we set about stripping the floor of what remained of the old sealant using a strong dilution of Tile Doctor Pro-Clean which is an industrial strength alkaline tile and grout cleaning product that is safe to use on Tile and Stone. The product is applied to the floor, left to soak in for ten minutes and the scrubbed into the tile using a black scrubbing pad fitted to a rotary bonnet machine. The floor was then rinsed and the now soiled cleaning solution extracted using a wet vacuum.
The process was repeated several times until we were happy the floor was clean and free of sealer and then given a final rinse with water. Before leaving for the day the floor was dried as much as possible using the wet vacuum to extract as much moisture as possible.
On the second day our first task was to check the floor with a damp meter in several places to ensure the tiles had dried off overnight. All was well and we began the process of sealing the floor with a Tile Doctor Seal and Go. This is a topical sealer which provides a high-quality low-sheen finish and protection against ingrained dirt and stains.
Victorian tiles are quite porous and five coats were needed to fully seal the floor. This took some time to complete as you have to wait until the first coat is dry before applying the next however it was well worth the effort as the floor looked fantastic afterwards.
Thomas Wilson
Edinburgh Tile Doctor
 Tile Doctor Ltd
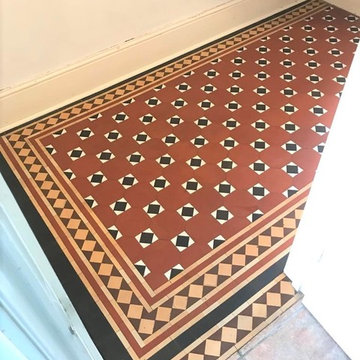
Our client had recently moved to a property in Newport, Gwent and when removing the carpet in the hallway she discovered this beautiful Victorian Tiled floor. The property had numerous period features and realising the value that the floor could add to the property she was keen to have it restored and so contacted Tile Doctor for help.
We popped round to survey the floor and except for a couple of broken tiles it had preserved well under the carpet. It was a shame the previous owner had covered the floor over but I was confident we could source some matching tiles to replace the broken ones and then restore the overall appearance. We gave the client a quote for the work which would take a couple of days. Pleased to hear that the floor could be restored and that it could soon be on show the quote was accepted and a date set to do the work.
We returned later the same month to renovate the floor and started by removing the broken tiles, cleaning out the old grout and adhesive and then relaying matching replacements. There are several specialist suppliers that can supply Victorian tiles so we can usually source reclaimed or reproduction tiles.
Some of the grout lines had dropped so as well as grouting around the replacement tiles more renovation work was needed to ensure the grout was level. We used quick setting products for this work, so I was able to move on to cleaning the floor later that afternoon.
To restore the appearance of the Victorian Tiles I used a strong dilution of Tile Doctor Pro-Clean combined with Tile Doctor Remove and Go which was left to soak in for ten minutes before being scrubbed into the tiles. This created a powerful cleaner/stripper cocktail which gets to work at removing dirt, grime and breaking down old sealers paint splashes.
After extracting the soil using a wet vacuum the floor was inspected. There were a few stubborn areas which were treated to a repeat clean and a wire brush to get the floor as clean as possible.
The floor was rinsed with water to remove any trace of cleaning products and then as much moisture as possible was extracted using a wet vacuum. The floor was left to dry off overnight and we arranged to return the next day to apply a sealer.
The following morning, we checked the floor was dry using a damp meter and this confirmed we were good to apply the sealer. The floor was sealed with Tile Doctor Colour Grow which is an impregnating sealer that protects the floor and enhances the beautiful colours in the tile. Three coats of the sealer were applied allowing each coat to dry before applying the next.
The client was very happy with the result and how beautiful the floor looked as you can see from the picture.
Paul Wales
Monmouthshire Tile Doctor
 Tile Doctor Ltd
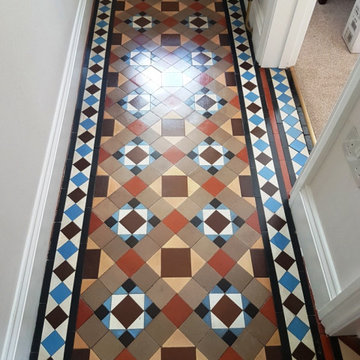
I was contacted by a homeowner who had moved into a property in the small Yorkshire market town of Masham and discovered a Victorian tiled floor under the hallway carpet. Realising this was a valuable period feature he was keen to see if it could be restored. As you can imagine he was delighted when I told him that it should be possible, and he was keen to get it uncovered and back on show.
After discussing the floor on the phone, I visited the property and removed the carpet so we could take a long look at the Victorian tile’s underneath. The carpet had protected the floor well and it was in good physical order, (i.e. no cracks etc.) it was just very dirty but was also marked with paint splashes from some untidy decorating work from the past. I confirmed none of these issues should present a problem and got the go ahead for the work to start.
There was no sealer on the floor, so I started the cleaning process using a medium dilution of Tile Doctor Pro-Clean which was worked into the tiles using a coarse 200-grit pad fitted to a rotary floor buffer. I then used a 400-grit hand-held diamond block to clean the edges which couldn’t be reached by the machine. This also removed the paint splashes which should have been on the skirting boards and not the floor!
The floor was then rinsed with water and the soil extracted with a wet vacuum. I was able to inspect the floor at this stage and spot treat areas that needed more work as they were a little stubborn. It wasn’t a large hallway and except for the paint it only needed a light clean. The result was I was able to complete the cleaning process by lunch time. I dried the floor as much as possible and left an air blower in the space for a couple of hours.
I returned later that afternoon and checked the floor for moisture using a damp meter. The floor was mostly dry, but some areas needed some more help with a heat gun. It was late summer and so still warm and so there was no need on this occasion to leave the floor overnight.
Once I was happy the floor was dry, I started sealing the tiles with the first of four coats of Tile Doctor Seal and Go. This is a specially formulated water-based blend of acrylic polymers that provides both a stain resistant surface seal and a durable low-sheen finish. It is perfect for a floor of this age as it allows moisture vapour to pass through, this is an important feature when considering a sealer for old floors which will not have a damp-proof membrane installed. If you were to apply a non-breathable sealer moisture can get trapped under the floor causing it to spread out to the walls resulting in rising damp.
The combination of the cleaning and new sealer brought the floor back to life and it now looked in keeping with the rest of the property which had numerous other period features. My client was over the moon with the difference and very happy to see the back of the grubby carpet.
Nigel Stoker
North West Yorkshire Tile Doctor
 Tile Doctor Ltd
Pontcanna is a popular residential area in the western district of Cardiff, in South East Wales. Known for its rather large houses and spectacular foliage, interestingly enough roughly a quarter of the population are English folk.
I was called down to a property in the area to take a look at a Victorian tiled floor which was in quite poor condition. Along with the typical amount of dirt and muck seen on poorly maintained tiles, there were a number of missing tiles and a fair bit of cement caked on the surface of the floor.
It would require a robust clean, fresh seal, and several repairs to get this floor back into optimum condition.
To begin, I checked for excess moisture problems using a damp meter in various places of the hallway floor and, thankfully, it was showing dry results. Any dampness could have potentially caused problems later on in the restoration process, so it was s good idea to run tests before starting.
Next, I manually scraped as much of the dry paint and cement off the tiles as possible, with no lubrication necessary. I then proceeded to clean the floor with a solution I mixed early, consisting of equal parts Tile Doctor NanoTech HBU and Tile Doctor Pro Clean, rinsing as I went. Both products are designed to tackle heavy soil build-up, with the former uniquely using nano-sized particles (as the product name suggests) to penetrate deep into difficult to reach areas in the tiles in order to lift out ingrained muck.
Following the initial clean, I removed all of the loose tiles and those heavily affected by cement, before retiling as necessary with fresh Victorian tiles, and grouting the whole floor. Of course, these replacement tiles were carefully sourced to ensure consistency, as far as possible, with the original pattern of the floor.
The next day, I went over the whole floor with an application of the acid-based Tile Doctor Grout Clean Up, diluted with a little alkaline Pro Clean to form a cleaning solution. I then used a black pad to scrub the cleaner into the tiles, similarly to the previous day’s cleaning. This was followed by a through rinse with water to neutralise the floor.
It was at this point that I noticed some stubborn cement stains remained so I set about breaking them down using a 60 grade hand held diamond polishing block, and this technique proved successful.
After completing the clean, I left the floor to dry out for roughly 24 hours. Upon my return to the property to seal the tiles, I tested again for moisture. It is recommended to run damp tests before sealing, as excess moisture can cloud the sealer, affecting its performance in the long run.
Fortunately, no dampness was detected and I was proceeded to seal the floor with seven coats of Tile Doctor Seal & Go, which enhances the natural colours in the stone and provides a nice satin gloss appearance, as requested by the customer.
I was extremely pleased with the results of this restoration, as was the customer. The extent of the soil build up and damage was such before the restoration that, after completion, the floor looked like it had been newly laid!
Julian Iancono
South East Wales Tile Doctor
 Tile Doctor Ltd
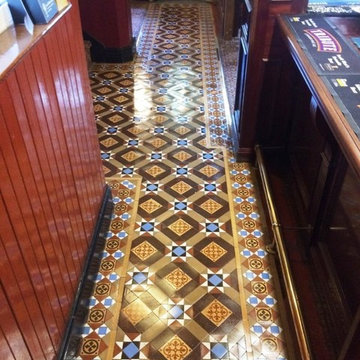
Here’s a really interesting commercial job for you, which I recently completed in the town of Hinckley, Leicestershire. I was asked to take a look at a Victorian Geometric and Encaustic tiled floor in the historic Queen’s Head pub.
This floor is over a century old and although in good condition for its age had suffered significant wear over the years, along with some cracked tiles and slight inherent moisture issues. What the pub landlord requested was a restorative clean to alleviate the aesthetically damaging effect of the wear, and to enhance the natural colours of the stone. I was also asked to seal the floor following the clean to achieve a semi-gloss finish.
The first step in the cleaning process was to mix a strong solution of one part Tile Doctor Pro-Clean to four parts clean water. Pro-Clean is a high alkaline cleaner which also contains stripping properties, allowing it to break down old sealer and tackle heavy soil build-up. The solution was applied to the floor and left to dwell for 15 minutes, giving it times to seep into the stone, get underneath the dirt and lift it to the surface.
I addressed several paint spots and areas suffering from glue contamination by using Tile Doctor Remove & Go, which is specially formulated to break down paint and adhesives on unpolished natural stone floors, amongst others. The entire floor was then scrubbed using a special floor cleaning pad, and the resulting slurry was vacuumed away using a wet-vac machine.
The final issue to deal with was the inherent efflorescence staining. This was treated using Tile Doctor Grout Clean-Up, an acid-based product which removes not just efflorescence but also grout haze, mineral deposits, and rust stains. The solution here was one part Grout Clean-Up diluted with four parts water.
After completing the clean, I thoroughly rinsed the floor with clean water to remove any trace of cleaning product and dried the floor as much as possible with a wet vacuum, then before leaving for the day i installed a couple of air movers to assist with drying overnight.
Upon my return the following day, I checked the floor for any excess moisture before sealing it with our topical, semi-gloss finish sealer, known as Seal & Go Extra which due to its formula is ideal for external or old internal floors where there is unlikely to be damp from membrane.
This unique product provides excellent protection, and allows the tiles to breath where floors are suffering from inherent moisture issues. It is suitable for both internal and external use, on Victorian floor tiles, Sandstone, Flagstones, Terracotta, and rough Slate.
As you can see from the photo, I was able to fulfil my client’s request to a high standard, bringing the pub’s old yet characterful Victorian tiled floor back to life again.
Kay Sylvester
Leicestershire Tile Doctor
 Tile Doctor Ltd
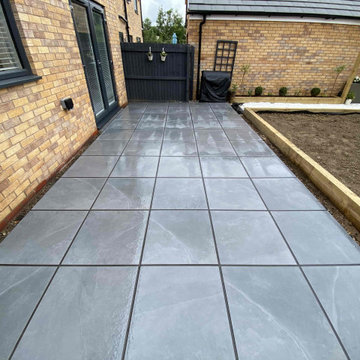
Earlier this summer I was called out to this job in the garden of a house in the city of Ely to inspect a freshly laid porcelain tiled patio with grout haze issues. The builder who had installed the patio hadn’t removed all the grout from the textured surface of the tile before it had dried. This was probably due to the hot weather which reduces drying times and has caught many tilers out. Multiple repeat visits by the builder trying followed who spent countless hours trying to remove the grout haze, unfortunately due to the textured surface of the tile he was unable to remove it and the patio was left looking awful.
Like the builder we are increasingly finding modern grouts, which although more durable, are very difficult to remove. Fortunately belonging to the Tile Doctor network, I had already been made aware of this problem and was able to offer a solution.
I arranged to pay the property a visit to demonstrate a potential solution and quote for resolving the issues. Even though the grout haze was indeed difficult to remove it wasn’t impossible if you know how. The demonstration came out well and relieved that they had finally found a solution to the problem booked me in to get the work carried out.
On my return I started with the application of a strong dilution of Tile Doctor Grout Clean-Up. This product is ideal for removing grout haze or smears as they often referred to; however, being acidic we don’t recommend it for use on every surface so if your using it yourself do check the label first. I left it to soak in for ten minutes before being agitated with a black scrubbing pad fitted to a rotary buffer
The weather was good, so it wasn’t a problem working outside and once all the grout smears were removed, I finished off by giving the whole patio a high-pressure rinse. I use a van mounted rinse/extraction system for this that applies warm water at high pressure onto the patio to dislodge dirt and then extracts the waste into a separate tank in the vehicle. It was an expensive investment but makes light work of jobs like this.
It took around four to five cleans to complete the job, by the late afternoon the grout haze was gone, and the porcelain patio looked completely transformed. It was quite a warm day, so the patio soon dried allowing my client to use it later that day. I should mention that this variety of Porcelain tiles were not the micro porous type and therefore did not need to be sealed.
Relieved the problem was finally resolved and happy with the result my client left the following feedback:
Amazing service, they were able to provide us with a quote and demo before we agreed to work. We are so happy with the results we have as our patio slabs looked ruined to the eye but the Tile Doctor managed to get them looking brand new.
Tom Conlon
Cambridge Tile Doctor
 Tile Doctor Ltd
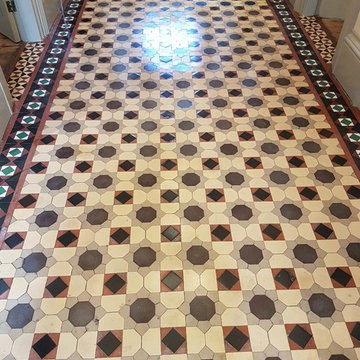
I recently re-visited a Victorian period property in the Leeds suburb of Headingley which had an unusually large tiled entrance hall which we believe to be as old as the property itself. I say re-visited as I actually gave this floor a deep clean and reseal around five years ago; it’s always nice to be asked to return to a job as it shows the customers was very happy with the work. However, with five years of wear and tear the sealer had worn down and the floor was now starting to trap dirt, also it had lost the attractive shine added by the sealer and the owner felt it was time to have it done again. Additionally, the owner had recently had the whole house decorated and wanted the floor to look its best and match the fresh appearance of the property.
Sealers do wear off with use and so it is inevitable that the tiles will need to be cleaned and sealed again with time. Given it hadn’t had a professional clean and seal for five years the floor wasn’t looking too bad as you can see from the picture, it was just a bit dull in the high traffic areas such as along the centre. I’ve certainly seen a lot worse.
Initially I wasn’t 100% sure on which cleaning method l was going to use on this floor. Originally l thought about using a coarse 200-grit burnishing pad to take off a couple of layers of sealer and then re-apply 2 more coats. However, the finish on the floor wasn’t even across the width of the hallway and l felt using that approach wouldn’t resolve that. Additionally, a lot of tiles were pitted and a burnishing pad would struggle to get into the holes. So instead I decided to completely strip the floor and re-seal it which would ensure a uniform finish across the floor.
I used a strong 50:50 dilution of Tile Doctor Pro-Clean on the tiles and scrubbed it in with a black floor pad which removed the old sealer and ingrained dirt. The large floor pads are not very effective in the corners and edges, so I used a 6-inch red buffing pad fitted to a hand buffer for those. The floor was rinsed with water and the soil extracted using a wet vacuum. After inspecting the floor some areas were retreated with a repeat of the same process.
After a final rinse and extraction of the soiled water the floor was left to dry overnight.
The next day after first checking the floor was dry with a damp meter it was sealed with four coats of Tile Doctor Seal and Go. This is a water based sealer that gives a lovely sheen and allows the colours to shine through as well as letting the floor breath, which is important in properties of this age that usually do not have a damp proof membrane.
I was very pleased with the finished result as the pictures show and glad that l had chosen to do a deep clean and not just apply more coats of sealer. The client was over the moon.
Nigel Stoker
North West Yorkshire Tile Doctor
 Tile Doctor Ltd
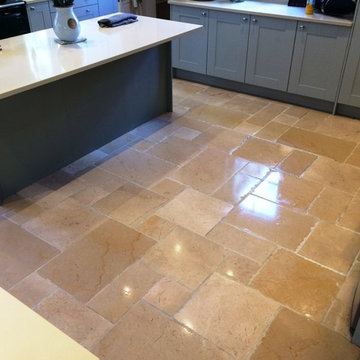
Earlier this year I was contacted by a lady in Icklesham which is a small village near Hastings. My client requested a deep clean for her Limestone tiled kitchen floor which had, over time, become quite dirty, with the grout in particular being very much worse for wear. Limestone is a popular choice for tiled floors however it needs to be sealed to ensure dirt doesn’t get into the pores of the stone otherwise it becomes difficult to clean and if the sealer is not maintained it will wear down and the floor will lose its protection especially in high traffic areas such as kitchens.
Cleaning a Limestone tiled kitchen floor
My product of choice for cleaning this floor was Tile Doctor Pro-Clean, which I found to be particularly effective in lifting ingrained dirt out of the grout. I used a stiff grout brush to work the solution of Pro-Clean diluted with warm water to work the cleaner deep into the grout. I also used a buffing machine fitted with a scrubbing pad and more Pro-Clean to lift the dirt out of the Limestone tiles. It wasn’t long before the dirty grout lines began to disappear, and the floor was well on its way to looking great again.
Once I’d also cleaned the nearby utility room, bathroom and cloakroom in a similar manner, I gave the floor a thorough rinse with fresh water before using a wet-dry vac machine to remove the soiled water from the surface of the tiles. I removed as much moisture from the Limestone tile and grout as possible to speed up the drying process as it’s important to ensure a stone floor is bone dry before sealing it as any excess moisture will compromise the sealer.
Applying Tile Doctor Colour Grow sealer to Limestone tiles
I left the floor for three days to dry before returning and used a damp meter on my return to confirm the floor was in-deed dry, spring had arrived and the sunshine really helped. My choice of sealer for the Limestone tiles was Tile Doctor Colour Grow, a product which soaks into the pores of the stone to enhance the colour of tiles whilst also providing durable protection. In this case two coats of Colour Grow were applied and as you can see from the photographs this really did bring out the fantastic natural colours in the Limestone and exaggerate the shading. At the same time, the added surface protection will help the floor stay looking great for longer, even with a lot of usage.
When she returned from dog walking, my client was so pleased with the final result that she almost screamed the house down! She was so pleased, in fact, that she promised to have me return every year to ensure her floor was maintained to a high standard. I was also really happy with my work, particularly in terms of getting the grout into far better condition than it had been before.
 Tile Doctor Ltd
The pictures showed are of an Encaustic Cement tiled floor that had been installed in the bathroom of a property in Twickenham. At the time the tiles were installed, they did not seal them and had since accumulated dirt, especially in the grout lines.
Encaustic cement tiles have become extremely popular in the last few years with many beautiful artistic often geometric patterns available to choose from. The very nature of the cement-based tile however does make it slightly porous, and if left unsealed dirt will become ingrained in the tile making it difficult to remove and keep clean. Like grout they do therefore need to be sealed in order to keep them looking at their best for longer.
Now we normally recommend using diamond encrusted burnishing pads when renovating Encaustic Cement tiles however in this case the face of the tiles were not too bad and it was really the grout that needed the most attention. So, to cut the cost for customer, I advised a straightforward alkaline scrub clean and seal.
To clean the tile and grout I sprayed the floor with a strong dilution of Tile Doctor Pro-Clean and left it to soak into the dirt for ten minutes. Space in the bathroom was quite tight so instead of using a mechanical floor scrubber I scrubbed the tile and grout by hand working the alkaline cleaning solution into the pores to release the grout in dirt.
After scrubbing the floor was rinsed with a little water and the soil removed with a wet vacuum. Afterwards the floor was inspected, and any stubborn areas retreated with repeat of the process. After a final rinse, the floor was dried as much as possible with the wet vacuum.
Fortunately, the weather has been amazing of late and so it did not take long for the floor to dry, being a small space and a little encouragement from a heat gun always helps. Removing excess moisture before sealing is essential as even a small amount can cloud the sealer resulting in an uneven appearance.
Once satisfied that the floor was dry, I proceeded to seal it by applying a couple two coats of Tile Doctor Colour Grow across the Encaustic tile and grout. As an impregnating sealer Colour Grow penetrates the pores of the cement occupying the space and thus prevent any dirt from becoming ingrained there. Colour Grow’s colour intensifying properties also helped to deepen the black colour of the tile enhancing the contrast between the tiles and grout.
Now the floor has been properly sealed it will be far easier for the customer to keep them clean in future. For maximum longevity of the sealer I recommend maintenance cleaning with Tile Doctor Neutral Cleaner. Don’t be tempted to use supermarket cleaning products without reading the label first, many are simply too strong for cleaning sealed surfaces and will strip off the sealer prematurely leaving the tiles unprotected.
Jonathan Oldham
South Middlesex Tile Doctor
 Tile Doctor Ltd
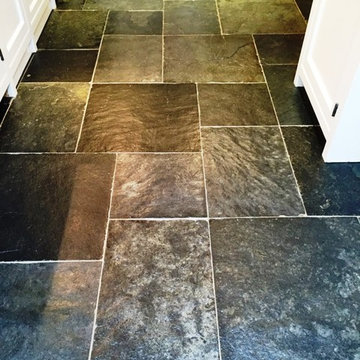
These photographs below are of a Slate Tiled Kitchen floor taken at a customer’s house in Henley-on-Thames which, as its name suggests, sits alongside the River Thames in Oxfordshire. My client’s Slate kitchen floor had recently been cleaned with unsuitable cleaning products which I suspect impacted the sealer leaving it looking dull. Sealers really to improve the look of a stone floor so unsurprisingly once the sealer had been damaged my client had been unable to find a cleaning product that could have any kind of positive effect on the tiles.
It’s fairly well known that many supermarket quality cleaners are only really designed for use on Ceramic or Porcelain tiled floors as they contain acids which strip away at sealers and acid sensitive stone floors, leaving the stone beneath vulnerable. So your select a cleaning product for your floor always read the small print on the back of the label and make sure you avoid anything that mentions not for use on acid sensitive stone; belter still Tile Doctor have a number of products for cleaning tiled floors including Neutral Cleaner and Stone Soap.
To clean the floor and remove any remaining sealer I first made a strong dilution of Tile Doctor Pro Clean which is a strong alkaline cleaner and then spread this over the floor, leaving it to dwell. This allows the cleaner to seep into the slate and get underneath, breakdown sealers and start to lift out ingrained dirt.
Following a dwelling period of roughly ten minutes, I agitated the floor periodically with a rotary machine fitted with a black scrubbing pad and scrubbed along the grout lines with a stiff grout brush. I then used a wet vacuum to extract the resultant slurry away and then followed up by rinsing the floor with clean water, and once again vacuumed up the residue.
Any stubborn areas were retreated until I was happy with the floor and then I left the floor to dry off completely overnight, in preparation for sealing the following day.
Upon my return to the house the following day, I ran some damp tests on different parts of the floor to check for any excess moisture which could potentially damage the performance of the sealer. Once I was satisfied that the floor was completely dry, I proceeded to seal the tiles using Tile Doctor Seal & Go. This will provide a robust surface seal for the future, along with an aesthetically pleasing low-sheen finish.
This sealer works particularly well on Slate tiles and, being a water-based sealant, additionally Seal & Go does not emit an unpleasant smell as it dries. Slate is quite a porous stone so I applied six coats of seal to provide long-lasting protection.
Barry Woodward
Oxfordshire Tile Doctor
 Tile Doctor Ltd
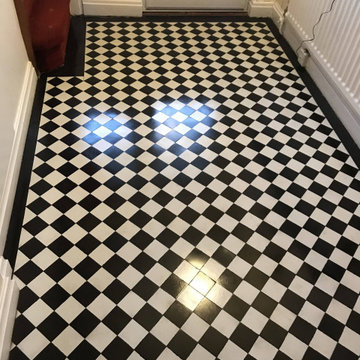
This is a great example of a Victorian Tiled floor refurbishment which I recently completed at a property in Stoke-on-Trent. If you look closely at the photographs below you will see the white tiles are looking grubby and paint splash staining from decorating. The owner was unhappy with how the floor now looked and wanted it refurbished.
Black and White Victorian tiles laid in a chequered diamond pattern is a classic style and a very popular choice for hallways at the turn of the 20th century. Over the years many have been replaced or covered up with carpet and those that survived are now a sought-after period feature that adds value to your property.
I initially cleaned the floor by applying a strong dilution of Tile Doctor Pro-Clean which was sprayed onto the floor and then left to soak in for ten minutes. Pro-Clean is our goto tile and grout cleaning product that is designed to break down dirt and remove old sealers. After ten minutes the solution was scrubbed in with a rotary machine fitted with a coarse 200-grit pad. The soil generated was rinsed off the tiles and extracted with a wet vacuum and the floor inspected.
I would see more work was needed to get the floor clean and free of staining, so I spot treated the problem areas with Tile Doctor Remove and Go which is a coatings remover. I worked in small sections leaving the product to dwell as before for 10 minutes, I then used a wallpaper steamer with handheld diamond blocks to get the ingrained dirt out of the floor. After a final rinse and extraction, the floor looked clean so, so much better than when I started.
I then left the floor to dry off overnight and came back the second day to seal the tiles first checking the moisture levels with a damp meter. Applying sealer to a damp floor will result in the floor looking patchy when it dries so I always check first. The readings were good, so I started to apply the first of five coats of sealer which for this floor I chose Tile Doctor Seal and Go Extra.
Old Victorian floors do not have a damp-proof membrane installed under the floor so its important to select a sealer that will allow moisture to rise through the tiles and evaporate on the surface, Seal and Go Extra allows for this. Choosing a non-breathable sealer can result in moisture being trapped under the floor where it can reach out to the walls leading to rising damp.
Once the floor dried it looked fantastic. In fact, my customer was so happy with the transformation she was taking pictures and sending them to her daughters as I worked; she couldn’t believe how well it was turning out.
Trevor Preece
Staffordshire Tile Doctor
 Tile Doctor Ltd
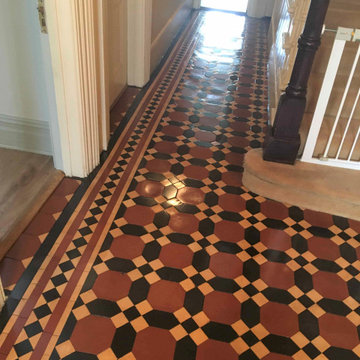
This Victorian tiled hallway floor at a property in Twickenham was in great physical condition considering its age but just hadn’t been cleaned or sealed in quite a few years. Over the years the protective sealer has worn away and dirt tracked in from outside had sunk deep into the pores of the tile. The floor looked dull, and my customer was finding it hard to clean and maintain effectively.
To remove the ground in dirt from within the pores of the tile I needed to apply a strong cleaning product that would breakdown the dirt and deal with any remaining sealer left on the floor. Usually, I find the sealer down the center of the hallway is worn away with use, but you still find traces towards the wall. To do the renovation effectively I would need to remove all the sealer during cleaning otherwise you risk an uneven appearance.
The best sealer stripper and cleaner for the job is a product called Tile Doctor Remove and Go so I mopped a strong dilution onto the floor and then left it to soak in for around fifteen minutes. To get the best from this product it’s advised to give it a long dwell time thereby allowing it to break down old sealer and dissolve the dirt and contaminants.
The floor was then scrubbed with a rotary floor machine to work the product into the pores of the tile and release the trapped dirt. After the first pass the floor was rinsed with a little water and the soil extracted using a machine. After inspecting the floor some areas were re-treated using the same process to ensure all the sealer and dirt had been removed.
After a final inspection I left the tiles to dry off overnight.
The following day I returned and started by taking moisture readings from different parts of the floor. Its not a good idea to apply a sealer to a damp tile and damp areas should be dried out with a heat gun first.
My client was keen to have a classic shiny appearance, so I chose Tile Doctor Seal and Go to add protection to the tiles. The sealer will prevent dirt becoming ingrained in the tile and protect the floor from staining caused by spillages whilst making it very easy for our customer to maintain in the future. As you can see from the pictures, it also gives a nice sheen finish to add lustre to the floor as requested by my customer.
Before leaving we had a quick chat about maintaining the floor and a warning about the use of strong floor cleaning products which can be over strong and prematurely strip the sealer away over time. For this floor I recommend Tile Doctor Neutral cleaner which is an effective cleaner but as its name suggests is pH neutral and mild enough not to harm the sealer.
Jonathan Oldham
South Middlesex Tile Doctor
 Tile Doctor Ltd
Recently I was called to a house in the very small town of Marton in Warwickshire which is known for its proximity to the medieval “Marton Bridge”, which lies just to the north, crossing the River Leam.
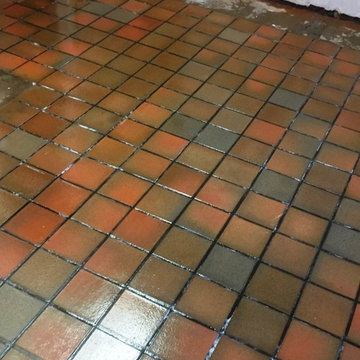
The entire downstairs flooring of my client’s house consisted of Quarry tiles apart from one room where the tiles had been covered by screed and then linoleum. Quarry tiles are a classic hard wearing tile used for both internal and external commercial and residential flooring due to its ability to withstand heavy usage. Reception areas, outdoor patios and porches, for example, are commonly tiled using Quarry.
My client wanted to restore the covered floor back to its original state so that it would match the rest of the downstairs. Realising that this would be a complex and physically demanding task, my client decided to call in Tile Doctor to carry out the restoration.
Removing the Linoleum covering was a relatively straightforward process, so I was able to do this relatively quickly. The main issue concerned removing the screed, which is far more difficult to remove, requiring a lot of physical scraping. Thus I opted to call in some extra manpower in the form of the Nottinghamshire Tile Doctor, Steve Carpenter. With the two of us armed with scrapers we set about removing the screed, taking extra care not to damage the Quarry tile underneath.
Once Steve and I had scraped off as much of the screed as physically possible, I applied a strong dilution of Tile Doctor Remove & Go, a stripper with cleaning properties that is particularly effective at breaking down coatings such as adhesives, plasters and sealers. The product was left to dwell for ten minutes before I worked it into the stone with a scrubbing pad.
After cleaning the tiles, I noticed a layer of grout haze on the surface of the exposed Quarry tiles, so I applied Tile Doctor Grout Clean-Up to remove it. Once the cleaning process was complete I gave the floor a thorough rinse with clean water, before soaking up the resulting residue with a wet-vac machine. The first day of work was a gruelling 12 hours long, but I was very pleased with the results and left the floor to dry overnight.
On day two I returned to finish the job by sealing the newly uncovered Quarry tiles, but not before using a damp meter to check that they were completely dry. Any excess moisture left on unsealed tiles can potentially effect the performance of any sealers that are applied. I sealed the tiles using Tile Doctor Colour Grow, an impregnating, colour-enhancing sealer which gave the surface an aesthetically pleasing shine, as well as durable protection against dirt and wear for the future.
After two long days of work the job was done and the transformation was fantastic and highly rewarding to see, the house now has a fantastic looking Quarry tiled floor running throughout the entirety of the lower level.
Mick Gayton
Warwickshire Tile Doctor
 Tile Doctor Ltd
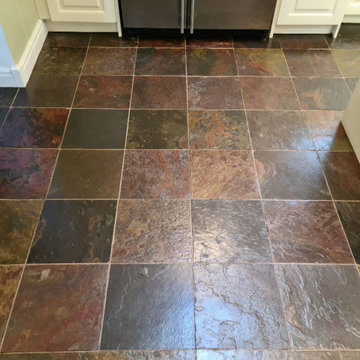
The pictures above are of a 12 metre squared Chinese slate floor in the kitchen of a property in Harrogate which had been laid ten years prior. You can see from the photographs that the grout had darkened and the slate itself had lost a lot of its character and colour.
Sealers typically last between three to five years so by now there was little protection left and so dirt had become trapped in the pores of the stone and grout making it difficult to keep clean. It was now overdue a deep clean and the application of a fresh seal.
I went over to survey the floor and provide a quote for stripping off what was left of the original sealer, cleaning the floor, and then resealing. I had been recommended by a previous customer so happy with my track record and the price I quoted, they asked me to do the work. They had received a quote from another firm which as it turned out was a lot more expensive than mine.
Given there was little sealer left to remove I decided to start by scrubbing the floor with a strong concentration of Tile Doctor Pro-Clean which was left to soak into the slate for ten minutes. Then I worked the solution in with a rotary machine fitted with a black scrubbing pad. Pro-Clean is a very versatile product that will strip the sealer off a floor when used in a strong dilution with water, it will also remove deep seated dirt too.
Due to the riven nature of the tiles however I found the black pad was struggling to reach into the crevices of the tile so to achieve the desired result I resorted to scrubbing the floor on my hands and knees with a scrubbing brush. Its important that the floor is as clean as it possibly can be before sealing otherwise you simply lock the dirt in and it will never look clean.
The floor was left to dry off overnight and I returned the next day to apply the new sealer. First, I checked to ensure that the floor was fully dry using a damp meter. The sealer would not cure properly if the floor damp and this can detract from the finished appearance.
I was happy with the readings, so I started to apply the first coat of Tile Doctor Seal and Go which I felt was the best product sealing Slate. The stone needed four coats; each one being left to dry before applying the next. Seal and Go is a stain resistant sealer which results in a low sheen silky appearance, it is good on surfaces such as the Chinese Slate which tend to be more porous and being water based it does not leave a smell as it dries.
The client was very happy with the result and mentioned to me that it had never looked that good even when new.
For aftercare cleaning I recommended the use of Tile Doctor Neutral Tile Cleaner which will keep the floor in the best condition. This is a pH neutral cleaner which can be used daily and won’t compromise the newly laid sealer like many of the stronger products you find in supermarkets.
Nigel Stoker
North West Yorkshire Tile Doctor
 Tile Doctor Ltd
When you discover an old Victorian tiled floor underneath carpet, the first question that will probably pop into your mind is: can it be restored?
The answer, in the majority of cases, is yes. In fact, Tile Doctor has completed hundreds of Victorian tiled floor restorations. Victorian tiles have a timeless quality about them and are still popular for residential use even in the twenty first century.
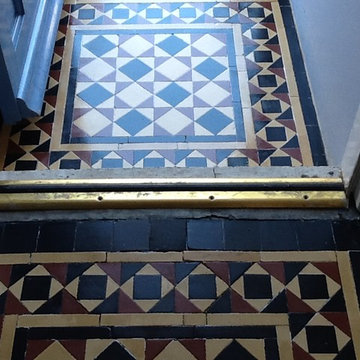
What you can usually expect upon lifting your carpet is for the tiles to be covered in carpet adhesives and grippers, as was the case with this particular example of a Victorian Tiles hallway floor at a property in Bedford. Sometimes you might also find paint splashes or other staining left over from decoration work. And, of course, the tiles will be dirty and in much need of a deep clean. These issues spoil the original appearance of the tiles, but with the right methods and products, a complete restoration can be achieved quickly and cost-effectively.
My first task upon arriving at the proper was to carry out a site survey to address the condition of the tiles, before running a quick test clean on a small area of the floor. The result was good and so I was confident that I could achieve a high-quality restoration for the client.
A quote was issued and accepted, and the work was booked in at a date that was convenient for the customer.
Returning to the property, my first course of action was to mix a strong dilution of Tile Doctor Pro Clean, which is a powerful alkaline cleaner safe to use on natural stone, with hot water. This cleaning solution was sprayed along all edges of the floor loosen the glue securing the carpet grippers. I then successfully removed the adhesive carefully using handheld tools to avoid damaging any tiles.
Once this was done, I applied Tile Doctor Remove and Go, scrubbing it into the tiles with a rotary machine. This product is designed to remove heavy soiling, paint splashes and old waxes and sealers. The soiled solution was then extracted using a wet vacuum and stubborn areas re-treated until I was satisfied the floor was clean.
The entire floor was then given a thorough rinse with water to remove any trace of cleaning products and extracted using a wet vax machine.
The floor was allowed to dry for several days before I was able to return to seal the tiles. It’s always important to leave significant time for the floor to dry because any moisture left over can impact the performance of the sealer.
The choice of sealer was Tile Doctor Seal and Go Extra, which provides robust protection against dirt and stains, with a light sheen finish. I chose this sealer not only because the customer wanted a light sheen finish, but also because this particular sealer is fully breathable. Dampness can sometimes be an issue with old Victorian and Quarry tiles which were installed before damp proof membranes became standard.
The transformation achieved within the space of a week was quite incredible and the colours in the tile have really come through.
Another satisfied customer!
David Vissian
Bedfordshire Tile Doctor
 Tile Doctor Ltd
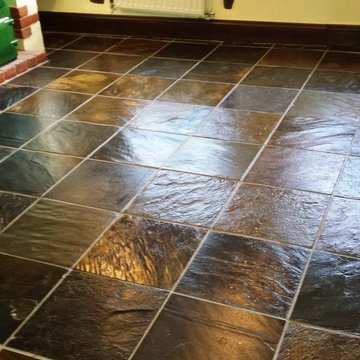
I recently made a trip down to South Molton, a small town which sits on the River Mole. The river, actually a tributary of the River Taw, gets its name from the two small towns it runs by, North Molton and South Molton. Anyway I digress, my client asked me to take a look at a Chinese Slate floor in her house, as it was in dire need of a good clean due to the original sealer having worn off over time allowing the dirt to become ingrained in the tile.
As this particular type of floor is naturally quite rough, I advised my client to have the Slate milled flat. This would not only make the floor easier to clean on a regular basis, but also it would reduce the hazard of people tripping over the exposed edges. However, the milling procedure is expensive due to the need to use a special grinding disc formed of diamond segments, which is then attached to a rotary machine and used on the stone. My client decided against this, instead opting for a thorough clean and seal. This would be the first time the floor had ever received a proper clean – it had not even been cleaned when the tilers first fitted it!
My choice of product for the cleaning was Tile Doctor Pro-Clean, a high alkaline cleaner which, along with Slate, is suitable for use on other natural stone floors such as Limestone, Granite and Travertine. The product, diluted with clean water, was applied evenly to the floor using a Polybrush, as well as a rotary machine fitted with a buffing pad. This also helped to remove any remaining old sealer although, as aforementioned, the vast majority of the old sealer had already worn away.
Following this, I cleaned the grout using Tile Doctor Grout Clean-Up and a long-handled stiff grout brush. Grout Clean-Up penetrates below the surface of the grout to lift out grout haze and general dirt. After completing the cleaning I rinsed the floor several times with clean water to remove any trace of cleaning product. The floor was then left to dry completely before sealing, as any moisture left over on the floor could have impacted on the sealer.
When I returned to seal the floor I opted to use Tile Doctor High Shine Sealer, which is suitable for use on textured natural stone floors, as well as textured ceramic, textured porcelain, and a range of others. Five coats of High Shine Sealer were applied, providing the floor with durable surface protection and a nice high-sheen finish. This dramatically improved the appearance of the floor to the point that it is hard to believe this is the first time it has been treated to a proper clean and seal!
Both myself and my client were very pleased with the results. Chinese Slate is one of the most beautiful and characterful types of stone for tiled floors, so it was very rewarding to be able to make such a difference here.
 Tile Doctor Ltd
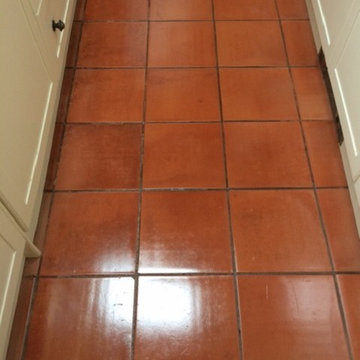
Terracotta is an interesting type of stone manufactured using a variety of techniques dependant on the country of origin which leads to a number of differences such as Spanish Terracotta being less porous than its Mexican counterpart: the former is semi-hand made and finished in a factory kiln, while the latter is completely handmade. Spanish Terracotta is therefore a lot less than porous and ultimately, of a higher quality.
But despite the Spanish Terracotta being less porous, and therefore being less prone to ingrained dirt, it still, like any other stone, needs regular maintenance to keep it looking smart. In the tiling trade, we quite often refer to this as a good old fashioned ‘Clean and Seal’ and this is exactly what was requested by this property owner in Halifax, for their Spanish Terracotta tiled floors in the kitchen and adjacent hallway.
I cleaned both sets of Terracotta tiles using the same process, which involved the application of our reliable alkaline cleaner known as Tile a Doctor Pro Clean, diluted with five parts of warm water. Once the solution had been left to dwell for a short period, it was scrubbed into the tiles to remove all dust, dirt, and general muck. This created a slurry of cleaning residue, which I promptly soaked up using a wet vac. A wet vac machine is an essential tool when it comes to cleaning porous tiles since, unlike a traditional mop and bucket, it sucks the excess trapped dirt out of the clay and thus provides a superior clean.
Following this, I applied a small amount of our heavy duty remover, known as Tile Doctor Remove & Go, to deal with some of the more stubborn stains and paint splashes, before rinsing with clean water and wet vaxing in a similar fashion to before.
Once the clean had been completed I left the tiles to dry completely. This can take 12 to 24 hours depending on numerous factors including whether a Damp proof Membrane and underfloor heating has been installed which can really help reduce drying times. Letting the tiles dry completely before sealing is paramount as moisture can cloud the sealer and affect its performance.
Upon my return to the property I ran some quick damp tests, which revealed the tiles were ready to be sealed. I then applied several coats of Tile Doctor Seal and Go, our topical sealer which provides a satin finish and accentuates colour. A new coat of this product is recommended every six months on Terracotta to ensure the continuous protection of the tiles’ soft clay particles.
My customer was extremely pleased with her refreshed Terracotta tiles. It goes to show what a big difference a bit of regular maintenance can make. I advised the customer that an everyday cleaner called Tile Doctor pH Neutral cleaner can also be used regularly to keep the tiles looking great without damaging the sealer.
Nigel Stoker
North West Yorkshire Tile Doctor
12