
Search results for "Diluted" in Home Design Ideas

 Archviz-studio.com
The design project of the studio is in white. The white version of the interior decoration allows to visually expanding the space. The dark wooden floor counterbalances the light space and favorably shades.
The layout of the room is conventionally divided into functional zones. The kitchen area is presented in a combination of white and black. It looks stylish and aesthetically pleasing. Monophonic facades, made to match the walls. The color of the kitchen working wall is a deep dark color, which looks especially impressive with backlighting. The bar counter makes a conditional division between the kitchen and the living room. The main focus of the center of the composition is a round table with metal legs. Fits organically into a restrained but elegant interior. Further, in the recreation area there is an indispensable attribute - a sofa. The green sofa complements the cool white tone and adds serenity to the setting. The fragile glass coffee table enhances the lightness atmosphere.
The installation of an electric fireplace is an interesting design solution. It will create an atmosphere of comfort and warm atmosphere. A niche with shelves made of drywall, serves as a decor and has a functional character. An accent wall with a photo dilutes the monochrome finish. Plants and textiles make the room cozy.
A textured white brick wall highlights the entrance hall. The necessary furniture consists of a hanger, shelves and mirrors. Lighting of the space is represented by built-in lamps, there is also lighting of functional areas.

 A Work of Art
Today we are featuring another D77 Project by Tim and Camet Runkel at Beautiful Brush Works! I am always excited to share with you about the endless possibilities of Design 7 Seven Acrylic Glaze.
Wow, another beautiful performance from Design 7 Seven Glaze! This 2 tone metallic finish was achieved using a small portion of D77 in my metallics, only about 20% and a splash of water and then worked lightly with tools to erase work lines. Used the D77 in both the Silver base layer and in the golden bronze top layer, and. Voila ! it looks sprayed. The D77 absolutely made this possible, because it gave me the ability to soften the metallic work lines and work from one section into another and then gel out to a flawless finish! I've never used anything like it. I love being able to use products to glaze with that normally dry so quickly that they are difficult to glaze with. Such as Metallics, acrylic stains, acrylic polyurethanes lime products, and many art acrylics. And D77 is phenomenal in metallics! You don’t have to dilute the metallic with glaze so much that it requires many layers to achieve the metallic luster. I even use a small amount in my clear acrylic top coats to have time to work the product over the surface, and increase the dry time a small amount to allow it to level to a rich, smooth, even, finish.
Thank You so much for this wonder Glaze!!
Tim & Camet Runkel,
Beautiful Brushworks
 Archviz-studio.com
The design project of the studio is in white. The white version of the interior decoration allows to visually expanding the space. The dark wooden floor counterbalances the light space and favorably shades.
The layout of the room is conventionally divided into functional zones. The kitchen area is presented in a combination of white and black. It looks stylish and aesthetically pleasing. Monophonic facades, made to match the walls. The color of the kitchen working wall is a deep dark color, which looks especially impressive with backlighting. The bar counter makes a conditional division between the kitchen and the living room. The main focus of the center of the composition is a round table with metal legs. Fits organically into a restrained but elegant interior. Further, in the recreation area there is an indispensable attribute - a sofa. The green sofa complements the cool white tone and adds serenity to the setting. The fragile glass coffee table enhances the lightness atmosphere.
The installation of an electric fireplace is an interesting design solution. It will create an atmosphere of comfort and warm atmosphere. A niche with shelves made of drywall, serves as a decor and has a functional character. An accent wall with a photo dilutes the monochrome finish. Plants and textiles make the room cozy.
A textured white brick wall highlights the entrance hall. The necessary furniture consists of a hanger, shelves and mirrors. Lighting of the space is represented by built-in lamps, there is also lighting of functional areas.
Find the right local pro for your project
 Archviz-studio.com
The design project of the studio is in white. The white version of the interior decoration allows to visually expanding the space. The dark wooden floor counterbalances the light space and favorably shades.
The layout of the room is conventionally divided into functional zones. The kitchen area is presented in a combination of white and black. It looks stylish and aesthetically pleasing. Monophonic facades, made to match the walls. The color of the kitchen working wall is a deep dark color, which looks especially impressive with backlighting. The bar counter makes a conditional division between the kitchen and the living room. The main focus of the center of the composition is a round table with metal legs. Fits organically into a restrained but elegant interior. Further, in the recreation area there is an indispensable attribute - a sofa. The green sofa complements the cool white tone and adds serenity to the setting. The fragile glass coffee table enhances the lightness atmosphere.
The installation of an electric fireplace is an interesting design solution. It will create an atmosphere of comfort and warm atmosphere. A niche with shelves made of drywall, serves as a decor and has a functional character. An accent wall with a photo dilutes the monochrome finish. Plants and textiles make the room cozy.
A textured white brick wall highlights the entrance hall. The necessary furniture consists of a hanger, shelves and mirrors. Lighting of the space is represented by built-in lamps, there is also lighting of functional areas.
 Archviz-studio.com
The design project of the studio is in white. The white version of the interior decoration allows to visually expanding the space. The dark wooden floor counterbalances the light space and favorably shades.
The layout of the room is conventionally divided into functional zones. The kitchen area is presented in a combination of white and black. It looks stylish and aesthetically pleasing. Monophonic facades, made to match the walls. The color of the kitchen working wall is a deep dark color, which looks especially impressive with backlighting. The bar counter makes a conditional division between the kitchen and the living room. The main focus of the center of the composition is a round table with metal legs. Fits organically into a restrained but elegant interior. Further, in the recreation area there is an indispensable attribute - a sofa. The green sofa complements the cool white tone and adds serenity to the setting. The fragile glass coffee table enhances the lightness atmosphere.
The installation of an electric fireplace is an interesting design solution. It will create an atmosphere of comfort and warm atmosphere. A niche with shelves made of drywall, serves as a decor and has a functional character. An accent wall with a photo dilutes the monochrome finish. Plants and textiles make the room cozy.
A textured white brick wall highlights the entrance hall. The necessary furniture consists of a hanger, shelves and mirrors. Lighting of the space is represented by built-in lamps, there is also lighting of functional areas.
 Tile Doctor Ltd
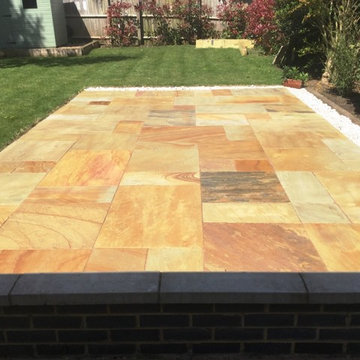
At the start of the year we usually get asked to restore the appearance of patios and other outside areas which have suffered from the staining of autumn leaves and the ravages of winter cold snaps. Most patios are quite straight forward to maintain however when you’re dealing natural stone then it’s best to call in your local Tile Doctor to ensure nothing is applied to the stone that could damage it.
Such was the case with this four-year-old Sandstone Patio at a house in the town of Kettering. Unfortunately, it was not sealed when it was first installed and the combination of weather and UV sunlight had faded the tiles, this together with general soiling had greatly affected the appearance of this beautiful stone and could almost have been mistaken for concrete slabs.
My first course of action was to lightly spray the area with a dilution of Tile Doctor Pro-Clean which is a powerful tile cleaning product that is safe to use on Stone. The solution was allowed to soak in for a while before being agitated with a brush to bring out the dirt. This was followed by pressure washing with a spinning tool at a medium pressure so as to not damage the stone.
Once dry I re-grouted the entire area and then sealed with Tile Doctor Colour Grow Sealant which is a impregnating breathable product (essential for damp environments) that also enhances the natural colours of the stone.
Within hours of finishing the customer came home and called me straight away to say he couldn’t believe the transformation that was achieved and they looked better than when they were first laid.
Phil Vissian
Northamptonshire Tile Doctor
 Tile Doctor Ltd
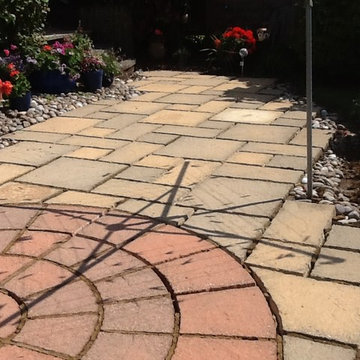
Lichen, moss and other plant-based staining is a common sight on patios exposed to the UK climate. For many property owners, it’s a very difficult task to keep patios looking great in the face of the natural effects of the environment. However always happy to help Tile Doctor is available to provide the professional cleaning and sealing needed on a regular basis.
This Sandstone tiled patio in Rushden was certainly a prime candidate for restoration. Not only was it completely covered in lichen and moss, but it was also cracked in parts and missing grout. The patio would therefore need not only cleaning and sealing, but also re-grouting.
To begin the restoration, I opted to power jet wash the entire area to remove as much of the initial layers of moss. Then, I mixed a strong dilution of Tile Doctor Pro Clean, which is a powerful and reliable alkaline cleaner suitable for use on both internal and external natural stone tiles. This was applied liberally to the patio and scrubbed into the stone to cut through the particularly stubborn stains. The two photos below show the fantastic result.
After completing the cleaning phase, I allowed the patio to dry completely overnight before returning to re-grout the entire area with mortar. To finish off I applied a fresh sealer in the form of Tile Doctor Seal and Go Extra, which an acrylic-based, fully breathable sealer appropriate for outside use.
The below pictures show the final result. As you can see, it was a complete transformation – and my very happy customer will agree! With the right products and methods, it’s possible to bring new life back to weathered patios.
Phil Vissian
Northamptonshire Tile Doctor
 Tile Doctor Ltd
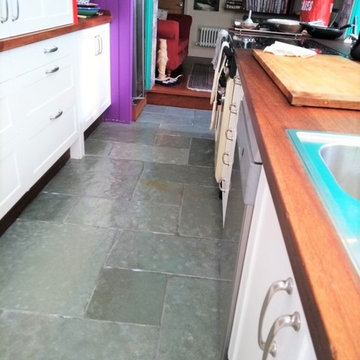
I recently helped a homeowner from my home town of Dursley who got in touch about her kitchen Flagstone floor. The problem revolved around an accident she had with raspberries which had stained the flagstones and the problem became compounded when a house hold clearing product was applied neat to clean up the mess. If you follow any of our Tile Doctor blogs, you will know that using strong household cleaning products can damage the sealer and, in this case, it had left white marks on the floor.
I called round to the property to survey the floor as was surprised to find out that the floor had been cleaned and sealed only four months prior by another company. I don’t like to comment on other people’s work, but I found the grout lines and flagstones were still badly ingrained with dirt, so it wasn’t a through job.
I completed by survey and demonstrated the process I would follow to resolve the issues on one of the flagstone tiles. She could not believe the difference I was able to make and booked me in straight away to restore the entire floor.
My first task was to protect the wooden kitchen units from splashing that can happen when cleaning the floor. Once that was done, I set about stripping the sealer from the floor and deep cleaning the tile and grout with a strong dilution of Tile Doctor Pro-Clean. Pro-Clean is a concentrated, multi-purpose high-alkaline cleaner, stripper and degreaser which is safe to use on all types of tile, stone and grout including natural stone.
Working in sections across the Kitchen and adjacent dining room I diluted one part Pro-Clean to two parts water and mopped it onto the flagstones and grout where I left it to soak in for roughly fifteen minutes. Then using a rotary floor buffer fitted with a black scrubbing pad I scrubbed the solution into the floor into the old sealer and trapped dirt came away turning the cleaning fluid black in the process. The soil was then rinsed off with water and then extracted with a powerful 3,000 watt wet and dry vacuum. This process was repeated until I was satisfied the floor was clean and I ran a stiff grout brush along the grout lines to ensure they also received a good scrub. After I was satisfied the section was clean it was rinsed thoroughly with water to neutralise the floor and remove any trace of product and then dried with the wet and dry vacuum.
The cleaning process took up the whole day, but the flagstones would need to be dry before sealing so after giving the owner an update I left the floor for two days, so it could dry out thoroughly.
On my return I tested the floor was dry in multiple places with a damp meter to ensure it was ready to be sealed. The readings showed that the wet and dry vacuum had done a good job in removing the moisture, so all was well. To seal I applied several coats of Tile Doctor Seal and Go allowing each coat to dry before applying the next however with such a large area to cover I was able to work in sections around the floor.
Seal and Go works really well on Flagstones and leaves a very appealing sheen finish, also being water based it doesn’t leave a smell as it dries.
The results were amazing, and the customer thanked me for making such a massive improvement on her floor. Before leaving I made sure to discuss after-care and to avoid the use of hash cleaning products.
Malcolm Crowther
Gloucester Tile Doctor
 Tile Doctor Ltd
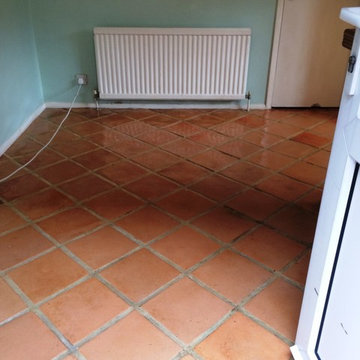
This was a rather dirty Terracotta kitchen floor located at a house in Winchmore Hill in Buckinghamshire, not to be confused with the Winchmore Hill in London. The sealer on the tiles had worn off some time ago and now the dirt was becoming trapped in the pores of the Terracotta making it impossible to clean.
Deep Cleaning Terracotta Tile
To deep clean into the pores of the Terracotta a diluted solution of Tile Doctor Pro Clean, which is a strong tile cleaner sage to use on tiled floors, was applied to kitchen floor and left to soak in for around ten minutes. Then with the aid of a commercial rotary machine the solution was scrubbed into the tiles to release the many years of accumulated ingrained soiling which was removed from the floor using a wet vacuum.
Although this deep cleaned the tile the grout lines needed further attention and were treated with Tile Doctor Grout Clean-up solution and then washed down with fresh water which was removed with a wet vacuum.
There was still evidence of sealer remaining on the floor in some areas so the next step in the process was to apply Tile Doctor Remove and Go again working it into the tile using a scrubbing pad fitted to a rotary machine. Remove and Go as its name suggests is used to remove waxes and sealants from tile and stone. It certainly did the job and once the resultant slurry was vacuumed up and the floor given a final rinse to remove any chemicals used in the process the floor was looking much cleaner and left to dry overnight ready for our return
Sealing Terracotta Tile
The next day came back to do the sealing and checked the floor first for any spots we might had missed and also to ensure it had dried sufficiently. Tile Doctor Seal and Go was then applied in coats to fully seal the floor. As well as adding protection Seal and Go adds a nice subtle satin finish to Terracotta and being water based it doesn’t give off an odour when it’s drying.


 Betty Wasserman Art & Interiors
Modern luxury meets warm farmhouse in this Southampton home! Scandinavian inspired furnishings and light fixtures create a clean and tailored look, while the natural materials found in accent walls, casegoods, the staircase, and home decor hone in on a homey feel. An open-concept interior that proves less can be more is how we’d explain this interior. By accentuating the “negative space,” we’ve allowed the carefully chosen furnishings and artwork to steal the show, while the crisp whites and abundance of natural light create a rejuvenated and refreshed interior.
This sprawling 5,000 square foot home includes a salon, ballet room, two media rooms, a conference room, multifunctional study, and, lastly, a guest house (which is a mini version of the main house).
 Riddle Construction & Design
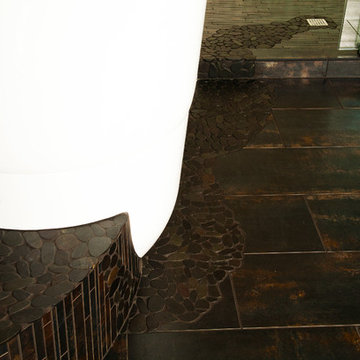
close up of pebble tile design around soaking tub.
Inspiration for a large asian master white tile and porcelain tile porcelain tile home design remodel in Seattle with a vessel sink, flat-panel cabinets, medium tone wood cabinets, quartz countertops, a two-piece toilet and beige walls
Inspiration for a large asian master white tile and porcelain tile porcelain tile home design remodel in Seattle with a vessel sink, flat-panel cabinets, medium tone wood cabinets, quartz countertops, a two-piece toilet and beige walls

 Platinum Poolcare
Request Free Quote
This swimming pool measures 20'0" x 40'0" , depth 3'6" to 5'6" with an offset stairs section. The decking and coping is unilock. Glass tile on the perimeter and spa top are black irridescent subway. The swimming pool surface was a custom blend exposed aggregate. Photos courtesy of Outvision photography
 Tile Doctor Ltd
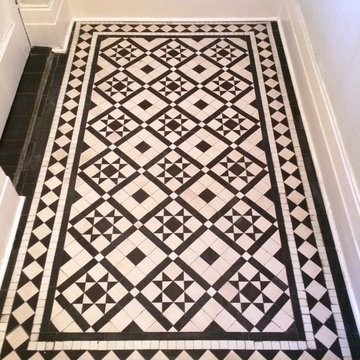
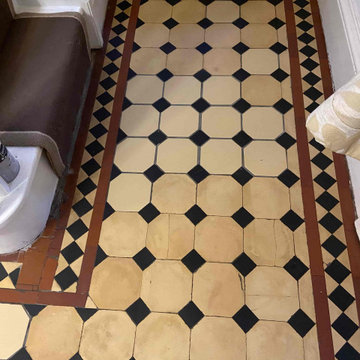
This job was at a house in near Windermere in South Cumbria, a place which is very popular amongst tourists to the Lake District. My client had a Black and White Victorian tiled floor in dire need of a clean and re-seal.
Prior to the application of any cleaning products, my first task was to run damp tests to make sure there were no inherent damp problems. With old floors of this type it’s good to know if there is a damp problem as this will affect the choice of sealer and also the length of time the floor requires to dry.
Fortunately, there were no damp issues present, and I was able to proceed however had the floor been damp and being December I would have offered to carry out the clean and seal in the Summer, when the water tables were lower and the damp levels would be more settled, thus creating a better environment for the sealer to operate in.
I started cleaning the Victorian tiles with Tile Doctor Remove & Go, a product which breaks down old sealers in preparation for a fresh seal to be applied. The product is diluted with water and then scrubbed into the floor with a scrubbing pad fitted to rotary machine; the resulting slurry is then removed using a wet vacuum.
Next step was to apply Tile Doctor Pro-Clean which was applied liberally to the floor, left to dwell for a short period and then agitated with a black scrubbing pad to lift out the ingrained dirt. I also paid special attention to cleaning the grout lines with a stiff scrubbing brush. The floor was then rinsed with clean water, and the resulting residue was extracted using a wet-vac machine.
After the cleaning was completed, the tiles were left for a couple of days to allow them ample time to dry. Upon my return to the house I checked the damp levels again and then applied two coats of the impregnating, colour enhancing sealer Tile Doctor Colour Grow which gives the black tiles more depth of colour, along with the robust surface seal and Matt finish my client had requested.
My client was exceptionally pleased the results – but really, the photographs speak for themselves.
Heidi Taylor
South Cumbria
 Tile Doctor Ltd
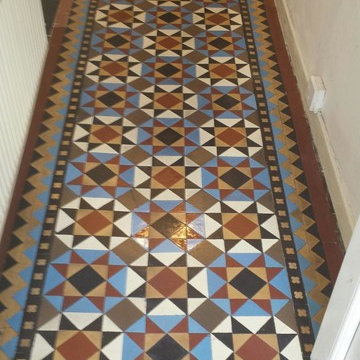
This set of photographs are from a house in the Warrington suburb of Stockton Heath where my client had discovered a Victorian Tiled floor under carpet in the hallway and was keen to have it restored back to its original condition. You can see from the photograph below that it was in quite a state with dirt and paint splashes however I was confident we could manage it.
On arrival I started to protect the skirting boards and entrance carpet to another room. Once that was done i started to strip the paint splashed and any remaining sealer from the floor using Tile Doctor Remove and Go which is an effective coatings and sealer remover that unlike some products is perfect safe to use on Victorian tiles
Working on the floor the product was diluted, scrubbed into the tile and then left to dwell for twenty minutes before being rinsed off with water which was then removed using a wet vacuum. The floor was now looking a lot cleaner, however I could see a number of stubborn areas that were going to need further treatment so I mixed the Remove and Go 50/50 with another Tile Doctor product called NanoTech HBU (Heavy Build-up Remover), which adds abrasive particles to the solution. This solution was scrubbed in and then rinsed off when i was happy with the condition of the floor. This process took much of the day and once done it was left to dry overnight ready for sealing the next day.
On my return the next morning i tested the floor in several places with a damp meter to ensure it was dry. When i was happy the floor was dry i started sealing with thin coats of Tile Doctor Seal and Go leaving thirty minutes between coats to allow it to dry; in total i gave the floor seven coats of sealer which gave the floor a nice shine which the customer was very happy with. As well as enhancing the look of the floor the sealer will provide stain protection going forward.
Alastair Robb
West Cheshire Tile Doctor
 Tile Doctor Ltd
Detailed below is the restoration of a Victorian tiled hallway floor that we started back in June in Preston. Although we started in June there was so much damage to the subfloor and the tiles it took some time to complete, additionally, the client did not like the colour samples of the replacement tiles we had brought along and so decided to source their own which took some time.
Three months later with replacement tiles now sourced we were given the go ahead to start the restoration. The first day’s focus was cleaning the original floor using very coarse 100-grit and 200-grit Diamond pads fitted to a rotary buffer machine and applied to the floor using a strong dilution of Tile Doctor Remove and Go to add extra cleaning power. Tile edges were given special attention using a flex machine fitted with small diamond grit pads.
The floor was rinsed with water to remove the soil generated and this was followed up with an acid rinse using a 1:3 dilution of Tile Doctor Grout Clean Up. This last step in the cleaning process is especially recommend for old floors like this which don’t have a damp proof membrane and can suffer from efflorescence issues.
The next stage focused on repairing the floor and started by carefully knocking out all the broken and chipped tiles. We had previously estimated over 30 tiles needed replacing and so the client had bought two boxes, meaning I had plenty of spares to work with.
Before tiling however, the subfloor had suffered over the years and needed attention first. To deal with this the damaged areas were raked out, cleaned up and then back filled with rapid setting self-levelling screed from Mapie adhesives. Once the sub-base was fixed then we put the new tiles back in, they were not an exact match, about 5mm too short and lighter in tone, but the colour was pretty close.
Tiling an old Victorian floor like this can be a bit like dominoes as you move one out of place 2 decent ones come loose and then they also need refixing. Some of the tiles had hair line cracks in them and once they were loose, they just cracked in half. As such the 20 spare tiles that I thought were spare came into good use and I actually ended up using all of them. I could have done with a few more so it was decided to reset the last four broken tiles and grout them in. Luckily for me the client was very understanding about the nature of tile restoration and had accepted that there would be some imperfections and they were not expecting a new floor.
The Tiles were fixed down using Ultralite Rapid Flex (another product from Mapie) and then grouted using the same adhesive (not a grout, as they did not have grout back in the day, just cement and screed).
The floor was left this to cure overnight, and we came back the next day to finish the clean using a 200-grit diamond pad fitted to a buffing machine and lubricated with water, then one last acid rinse to get the tiles as clean as possible and remove any lingering grout haze. This last clean helps to blend the new tiles in with the original.
Before applying a protective sealer, the floor was left to dry for a couple of days, the tiles need to be thoroughly dry before sealing or you can end up with a patchy appearance.
For this floor with no damp proof membrane, it was important to use a fully breathable sealer that will allow moisture to rise through the tile and evaporate at the surface, so Tile Doctor Colour Grow was chosen. This is a good choice for old floors like this as its fully breathable, head wearing, and it contains a colour enhancer that improves the overall appearance of the tile.
Three coats of Tile Doctor Colour Grow which is a fully breathable, colour enhancing sealer hat works by soaking into the pores of the tile protecting it from within. It has a matt finish, and it works really well with all clay tiles and is ideal for these types of floors.
You can probably spot the lighter coloured tiles in the after photos on this page, however it’s a very subtle difference and I think they have blended in quite well with the original. Certainly, my client was very pleased with the newly restored floor, its completely transformed from when we first visited the client, and the floor has now gained character and history. For aftercare we recommend Tile Doctor Neutral Cleaner, its an effective pH neutral product that is compatible with the new sealer.
Russell Taylor
Lancashire Tile Doctor
 Tile Doctor Ltd
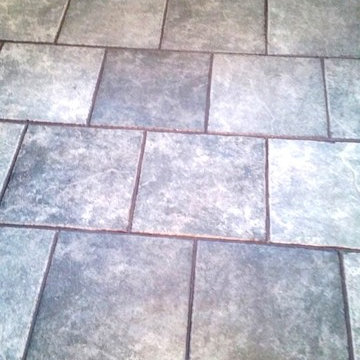
Here’s a quick grout cleaning and re-colouring job I completed in the town of Canvey Island, Essex. Canvey Island lies on the south east coast, and lies just above sea level which in my job is always worth noting as the area can be prone to flooding. This wasn’t the problem here though, simply put, my client was unhappy with the colour of their grout, and wanted it re-coloured to a darker shade to match the grey Ceramic floor tiles.
Cleaning the grout before re-colouring is essential because, as many readers are probably well aware, grouts are porous and therefore can very easily absorb dirt and grease. Most often this will result in grout discolouration if not dealt with promptly.
So, as mentioned above the first step in the re-colouring process involved cleaning the grout lines. For this Tile Doctor has a special Pre-Treat Cleaner which is sprayed on and scrubbed into the grout to both remove any existing dirt and also to prepare the grout joints for a superior bond with the Grout Colourant. Once complete the grout lines looked clean and refreshed.
To clean the ceramic I diluted one part Tile Doctor Pro-Clean to three parts water, and used it to wash down the Ceramic tiles, leaving a consistent level of cleanliness across the entire floor. I then rinsed the floor with water which was then extracted using a wet vacuum and waited for 3 hours for the floor to dry.
Once dry, I began the process of applying the Charcoal Grey (as chosen by the client) Grout Colourant to the grout lines. As well as changing the colour the colourant also forms a barrier over the grout sealing it in and protecting it from future staining for years to come.
Then, once dry, the floor was given another quick clean using a light spray of water and a white buffing pad, resulting in an aesthetically pleasing sheen finish. My client was very happy with the outcome and now has the floor they wanted.
Nick Murphy
South Essex Tile Doctor
 Tile Doctor Ltd
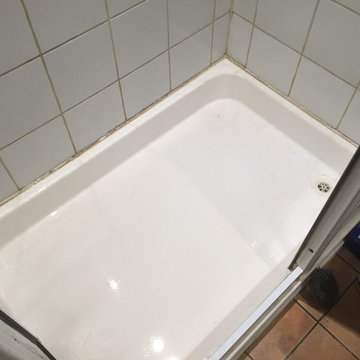
The photographs below are taken from a house in the old market town of Basingstoke which is now the largest town in Hampshire. I was asked to address a very severe case of Limescale build-up in a shower cubicle. The wall tiles were Ceramic and a shocking amount of Limescale had deposited itself on them and the shower tray over the years; the owners were going to have to replace everything if Tile Doctor could not come to the rescue!
The photos below really demonstrate the extent of the problem and needless to say the Gauntlet had been laid down and I was ready for a challenge!
My first task was to provide the Ceramic tiled walls with an initial clean. I did this by firstly mixing a diluted solution of the high alkaline cleaner known as Tile Doctor Pro Clean and then applying this on the tiles and leaving it to dwell for a while before scrubbing it in by hand in order to remove any surface dirt and scum. This was then washed off and I set my mind to the main task at hand: the Limescale removal.
To remove the Limescale it is necessary to apply an acidic product. However, there is an issue for homeowners that most products readily available on the market come in a liquid form, which of course simply drips down the tile, and therefore does not work to the best of its abilities. Fortunately, Tile Doctor recently launched a new product by the name of Acid Gel. Since it’s in a gel form it stays put on the surface and does not evaporate or dry out too quickly. This allows it time to break down the Limescale and other difficult stains.
Acid Gel was thus applied to the affected areas and left to dwell for a short while. I then scrubbed it deeply into the tile and grout lines, and follow up with an application of steam to tackle the stubborn areas and help the Acid Gel to tackle the Limescale.
The results were absolutely fantastic, and even the shower tray – which was in a very poor state indeed – came up very clean. Needless to say, my client was very pleased that they now do not have to replace the shower!
Charles Okwechime
Hampshire Tile Doctor
 Tile Doctor Ltd
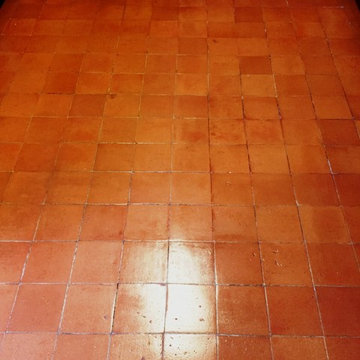
Not too long ago I visited a client who had just moved into a lovely old cottage in Milton, Oxfordshire. She wanted to restore many of the antique features of the building, including a fantastic Quarry tiled floor in the kitchen.
Quarry is typically a robust, hard wearing stone, but in a high traffic area like a kitchen, the tiles will need regular maintenance. These tiles clearly hadn’t seen a thorough clean and fresh seal in a long time, and so I was called in to provide just that.
On the first day of work, I gave the Quarry tiles a deep clean using a strong solution of Tile Doctor Pro-Clean and water. Pro-Clean is a versatile alkaline cleaner that also helps to break down any old and no longer effectual sealer remaining on the tiles.
The solution was applied evenly to the floor and left to dwell for half an hour, allowing time for it to seep into the stone to get underneath and lift out the ingrained dirt. I then removed the dirt by agitating the solution with a scrubbing pad fitted to a rotary floor scrubber. I worked in small sections at first, and gradually finished the entire floor.
After completing the initial clean, I rinsed away the soiled solution and vacuumed up the excess moisture using a wet-vac machine. I then scrubbed the floor an acid wash using a dilution of Tile Doctor Grout Clean-Up to remove grout smears and other mineral type deposits. The resulting solution was then removed in a similar fashion using a wet-vac.
The final step in the cleaning process was to rinse the floor with Tile Doctor pH Neutral Cleaner to remove any trace of product helps to tackle any remaining dirt and reset the pH balance of the tiles before sealing.
After leaving the floor to dry overnight, I returned the next day to the house to seal the floor with Tile Doctor Seal & Go, a water-based topical sealer which gives the floor an aesthetically pleasing sheen and a robust surface seal.
The photos demonstrate the results better than this short account can, needless to say the floor is now transformed.
Barry Woodward
Oxfordshire Tile Doctor


10