
Search results for "Diluted" in Home Design Ideas
 Archviz-studio.com
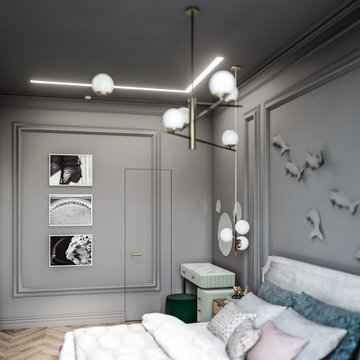
The interior of this bedroom is in a grey monochrome style. A calm background will relieve the visual tension. The aesthetic mood creates molding in the interior design, especially at the head of the bed, in the shape of fish. Creates a soft, muted atmosphere. The monochrome background is diluted with wood flooring, which brings a note of warmth and comfort.
The decor element is a bed with a soft headboard. The bedroom interior cannot be imagined without an elegant pastel dressing table, perfectly complementing the gray color of the bedroom. The round mirror decor takes on a sophisticated look in the gray wall decoration. Used details such as black and white photos as decoration. They add beauty to the overall design.
Decorate the room and illuminate the chandeliers with white plafonds. Additionally, lamps on the ceiling illuminate the room.
Learn more about our 3D Rendering Services on our website: www.archviz-studio.com
 5 star finishes ltd
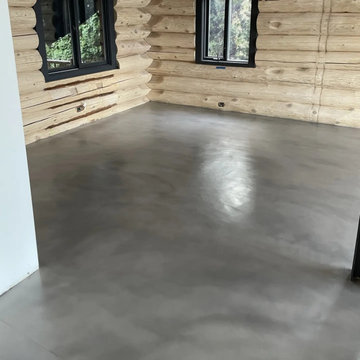
Microcement floor (2500 square feet) installed over a Warmboard heated floor system.
The entire floor was covered in the Warmboard system, and then Hardi backer board ¼ inch was embedded in flexible tile adhesive and screwed down over the warmboard.
The seams were all taped in with 5StarFinishes Adex fledx tape and megalite tile adhesive.
The final installation had 5StarFinishes EIFS mesh applied over the hardi backer board after two layer of diluted quartz primer was applied.
The final decorative layers of Microcement Floor Fine were installed over two smooth layers of Microcement Floor Base, and sponged to remove pin holes and trowel marks.
We color matched the plaster to the shade Creek Bend.
Final sealer was chosen to be 5StarFinishes Hi wear oil based sealer with Aluminum oxide for extreme wear and stain resistance.
Completed in 2022.
Install not including warmboard and Hardi backer board: $50,000

 Redman Design Studio
This little girls bedroom started out as a playroom before she was born. You can still see remnants of the former room in the carpet tiles and built-in toy storage. We began the transformation with a pink ceiling that runs down the wall about 18", grey walls below to help dilute the brightness a little and provide a backdrop for other pops of color. This antique bed was drug out of her great-grandmothers attic, as well as the dresser and dressing table. They were all given some much needed love with bright paint colors to match the little girls personality. A window seat with toy storage below was fixed with a purple seat cushion, throw pillows, and a glass bird in a pink birdcage. Wrapping paper was glued below the window seat and on the cabinet doors as wall paper to provide a little pattern in the room. Original kids artwork as well as calendar photos are framed throughout the room. A body pillow creates a comfortable headboard and a colorful, butterfly pattern (which is where most of the colors for the room were pulled) adorn the bed with all white bedding.
Find the right local pro for your project
 Tile Doctor Ltd
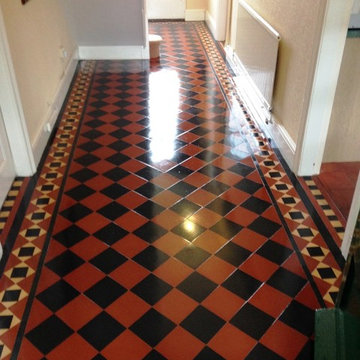
This black and red Victorian tiled hallway at a property in Newport, the third largest city in Wales, had a timeless charm about it, and a classic diamond pattern. Unfortunately, the tiles had lost their colour, leaving them looking dull and lifeless. It was clear to me, upon further inspection, that the existing sealer had failed, allowing dirt to become trapped in the pores of tile.
This can be a very difficult problem to rectify without the right professional assistance; everyday household cleaners are rarely suitable for sealed floors and acidic cleaners can actually male the problem worse. The tiles needed a deep clean with strong products, followed by a fresh, robust surface seal to prevent dirt from becoming trapped again in the future.
I started cleaning the tiles with a strong dilution of Tile Doctor Pro Clean, worked in to the stone as per usual by using a rotary machine fitted with a black scrubbing pad. Pro Clean is a reliable alkaline cleaner that works well on most kinds of natural stone, and while I could see it made a difference here, it was clear something stronger was required to remove what was left of the old sealer.
To remove this, I applied a dilution of Tile Doctor Remove and Go, which is a dedicated stripper that is safe to use on tile and stone for the purposes of breaking down old sealers, waxes, paints, and adhesives, and this proved effective in getting rid of all the old sealer.
Once the cleaning was complete, I rinsed the floor thoroughly to remove any trace of chemicals left over from the cleaning products, before leaving it to dry overnight.
I came back to the property the next day and, after checking the floor was completely dry, I proceeded to seal the floor using eight coats of Tile Doctor Seal and Go. This types of sealer is known as ‘topical’, which means that it builds up a solid layer of protection on the surface of the tile. Topical sealers tend to be more suitable to Victorian and Quarry tiles as they typically require a lot of sealer due to their porosity and these types of sealer are less costly. Seal and Go also adds a nice aesthetically pleasing low sheen finish.
As you can see from the second photo, this did wonders to the tiles and really brought this classic Victorian pattern back to life. Another satisfied client for the Monmouthshire Tile Doctor.
Paul Wales
Monmouthshire Tile Doctor
 5 star finishes ltd
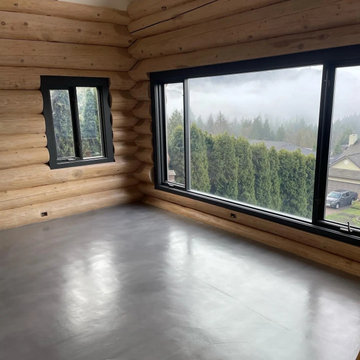
Microcement floor (2500 square feet) installed over a Warmboard heated floor system.
The entire floor was covered in the Warmboard system, and then Hardi backer board ¼ inch was embedded in flexible tile adhesive and screwed down over the warmboard.
The seams were all taped in with 5StarFinishes Adex fledx tape and megalite tile adhesive.
The final installation had 5StarFinishes EIFS mesh applied over the hardi backer board after two layer of diluted quartz primer was applied.
The final decorative layers of Microcement Floor Fine were installed over two smooth layers of Microcement Floor Base, and sponged to remove pin holes and trowel marks.
We color matched the plaster to the shade Creek Bend.
Final sealer was chosen to be 5StarFinishes Hi wear oil based sealer with Aluminum oxide for extreme wear and stain resistance.
Completed in 2022.
Install not including warmboard and Hardi backer board: $50,000

 Beroza Flooring
Transitional living room style embraces both traditional and contemporary elements. At very first look room has traditional character carrying conventional furniture and decorative elements. Though contemporary stone fireplace as well as modern rustic hardwood floors with pattern that stands out dilutes atmosphere giving it life. - Olegsimage
 Tile Doctor Ltd
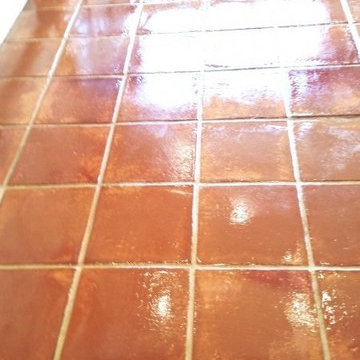
Sealers really do bring out the best in Terracotta tiles, however the catch is they will wear off over time and if you want to maintain that appearance you have to work out a regular maintenance plan. If you don’t maintain the sealer you will find that the sealer near the most heavily used areas such as doors etc. will wear away first and once that happens dirt will become ingrained in the tile and becomes difficult to clean resulting in a patchy appearance.
The remaining sealer on this Terracotta tiled kitchen floor at a house in the town of Wickford, Essex was no longer effective and had worn completely off in places. The solution was to strip off the old sealer, clean the Terracotta tile and gout and then re-seal with a fresh seal.
I started by giving the floor a deep clean with Tile Doctor Pro Clean diluted 2 parts water to 1 part cleaner. This is quite a strong dilution designed to allow the removal of the sealer and was left to dwell on the floor for ten minutes before working it into the floor using a scrubbing machine fitted with a black pad. Surprisingly the sealer was proving difficult to shift in certain areas and I had to repeat the process a few times and made sure to give the grout a good scrubbing as well.
I managed to get rid of most of the sealer using this process and for the remaining stubborn areas I used a stronger product called Tile Doctor Remove and Go which is a very effective coatings remover that is safe to use on tiles. This did the trick and the floor was now free of sealers and the grout was looking much better too, the resultant slurry was removed using a wet vacuum and I then rinsed the floor several times with water before leaving it to dry for weekend.
Tile Doctor Colour Grow which is an impregnating sealer that seeps into the pores of the tile to block them and prevent contaminates becoming ingrained in there and it also enhances the natural colours. Once this was dry I followed up with a number of coats of Tile Doctor Seal and Go which is topical sealer that will protect the surface and adds a nice sheen to the floor and is a popular choice for Terracotta and Quarry tiles.
I’m not sure my photographs do this post any justice however hopefully you can see that floor was quite transformed, the grout is much cleaner and the colours in the Terracotta have really come to life.
Nick Murphy
South Essex Tile Doctor
 Tile Doctor Ltd
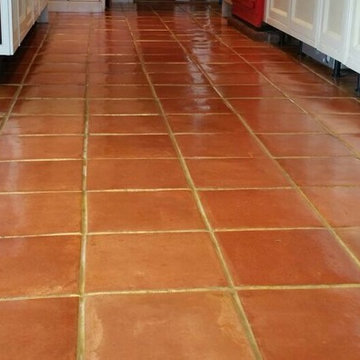
Here’s an interesting job I completed recently in the town of Lymington which is a lovely costal town within the New Forest and on the west side of the Solent. This Terracotta tiled floor was installed in the kitchen and was suffering from an efflorescence issue due to an ongoing leak which resulted in the salts in the water becoming deposited on the surface of the tiles as the water evaporated leaving a white bloom on the surface.
This process is more commonly known as efflorescence and is particularly common in old properties which have no damp proof membrane under the floor and white staining by the cupboards is especially visible in the below photograph.
My client was eager to have the problem fixed, and so enlisted Tile Doctor to get the job done.
To remove the efflorescence, the Terracotta tiled floor was acid washed using a mild dilution of Tile Doctor Grout Clean-Up which is primarily sold to remove grout smears but is equally effective at removing mineral deposits such as the white salts left behind by efflorescence.
The solution was scrubbed into the tiles using a stiff scrubbing brush and was successful at removing the white staining. Naturally it’s not advised to leave acid too long on any surface so the floor was treated in sections and then rinsed off with water and the residue removed using a wet-vacuum.
Following this, the floor was power-scrubbed in combination with a diluted solution of Tile Doctor Pro-Clean. Pro-Clean is a versatile cleaner that also contains stripping properties, allowing it to break down and remove old sealers, it also does a nice job getting the grout clean.
With the efflorescence treated and the floor now clean I was now happy with the condition of the tiles and give them a final rinse under pressure to ensure the floor was neutralised and any trace of products removed.
The Terracotta tiled floor was then left to dry overnight and I came back to seal the floor the next day. To seal the tiles I used three coats of Tile Doctor Seal & Go Extra, which provides a robust surface seal, and is recommended for internal floors with the damp issues.
Hopefully this quick report has offered some useful advice on how to treat efflorescence which is quite a common problem; naturally if you have further questions Tile Doctor does offer a free advice service so do get in touch.
Charles Okwechime
Hampshire Tile Doctor

 Jacklynn Little Interiors
Example of a mid-sized trendy galley medium tone wood floor open concept kitchen design in Toronto with a double-bowl sink, shaker cabinets, white cabinets, quartzite countertops, gray backsplash, stone tile backsplash, stainless steel appliances and an island


 Tile Doctor Ltd
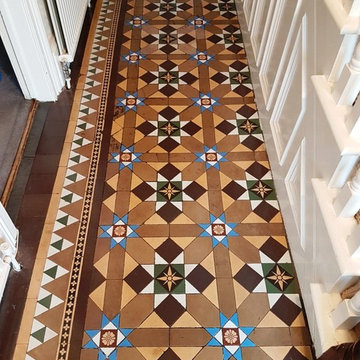
Shipley is a town in West Yorkshire that was heavily shaped by the Industrial Revolution and the Victorian period. It became particularly well-known for its textile industry and some of the original mills in which textiles were manufactured still survive in the town today. Being in West Yorkshire, Shipley is also part of what is commonly known as ‘Brontë country’ – once home to the famous Brontë sisters.
Many Victorian era properties still survive in the area too and all too often the original Victorian tiled floors contained within are not well maintained. I recently visited a customer in Shipley who had a Victorian tiled hallway that was in need of a deep clean and seal. What’s more, the customer told me that there were around 20 loose tiles in the hallway that would need to be reinstalled.
On the first day, I started by refitting the 20 loose tiles in the hallway. The problem however was a lot worse than originally thought and, in the end, I had to take up 108 tiles, so I could rebuild the base of the floor, and then relay them. This process took up most of the day but at least the adhesive and grout would be set in time for cleaning the next day.
On day two I focused on deep cleaning the tiles and removing any remaining sealer by applying a strong dilution of Tile Doctor Pro-Clean. Pro-Clean is a strong alkaline heavy-duty tile and grout cleaner that serves the purpose of both cleaning the stone and when used in a strong dilution will strip off sealers.
I applied the Pro Clean liberally across the length of the hallway and left it to soak into the tiles for about twenty minutes. This allows the product time to breakdown the sealer and dirt before being scrubbed in with a black scrubbing pad.
Special attention had to be paid to parts of the floor which had suffered paint splashes from previous decoration. I was also surprised to find that there were even some chewing gum stains marking the tiles. These were removed using the combination of a steam cleaner, more Pro-Clean and the careful use of a handheld scraper.
The floor was then given a thorough rinse with fresh water and then dried as much as possible with a wet vacuum. It was then also left to dry off overnight.
Upon returning to the property the next day I checked for any moisture issues with a damp tester. Thankfully, the floor proved dry and I could proceed with sealing the tiles which was done using four coats of Tile Doctor Seal and Go that leaves a deep satin finish that the customer had requested.
Nigel Stoker
North West Yorkshire Tile Doctor
 Archviz-studio.com
High-tech house exterior rendering project. The architecture of this style uses materials such as concrete, glass, wood. The walls are even and smooth, without relief. The color scheme is restrained, a combination of white and gray. Large windows on the facades dilute the strict structure of the facade and fill the house with light. The roof is flat. The facade of the house organically fits into the laconic landscape design, without unnecessary plantings. Convenient wide driveway. There is a recreation area with a small swimming pool on the house plot. Lamps on the site will provide beautiful lighting; the facade of the house is additionally highlighted.
 Archviz-studio.com
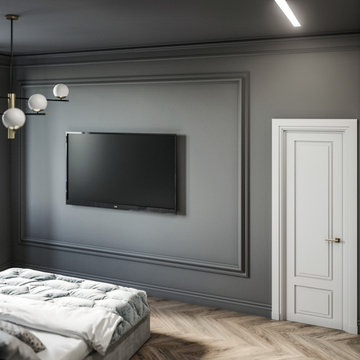
The interior of this bedroom is in a grey monochrome style. A calm background will relieve the visual tension. The aesthetic mood creates molding in the interior design, especially at the head of the bed, in the shape of fish. Creates a soft, muted atmosphere. The monochrome background is diluted with wood flooring, which brings a note of warmth and comfort.
The decor element is a bed with a soft headboard. The bedroom interior cannot be imagined without an elegant pastel dressing table, perfectly complementing the gray color of the bedroom. The round mirror decor takes on a sophisticated look in the gray wall decoration. Used details such as black and white photos as decoration. They add beauty to the overall design.
Decorate the room and illuminate the chandeliers with white plafonds. Additionally, lamps on the ceiling illuminate the room.
Learn more about our 3D Rendering Services on our website: www.archviz-studio.com

 Robb & Stucky
Coastal meets modern in this living room design with a color palette of whites, creams and greys accented by turquoise. The grey brick fireplace adds a cozy touch.
 Archviz-studio.com
High-tech house exterior rendering project. The architecture of this style uses materials such as concrete, glass, wood. The walls are even and smooth, without relief. The color scheme is restrained, a combination of white and gray. Large windows on the facades dilute the strict structure of the facade and fill the house with light. The roof is flat. The facade of the house organically fits into the laconic landscape design, without unnecessary plantings. Convenient wide driveway. There is a recreation area with a small swimming pool on the house plot. Lamps on the site will provide beautiful lighting; the facade of the house is additionally highlighted.
 Archviz-studio.com
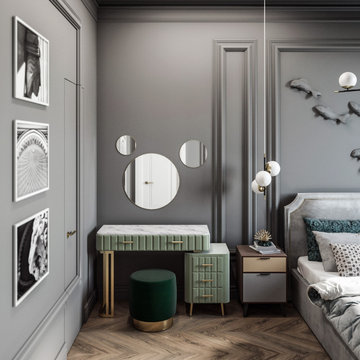
The interior of this bedroom is in a grey monochrome style. A calm background will relieve the visual tension. The aesthetic mood creates molding in the interior design, especially at the head of the bed, in the shape of fish. Creates a soft, muted atmosphere. The monochrome background is diluted with wood flooring, which brings a note of warmth and comfort.
The decor element is a bed with a soft headboard. The bedroom interior cannot be imagined without an elegant pastel dressing table, perfectly complementing the gray color of the bedroom. The round mirror decor takes on a sophisticated look in the gray wall decoration. Used details such as black and white photos as decoration. They add beauty to the overall design.
Decorate the room and illuminate the chandeliers with white plafonds. Additionally, lamps on the ceiling illuminate the room.
Learn more about our 3D Rendering Services on our website: www.archviz-studio.com
 Archviz-studio.com
High-tech house exterior rendering project. The architecture of this style uses materials such as concrete, glass, wood. The walls are even and smooth, without relief. The color scheme is restrained, a combination of white and gray. Large windows on the facades dilute the strict structure of the facade and fill the house with light. The roof is flat. The facade of the house organically fits into the laconic landscape design, without unnecessary plantings. Convenient wide driveway. There is a recreation area with a small swimming pool on the house plot. Lamps on the site will provide beautiful lighting; the facade of the house is additionally highlighted.
 Tile Doctor Ltd
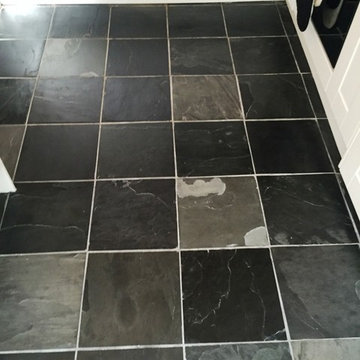
These Slate kitchen floor tiles at a property in Oxford were in good physical condition, but had become dull over time due to heavy usage, and upon close inspection the grout was stained. The customer contacted me as she was keen to get the tiles back to looking their best. This would require a thorough clean and the application of a fresh sealer.
While Slate floor tiles are reputed to be hard wearing and damage resistant – and are therefore a popular choice for high traffic areas like kitchens – this does not exclude them from needing regular maintenance.
To begin, I mixed a strong solution of Tile Doctor Pro Clean and water. Pro-Clean is a versatile cleaner that when used in a weak dilution can be used as a regular cleaner for most types of natural stone floor, including more sensitive stones such as Limestone and Marble.
The cleaning was then spread across the surface area of the floor, and left it to dwell for ten minutes to allow the solution to seep into the pores of the stone and lift the ingrained dirt to the surface. Pro-Clean in a strong dilution also functions as a stripping product, meaning it works to strip away any old and ineffectual sealer.
I then scrubbed the solution into the floor using a stiff scrubbing brush, paying particular attention to the grout in order to break down the visible staining. The tiles and grout lines came up really well during the cleaning process – this became clear once I had rinsed the floor and removed the residue using a wet vacuum.
With the customer eager to have the job completed quickly, I installed portable room dryers and utilised a heat gun to dry the floor, allowing me to seal it on the same day.
Once I had ensured the floor was completely dry, I commenced the sealing process by firstly applying a coat of Tile Doctor Stone Oil, a product which is designed to bring out all of the natural dark shades in the Slate.
When this was dry, I applied a single coat of Tile Doctor Colour Grow. This is an impregnating sealer, meaning that it soaks into pores of the stone to provide durable protection from within against ingrained dirt and stains. Colour Grow also enhances the natural colours in the stone even further.
The customer was amazed by just how big a difference could be made to the tiles in the space of just a day. Although the tiles were generally in very good nick, my main task was to be liven them up – judging by the before and after photos, I think this was achieved. And, now that they have been treated to a fresh seal, the tiles will be prevented from quickly becoming dull again.
Barry Woodward
Oxfordshire Tile Doctor
 Left Shore Construction
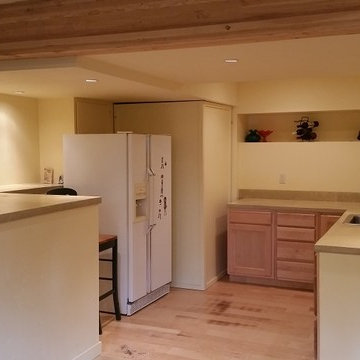
The outcome of the basement remodel turned out exceptionally well. The homeowner converted the unused 4’-high crawlspace into a daylight basement with skip trowel ceiling, Tuscan walls, concrete counter-tops and new bathroom with Jacuzzi tub.
We took the uneven foundation and turned it into a shelf that goes around the perimeter.
I was able to do the concrete counter-tops and they turned out really well. The shelf stands out in the room. We chose a light yellow hue for the cement to brighten up the area.
The ceiling turned out to be a bit of a challenge, as we had to go around the newly installed furnace system, account to for all the angles and still allow adequate head room, especially in the bathroom. We utilized the low ceiling to put in mood lighting. The kitchen got several bright can lights in addition to mood lights.
I normally prefer to use colored plaster, but on the request of the home owner, used the special Miller paint that reflects sunlight to make the daylight basement look brighter. Used the same paint on the ceiling, just ½ diluted with white.
What we have done, is taken a crawl space and converted it into a lovely beautiful daylight basement with tones of room and a lot of personality.

 Carlton Edwards
David Dietrich Photography
Large arts and crafts light wood floor and brown floor great room photo in Charlotte with brown walls
Large arts and crafts light wood floor and brown floor great room photo in Charlotte with brown walls
7