
Search results for "Doctorate" in Home Design Ideas
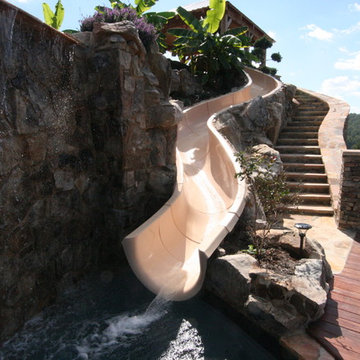
 Swimming Pool Doctor Inc
Large beach style backyard stone and custom-shaped infinity water slide photo in Nashville


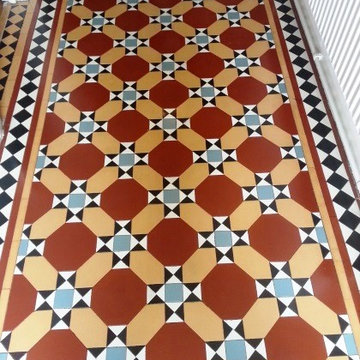
 Tile Doctor Ltd
We were asked to restore a beautiful geometric Victorian tiled floor. The property had been used as a letting house and the floor had been used and abused for many years, just given an occasional mop over from time to time.
The new owners wanted to revive the colours and deal with the neglect. Step one was to put down the tile doctor pro clean alkaline cleaning solution and to let it dwell for a period of around twenty minutes.
We gave the solution plenty of dwell time before setting up our low speed rotary machine, underneath it we used a black pad to agitate and help loosen the ingrained dirt.
Once completed we set up our powerful rinsing tool which is attached to a machine fixed into our van, by doing this we do not need to dispose of any dirty water on your property but instead we take it away with us and dispose of it in the proper manner in an appropriate disposal point.
After rinsing the floor came up very well but we still felt it could be better, we used a steamer coupled with HBU Nanotech and a scraper to remove various deposits of paint and other sticky residue which had set over time.
After thoroughly rinsing the floor again we left the floor to dry for 4 days, Victorian tiles along with other earth based tiles are very absorbent and need to dry thoroughly and fully.
On our return we tested for damp ensuring the floor was dry enough to seal.
To seal the floor we used two coats of colour grow impregnating sealer, once the sealer had dried we then began sealing the floor using seal and go.
After applying several thin coats of seal and go, the floor reached the desired appearance.
A combination of Pro clean, hbu nanotech, colour grow and seal and go with a little bit of care from your local tile doctor restored this old uncared for floor back to the prime of its life.
Find the right local pro for your project

 Denver Mattress
The right bedroom starts with the right support. This calming retreat showcases the Doctor's Choice® Original Medium Mattress from Denver Mattress, designed for sleepers seeking the ideal balance of comfort and support.
Engineered to help promote proper spinal alignment while providing pressure-relieving comfort, the Doctor's Choice® Original Medium is a versatile sleep solution for a wide range of sleep styles. The mattress serves as the foundation of a restorative bedroom designed to help you wake up feeling refreshed and ready for the day ahead.
Warm wood furnishings, soft neutral tones, natural greenery, and layered textures create a relaxing environment focused on wellness and recovery. Together, thoughtful design and supportive sleep technology demonstrate how a bedroom can be both beautiful and functional while prioritizing what matters most: better sleep.
 Denver Mattress
Better sleep starts with the right balance of comfort and support. This contemporary bedroom showcases the Doctor's Choice® Elite Medium Mattress from Denver Mattress, designed for sleepers seeking pressure relief, responsive comfort, and proper spinal alignment throughout the night.
As part of the premium Doctor's Choice® Collection, the Elite Medium delivers a balanced feel that adapts to a variety of sleep positions while providing the support needed for restorative rest. Advanced comfort materials and enhanced support technology work together to help reduce pressure points, promote healthy sleep posture, and support deeper, more comfortable sleep.
The room's rich navy walls, warm wood furnishings, soft textures, and calming atmosphere create a sophisticated retreat focused on wellness and recovery. Together, thoughtful bedroom design and engineered sleep support create a space dedicated to helping you wake up feeling refreshed, recovered, and ready for the day ahead.
 Tile Doctor Ltd
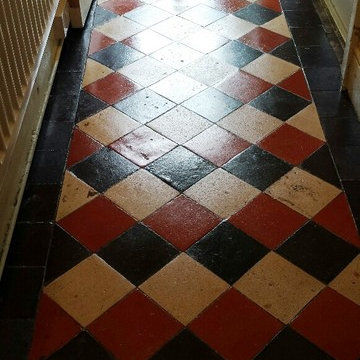
The pictures below were taken at a house in the town of Merthyr Tydfil, which is located not too far north of Cardiff. My client was keen to keep her very old Quarry tiled floor – which dated back to 1905 – intact. The floor had understandably seen a large amount of traffic in its lifetime, and was now in dire need of a professional restoration, including a thorough clean and seal.
First, I completed a survey of the area and provided my client with a quote. After completing many similar jobs in the past, I generally have a good idea of what the final result will look like. I passed on some images of a final result to my client, who was happy for me to begin my work.
On the first day, my first task was to take run some damp tests which were fine; it’s always good to know up front if there are likely to be any damp issues. Next I covered the floor with water to take the surface suction out and waited fifteen minutes before applying a cocktail of Tile Doctor NanoTech Heavy Build-Up cleaner mixed with Pro-Clean and Grout clean-up covering the whole floor. I then immediately starting to work the solution into the floor with a rotary machine fitted with a coarse black pad. The solution was then rinsed off with water which was then extracted with a wet vacuum as I worked. For stubborn areas I applied more of the previously mixed solution scrubbed into the floor with coarse wire wool by hand followed by further rinsing with water.
Each of the products used serves a particular purpose. Pro-Clean is a strong high-alkaline cleaner for natural stone, while NanoTech HBU is a particularly powerful cleaner that uses nano-sized particles to penetrate deep into the stone to get underneath and lift out ingrained dirt and stains. Grout Clean-Up, as the name implies, is a product for resolving grout related problems such as removing grout smears from tile surfaces aka grout haze.
After completing the clean I left the house for 48 hours, to leave enough time for the floor to dry completely in preparation for sealing. Upon my arrival back at the house I conducted some more damp tests to check that the floor was dry enough to seal using the previous readings as a benchmark. The results indicated that I was fine to proceed with the seal, so I applied a total of eight coats of Tile Doctor Seal & Go for durable protection. This was the product I recommended to my client as she wanted a nice, soft shine for her surface seal.
As you can see from the photos, the desired result was achieved to a high standard and needless to say my client was delighted with the transformation.
Julian Iancono
South East Wales
 Tile Doctor Ltd
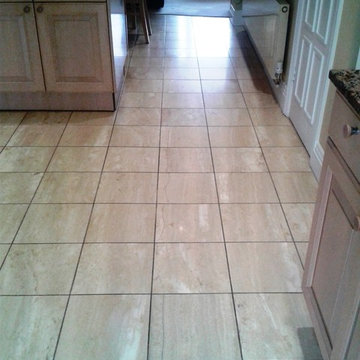
Every now and again, I get a call from a client located on the small peninsula of Sandbanks, Poole. Sandbanks, sometimes referred to as ‘Britain’s Palm Beach’, is known for its fantastic beach and high value property. My client asked me to take a look at a Travertine floor in his kitchen which was, in fact, more highly polished than he had wanted. The polished finish had worn off the travertine tiles where they had been walked on, leaving a dull trackway running down the centre of the kitchen. With its distinct characteristics, travertine is a popular choice for kitchen flooring, although it is also quite often used in bathrooms. In any case Travertine tiles will need regular maintenance to keep them looking their best.
Unfortunately, the kitchen floor must have experienced some sort of settlement or shrinkage as a long crack has appeared, which ran along the same line as the dull trackway. It is not uncommon for Travertine tiles to crack due to wear over time, or even bad fitting in some cases. While the exact cause of the crack was unclear, the homeowner concluded that the floor was certainly in need of restoration.
Repairing a crack in a Travertine tiled floor
Replacing the Travertine tiles was not an option due to a lack of spare tiles, so I opted instead to fill the crack in the floor using Harbro Stone Filler, an epoxy stone filler, matching the colour of the tile as closely as possible. I left this to set, before sanding down the excess filler.
My next action was to use a set of Tile Doctor Diamond burnishing pads to sand out any scratches and restore a more even shine to the floor, as per the client’s request. For polished stone, I recommend using a set of four burnishing pads applied in order: Coarse, Medium, Fine, and Very Fine. I used these one after the other with a little water to lubricate and restore the surface polish to the desired level.
Sealing a Travertine tiled floor
The next day, I returned to seal the floor with a couple of coats of Tile Doctor Colour Grow sealer. Colour Grow is a colour enhancing, impregnating sealer which penetrates deeply into the pores of the stone, thereby preventing dirt from becoming ingrained within. This particular sealer also enhances the natural colours within the Travertine tile, whilst also providing long term durable protection.
Although the crack could not be made to disappear completely, its appearance was much improved. The customer was also very pleased with the long-lasting lower sheen provided, describing it as “the finish I had wanted in the first place when the tiles were fitted”.
 Tile Doctor Ltd
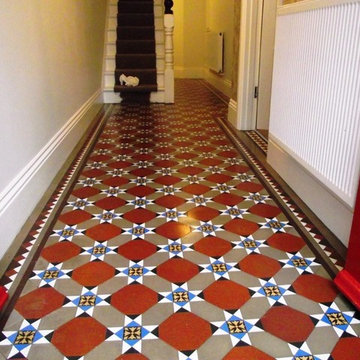
These Victorian hallway tiles were cleaned at a residence in the historic town of Bideford. As you can see from the photograph below the tiles were dull and had lost their vitality due to ingrained dirt, clearly it had been some time since they were given a good deep clean.
Cleaning a Victorian Floor
The first job was to protect the skirting with tape and then vacuum to remove any loose debris and grit. The next step was to cover the entire floor with a strong dilution of Tile Doctor Remove and Go which is a powerful cleaning and coating remover that is safe to use on tile and stone. It was left to dwell on the floor for twenty minutes so it could soak into the tile and make the job of removing any remaining sealer and ingrained dirt easier.
The solution was scrubbed into the tile using a black scrubbing pad fitted to a rotary machine and then the soiled cleaning solution rinsed off using a wet vacuum. This process was repeated a number of times until I was satisfied with the condition of the floor and followed with a final rinse with clean water to remove any trace of cleaning product. The water was extracted with the wet vacuum to get the floor as dry as possible before leaving for the day.
Sealing a Victorian Floor Sealing
The tiles were left to dry for 24 hours and I came back to seal the tiles using eight to nine coats of Tile Doctor Seal and Go which is an ideal sealer for Victorian Tiles as it leaves a nice sheen and provides excellent stain protection.
I think you will agree the hallway floor came up really well and now been given a new lease of life.
 The Home Doctors Inc
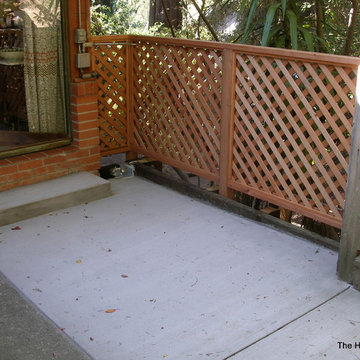
This Mill Valley hill hose had a failing retaining and collapsing slab. The Home Doctors constructed a new retainer outside of the existing one, poured a nice new slab and finished it off with this attractive railing using heavy diagonal lattice.home doctors
 Tile Doctor Ltd
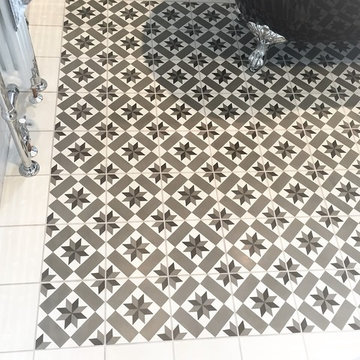
I’m often asked if you should seal a tile before grouting and the answer is a definite yes, and this Encaustic Cement tiled bathroom floor installation in Stockport is a great example as to why. The tiles had not been sealed before grouting and then, once the tiler went to grout the newly installed tiles with a grey grout, the colour ran into the tiles, staining them and leaving them looking grubby and dirty. Had the tiles been sealed it would of made the process of removing the grout from the surface of the tile much easier.
If you haven’t come across them before Encaustic cement tiles are often hand painted and are available in a range of beautifully artistic patterns, so it was a real shame that these tiles were allowed to be spoilt by an avoidable mistake. As you can imagine, the property owner was keen to have the tiles professionally restored, and she contacted me to get the job done. I took some photographs but I’m not sure that they do justice to the problem.
Rather than use a liquid cleaning product, I opted to use diamond encrusted handheld burnishing pads to remove the grout stains. Our burnishing system comprises four pads of varying grits. I started with the Coarse grit burnishing pads applying to the tiles it with a small amount of water as lubricant to grind down the grubby marks. Following this I worked my way through the system, applying Medium, Fine and Very Fine pads to gradually restore the appearance of the floor. Once the burnishing process has been completed I rinsed the tiles and then accelerated the drying process using a heat gun to prepare them to be sealed.
Removing any excess moisture before sealing is essential as even a small amount can cloud the sealer and prevent it from properly protecting the tiles from dirt and stains. Once satisfied that the floor was dry, I proceeded to seal it using Tile Doctor Colour Grow. As an impregnating sealer Colour Grow penetrates deep into the pores of the stone to fill them and thus prevent dirt from becoming ingrained. Colour Grow’s colour intensifying properties also really accentuated the patterns of the Encaustic Cement tiles.
Now that these fantastic tiles have been properly sealed it will be far easier for the customer to keep them clean in future. Needless to say, she was very happy with the result. We recommend topping up your sealer on a regular basis to ensure problems like those which occurred here do not damage the appearance of your tiles.
Steve Keary
Greater Manchester Tile Doctor
 The Home Doctors Inc
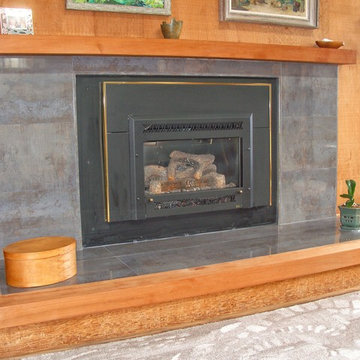
The Home Doctors with trade partner Paramount Tile converted this bland brown fireplace surround into an elegant showpiece.
The Home Doctors
Living room - eclectic living room idea in San Francisco
Living room - eclectic living room idea in San Francisco
 Tile Doctor Ltd
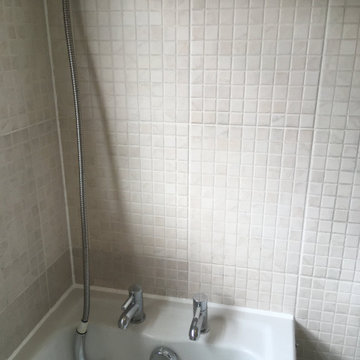
I recently visited a property in Levenshulme where the bathroom tiling and grout needed renovation. Although they resembled small square mosaic tiles, they were actually large 45cm x 60cm sheets of glazed ceramic tiles which are easier to install and require less grouting.
Over time the tiles had attracted a lot of dirt from showering and now needed a good clean, additionally mould had got a grip on the lower tiling and mastic sealant between the tile and bath.
Levenshulme sits halfway between Manchester City centre and Stockport and was recently declared by the Times Newspaper as one of the best places to live in the North West. It’s actually only a few miles drive from my base so well within my service area.
Normally I would look to renovate the grout lines with a grout colourant however grout had only been used between the sheets of tiles and what appeared to be grout between the small square mosaic tiles was in fact part of the glaze. I knew the colourant would struggle to achieve a bond with a glazed surface and so my only option would be to give the tiles a good scrub with a strong cleaning product.
My solution was to spay the tiles with Tile Doctor Duo Clean which is an effective double action grout cleaner and mould remover. It’s designed for cleaning up bathroom tile and can remove mould and blackspot from grout and silicone. I worked in sections allowing the product to soak in for a good ten minutes before scrubbing it in by hand with a stiff brush. After rinsing the tiles down with water, they were inspected and the procedure re-applied if needed. I found in fact that I had to do this several times before I was happy with the tile, grout and silicone were as clean as the could be. I often find longer dwell times can help the situation.
The bathroom looked new by the time I had finished, it was quite the transformation and my client was really happy with the result and left a long testimonial for me which is copied below.
I could not be happier with Kamila’s work. She is delightful, efficient, and quite frankly a genius. My tiles were horrible and my bathroom seal mouldy and disgusting. Now thanks to Kamila I feel like I ha e a new bathroom all over again. She has done the most amazing job and I am so so pleased. I cannot recommend her highly enough! She has done the most outstanding job and the results are better than I could ever have dreamed of. Thank you so much ? – By Sarah B, Stockport, 03 August 2020
Alex Logozny
Greater Manchester Tile Doctor
 The Home Doctors Inc
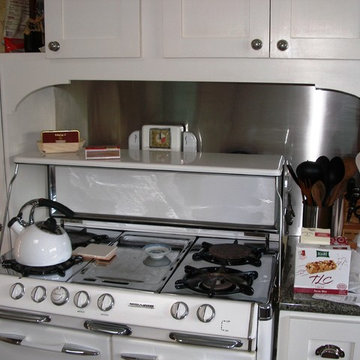
Before the Home Doctoring began...note the pantry at the left, the low cabinet and lack of vent pipe...The Home Doctors
Enclosed kitchen - craftsman enclosed kitchen idea in San Francisco with recessed-panel cabinets, white cabinets, granite countertops, metallic backsplash and stainless steel appliances
Enclosed kitchen - craftsman enclosed kitchen idea in San Francisco with recessed-panel cabinets, white cabinets, granite countertops, metallic backsplash and stainless steel appliances
 Tile Doctor Ltd
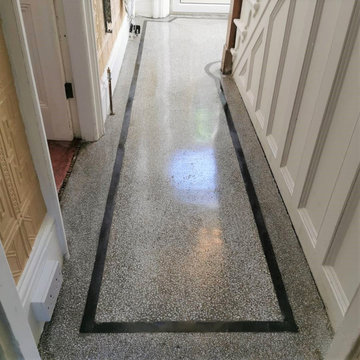
This beautiful Terrazzo floor was uncovered in the hallway of a house in Doncaster, as you can see it had taken a bit of a beating over the years, but the owners were keen on having it restored. Restoring period features like these are a great idea as they are very sought after and can add a lot of value to a property.
The floor had spent many years below carpet and nails had been hammered through the floor to hold carpet grippers in place. Along with this there was a lot of glue and paint to remove. However, I was confident that we could get the floor restored, I gave them a quotation for the work, and they were happy to proceed as soon as possible.
Doncaster is a hot spot for terrazzo floors, apparently there was a big Italian community there in the early part of the 1900s. Doncaster is also famous for its rich rail heritage; the main Doncaster train station is on the East Coast mainline and you find many original station buildings have Terrazzo floors in the public areas.
The first job was to remove as much of the paint, glue and other contaminates as possible. These were scraped off the floor by hand using a razor-sharp scraper.
We then moved onto using a set of five diamond burnishing pads of different grits to cut through the top layers and grime to eventually bring this floor back up to its’ former glory. Starting off with the most coarse pad first I started to go over the floor a pad at a time, each pad is fitted to a rotary machine which has extra weight added to it to make the pads work ever better. Each time a pad is changed, it is slightly less coarse, this starts to polish the floor up to a shine eventually ended with a very fine diamond pad. Water is added at each stage and removed with the wet vacuum before the next pad is used.
Gradually the original floor started to shine through, the colours were quite pronounced, and you could see the floor was a lovely example of terrazzo. After a final rinse to remove the soiling generated by burnishing, I turned my attention to filling the many holes where the nails had been.
The floor was left to dry off overnight and the following morning I returned to seal the floor with several coats of Tile Doctor Colour Grow. I choose this product as its designed to enhance the subtle colours in the floor and its fully breathable which is an important consideration when sealing floors in older properties. Damp proof membranes are a common feature these days but are a relatively recent invention. With older floors you need to allow the floor to breathe so the moisture in the sub floor can rise and evaporate at the surface, without this the moisture will reach out to the walls where it can cause rising damp.
The result was a highly polished floor just the way it would have looked when it was first installed 90 years ago. As you can imagine the owners were over the moon with the transformation.
Matthew Lovett
South Yorkshire TIle Doctor
 Tile Doctor Ltd
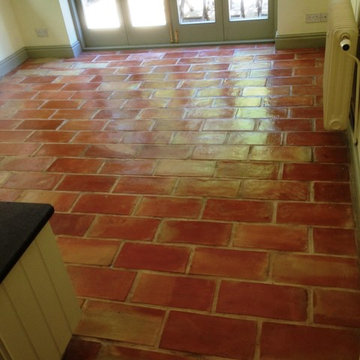
This is an interesting Terracotta brick tiled floor installed in a house in the village of Alderly Edge. The Terracotta tiles were made in a brick shape which was a popular design found in rural buildings in the 19th century. Although the floor was in good condition the sealer was starting to wear off and being clay Terracotta are porous and trap dirt if not sealed. You can see this in the before photograph below where you can see how the grout and Terracotta has darkened with ingrained dirt.
To get the Terracotta tiles clean and free of any remaining sealer I soaked tiles in a strong dilution of Tile Doctor Pro-Clean and left it to dwell for twenty minutes, Pro-Clean is an alkaline product and so safe to use on tiled floors. Then using a large 17inch black scrubbing pad fitted to a rotary machine and a stiff grout brush proceeded to work the cleaning solution into the tile and grout. The now dirty cleaning solution was removed using a wet vacuum and the floor rinsed down with hot water. Some stubborn areas were spot treated using the same process and once happy with the overall condition of the floor the tiles were thoroughly rinsed three times using hot water to remove any trace of cleaning product prior to sealing and then left to dry overnight.
I returned the next day to seal the floor testing it first with a damp meter to make sure it had dried. I then started to seal the tiles and with Terracotta being a very porous material it took eight coats of sealer to do the job. I used Tile Doctor Seal and Go which is a topical sealer that gives Terracotta a subtle gloss finish, it’s also water based so it doesn’t leave a smell as it dries.
 Tile Doctor Ltd
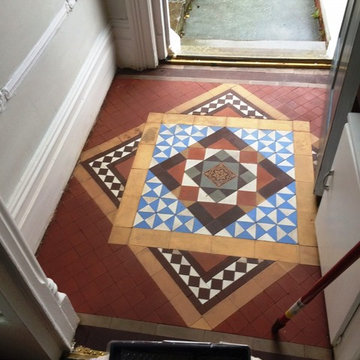
I was asked to take a look at restoring a Victorian Tiled Floor in the Cumbrian town of Barrow in Furness where the floor had been covered in black bitumen; the bitumen was so thick it was difficult to gauge the condition of the floor underneath. I did a test clean which came out well but I had to explain there could be tile damage and other hidden problems so very difficult to quote for however we agreed a date and price and I came back a couple of weeks later to do the job.
Removing Bitumen form Victorian Tiles
Removing the bitumen from the floor without damaging the tiles underneath was a slow process involving spraying on a strong solution of Tile Doctor Remove and Go, letting it soak in, applying steam and then carefully scraping off the bitumen. The floor was treated in this manner a small area at a time and a wet vacuum was used to rinse and remove the resulting slurry. This process took up the whole day and was completely successful at removing the bitumen, before finishing I gave the floor a thorough rinse with clean water and used the wet vacuum to dry the floor was much as possible before leaving.
Sealing a Victorian Tiled Floor
I had used a lot of water cleaning the floor so I agreed with the owner to leave the floor for a few days before sealing it so it could thoroughly dry out. When I did return I used Tile Doctor Colour Grow to seal the tiles, the customer had wanted a satin finish but having weighed up the options including the fact that there was a damp problem in the house I felt Colour Grow which is a penetrating and breathable sealer would have the best longevity.
The customers were very happy with the results and before leaving we discussed aftercare cleaning, with sealed surfaces you have to be careful not to use acidic products as this can reduce the life of the sealer.
 Tile Doctor Ltd
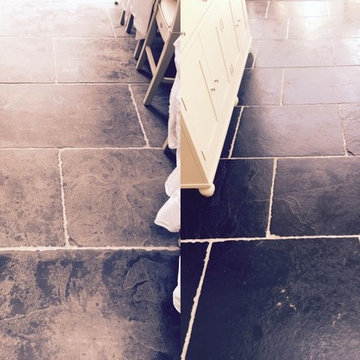
I was recently asked to this property in Wimbledon in to see if there was anything we could do to resolve the problem with a recently laid Black Limestone tiled floor. The builders that had laid the Limestone did not cover or clean the tiles prior to sealing with an impregnating seal thereby trapping in all the dirt from the building works. They then grouted the tiles but didn’t clean the grout off the surface before putting on another two coats of sealer all of which resulted in a very poor finish.
Naturally the customer was not happy so called them back to rectify the problem and so they came back and tried to strip the sealer off with cloths and a chemical stripper. Then without rinsing the stone to remove the chemicals they added another two coats of sealer; in desperation the lady gave up with them and called me in.
To resolve I tried all the sealant strippers available to me but couldn’t budge the mess effectively. The only other option available was to diamond grind the surface so I discussed this with the customer and she agreed to this and left me to carry on.
Initially I started with a coarse 400 grit diamond pad but even that wasn’t having much effect so in the end I had to cut back the surface using a 100 grit pad moving up to 200 grit, then 400 before finally stopping at 800. To lubricate the process you need to use a little water and then rinse away the resultant soil after each pad. If this was a polished stone surface I would have continued with finer and finer grits to restore the surface polish however these tiles were rough limestone and I needed to leave it as near to how it should be.
Once all the Limestone had been stripped back the stone turned an uninviting grey colour, so to bring it back to black I applied two coats of Tile Doctor Stone Oil which enhanced the colour.
I left the floor overnight to allow the Stone Oil to dry out and then returned to seal the Limestone using two coats of Tile Doctor Colour Grow which is an impregnating sealer that enhances the colour in the stone and will protect it from staining going forward.
When the customer saw the final result she was overwhelmed and said she felt like crying with relief, because the floor now looked how she had imagined it to be. It was a great feeling for me to know that I had solved the problems for her.
 Tile Doctor Ltd
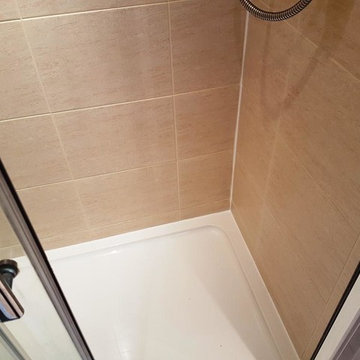
This is a great example of the difference we can make to a Shower Cubicle which suffer from a build up of soap scum, mould and staining from the dyes in shampoos and soaps etc.
This particular cubicle was installed at a property in the city of Edinburgh. The walls were Ceramic tiles which are ideal for shower areas as the glaze makes them completely water proof. However with grout being cementitious it does attract dirt and this shower was no different.
Cleaning Ceramic Tiled Shower Cubicle
The first step was to remove the wire accessory holder and then soak all the tile and grout in a strong solution of Tile Doctor Pro-Clean. I find decanting into a spray bottle works best as it mixes it with air which makes it easier to stick to the wall.
With the Pro-Clean in place it was then hand scrubbed to get the tile and especially the grout clean of all the mould and other stains. The shower walls were rinsed down and the process repeated where necessary.
Grout Colouring Shower Wall Tiles
With the tiles and grout now clean we could see that the grout was still discoloured in some areas where it had been badly stained. One option at this point would be rake out the grout and replace with new however overtime it would only discolour again, so in agreement with the customer we applied a grout colourant in a Limestone colour to better match the tile.
The Grout Colourant would ensure all the grout had a consistent appearance while also adding an impenetrable barrier that will keep its appearance for a long time. It takes a little time to do but is easily applied with a small brush and then you wipe off any excess that gets onto the tile.
The next step was to strip out the mastic silicone sealant strip from around the base of the shower cubicle and replace with new. I used high quality silicone sealant that left nice lines and fresh look, don’t use cheap sealant as it will soon discolour and some have been known to shrink.
Deep cleaning and re-colouring the grout made a huge difference; the shower cubicle has been transformed and now looks like a new installation.
Thomas Wilson
Edinburgh Tile Doctor
 Tile Doctor Ltd
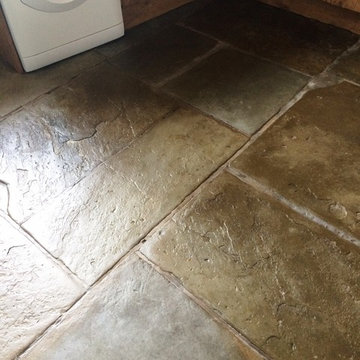
This Flagstone floor was installed in a house near the village of Ambleside and had previously been sealed with varnish and other products which had left the floor looking dull and nowhere near its best. I did a test clean which came out well and then agreed a date and price I came back a couple of weeks later to do the job.
Due to the numerous coatings that had been applied to the floor it was necessary to completely strip off the coatings back to the bare stone. To start I used Tile Doctor Remove and Go which does what it says on the bottle and removes coatings from tiles, the product was diluted with water and left to soak in before being scrubbed in using a Black Scrubbing pad fitted to a rotary machine. The now dirty cleaning solution was removed using a wet vacuum and I could see that the Remove and Go had removed most but not all of the coatings so it was time to using something stronger. To do this I applied NanoTech UltraClean which is a gel that is left to soak into the floor for thirty minutes before adding water and then agitating with the black pad. The floor was rinsed with water and the solution removed with the wet vacuum. At this point I could see that all the varnish and dirt had been removed so I gave the floor a final wash down with clean water to neutralise the floor before sealing and left for the evening so the floor could dry overnight.
I came back the next day and tested the floor with a damp meter to confirm the floor was dry and then proceeded to seal the floor with Tile Doctor Seal and Go applied with a paint pad which gave the floor a nice low sheen finish that the customer requested.
 Denver Mattress
When better sleep is the goal, support matters. This sophisticated bedroom showcases the Doctor's Choice Elite Firm Mattress from Denver Mattress, designed for sleepers seeking enhanced support, pressure relief, and long-lasting comfort.
As the premium model in the Doctor's Choice Collection, the Elite Firm is engineered to help promote proper spinal alignment while providing the stable, supportive feel preferred by many back and stomach sleepers. Advanced comfort materials and thoughtfully designed support systems work together to create a sleep surface focused on recovery, comfort, and restorative rest.
The room's rich color palette, warm wood furnishings, layered textures, and calming atmosphere reinforce the connection between thoughtful design and healthy sleep. Together, the space and mattress create an environment dedicated to helping you wake up refreshed, supported, and ready for whatever the day brings.
23