
Search results for "Doctorate" in Home Design Ideas
 Tile Doctor Ltd
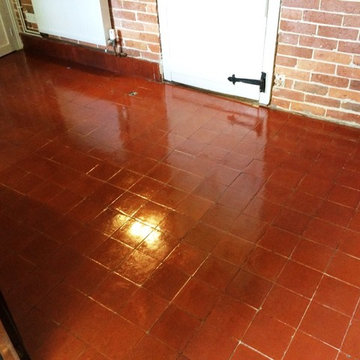
Let me start by saying this was by far the hardest job I’ve ever done and as you read on you will soon realise why. The customer called me out to quote on a Quarry tiled floor at a house in Danehill that was covered in concrete screed. She said it had always been there and she’s lived there for years always meaning to get it bought back to a state that she could live with. Undaunted by the state of the floor (see photo below) we agreed a price and fixed a date to do the work.
For the next two days I spent all my time pouring neat Tile Doctor Grout Clean-up onto small areas and working it in with a metal scraper and wire brush. Once removed the resultant muck was rinsed and extracted using a wet vacuum, laborious work as you can imagine although I was kept entertained by playing the occasional game of fetch with a very keen Collie dog who seemed fascinated by the bloke sitting on his floor all day. After two days of this my hands were throbbing but I could see red quarry tile emerging. The final two hours on the second day were spent making good any areas under the washing machine and fridge and giving the floor a thorough rinse to remove any trace of cleaning product.
The floor dried off overnight and I came back the third day to seal the tiles making sure that my canine companion had been sent next door first. To seal the floor I used six coats of Tile Doctor Seal and Go which really brought back the colour in the floor and gave it an amazingly shiny surface.
Once sealed the floors transformation was complete and when the customer returned from work she was utterly speechless. I’d turned what looked like a building site into a stunning tiled floor.
 Tile Doctor Ltd
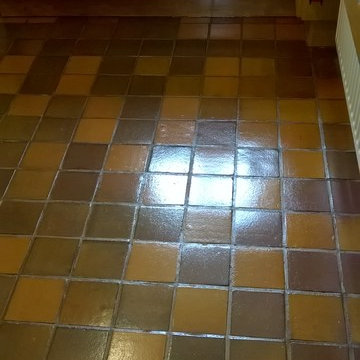
This Quarry tiled kitchen floor was in very good condition, with no cracked or broken tiles. However, my customer, who lives in the town of Tutbury, near Burton-on-Trent, was keen to boost the condition of the tiles further through professional maintenance, including a deep clean and a fresh seal to restore the sheen to the Quarry. NB, did you know it’s estimated that Tutbury has actually been inhabited for 3000 years, having once been the site of an Iron Age hill fort, this house of course was a lot more recent.
To clean the tiles, I chose to use our tried and trusted alkaline cleaner, Tile Doctor Pro Clean. We use Pro Clean on most types of natural stone floor, including Quarry, Slate, and Victorian. I applied Pro Clean liberally across the floor and left it to dwell for a short period, giving it time to seep into the tile to get underneath and lift out any ingrained dirt. The cleaner was then agitated using a scrubbing pad fitted to a rotary machine to remove the dirt and other general muck.
I then rinsed the floor with cold water and soaked up the resulting slurry with a wet-vac machine. Some areas of the floor proved to be quite stubborn to clean, so in these areas the cleaning process was repeated until satisfactory results were achieved. Finally, the floor was given another rinse and left to dry off overnight.
The next day I returned to the property and checked that the floor was ready to seal by running several damp tests, with the results indicating that was no excess moisture remaining on the tiles. We carry out these tests before sealing because moisture can cloud the sealer and prevent it from properly protecting the tiles.
My choice of sealer was Tile Doctor Seal & Go, a cost effective topical sealer that builds up a robust layer of protection on the surface of the floor and provides a durable sheen finish that, as you can see from the photographs, really lifts the appearance of the tiles.
It’s a fact that any sealed tiled floor will need to be regularly maintained as sealers do wear off over time, especially in the high traffic areas, and this is when the floor starts to lose its appearance as dirt becomes trapped in the pores of the stone. The life of the sealer can be extended however by ensuring you only clean the floor with a PH Neutral cleaner.
Trevor Preeece
 Kitchen Doctors
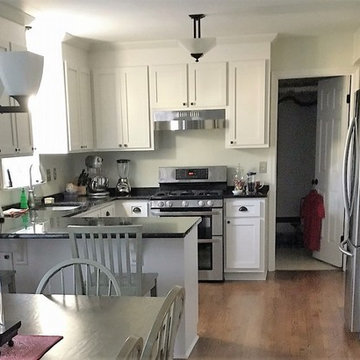
White Maple Custom Cabinet Reface
Eat-in kitchen - mid-sized contemporary u-shaped medium tone wood floor and brown floor eat-in kitchen idea in Richmond with an undermount sink, flat-panel cabinets, white cabinets, quartz countertops, stainless steel appliances, a peninsula and window backsplash
Eat-in kitchen - mid-sized contemporary u-shaped medium tone wood floor and brown floor eat-in kitchen idea in Richmond with an undermount sink, flat-panel cabinets, white cabinets, quartz countertops, stainless steel appliances, a peninsula and window backsplash
Find the right local pro for your project
 Tile Doctor Ltd
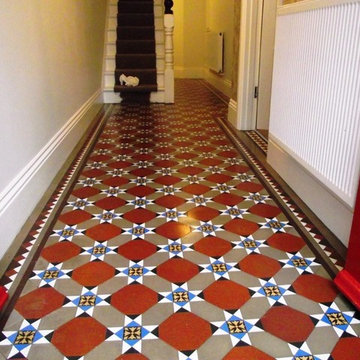
These Victorian hallway tiles were cleaned at a residence in the historic town of Bideford. As you can see from the photograph below the tiles were dull and had lost their vitality due to ingrained dirt, clearly it had been some time since they were given a good deep clean.
Cleaning a Victorian Floor
The first job was to protect the skirting with tape and then vacuum to remove any loose debris and grit. The next step was to cover the entire floor with a strong dilution of Tile Doctor Remove and Go which is a powerful cleaning and coating remover that is safe to use on tile and stone. It was left to dwell on the floor for twenty minutes so it could soak into the tile and make the job of removing any remaining sealer and ingrained dirt easier.
The solution was scrubbed into the tile using a black scrubbing pad fitted to a rotary machine and then the soiled cleaning solution rinsed off using a wet vacuum. This process was repeated a number of times until I was satisfied with the condition of the floor and followed with a final rinse with clean water to remove any trace of cleaning product. The water was extracted with the wet vacuum to get the floor as dry as possible before leaving for the day.
Sealing a Victorian Floor Sealing
The tiles were left to dry for 24 hours and I came back to seal the tiles using eight to nine coats of Tile Doctor Seal and Go which is an ideal sealer for Victorian Tiles as it leaves a nice sheen and provides excellent stain protection.
I think you will agree the hallway floor came up really well and now been given a new lease of life.
 Tile Doctor Ltd
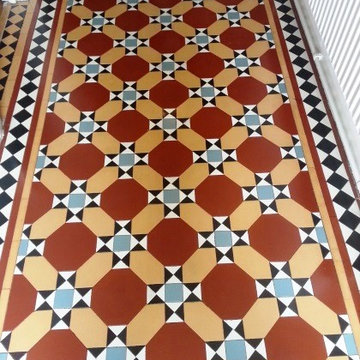
We were asked to restore a beautiful geometric Victorian tiled floor. The property had been used as a letting house and the floor had been used and abused for many years, just given an occasional mop over from time to time.
The new owners wanted to revive the colours and deal with the neglect. Step one was to put down the tile doctor pro clean alkaline cleaning solution and to let it dwell for a period of around twenty minutes.
We gave the solution plenty of dwell time before setting up our low speed rotary machine, underneath it we used a black pad to agitate and help loosen the ingrained dirt.
Once completed we set up our powerful rinsing tool which is attached to a machine fixed into our van, by doing this we do not need to dispose of any dirty water on your property but instead we take it away with us and dispose of it in the proper manner in an appropriate disposal point.
After rinsing the floor came up very well but we still felt it could be better, we used a steamer coupled with HBU Nanotech and a scraper to remove various deposits of paint and other sticky residue which had set over time.
After thoroughly rinsing the floor again we left the floor to dry for 4 days, Victorian tiles along with other earth based tiles are very absorbent and need to dry thoroughly and fully.
On our return we tested for damp ensuring the floor was dry enough to seal.
To seal the floor we used two coats of colour grow impregnating sealer, once the sealer had dried we then began sealing the floor using seal and go.
After applying several thin coats of seal and go, the floor reached the desired appearance.
A combination of Pro clean, hbu nanotech, colour grow and seal and go with a little bit of care from your local tile doctor restored this old uncared for floor back to the prime of its life.

 Denver Mattress
The right bedroom starts with the right support. This calming retreat showcases the Doctor's Choice® Original Medium Mattress from Denver Mattress, designed for sleepers seeking the ideal balance of comfort and support.
Engineered to help promote proper spinal alignment while providing pressure-relieving comfort, the Doctor's Choice® Original Medium is a versatile sleep solution for a wide range of sleep styles. The mattress serves as the foundation of a restorative bedroom designed to help you wake up feeling refreshed and ready for the day ahead.
Warm wood furnishings, soft neutral tones, natural greenery, and layered textures create a relaxing environment focused on wellness and recovery. Together, thoughtful design and supportive sleep technology demonstrate how a bedroom can be both beautiful and functional while prioritizing what matters most: better sleep.
 The Home Doctors Inc
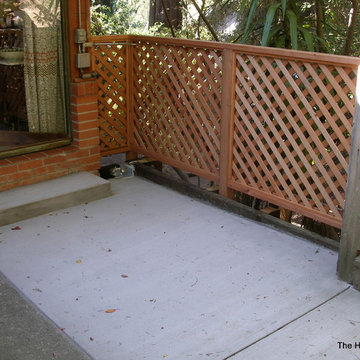
This Mill Valley hill hose had a failing retaining and collapsing slab. The Home Doctors constructed a new retainer outside of the existing one, poured a nice new slab and finished it off with this attractive railing using heavy diagonal lattice.home doctors
 Denver Mattress
Better sleep starts with the right balance of comfort and support. This contemporary bedroom showcases the Doctor's Choice® Elite Medium Mattress from Denver Mattress, designed for sleepers seeking pressure relief, responsive comfort, and proper spinal alignment throughout the night.
As part of the premium Doctor's Choice® Collection, the Elite Medium delivers a balanced feel that adapts to a variety of sleep positions while providing the support needed for restorative rest. Advanced comfort materials and enhanced support technology work together to help reduce pressure points, promote healthy sleep posture, and support deeper, more comfortable sleep.
The room's rich navy walls, warm wood furnishings, soft textures, and calming atmosphere create a sophisticated retreat focused on wellness and recovery. Together, thoughtful bedroom design and engineered sleep support create a space dedicated to helping you wake up feeling refreshed, recovered, and ready for the day ahead.
 Tile Doctor Ltd
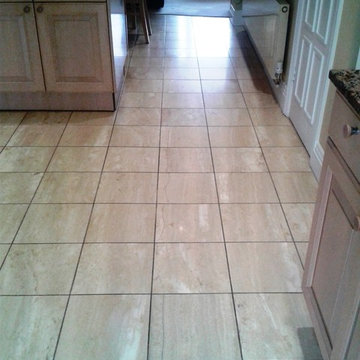
Every now and again, I get a call from a client located on the small peninsula of Sandbanks, Poole. Sandbanks, sometimes referred to as ‘Britain’s Palm Beach’, is known for its fantastic beach and high value property. My client asked me to take a look at a Travertine floor in his kitchen which was, in fact, more highly polished than he had wanted. The polished finish had worn off the travertine tiles where they had been walked on, leaving a dull trackway running down the centre of the kitchen. With its distinct characteristics, travertine is a popular choice for kitchen flooring, although it is also quite often used in bathrooms. In any case Travertine tiles will need regular maintenance to keep them looking their best.
Unfortunately, the kitchen floor must have experienced some sort of settlement or shrinkage as a long crack has appeared, which ran along the same line as the dull trackway. It is not uncommon for Travertine tiles to crack due to wear over time, or even bad fitting in some cases. While the exact cause of the crack was unclear, the homeowner concluded that the floor was certainly in need of restoration.
Repairing a crack in a Travertine tiled floor
Replacing the Travertine tiles was not an option due to a lack of spare tiles, so I opted instead to fill the crack in the floor using Harbro Stone Filler, an epoxy stone filler, matching the colour of the tile as closely as possible. I left this to set, before sanding down the excess filler.
My next action was to use a set of Tile Doctor Diamond burnishing pads to sand out any scratches and restore a more even shine to the floor, as per the client’s request. For polished stone, I recommend using a set of four burnishing pads applied in order: Coarse, Medium, Fine, and Very Fine. I used these one after the other with a little water to lubricate and restore the surface polish to the desired level.
Sealing a Travertine tiled floor
The next day, I returned to seal the floor with a couple of coats of Tile Doctor Colour Grow sealer. Colour Grow is a colour enhancing, impregnating sealer which penetrates deeply into the pores of the stone, thereby preventing dirt from becoming ingrained within. This particular sealer also enhances the natural colours within the Travertine tile, whilst also providing long term durable protection.
Although the crack could not be made to disappear completely, its appearance was much improved. The customer was also very pleased with the long-lasting lower sheen provided, describing it as “the finish I had wanted in the first place when the tiles were fitted”.
 Tile Doctor Ltd
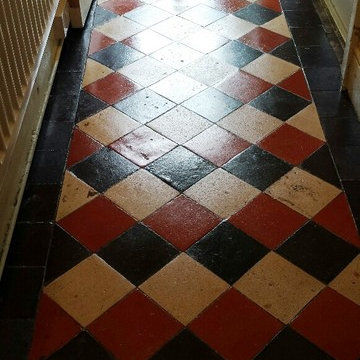
The pictures below were taken at a house in the town of Merthyr Tydfil, which is located not too far north of Cardiff. My client was keen to keep her very old Quarry tiled floor – which dated back to 1905 – intact. The floor had understandably seen a large amount of traffic in its lifetime, and was now in dire need of a professional restoration, including a thorough clean and seal.
First, I completed a survey of the area and provided my client with a quote. After completing many similar jobs in the past, I generally have a good idea of what the final result will look like. I passed on some images of a final result to my client, who was happy for me to begin my work.
On the first day, my first task was to take run some damp tests which were fine; it’s always good to know up front if there are likely to be any damp issues. Next I covered the floor with water to take the surface suction out and waited fifteen minutes before applying a cocktail of Tile Doctor NanoTech Heavy Build-Up cleaner mixed with Pro-Clean and Grout clean-up covering the whole floor. I then immediately starting to work the solution into the floor with a rotary machine fitted with a coarse black pad. The solution was then rinsed off with water which was then extracted with a wet vacuum as I worked. For stubborn areas I applied more of the previously mixed solution scrubbed into the floor with coarse wire wool by hand followed by further rinsing with water.
Each of the products used serves a particular purpose. Pro-Clean is a strong high-alkaline cleaner for natural stone, while NanoTech HBU is a particularly powerful cleaner that uses nano-sized particles to penetrate deep into the stone to get underneath and lift out ingrained dirt and stains. Grout Clean-Up, as the name implies, is a product for resolving grout related problems such as removing grout smears from tile surfaces aka grout haze.
After completing the clean I left the house for 48 hours, to leave enough time for the floor to dry completely in preparation for sealing. Upon my arrival back at the house I conducted some more damp tests to check that the floor was dry enough to seal using the previous readings as a benchmark. The results indicated that I was fine to proceed with the seal, so I applied a total of eight coats of Tile Doctor Seal & Go for durable protection. This was the product I recommended to my client as she wanted a nice, soft shine for her surface seal.
As you can see from the photos, the desired result was achieved to a high standard and needless to say my client was delighted with the transformation.
Julian Iancono
South East Wales
 Tile Doctor Ltd
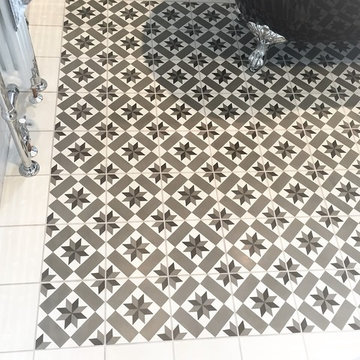
I’m often asked if you should seal a tile before grouting and the answer is a definite yes, and this Encaustic Cement tiled bathroom floor installation in Stockport is a great example as to why. The tiles had not been sealed before grouting and then, once the tiler went to grout the newly installed tiles with a grey grout, the colour ran into the tiles, staining them and leaving them looking grubby and dirty. Had the tiles been sealed it would of made the process of removing the grout from the surface of the tile much easier.
If you haven’t come across them before Encaustic cement tiles are often hand painted and are available in a range of beautifully artistic patterns, so it was a real shame that these tiles were allowed to be spoilt by an avoidable mistake. As you can imagine, the property owner was keen to have the tiles professionally restored, and she contacted me to get the job done. I took some photographs but I’m not sure that they do justice to the problem.
Rather than use a liquid cleaning product, I opted to use diamond encrusted handheld burnishing pads to remove the grout stains. Our burnishing system comprises four pads of varying grits. I started with the Coarse grit burnishing pads applying to the tiles it with a small amount of water as lubricant to grind down the grubby marks. Following this I worked my way through the system, applying Medium, Fine and Very Fine pads to gradually restore the appearance of the floor. Once the burnishing process has been completed I rinsed the tiles and then accelerated the drying process using a heat gun to prepare them to be sealed.
Removing any excess moisture before sealing is essential as even a small amount can cloud the sealer and prevent it from properly protecting the tiles from dirt and stains. Once satisfied that the floor was dry, I proceeded to seal it using Tile Doctor Colour Grow. As an impregnating sealer Colour Grow penetrates deep into the pores of the stone to fill them and thus prevent dirt from becoming ingrained. Colour Grow’s colour intensifying properties also really accentuated the patterns of the Encaustic Cement tiles.
Now that these fantastic tiles have been properly sealed it will be far easier for the customer to keep them clean in future. Needless to say, she was very happy with the result. We recommend topping up your sealer on a regular basis to ensure problems like those which occurred here do not damage the appearance of your tiles.
Steve Keary
Greater Manchester Tile Doctor
 Tile Doctor Ltd
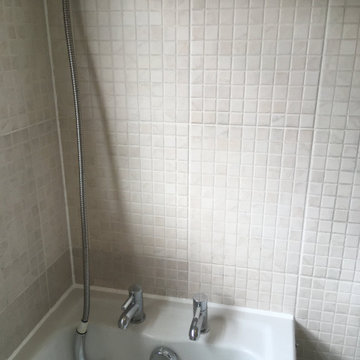
I recently visited a property in Levenshulme where the bathroom tiling and grout needed renovation. Although they resembled small square mosaic tiles, they were actually large 45cm x 60cm sheets of glazed ceramic tiles which are easier to install and require less grouting.
Over time the tiles had attracted a lot of dirt from showering and now needed a good clean, additionally mould had got a grip on the lower tiling and mastic sealant between the tile and bath.
Levenshulme sits halfway between Manchester City centre and Stockport and was recently declared by the Times Newspaper as one of the best places to live in the North West. It’s actually only a few miles drive from my base so well within my service area.
Normally I would look to renovate the grout lines with a grout colourant however grout had only been used between the sheets of tiles and what appeared to be grout between the small square mosaic tiles was in fact part of the glaze. I knew the colourant would struggle to achieve a bond with a glazed surface and so my only option would be to give the tiles a good scrub with a strong cleaning product.
My solution was to spay the tiles with Tile Doctor Duo Clean which is an effective double action grout cleaner and mould remover. It’s designed for cleaning up bathroom tile and can remove mould and blackspot from grout and silicone. I worked in sections allowing the product to soak in for a good ten minutes before scrubbing it in by hand with a stiff brush. After rinsing the tiles down with water, they were inspected and the procedure re-applied if needed. I found in fact that I had to do this several times before I was happy with the tile, grout and silicone were as clean as the could be. I often find longer dwell times can help the situation.
The bathroom looked new by the time I had finished, it was quite the transformation and my client was really happy with the result and left a long testimonial for me which is copied below.
I could not be happier with Kamila’s work. She is delightful, efficient, and quite frankly a genius. My tiles were horrible and my bathroom seal mouldy and disgusting. Now thanks to Kamila I feel like I ha e a new bathroom all over again. She has done the most amazing job and I am so so pleased. I cannot recommend her highly enough! She has done the most outstanding job and the results are better than I could ever have dreamed of. Thank you so much ? – By Sarah B, Stockport, 03 August 2020
Alex Logozny
Greater Manchester Tile Doctor
 The Home Doctors Inc
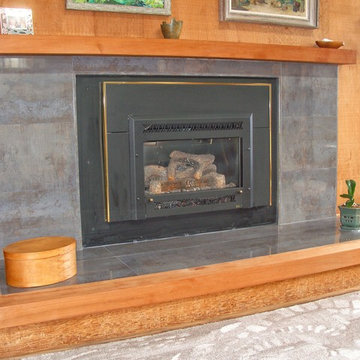
The Home Doctors with trade partner Paramount Tile converted this bland brown fireplace surround into an elegant showpiece.
The Home Doctors
Living room - eclectic living room idea in San Francisco
Living room - eclectic living room idea in San Francisco

 B.C.D. Interiors
Design By: Sandra Bargiel, Suzannah Tobin and Nancy Duke.
Photos by Mike Gullon
Inspiration for a large eclectic single-wall medium tone wood floor enclosed kitchen remodel in Other with a farmhouse sink, beaded inset cabinets, gray cabinets, granite countertops, gray backsplash, stone tile backsplash, stainless steel appliances and an island
Inspiration for a large eclectic single-wall medium tone wood floor enclosed kitchen remodel in Other with a farmhouse sink, beaded inset cabinets, gray cabinets, granite countertops, gray backsplash, stone tile backsplash, stainless steel appliances and an island

 The Dock Doctors
Boathouse with sundeck roof in Lake George New York. Permanent steel pile dock foundation.

 The Stucco Doctors
Designed by Scott Roberts
908-451-6256
Installed by Stucco Doctor
stuccodoctor.net
Example of a classic exterior home design in New York
Example of a classic exterior home design in New York
 The Stucco Doctors
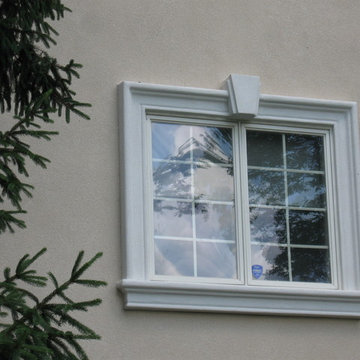
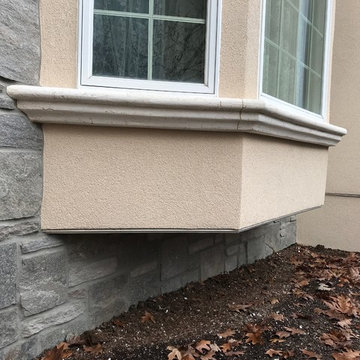
Drainable hard coat stucco with Arcusstone window trim and crown molding.
Installed by The Stucco Doctors and
Scott Roberts 908-451-6256
Mid-sized traditional beige two-story stone exterior home idea in New York with a shingle roof
Mid-sized traditional beige two-story stone exterior home idea in New York with a shingle roof
 The Stucco Doctors
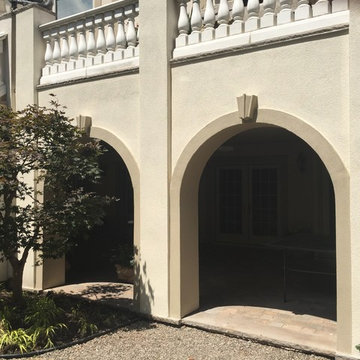
Drainable hard coat stucco with Arcusstone window trim and crown molding.
Installed by The Stucco Doctors and
Scott Roberts 908-451-6256
Inspiration for a 1960s exterior home remodel in New York
Inspiration for a 1960s exterior home remodel in New York
25