
Search results for "Effective solution" in Home Design Ideas
 ESF Home Textile LLC.
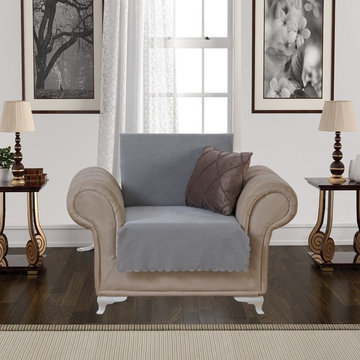
Chiara Rose Anti-slip Armless Sofa Cover Furniture Protector Chair Size Diamond
Dimensions: 29 Inch X 70 Inch
BEST SOFA PROTECTOR - This Slipcover is Extremely Sturdy, as well as an Instant, Magical Solution to Renew your Old Furniture with an Elegant Look! Ultrasonically welded seams prevent ripping apart and unraveling. The Edges are Laser-Cut to give a Chenille Trim Effect. Its Velvety Texture is Soft and also functions like a Warm Pet Bed giving a Sense of Security while your Pet is Resting. Our Covers are absolutely Pet-Friendly.
PROTECTIVE! Best Protection for ANIMAL SCRATCHES FUR SHED-HAIR DIRT FOOD SPILLS WEAR TEAR! STAIN PROOF! Perfect Guard against Cats Dogs Kids Children!
DECORATIVE! Great Stylish Coverage and Luxury Decoration in Living, Sitting Room with Full Solid Colors and Beautiful Printed, Patterned Designs, Extra Deluxe Décor, Nice Plush Texture! New Modern Look! CUSTOM-FIT! Relaxed fitted in Wing-back, Club, Rocker, Single Chair and a Half, one two three Pillow Coach, 1 2 Seaters, Box, T cushion, L, U shape Seaters! Big Large Long Wide Couches! Leather Velour Denim Twill Linen Sofas!
NON SLIDE! Slid-Resistant with PLASTIC DROP BACKING! No More Slipping Off / Sliding Over! Plastic Dots firmly Grip Upholstery! Stays in Place! No Zipper, Mat, Elastic Strap! No Pads under!
EASY CARE & WASH, DURABLE, DETERRENT! Machine Washable! Easily Removable Ready Made Furniture Throws! Cheap and Inexpensive! Heavy Duty Fabric! Stretch Enough to Cloth up Perfectly and Look Form Fit! NO ARMS! Slipcovers with Armrests DON’T properly FIT IN the Armrests and always create Fitting Problems. You know, they also have an Ugly Look. But with Chiara Rose no Need to Worry about Armrests anymore!
• PLEASE MAKE SURE TO READ DETAILED PRODUCT INFORMATION BELOW!
________________________________________
Product Description
WHY CHIARA ROSE SOFA COVERS?
Kids and Pets; We love them but we also love our furniture. Cleaning furniture is one of the most difficult chores and that’s why you need to protect it from dirt. The easiest and economical way of preserving your furniture is Chiara Rose Sofa Protector. Just put the sofa protector on your sofas (futon or couch) and stop worrying about stains and spills. It is perfect for homes with kids and pets. Pets love to scratch upholstery of the furniture. The enduring 220 gsm polyester fabric of Chiara Rose Sofa Protectors prevents tears and any kind of debris on your sofas. Its sturdy texture doesn’t let any spill and dirt penetrate the upholstery.
Besides being durable, Chiara Rose Sofa Cover is suitable to all types of decoration. To express your own personal style, you can choose from a variety of color and design options that fit perfectly to your home décor. With brilliant colors and attractive patterns, Chiara Rose Sofa Covers will give your room a completely new outlook. Unlike other covers, you don’t need to remove Chiara Rose Sofa Protector when you have guests. It will both protect your furniture and become a part of your home decoration.
WHY CHIARA ROSE SOFA PROTECTOR IS DURABLE?
The most common problem with traditional sofa covers is that after a short time of use the stitches come apart. The edges of Chiara Rose Sofa Cover are manufactured with ultrasonic laser cut technology. This technology prevents the edges from unraveling. What’s more, the 220 gsm polyester knitted fabric is the most long lasting fabric used in furniture protectors. While being durable, this fabric gives a warm sense
of touch and pleasure to sit upon.
WHY CHIARA ROSE IS THE BEST ANTI-SLIP SOFA PROTECTOR?
We always use the most contemporary technology to develop our products. That’s why we decided to use the patented plastic drop design on the back side of our covers to create the anti slip effect. These plastic drops firmly grip the upholstery of furniture so that the cover doesn’t slip off the seat easily. Even after your kids and pets jump on the sofa, Chiara Rose Sofa Cover holds on to your furniture. A quick adjustment is all it takes to get it back to look smooth. Chiara Rose Sofa Cover is the only sofa protector that uses this new technology.
WHY IT IS EASY TO USE CHIARA ROSE SOFA PROTECTORS?
No zippers, no elastic straps, no metal hooks!!! The anti-slip drops will take care of everything! , As shown on the image, just lay Chiara Rose Sofa Cover on your sofa, and tuck it between the cushion and the arms of the sofa. That’s all you need to do to put it on.
Chiara Rose Sofa Protector doesn’t allow everyday dirt, pet hair and food spills reach your sofa. The pattern of the fabric prevents accumulation of dirt on it. You can easily take off this dirt. In order to get best results, use a vacuum cleaner or shake your cover off before machine wash.
Chiara Rose Sofa Protector is easy care. It can be machine washed on max. 30°C or 85°F water temperature. Don’t use bleacher. Machine dryer can be used on low heat setting. To avoid wrinkles, use gentle cycle on washing machine and hang from a line while drying. If necessary, iron at low temperature.
 Gallery KBNY
This renovation in Manhattan placed us within a block of Central Park, delivering a complete overhaul of an ideally-located 1800-square-foot condo. The project was for a young family, whose newly-purchased property is in a post-war building and was in sponsor-condition when we arrived, warranting quite a bit of love. By delivering a complete interior renovation of the apartment, including two bathrooms, kitchen, floors, lighting, and custom millwork, we provided a modern, highly-functional space the family can proudly call home for years to come.
PARENTS NEED SPACE
Storage was the most important factor in this renovation. With a small child ready to rumble at all hours, our clients knew they were going to have all kinds of stuff taking over their space. At the same time, they wanted to be able to have guests come in and not see clutter. Our solution was neatly designed opportunities for storage nestled throughout the apartment.
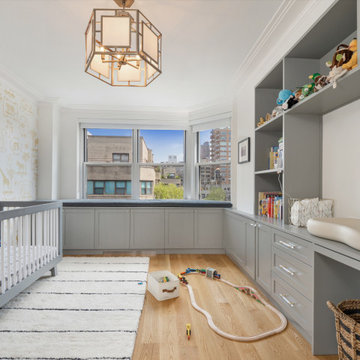
To start, we created a custom entertainment unit, offering storage below, with open shelves above. Built-in under the living room window is banquette seating with significant storage beneath. Not only does the dual-purpose nook offer areas to store toys galore, the cozy spot offers beautiful windows with views of the shimmering skyline and rooftop gardens, providing practical peace of mind. Every inch of this renovation was designed with intention, so no space is wasted.
UNIQUE KITCHEN DESIGN
There are various custom elements that make this particular NYC kitchen renovation stand-out. While the majority of the apartment has herringbone wood flooring, determination was made that having herringbone in the kitchen would have been way too busy. So, we went with straight planks for the kitchen, blended from the living room with a custom wood flooring design. The straight planks not only look better, they were most cost-effective. Additionally, there’s wood paneling lining the kitchen, accenting the off-white and chestnut cabinets with a touch of luxe. Finally, the quartz backsplash and countertop offer a nice and seamless touch to the overall modern design.
FORWARD-THINKING DESIGN FOR CHILDREN
Our goal with the kid’s bedroom design was to offer a multi-purpose space the child could enjoy and use as needs change over the years. Beyond the playful wallpaper, we provided plenty of timeless built-ins that can be used to store diapers and books early on, while also including a desk space for homework in later years (hopefully).
COMPLIMENTARY BATHROOMS
When we renovated the two bathrooms in this Manhattan apartment, our goal was to create similar but distinct designs between the two spaces, that still felt unique in their own right and blended with the rest of the home. The wood vanities incorporate the heavy wood tones from other rooms, while the strong accent tiles on the walls and big, bold marble floor tiling create elegant foundations for each space.
SOME HIGHLIGHTS
- Natural light drop ceilings offer nice recessed lighting throughout the entire apartment
- New doors & new hardware throughout, w/crystal doorknobs in various areas
- Built-in bar to accommodate guests, complete with lights under cabinet and distressed mirrored backsplash
- Plaster crown molding offering a very clean and classic touch throughout the transitional space
Considering an apartment renovation in NYC? We specialize in loft, condo and co-op, brownstone and private home renovations in Manhattan and Brooklyn, specializing in pre-war apartments. When you work with a design-build firm like Gallery to renovate your home, you get the full range of our expertise. We handle every step of the process, from architecture and design to filing permits and organizing schedules to sourcing custom pieces and managing all rounds of the remodel. Contact us today to bring your dream home to life.
 Tile Doctor Ltd
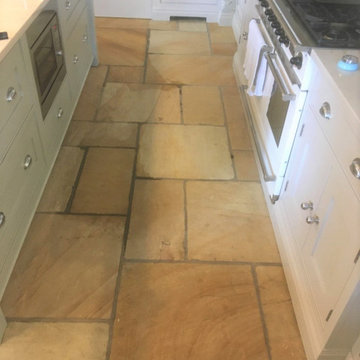
This is a large 17.2 m2 Sandstone Floor installed throughout the living and kitchen areas of a property in the beautiful village of Disley close to Lyme Park which is run by the National Trust. The floor had been installed four years ago and my client was unhappy with the original sealer which hadn’t lasted very long. Without the protection of a sealer dirt had become ingrained in the pores of the stone which was now difficult to clean. Another issue was the rough nature of the Sandstone meant it was impossible to mop as it shreds the mop! As a result, the floor was mainly cleaned with a hoover which was not ideal, especially in a kitchen.
I went over to survey the floor and before quoting I ran a small test clean in the kitchen which took the floor back to its natural pale colour and really showed how dirty the floor had become. Test cleans are great as it helps me to formulate an effective cleaning plan and provide an accurate quote. My client was impressed with the result and so I was booked to come back and deep clean and then reseal the whole floor. Due to its size I estimated the floor would take two days to deep clean and a further day to apply a new sealer, so three days in total.
Working in large sections I started by cleaning the floor and stripping off the old sealer with a strong dilution of Tile Doctor Remove and Go which is a coatings remover that is safe to use on stone. The solution was left to soak into the pores of the Sandstone for ten minutes before being worked in with a 200-grit diamond pad fitted to a rotary floor machine. This action not only removed the old sealer and cleaned the floor but the 200-grit pad being vey coarse removed a lot of the roughness from the surface of the Sandstone so it shouldn’t shred any more mops.
After rinsing the floor with water and removing the slurry with a wet vacuum I set about cleaning the grout with Tile Doctor Pro-Clean worked into the grout line with a stiff brush and assisted with steam from a professional steam cleaner with a grout attachment. Once done the floor was rinsed and extracted again to remove the soil from the grouting. There was also an area near one of the doors where the grout had become loose and needed replacing so I made up a batch of matching grout and filled this in. The floor was then left overnight to dry with assistance from a couple of air movers.
I returned the next day to finish the floor by applying a sealer. First, I double checked the floor was dry with the damp meter. The readings confirmed the air movers had done a good job and that the floor was within the accepted parameters, so I was ready to seal. The sealer I chose was Tile Doctor Seal and Go which being water based doesn’t leave a smell as it dries, it really works well on Sandstone and adds a nice subtle sheen to the stone.
Once finished the floor looked much cleaner, lighter in colour overall more inviting, you could even see the fossils in some of the tiles.
The surface was also smoother so the customer should find cleaning with a mop much easier in future. On that subject its worth pointing out that owners of sealed floors should always use a neutral pH tile cleaner on their floors as most supermarket products are simply too strong and will prematurely strip the sealer off a tile if used repeatedly. Tile Doctor sell a product called Tile Doctor Neutral Cleaner which is ideal for cleaning sealed Sandstone floors like this one.
My client was really happy with the results and sent me a message later saying: “the floor looks amazing!”
Kamila Logonzy
East Cheshire Tile Doctor
Find the right local pro for your project

 ValHolla LLC
Valerie Holland
Eat-in kitchen - large cottage u-shaped medium tone wood floor eat-in kitchen idea in Wichita with a double-bowl sink, recessed-panel cabinets, distressed cabinets, granite countertops, white backsplash, ceramic backsplash, stainless steel appliances and an island
Eat-in kitchen - large cottage u-shaped medium tone wood floor eat-in kitchen idea in Wichita with a double-bowl sink, recessed-panel cabinets, distressed cabinets, granite countertops, white backsplash, ceramic backsplash, stainless steel appliances and an island

 Wine Cellar Specialists
As you can see, our custom wine cellar Dallas builders included a wine tasting table in this wine room, for convenience.
Just like the wine racks, the table was made from All Heart Redwood. As such, it blends in wonderfully.
Case storage was also included, beneath the Redwood tabletop.
Wine Cellar Specialists
1134 Commerce Drive
Richardson
(972)454-0480
75081
https://winecellarspec.com/
 Tile Doctor Ltd
Having an effective sealer in place is essential for ensuring the long term condition of tiled floors in fact a lack of sealer can make cleaning the tiles exceptionally difficult as the sealer prevents dirt becoming ingrained in the tile.
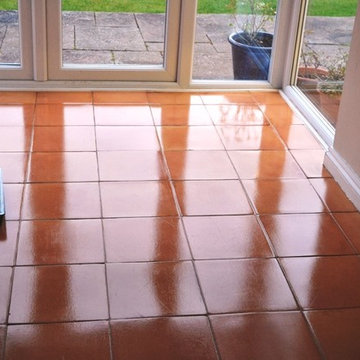
This property owner, living in the former spa town of Matlock in Derbyshire, was experiencing problems with their Terracotta tiled kitchen floor since they had applied some kind of wax to act as a sealer, and this had worn off within a few weeks. After this happened the tiles were not sealed again, making cleaning a big problem. Terracotta is a highly porous stone and thus easily soaks in spillages and stains, and allows dirt to become very easily trapped.
In this situation, the property owner resolved to contact me about some professional maintenance. I suggested that the tiles would need a deep clean followed by the application of a fresh, high quality sealer. The work was agreed on and I made my way down to the property the following week.
When I arrived at the property and saw the tiles first hand it became clear that a professional clean had been in need for a long time: greasy looking stains were particularly prevalent and covered large areas of the kitchen floor.
To remove I mixed a strong solution of Tile Doctor Pro Clean, which is a multi-purpose, high-alkaline cleaner, stripper and degreaser, and, working in small areas, applied it to the floor. Working in small sections was important because the stone is very porous and quickly soaked in any product laid down. I scrubbed the cleaner into the stone using a rotary machine fitted with a black scrubbing pad, with the dirt and stains coming away nicely. Pro Clean is highly versatile and can be used for similar cleaning purposes on most types of natural stone floor.
After cleaning each section, I quickly removed the excess dirty water and chemicals with my wet vax machine. Once the whole floor had been cleaned I rinsed it several times with fresh water just to make sure all cleaning chemicals were gone. I then left the floor to dry completely for 36 hours.
When I returned to the property, I conducted several damp tests to check for any areas of the floor that needed further drying. As is almost always the case, there were a few areas that remained slightly damp, and I set about speeding the drying process along using my heat gun. In fact, it actually took me more than three hours to get the floor completely dry, but this was worth the effort as even the slightest excess moisture can damage the performance of the sealer.
Once the floor was finally dried I began sealing the floor with one coat of Tile a Doctor Colour Grow sealer. Colour Grow is an impregnating sealer that penetrates deep into the pores of the stone, thus acting as a shield against ingrained dirt, and also raises the colour of the tiles to provide an aesthetically appealing appearance. sealer. After sealing with Colour Grow, I left the floor to dry for couple of hours and then applied six coats of Tile Doctor Seal & Go, which is a topical sealer that builds up durable protection on the surface of the tiles.
The combination of through cleaning and the application of not one, but two high quality sealers really did wonders for the appearance of these Terracotta tiles. Looking at the final results you wouldn’t have believed they had been without a proper clean and seal for so long! Needless to say the customer was exceptionally pleased and will surely be able to keep her floor looking great for a long time to come.
Tony Olmet
Derbyshire Tile Doctor
 Gallery KBNY
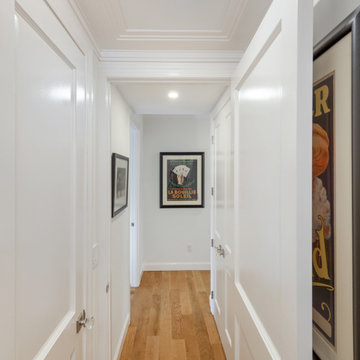
This renovation in Manhattan placed us within a block of Central Park, delivering a complete overhaul of an ideally-located 1800-square-foot condo. The project was for a young family, whose newly-purchased property is in a post-war building and was in sponsor-condition when we arrived, warranting quite a bit of love. By delivering a complete interior renovation of the apartment, including two bathrooms, kitchen, floors, lighting, and custom millwork, we provided a modern, highly-functional space the family can proudly call home for years to come.
PARENTS NEED SPACE
Storage was the most important factor in this renovation. With a small child ready to rumble at all hours, our clients knew they were going to have all kinds of stuff taking over their space. At the same time, they wanted to be able to have guests come in and not see clutter. Our solution was neatly designed opportunities for storage nestled throughout the apartment.
To start, we created a custom entertainment unit, offering storage below, with open shelves above. Built-in under the living room window is banquette seating with significant storage beneath. Not only does the dual-purpose nook offer areas to store toys galore, the cozy spot offers beautiful windows with views of the shimmering skyline and rooftop gardens, providing practical peace of mind. Every inch of this renovation was designed with intention, so no space is wasted.
UNIQUE KITCHEN DESIGN
There are various custom elements that make this particular NYC kitchen renovation stand-out. While the majority of the apartment has herringbone wood flooring, determination was made that having herringbone in the kitchen would have been way too busy. So, we went with straight planks for the kitchen, blended from the living room with a custom wood flooring design. The straight planks not only look better, they were most cost-effective. Additionally, there’s wood paneling lining the kitchen, accenting the off-white and chestnut cabinets with a touch of luxe. Finally, the quartz backsplash and countertop offer a nice and seamless touch to the overall modern design.
FORWARD-THINKING DESIGN FOR CHILDREN
Our goal with the kid’s bedroom design was to offer a multi-purpose space the child could enjoy and use as needs change over the years. Beyond the playful wallpaper, we provided plenty of timeless built-ins that can be used to store diapers and books early on, while also including a desk space for homework in later years (hopefully).
COMPLIMENTARY BATHROOMS
When we renovated the two bathrooms in this Manhattan apartment, our goal was to create similar but distinct designs between the two spaces, that still felt unique in their own right and blended with the rest of the home. The wood vanities incorporate the heavy wood tones from other rooms, while the strong accent tiles on the walls and big, bold marble floor tiling create elegant foundations for each space.
SOME HIGHLIGHTS
- Natural light drop ceilings offer nice recessed lighting throughout the entire apartment
- New doors & new hardware throughout, w/crystal doorknobs in various areas
- Built-in bar to accommodate guests, complete with lights under cabinet and distressed mirrored backsplash
- Plaster crown molding offering a very clean and classic touch throughout the transitional space
Considering an apartment renovation in NYC? We specialize in loft, condo and co-op, brownstone and private home renovations in Manhattan and Brooklyn, specializing in pre-war apartments. When you work with a design-build firm like Gallery to renovate your home, you get the full range of our expertise. We handle every step of the process, from architecture and design to filing permits and organizing schedules to sourcing custom pieces and managing all rounds of the remodel. Contact us today to bring your dream home to life.

Sponsored
Sunbury, OH

J.Holderby - Renovations
Franklin County's Leading General Contractors - 2X Best of Houzz!
 Priority Remodeling
's Exquisite One-Bedroom ADU Project
In the world of home improvement and design, every so often, a project emerges that flawlessly marries aesthetics with functionality. The recent completion of a one-bedroom Accessory Dwelling Unit (ADU) by Priority Remodeling stands as a testament to this golden rule.
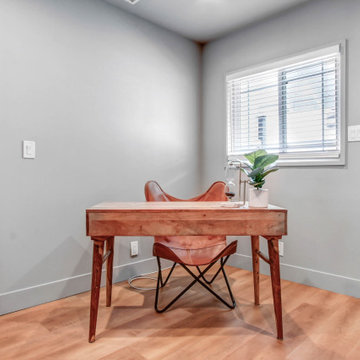
As one steps into the space, the first thing that catches the eye is the immaculate and contemporary design of the room. Muted gray walls serve as the perfect backdrop, enhancing the natural brightness of the room, thanks to the strategically positioned windows. The window blinds, neatly tucked away, provide options for privacy while allowing natural light to illuminate the space.
The minimalist office area showcases a sleek wooden desk paired with a luxurious leather chair. A simple potted plant adds a touch of organic green, giving a nod to the importance of biophilic design elements. With ample space for working or studying, it offers the perfect environment for productivity and focus.
Transitioning into the bedroom area, the understated elegance continues. The centerpiece - a comfortable bed with crisp white linens - invites rest and relaxation. The headboard's unique nailhead trim design adds a touch of sophistication without overpowering the room. Adjacent to it, a cozy sitting area with a leather lounge chair and throw pillow makes for an ideal reading or relaxation spot.
Both practical and aesthetic, the choice of wooden flooring complements the neutral color palette, warming up the space and providing continuity. The floor seamlessly ties the different areas together, creating a cohesive and harmonious environment.
In sum, Priority Remodeling's recent ADU project is a masterclass in modern interior design. Each element has been meticulously chosen and placed, ensuring both functionality and beauty. This ADU is not just a living space; it's an experience. A testament to the prowess and vision of Priority Remodeling.
---------
In recent years, Accessory Dwelling Units (ADUs) have surged in popularity among homeowners, and for a multitude of good reasons. These self-contained living spaces, often constructed in the backyard or converted from existing structures like garages, bring forth a myriad of benefits:
Additional Income Stream: One of the most immediate benefits of an ADU is the potential for rental income. Homeowners can rent out these units to tenants, providing a steady stream of revenue that can help offset mortgage payments or other expenses.
Increased Property Value: Well-designed and constructed ADUs can significantly increase a property's value. It's not just about the added square footage but also the flexibility and functionality that such a space offers.
Housing Flexibility: ADUs can serve multiple purposes over time. They can start as a home office, transition to a living space for a college-going child, and later serve as a residence for aging parents. This adaptability is invaluable in ever-changing life scenarios.
Sustainable Living: Smaller spaces typically consume fewer resources, both in their construction and daily operation. This makes ADUs an environmentally friendly choice for those keen on reducing their carbon footprint.
Community Building: ADUs can help address housing shortages in dense urban areas. By providing affordable rental options, they contribute to community diversity and vitality.
Privacy with Proximity: For families looking to support relatives (like elderly parents or adult children), an ADU offers the perfect balance. Family members live close by, fostering connection and support, yet both parties maintain their privacy.
Cost-effective Expansion: Compared to the costs associated with buying a larger home or constructing a full-fledged home addition, ADUs often present a more economical solution to gaining extra living space.
Incorporating an ADU into one's property is not just about creating additional space but about unlocking a range of benefits that enhance both the financial and functional aspects of homeownership. As seen in Priority Remodeling's recent project, an ADU can also be a pinnacle of design and comfort, proving that with the right vision, even compact spaces can offer a grand living experience.

 habibisoft
We extend our gratitude for selecting Habibisoft as your trusted partner for a social media marketing agency in Dubai. Our team is dedicated to boosting your brand using tailored social media services of unrivaled quality. Our outstanding strategies aim at making your brand stand out in the digital world; trust us and let us make it a reality. At Habibisoft, we consider the dynamic trends that shape social media marketing and tailor our services to achieve lasting results. Strengthen your visibility online with our expertly crafted social media packages. Enlist us as your ideal social media partner of choice in Dubai!
Choose Habibisoft for an unparalleled social media marketing experience in Dubai. Drive engagement and conversions with our superior services, crafted by a team of skilled professionals exclusively for your brand. From recognition to lasting memorability, we've got the expertise to make your company stand out. Browse our variety of customized social media packages adaptable to your brand's requirements. At Habibisoft, Dubai's premium social media company, we pledge our unwavering dedication to helping you succeed.
Embark on a path towards digital triumph with Habibisoft, the leading social media marketing company in Dubai. Our team of dedicated professionals strives towards incomparable excellence, curating a diverse suite of services to offer the most distinguished experience in the market. Here at Habibisoft, we recognize the constantly changing landscape of social media marketing and develop consolidated approaches to hook your audience. Regardful of your brand's singular individuality, we emphasize crafting your distinct image, taking you to the forefront of competitors.
At Habibisoft, our team utilizes innovation, creative approaches, and sound strategy to obtain concrete outcomes through effective social media campaigns. No matter your scale, whether fledgling or a long-established icon, we at Habibisoft commit ourselves to compelling marketing efforts that successfully engage your following and bolster your virtual footprint.
Explore our expertly developed social media packages tailored to your business needs. Whether you focus on increasing visibility or producing valuable leads, we provide all the solutions and select the ideal package for you. See your brand reach new boundaries today by selecting the bundle that aligns perfectly with your vision.
Habibisoft stands out because of our steadfast loyalty to our clients' journeys to prosperity. Our scope extends beyond simply handling social media to forging lasting bonds and curating powerful encounters. Being guided by social values, we appreciate the vitality of fostering interactions within the digital landscape.
Entrusting your brand with Habibisoft means working with a team of vibrant specialists. Informed by data, our approach enables us to make sound business choices to enhance your social media campaigns. Count on our competence in Social Media Advertising in Dubai and Social Media Marketing in Dubai to give your brand the polished appeal it deserves.
Put your confidence in Habibisoft for all your social media needs in today's fast-paced digital world. Our team provides expert guidance in navigating the intricacies and steering your brand to success. For Dubai's premier social media marketing experience, team up with Habibisoft – where conscious progress meets creative balance.

 Mottram Architecture
Timber frame homes offer unique challenges during a remodel. What often makes them beautiful and attractive to most homeowners, also makes them challenging for space requirements.
Context: The lovely couple that owned this home were struggling with some interesting floor plan challenges that just didn't work for their family. The loved the beautiful timbers and woodwork of their home, but the dramatically sloping ceilings on the second floor, particularly in the bathroom, just didn't work for this 1 1/2 bath home. Needing to use the skylight to approach the toilet was a less then ideal scenario. Although the bathroom footprint was more then adequate, the sloped ceiling only made half of the space useable. Check out the Before/After post on our blog to see the photos of the house pre-renovation. As much as they loved all the wood features in their home, another challenge they had was light. The wood ceiling made everything inside the house darker, even with a fantastic array of south facing windows, there were spaces in the home that felt dark and small. When they contacted us they wanted to know how could they make their brighter and more inviting, were there solutions to the 2nd floor sloped ceiling issues, and if they were going to do all of this work, how could they make their home more comfortable and efficient. A nagging water leak in the upstairs bathroom spurred them into action and here is how we solved their dilemma.
Conclusion: First, we added a little dormer to the rear of the house so we could get full headroom in nearly all of the upstairs bathroom! Then we decided to extend that dormer one more timber bay over to create a walk in closet with natural light and plenty of space. Since we were contemplating energy efficiency, we resolved a nagging issue that is present in a lot of timber frame construction, air tightness. Commonly found in timber frame construction, fiberglass insulation is installed in the rafter bays and board ceilings are installed over top. Unfortunately, board ceilings are anything but air tight, and fiberglass insulation needs to be in an airtight cavity for maximum effectiveness. So we were able to solve two issues at the same time for this homeowner. We removed the board ceiling and fiberglass insulation, we dense packed the rafter bays with cellulose insulation, and installed sheetrock in place of the boards. The boards were salvaged for re-use by the homeowner, and the space and light quality was dramatically improved. Some may think that losing the board ceiling took something away from the space, but what you'll see in the pictures is that it highly accentuates the heavy timbers and really makes them stand out in a beautiful way. Now with this added airtightness, better insulation, and brighter space, the homeowner hardly runs their wood stove, and it's so quiet in the space, an added bonus from changing the insulation. It became necessary to also add a sheetrock ceiling to the living room to hide the plumbing from the new bathroom layout above. Changing this ceiling gave the homeowner some real quality lighting that was lacking in the living room before. The brighter ceiling and new lighting layout completely transforms the living room into a space you want to hang out, even though the layout didn't change at all. When the homeowner saw the finished spaces she said "I can't believe this is my house, I want to live in this house"
Energy Efficiency: I touched a little on the efficiency above, but like all projects done with Mottram Architecture, we always want to leave you with a little extra. Timber frame construction with board ceilings and fiberglass insulation are notoriously leaky! If you want to know what we think about fiberglass insulation, check our our blog post on Why Fiberglass Insulation Sucks. By installing cellulose insulation and covering it with sheetrock we were able to greatly reduce the heat flowing out of this home. It not only improves cashflow it improves the comfort level in the space. Who wants to sit in their living room and feel a draft? Let us remind you, we are not saying cellulose insulation is an air barrier, we use the sheetrock to help with that, but it does significantly reduce the air flow over fiberglass insulation. And when we reduce the airflow, we reduce the heat flow. And when we reduce the heat flow, we reduce the need to re-heat that drafty air from outside. When it comes to energy efficiency the first and best place to start is air infiltration. We greatly reduced the air infiltration with the new insulation, but we also added a hat and warm boots. What I mean by that is, we improved the insulation in the roof, and we installed insulation in the basement. Maybe it's a silly analogy, but when you think about keeping warm, we always start with the hat and boots! With sustainability in mind, the next project will be to add a deck to the front of this house with rain catchment barrels from the metal roof. They are planning to plant a garden in the spring and the rain catchment system will help to irrigate the new garden.
Builder: East Shore Builders
Photographer: Michael Eric Berube
 Tile Doctor Ltd
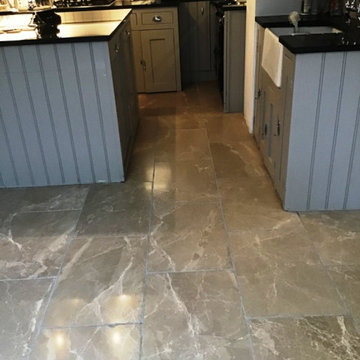
This Limestone tiled floor installed in a kitchen and family room at a property in Wellingborough is a great example of how this material can lose its appearance without a regular maintenance plan in place.
The customer called me as not only was she concerned that the floor had lost its lustre the grey grout had become very stained and almost black in heavy traffic areas, in fact my customer had originally asked about re-grouting but I was confident it could be cleaned.
I provided a quote which they were happy to accept.
The area was a nice wide 6 metre by 5 metre space and except for a few items of furniture that would need moving around there were relatively few obstacles. I reasoned the most efficient way to restore the polished appearance of the Limestone would be to use a set of diamond encrusted Burnishing Pads. These are fitted to a rotary machine and applied to the stone in sequence from coarse to smooth. It’s an effective process that cuts back the layer of dirt on the floor and then we build back up the polish.
We started burnishing the Limestone with a coarse 400-grit pad fitted to a rotary machine and applied with a little water for lubrication. The coarse pad is very good at removing dirt and old sealers from stone and once completed the resultant surface water and loose dirt is removed using a wet vacuum.
At this point I turned my attention to the badly stained grout lines, and applied a strong solution of Tile Doctor Pro-Clean which was scrubbed in along the grout lines using a stiff grout brush, this is necessary as the recessed nature of the grout makes it difficult for the rotary pads to reach it.
I then repeated the burnishing process with the medium 800-grit pad and fine 1500-grit pad, the 800-grit pad removes any small surface scratches and the 1500-grit further refines the look of the Limestone slowly restoring its polished appearance.
After the whole floor had been burnished in this way it was given a further rinse with water and the soil extracted as before. I then inspected the floor to see if more work would be needed.
I was not fully happy with how some of the grout lines had responded, some were still slightly stained, and some marks were visible in the high traffic areas. I had already discussed on my initial visit with the client that this might be the case and it was agreed between us that should this be the case I would apply a Tile Doctor Grout Colourant in Light Grey to recolour all the grout lines and achieve a uniform finish.
The stone and grout was still damp from cleaning and polishing, so I decided to leave the grout colouring until the following day.
On day two I started by grout recolouring all the grout lines, it’s a straight forward process but can be a little tedious where there is a lot of grout to cover. Once complete I allowed the grout colour to dry for a couple of hours before moving onto the next step.
The last pad to be applied in the stone burnishing process is the very fine 3000-grit polishing pad which is applied dry to the tiles using a small amount of water sprayed onto the floor and leaves the stone dry and with a polished silk finish.
The floor was then sealed using two coats of Tile Doctor Ultra Seal Sealant allowing the first coat to dry before applying the second. Ultra-Seal is an impregnating sealer that works by occupying the pores in the stone thereby preventing dirt from becoming ingrained there. It’s also a natural look sealer that doesn’t affect the appearance of the stone.
My customer was very happy with the transformation of her floor and provided the feedback copies below. In-fact she was so impressed with the results that she also used our services to restore the grout and silicon in one of her bathrooms.
“Phil was on time & easy to deal with and did an amazing job on my kitchen and bathroom floors and the carpets & sofa. No fuss, just a great job. Liz O.”
Phil Vissian
Northamptonshire Tile Doctor
 habibisoft
We extend our gratitude for selecting Habibisoft as your trusted partner for a social media marketing agency in Dubai. Our team is dedicated to boosting your brand using tailored social media services of unrivaled quality. Our outstanding strategies aim at making your brand stand out in the digital world; trust us and let us make it a reality. At Habibisoft, we consider the dynamic trends that shape social media marketing and tailor our services to achieve lasting results. Strengthen your visibility online with our expertly crafted social media packages. Enlist us as your ideal social media partner of choice in Dubai!
Choose Habibisoft for an unparalleled social media marketing experience in Dubai. Drive engagement and conversions with our superior services, crafted by a team of skilled professionals exclusively for your brand. From recognition to lasting memorability, we've got the expertise to make your company stand out. Browse our variety of customized social media packages adaptable to your brand's requirements. At Habibisoft, Dubai's premium social media company, we pledge our unwavering dedication to helping you succeed.
Embark on a path towards digital triumph with Habibisoft, the leading social media marketing company in Dubai. Our team of dedicated professionals strives towards incomparable excellence, curating a diverse suite of services to offer the most distinguished experience in the market. Here at Habibisoft, we recognize the constantly changing landscape of social media marketing and develop consolidated approaches to hook your audience. Regardful of your brand's singular individuality, we emphasize crafting your distinct image, taking you to the forefront of competitors.
At Habibisoft, our team utilizes innovation, creative approaches, and sound strategy to obtain concrete outcomes through effective social media campaigns. No matter your scale, whether fledgling or a long-established icon, we at Habibisoft commit ourselves to compelling marketing efforts that successfully engage your following and bolster your virtual footprint.
Explore our expertly developed social media packages tailored to your business needs. Whether you focus on increasing visibility or producing valuable leads, we provide all the solutions and select the ideal package for you. See your brand reach new boundaries today by selecting the bundle that aligns perfectly with your vision.
Habibisoft stands out because of our steadfast loyalty to our clients' journeys to prosperity. Our scope extends beyond simply handling social media to forging lasting bonds and curating powerful encounters. Being guided by social values, we appreciate the vitality of fostering interactions within the digital landscape.
Entrusting your brand with Habibisoft means working with a team of vibrant specialists. Informed by data, our approach enables us to make sound business choices to enhance your social media campaigns. Count on our competence in Social Media Advertising in Dubai and Social Media Marketing in Dubai to give your brand the polished appeal it deserves.
Put your confidence in Habibisoft for all your social media needs in today's fast-paced digital world. Our team provides expert guidance in navigating the intricacies and steering your brand to success. For Dubai's premier social media marketing experience, team up with Habibisoft – where conscious progress meets creative balance.


Sponsored
Sunbury, OH
J.Holderby - Renovations
Franklin County's Leading General Contractors - 2X Best of Houzz!


 Wine Cellar Specialists
The California wine cabinets pictured here are made of Knotty Alder, with a rustic stain and clear lacquer.
They seal the wine bottles in the ideal wine storage conditions, allowing them to age safely and securely.
Wine Cellar Specialists
858 W Armitage Ave #385 Chicago, IL 60614
(773) 234-0112
winecellarspec.com
 Paver House
This Tampa Bay homeowner was looking into complete change his backyard. Most pools in Tampa are built with a connected spa. To increase his pool size, he ended up deciding for not to build spa, however, he still wanted an appealing focal point to his pool. To contrast with the beautiful green landscape around the backyard, our customer wanted to add color and movement to his outdoor area.
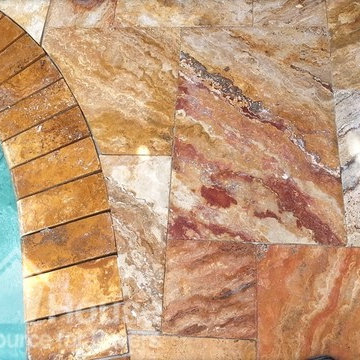
For the main pool deck area, our customer felt in love with the french pattern autumn blend tumbled travertine pavers. French Pattern Tumbled Autumn Blend Travertine Pavers contain a mixture of mostly red and gold, with some white, dark and light brown tones. Autumn Blend added the perfect amount of color and movement our customer wanted.
Travertine pavers offer a few unique color mixtures that make any outdoor space pops up from others.
A great accent color solution for the coping was the Desert Gold color on the 4×9 tumbled travertine copings. The beautifully blended Desert Gold may be bright and striking but does not lack for warmth and richness as well. To not compete with the strong colors of the pool deck, we advised our customer to add a lighter and more neutral pool tile: 2×2 autumn blend tumbled travertine tiles brought the perfect combination of contrast and harmony we were looking to achieve.
CREATIVITY ON YOUR POOL REMODEL WITH TRAVERTINE PAVER.
Pool remodel with travertine paver does not need to represent neutral colors only. Different than what most people believe, travertine pavers offer a few unique color mixtures that make any outdoor space pop up from others. Don’t be afraid of mixing different patterns, colors and textures to add more character to your outdoor space. Remember that, travertine pavers will display better their color when sealed, like the pictures from this pool remodel. If you are not sure if you would like your paver with the enhanced color, spray the sample with water first.
PREMIUM TRAVERTINE FRENCH PATTERN PAVERS
Pool remodel with travertine paver
POOL REMODEL WITH TRAVERTINE PAVERS
This Tampa Bay homeowner was looking into complete change his backyard. Most pools in Tampa are built with a connected spa. To increase his pool size, he ended up deciding for not to build spa, however, he still wanted an appealing focal point to his pool. To contrast with the beautiful green landscape around the backyard, our customer wanted to add color and movement to his outdoor area.
For the main pool deck area, our customer felt in love with the french pattern autumn blend tumbled travertine pavers. French Pattern Tumbled Autumn Blend Travertine Pavers contain a mixture of mostly red and gold, with some white, dark and light brown tones. Autumn Blend added the perfect amount of color and movement our customer wanted.
pool remodel with travertine paverpool remodel with travertine paverpool remodel with travertine paverpool remodel with travertine paverpool remodel with travertine paver
Previous
Next
Travertine pavers offer a few unique color mixtures that make any outdoor space pops up from others.
A great accent color solution for the coping was the Desert Gold color on the 4×9 tumbled travertine copings. The beautifully blended Desert Gold may be bright and striking but does not lack for warmth and richness as well. To not compete with the strong colors of the pool deck, we advised our customer to add a lighter and more neutral pool tile: 2×2 autumn blend tumbled travertine tiles brought the perfect combination of contrast and harmony we were looking to achieve.
CREATIVITY ON YOUR POOL REMODEL WITH TRAVERTINE PAVER.
Pool remodel with travertine paver does not need to represent neutral colors only. Different than what most people believe, travertine pavers offer a few unique color mixtures that make any outdoor space pop up from others. Don’t be afraid of mixing different patterns, colors and textures to add more character to your outdoor space. Remember that, travertine pavers will display better their color when sealed, like the pictures from this pool remodel. If you are not sure if you would like your paver with the enhanced color, spray the sample with water first.
PREMIUM TRAVERTINE FRENCH PATTERN PAVERS
On this pool remodel project, our customer preferred to use the French Pattern design, which is a good way to break up the monotony of the typical geometric or square appearance of large areas. Just like this outstanding pool deck remodel, patios and walkways will appear more fluid and mosaic by eliminating grout lines and the usual linear effect as well as the need for constant maintenance of the typical square or rectangular paver.
A French Pattern or a Versailles pattern is a paver pattern made up of four different sized tiles. Most French patterns are laid in stone, and nearly all are sold in “bundles” of tile that will cover 16 square feet.
Travertine pavers on your pool deck will reflect heat on hot days, remaining cool to the touch, unlike concrete surface options. Travertine does not discolor or become chalky after installation. The texture of travertine ensures that the stone remains slip resistant for wet feet, while its cool feel prevents burns. Another great advantage of travertine pavers is that there will be no visible grout lines; grout can be a source of both installation problems and added cost for future removal / replacement or up-keep.
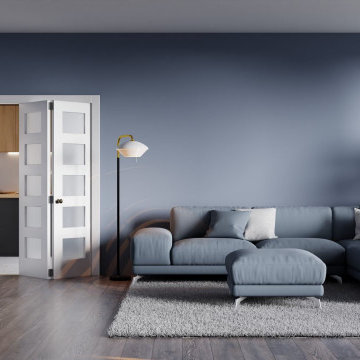
 Almesedoors
FINISH: PRIMED
The advantages of this approach – of this type of interior door finish – are fairly obvious. Pick a color, any color that suits your projects best. Mix and apply. Re- coat whenever you feel it is necessary to do so. Touch it up. It gives you, the proud owner of these interior doors, complete freedom of choice, and the significant savings, especially where it comes to bulk orders, can be a true source of joy.
As Kurt Vonnegut mentions in one of his novels (Bluebeard, unless I’m mistaken … check it out when you get a chance), the thrill of laying on colors is a large part of the artist’s professional satisfaction. In other words, a keen pleasure.
When back in the remote past visual arts became a field dominated by professionals rather than hobbyists, the main problem of “just laying on paint” became obvious: you can’t.
The medium of choice back then was egg tempera, a permanent, fast-drying substance consisting of colored pigments mixed with a water-soluble binder medium, usually glutinous material such as egg yolk. Portraits and ornaments were executed in this medium, and the wood panel was the surface of choice. One of tempera’s interesting features is that it is not as easily absorbed by wood as other mediums. Some sort of primer was necessary, of course, but pretty much any substance that dried evenly could be used.
The drawbacks of tempera, or pintura al temple, as the Spanish call it, only became obvious with the advent of the Renaissance, when the leading representatives of the trade turned to oil (and interior doors suddenly became a great deal less crude, but that’s a story for another day).
Oil painting is the process of “painting with pigments with a medium of drying oil as the binder.” Commonly used types include linseed (highly preferable in art, though not necessarily in interior doors, mind you), poppy seed, walnut, and safflower.
Today, five hundred years later, it is safe to say that oil is more versatile than pintura al temple – by orders of magnitude. Specifically, the contrasts achieved through the former are much greater, the darks are far deeper, and three- dimensional, highly realistic images are much easier to achieve. Next time you visit a museum, take a closer look at pintura al temple portraits. All of them, without exception, come off as a bit “flat” as opposed to their latter-day counterparts.
Also, where glazing is concerned …
Glazing: a painting technique in which a transparent layer, with just a touch of pigment, is laid over a previously painted surface, allowing light to travel through the glaze and be reflected back off of the opaque layer below. Gentle shadows, subtle changes of color, smooth transitions – all these can be achieved through glazing, which was used by all artists up until the middle of the Nineteenth Century, when artist tubes were invented, revolutionizing the field, and other techniques began to be explored.
Tempera enthusiasts (it takes all kinds to make a world) will assure you that glazing is not just possible in pintura al temple but is actually the basis of the whole enterprise. Well, what are you going to do? They’re enthusiasts.
Anyway, la peinture à l'huile, as the French call it, re-introduced the ancient problem of most surface’s propensity to absorb dipingere, as the Italians call the stuff. Wood or canvas, it is all the same: you’re not going to get very far without a good primer.
Experiments were conducted, and soon rabbit skin glue emerged as the least expensive and most effective solution. It was easy to apply. It dried evenly. It made the application of the l’huile stuff on top of it a walk in the park.
There were drawbacks. Today, rabbit skin glue is considered to be a major cause of cracking by most modern conservators. (Remember, when you visited the Metropolitan Museum of Art – and did you see those interior doors? … some of them are quite something … - most “old masters” pictures are completely covered with a cobweb of cracks? There you go). Because the glue is hygroscopic, it continually absorbs moisture from the atmosphere, causing the glue to swell and shrink as ambient humidity levels change. Over many humidity cycles, this repeated flexing causes the brittle oily layers to crack.
To combat this problem, modern primers are made of acrylic materials which are guaranteed not to cause any damage to the dipingere. No bubbling, no cracks. Your interior doors are safe.


 Lowe's of E. Virginia Beach
Photo Credit: Mary Ford, Project Specialist- Interiors at Lowe's of E.Virginia Beach
Example of a small beach style master beige tile and porcelain tile porcelain tile alcove shower design with shaker cabinets, white cabinets, quartz countertops, a two-piece toilet, an undermount sink and blue walls
Example of a small beach style master beige tile and porcelain tile porcelain tile alcove shower design with shaker cabinets, white cabinets, quartz countertops, a two-piece toilet, an undermount sink and blue walls
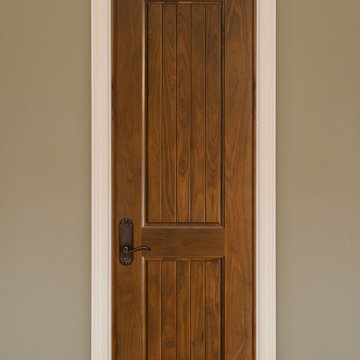
 Glenview Haus – Custom Doors & Wine Cellars
Don't let your interior doors be written off as some functional piece of hardware. Come to Glenview Haus and make your interior doors just as stunning as the rest of your home. Glenview Haus' Traditional Wood Interior Door Collection ensures that every door stands out with all the elegance and style. Our Traditional wooden doors are finely made by expert artisans and designed with all of your needs in mind.
 Paver House
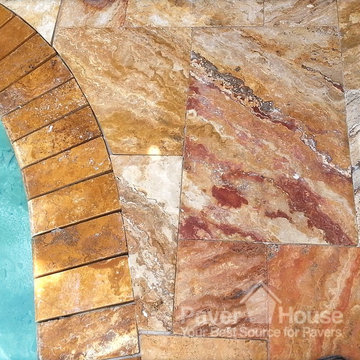
This Tampa Bay homeowner was looking into complete change his backyard. Most pools in Tampa are built with a connected spa. To increase his pool size, he ended up deciding for not to build spa, however, he still wanted an appealing focal point to his pool. To contrast with the beautiful green landscape around the backyard, our customer wanted to add color and movement to his outdoor area.
For the main pool deck area, our customer felt in love with the french pattern autumn blend tumbled travertine pavers. French Pattern Tumbled Autumn Blend Travertine Pavers contain a mixture of mostly red and gold, with some white, dark and light brown tones. Autumn Blend added the perfect amount of color and movement our customer wanted.
Travertine pavers offer a few unique color mixtures that make any outdoor space pops up from others.
A great accent color solution for the coping was the Desert Gold color on the 4×9 tumbled travertine copings. The beautifully blended Desert Gold may be bright and striking but does not lack for warmth and richness as well. To not compete with the strong colors of the pool deck, we advised our customer to add a lighter and more neutral pool tile: 2×2 autumn blend tumbled travertine tiles brought the perfect combination of contrast and harmony we were looking to achieve.
CREATIVITY ON YOUR POOL REMODEL WITH TRAVERTINE PAVER.
Pool remodel with travertine paver does not need to represent neutral colors only. Different than what most people believe, travertine pavers offer a few unique color mixtures that make any outdoor space pop up from others. Don’t be afraid of mixing different patterns, colors and textures to add more character to your outdoor space. Remember that, travertine pavers will display better their color when sealed, like the pictures from this pool remodel. If you are not sure if you would like your paver with the enhanced color, spray the sample with water first.
PREMIUM TRAVERTINE FRENCH PATTERN PAVERS
Pool remodel with travertine paver
POOL REMODEL WITH TRAVERTINE PAVERS
This Tampa Bay homeowner was looking into complete change his backyard. Most pools in Tampa are built with a connected spa. To increase his pool size, he ended up deciding for not to build spa, however, he still wanted an appealing focal point to his pool. To contrast with the beautiful green landscape around the backyard, our customer wanted to add color and movement to his outdoor area.
For the main pool deck area, our customer felt in love with the french pattern autumn blend tumbled travertine pavers. French Pattern Tumbled Autumn Blend Travertine Pavers contain a mixture of mostly red and gold, with some white, dark and light brown tones. Autumn Blend added the perfect amount of color and movement our customer wanted.
pool remodel with travertine paverpool remodel with travertine paverpool remodel with travertine paverpool remodel with travertine paverpool remodel with travertine paver
Previous
Next
Travertine pavers offer a few unique color mixtures that make any outdoor space pops up from others.
A great accent color solution for the coping was the Desert Gold color on the 4×9 tumbled travertine copings. The beautifully blended Desert Gold may be bright and striking but does not lack for warmth and richness as well. To not compete with the strong colors of the pool deck, we advised our customer to add a lighter and more neutral pool tile: 2×2 autumn blend tumbled travertine tiles brought the perfect combination of contrast and harmony we were looking to achieve.
CREATIVITY ON YOUR POOL REMODEL WITH TRAVERTINE PAVER.
Pool remodel with travertine paver does not need to represent neutral colors only. Different than what most people believe, travertine pavers offer a few unique color mixtures that make any outdoor space pop up from others. Don’t be afraid of mixing different patterns, colors and textures to add more character to your outdoor space. Remember that, travertine pavers will display better their color when sealed, like the pictures from this pool remodel. If you are not sure if you would like your paver with the enhanced color, spray the sample with water first.
PREMIUM TRAVERTINE FRENCH PATTERN PAVERS
On this pool remodel project, our customer preferred to use the French Pattern design, which is a good way to break up the monotony of the typical geometric or square appearance of large areas. Just like this outstanding pool deck remodel, patios and walkways will appear more fluid and mosaic by eliminating grout lines and the usual linear effect as well as the need for constant maintenance of the typical square or rectangular paver.
A French Pattern or a Versailles pattern is a paver pattern made up of four different sized tiles. Most French patterns are laid in stone, and nearly all are sold in “bundles” of tile that will cover 16 square feet.
Travertine pavers on your pool deck will reflect heat on hot days, remaining cool to the touch, unlike concrete surface options. Travertine does not discolor or become chalky after installation. The texture of travertine ensures that the stone remains slip resistant for wet feet, while its cool feel prevents burns. Another great advantage of travertine pavers is that there will be no visible grout lines; grout can be a source of both installation problems and added cost for future removal / replacement or up-keep.
133