
Search results for "Effective solution" in Home Design Ideas
 Tile Doctor Ltd
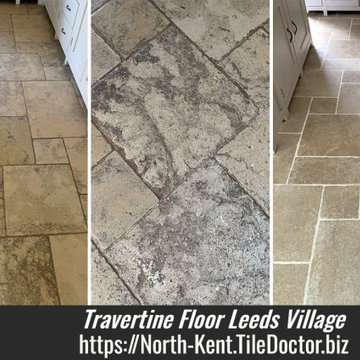
I was contacted about a Georgian property in the Kent village of Leeds , to see if I could do anything to improve a Travertine tiled floor. The use of Travertine was extensive and had been installed throughout the ground floor including the kitchen, dining room, utility and bathroom WC. Travertine is probably my favourite stone, but it is acid sensitive and attracts dirt easily, due to its ‘holey’ composition.
Initially we discussed the floor over the phone where I got to know about the issues they were experiencing, and I detailed the renovation process I normally use to restore it including the products and timelines. Naturally they wanted to me to provide a quote for the work however its tricky to do that accurately without seeing the floor, so I arranged a date to pop over.
Upon arriving I could see the tiles and the wide grout joints had extensive, ingrained dirt indicating the previous sealer had long since worn away. This is a common issue with stone floors, and to re-assure myself and the client it could be resolved I cleaned a small area in the utility room with pleasing results!
This test clean helped me to understand which products and methods would work best on the floor and later that day I emailed over a detailed quote for the renovation. Happy with the quote I received a reply the same day asking when I could start.
My colleague and I arrived on the agreed date and work started with adding protection to all areas that required it. We use a lot of water during the cleaning process and some materials such as MDF can become damaged with water ingress, so it makes sense to do this.
To get the floor clean, a coarse Carbide Brush fitted to a rotary machine was run over the Travertine tiles to scrub in a strong solution of Tile Doctor Pro-Clean. This process generates a lot of slurry as the dirt was washed out of the stone and grout which is extracted with a wet vacuum as we progressed.
Next it was on hands and knees with more Tile Doctor Pro-Clean and handheld brushes run over stubborn areas and along the grout lines to take them from 80% up to 100%.
Happy with the results, the next step was to renovate the stone using a series of diamond encrusted burnishing pads. Using only water for lubrication this process starts with the application of a coarse 400-grit burnishing pad attached to the floor buffer. This produces a lot of slurry which again was removed with a wet vacuum.
This left the Travertine clean, but the pores of the stone had been opened giving the floor a matt finish and more absorbent than it was originally. To further refine the appearance of the stone the next two burnishing pads were applied which are 800 and 1500-grit. These pads polish the stone and close the pores, restoring the natural sheen in the process. After each pad was applied the slurry was rinsed off the floor with water and extracted with the wet vacuum. Once complete the floor was left to dry off fully overnight.
I arrived the next day and took several moisture readings from the floor to check that it had dried off sufficiently overnight. The results were good, so work moved onto sealing the Travertine with two coats of Tile Doctor Ultra Seal which is a natural look impregnating sealer. It works by soaking into the stone, occupying the pores and thereby preventing dirt from becoming ingrained there. This ensures dirt remains on the surface where it is easily cleaned away.
The final step in the floor’s renovation was to apply the last of the diamond polishing pads which is a very fine 3000-grit. This pad further improves the polished appearance of the stone resulting in a satisfying sheen.
The work made a massive difference to the floor, and I received an email the next day from one of the owners who was really pleased with the transformation:
”Floors look brilliant. Very pleased.”
For the care and maintenance of polished sealed floors I recommend the use of Tile Doctor’s Stone Soap which is a gentle but effective cleaning product that won’t impact the sealer and contains a patina enhancer. When it comes to sealed floors my mantra is:
“If you look after the sealer, the sealer will look after the floor!”
Graham Davis
North Kent Tile Doctor


 Oakford Home Furnishings
This tower style linen cabinet, was commissioned by a customer looking to finish off their bathroom renovation with a custom made-to-fit linen cabinet that would match with their vanity.
We designed and built this nearly 7 foot tall cabinet for the customer using traditional joinery methods, using rabbets and dados to hold the shelves in place for a very solid finished piece. Decorative molding and trim was added to the bottom of the cabinet and the legs provide a pleasing negative space under the tall cabinet.
Prefabricated molding, that matched the customer's vanity, was added to the top of the piece for added effect.
The piece was sealed and then finished with a white cabinet enamel. Decorative knobs were added to also match the vanity in the bathroom.
Find the right local pro for your project

 Mottram Architecture
Timber frame homes offer unique challenges during a remodel. What often makes them beautiful and attractive to most homeowners, also makes them challenging for space requirements.
Context: The lovely couple that owned this home were struggling with some interesting floor plan challenges that just didn't work for their family. The loved the beautiful timbers and woodwork of their home, but the dramatically sloping ceilings on the second floor, particularly in the bathroom, just didn't work for this 1 1/2 bath home. Needing to use the skylight to approach the toilet was a less then ideal scenario. Although the bathroom footprint was more then adequate, the sloped ceiling only made half of the space useable. Check out the Before/After post on our blog to see the photos of the house pre-renovation. As much as they loved all the wood features in their home, another challenge they had was light. The wood ceiling made everything inside the house darker, even with a fantastic array of south facing windows, there were spaces in the home that felt dark and small. When they contacted us they wanted to know how could they make their brighter and more inviting, were there solutions to the 2nd floor sloped ceiling issues, and if they were going to do all of this work, how could they make their home more comfortable and efficient. A nagging water leak in the upstairs bathroom spurred them into action and here is how we solved their dilemma.
Conclusion: First, we added a little dormer to the rear of the house so we could get full headroom in nearly all of the upstairs bathroom! Then we decided to extend that dormer one more timber bay over to create a walk in closet with natural light and plenty of space. Since we were contemplating energy efficiency, we resolved a nagging issue that is present in a lot of timber frame construction, air tightness. Commonly found in timber frame construction, fiberglass insulation is installed in the rafter bays and board ceilings are installed over top. Unfortunately, board ceilings are anything but air tight, and fiberglass insulation needs to be in an airtight cavity for maximum effectiveness. So we were able to solve two issues at the same time for this homeowner. We removed the board ceiling and fiberglass insulation, we dense packed the rafter bays with cellulose insulation, and installed sheetrock in place of the boards. The boards were salvaged for re-use by the homeowner, and the space and light quality was dramatically improved. Some may think that losing the board ceiling took something away from the space, but what you'll see in the pictures is that it highly accentuates the heavy timbers and really makes them stand out in a beautiful way. Now with this added airtightness, better insulation, and brighter space, the homeowner hardly runs their wood stove, and it's so quiet in the space, an added bonus from changing the insulation. It became necessary to also add a sheetrock ceiling to the living room to hide the plumbing from the new bathroom layout above. Changing this ceiling gave the homeowner some real quality lighting that was lacking in the living room before. The brighter ceiling and new lighting layout completely transforms the living room into a space you want to hang out, even though the layout didn't change at all. When the homeowner saw the finished spaces she said "I can't believe this is my house, I want to live in this house"
Energy Efficiency: I touched a little on the efficiency above, but like all projects done with Mottram Architecture, we always want to leave you with a little extra. Timber frame construction with board ceilings and fiberglass insulation are notoriously leaky! If you want to know what we think about fiberglass insulation, check our our blog post on Why Fiberglass Insulation Sucks. By installing cellulose insulation and covering it with sheetrock we were able to greatly reduce the heat flowing out of this home. It not only improves cashflow it improves the comfort level in the space. Who wants to sit in their living room and feel a draft? Let us remind you, we are not saying cellulose insulation is an air barrier, we use the sheetrock to help with that, but it does significantly reduce the air flow over fiberglass insulation. And when we reduce the airflow, we reduce the heat flow. And when we reduce the heat flow, we reduce the need to re-heat that drafty air from outside. When it comes to energy efficiency the first and best place to start is air infiltration. We greatly reduced the air infiltration with the new insulation, but we also added a hat and warm boots. What I mean by that is, we improved the insulation in the roof, and we installed insulation in the basement. Maybe it's a silly analogy, but when you think about keeping warm, we always start with the hat and boots! With sustainability in mind, the next project will be to add a deck to the front of this house with rain catchment barrels from the metal roof. They are planning to plant a garden in the spring and the rain catchment system will help to irrigate the new garden.
Builder: East Shore Builders
Photographer: Michael Eric Berube

 First State Building & Design
We expanded an existing deck with new stairs, railing, decking, deck board design, lighting, complete with all post and beam wraps. All decking you see is Zuri decking with Timbertech Rail Systems. We installed riser lights up the stairs with post caps on top of all posts.
 Mottram Architecture
Timber frame homes offer unique challenges during a remodel. What often makes them beautiful and attractive to most homeowners, also makes them challenging for space requirements.
Context: The lovely couple that owned this home were struggling with some interesting floor plan challenges that just didn't work for their family. The loved the beautiful timbers and woodwork of their home, but the dramatically sloping ceilings on the second floor, particularly in the bathroom, just didn't work for this 1 1/2 bath home. Needing to use the skylight to approach the toilet was a less then ideal scenario. Although the bathroom footprint was more then adequate, the sloped ceiling only made half of the space useable. Check out the Before/After post on our blog to see the photos of the house pre-renovation. As much as they loved all the wood features in their home, another challenge they had was light. The wood ceiling made everything inside the house darker, even with a fantastic array of south facing windows, there were spaces in the home that felt dark and small. When they contacted us they wanted to know how could they make their brighter and more inviting, were there solutions to the 2nd floor sloped ceiling issues, and if they were going to do all of this work, how could they make their home more comfortable and efficient. A nagging water leak in the upstairs bathroom spurred them into action and here is how we solved their dilemma.
Conclusion: First, we added a little dormer to the rear of the house so we could get full headroom in nearly all of the upstairs bathroom! Then we decided to extend that dormer one more timber bay over to create a walk in closet with natural light and plenty of space. Since we were contemplating energy efficiency, we resolved a nagging issue that is present in a lot of timber frame construction, air tightness. Commonly found in timber frame construction, fiberglass insulation is installed in the rafter bays and board ceilings are installed over top. Unfortunately, board ceilings are anything but air tight, and fiberglass insulation needs to be in an airtight cavity for maximum effectiveness. So we were able to solve two issues at the same time for this homeowner. We removed the board ceiling and fiberglass insulation, we dense packed the rafter bays with cellulose insulation, and installed sheetrock in place of the boards. The boards were salvaged for re-use by the homeowner, and the space and light quality was dramatically improved. Some may think that losing the board ceiling took something away from the space, but what you'll see in the pictures is that it highly accentuates the heavy timbers and really makes them stand out in a beautiful way. Now with this added airtightness, better insulation, and brighter space, the homeowner hardly runs their wood stove, and it's so quiet in the space, an added bonus from changing the insulation. It became necessary to also add a sheetrock ceiling to the living room to hide the plumbing from the new bathroom layout above. Changing this ceiling gave the homeowner some real quality lighting that was lacking in the living room before. The brighter ceiling and new lighting layout completely transforms the living room into a space you want to hang out, even though the layout didn't change at all. When the homeowner saw the finished spaces she said "I can't believe this is my house, I want to live in this house"
Energy Efficiency: I touched a little on the efficiency above, but like all projects done with Mottram Architecture, we always want to leave you with a little extra. Timber frame construction with board ceilings and fiberglass insulation are notoriously leaky! If you want to know what we think about fiberglass insulation, check our our blog post on Why Fiberglass Insulation Sucks. By installing cellulose insulation and covering it with sheetrock we were able to greatly reduce the heat flowing out of this home. It not only improves cashflow it improves the comfort level in the space. Who wants to sit in their living room and feel a draft? Let us remind you, we are not saying cellulose insulation is an air barrier, we use the sheetrock to help with that, but it does significantly reduce the air flow over fiberglass insulation. And when we reduce the airflow, we reduce the heat flow. And when we reduce the heat flow, we reduce the need to re-heat that drafty air from outside. When it comes to energy efficiency the first and best place to start is air infiltration. We greatly reduced the air infiltration with the new insulation, but we also added a hat and warm boots. What I mean by that is, we improved the insulation in the roof, and we installed insulation in the basement. Maybe it's a silly analogy, but when you think about keeping warm, we always start with the hat and boots! With sustainability in mind, the next project will be to add a deck to the front of this house with rain catchment barrels from the metal roof. They are planning to plant a garden in the spring and the rain catchment system will help to irrigate the new garden.
Builder: East Shore Builders
Photographer: Michael Eric Berube

 Vidal Design Collaborative
Marcia Prentice
Inspiration for a contemporary bathroom remodel in Los Angeles
Inspiration for a contemporary bathroom remodel in Los Angeles

Sponsored
Sunbury, OH

J.Holderby - Renovations
Franklin County's Leading General Contractors - 2X Best of Houzz!

 Valentini Kids Furniture Brooklyn NY
Italian Kids Bedroom Set ONE-508 by SPAR
Made in Italy by Spar
ONE Junior by Spar is a modern styled Italian kids bedroom furniture collection that is remarkable for its innovative technologies that help not only safe so valuable space, but get it optimized for the every need of your kid. ONE Junior Furniture Collection by Spar makes dreams come true, making both parents and children happy, providing bedroom solutions that you really need and deserve. ONE Kids Furniture line creates functional and modern bedroom designs for girls and boys, small kids and teenagers, optimizing the space for sleeping, studying and playing. Featuring a variety of colors to choose from and abundance of size customization options, modular ONE Bedroom Collection sets no limits between your kids and bedroom they are dreaming about.
All the pieces can be mixed & matched from one set to another and are available in a variety of sizes and colors. Please contact our office regarding customization of this kids bedroom set.
The starting price is for the "As Shown" kids bedroom set ONE 508 that includes the following items:
1 High Twin Size Bed with Pull-Out Desk (bed fits US standard Twin size mattress 39" x 75")
1 Sliding Lower Trundle Bed (bed fits US standard Twin size mattress 39" x 75")
1 Desk
1 Standing Bookcase
1 Standing Bookcase (with 4 drawers)
3 Wall Shelves W53"
1 Wall Shelf W80"
1 Corner Wardrobe
1 Storage Composition "Bridge"
Please Note: Room/Bed decorative accessories and the mattress are not included in the price.
MATERIAL/CONSTRUCTION:
E1-Class ecological panels, which are produced exclusively trough a wood recycling production process
Used lacquers conform to the norm 71/3 (toys directive)
Structure: 18 mm thick melamine-coated particle board
Shelves: 25mm thick melamine-coated particle board
Back panels: high density fibreboard 5mm thick
Doors: 18 mm thick melamine-coated particle board finished on 4 sides
Hardware: metal runners with self-closing system and double stop; adjustable self closing hinges; quick-mount and braking systems
Dimensions:
High Twin Size Bed: W43" x D80" x H39.6" (internal 39" x 75" US Standard)
High Full Size Bed: W58" x D80" x H39.6" (internal 54" x 75" US Standard)
Lower Twin Size Bed: W42.4" x D77.6" x H22.7" (internal 39" x 75" US Standard)
Lower Full Size Bed: W57.4" x D77.6" x H22.7" (internal 54" x 75" US Standard)
Desk: W53" x D23.2" x H30"
Standing Bookcase: W18.5" x D14.4" x H89.8" or H102.4"
Standing Bookcase (with drawers): W18.5" x D15" x H89.8" or H102.4"
Wall Shelf: W53" x D10" x H1"
Wall Shelf: W80" x D10" x H1"
Corner Wardrobe: W(66" x 49") x D23.6" x H89.8" or H102.4"
Storage Composition "Bridge": W81" x D23.6" x H89.8" or H102.4"


 Young & Borlik Architects, inc.
A laser cut floor drain and glass tile created a fun shower floor.
Steve Borlik, Architect
De Mattei Construction, General Contractor
Chelsea Court, Interior Design
 EK ARCHITECTURE, PLLC
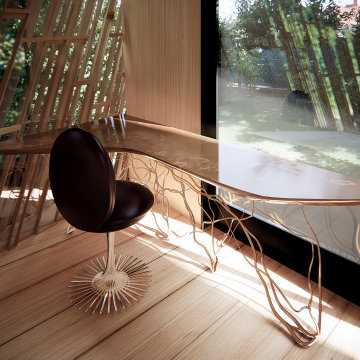
Discover our revolutionary line of customizable biophilic home-office furniture WellthyFlex. WellthyFlex is crafted from natural stone and carbon-fiber-reinforced plastic with its tree branch-inspired form. It brings the beauty of nature indoors. Each piece is thoughtfully designed to create a harmonious and soothing environment, allowing you to thrive in your work. Immerse yourself in the tranquility of your surroundings as our furniture's gentle curves and organic textures evoke a sense of calm and balance. Experience the power of biophilia as you tap into the therapeutic qualities of nature, boosting your focus, creativity, and overall well-being. Embrace the future of work with our biophilic home workplace furniture and create a sanctuary that inspires success.
Lightweight carbon-fiber-reinforced plastic, which would be algae-based in the near future, is used for table structure. With tensile strength at one-quarter the weight of steel, and lighter than aluminum, carbon-fiber-reinforced plastic legs are further optimized with generative design algorithms to use less material.
Algae-based carbon fiber:
https://www.compositesworld.com/articles/technical-university-of-munich-researchers-explore-using-algae-to-make-carbon-fiber
 SUPERIOR CHIMNEY SERVICES CORPORATION
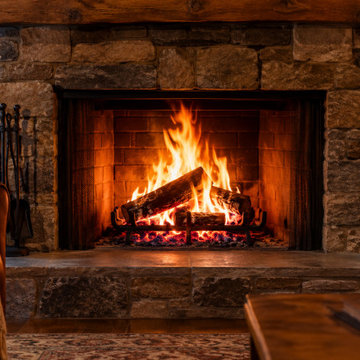
To prepare your fireplace and chimney for winter, schedule a professional inspection and chimney cleaning. The temperatures are just about right to either fire up those logs or turn on the gas fireplace. Either way, you don’t want to miss out on a cozy night in front of the fireplace.
But why is it important to prepare your fireplace and chimney for winter? That’s what we going to talk about today, everything from the damper, to chimney cap to what to look out for and what to repair now. The team at Superior Chimney is ready to share practical tips for getting ready for the cold to start.
Why is it Important to Prepare the Fireplace for Winter?
Your fireplace works hard during the winter. Using your fireplace just on the weekends or everyday while you relax causes system stress behind the scenes regardless. While providing you warmth and comfort, the fire in the fireplace creates a byproduct called creosote, which is sticky and gives off a smokey smell. All winter long, this will be slowly building inside of the chimney walls. Now that’s what’s going on inside your home.
Outside, your chimney endures the elements every day with the snow, ice, freezing rain, and critters looking for a nice warm place to settle. All these things add up putting stress on the chimney structure.
Getting this done now will give you peace of mind and helps your system run efficiently. This way, heat stays in your living room where you want it.
Start with an Annual Chimney Inspection
The most important step to take now is to get a certified chimney inspection before you light your first fire. A certified technician can identify creosote buildup, cracked flue liners, damaged masonry and blockages that are hard to see from inside and outside the home.
The National Fire Protection Association standard for chimneys, fireplaces, and vents calls for chimneys to be inspected at least once a year and cleaned as needed for safe operation (NFPA 211).
The Chimney Safety Institute of America gives the same guidance, recommending that fireplaces, chimneys, and vents be inspected annually by a certified professional (CSIA).
Ventilation is a Breath of Fresh Air for Your Home
Proper ventilation allows your home to breathe. Your home relies on vents connected to the fireplace and natural gas appliances to carry harmful gases such as carbon monoxide safely outdoors.
During the winter, snow and ice can pile up around the vents. When that happens, pollutants have a harder time leaving the home.
Signs of a Blocked Chimney Vent
A blocked vent can cause symptoms such as headaches, nausea, fatigue, and dizziness. If symptoms go away once you or your family leave the house, that’s a sign of a blocked chimney vent, and it needs to be addressed right away. Be sure your carbon monoxide detectors are in working order and located on every level of your home.
Keep the Cold Air Out of Your Fireplace
Pay attention to the chimney effect, also called the stack effect, during winter. Warm air inside your home rises to meet the colder air outside. That cold air can rush down the chimney and into your home.
This pressure imbalance can also pull smoke back into the room when you light a fire. Keeping the damper closed whenever the fireplace is not working, is one of the best ways to stop cold drafts from entering your home.
Have You Tried to Preheat the Chimney Flue?
What? What is that? When you are ready to light the fireplace, warming the flue can help smoke travel up the chimney flue and out of your home. Light your gas starter without wood in there for a few minutes or a small bundle of kindling if you don’t have the convenience of a gas log starter. This will warm the air and cold chimney walls within the chimney flue so when the fire starts, it will go up and out of your home (Priming the system). Never roll up a sheet of newspaper, or any paper, and hold it up toward the open damper!
The New Critter Home?
For many animals, a chimney looks like a warm and safe place from the cold and freezing temperatures. Squirrels, raccoons, birds, bats, possum and other small creatures may try to nest inside.
How do you know if a critter made its way in? If you hear scratching, chirping, or the sounds of moving around in the chimney, or a foul smell call a certified chimney professional to inspect the chimney flue. A technician can safely remove the animals and check for any nesting material or structural damage it left behind.
Sometimes an animal can die inside the chimney. Typical first signs can be a strong odor, trouble venting smoke, seeing flesh flies or maggots. Any situation, you will want to call Superior Chimney at 877-244-6349 for help.
You may want to consider a tightly fitted stainless steel chimney cap with mesh sides is the best long term solution. It keeps wildlife out while still allowing smoke and gases to escape freely.
What are Common Chimney Repairs
Your chimney stands tall and is exposed to the weather all year long. In winter, snow builds up on the chimney crown and rain always finds its way into small crack in the chimney masonry. Anytime you have spalling or cracked bricks with or without missing or deteriorating mortar, you have a problem brewing with the chimney structure. When water from rain or snow freezes, it expands and widens the cracks. This process is known as the freeze and thaw cycle.
Water that enters the chimney can mix with creosote. That’s what creates a musty, smoky smell. A persistent odor from your fireplace is often an early sign that moisture is getting inside, so prompt repairs help protect your home.
Don’t Forget the Chimney Flashing
Metal step flashing seals the joint where your chimney meets the roof. Over time, it can loosen, rust, or pull away from the chimney.
Have a certified chimney professional inspect the flashing each year to confirm it remains watertight. Adding a waterproofing sealant to the masonry and a crown repair when needed gives your chimney lasting protection through the wettest months.
The Chimney from Bottom to Top
Each year when your chimney inspection is performed, the certified chimney technician will automatically check the firebox all the way up to the damper and out to the exterior chimney itself. The chimney technician will be looking for cracked or missing firebricks, gaps in the mortar joints, and loose pieces within the chimney walls especially if you do not have a chimney liner.
The chimney technician is searching for hairline cracks, damaged bricks, ineffective damper, damaged or missing chimney cap to name a few on the 14-point inspection. Because it is difficult for a homeowner to inspect on top of the roof or inside of the chimney as well as know exactly what to look for, it is best to have a trained, certified technician to do it for you. The technician will show you and the office staff will email you pictures so you have an understanding of what the technician has found.
Keep Fire Safety Essentials Nearby
A few simple tools make a fire experience safer for family, pets and guests.
Keep a sturdy metal fireplace screen in front of the opening to catch sparks and embers.
Place a fire extinguisher rated for household use in a safe, dry space. If you can have it near the fireplace, even better. Be sure to talk to family members or anyone else living in your home so they know where it is.
Test smoke alarms and carbon monoxide detectors monthly throughout the heating season.
Keep rugs, furniture, holiday decorations including Santa stockings at least three feet from the fireplace. This space gives you plenty of room to ensure the fire stays in the fireplace.
When it is time to clean out the ashes, wait until they have cooled down… at least until the next morning. Shovel them into a metal container with a tight lid and keep it outside away from your home.
Preparing a Gas Fireplace for Winter
Gas fireplaces need attention before starting it up too. Have a certified chimney technician check the burner, pilot assembly, gas connections, and venting system before you turn it on for the season. The chimney technician will continue to conduct a thorough cleaning and inspection from bottom to top according to the 14-point inspection.
As a homeowner, clean the protective glass front that’s attached or separate from the fireplace only once the unit is cool. Look for any soot buildup, which can be an indication that a burner or vent is experiencing a problem.
Frequently Asked Questions
How often should a chimney be inspected?
CSIA (the Chimney Safety Institute of America), NCSG (the National Chimney Sweep Guild), NFPA (the National Fire Protection Association) and IRC (International Residential Code) all specify a chimney inspection at least once a year. Cleaning is then scheduled based on how much buildup the technician finds.
Why does my fireplace smell bad in winter?
A strong odor can point to creosote mixed with moisture, a downdraft caused by the stack effect, or an animal in the chimney flue. A certified inspection can pinpoint the cause quickly.
Should I close the damper when the fireplace is off or cooled?
Yes, once the fire is completely out and the ashes are cool. A closed damper keeps warm air inside and cold air outside.
What is the best time of year to have my chimney cleaning?
Right now! Scheduling before the first cold snap gives you more appointment options and time for any repairs.
Do I need a chimney cap?
A chimney cap is critical to the function of your chimney. It keeps out rain, snow, debris and animals while allowing smoke to go up and out of your home properly. Every chimney needs a chimney cap for the same reasons every home needs a roof!
Get Your Fireplace Winter-Ready With Superior Chimney
A well maintained fireplace is one of the coziest parts of winter. With a yearly inspection, clear vents, a sturdy chimney cap, and sound masonry, you can enjoy every fire without unnecessary worry. Now that you know how to prepare your fireplace and chimney for winter, contact Superior Chimney today to schedule your inspection and sweeping, and enjoy a warm and comfortable season by the fire.
 BMR BelMax Remodeling
Luxury Bathroom Remodeling in Langhorne, PA – A Stunning Transformation by BMR Belmax Remodeling
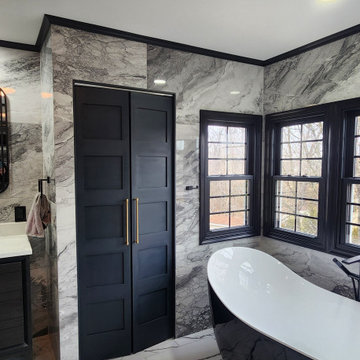
At BMR Belmax Remodeling, we take pride in transforming bathrooms into elegant, functional, and modern spaces. Our latest bathroom remodeling in Langhorne, PA is a testament to high-quality craftsmanship and attention to detail. This project was about creating a luxurious retreat, where aesthetics meet functionality. From a spacious walk-in shower to a sleek freestanding tub, black fixtures, and marble-inspired finishes, this bathroom is truly a piece of art.
The Challenge: A Bathroom in Need of Modernization
Our client in Langhorne, PA, wanted a bathroom renovation that would maximize space, enhance functionality, and create a modern, elegant atmosphere. The existing bathroom lacked the cohesive design and luxury finishes that the homeowner desired. They envisioned a spacious walk-in shower, stylish vanity, elegant tiling, and a freestanding bathtub that would bring a spa-like feel to their home.
BMR Belmax Remodeling was up to the challenge. We focused on layout optimization, high-end finishes, and sophisticated black fixtures to create a space that exudes timeless elegance and modern convenience.
The Transformation: A Spacious & Elegant Bathroom Design
Our remodeling team executed a complete renovation, incorporating top-tier materials, innovative design elements, and seamless craftsmanship. The result? A stunning, spa-like master bathroom that exceeds expectations.
1. Walk-In Shower with Premium Features
Built a spacious 68” x 36” walk-in shower, offering comfort and luxury.
Installed beautiful marble-look tiles on the shower walls, adding a sophisticated and timeless aesthetic.
Used mosaic tiles for the shower base, enhancing texture, durability, and slip-resistance.
Integrated a sleek black shower fixture, creating a striking contrast with the light-colored tiles.
Installed a recessed shower light, ensuring proper illumination for a relaxing shower experience.
2. Stunning Marble-Effect Tile Work
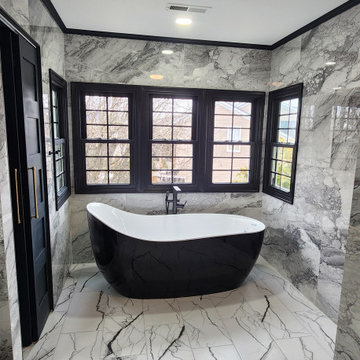
The entire bathroom features marble-look tiles, creating a high-end and cohesive design.
Used white marble-look tiles for the bathroom floor, complementing the shower walls while enhancing the sense of space and brightness.
3. Elegant Freestanding Tub as the Centerpiece
Installed a modern black-and-white freestanding bathtub, adding a luxurious spa-like feel to the space.
Positioned the tub near the newly painted black-framed windows, creating a stunning visual contrast.
Added a sleek black floor-mounted tub filler, blending perfectly with the overall design.
4. Custom Wall-Mounted Double Vanity & Mirrors
Installed a double vanity, reconfiguring all plumbing to allow for a floating, wall-mounted design.
The wall-mounted vanity enhances floor space and gives the bathroom a modern, airy look.
Added matching lighted mirrors, providing both functionality and style.
5. Thoughtful Lighting & Black Accents
Installed recessed lighting throughout the bathroom, creating a bright and inviting atmosphere.
Added an additional light in the shower, ensuring proper visibility and ambiance.
Painted all bathroom doors black, complementing the black fixtures and window frames.
Installed all bathroom fixtures in black, creating a bold contrast against the marble-inspired tile work.
6. New Windows for a Balanced Aesthetic
Installed five new windows, painted black inside and white outside, enhancing both exterior curb appeal and interior elegance.
The black window frames create a striking contrast against the light-colored tile walls.
The Result: A Luxurious and Functional Bathroom Retreat
The completed bathroom renovation in Langhorne, PA, is a stunning masterpiece, blending modern sophistication with timeless luxury. The spacious walk-in shower, freestanding tub, and floating vanity contribute to an elegant, spa-like environment.
The combination of marble-look tiles, black fixtures, recessed lighting, and high-end finishes creates a harmonious and visually stunning space. Every design choice was carefully planned and executed to maximize comfort, elegance, and functionality.
Our client was extremely happy with the outcome, describing the bathroom as a true work of art. They particularly loved how the black fixtures and accents contrast beautifully with the marble-inspired tiles, giving the bathroom a sophisticated and high-end feel.
Why Choose BMR Belmax Remodeling?
This bathroom remodeling in Langhorne, PA reflects the quality, creativity, and dedication we bring to every project. Homeowners trust BMR Belmax Remodeling because we offer:
✅ High-End Custom Designs – Tailored solutions that meet unique preferences and styles.
✅ Premium Materials & Finishes – Using only the best materials for durability and beauty.
✅ Expert Craftsmanship – Attention to detail and quality workmanship in every aspect.
✅ Seamless Project Management – From planning to completion, we ensure a stress-free renovation experience.
✅ Client-Focused Service – We prioritize homeowner satisfaction and deliver beyond expectations.
Upgrade Your Bathroom with BMR Belmax Remodeling
If you’re considering a bathroom renovation in Langhorne, PA, trust BMR Belmax Remodeling to bring your dream bathroom to life. Whether you want a spacious walk-in shower, a freestanding bathtub, modern lighting, or custom fixtures, we have the expertise to deliver stunning results.
Contact us today to schedule a consultation and start transforming your bathroom into a luxurious retreat!

 Stone Improvement Inc.
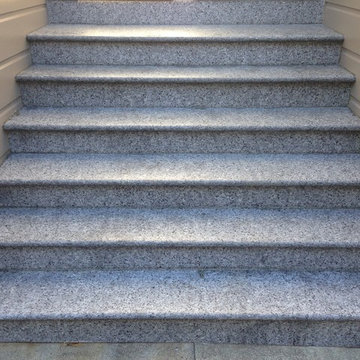
Granite entry staircase cleaning, sealing and caulking application after photo. These stairs cleaned up beautifully after our extractor cleaning process. This just shows the durability and longevity that granite can have.


 Smart Construction Inc.
The Tanglewood is a Donald A. Gardner plan with three bedrooms and two bathrooms. This 2,500 square foot home is near completion and custom built in Grey Fox Forest in Shelby, NC. Like the Smart Construction, Inc. Facebook page or follow us on Instagram at scihomes.dream.build.live to follow the progress of other Craftsman Style homes. DREAM. BUILD. LIVE. www.smartconstructionhomes.com

 Stange's of Waupaca Inc
When our Wisconsin client decided to build a home in Hawaii, Elizabeth Stange ASID coordinated their project, including this lovely tile work in the Guest Bathroom.
Sponsored
Sunbury, OH
J.Holderby - Renovations
Franklin County's Leading General Contractors - 2X Best of Houzz!

 Lord & Lady Construction LLC
Laura Cavendish
Mid-sized elegant master beige tile and porcelain tile porcelain tile doorless shower photo with an undermount sink, dark wood cabinets, quartz countertops, a two-piece toilet and orange walls
Mid-sized elegant master beige tile and porcelain tile porcelain tile doorless shower photo with an undermount sink, dark wood cabinets, quartz countertops, a two-piece toilet and orange walls

 Art Smart Painting & Remodeling
Inspiration for a large timeless master beige tile and ceramic tile ceramic tile alcove shower remodel in Dallas with raised-panel cabinets, white cabinets, beige walls, an undermount sink and solid surface countertops
 BMR BelMax Remodeling
Luxury Bathroom Remodeling in Langhorne, PA – A Stunning Transformation by BMR Belmax Remodeling
At BMR Belmax Remodeling, we take pride in transforming bathrooms into elegant, functional, and modern spaces. Our latest bathroom remodeling in Langhorne, PA is a testament to high-quality craftsmanship and attention to detail. This project was about creating a luxurious retreat, where aesthetics meet functionality. From a spacious walk-in shower to a sleek freestanding tub, black fixtures, and marble-inspired finishes, this bathroom is truly a piece of art.
The Challenge: A Bathroom in Need of Modernization
Our client in Langhorne, PA, wanted a bathroom renovation that would maximize space, enhance functionality, and create a modern, elegant atmosphere. The existing bathroom lacked the cohesive design and luxury finishes that the homeowner desired. They envisioned a spacious walk-in shower, stylish vanity, elegant tiling, and a freestanding bathtub that would bring a spa-like feel to their home.
BMR Belmax Remodeling was up to the challenge. We focused on layout optimization, high-end finishes, and sophisticated black fixtures to create a space that exudes timeless elegance and modern convenience.
The Transformation: A Spacious & Elegant Bathroom Design
Our remodeling team executed a complete renovation, incorporating top-tier materials, innovative design elements, and seamless craftsmanship. The result? A stunning, spa-like master bathroom that exceeds expectations.
1. Walk-In Shower with Premium Features
Built a spacious 68” x 36” walk-in shower, offering comfort and luxury.
Installed beautiful marble-look tiles on the shower walls, adding a sophisticated and timeless aesthetic.
Used mosaic tiles for the shower base, enhancing texture, durability, and slip-resistance.
Integrated a sleek black shower fixture, creating a striking contrast with the light-colored tiles.
Installed a recessed shower light, ensuring proper illumination for a relaxing shower experience.
2. Stunning Marble-Effect Tile Work
The entire bathroom features marble-look tiles, creating a high-end and cohesive design.
Used white marble-look tiles for the bathroom floor, complementing the shower walls while enhancing the sense of space and brightness.
3. Elegant Freestanding Tub as the Centerpiece
Installed a modern black-and-white freestanding bathtub, adding a luxurious spa-like feel to the space.
Positioned the tub near the newly painted black-framed windows, creating a stunning visual contrast.
Added a sleek black floor-mounted tub filler, blending perfectly with the overall design.
4. Custom Wall-Mounted Double Vanity & Mirrors
Installed a double vanity, reconfiguring all plumbing to allow for a floating, wall-mounted design.
The wall-mounted vanity enhances floor space and gives the bathroom a modern, airy look.
Added matching lighted mirrors, providing both functionality and style.
5. Thoughtful Lighting & Black Accents
Installed recessed lighting throughout the bathroom, creating a bright and inviting atmosphere.
Added an additional light in the shower, ensuring proper visibility and ambiance.
Painted all bathroom doors black, complementing the black fixtures and window frames.
Installed all bathroom fixtures in black, creating a bold contrast against the marble-inspired tile work.
6. New Windows for a Balanced Aesthetic
Installed five new windows, painted black inside and white outside, enhancing both exterior curb appeal and interior elegance.
The black window frames create a striking contrast against the light-colored tile walls.
The Result: A Luxurious and Functional Bathroom Retreat
The completed bathroom renovation in Langhorne, PA, is a stunning masterpiece, blending modern sophistication with timeless luxury. The spacious walk-in shower, freestanding tub, and floating vanity contribute to an elegant, spa-like environment.
The combination of marble-look tiles, black fixtures, recessed lighting, and high-end finishes creates a harmonious and visually stunning space. Every design choice was carefully planned and executed to maximize comfort, elegance, and functionality.
Our client was extremely happy with the outcome, describing the bathroom as a true work of art. They particularly loved how the black fixtures and accents contrast beautifully with the marble-inspired tiles, giving the bathroom a sophisticated and high-end feel.
Why Choose BMR Belmax Remodeling?
This bathroom remodeling in Langhorne, PA reflects the quality, creativity, and dedication we bring to every project. Homeowners trust BMR Belmax Remodeling because we offer:
✅ High-End Custom Designs – Tailored solutions that meet unique preferences and styles.
✅ Premium Materials & Finishes – Using only the best materials for durability and beauty.
✅ Expert Craftsmanship – Attention to detail and quality workmanship in every aspect.
✅ Seamless Project Management – From planning to completion, we ensure a stress-free renovation experience.
✅ Client-Focused Service – We prioritize homeowner satisfaction and deliver beyond expectations.
Upgrade Your Bathroom with BMR Belmax Remodeling
If you’re considering a bathroom renovation in Langhorne, PA, trust BMR Belmax Remodeling to bring your dream bathroom to life. Whether you want a spacious walk-in shower, a freestanding bathtub, modern lighting, or custom fixtures, we have the expertise to deliver stunning results.
Contact us today to schedule a consultation and start transforming your bathroom into a luxurious retreat!
135