
Search results for "Effective test taking" in Home Design Ideas
 Milgard Windows & Doors
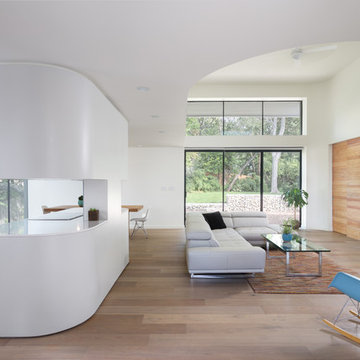
The Kiguchi family moved into their Austin, Texas home in 1994. Built in the 1980’s as part of a neighborhood development, they happily raised their family here but longed for something more contemporary. Once they became empty nesters, they decided it was time for a major remodel. After spending many years visiting Austin AIA Home Tours that highlight contemporary residential architecture, they had a lot of ideas and in 2013 were ready to interview architects and get their renovation underway.
The project turned into a major remodel due to an unstable foundation. Architects Ben Arbib and Ed Hughey, of Arbib Hughey Design were hired to solve the structural issue and look for inspiration in the bones of the house, which sat on top of a hillside and was surrounded by great views.
Unfortunately, with the old floor plan, the beautiful views were hidden by small windows that were poorly placed. In order to bring more natural light into the house the window sizes and configurations had to be addressed, all while keeping in mind the homeowners desire for a modern look and feel.
To achieve a more contemporary and sophisticated front of house, a new entry was designed that included removing a two-story bay window and porch. The entrance of the home also became more integrated with the landscape creating a template for new foliage to be planted. Older exterior materials were updated to incorporate a more muted palette of colors with a metal roof, dark grey siding in the back and white stucco in the front. Deep eaves were added over many of the new large windows for clean lines and sun protection.
“Inside it was about opening up the floor plan, expanding the views throughout the house, and updating the material palette to get a modern look that was also warm and inviting,” said Ben from Arbib Hughey Design. “Prior to the remodel, the house had the typical separation of rooms. We removed the walls between them and changed all of the windows to Milgard Thermally Improved Aluminum to connect the inside with the outside. No matter where you are you get nice views and natural light.”
The architects wanted to create some drama, which they accomplished with the window placement and opening up the interior floor plan to an open concept approach. Cabinetry was used to help delineate intimate spaces. To add warmth to an all-white living room, white-washed oak wood floors were installed and pine planks were used around the fireplace. The large windows served as artwork bringing the color of nature into the space.
An octagon shaped, elevated dining room, (named “the turret”), had a big impact on the design of the house. They architects rounded the corners and added larger window openings overlooking a new sunken garden. The great room was also softened by rounding out the corners and that circular theme continued throughout the house, being picked up in skylight wells and kitchen cabinetry. A staircase leading to a catwalk was added and the result was a two-story window wall that flooded the home with natural light.
When asked why Milgard® Thermally Improved Aluminum windows were selected, the architectural team listed many reasons:
1) Aesthetics: “We liked the slim profiles and narrow sightlines. The window frames never get in the way of the view and that was important to us. They also have a very contemporary look that went well with our design.”
2) Options: “We liked that we could get large sliding doors that matched the windows, giving us a very cohesive look and feel throughout the project.”
3) Cost Effective: “Milgard windows are affordable. You get a good product at a good price.”
4) Custom Sizes: “Milgard windows are customizable, which allowed us to get the right window for each location.”
Ready to take on your own traditional to modern home remodeling project? Arbib Hughey Design advises, “Work with a good architect. That means picking a team that is creative, communicative, listens well and is responsive. We think it’s important for an architect to listen to their clients and give them something they want, not something the architect thinks they should have. At the same time you want an architect who is willing and able to think outside the box and offer up design options that you may not have considered. Design is about a lot of back and forth, trying out ideas, getting feedback and trying again.”
The home was completely transformed into a unique, contemporary house perfectly integrated with its site. Internally the home has a natural flow for the occupants and externally it is integrated with the surroundings taking advantage of great natural light. As a side note, it was highly praised as part of the Austin AIA homes tour.
 Columbia Roofing Inc.
Mr. Mescher – Home Owner Shares Story
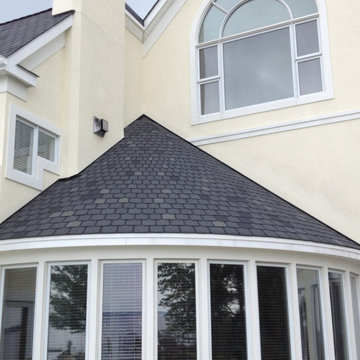
“I wanted to take this opportunity to tell you that I am extremely pleased with the work that Columbia Roofing did in replacing the roof on our Kent Island home. The house has a complicated roof structure with multiple gables and a quarter round conical roof which spans between two vertical walls in the back. We choose a 50 year Owens Corning shingle and to assure a good job, we only obtained quotes from roofing companies that received outstanding reviews.
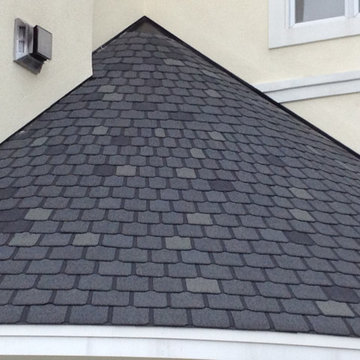
We were pleased when the Columbia production crew roofed the house without issue and brought the full visual effect of slate using the 4 tab asphalt shingle with its distinctive keyway.
When it came to the conical roof, we were faced with the possibility of having to install a metal roof in lieu of maintaining the slate like appearance that was so prominent on the other roof sections of the house. Our preference was to maintain the appearance of slate on the conical section similar to that seen on the old slate roof cathedrals. While this is easy to say, I can now appreciate how difficult it is to do.
To honor our wishes, Ben Alsop came to the house and worked through the complicated layout necessary to use the same 4 tab shingles on the conical section. To do the job properly, every single 4 tab shingle had to be cut into individual tabs.
Each tab was then taken up on the roof where the keyway was aligned to vertical through a system of straight lines drawn from the point of the conical roof to the starter shingle at the roof’s edge. Each tab had to be cut again (often multiple times) after the tab alignment was complete. To assure the accuracy necessary to maintain the visual effect, Ben took it upon himself to personally perform the roofing of the conical section.
Ben is a manager for Columbia Roofing who no longer performs the physical roofing work after coming up through the ranks of the roofing trade. His personal dedication to getting this job done for us in a way that is simply stellar could not go without acknowledgement. Ben is not only a craftsman, he is an artisan whose skill set can clearly be seen in the pictures that I have attached.
I want to thank Columbia Roofing for a job well done and particularly I want to thank Ben for taking the time and putting in the effort to truly make this a stellar installation.”
 Columbia Roofing Inc.
Mr. Mescher – Home Owner Shares Story
“I wanted to take this opportunity to tell you that I am extremely pleased with the work that Columbia Roofing did in replacing the roof on our Kent Island home. The house has a complicated roof structure with multiple gables and a quarter round conical roof which spans between two vertical walls in the back. We choose a 50 year Owens Corning shingle and to assure a good job, we only obtained quotes from roofing companies that received outstanding reviews.
We were pleased when the Columbia production crew roofed the house without issue and brought the full visual effect of slate using the 4 tab asphalt shingle with its distinctive keyway.
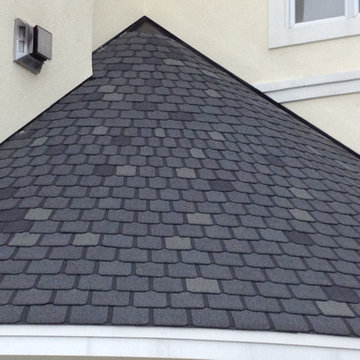
When it came to the conical roof, we were faced with the possibility of having to install a metal roof in lieu of maintaining the slate like appearance that was so prominent on the other roof sections of the house. Our preference was to maintain the appearance of slate on the conical section similar to that seen on the old slate roof cathedrals. While this is easy to say, I can now appreciate how difficult it is to do.
To honor our wishes, Ben Alsop came to the house and worked through the complicated layout necessary to use the same 4 tab shingles on the conical section. To do the job properly, every single 4 tab shingle had to be cut into individual tabs.
Each tab was then taken up on the roof where the keyway was aligned to vertical through a system of straight lines drawn from the point of the conical roof to the starter shingle at the roof’s edge. Each tab had to be cut again (often multiple times) after the tab alignment was complete. To assure the accuracy necessary to maintain the visual effect, Ben took it upon himself to personally perform the roofing of the conical section.
Ben is a manager for Columbia Roofing who no longer performs the physical roofing work after coming up through the ranks of the roofing trade. His personal dedication to getting this job done for us in a way that is simply stellar could not go without acknowledgement. Ben is not only a craftsman, he is an artisan whose skill set can clearly be seen in the pictures that I have attached.
I want to thank Columbia Roofing for a job well done and particularly I want to thank Ben for taking the time and putting in the effort to truly make this a stellar installation.”
Find the right local pro for your project

 Smart-Solutiions
The Science of Light and Learning
To understand the relationship between lighting and learning, it’s critical to grasp the concept of correlated colour temperature (CCT). CCT refers to the warmth or coolness of light, measured in Kelvin (K). Lower CCTs (around 3000K) provide a warm, cosy atmosphere, while higher CCTs (5000K or above) emit a cool, daylight-like glow. Studies have shown that cool white light, which mimics natural daylight, can increase alertness and mood, contributing to improved cognitive performance. LED lighting, with its ability to produce this desired CCT, makes an ideal choice for educational settings.
LED Lighting: Brightening the Future of Education
Energy Efficiency and Cost Effectiveness
One of the main advantages of LED lighting is its energy efficiency. Traditional lighting solutions like fluorescent and incandescent bulbs consume much more energy to produce the same amount of light as LEDs, which is not only environmentally harmful but also financially costly. Switching to LED lights can result in substantial cost savings for schools, enabling them to redirect funds to other critical areas of education.
Durability and Longevity
LED lights are renowned for their durability and longevity. They have a significantly longer lifespan compared to conventional lights, which means less frequent replacement and reduced maintenance costs. This durability also minimises disruptions caused by light failure, providing a consistent, well-lit learning environment.
Improved Visibility and Reduced Eye Strain
With their superior colour rendering index (CRI), LED lights render colours more accurately, leading to improved visibility. This is particularly beneficial in educational settings, where activities often require distinguishing fine details and colours. LED lights also emit less glare than traditional lighting solutions, reducing eye strain and fatigue. This can lead to better concentration and increased comfort for both students and teachers.
Incorporating LED Lighting in Classrooms: Practical Considerations
When transitioning to LED lighting in classrooms, a few key factors need to be taken into account. Firstly, the lighting design should ensure an even distribution of light, preventing shadowy or overly bright spots that could distract or discomfort students. Secondly, the integration of dimming capabilities can provide flexibility, allowing educators to adjust the lighting level based on the task at hand. Finally, lighting controls can be used to take advantage of natural light, automatically dimming or turning off the LEDs when sufficient daylight is present.
Conclusion: The Bright Promise of LED Lighting in Education
As education systems continue to evolve, it’s imperative to keep sight of the physical factors that significantly impact learning, one of which is lighting. LED technology, with its myriad benefits, offers an innovative and effective way to enhance the quality of lighting in classrooms. By prioritising investments in such improvements, we can take a significant step towards creating an optimised learning environment that nurtures the educational success of future generations.
 Real Estate Renderings
3D Real Estate Renderings
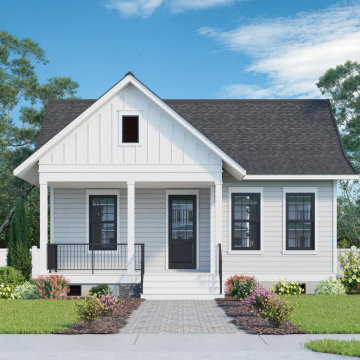
If you are looking for High-Quality Real Estate Rendering Services at a Lowest and Unbeatable Price, then we are here to assist you. We provide Photo-realistic and Professional 3D Real Estate Renderings at an insanely low price. This lowest pricing is only possible, because of our operations technical team set-up in India, large volume and bulk orders, and matured-efficient operations delivery process. At this price, we do offer high-quality real estate 3D renderings, using the most advanced Real Estate 3D Rendering Software i.e. 3DsMax (for 3D modeling) and V-ray (for 3D rendering). This software combination makes the best possible photo-realistic rendering images.3D Renderings are a very powerful marketing tool. Customers do not want to see your property in 2D, they want to SEE IT! There is nothing more effective than seeing a 3D Rendering of your property. With today’s technology you can give your customers the ability to look at your home from any angle and even close up. This will eliminate the guessing game for buyers and help them make that all important decision to purchase.
Our photo-realistic 3D renderings are unmatched in quality. We can give you an incredible virtual tour of your property that will have interested buyers, brokers and real estate agents wanting to see more. Our 3D renderings come with unlimited revisions, so you can tweak and make changes until you’re satisfied.
Our team of professional, highly-trained 3D Renderersspecialize in turning your ideas and design concepts into photo-realistic images that look virtually the same as a photograph. We specialize in custom designs and will work with you until you are 100% satisfied with your rendering. No project is too large or too small!
We provide realistic, visual marketing solutions in order to give you the edge in today’s competitive housing market. We produce stunning 3D virtual tours and 3D rendered animations (Movies). Our marketing packages are unmatched in quality, creativity and affordability. Whether you are a realtor who wants to sell your client’s property or an investor looking for outstanding 3D renderings for your next project, we have a solution for you!
3D Real Estate Renderings are undeniably the most effective way to sell a property and they are our specialty. We’ll take your property from drab to fab by creating a beautiful, custom 3D real estate renderingthat will get you the highest price possible. Our designers will polish your home to perfection, bringing out its best features through lighting and camera angles, in order to create the most compelling visual presentation of your listing or product.
Professional Out-of-the-Box 3D Real Estate Renderings for your REDFIN ZILLOW, and other real estate website. We take the guesswork out of selling your home by creating online showings that will make buyers feel like they have already toured your home in person. Our 3D renderings are customized to fit the style of a specific location, such as the architecture or neighborhood of a property. This customization gives our virtual tours an authentic look that is unparalleled among other competitors’ presentations.
Other Services:
Real Estate Rendering Services
Real Estate Rendering Company
Real Estate Rendering Companies
Digital Real Estate Renderings
3D Real Estate Renderings
Real Estate 3D Rendering
High-Quality Real Estate Renderings
Real Estate Renderings
 Columbia Roofing Inc.
Mr. Mescher – Home Owner Shares Story
“I wanted to take this opportunity to tell you that I am extremely pleased with the work that Columbia Roofing did in replacing the roof on our Kent Island home. The house has a complicated roof structure with multiple gables and a quarter round conical roof which spans between two vertical walls in the back. We choose a 50 year Owens Corning shingle and to assure a good job, we only obtained quotes from roofing companies that received outstanding reviews.
We were pleased when the Columbia production crew roofed the house without issue and brought the full visual effect of slate using the 4 tab asphalt shingle with its distinctive keyway.
When it came to the conical roof, we were faced with the possibility of having to install a metal roof in lieu of maintaining the slate like appearance that was so prominent on the other roof sections of the house. Our preference was to maintain the appearance of slate on the conical section similar to that seen on the old slate roof cathedrals. While this is easy to say, I can now appreciate how difficult it is to do.
To honor our wishes, Ben Alsop came to the house and worked through the complicated layout necessary to use the same 4 tab shingles on the conical section. To do the job properly, every single 4 tab shingle had to be cut into individual tabs.
Each tab was then taken up on the roof where the keyway was aligned to vertical through a system of straight lines drawn from the point of the conical roof to the starter shingle at the roof’s edge. Each tab had to be cut again (often multiple times) after the tab alignment was complete. To assure the accuracy necessary to maintain the visual effect, Ben took it upon himself to personally perform the roofing of the conical section.
Ben is a manager for Columbia Roofing who no longer performs the physical roofing work after coming up through the ranks of the roofing trade. His personal dedication to getting this job done for us in a way that is simply stellar could not go without acknowledgement. Ben is not only a craftsman, he is an artisan whose skill set can clearly be seen in the pictures that I have attached.
I want to thank Columbia Roofing for a job well done and particularly I want to thank Ben for taking the time and putting in the effort to truly make this a stellar installation.”

 Axium Inspections
Axium Home inspection is Colorado’s #1 Rated home inspection company with over 3,000 5-Star Reviews. We are locally owned and operated out of Denver (Home inspection in Denver), Colorado ( Home inspection in Colorado) and have grown into the largest and most referred property inspection company in Colorado. Our certified Home inspector in Denver have been professionally trained by Board Certified Master Inspectors to provide you with the quality home inspections in Denver, CO experience in the industry. We put our clients’ needs first, and we’ll get the results of your inspection back to you as quickly as possible. We'll go out of our way to accommodate your schedule. Above all, we understand our services are essential when completing a real estate (Real Estate inspection Denver) transaction and feeling safe in your home so we make the process as easy and comfortable as possible. We back all of our Residential (Residential Real Estate Inspections Denver) and Commercial inspections (Commercial Real Estate Inspections Denver) with a 100-Day Inspection Guarantee and we will always offer the absolute best home inspection (Colorado) service at the best price. Review our qualifications, certifications, and complete inspection services, and you will see that we are the best choice for all of your inspection needs. Schedule your inspection today and take the first step in protecting the investment in your new home.
Here are some of our qualifications to provide you a top-quality Home Inspection: • Professionally Trained, Certified Home Inspection;
Our quality home inspectors are nationally certified through InterNACHI or ASHI. We have 3 Board Certified Master Inspectors, and our inspectors are trained by a CMI with years of experience. • Flexible Scheduling;
Axium Inspections has customer service (Inspect All services Denver) representatives available 7:00 AM -7:00 PM, 7 days a week eager to handle all of your home inspection scheduling needs. • 110% Best Price Guarantee;
Axium Home Inspections offers the BEST VALUE at the LOWEST PRICE, offering a 110% Price Match Guarantee for all home inspections. If you find a lower quote from a company that has the same credentials as we do, we’ll match their quote then take another 10% off! • Insured and Bonded;
Axium’s home inspectors (licensed real estate home inspectors in Denver) are fully insured and bonded. We carry $2 Million in liability and $1 Million in Errors and Omissions insurance. We are bonded for $25,000, and we are backed by NACHI’s $10,000 honor guarantee for our home inspections.
Axium Home inspection Inspect All services in Denver Co
Axium Promises to Provide You the Best Home Inspection Services:
• Home inspection in Denver Colorado • Radon Testing in Denver Colorado • Real Estate inspection in Denver • Commercial Real Estate Inspections in Denver • Mold Inspection service in Denver Colorado • Infra-red Thermal Inspection Service in Denver • Water quality inspection in Denver Colorado • licensed real estate home inspectors in Denver
So, what are you waiting for? Hurry up Book an appointment at Axium Inspection today if you feel like your home needs our attention. For more information, visit our site (www.axiuminspections.com).

Sponsored
Delaware, OH

Buckeye Basements, Inc.
Central Ohio's Basement Finishing ExpertsBest Of Houzz '13-'21
 Axium Inspections
Axium Home inspection is Colorado’s #1 Rated home inspection company with over 3,000 5-Star Reviews. We are locally owned and operated out of Denver (Home inspection in Denver), Colorado ( Home inspection in Colorado) and have grown into the largest and most referred property inspection company in Colorado. Our certified Home inspector in Denver have been professionally trained by Board Certified Master Inspectors to provide you with the quality home inspections in Denver, CO experience in the industry. We put our clients’ needs first, and we’ll get the results of your inspection back to you as quickly as possible. We'll go out of our way to accommodate your schedule. Above all, we understand our services are essential when completing a real estate (Real Estate inspection Denver) transaction and feeling safe in your home so we make the process as easy and comfortable as possible. We back all of our Residential (Residential Real Estate Inspections Denver) and Commercial inspections (Commercial Real Estate Inspections Denver) with a 100-Day Inspection Guarantee and we will always offer the absolute best home inspection (Colorado) service at the best price. Review our qualifications, certifications, and complete inspection services, and you will see that we are the best choice for all of your inspection needs. Schedule your inspection today and take the first step in protecting the investment in your new home.
Here are some of our qualifications to provide you a top-quality Home Inspection: • Professionally Trained, Certified Home Inspection;
Our quality home inspectors are nationally certified through InterNACHI or ASHI. We have 3 Board Certified Master Inspectors, and our inspectors are trained by a CMI with years of experience. • Flexible Scheduling;
Axium Inspections has customer service (Inspect All services Denver) representatives available 7:00 AM -7:00 PM, 7 days a week eager to handle all of your home inspection scheduling needs. • 110% Best Price Guarantee;
Axium Home Inspections offers the BEST VALUE at the LOWEST PRICE, offering a 110% Price Match Guarantee for all home inspections. If you find a lower quote from a company that has the same credentials as we do, we’ll match their quote then take another 10% off! • Insured and Bonded;
Axium’s home inspectors (licensed real estate home inspectors in Denver) are fully insured and bonded. We carry $2 Million in liability and $1 Million in Errors and Omissions insurance. We are bonded for $25,000, and we are backed by NACHI’s $10,000 honor guarantee for our home inspections.
Axium Home inspection Inspect All services in Denver Co
Axium Promises to Provide You the Best Home Inspection Services:
• Home inspection in Denver Colorado • Radon Testing in Denver Colorado • Real Estate inspection in Denver • Commercial Real Estate Inspections in Denver • Mold Inspection service in Denver Colorado • Infra-red Thermal Inspection Service in Denver • Water quality inspection in Denver Colorado • licensed real estate home inspectors in Denver
So, what are you waiting for? Hurry up Book an appointment at Axium Inspection today if you feel like your home needs our attention. For more information, visit our site (www.axiuminspections.com).
 Tile Doctor Ltd
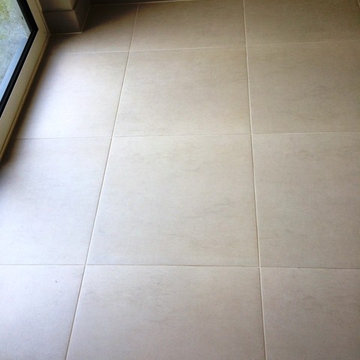
Recently, I was called to a work on a Limestone tiled floor in a house near Hove Park. Hove Park is a popular park in Hove, East Sussex, which was once opposite to the Goldstone Ground, the traditional home of Brighton and Hove Albion football club until the ground was demolished. My client informed me that the house was used a meeting place every Friday, and the high traffic of people was taking its toll on the floor.
The floor was clearly in need of a good clean, especially the grout. You do need to take care when cleaning Limestone as it can be affected by the acidic substances you get in some cleaning products which can break down the surface of the Limestone and cause further damage. The results of my test clean showed the Limestone tiles responded well to the cleaning, but I was concerned about the grout, which was not cleaning very easily. I suspected that the grout had, in fact, been discoloured by a bleach-based cleaner, turning it grey. Bleach contains strong chemicals, so there is a good chance that any bleach-based cleaners used on tiled floors will discolour the grout over time. After discussing this issue with my client, I quoted separately for a possible grout recolour.
On the first day of working on the floor, I started the cleaning process using a black buffing pad attached to a floor buffer machine, in combination with a solution of Tile Doctor Pro-Clean, which I applied to the floor. This combination really helped to remove the heavily built up grime and dirt. Although the tiles looked great after the clean, I still wasn’t convinced by the state of the grout. After drying a test area with a heat gun, I confirmed that the grout was not continuous in colour and would need a recolour to get it back to looking its best again.
I left the rest of the floor to dry for a period of two days, allowing any residual moisture to evaporate, before returning to recolour the grout with a white Grout Colourant which was applied using a good old fashioned toothbrush and baby wipes to remove any excess. I was careful to apply thin, even coats in order to prevent the possibility of the Colourant staining the tile.
After several hours of knee-breaking work, the recolouring was complete, and I was extremely pleased to be able to show my client the finished product. She was very happy to be able to show off the floor to her friends, which was now white all the way through, without the dark lines caused by the discoloured grout.
Another satisfied client.
 NewWall
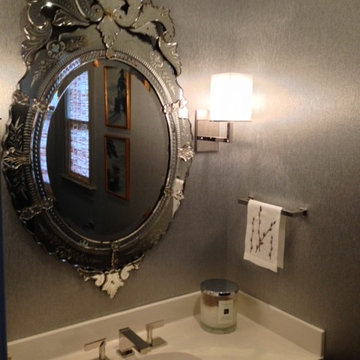
Jannelli & Volpi is one of the leading European companies in the field of wallcoverings and furniture fabric production. Founded in 1961, the company has succeeded in finding the right balance between new and innovative ideas and the great Italian decorating tradition. After decades of producing branded wallcoverings for some of the world's most established design houses, they recently launched J&V Italian Design, matching their own unique take on Italian style with their acquired expertise in production.
The offerings continually surprise designers and design aficionados by seamlessly weaving together classical ideas, global influences and innovative special effects, resulting in a fresh take on contemporary living. J&V Italian Design developed and perfected state-of-the-art techniques of screen printing with metallic effects, contrasting velvet details and sumptuous designs achieved through the use of grains of sand and shards of glass.
In addition, environmental protection is a main concern for the company. Their wallcoverings exhibit the prestigious IGI quality certificate, which ensures the use of sustainable raw materials and environmentally friendly production processes.
 Tile Doctor Ltd
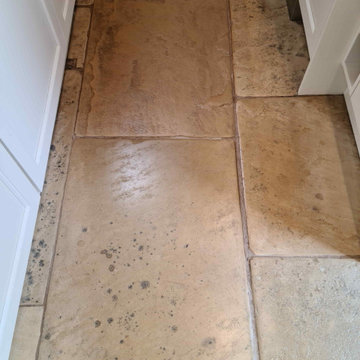
These pictures are of a beautiful Sandstone floor in Ilkley, the tiles were sourced from Lapicida of Harrogate and installed around twelve years prior. If you take a look at their website now you will see they are selling a similar London White Sandstone for nearly £100 per m2. This floor was 35 square metres so clearly this was a significant investment for the owner at the time.
After twelve years of use however the sealer had worn off the floor and dirt had become ingrained in the pores of the stone making it very difficult to keep clean. A good sealer takes a long time to wear off so the change to the appearance of the stone happens so slowly you don’t notice it. The floor was now looking permanently dirty, and the owner of the property had decided it was time to get it renovated.
Before quoting I paid a visit to the property to survey the floor and conduct an initial test clean which came out well. The test cleaning did not go as quickly as I had hoped it might however, due to traces of old satin sealer on some of the stone. It’s important to remove all the old sealer before applying new or you can end up with a patchy appearance. The remnants of old sealer proved challenging to remove as a result I had to try several products and methods before working out the right approach. In the end I resulted to using a product called Tile Doctor Wax Away. I had considered applying diamond burnishing pads which would have been a quicker option, but the flagstones had a riven finish, and the dirt was deeply pitted.
With a successful cleaning plan worked out I provided the client with a which was accepted, and a date agreed for my return.
The cleaning plan I had worked out was to apply a strong dilution of Tile Doctor Wax Away, leave it to soak into the stone for thirty minutes and then scrub it in with a rotary buffer fitted with a black scrubbing pad. The old sealer proved to be tough to remove and in total I used five litres of Tile Doctor Wax Away in the process, as I said it was a big floor!
On day three, I sealed the floor using three coats of Tile Doctor Seal and Go which gave the Sandstone a lovely satin finish that the client liked. This product is also water based so it doesn’t leave a smell as it dries.
Once done the floor was completely transformed, and my client very pleased with the floor which looked so much lighter and cleaner. For aftercare cleaning I recommended the use of Tile Doctor Neutral Tile Cleaner for maintenance, it is pH neutral so will ensure the newly applied seal is protected. It has a nice fresh smell and is gentle enough to use frequently keeping the newly renovated floor looking lovely.
Nigel Stoker
North West Yorkshire Tile Doctor
 Alquimia Inc
Full Custom Remodel
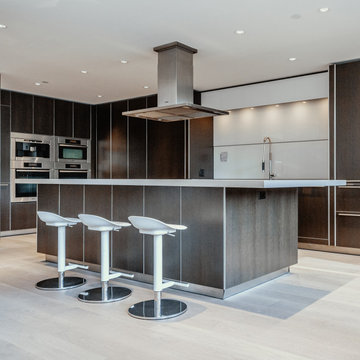
The project consisted of simple new floors and stairs and a few lights. It just happens that the client wanted the walls removed and the stairs relocated.
The project included new controlled lighting design and automation. Structural steel fabrication to remove all supporting walls and posts on the first floor. Custom doors and hidden hinges detailed out with 1/4 reveals around the doors meeting the floors. We removed door trim and baseboards. Precision sheetrock details and custom wide plank oak floors make this spectacular home feel warm and cozy.
Nothing compares to having a beautiful wide plank flooring in your home.
The home improvement project consisted of simple new floors and stairs and a few lights. It just happens that the client wanted the walls removed and the stairs relocated. Further complicated by 4th-floor location and no freight elevator.
This meant working with local architect Robert Fowler to detail out the structural framing, design, and details to create a beautiful loft gallery space.
Prior to installation, we reached out to the experts @carlislewideplankfloors. They truly understand what it takes to handcraft a floor that was worthy of the ultimate in urban living!
Samples of their engineered wood flooring were mailed and we had a choice of several colors. We tested them day and night in sun and in shadows. Once we had an idea of how this hardwood floors installation would look we ordered a few larger pieces. Solid hardwood flooring samples were also tested for thresholds and transitions.
The client was so happy with the product they increased the square footage and added more rooms to our scope of work.
One tip that was very important for a high-end job using this type of flooring is to lay out the boards ahead of time so you can look for color and wood grain to match. Engineered hardwood floors are a natural product and you will get some variation. Take your time and do the job correctly the first time.
We love this type of wood product and look forward to using them again on other projects.
 Tile Doctor Ltd
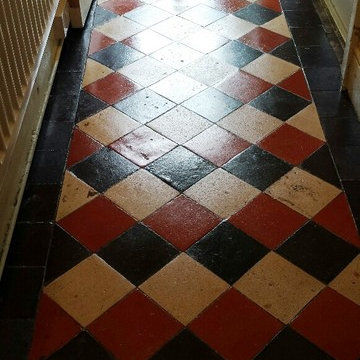
The pictures below were taken at a house in the town of Merthyr Tydfil, which is located not too far north of Cardiff. My client was keen to keep her very old Quarry tiled floor – which dated back to 1905 – intact. The floor had understandably seen a large amount of traffic in its lifetime, and was now in dire need of a professional restoration, including a thorough clean and seal.
First, I completed a survey of the area and provided my client with a quote. After completing many similar jobs in the past, I generally have a good idea of what the final result will look like. I passed on some images of a final result to my client, who was happy for me to begin my work.
On the first day, my first task was to take run some damp tests which were fine; it’s always good to know up front if there are likely to be any damp issues. Next I covered the floor with water to take the surface suction out and waited fifteen minutes before applying a cocktail of Tile Doctor NanoTech Heavy Build-Up cleaner mixed with Pro-Clean and Grout clean-up covering the whole floor. I then immediately starting to work the solution into the floor with a rotary machine fitted with a coarse black pad. The solution was then rinsed off with water which was then extracted with a wet vacuum as I worked. For stubborn areas I applied more of the previously mixed solution scrubbed into the floor with coarse wire wool by hand followed by further rinsing with water.
Each of the products used serves a particular purpose. Pro-Clean is a strong high-alkaline cleaner for natural stone, while NanoTech HBU is a particularly powerful cleaner that uses nano-sized particles to penetrate deep into the stone to get underneath and lift out ingrained dirt and stains. Grout Clean-Up, as the name implies, is a product for resolving grout related problems such as removing grout smears from tile surfaces aka grout haze.
After completing the clean I left the house for 48 hours, to leave enough time for the floor to dry completely in preparation for sealing. Upon my arrival back at the house I conducted some more damp tests to check that the floor was dry enough to seal using the previous readings as a benchmark. The results indicated that I was fine to proceed with the seal, so I applied a total of eight coats of Tile Doctor Seal & Go for durable protection. This was the product I recommended to my client as she wanted a nice, soft shine for her surface seal.
As you can see from the photos, the desired result was achieved to a high standard and needless to say my client was delighted with the transformation.
Julian Iancono
South East Wales


 Tile Doctor Ltd
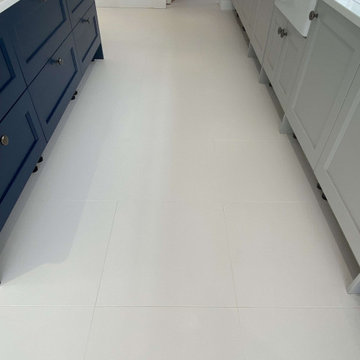
I was called out to clean a Porcelain tiled floor at a newly built property in Winwick near Huntingdon. The tiles were heavily marked with grout and dirt and were impossible to get clean. To make things worse the tiles were pale, almost white, in colour which made the staining more obvious. It was clear to me that the builder had not managed to polish off all the grout after tiling and this had now set hard on the surface.
This is a very common problem known as Grout Haze and fortunately there is a solution, in that it can be removed by giving the tiles a rinse with an acidic tile cleaner called Tile Doctor Grout Clean-up. To prove the point, I carried out a quick demonstration so the new owners could appreciate the difference.
I always like to test porcelain tiles for a reaction to acid prior to commencing work as acidic cleaners can have a negative effect on some types of polished porcelain however this one had a textured feel to it so there was no issue.
The test went well so having got the go head I began by first cleaning the tiles with a medium dilution of Tile Doctor Pro-Clean, this was left for about ten minutes before being worked into the tile with a black scrubbing pad fitted to a rotary machine. I also used a stiff brush along the grout lines to make sure the grout was as clean as the tile.
This process generates a lot of soiling which was then extracted using a truck mount machine. By Truck Mount I’m referring to a powerful cleaning machine that’s fitted into my van, it blasts the floor with hot water and then immediately extracts it using an equally powerful vacuum to grey tank in the vehicle, it’s incredibly effective and leaves very little water on the floor afterwards.
The next step was to tackle the grout haze and this is done as before by Acid Washing the floor using a dilution of Tile Doctor Grout Clean-up and scrubbing into the tile as before. Again, the resultant soils were extracted as before using the truck mount.
The floor was then speed dried using Dripods which are small horizontal fans designed to blow air downwards and ideal for drying carpets and hard floors. Once dry, a coat of Tile Doctor Ultra-Seal was applied, left to dry and any excess buffed away with a White pad.
The work was completed in one day and completely transformed the floor much to the delight of my customer who left the following message in a subsequent email:
“Thank you very much indeed, we are delighted with the floor.”
I’m pleased to say I have since returned to the neighbourhood and completed another identical grout removal job at a neighbour’s property who had the same issue with builder.
Tom Conlon
Cambridge Tile Doctor
 Loft Design System USA
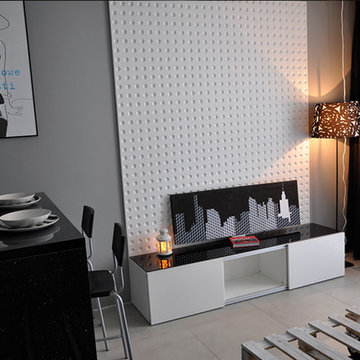
The visible concavities resemble imprints of a ping-pong ball. Don’t panic! This effect has been intended. It was achieved thanks to the work of architects who integrated spherical concavities into this decorative wall panel. As a result, they have achieved a stunning pattern, which seen from the distance hypnotizes with its form and forces you to take a closer look. This modern pattern will suit every interior. It can successfully adorn any room’s walls, because it lacks large geometrical motives.
The visible concavities resemble imprints of a ping-pong ball. Don’t panic! This effect has been intended. It was achieved thanks to the work of architects who integrated spherical concavities into this decorative wall panel. As a result, they have achieved a stunning pattern, which seen from the distance hypnotizes with its form and forces you to take a closer look. This modern pattern will suit every interior. It can successfully adorn any room’s walls, because it lacks large geometrical motives.
Specyfication:
Width: 60 cm*
Height: 60 cm*
Thickness: 0.7-1.7 cm
Weight: 4.5 kg
* dimensions tolerance 1cm, in ordered part up to 1mm.
All the patterns are registered trademarks, protected by the law. Using the present patterns without patent owner’s consent will be prosecuted by the certified authorities.
 Brett Hardy Landscapes Ltd
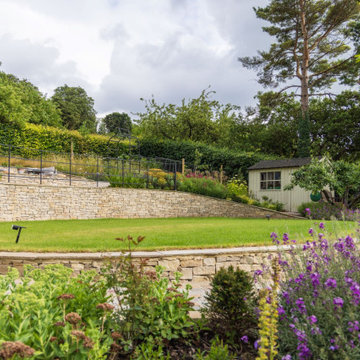
Our clients came to us looking for a complete country-style garden design and landscape build.
Their existing garden was an open space dominated by a sloping lawn, a feature summerhouse in the top corner and a shed for storage. There were two raised beds for growing home produce and some small trees in the existing garden.
They wanted design inspiration to create a feature path to the summerhouse. It must be easy to mow the lawns and have considered planting in the beds. They didn’t want anything high maintenance to look after.
Our clients wanted a crisp and clean formal feel to the country-style garden design, and we knew they enjoyed their Yew Topiary balls. Our other consideration for the brief was that they wanted some privacy from neighbours.
Our garden designer took up the challenge and worked with the client to create their garden. Before we started, we surveyed the space in detail as we do before we start any project.
After discussing their needs and desires, we knew they needed to create a feature landscaped pathway to the destination summerhouse with an adjoined gorgeous seating area.
Among this, it was essential to create a level lawn area that was flat and trouble-free and fill the planting areas with perennials and shrubs in the customer’s preferred colours of white, blue and purple.
Brett came along and presented me with a very professional and beautiful design to turn my unloved outdoor space into something to be proud of. I had to wait for the transformation, but once it was underway, it soon became clear that it had been worth it. The lads were hard-working and polite and left me with a lovely new feature.
A flat oval lawn on the mid-level was integral to the design and surrounded by a sweeping curved pathway leading to the summerhouse. The sett cobbled path takes you up and around to the top seating area.
landscape country style garden design
A GARDEN PARADISE
To the back of the oval lawn is a spectacular feature stone retaining topped wall finished with country-style estate-style fencing for safety and effect.
On the highest level by the summerhouse, there is a spacious seating terrace to relax.
Head through the arch of black galvanised steel, where you will find several raised beds for vegetables and fruit crops. This added to their established apple tree collection. Then we planted some espalier fruit tree screens to define the garden’s zones. This abundant growing area is surrounded by wildflower meadow planting to attract wildlife and pollinators.
For privacy, there are trees strategically planted on the boundaries to provide effective green screening.
Descending from the lawn, you will find stepping stones to take you down to the shed. Here you will find a delightfully secluded seating spot.
The area closest to the house has stepped levels of planted banks. They are filled with easy-to-care-for shrubs and perennial planting that will return year after year. The roses and lavender fill the air with a glorious scent as you pass them.
We are proud to have been involved in this thrilling country-style garden project from start to finish.
 Electronic Design & Consulting, Inc.
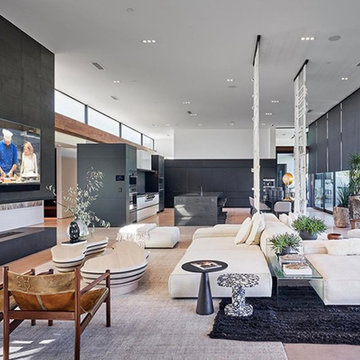
This article is posted here with the consent of the author. The views and opinions expressed in this article are those of the author and do not necessarily reflect the official policy, position, view, or opinion of Crestron Electronics, Inc., or of any of its employees. Crestron Electronics is not responsible for, and does not verify the accuracy of, any of the information contained in this article.
By Jeff Singer
The “smart” revolution began several years ago with smartphones (a.k.a phones) and has extended in recent years to thermostats, doorbells, alarm systems, and kitchen appliances. Smart devices are so ubiquitous that the term “smart” is overused to the point that it is almost meaningless. Companies are eager to jump on the bandwagon and claim their products are “smart,” and consumers proudly claim they have a smart home because they have lighting control. Misconceptions about smart homes are prevalent and create confusion in the marketplace. This can have deleterious effects on businesses and underserve consumers. Here are seven of the most popular misconceptions about smart homes:
1. Apps are smart
Apps are convenient and easy to use. Yes, it seems there’s an app for everything. People expect to be able to download an app and do just about anything. App developers and many companies do not disavow consumers of this myth. On the contrary, they promote this idea with carefully worded descriptions. The promise of having the world at your fingertips for $1.99 is very enticing. Although it sounds too good to be true, it is also too good to pass up for many people. This leads to undervaluing home control and disappointment when the apps don’t work, which undermines confidence in our industry. The fact is that apps are not smart. They do not control anything. They must connect to and communicate with a control system or cloud service that processes, prioritizes, and executes commands. That’s the real magic and what most people do not understand.
2. Smart devices work together
With so many smart appliances and devices on the market today, it’s understandable that the average consumer might think that they actually communicate and work together. This is simply not the case. Smart devices are not that smart. They are designed and manufactured by different, often competing, companies. There are no national or industry standards governing these products. Even if they all operate using Wi-Fi® communications, that doesn’t mean they work together. Some companies promote a home control platform, which unites different devices from different companies – in theory. The platform is yet another third-party software totally dependent on other companies developing APIs and writing control modules for their hardware to run on that piece of software. The devices are not independently compatible. Also, when updates are made to either the hardware or the software, functionality may be affected for some period. That’s a nice way of saying the device or system won’t work and there’s no way of knowing for how long.
3. It’s a DIY project
Which brings us to the next myth, which is that the average person can do it themselves. Unless you are a skilled professional, I would not advise taking on a smart home project. You want to make a light turn on and off with your Alexa® or Google Assistant™ virtual assistant software, go for it. A smart home takes much more planning and expertise. I have no problem changing a light bulb or hanging a light fixture in my dining room; however, I am not going to rewire my house. I may change the flush valve in my toilet, but I’m not going to replace the pipes in my house. You get it. Integrating devices and systems, establishing different zones, creating scenes, designing the UI with a balance between control, feedback, and simplicity – all takes experience and skill.
4. Need a programmer to make changes
Early adopters may have experienced the pain of trying to make a simple change or update to their home control system. Years ago, if the cable provider changed the channel line-up, the homeowner would have to call the dealer or programmer to make an appointment for them to come out to the house to reprogram the system. The system wouldn’t work as expected until it was updated, which often took several days and beaucoup bucks. Not anymore. Technology has evolved so now it’s easy for system owners to change favorite channels, create scenes, rename buttons, update images, and more. While a professional is needed for the initial installation and setup, the system is easy to manage once it’s up and running. This makes life so much easier for both dealer and customer.
5. Tech becomes obsolete quickly
Similar to updating the UI, updating firmware or hardware used to be a stressful process. A smart home should be intelligent enough to update itself. Apps don’t become obsolete. Updates are constantly pushed out from the cloud, making them better all the time. The same is true for a good smart home system. New features, functions, and device support gets added in the background consistently, so the system you installed (or purchased) yesterday gets better over time. Swapping out decorative elements, such as keypads, dimmers, and touch screens is also seamless. When a new device is added, all the settings are pulled down from the cloud and it just works. No system interruptions. No sunk costs. No imposing house calls. No surprise bills.
6. Lighting control saves energy and money
Lighting control is one of the most popular smart systems, but it takes more than just one system to make a home smart. On the surface, it makes sense that if you dim the lights ten percent, then you save ten percent of energy costs. If the shades are raised during the day to take advantage of sunlight so the lights don’t need to be on (or at least not 100%), but that causes the room temperature to rise a few degrees, which triggers the air conditioner to run longer and more often, was energy usage (or cost) reduced? A smart home integrates all the various systems and technology to optimize comfort, convenience, safety, and sometimes energy.
7. Home technology is easy to hack
Security is at the forefront of people’s minds these days. Personal identities are stolen; email accounts hacked; private photos publicized; and more. A smart home must outsmart those who don’t respect privacy. Crestron control systems adhere to the strictest security standards. The same Crestron control system that goes into a home is also installed in secure government and military facilities, global banking institutions, hospitals, and other mission critical applications. When installed correctly by a trained professional, a Crestron smart home is the gold standard for security, comfort, and convenience.

Sponsored
Sunbury, OH

J.Holderby - Renovations
Franklin County's Leading General Contractors - 2X Best of Houzz!
 Wanda Ely Architect Inc.
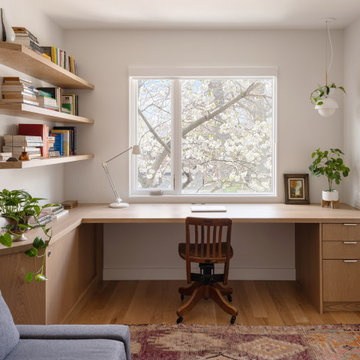
On the second floor, the main office space takes advantage of beautiful west light. In the spring, the cherry tree outside bursts into bloom, creating a soft, ethereal view. Faceted floating shelves and a built-in desk provide storage and negotiate the transition space between the old house and the new addition.
 Pool Environments, Inc.
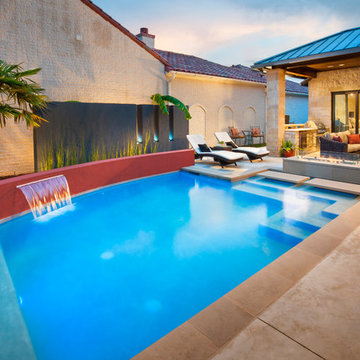
Randy Angell, Designer GOLD International Award of Excellence winner - The transitional modern home was designed with large amounts of glass opening into the courtyard, creating an indoor-outdoor feel, and a visual connection among the spaces that could not be ignored. The neighboring wall, however, was not only rather imposing, but also of a style completely disconnected from our clients home. Our goal was to create a layering effect, with features of varying heights, both to add depth and dimension to the space, and to take the focus of the viewer off of the neighbor's wall.
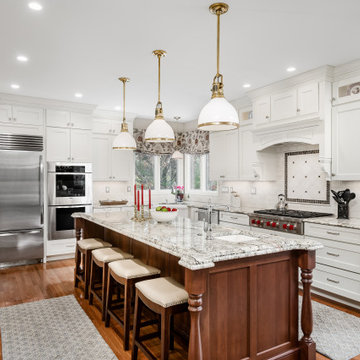
 Chris Rossetti at Main Line Kitchen Design
Main Line Kitchen Design's unique business model allows our customers to work with the most experienced designers and get the most competitive kitchen cabinet pricing.
How does Main Line Kitchen Design offer the best designs along with the most competitive kitchen cabinet pricing? We are a more modern and cost effective business model. We are a kitchen cabinet dealer and design team that carries the highest quality kitchen cabinetry, is experienced, convenient, and reasonable priced. Our five award winning designers work by appointment only, with pre-qualified customers, and only on complete kitchen renovations.
Our designers are some of the most experienced and award winning kitchen designers in the Delaware Valley. We design with and sell 8 nationally distributed cabinet lines. Cabinet pricing is slightly less than major home centers for semi-custom cabinet lines, and significantly less than traditional showrooms for custom cabinet lines.
After discussing your kitchen on the phone, first appointments always take place in your home, where we discuss and measure your kitchen. Subsequent appointments usually take place in one of our offices and selection centers where our customers consider and modify 3D designs on flat screen TV's. We can also bring sample doors and finishes to your home and make design changes on our laptops in 20-20 CAD with you, in your own kitchen.
Call today! We can estimate your kitchen project from soup to nuts in a 15 minute phone call and you can find out why we get the best reviews on the internet. We look forward to working with you.
As our company tag line says:
"The world of kitchen design is changing..."
12