
Search results for "Electricity utilization" in Home Design Ideas
 Boyenga Team / Compass
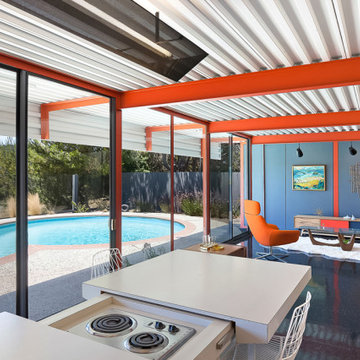
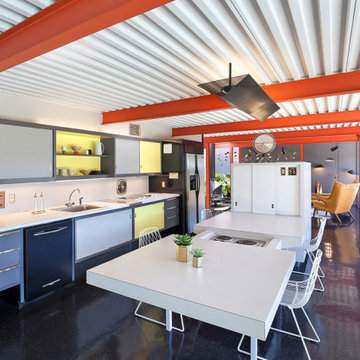
Eichler X-100 Kitchen: A Futuristic Vision of Function and Design
The kitchen of the Eichler X-100 is not just a place to cook—it is a designed system, a forward-thinking experiment in how everyday living could be streamlined, modernized, and elevated through architecture. Envisioned by A. Quincy Jones and Frederick Emmons for Joseph Eichler, the space reflects a bold reimagining of the American kitchen in the mid-20th century.
A Central Hub of the Home
Positioned within the home’s central utility core, the kitchen is strategically located to connect all major living zones. Rather than being tucked away, it becomes a functional anchor, allowing for seamless interaction between cooking, dining, and gathering spaces.
This layout reinforces Eichler’s philosophy:
the kitchen is not separate—it’s part of everyday life.
Innovation Built In
What sets the X-100 kitchen apart is its integration of experimental, built-in features that were far ahead of their time.
Highlights include:
A sliding dining table with integrated electric burners, blending cooking and dining into one continuous experience
Built-in appliances and systems, designed to reduce clutter and maximize efficiency
Thoughtful ergonomic planning that simplifies daily routines
These elements reflect a larger idea:
that the home should work for you—not the other way around.
Material as Modern Expression
The kitchen showcases extensive use of laminate surfaces (Formica)—a material that, in the 1950s, symbolized innovation, durability, and modern living. Clean, smooth, and easy to maintain, these surfaces reinforce the home’s futuristic identity.
Paired with steel structure and clean lines, the material palette creates a space that feels both industrial and approachable.
Open, Light-Filled Design
True to the X-100’s overall concept, the kitchen is fully integrated into the open-plan layout. Sightlines extend outward to living areas, glass walls, and even interior gardens, ensuring the space never feels enclosed.
Natural light filters in from multiple directions, enhanced by skylights and reflective surfaces, giving the kitchen a bright, uplifting atmosphere throughout the day.
A Prototype for Modern Living
In many ways, the X-100 kitchen anticipated how we live today:
Open-concept layouts
Multi-functional islands and dining spaces
Integrated appliances
Clean, minimal design
What feels standard now was radical in 1956.
Where Design Meets Daily Life
The kitchen of the Eichler X-100 is a perfect example of how architecture can elevate the everyday. It transforms routine into experience—where cooking, gathering, and living all happen within a single, beautifully orchestrated space.
It’s not just a kitchen.
It’s a glimpse into the future—designed decades ahead of its time.

 McCabe By Design LLC
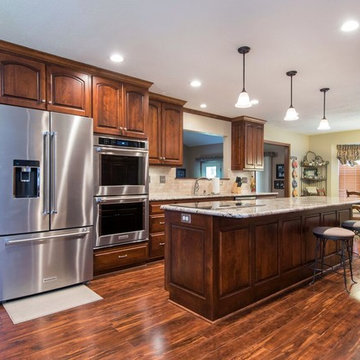
Drawers on the family room side of the island provide storage for games and coloring books for grandchildren. By removing the overhead cabinets, the kitchen is opened up to the family room for enhanced game day activities.
 User
The clients enjoy entertaining guests in their home. They enjoy sports events, but don't necessarily enjoy the hustle 'n bustle of going to the stadium, finding a place to park, and in the case of football, freezing to death. They much prefer sharing the ambiance of their comfortable home, offering snacks and drinks from the bar, and enjoying a round of pool during intermissions and halftime, or watching halftime shows on a state-of-the-art home theater.
These clients were so committed to this enterprise, they dedicated their 3,000 sq’ basement, except those areas already used for utility, storage, and mechanical needs, the renovation.To make sure the clients' every wish was met, a complete entertainment area was designed and constructed with ease of movement, lighting, and safety in mind. The area would include a home theater with totally wireless controls, a pool room, and a social area replete with a commercial-grade wet bar.
The home theater consists of a screen within a custom cabinet system that also houses the complete audio-visual equipment center. Speakers are nestled in custom benches with the sound cones discretely hidden behind fabric panels. The motor for the panel that hides the screen when not in use is behind a similar fabric panel.The furniture style cabinet has Shaker style doors with walnut peg inlays and leaded glass panels. There are multiple lighting "scenes" for ambiance; low-voltage lighting inside the crown molding, and recessed can lights are discretely placed so that they can provide an extra level of illumination when required.The pool room was walled with a custom wainscot paneling with clear cherry stiles and rails finished with a clear satin lacquer.
The panels are of Madagascar ebony with a light satin stain and a clear lacquer finish. A custom cue rack was constructed from clear cherry and backed with the Madagascar ebony panel.Drink rails were custom fabricated from cherry and custom crown molding was fabricated to match the rest of the house. The space is lit with a combination of recessed lights and a series of hidden lights behind crown molding for dramatic effect. The bar area is topped with a custom crown detail to contain the lighting.
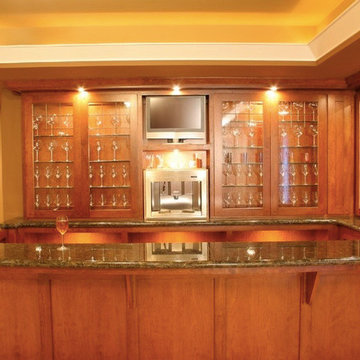
The bar is constructed in the same manner and fashion as the theater and pool rooms with Shaker style cabinetry with square walnut peg in the door corners and decorative leaded glass door fronts with more than enough front and back bar space to serve and enjoy drinks and snacks. Entry behind the bar is through custom, bi-directional butler doors. A custom bottle display and storage area takes up the bottom half of the bar's back wall. And, for the sake of convenience, a full size automatic dishwasher is installed under the bar for cleaning glasses and stemware. The bar is also tricked out with an espresso machine, its own flat screen TV and AmX video controller.
The bar is lit with puck lights in the upper cabinets that illuminate downward through glass shelves, and low-voltage lighting is used behind the bottle display. The bar itself is lit by a series of earthen tone pendant lights.All three areas complement each other and are in total harmony with the remainder of the house. Moldings were matched, carpeting styles were chosen to complement rather than compromise, and muted, natural colors and textures were chosen that complement the surroundings. There is a seamless transition between the newer areas of the home and those already in everyday use. The entire area is a nebula of electrons operating servos, quietly opening and closing hidden switches, mysteriously dimming and brightening lights, and not only creating an alluring atmosphere, but one that is programmable, available at the touch of a finger to a heat sensitive screen, for an individual, or a group. At a single touch the lights in the theater and bar areas dim as the theater screen lowers into viewing position. Not only does the AMX controller open and close shades and window treatments to facilitate better viewing, but on an entirely different level it controls the very access to the property. It opens and closes entryways, external doors and gates as well.None of this magic came easily. Electrical circuits were at a premium. Over heating plagued the AV rack, and pesky rays of light seemed to creep in where and when they were least welcome. An exhaust fan was installed in the AV cabinet to dissipate the heat. New electrical outlets were scheduled and placed while others were moved. The bar area received custom wire chases hidden within the cabinetry. Exterior roll-a-way shutters, all controlled from the AMX controller, were installed and programmed as the answer to those pesky light rays.
Find the right local pro for your project

 Renovisions
It’s no surprise these Hanover clients reached out to Cathy and Ed of Renovisions for design and build services as they wanted a local professional bath specialist to turn their plain builder-grade bath into a luxurious handicapped accessible master bath.
Renovisions had safety and universal design in mind while creating this customized two-person super shower and well-appointed master bath so their clients could escape to a special place to relax and energize their senses while also helping to conserve time and water as it is used simultaneously by them.
This completely water proofed spacious 4’x8’ walk-in curb-less shower with lineal drain system and larger format porcelain tiles was a must have for our senior client –with larger tiles there are less grout lines, easier to clean and easier to maneuver using a walker to enter and exit the master bath.
Renovisions collaborated with their clients to design a spa-like bath with several amenities and added conveniences with safety considerations. The bench seat that spans the width of the wall was a great addition to the shower. It’s a comfortable place to sit down and stretch out and also to keep warm as electric mesh warming materials were used along with a programmable thermostat to keep these homeowners toasty and cozy!
Careful attention to all of the details in this master suite created a peaceful and elegant environment that, simply put, feels divine. Adding details such as the warming towel rack, mosaic tiled shower niche, shiny polished chrome decorative safety grab bars that also serve as towel racks and a towel rack inside the shower area added a measure of style. A stately framed mirror over the pedestal sink matches the warm white painted finish of the linen storage cabinetry that provides functionality and good looks to this space. Pull-down safety grab bars on either side of the comfort height high-efficiency toilet was essential to keep safety as a top priority.
Water, water everywhere for this well deserving couple – multiple shower heads enhances the bathing experience for our client with mobility issues as 54 soft sprays from each wall jet provide a soothing and cleansing effect – a great choice because they do not require gripping and manipulating handles yet provide a sleek look with easy cleaning. The thermostatic valve maintains desired water temperature and volume controls allows the bather to utilize the adjustable hand-held shower on a slide-bar- an ideal fixture to shower and spray down shower area when done.
A beautiful, frameless clear glass enclosure maintains a clean, open look without taking away from the stunning and richly grained marble-look tiles and decorative elements inside the shower. In addition to its therapeutic value, this shower is truly a design focal point of the master bath with striking tile work, beautiful chrome fixtures including several safety grab bars adding aesthetic value as well as safety benefits.

 Talon Construction Inc.
Designing and building a kitchen addition is a complex process that involves multiple steps and considerations. Here is a general outline to help you get started on your kitchen addition project:
Define Your Goals and Budget:
• Determine the purpose of the kitchen addition. Is it for more cooking space, a dining area, or a combination of both?
• Establish a realistic budget for your project. Consider all costs, including construction, permits, materials, and furnishings.
Hire a Design Professional:
• Seek the services of a design build company who specializes in kitchen additions.
• Discuss your vision, needs, and budget with the design professional to create a design concept.
Site Evaluation:
• Assess the existing space and structural condition of your home to ensure it can support the addition.
• Consider factors like zoning regulations, setbacks, and building codes.
Design Development:
• Collaborate with your design professional to refine the concept, including the layout, size, and architectural style.
• Choose materials, finishes, and fixtures that fit your design and budget.
Obtain Permits:
• Consult with your local design build contractor to determine the necessary permits and approvals.
• Prepare and submit all required documents, including architectural drawings and engineering plans.
Create Construction Documents:
• Work with your design build professional to develop detailed construction drawings and specifications.
• These documents will serve as a guide for contractors during construction.
Hire a design build contractor:
• Check references, credentials, and licenses before selecting a contractor.
• Sign a detailed contract that outlines the scope of work, timeline, and payment schedule.
Construction Phase:
• Demolition: If needed, remove any existing structures or walls.
• Foundation: Construct the foundation for the addition.
• Framing: Build the structural framework of the addition.
• Plumbing, Electrical, and HVAC: Install or update utilities as required.
• Insulation: Ensure proper insulation for energy efficiency.
• Drywall and Finish Work: Complete the walls and ceilings.
• Flooring and Cabinetry: Install flooring and kitchen cabinets.
• Appliances and Fixtures: Add appliances, plumbing fixtures, and lighting.
• Paint and Finish: Apply paint and finishes to achieve the desired look.
• Final Inspection: Schedule inspections to ensure compliance with building codes.
Final Inspections and Approvals:
• Arrange for final inspections to ensure the addition meets all safety and code requirements.
• Obtain any necessary certificates of occupancy or compliance.
Move In and Enjoy:
• Once all inspections and approvals are received, you can move into your new kitchen addition and start enjoying it.
Remember that every kitchen addition project is unique, so adapt this outline to your specific needs and circumstances. Consulting with professionals and obtaining the required permits and inspections is crucial to a successful and safe project.
 Talon Construction Inc.
Designing and building a kitchen addition is a complex process that involves multiple steps and considerations. Here is a general outline to help you get started on your kitchen addition project:
Define Your Goals and Budget:
• Determine the purpose of the kitchen addition. Is it for more cooking space, a dining area, or a combination of both?
• Establish a realistic budget for your project. Consider all costs, including construction, permits, materials, and furnishings.
Hire a Design Professional:
• Seek the services of a design build company who specializes in kitchen additions.
• Discuss your vision, needs, and budget with the design professional to create a design concept.
Site Evaluation:
• Assess the existing space and structural condition of your home to ensure it can support the addition.
• Consider factors like zoning regulations, setbacks, and building codes.
Design Development:
• Collaborate with your design professional to refine the concept, including the layout, size, and architectural style.
• Choose materials, finishes, and fixtures that fit your design and budget.
Obtain Permits:
• Consult with your local design build contractor to determine the necessary permits and approvals.
• Prepare and submit all required documents, including architectural drawings and engineering plans.
Create Construction Documents:
• Work with your design build professional to develop detailed construction drawings and specifications.
• These documents will serve as a guide for contractors during construction.
Hire a design build contractor:
• Check references, credentials, and licenses before selecting a contractor.
• Sign a detailed contract that outlines the scope of work, timeline, and payment schedule.
Construction Phase:
• Demolition: If needed, remove any existing structures or walls.
• Foundation: Construct the foundation for the addition.
• Framing: Build the structural framework of the addition.
• Plumbing, Electrical, and HVAC: Install or update utilities as required.
• Insulation: Ensure proper insulation for energy efficiency.
• Drywall and Finish Work: Complete the walls and ceilings.
• Flooring and Cabinetry: Install flooring and kitchen cabinets.
• Appliances and Fixtures: Add appliances, plumbing fixtures, and lighting.
• Paint and Finish: Apply paint and finishes to achieve the desired look.
• Final Inspection: Schedule inspections to ensure compliance with building codes.
Final Inspections and Approvals:
• Arrange for final inspections to ensure the addition meets all safety and code requirements.
• Obtain any necessary certificates of occupancy or compliance.
Move In and Enjoy:
• Once all inspections and approvals are received, you can move into your new kitchen addition and start enjoying it.
Remember that every kitchen addition project is unique, so adapt this outline to your specific needs and circumstances. Consulting with professionals and obtaining the required permits and inspections is crucial to a successful and safe project.
 Talon Construction Inc.
Designing and building a kitchen addition is a complex process that involves multiple steps and considerations. Here is a general outline to help you get started on your kitchen addition project:
Define Your Goals and Budget:
• Determine the purpose of the kitchen addition. Is it for more cooking space, a dining area, or a combination of both?
• Establish a realistic budget for your project. Consider all costs, including construction, permits, materials, and furnishings.
Hire a Design Professional:
• Seek the services of a design build company who specializes in kitchen additions.
• Discuss your vision, needs, and budget with the design professional to create a design concept.
Site Evaluation:
• Assess the existing space and structural condition of your home to ensure it can support the addition.
• Consider factors like zoning regulations, setbacks, and building codes.
Design Development:
• Collaborate with your design professional to refine the concept, including the layout, size, and architectural style.
• Choose materials, finishes, and fixtures that fit your design and budget.
Obtain Permits:
• Consult with your local design build contractor to determine the necessary permits and approvals.
• Prepare and submit all required documents, including architectural drawings and engineering plans.
Create Construction Documents:
• Work with your design build professional to develop detailed construction drawings and specifications.
• These documents will serve as a guide for contractors during construction.
Hire a design build contractor:
• Check references, credentials, and licenses before selecting a contractor.
• Sign a detailed contract that outlines the scope of work, timeline, and payment schedule.
Construction Phase:
• Demolition: If needed, remove any existing structures or walls.
• Foundation: Construct the foundation for the addition.
• Framing: Build the structural framework of the addition.
• Plumbing, Electrical, and HVAC: Install or update utilities as required.
• Insulation: Ensure proper insulation for energy efficiency.
• Drywall and Finish Work: Complete the walls and ceilings.
• Flooring and Cabinetry: Install flooring and kitchen cabinets.
• Appliances and Fixtures: Add appliances, plumbing fixtures, and lighting.
• Paint and Finish: Apply paint and finishes to achieve the desired look.
• Final Inspection: Schedule inspections to ensure compliance with building codes.
Final Inspections and Approvals:
• Arrange for final inspections to ensure the addition meets all safety and code requirements.
• Obtain any necessary certificates of occupancy or compliance.
Move In and Enjoy:
• Once all inspections and approvals are received, you can move into your new kitchen addition and start enjoying it.
Remember that every kitchen addition project is unique, so adapt this outline to your specific needs and circumstances. Consulting with professionals and obtaining the required permits and inspections is crucial to a successful and safe project.

 Talon Construction Inc.
Designing and building a kitchen addition is a complex process that involves multiple steps and considerations. Here is a general outline to help you get started on your kitchen addition project:
Define Your Goals and Budget:
• Determine the purpose of the kitchen addition. Is it for more cooking space, a dining area, or a combination of both?
• Establish a realistic budget for your project. Consider all costs, including construction, permits, materials, and furnishings.
Hire a Design Professional:
• Seek the services of a design build company who specializes in kitchen additions.
• Discuss your vision, needs, and budget with the design professional to create a design concept.
Site Evaluation:
• Assess the existing space and structural condition of your home to ensure it can support the addition.
• Consider factors like zoning regulations, setbacks, and building codes.
Design Development:
• Collaborate with your design professional to refine the concept, including the layout, size, and architectural style.
• Choose materials, finishes, and fixtures that fit your design and budget.
Obtain Permits:
• Consult with your local design build contractor to determine the necessary permits and approvals.
• Prepare and submit all required documents, including architectural drawings and engineering plans.
Create Construction Documents:
• Work with your design build professional to develop detailed construction drawings and specifications.
• These documents will serve as a guide for contractors during construction.
Hire a design build contractor:
• Check references, credentials, and licenses before selecting a contractor.
• Sign a detailed contract that outlines the scope of work, timeline, and payment schedule.
Construction Phase:
• Demolition: If needed, remove any existing structures or walls.
• Foundation: Construct the foundation for the addition.
• Framing: Build the structural framework of the addition.
• Plumbing, Electrical, and HVAC: Install or update utilities as required.
• Insulation: Ensure proper insulation for energy efficiency.
• Drywall and Finish Work: Complete the walls and ceilings.
• Flooring and Cabinetry: Install flooring and kitchen cabinets.
• Appliances and Fixtures: Add appliances, plumbing fixtures, and lighting.
• Paint and Finish: Apply paint and finishes to achieve the desired look.
• Final Inspection: Schedule inspections to ensure compliance with building codes.
Final Inspections and Approvals:
• Arrange for final inspections to ensure the addition meets all safety and code requirements.
• Obtain any necessary certificates of occupancy or compliance.
Move In and Enjoy:
• Once all inspections and approvals are received, you can move into your new kitchen addition and start enjoying it.
Remember that every kitchen addition project is unique, so adapt this outline to your specific needs and circumstances. Consulting with professionals and obtaining the required permits and inspections is crucial to a successful and safe project.
 Talon Construction Inc.
Designing and building a kitchen addition is a complex process that involves multiple steps and considerations. Here is a general outline to help you get started on your kitchen addition project:
Define Your Goals and Budget:
• Determine the purpose of the kitchen addition. Is it for more cooking space, a dining area, or a combination of both?
• Establish a realistic budget for your project. Consider all costs, including construction, permits, materials, and furnishings.
Hire a Design Professional:
• Seek the services of a design build company who specializes in kitchen additions.
• Discuss your vision, needs, and budget with the design professional to create a design concept.
Site Evaluation:
• Assess the existing space and structural condition of your home to ensure it can support the addition.
• Consider factors like zoning regulations, setbacks, and building codes.
Design Development:
• Collaborate with your design professional to refine the concept, including the layout, size, and architectural style.
• Choose materials, finishes, and fixtures that fit your design and budget.
Obtain Permits:
• Consult with your local design build contractor to determine the necessary permits and approvals.
• Prepare and submit all required documents, including architectural drawings and engineering plans.
Create Construction Documents:
• Work with your design build professional to develop detailed construction drawings and specifications.
• These documents will serve as a guide for contractors during construction.
Hire a design build contractor:
• Check references, credentials, and licenses before selecting a contractor.
• Sign a detailed contract that outlines the scope of work, timeline, and payment schedule.
Construction Phase:
• Demolition: If needed, remove any existing structures or walls.
• Foundation: Construct the foundation for the addition.
• Framing: Build the structural framework of the addition.
• Plumbing, Electrical, and HVAC: Install or update utilities as required.
• Insulation: Ensure proper insulation for energy efficiency.
• Drywall and Finish Work: Complete the walls and ceilings.
• Flooring and Cabinetry: Install flooring and kitchen cabinets.
• Appliances and Fixtures: Add appliances, plumbing fixtures, and lighting.
• Paint and Finish: Apply paint and finishes to achieve the desired look.
• Final Inspection: Schedule inspections to ensure compliance with building codes.
Final Inspections and Approvals:
• Arrange for final inspections to ensure the addition meets all safety and code requirements.
• Obtain any necessary certificates of occupancy or compliance.
Move In and Enjoy:
• Once all inspections and approvals are received, you can move into your new kitchen addition and start enjoying it.
Remember that every kitchen addition project is unique, so adapt this outline to your specific needs and circumstances. Consulting with professionals and obtaining the required permits and inspections is crucial to a successful and safe project.
 Boyenga Team / Compass
Eichler X-100 Kitchen: A Futuristic Vision of Function and Design
The kitchen of the Eichler X-100 is not just a place to cook—it is a designed system, a forward-thinking experiment in how everyday living could be streamlined, modernized, and elevated through architecture. Envisioned by A. Quincy Jones and Frederick Emmons for Joseph Eichler, the space reflects a bold reimagining of the American kitchen in the mid-20th century.
A Central Hub of the Home
Positioned within the home’s central utility core, the kitchen is strategically located to connect all major living zones. Rather than being tucked away, it becomes a functional anchor, allowing for seamless interaction between cooking, dining, and gathering spaces.
This layout reinforces Eichler’s philosophy:
the kitchen is not separate—it’s part of everyday life.
Innovation Built In
What sets the X-100 kitchen apart is its integration of experimental, built-in features that were far ahead of their time.
Highlights include:
A sliding dining table with integrated electric burners, blending cooking and dining into one continuous experience
Built-in appliances and systems, designed to reduce clutter and maximize efficiency
Thoughtful ergonomic planning that simplifies daily routines
These elements reflect a larger idea:
that the home should work for you—not the other way around.
Material as Modern Expression
The kitchen showcases extensive use of laminate surfaces (Formica)—a material that, in the 1950s, symbolized innovation, durability, and modern living. Clean, smooth, and easy to maintain, these surfaces reinforce the home’s futuristic identity.
Paired with steel structure and clean lines, the material palette creates a space that feels both industrial and approachable.
Open, Light-Filled Design
True to the X-100’s overall concept, the kitchen is fully integrated into the open-plan layout. Sightlines extend outward to living areas, glass walls, and even interior gardens, ensuring the space never feels enclosed.
Natural light filters in from multiple directions, enhanced by skylights and reflective surfaces, giving the kitchen a bright, uplifting atmosphere throughout the day.
A Prototype for Modern Living
In many ways, the X-100 kitchen anticipated how we live today:
Open-concept layouts
Multi-functional islands and dining spaces
Integrated appliances
Clean, minimal design
What feels standard now was radical in 1956.
Where Design Meets Daily Life
The kitchen of the Eichler X-100 is a perfect example of how architecture can elevate the everyday. It transforms routine into experience—where cooking, gathering, and living all happen within a single, beautifully orchestrated space.
It’s not just a kitchen.
It’s a glimpse into the future—designed decades ahead of its time.
 Talon Construction Inc.
Designing and building a kitchen addition is a complex process that involves multiple steps and considerations. Here is a general outline to help you get started on your kitchen addition project:
Define Your Goals and Budget:
• Determine the purpose of the kitchen addition. Is it for more cooking space, a dining area, or a combination of both?
• Establish a realistic budget for your project. Consider all costs, including construction, permits, materials, and furnishings.
Hire a Design Professional:
• Seek the services of a design build company who specializes in kitchen additions.
• Discuss your vision, needs, and budget with the design professional to create a design concept.
Site Evaluation:
• Assess the existing space and structural condition of your home to ensure it can support the addition.
• Consider factors like zoning regulations, setbacks, and building codes.
Design Development:
• Collaborate with your design professional to refine the concept, including the layout, size, and architectural style.
• Choose materials, finishes, and fixtures that fit your design and budget.
Obtain Permits:
• Consult with your local design build contractor to determine the necessary permits and approvals.
• Prepare and submit all required documents, including architectural drawings and engineering plans.
Create Construction Documents:
• Work with your design build professional to develop detailed construction drawings and specifications.
• These documents will serve as a guide for contractors during construction.
Hire a design build contractor:
• Check references, credentials, and licenses before selecting a contractor.
• Sign a detailed contract that outlines the scope of work, timeline, and payment schedule.
Construction Phase:
• Demolition: If needed, remove any existing structures or walls.
• Foundation: Construct the foundation for the addition.
• Framing: Build the structural framework of the addition.
• Plumbing, Electrical, and HVAC: Install or update utilities as required.
• Insulation: Ensure proper insulation for energy efficiency.
• Drywall and Finish Work: Complete the walls and ceilings.
• Flooring and Cabinetry: Install flooring and kitchen cabinets.
• Appliances and Fixtures: Add appliances, plumbing fixtures, and lighting.
• Paint and Finish: Apply paint and finishes to achieve the desired look.
• Final Inspection: Schedule inspections to ensure compliance with building codes.
Final Inspections and Approvals:
• Arrange for final inspections to ensure the addition meets all safety and code requirements.
• Obtain any necessary certificates of occupancy or compliance.
Move In and Enjoy:
• Once all inspections and approvals are received, you can move into your new kitchen addition and start enjoying it.
Remember that every kitchen addition project is unique, so adapt this outline to your specific needs and circumstances. Consulting with professionals and obtaining the required permits and inspections is crucial to a successful and safe project.
 Talon Construction Inc.
Designing and building a kitchen addition is a complex process that involves multiple steps and considerations. Here is a general outline to help you get started on your kitchen addition project:
Define Your Goals and Budget:
• Determine the purpose of the kitchen addition. Is it for more cooking space, a dining area, or a combination of both?
• Establish a realistic budget for your project. Consider all costs, including construction, permits, materials, and furnishings.
Hire a Design Professional:
• Seek the services of a design build company who specializes in kitchen additions.
• Discuss your vision, needs, and budget with the design professional to create a design concept.
Site Evaluation:
• Assess the existing space and structural condition of your home to ensure it can support the addition.
• Consider factors like zoning regulations, setbacks, and building codes.
Design Development:
• Collaborate with your design professional to refine the concept, including the layout, size, and architectural style.
• Choose materials, finishes, and fixtures that fit your design and budget.
Obtain Permits:
• Consult with your local design build contractor to determine the necessary permits and approvals.
• Prepare and submit all required documents, including architectural drawings and engineering plans.
Create Construction Documents:
• Work with your design build professional to develop detailed construction drawings and specifications.
• These documents will serve as a guide for contractors during construction.
Hire a design build contractor:
• Check references, credentials, and licenses before selecting a contractor.
• Sign a detailed contract that outlines the scope of work, timeline, and payment schedule.
Construction Phase:
• Demolition: If needed, remove any existing structures or walls.
• Foundation: Construct the foundation for the addition.
• Framing: Build the structural framework of the addition.
• Plumbing, Electrical, and HVAC: Install or update utilities as required.
• Insulation: Ensure proper insulation for energy efficiency.
• Drywall and Finish Work: Complete the walls and ceilings.
• Flooring and Cabinetry: Install flooring and kitchen cabinets.
• Appliances and Fixtures: Add appliances, plumbing fixtures, and lighting.
• Paint and Finish: Apply paint and finishes to achieve the desired look.
• Final Inspection: Schedule inspections to ensure compliance with building codes.
Final Inspections and Approvals:
• Arrange for final inspections to ensure the addition meets all safety and code requirements.
• Obtain any necessary certificates of occupancy or compliance.
Move In and Enjoy:
• Once all inspections and approvals are received, you can move into your new kitchen addition and start enjoying it.
Remember that every kitchen addition project is unique, so adapt this outline to your specific needs and circumstances. Consulting with professionals and obtaining the required permits and inspections is crucial to a successful and safe project.

 ZeroEnergy Design
This LEED Platinum certified house reflects the homeowner's desire for an exceptionally healthy and comfortable living environment, within a traditional neighborhood.
INFILL SITE. The family, who moved from another area of Wellesley, sought out this property to be within walking distance of the high school and downtown area. An existing structure on the tight lot was removed to make way for the new home. 84% of the construction waste, from both the previous structure and the new home, was diverted from a landfill. ZED designed to preserve the existing mature trees on the perimeter of the property to minimize site impacts, and to maintain the character of the neighborhood as well as privacy on the site.
EXTERIOR EXPRESSION. The street facade of the home relates to the local New England vernacular. The rear uses contemporary language, a nod to the family’s Californian roots, to incorporate a roof deck, solar panels, outdoor living space, and the backyard swimming pool. ZED’s careful planning avoided to the need to face the garage doors towards the street, a common syndrome of a narrow lot.
THOUGHTFUL SPACE. Homes with dual entries can often result in duplicate and unused spaces. In this home, the everyday and formal entry areas are one and the same; the front and garage doors share the entry program of coat closets, mudroom storage with bench for removing your shoes, and a laundry room with generous closets for the children's sporting equipment. The entry area leads directly to the living space, encompassing the kitchen, dining and sitting area areas in an L-shaped open plan arrangement. The kitchen is placed at the south-west corner of the space to allow for a strong connection to the dining, sitting and outdoor living spaces. A fire pit on the deck satisfies the family’s desire for an open flame while a sealed gas fireplace is used indoors - ZED’s preference after omitting gas burning appliances completely from an airtight home. A small study, with a window seat, is conveniently located just off of the living space. A first floor guest bedroom includes an accessible bathroom for aging visitors and can be used as a master suite to accommodate aging in place.
HEALTHY LIVING. The client requested a home that was easy to clean and would provide a respite from seasonal allergies and common contaminants that are found in many indoor spaces. ZED selected easy to clean solid surface flooring throughout, provided ample space for cleaning supplies on each floor, and designed a mechanical system with ventilation that provides a constant supply of fresh outdoor air. ZED selected durable materials, finishes, cabinetry, and casework with low or no volatile organic compounds (VOCs) and no added urea formaldehyde.
YEAR-ROUND COMFORT. The home is super insulated and air-tight, paired with high performance triple-paned windows, to ensure it is draft-free throughout the winter (even when in front of the large windows and doors). ZED designed a right-sized heating and cooling system to pair with the thermally improved building enclosure to ensure year-round comfort. The glazing on the home maximizes passive solar gains, and facilitates cross ventilation and daylighting.
ENERGY EFFICIENT. As one of the most energy efficient houses built to date in Wellesley, the home highlights a practical solution for Massachusetts. First, the building enclosure reduces the largest energy requirement for typical houses (heating). Super-insulation, exceptional air sealing, a thermally broken wall assembly, triple pane windows, and passive solar gain combine for a sizable heating load reduction. Second, within the house only efficient systems consume energy. These include an air source heat pump for heating & cooling, a heat pump hot water heater, LED lighting, energy recovery ventilation, and high efficiency appliances. Lastly, photovoltaics provide renewable energy help offset energy consumption. The result is an 89% reduction in energy use compared to a similar brand new home built to code requirements.
RESILIENT. The home will fare well in extreme weather events. During a winter power outage, heat loss will be very slow due to the super-insulated and airtight envelope– taking multiple days to drop to 60 degrees even with no heat source. An engineered drainage system, paired with careful the detailing of the foundation, will help to keep the finished basement dry. A generator will provide full operation of the all-electric house during a power outage.
OVERALL. The home is a reflection of the family goals and an expression of their values, beautifully enabling health, comfort, safety, resilience, and utility, all while respecting the planet.
ZED - Architect & Mechanical Designer
Bevilacqua Builders Inc - Contractor
Creative Land & Water Engineering - Civil Engineering
Barbara Peterson Landscape - Landscape Design
Nest & Company - Interior Furnishings
Eric Roth Photography - Photography
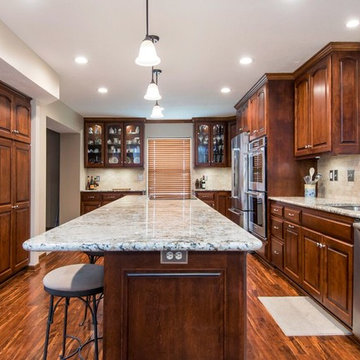

 O'Hanlon Kitchen & Bath
This kitchen was beautifully transformed into a Modern Rustic masterpiece. We were honored to have a part in the design and installation of the cabinets and countertop as well as being the general contractor for the project. The homeowners, Mr. Scott & Ms. Rauhofer are not new to architecture and home design. Their home had previously won an architectural award for its construction and design.
Mr. Scott & Ms. Rauhofer utilized the expertise of many different artists and contractors on this project. Our designer, Tracy West, worked with them on the design of their new kitchen. They did have a separate contractor who took care of the rough-in work (wall removal, refinishing the floors, electrical, and plumbing) as well as configuring the installation of the unique 3Form Lightbox above the sink.
Julie Gabrielli with Gabrielli Design Studio masterfully designed the above-mentioned lightbox, which was then installed by Baltic Custom Construction (additional contractor). Ken Girardini with Girardini Design artfully designed and constructed many metal artwork pieces to showcase in the space. Ken also beautifully crafted the distinctive cabinet hardware pieces seen throughout.
This stunning kitchen was incredibly well thought out and planned, using the many talents of some local artists and craftsmen to truly showcase what is possible to create a beautiful space within the home.
New Cabs: DeWils Blanco Supermatte Luxe
Countertop: Cambria Warm Britannica with Waterfall island
Hardware: Ken Girardini with Girardini Design
Backsplash: customer supplied
Sink: Kraus KHU32
Stove: Miele 48” Rangetop with Grill Model: KMR 1355 G / KMR 1355 LP
Stove Hood: Miele Décor Island Ventilation Hood DA 424V-6
Refrigerator: Subzero
Convection Oven: Miele ContourLine 30” H 6780 BP
Dishwasher: Miele EcoFlex Series
Microwave: Miele PureLine 24” Microwave Oven M 6260 TC
Cabinet accessories by Dewils and Fineline accessories in the drawers.
Lightbox Info- https://www.3-form.com/collaborate/light_design/
Tracy West
Kitchen Designer
O’Hanlon Kitchens, Inc.
47 Loveton Circle, Ste. D
Sparks, MD 21152
443-285-0558
717-755-5555
www.OKitchens.com
Melanie Sammons
Project Coordinator
O’Hanlon Kitchens, Inc.
47 Loveton Circle, Ste. D
Sparks, MD 21152
443-285-0558
717-755-5555
www.OKitchens.com
Baltic Custom Construction, Inc.
8 Havenfield Dr, Parkville, MD 21234
410-375-1283
Ken Girardini
keng@girardinidesign.com
927 Buckhorn Rd
Sykesville, MD. 21784
410-549-3499
Julie E Gabrielli, NCARB, LEED AP
Gabrielli Design Studio, LLC
2224 Crest Rd
Baltimore, MD 21209
julie@gabriellidesign.com
410-530-0389
www.gabriellidesign.com
blog: juliegabrielli com

 INSPIRED KITCHEN DESIGN
The pantry area features some glass- fronted BODBYN upper cabinetry which holds dishes and display items, which is next to the IKEA NUTID refrigerator and convection oven, as well as additional tall cabinetry on the opposite side.
After agreeing on a white kitchen design theme, William claims the hardest part of the install was getting the kitchen itself structurally ready for cabinet installation.
In particular, the age of the house was a unique challenge. So, since the house was originally constructed in 1915, the walls were not exactly plumb or square, he says. Therefore, they needed to move gas and water lines, and run new electrical. He adds that they removed some very old vinyl flooring, added drywall to walls which had severe plaster damage, and added light fixtures to the ceiling.
“The IKEA cabinets themselves were rather easy to install, it was just challenging to get the filler panels to fit our walls, floors, and ceilings!” he notes.
Complementing the white cabinetry is Atlantic Salt KASKER quartz countertops from IKEA.
“We liked the look of the quartz better than granite, and IKEA actually had the countertops on sale when we purchased the kitchen” he says.
The quartz countertops are seen on the end run by the sink as well as throughout the peninsula island that features the five-burner stove and ample space for dishes while cooking. Notably, a small peninsula area was included, providing even more storage options. William also points out that he used IKEA’s cabinet lighting system for above the countertops and a row of glass front cabinets as well.
“I’m very pleased with the install and the ease of controlling the lights with the remote control” he notes.
For William, there is some sound advice he wants to share with future IKEA remodelers.
“The first thing is to join IKEA’s Family Program — and keep all your receipts! Our kitchen install had over 250 boxes, so even after checking upon delivery, we had some damaged items. Our IKEA store gladly exchanged these items with the receipts. We also utilized IKEA’s 90-day Price Protection Program through the IKEA Family Program” he says.
And, he quickly adds, to keep your eyes out for the next IKEA sales event.
“We had a feeling that a kitchen sale was up coming, but made our purchases before one was actually announced. However, when the sale was announced about a month later, we took our receipts back in, and were refunded almost $3,000 for items that had been put on sale after we bought them!” William says.
He adds: “I also recommend that you try to understand the installation process for an IKEA kitchen, even if you aren’t installing the kitchen yourself. A great resource is YouTube, where there are many videos from contractors walking through IKEA kitchen installations.”
These approaches will save you time, money and stress – and repeated trips to IKEA as well, he concludes.
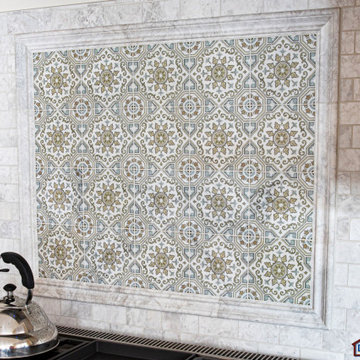
 Dimensions in Wood Inc
This client’s vision for their kitchen/hearth room remodel was to create a harmonious space for gathering and socializing with family and friends. Without the before and after photos, you would scarcely believe this was the same home.
This huge home renovation perfectly illustrates that Dimensions In Wood’s expert team can handle every aspect of your remodeling project. Plumbing, flooring, electrical wiring, custom cabinets, structural engineering, appliances, windows, interior and exterior doors, entertainment and more. Contact us today to discuss Translating Your Visions into Reality
The client was interested in new appliance technology, cabinetry to the ceiling, and an Island large enough to seat 3. They also wanted a built-in breakfast nook, improved pantry space, more functional storage on either side of their fireplace, and a built-in appearance for the TV above the mantel. The original built-in desk was not used, and they preferred for that space to serve as a small bar area with refrigeration and a place to store their printer. We designed several plans for the space before selecting the final layout.
The new design required the removal of the soffit over the old sink, as well as a small wall beside the old refrigerator. The wall beside the stairwell had to be shortened 13 inches and a new beam installed to carry the load of the home’s 2nd story to gain enough space for the large central island. The existing closet pantry walls were also reconfigured as per the new plan.
This serves as a great reminder that Dimensions In Wood is much more than just custom cabinets.
Central to the entire custom kitchen is an 8-foot Walnut island. The huge island, which comfortably seats three, is topped with Essenza Blue quartzite. The stone’s natural striations are beautiful. Quartzite is harder than granite, and less likely to stain than other stones because of its density. The couple had to look through multiple slabs to find a piece they LOVED. The island’s custom Walnut cabinetry, built to resemble a piece of custom furniture, was stained Bronzed Walnut by Sherwin Williams.
The 4-foot Galley Workstation in the island, handles all the kitchen’s prep, serving, and cleanup needs. The Galley’s culinary tools include an upper tier cutting board, upper tier drying rack, 2 lower tier platforms, 11″ colander with non-slip handles, and 11” mixing bowl with lid and non-slip bottom. Learn more about the amazing Galley Workstation here. A Waterstone gantry faucet in a pewter finish combines a pull-down sprayer for maximum mobility and a articulated swivel spout. A water tap with reverse osmosis filter provides the highest quality drinking water. To keep a clean and sleek counter we installed a raised air switch for the garbage disposal and integrated soap dispenser. The island also houses the Thermador Sapphire 7-Program Dishwasher with a hidden touch control panel and a custom Walnut wood front. The cabinetry under the Galley Workstation features a trash roll out, as well as storage for the culinary tools.
Shortening the stairwell wall, and reframing around the stairs, which included shortening the handrail, also made room for a bi-fold door walk-in pantry with extra roll out storage and space for a small microwave. Above the panty doors is a remote controlled, electric motor powered, lift up cabinet door which hides a flat screen TV, used while the family is cooking.
To the right of the walk-in pantry is cold food storage. The Thermador, 30-inch Freedom Collection refrigerator and 24-inch built-in freezer column with internal ice maker are covered with matching cabinetry fronts. An open display space was designed above the units, creating an aesthetically beautiful wall. To the right of the refrigerator & freezer columns is a tall cabinet designed for the built-in Thermador steam and convection oven. The convention steam oven is a relatively new technology for homes, but its versatility and food quality is amazing. To the right of this is a pull-out appliance pantry which provides easy access and storage for a stand mixer, blender, and any other appliance you do not want to clutter the counter.
The most visible wall of the kitchen features the 36-inch Thermador Professional Series Harmony Gas Range with Griddle. Between the range and custom designed wood hood, a framed mosaic tile accent in the backsplash, creates a focal point. To clear the air, the Professional Series Thermador 42-inch ventilation insert provides excellent exhaust capabilities, as well as providing multi-level, vivid LED lights for beautiful illumination.
The wall cabinetry symmetrically flanks the custom hood, utilizing deeper wall cabinetry on each end, allowing for storage of oversized dishware. The base cabinetry on this wall is made up of drawers, except for the corner, which is a Kesseböhmer LeMans II. This specially designed shelf system allows ease of access in underutilized blind corners. The dual action articulation system with soft close mechanism ensures a smooth open and close.
Rounding the corner to the outside wall, the base cabinetry was built to a narrower depth, providing additional space for the island, as well as easier access to the new larger pass-thru window which serves the screen porch. The client selected Black Vermont granite countertops with an ogee edge to contrast the Linen White painted cabinetry.
The door to the screen porch was replaced with a Marvin Exterior Door with a raised panel at the bottom of the 3⁄4 glass door.
Marvin Windows replaced the other windows in the space increasing the energy efficiency and value of the home. To establish the breakfast nook, a bench with drawers and an upholstered seat was built into the bay area of the room.
Custom bookshelves were built with open shelves, cabinet doors, and drawers on either side of the fireplace. A new stone hearth and fireplace surround were installed. Above the existing mantel we built a recessed space for the flat screen television hiding all wiring inside the walls for a completely clean look.
The space that was once a desk was transformed into a bar area. The glass shelves and glass cabinet front liquor cabinet stand out. But this bar area has hidden secrets. Tucked beneath the black granite is a Thermador under-counter double drawer refrigerator with matching wood front panels. They blend in perfectly with the cabinets. A wireless printer is easily accessed on a slide out drawer. Plus, what looks like merely wooden panels on the wall are concealing recessed storage for more bottles and glasses!
Overhead recessed lighting and speaker system provide illumination and entertainment through the entire space.
This luxury home had original, solid oak flooring through most of the first floor which the homeowner obviously wanted to keep but were in desperate need of repair and refinishing. Our master craftsmen wove in new wood flooring to match the old where needed, particularly where walls had been changed and where the floor was damaged. We sanded the floors, smoothing away years of wear and tear. The entire wood floor was then uniformly stained, making it impossible to differentiate where any repairs were made.
If this renovation has inspired you, then contact us today! There is no limit to our Dimensions.
 O'Hanlon Kitchen & Bath
This kitchen was beautifully transformed into a Modern Rustic masterpiece. We were honored to have a part in the design and installation of the cabinets and countertop as well as being the general contractor for the project. The homeowners, Mr. Scott & Ms. Rauhofer are not new to architecture and home design. Their home had previously won an architectural award for its construction and design.
Mr. Scott & Ms. Rauhofer utilized the expertise of many different artists and contractors on this project. Our designer, Tracy West, worked with them on the design of their new kitchen. They did have a separate contractor who took care of the rough-in work (wall removal, refinishing the floors, electrical, and plumbing) as well as configuring the installation of the unique 3Form Lightbox above the sink.
Julie Gabrielli with Gabrielli Design Studio masterfully designed the above-mentioned lightbox, which was then installed by Baltic Custom Construction (additional contractor). Ken Girardini with Girardini Design artfully designed and constructed many metal artwork pieces to showcase in the space. Ken also beautifully crafted the distinctive cabinet hardware pieces seen throughout.
This stunning kitchen was incredibly well thought out and planned, using the many talents of some local artists and craftsmen to truly showcase what is possible to create a beautiful space within the home.
New Cabs: DeWils Blanco Supermatte Luxe
Countertop: Cambria Warm Britannica with Waterfall island
Hardware: Ken Girardini with Girardini Design
Backsplash: customer supplied
Sink: Kraus KHU32
Stove: Miele 48” Rangetop with Grill Model: KMR 1355 G / KMR 1355 LP
Stove Hood: Miele Décor Island Ventilation Hood DA 424V-6
Refrigerator: Subzero
Convection Oven: Miele ContourLine 30” H 6780 BP
Dishwasher: Miele EcoFlex Series
Microwave: Miele PureLine 24” Microwave Oven M 6260 TC
Cabinet accessories by Dewils and Fineline accessories in the drawers.
Lightbox Info- https://www.3-form.com/collaborate/light_design/
Tracy West
Kitchen Designer
O’Hanlon Kitchens, Inc.
47 Loveton Circle, Ste. D
Sparks, MD 21152
443-285-0558
717-755-5555
www.OKitchens.com
Melanie Sammons
Project Coordinator
O’Hanlon Kitchens, Inc.
47 Loveton Circle, Ste. D
Sparks, MD 21152
443-285-0558
717-755-5555
www.OKitchens.com
Baltic Custom Construction, Inc.
8 Havenfield Dr, Parkville, MD 21234
410-375-1283
Ken Girardini
keng@girardinidesign.com
927 Buckhorn Rd
Sykesville, MD. 21784
410-549-3499
Julie E Gabrielli, NCARB, LEED AP
Gabrielli Design Studio, LLC
2224 Crest Rd
Baltimore, MD 21209
julie@gabriellidesign.com
410-530-0389
www.gabriellidesign.com
blog: juliegabrielli com
Sponsored
Sunbury, OH

J.Holderby - Renovations
Franklin County's Leading General Contractors - 2X Best of Houzz!
 O'Hanlon Kitchen & Bath
This kitchen was beautifully transformed into a Modern Rustic masterpiece. We were honored to have a part in the design and installation of the cabinets and countertop as well as being the general contractor for the project. The homeowners, Mr. Scott & Ms. Rauhofer are not new to architecture and home design. Their home had previously won an architectural award for its construction and design.
Mr. Scott & Ms. Rauhofer utilized the expertise of many different artists and contractors on this project. Our designer, Tracy West, worked with them on the design of their new kitchen. They did have a separate contractor who took care of the rough-in work (wall removal, refinishing the floors, electrical, and plumbing) as well as configuring the installation of the unique 3Form Lightbox above the sink.
Julie Gabrielli with Gabrielli Design Studio masterfully designed the above-mentioned lightbox, which was then installed by Baltic Custom Construction (additional contractor). Ken Girardini with Girardini Design artfully designed and constructed many metal artwork pieces to showcase in the space. Ken also beautifully crafted the distinctive cabinet hardware pieces seen throughout.
This stunning kitchen was incredibly well thought out and planned, using the many talents of some local artists and craftsmen to truly showcase what is possible to create a beautiful space within the home.
New Cabs: DeWils Blanco Supermatte Luxe
Countertop: Cambria Warm Britannica with Waterfall island
Hardware: Ken Girardini with Girardini Design
Backsplash: customer supplied
Sink: Kraus KHU32
Stove: Miele 48” Rangetop with Grill Model: KMR 1355 G / KMR 1355 LP
Stove Hood: Miele Décor Island Ventilation Hood DA 424V-6
Refrigerator: Subzero
Convection Oven: Miele ContourLine 30” H 6780 BP
Dishwasher: Miele EcoFlex Series
Microwave: Miele PureLine 24” Microwave Oven M 6260 TC
Cabinet accessories by Dewils and Fineline accessories in the drawers.
Lightbox Info- https://www.3-form.com/collaborate/light_design/
Tracy West
Kitchen Designer
O’Hanlon Kitchens, Inc.
47 Loveton Circle, Ste. D
Sparks, MD 21152
443-285-0558
717-755-5555
www.OKitchens.com
Melanie Sammons
Project Coordinator
O’Hanlon Kitchens, Inc.
47 Loveton Circle, Ste. D
Sparks, MD 21152
443-285-0558
717-755-5555
www.OKitchens.com
Baltic Custom Construction, Inc.
8 Havenfield Dr, Parkville, MD 21234
410-375-1283
Ken Girardini
keng@girardinidesign.com
927 Buckhorn Rd
Sykesville, MD. 21784
410-549-3499
Julie E Gabrielli, NCARB, LEED AP
Gabrielli Design Studio, LLC
2224 Crest Rd
Baltimore, MD 21209
julie@gabriellidesign.com
410-530-0389
www.gabriellidesign.com
blog: juliegabrielli com
 O'Hanlon Kitchen & Bath
This kitchen was beautifully transformed into a Modern Rustic masterpiece. We were honored to have a part in the design and installation of the cabinets and countertop as well as being the general contractor for the project. The homeowners, Mr. Scott & Ms. Rauhofer are not new to architecture and home design. Their home had previously won an architectural award for its construction and design.
Mr. Scott & Ms. Rauhofer utilized the expertise of many different artists and contractors on this project. Our designer, Tracy West, worked with them on the design of their new kitchen. They did have a separate contractor who took care of the rough-in work (wall removal, refinishing the floors, electrical, and plumbing) as well as configuring the installation of the unique 3Form Lightbox above the sink.
Julie Gabrielli with Gabrielli Design Studio masterfully designed the above-mentioned lightbox, which was then installed by Baltic Custom Construction (additional contractor). Ken Girardini with Girardini Design artfully designed and constructed many metal artwork pieces to showcase in the space. Ken also beautifully crafted the distinctive cabinet hardware pieces seen throughout.
This stunning kitchen was incredibly well thought out and planned, using the many talents of some local artists and craftsmen to truly showcase what is possible to create a beautiful space within the home.
New Cabs: DeWils Blanco Supermatte Luxe
Countertop: Cambria Warm Britannica with Waterfall island
Hardware: Ken Girardini with Girardini Design
Backsplash: customer supplied
Sink: Kraus KHU32
Stove: Miele 48” Rangetop with Grill Model: KMR 1355 G / KMR 1355 LP
Stove Hood: Miele Décor Island Ventilation Hood DA 424V-6
Refrigerator: Subzero
Convection Oven: Miele ContourLine 30” H 6780 BP
Dishwasher: Miele EcoFlex Series
Microwave: Miele PureLine 24” Microwave Oven M 6260 TC
Cabinet accessories by Dewils and Fineline accessories in the drawers.
Lightbox Info- https://www.3-form.com/collaborate/light_design/
Tracy West
Kitchen Designer
O’Hanlon Kitchens, Inc.
47 Loveton Circle, Ste. D
Sparks, MD 21152
443-285-0558
717-755-5555
www.OKitchens.com
Melanie Sammons
Project Coordinator
O’Hanlon Kitchens, Inc.
47 Loveton Circle, Ste. D
Sparks, MD 21152
443-285-0558
717-755-5555
www.OKitchens.com
Baltic Custom Construction, Inc.
8 Havenfield Dr, Parkville, MD 21234
410-375-1283
Ken Girardini
keng@girardinidesign.com
927 Buckhorn Rd
Sykesville, MD. 21784
410-549-3499
Julie E Gabrielli, NCARB, LEED AP
Gabrielli Design Studio, LLC
2224 Crest Rd
Baltimore, MD 21209
julie@gabriellidesign.com
410-530-0389
www.gabriellidesign.com
blog: juliegabrielli com
 McCabe By Design LLC
A custom china hutch provides elegant display space for collectibles and seasonal decoration in addition to concealed storage.
Instant hot water dispenser make boiling water a snap and hot beverages a breeze.
101