
Search results for "Encounter safe conduct" in Home Design Ideas
 Spar Gc Decks & More
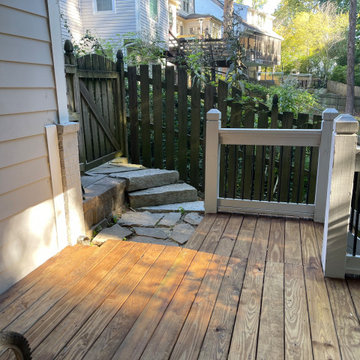
During this deck repair project, our team conducted a thorough inspection and identified key structural issues, including a 2x10 beam with extensive rot. We promptly replaced all compromised deck boards, reinforcing the structure to ensure long-term durability and safety. After repairs, we applied a high-quality semi-transparent TVP Dark Oak stain, enhancing the wood’s natural beauty while providing a protective layer against the elements. The final result is a revitalized, sturdy deck with a warm, inviting finish, ready for years of outdoor enjoyment. Our attention to detail and commitment to quality craftsmanship ensure a deck that’s both safe and aesthetically pleasing.
 Skill Construction & Design, LLC
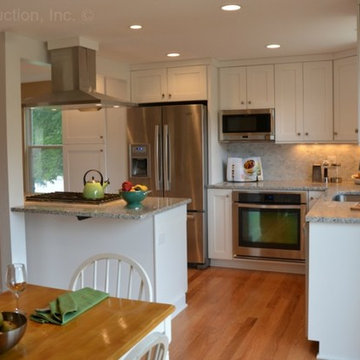
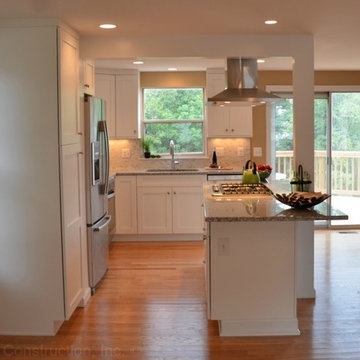
There are so many design elements to this kitchen, I almost don’t know where to start. Bright and airy with crisp clean white cabinets, the kitchen is open and welcoming. Still crisp but gently contrasting, the stainless steel appliance add depth amid the white. To keep this kitchen warm, natural oak covers the floors and a toasted wheat color washes the walls. And then there is the architectural elements. You know. That post and beam in the middle of the room. It’s the center of attention.
When you walk into a room your eyes roam around, establishing the size and shape of the room as your feet take you forward. From the front door of this home straight ahead you encountered this wall. The dining area to the right gives you a glimpse of things to come. Where there is a dining room you will usually find a kitchen.
The architecture of years gone by consistently hides the kitchen, the heart of the home, behind walls. I sympathize with my Mom, and all the other Moms, who have had to spend so much time tucked into a tight kitchen, away from the family. This wall had to go, but it was structural. We needed its support but not its bulk.
So we got rid of the bulk and only the bulk. Instead of a wall we have a post and beam, offering all of the structure we need. We could have installed a huge steel beam and reconfigure the joists to upset the beam, but why? The small beam and post add an incredible architectural element. It’s turning lemons into lemon, we simply made the most of what we had. It may be functional but it’s so fantastic. It looks like we created the effect just for the drama.
The original kitchen may have had a working triangle and some counter space, but it was fairly small, with each area only a step or two away. The dark cabinets made the space feel even smaller and the butcher block patterned laminate counter tops were very dated. The appliances were feeling their age as well, from a coil burner electric stove to a top freezer refrigerator. To keep this kitchen within its space, a half wall separated it from the dining area.
With the wall gone we borrowed some space from the living room and extended what was a U shaped kitchen into an L. At the living room window we start our new kitchen. We kept a small part of the wall to support the other end of our decorative beam. Sandwiched between a large pantry and our new French door refrigerator, the wall disappears. With our new open floor plan a sizable island was in order.
We split our cooking areas and installed a continuous grill gas cooktop into the island. A sleek island hood takes care of exhaust and adds an extra element to our architectural feature. Under the cooktop we added over-sized drawers for pots and pan storage. The frameless cabinets from New River Cabinetry are maple, painted white, with the Herndon door style. With the cooktop safely nestled into our island, we still had to add an oven.
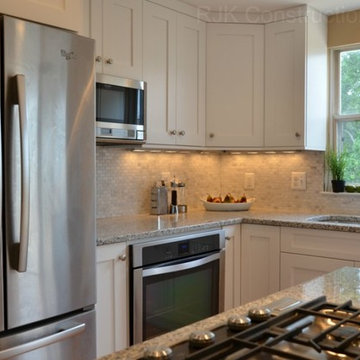
We used the space where the old range sat for a large single oven of stainless steel and glass. If it worked for one, why not two? We created a home for a microwave in the wall cabinets. It’s perfect for heating leftovers so close to the refrigerator.
An important consideration for hot spots in your kitchen is landing zones. Each of our cooking areas have generous landing zones, one on each side of the cooktop and an entire counter area above or below the ovens, depending on which one you’re using.
We wanted to give the sink area more room so the half wall had to come out. We moved the trash and recycle cans into a cabinet, removed the heavy soffits and kept the sink under the window.
With that little bit of extra space we were able to add a larger cabinet above the dishwasher and slide it all down. This used to be where the carpeting met the vinyl floor, but all of it is gone. Long oak planks eliminate that final divide between the kitchen and the dining area, while adding visual length to the area. White wall cabinets on each side of the window reflect the sunlight for a brighter view.
With all of the darker cabinetry the backsplash walls had been painted white. Even still, there was a darkness in the corners and it wasn’t very exciting. We wanted to add visual interest and reflect the new under-cabinet lighting, eliminating the shadows in this corner.
With 1″x 2″ Arabescato Honed marble mosaics and those under-cabinet lights, we achieved the perfect balance. The marble has subtle swirls in gray and beige on a clean white background, but with the honed finish the light is softly reflected instead of glaring. For granite, we chose the soft gray tones of Luna Pearl. The speckles of gray and beige are a gentle contrast to the white cabinets and emulate the color of the stainless steel.
Between the carpet, red half wall, dark railing and dated light fixture, the dining area felt tired. Since the kitchen lacked sufficient storage, a large utility cabinet crowded the table space without adding any decorate elements.
Although it didn’t get any bigger, our dining area feels fresher and more open too. With the oak flooring joining the area to the rest of our space and the toasted wheat on the walls, the white table and chairs compliment the cabinetry while contrasting the warmer colors. We replaced the chandelier with recessed lighting and changed that railing too.
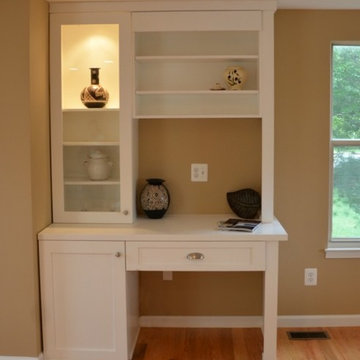
With our new open floor plan, we ended up with a fairly open area in between our foyer closet and the living room window. Not one to miss an opportunity, we filled the space with a multi-functional work space.
With the sunlight streaming in this bright corner works for anything this family needs.
There’s plenty of space for a chair under this large desk drawer. A closed cabinet below, glass doors above and lots of open shelving let you store and or showcase your belongings. We added a lite area at the top to keep away the darker corners.
The transformation is complete. This kitchen and all of its features are truly the center of attention in this home.
http://www.designsbyskill.com/
http://www.rjkconstructioninc.com/
 Elite Construction and Remodel Corp
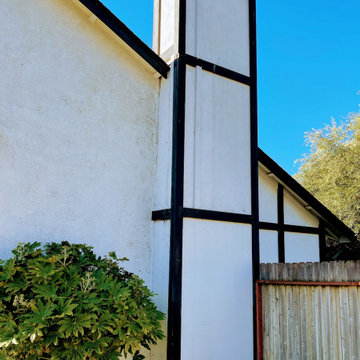
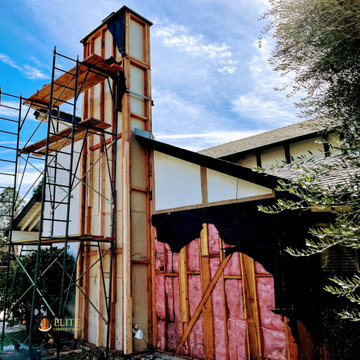
During our beginning stages for a standard chimney repair, we came across a bigger issue. We found poor roof flashing conducted by a roofer. Screws were used to secure roofing and flashing down around the chimney, this has damaged the home. This roof flashing system collected an excess of water and has caused dry rot down the chimney and wall next to the chimney. The chimney exterior wall needed to be cut out and replaced with new siding in all directions and replaced. We then installed new step flashing, and cricket to divert water and debris. Now, this chimney and roof, and siding are secure, safe, and will last for many more years.
Find the right local pro for your project

 safe ZOnea
Daylight is a very important factor that influences plant growth and reproduction. Gardeners need to make sure that they measure the length of daylight hours that a plant gets within a 24-hour period. This way, growth can be monitored and regulated.
For sun-loving plants, changes in the length of each day serve as the guide that helps plants transition from vegetative growth to reproductive stages. Changes in seasons and daylight hours have an impact on the adjustment of growth hormones that are responsible for flowering.
Therefore, it’s very important for gardeners to make sure that they conduct thorough research on long-season plants that are adapted to extended sunlight exposure. During this research, it’s not uncommon for gardeners to come across topics related to sativa seeds for sale because these plants are studied for their adaptation to bright, extended growing seasons.
For gardeners that want to experiment with these kinds of plants, sativa seeds for sale can be a good starting point. But in all cases of plant growth for sun-loving plants, the principle is always the same: it’s that daylight acts as a calendar that plants use so they can determine when it’s time for them to reproduce.
Long-Day, Short-Day, and Day-Neutral Responses
Different plants have different responses to light cycles. This is why plants are grouped into long-day, short-day, and day-neutral categories.
Long-day plants are those plants that thrive when daylight goes beyond the critical threshold. This is mostly common in late spring or early summer. A lot of sun-loving ornamental plants and vegetables fall within this category. They always take advantage of the longer days that support energy-intensive flower and seed production.
On the other hand, short-day plants are those that usually flower and thrive when nights grow longer. When temperatures cool or the seasonal rainfall patterns change, these plants tend to thrive. Sure, these plants still require strong sunlight. However, it’s their uninterrupted time in the dark that triggers their reproductive phase.
For day-neutral plants, it’s age and environmental stress that impacts their reproductive phase. However, they still do benefit from adequate sunlight.
It’s very important for gardeners to understand these categories so that they can plan what to grow in their garden with each turn of the season. By doing this, it’s easier to guarantee better results in one’s garden.
Why Sunlight Duration Matters More Than Intensity Alone
It’s not only the sun’s intensity that should be taken into account when growing a garden. It’s also very important to take note of sunlight duration, which is actually more important for plants.
Sure, light intensity does influence photosynthesis. However, it’s the duration of sunlight exposure that plays an important regulatory role. When plants are exposed to sunlight longer, they are able to produce more carbohydrates through photosynthesis. This helps them build the energy reserves they need to grow buds and flowers.
However, if a plant does not get enough sunlight time, there is a huge chance that the plant will not bloom at all. If you have observed plants that grow very quickly but do not flower, the reason is that it doesn’t get enough sunlight time. Therefore, it’s very important to monitor sunlight duration in order to make sure that plants will actually grow buds and flowers.
Practical Implications for Garden Planning
When gardeners understand the impact of daylight hours on plants, they are able to plan their gardens more effectively. After all, seasons do change and the conditions brought by each season will definitely have a huge impact on plant growth. Once gardeners have the right knowledge in terms of which categories plants belong to, they can easily decide which plants to grow at any given time.
It’s not enough to just rely on sunlight intensity and then expect plants to grow buds and flowers. It’s also very important to take into account the duration of sunlight time for each plant. By having this understanding, gardeners will become more effective when it comes to making sure that flowering occurs.
 Skill Construction & Design, LLC
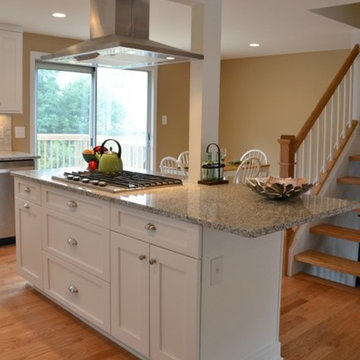
There are so many design elements to this kitchen, I almost don’t know where to start. Bright and airy with crisp clean white cabinets, the kitchen is open and welcoming. Still crisp but gently contrasting, the stainless steel appliance add depth amid the white. To keep this kitchen warm, natural oak covers the floors and a toasted wheat color washes the walls. And then there is the architectural elements. You know. That post and beam in the middle of the room. It’s the center of attention.
When you walk into a room your eyes roam around, establishing the size and shape of the room as your feet take you forward. From the front door of this home straight ahead you encountered this wall. The dining area to the right gives you a glimpse of things to come. Where there is a dining room you will usually find a kitchen.
The architecture of years gone by consistently hides the kitchen, the heart of the home, behind walls. I sympathize with my Mom, and all the other Moms, who have had to spend so much time tucked into a tight kitchen, away from the family. This wall had to go, but it was structural. We needed its support but not its bulk.
So we got rid of the bulk and only the bulk. Instead of a wall we have a post and beam, offering all of the structure we need. We could have installed a huge steel beam and reconfigure the joists to upset the beam, but why? The small beam and post add an incredible architectural element. It’s turning lemons into lemon, we simply made the most of what we had. It may be functional but it’s so fantastic. It looks like we created the effect just for the drama.
The original kitchen may have had a working triangle and some counter space, but it was fairly small, with each area only a step or two away. The dark cabinets made the space feel even smaller and the butcher block patterned laminate counter tops were very dated. The appliances were feeling their age as well, from a coil burner electric stove to a top freezer refrigerator. To keep this kitchen within its space, a half wall separated it from the dining area.
With the wall gone we borrowed some space from the living room and extended what was a U shaped kitchen into an L. At the living room window we start our new kitchen. We kept a small part of the wall to support the other end of our decorative beam. Sandwiched between a large pantry and our new French door refrigerator, the wall disappears. With our new open floor plan a sizable island was in order.
We split our cooking areas and installed a continuous grill gas cooktop into the island. A sleek island hood takes care of exhaust and adds an extra element to our architectural feature. Under the cooktop we added over-sized drawers for pots and pan storage. The frameless cabinets from New River Cabinetry are maple, painted white, with the Herndon door style. With the cooktop safely nestled into our island, we still had to add an oven.
We used the space where the old range sat for a large single oven of stainless steel and glass. If it worked for one, why not two? We created a home for a microwave in the wall cabinets. It’s perfect for heating leftovers so close to the refrigerator.
An important consideration for hot spots in your kitchen is landing zones. Each of our cooking areas have generous landing zones, one on each side of the cooktop and an entire counter area above or below the ovens, depending on which one you’re using.
We wanted to give the sink area more room so the half wall had to come out. We moved the trash and recycle cans into a cabinet, removed the heavy soffits and kept the sink under the window.
With that little bit of extra space we were able to add a larger cabinet above the dishwasher and slide it all down. This used to be where the carpeting met the vinyl floor, but all of it is gone. Long oak planks eliminate that final divide between the kitchen and the dining area, while adding visual length to the area. White wall cabinets on each side of the window reflect the sunlight for a brighter view.
With all of the darker cabinetry the backsplash walls had been painted white. Even still, there was a darkness in the corners and it wasn’t very exciting. We wanted to add visual interest and reflect the new under-cabinet lighting, eliminating the shadows in this corner.
With 1″x 2″ Arabescato Honed marble mosaics and those under-cabinet lights, we achieved the perfect balance. The marble has subtle swirls in gray and beige on a clean white background, but with the honed finish the light is softly reflected instead of glaring. For granite, we chose the soft gray tones of Luna Pearl. The speckles of gray and beige are a gentle contrast to the white cabinets and emulate the color of the stainless steel.
Between the carpet, red half wall, dark railing and dated light fixture, the dining area felt tired. Since the kitchen lacked sufficient storage, a large utility cabinet crowded the table space without adding any decorate elements.
Although it didn’t get any bigger, our dining area feels fresher and more open too. With the oak flooring joining the area to the rest of our space and the toasted wheat on the walls, the white table and chairs compliment the cabinetry while contrasting the warmer colors. We replaced the chandelier with recessed lighting and changed that railing too.
With our new open floor plan, we ended up with a fairly open area in between our foyer closet and the living room window. Not one to miss an opportunity, we filled the space with a multi-functional work space.
With the sunlight streaming in this bright corner works for anything this family needs.
There’s plenty of space for a chair under this large desk drawer. A closed cabinet below, glass doors above and lots of open shelving let you store and or showcase your belongings. We added a lite area at the top to keep away the darker corners.
The transformation is complete. This kitchen and all of its features are truly the center of attention in this home.
http://www.designsbyskill.com/
http://www.rjkconstructioninc.com/
 Skill Construction & Design, LLC
There are so many design elements to this kitchen, I almost don’t know where to start. Bright and airy with crisp clean white cabinets, the kitchen is open and welcoming. Still crisp but gently contrasting, the stainless steel appliance add depth amid the white. To keep this kitchen warm, natural oak covers the floors and a toasted wheat color washes the walls. And then there is the architectural elements. You know. That post and beam in the middle of the room. It’s the center of attention.
When you walk into a room your eyes roam around, establishing the size and shape of the room as your feet take you forward. From the front door of this home straight ahead you encountered this wall. The dining area to the right gives you a glimpse of things to come. Where there is a dining room you will usually find a kitchen.
The architecture of years gone by consistently hides the kitchen, the heart of the home, behind walls. I sympathize with my Mom, and all the other Moms, who have had to spend so much time tucked into a tight kitchen, away from the family. This wall had to go, but it was structural. We needed its support but not its bulk.
So we got rid of the bulk and only the bulk. Instead of a wall we have a post and beam, offering all of the structure we need. We could have installed a huge steel beam and reconfigure the joists to upset the beam, but why? The small beam and post add an incredible architectural element. It’s turning lemons into lemon, we simply made the most of what we had. It may be functional but it’s so fantastic. It looks like we created the effect just for the drama.
The original kitchen may have had a working triangle and some counter space, but it was fairly small, with each area only a step or two away. The dark cabinets made the space feel even smaller and the butcher block patterned laminate counter tops were very dated. The appliances were feeling their age as well, from a coil burner electric stove to a top freezer refrigerator. To keep this kitchen within its space, a half wall separated it from the dining area.
With the wall gone we borrowed some space from the living room and extended what was a U shaped kitchen into an L. At the living room window we start our new kitchen. We kept a small part of the wall to support the other end of our decorative beam. Sandwiched between a large pantry and our new French door refrigerator, the wall disappears. With our new open floor plan a sizable island was in order.
We split our cooking areas and installed a continuous grill gas cooktop into the island. A sleek island hood takes care of exhaust and adds an extra element to our architectural feature. Under the cooktop we added over-sized drawers for pots and pan storage. The frameless cabinets from New River Cabinetry are maple, painted white, with the Herndon door style. With the cooktop safely nestled into our island, we still had to add an oven.
We used the space where the old range sat for a large single oven of stainless steel and glass. If it worked for one, why not two? We created a home for a microwave in the wall cabinets. It’s perfect for heating leftovers so close to the refrigerator.
An important consideration for hot spots in your kitchen is landing zones. Each of our cooking areas have generous landing zones, one on each side of the cooktop and an entire counter area above or below the ovens, depending on which one you’re using.
We wanted to give the sink area more room so the half wall had to come out. We moved the trash and recycle cans into a cabinet, removed the heavy soffits and kept the sink under the window.
With that little bit of extra space we were able to add a larger cabinet above the dishwasher and slide it all down. This used to be where the carpeting met the vinyl floor, but all of it is gone. Long oak planks eliminate that final divide between the kitchen and the dining area, while adding visual length to the area. White wall cabinets on each side of the window reflect the sunlight for a brighter view.
With all of the darker cabinetry the backsplash walls had been painted white. Even still, there was a darkness in the corners and it wasn’t very exciting. We wanted to add visual interest and reflect the new under-cabinet lighting, eliminating the shadows in this corner.
With 1″x 2″ Arabescato Honed marble mosaics and those under-cabinet lights, we achieved the perfect balance. The marble has subtle swirls in gray and beige on a clean white background, but with the honed finish the light is softly reflected instead of glaring. For granite, we chose the soft gray tones of Luna Pearl. The speckles of gray and beige are a gentle contrast to the white cabinets and emulate the color of the stainless steel.
Between the carpet, red half wall, dark railing and dated light fixture, the dining area felt tired. Since the kitchen lacked sufficient storage, a large utility cabinet crowded the table space without adding any decorate elements.
Although it didn’t get any bigger, our dining area feels fresher and more open too. With the oak flooring joining the area to the rest of our space and the toasted wheat on the walls, the white table and chairs compliment the cabinetry while contrasting the warmer colors. We replaced the chandelier with recessed lighting and changed that railing too.
With our new open floor plan, we ended up with a fairly open area in between our foyer closet and the living room window. Not one to miss an opportunity, we filled the space with a multi-functional work space.
With the sunlight streaming in this bright corner works for anything this family needs.
There’s plenty of space for a chair under this large desk drawer. A closed cabinet below, glass doors above and lots of open shelving let you store and or showcase your belongings. We added a lite area at the top to keep away the darker corners.
The transformation is complete. This kitchen and all of its features are truly the center of attention in this home.
http://www.designsbyskill.com/
http://www.rjkconstructioninc.com/
 Skill Construction & Design, LLC
There are so many design elements to this kitchen, I almost don’t know where to start. Bright and airy with crisp clean white cabinets, the kitchen is open and welcoming. Still crisp but gently contrasting, the stainless steel appliance add depth amid the white. To keep this kitchen warm, natural oak covers the floors and a toasted wheat color washes the walls. And then there is the architectural elements. You know. That post and beam in the middle of the room. It’s the center of attention.
When you walk into a room your eyes roam around, establishing the size and shape of the room as your feet take you forward. From the front door of this home straight ahead you encountered this wall. The dining area to the right gives you a glimpse of things to come. Where there is a dining room you will usually find a kitchen.
The architecture of years gone by consistently hides the kitchen, the heart of the home, behind walls. I sympathize with my Mom, and all the other Moms, who have had to spend so much time tucked into a tight kitchen, away from the family. This wall had to go, but it was structural. We needed its support but not its bulk.
So we got rid of the bulk and only the bulk. Instead of a wall we have a post and beam, offering all of the structure we need. We could have installed a huge steel beam and reconfigure the joists to upset the beam, but why? The small beam and post add an incredible architectural element. It’s turning lemons into lemon, we simply made the most of what we had. It may be functional but it’s so fantastic. It looks like we created the effect just for the drama.
The original kitchen may have had a working triangle and some counter space, but it was fairly small, with each area only a step or two away. The dark cabinets made the space feel even smaller and the butcher block patterned laminate counter tops were very dated. The appliances were feeling their age as well, from a coil burner electric stove to a top freezer refrigerator. To keep this kitchen within its space, a half wall separated it from the dining area.
With the wall gone we borrowed some space from the living room and extended what was a U shaped kitchen into an L. At the living room window we start our new kitchen. We kept a small part of the wall to support the other end of our decorative beam. Sandwiched between a large pantry and our new French door refrigerator, the wall disappears. With our new open floor plan a sizable island was in order.
We split our cooking areas and installed a continuous grill gas cooktop into the island. A sleek island hood takes care of exhaust and adds an extra element to our architectural feature. Under the cooktop we added over-sized drawers for pots and pan storage. The frameless cabinets from New River Cabinetry are maple, painted white, with the Herndon door style. With the cooktop safely nestled into our island, we still had to add an oven.
We used the space where the old range sat for a large single oven of stainless steel and glass. If it worked for one, why not two? We created a home for a microwave in the wall cabinets. It’s perfect for heating leftovers so close to the refrigerator.
An important consideration for hot spots in your kitchen is landing zones. Each of our cooking areas have generous landing zones, one on each side of the cooktop and an entire counter area above or below the ovens, depending on which one you’re using.
We wanted to give the sink area more room so the half wall had to come out. We moved the trash and recycle cans into a cabinet, removed the heavy soffits and kept the sink under the window.
With that little bit of extra space we were able to add a larger cabinet above the dishwasher and slide it all down. This used to be where the carpeting met the vinyl floor, but all of it is gone. Long oak planks eliminate that final divide between the kitchen and the dining area, while adding visual length to the area. White wall cabinets on each side of the window reflect the sunlight for a brighter view.
With all of the darker cabinetry the backsplash walls had been painted white. Even still, there was a darkness in the corners and it wasn’t very exciting. We wanted to add visual interest and reflect the new under-cabinet lighting, eliminating the shadows in this corner.
With 1″x 2″ Arabescato Honed marble mosaics and those under-cabinet lights, we achieved the perfect balance. The marble has subtle swirls in gray and beige on a clean white background, but with the honed finish the light is softly reflected instead of glaring. For granite, we chose the soft gray tones of Luna Pearl. The speckles of gray and beige are a gentle contrast to the white cabinets and emulate the color of the stainless steel.
Between the carpet, red half wall, dark railing and dated light fixture, the dining area felt tired. Since the kitchen lacked sufficient storage, a large utility cabinet crowded the table space without adding any decorate elements.
Although it didn’t get any bigger, our dining area feels fresher and more open too. With the oak flooring joining the area to the rest of our space and the toasted wheat on the walls, the white table and chairs compliment the cabinetry while contrasting the warmer colors. We replaced the chandelier with recessed lighting and changed that railing too.
With our new open floor plan, we ended up with a fairly open area in between our foyer closet and the living room window. Not one to miss an opportunity, we filled the space with a multi-functional work space.
With the sunlight streaming in this bright corner works for anything this family needs.
There’s plenty of space for a chair under this large desk drawer. A closed cabinet below, glass doors above and lots of open shelving let you store and or showcase your belongings. We added a lite area at the top to keep away the darker corners.
The transformation is complete. This kitchen and all of its features are truly the center of attention in this home.
http://www.designsbyskill.com/
http://www.rjkconstructioninc.com/
 Skill Construction & Design, LLC
There are so many design elements to this kitchen, I almost don’t know where to start. Bright and airy with crisp clean white cabinets, the kitchen is open and welcoming. Still crisp but gently contrasting, the stainless steel appliance add depth amid the white. To keep this kitchen warm, natural oak covers the floors and a toasted wheat color washes the walls. And then there is the architectural elements. You know. That post and beam in the middle of the room. It’s the center of attention.
When you walk into a room your eyes roam around, establishing the size and shape of the room as your feet take you forward. From the front door of this home straight ahead you encountered this wall. The dining area to the right gives you a glimpse of things to come. Where there is a dining room you will usually find a kitchen.
The architecture of years gone by consistently hides the kitchen, the heart of the home, behind walls. I sympathize with my Mom, and all the other Moms, who have had to spend so much time tucked into a tight kitchen, away from the family. This wall had to go, but it was structural. We needed its support but not its bulk.
So we got rid of the bulk and only the bulk. Instead of a wall we have a post and beam, offering all of the structure we need. We could have installed a huge steel beam and reconfigure the joists to upset the beam, but why? The small beam and post add an incredible architectural element. It’s turning lemons into lemon, we simply made the most of what we had. It may be functional but it’s so fantastic. It looks like we created the effect just for the drama.
The original kitchen may have had a working triangle and some counter space, but it was fairly small, with each area only a step or two away. The dark cabinets made the space feel even smaller and the butcher block patterned laminate counter tops were very dated. The appliances were feeling their age as well, from a coil burner electric stove to a top freezer refrigerator. To keep this kitchen within its space, a half wall separated it from the dining area.
With the wall gone we borrowed some space from the living room and extended what was a U shaped kitchen into an L. At the living room window we start our new kitchen. We kept a small part of the wall to support the other end of our decorative beam. Sandwiched between a large pantry and our new French door refrigerator, the wall disappears. With our new open floor plan a sizable island was in order.
We split our cooking areas and installed a continuous grill gas cooktop into the island. A sleek island hood takes care of exhaust and adds an extra element to our architectural feature. Under the cooktop we added over-sized drawers for pots and pan storage. The frameless cabinets from New River Cabinetry are maple, painted white, with the Herndon door style. With the cooktop safely nestled into our island, we still had to add an oven.
We used the space where the old range sat for a large single oven of stainless steel and glass. If it worked for one, why not two? We created a home for a microwave in the wall cabinets. It’s perfect for heating leftovers so close to the refrigerator.
An important consideration for hot spots in your kitchen is landing zones. Each of our cooking areas have generous landing zones, one on each side of the cooktop and an entire counter area above or below the ovens, depending on which one you’re using.
We wanted to give the sink area more room so the half wall had to come out. We moved the trash and recycle cans into a cabinet, removed the heavy soffits and kept the sink under the window.
With that little bit of extra space we were able to add a larger cabinet above the dishwasher and slide it all down. This used to be where the carpeting met the vinyl floor, but all of it is gone. Long oak planks eliminate that final divide between the kitchen and the dining area, while adding visual length to the area. White wall cabinets on each side of the window reflect the sunlight for a brighter view.
With all of the darker cabinetry the backsplash walls had been painted white. Even still, there was a darkness in the corners and it wasn’t very exciting. We wanted to add visual interest and reflect the new under-cabinet lighting, eliminating the shadows in this corner.
With 1″x 2″ Arabescato Honed marble mosaics and those under-cabinet lights, we achieved the perfect balance. The marble has subtle swirls in gray and beige on a clean white background, but with the honed finish the light is softly reflected instead of glaring. For granite, we chose the soft gray tones of Luna Pearl. The speckles of gray and beige are a gentle contrast to the white cabinets and emulate the color of the stainless steel.
Between the carpet, red half wall, dark railing and dated light fixture, the dining area felt tired. Since the kitchen lacked sufficient storage, a large utility cabinet crowded the table space without adding any decorate elements.
Although it didn’t get any bigger, our dining area feels fresher and more open too. With the oak flooring joining the area to the rest of our space and the toasted wheat on the walls, the white table and chairs compliment the cabinetry while contrasting the warmer colors. We replaced the chandelier with recessed lighting and changed that railing too.
With our new open floor plan, we ended up with a fairly open area in between our foyer closet and the living room window. Not one to miss an opportunity, we filled the space with a multi-functional work space.
With the sunlight streaming in this bright corner works for anything this family needs.
There’s plenty of space for a chair under this large desk drawer. A closed cabinet below, glass doors above and lots of open shelving let you store and or showcase your belongings. We added a lite area at the top to keep away the darker corners.
The transformation is complete. This kitchen and all of its features are truly the center of attention in this home.
http://www.designsbyskill.com/
http://www.rjkconstructioninc.com/
 Lighting EVER
While we may normally think of it as a mere, functional necessity, creative use of outdoor patio lights can not only give a great look to your patio but also make your summer evenings more pleasurable. Cool outdoor/patio lighting ideas can help you to get more use as well as enjoyment from your outdoor living spaces.
Some of such outdoor and patio lighting ideas are presented below:
Star Lit Floors:
You can use fiber optic lighting to give your deck the star lit sky effect. In this type of lighting, light would travel through thin flexible cables, ending in points of light which are inserted into small holes drilled in the decking. The cables and lights are safe to use in all weather conditions since there is no electricity or heat conducted. This can also be done as a good DIY project, if you are so inclined.
Lighting the Way:
This type of deck lighting cannot just add safety but also help extend the deck party time. Post-mounted fixtures can provide ambient lighting and also signal the locations of the railings. You can use low-voltage LED fixtures operating on 12 volts which is much safer than the regular household level of 120 volts.
Movable Deck-Standing Lighting:
An over-sized floor-standing lamp that is designed for outdoor use can light up the whole deck sitting area using a 250 watts halogen lamp. This fixture can be made waterproof with an aluminum base, galvanized steel frame and a plastic shade. Stability in windy conditions can be ensured with adequate use of lead weights.
String Lights:
These can go up in any location including patios in order to offer versatility as well as style. String lights are easily available in many styles and sizes and the wiring does not need to be concealed, since it is a part of the fixture itself. Low-voltage (12 volts) or the regular (120 volts) lights can be used, as suitable. Although a bit expensive initially, outdoor solar powered lights can also be used which will save money in the long run, since they don't use the grid electricity.
Combination Light and Ceiling Fan:
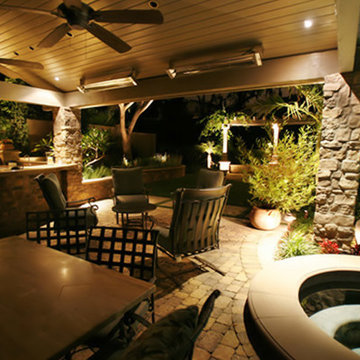
Keep your covered patio cool and stylish at the same time with a combination light and ceiling fan. The fan would need a 120 volts supply so you could use that to power the light as well. The wires can easily be concealed by painting them to match with the woodwork and/or running them along the framing members.
Patio Stairway Lights:
As you may be aware, many municipality building codes require you to light exterior deck, patio and entrance stairways. This sensible safety measure can be achieved with easy and style using motion-activated lighting. These bright LED lights would automatically turn on when they detect motion a few feet away and then turn off after the delay of a pre-set number of seconds. They can be easily installed anywhere with the help of screws or double-sided tape.
Put any of these ideas for outdoor patio lights to good use – wish you all the best.
 Do Arch LLC
Our Process
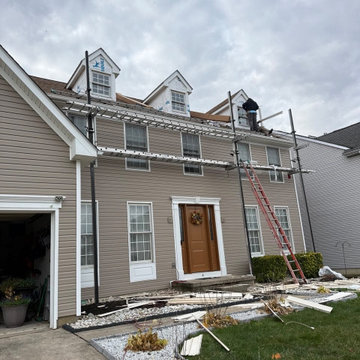
Every siding project we complete follows a structured, detail-focused approach to ensure long-term performance and a clean, high-end finish:
1. Preparation & Protection
We begin by protecting all surrounding areas, including landscaping, walkways, and entry points. This ensures a safe and clean job site from start to finish.
2. Removal of Existing Siding
The old siding is carefully removed and disposed of. During this stage, we inspect the underlying structure for any signs of damage or moisture issues.
3. Surface Inspection & Repairs
We address any compromised sheathing or framing as needed to create a solid, secure base for the new installation.
4. Weather Barrier Installation
A proper moisture barrier is installed to improve energy efficiency and protect the home from water intrusion.
5. Siding Installation
We install Double 4.5" Encore Dutch Lap siding in Natural Clay with precision, ensuring straight lines, tight seams, and consistent spacing throughout.
6. Trim, Shutters & Moldings
All shutters and exterior moldings are carefully reinstalled and aligned, maintaining the home’s original character while enhancing the updated look.
7. Final Detailing & Cleanup
We complete all finishing touches, conduct a full quality check, and leave the property clean and ready to enjoy.
 Great American Landscapes
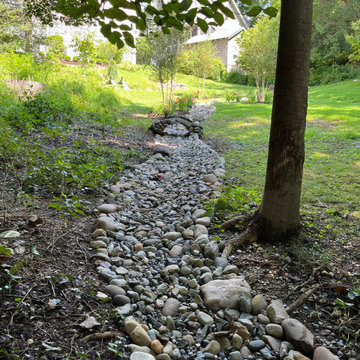
Over a span of two years we completed several projects at this Tokoma Park, Maryland property. We cleaned up the backyard, renovated an existing swale, and installed water loving plants. The following year, we replaced the old pea gravel driveway with a permeable paver driveway. While doing the driveway we encountered spongey clay that was saturated from a leaking water line. We had to install concrete piers down to virgin soil to bear the weight of the walkway. The driveway excavation had to take into account the root zones of large trees. To avoid the surface roots we used a minimal excavation design.
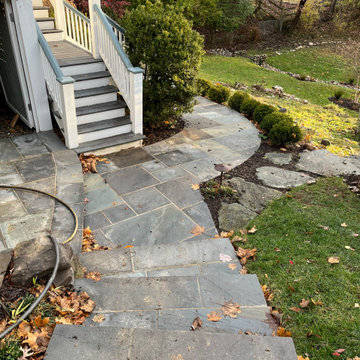
Our ultimate goal with this project was to ensure that the new walkways provided a safe and comfortable path for the homeowners and guest to get from their cars to porch whether parked along the street or in the driveway. To provide an extra layer of security, we added low-voltage lighting to accent trees and light the walkway, which were programmed to come on at dusk and turn off automatically at dawn.
The new plantings are native species including River Birch, Swamp Hibiscus, Blue Flag Iris, and Common Rush, that are adapted to growing in wet soils. The permeable paver driveway will reduce runoff by storing rain in gravel base while allowing it to be absorbed into the soil below. The paver surface eliminates the tracking of pea gravel into the house while allowing heels to walk on it without sinking in. The swale handles runoff from all the uphill properties and the gravel keeps it from becoming a soggy mess.
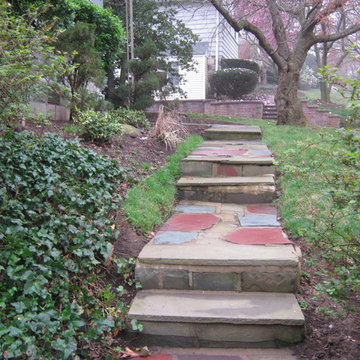
During seasonal months, snow and leaf removal are greatly eased by having a hard surface to shovel or rake. The permeable pavers used are Techo-Bloc Villagio in Shale Grey and we installed a granite Belgian block border. We replaced existing broken concrete walkway with new curving flagstone walkway and connected the front steps to the driveway and side steps. All projects were consulted with the City of Takoma Park’s Urban Forest Manager, and the Montgomery County Historical Preservation Commission.
 Great American Landscapes
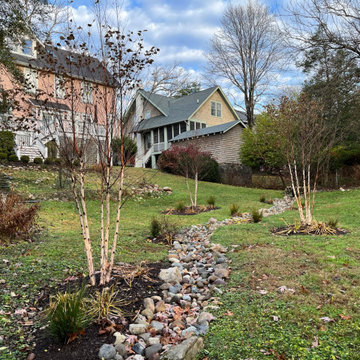
Over a span of two years we completed several projects at this Tokoma Park, Maryland property. We cleaned up the backyard, renovated an existing swale, and installed water loving plants. The following year, we replaced the old pea gravel driveway with a permeable paver driveway. While doing the driveway we encountered spongey clay that was saturated from a leaking water line. We had to install concrete piers down to virgin soil to bear the weight of the walkway. The driveway excavation had to take into account the root zones of large trees. To avoid the surface roots we used a minimal excavation design.
Our ultimate goal with this project was to ensure that the new walkways provided a safe and comfortable path for the homeowners and guest to get from their cars to porch whether parked along the street or in the driveway. To provide an extra layer of security, we added low-voltage lighting to accent trees and light the walkway, which were programmed to come on at dusk and turn off automatically at dawn.
The new plantings are native species including River Birch, Swamp Hibiscus, Blue Flag Iris, and Common Rush, that are adapted to growing in wet soils. The permeable paver driveway will reduce runoff by storing rain in gravel base while allowing it to be absorbed into the soil below. The paver surface eliminates the tracking of pea gravel into the house while allowing heels to walk on it without sinking in. The swale handles runoff from all the uphill properties and the gravel keeps it from becoming a soggy mess.
During seasonal months, snow and leaf removal are greatly eased by having a hard surface to shovel or rake. The permeable pavers used are Techo-Bloc Villagio in Shale Grey and we installed a granite Belgian block border. We replaced existing broken concrete walkway with new curving flagstone walkway and connected the front steps to the driveway and side steps. All projects were consulted with the City of Takoma Park’s Urban Forest Manager, and the Montgomery County Historical Preservation Commission.
 Great American Landscapes
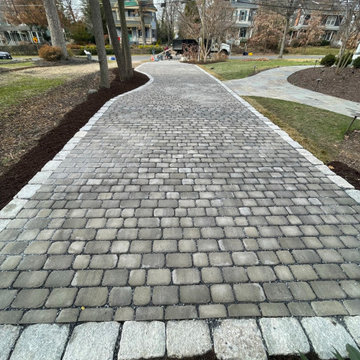
Over a span of two years we completed several projects at this Tokoma Park, Maryland property. We cleaned up the backyard, renovated an existing swale, and installed water loving plants. The following year, we replaced the old pea gravel driveway with a permeable paver driveway. While doing the driveway we encountered spongey clay that was saturated from a leaking water line. We had to install concrete piers down to virgin soil to bear the weight of the walkway. The driveway excavation had to take into account the root zones of large trees. To avoid the surface roots we used a minimal excavation design.
Our ultimate goal with this project was to ensure that the new walkways provided a safe and comfortable path for the homeowners and guest to get from their cars to porch whether parked along the street or in the driveway. To provide an extra layer of security, we added low-voltage lighting to accent trees and light the walkway, which were programmed to come on at dusk and turn off automatically at dawn.
The new plantings are native species including River Birch, Swamp Hibiscus, Blue Flag Iris, and Common Rush, that are adapted to growing in wet soils. The permeable paver driveway will reduce runoff by storing rain in gravel base while allowing it to be absorbed into the soil below. The paver surface eliminates the tracking of pea gravel into the house while allowing heels to walk on it without sinking in. The swale handles runoff from all the uphill properties and the gravel keeps it from becoming a soggy mess.
During seasonal months, snow and leaf removal are greatly eased by having a hard surface to shovel or rake. The permeable pavers used are Techo-Bloc Villagio in Shale Grey and we installed a granite Belgian block border. We replaced existing broken concrete walkway with new curving flagstone walkway and connected the front steps to the driveway and side steps. All projects were consulted with the City of Takoma Park’s Urban Forest Manager, and the Montgomery County Historical Preservation Commission.
 Great American Landscapes
Over a span of two years we completed several projects at this Tokoma Park, Maryland property. We cleaned up the backyard, renovated an existing swale, and installed water loving plants. The following year, we replaced the old pea gravel driveway with a permeable paver driveway. While doing the driveway we encountered spongey clay that was saturated from a leaking water line. We had to install concrete piers down to virgin soil to bear the weight of the walkway. The driveway excavation had to take into account the root zones of large trees. To avoid the surface roots we used a minimal excavation design.
Our ultimate goal with this project was to ensure that the new walkways provided a safe and comfortable path for the homeowners and guest to get from their cars to porch whether parked along the street or in the driveway. To provide an extra layer of security, we added low-voltage lighting to accent trees and light the walkway, which were programmed to come on at dusk and turn off automatically at dawn.
The new plantings are native species including River Birch, Swamp Hibiscus, Blue Flag Iris, and Common Rush, that are adapted to growing in wet soils. The permeable paver driveway will reduce runoff by storing rain in gravel base while allowing it to be absorbed into the soil below. The paver surface eliminates the tracking of pea gravel into the house while allowing heels to walk on it without sinking in. The swale handles runoff from all the uphill properties and the gravel keeps it from becoming a soggy mess.
During seasonal months, snow and leaf removal are greatly eased by having a hard surface to shovel or rake. The permeable pavers used are Techo-Bloc Villagio in Shale Grey and we installed a granite Belgian block border. We replaced existing broken concrete walkway with new curving flagstone walkway and connected the front steps to the driveway and side steps. All projects were consulted with the City of Takoma Park’s Urban Forest Manager, and the Montgomery County Historical Preservation Commission.
 Pennsylvania Landscape & Nursery Association
Terren Landscapes http://www.terrenlandscapes.com
2014 PLNA Awards for Landscape Excellence Winner
Category: Residential $60,000-$120,000
Award Level: Silver
Project Description:
We were contracted by the family to create a master plan for the property. They
were experiencing extreme drainage and erosion problems due to the surrounding properties’
drastic grade changes. Erosion had caused the rear lawn to sink in various areas and the existing
rear patio spaces were failing. The client wanted to rebuild their patios and walkways, repave
their driveway and give their home more visual appeal. Most importantly, they wanted an
environmentally friendly solution.
Our design solution was to create a rain garden that would slow storm water runoff, allow
for percolation, and promote infiltration, while permitting excess clean water to enter the storm
drain at the street with slower velocity. The rain garden acts as a temporary holding space that
allows the earth to slowly absorb water, rather than overwhelm the nearby storm drain. Our first
objective was to conduct a percolation test to determine the amount of clay soil that needed to be
removed before reaching the sandy loam layer. A percolation test and storm water calculations
were generated to accommodate a 1” rain event. Based on our calculations and the small size of
the property, we determined a depth of 18” was necessary for optimal holding capacity. We
removed 18” of clay soil until a layer of sandy loam was encountered. Next, the soil was amended
with compost and sand to create a highly porous planting media for the basin of the garden. We
piped the three existing rear downspouts to the rain garden area to capture for infiltration and
alleviate runoff throughout the rear lawn and patio space. We installed an 18” wide over-flow
standpipe at a 24” depth into the ground that outlets to a stone swale that carries the water to the
property edge. As an added means of holding the maximum amount of water, we designed the
standpipe to sit 14” above grade. The height of this standpipe allows this rain garden to capture
14” of water before reaching the overflow capacity. We placed geotextile fabric to help reduce
migration of the stones into the soil and aid in the prevention of weeds and erosion. We heavily
planted the rain garden to further aid in absorption and to attract local wildlife. A native plant
palette of butterfly weed, Panicum, Joe-Pye weed, and asters form a colorful backdrop while the
basin was filled with obligate wetland plants such as royal ferns, irises and cardinal flowers. The
upper edges in the foreground are planted with Echinacea, Rudbeckia and Monarda, satisfying
the local bird community and adding bright seasonal colors. This garden effectively collects and
cleanses rainwater while creating a habitat for birds, frogs, and butterflies.
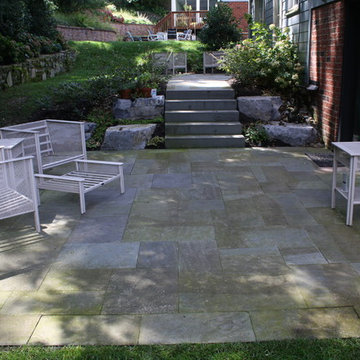
Our next challenge was to redesign the existing patios and walkways without increasing
impervious surfaces. According to township regulations this property was currently at its
maximum capacity, therefore we designed the front and rear patios with a slightly smaller
footprint to decrease their existing impervious surfaces.
New planting beds were designed throughout the entire property. Plants were chosen that
were tolerant of specific site conditions. For the rear yard, we choose a backdrop of witch hazel
and hollies to provide an evergreen screen as well as early spring color. We placed hydrangea
throughout to add summer color. We planted ostrich fern under the existing spruce tree to create
a lush floor. This area became an additional backdrop for the rain garden as well as a screen for
the neighboring property. We choose a combination of ‘Blue Star’ juniper and creeping jenny to
soften the existing rear wall with creepers. Around the rear patio areas we choose a combination
of Liatris, Rudbeckia and ‘Lo and Behold’ butterfly bush. This combination of plants works in
harmony with the rain garden and attracts additional butterflies.
For the front of the property we worked with an existing Japanese maple that provided
dense shade. We choose a shade-tolerant combination of Heuchera, Astilbe, ferns and hostas for
this area. We added more hydrangeas to the front foundation of the house to provide lush
layering of plant material and visual interest with additional summer blooms.
Overall, we were able to exceed the client’s needs and expectations in transforming their
property into a colorful paradise that attracts wildlife from season to season. The plant palette
provides seasonal interest and the rain garden has successfully decreased storm water runoff.
The new hardscape surfaces were designed and built with a slightly smaller footprint to decrease
impervious surfaces. This project is a positive example of how all properties, regardless of size,
can make an ecological difference by decreasing impervious surfaces and maintaining proper
storm water management.
Photo Credit:
Terren Landscapes
 Pennsylvania Landscape & Nursery Association
Terren Landscapes http://www.terrenlandscapes.com
2014 PLNA Awards for Landscape Excellence Winner
Category: Residential $60,000-$120,000
Award Level: Silver
Project Description:
We were contracted by the family to create a master plan for the property. They
were experiencing extreme drainage and erosion problems due to the surrounding properties’
drastic grade changes. Erosion had caused the rear lawn to sink in various areas and the existing
rear patio spaces were failing. The client wanted to rebuild their patios and walkways, repave
their driveway and give their home more visual appeal. Most importantly, they wanted an
environmentally friendly solution.
Our design solution was to create a rain garden that would slow storm water runoff, allow
for percolation, and promote infiltration, while permitting excess clean water to enter the storm
drain at the street with slower velocity. The rain garden acts as a temporary holding space that
allows the earth to slowly absorb water, rather than overwhelm the nearby storm drain. Our first
objective was to conduct a percolation test to determine the amount of clay soil that needed to be
removed before reaching the sandy loam layer. A percolation test and storm water calculations
were generated to accommodate a 1” rain event. Based on our calculations and the small size of
the property, we determined a depth of 18” was necessary for optimal holding capacity. We
removed 18” of clay soil until a layer of sandy loam was encountered. Next, the soil was amended
with compost and sand to create a highly porous planting media for the basin of the garden. We
piped the three existing rear downspouts to the rain garden area to capture for infiltration and
alleviate runoff throughout the rear lawn and patio space. We installed an 18” wide over-flow
standpipe at a 24” depth into the ground that outlets to a stone swale that carries the water to the
property edge. As an added means of holding the maximum amount of water, we designed the
standpipe to sit 14” above grade. The height of this standpipe allows this rain garden to capture
14” of water before reaching the overflow capacity. We placed geotextile fabric to help reduce
migration of the stones into the soil and aid in the prevention of weeds and erosion. We heavily
planted the rain garden to further aid in absorption and to attract local wildlife. A native plant
palette of butterfly weed, Panicum, Joe-Pye weed, and asters form a colorful backdrop while the
basin was filled with obligate wetland plants such as royal ferns, irises and cardinal flowers. The
upper edges in the foreground are planted with Echinacea, Rudbeckia and Monarda, satisfying
the local bird community and adding bright seasonal colors. This garden effectively collects and
cleanses rainwater while creating a habitat for birds, frogs, and butterflies.
Our next challenge was to redesign the existing patios and walkways without increasing
impervious surfaces. According to township regulations this property was currently at its
maximum capacity, therefore we designed the front and rear patios with a slightly smaller
footprint to decrease their existing impervious surfaces.
New planting beds were designed throughout the entire property. Plants were chosen that
were tolerant of specific site conditions. For the rear yard, we choose a backdrop of witch hazel
and hollies to provide an evergreen screen as well as early spring color. We placed hydrangea
throughout to add summer color. We planted ostrich fern under the existing spruce tree to create
a lush floor. This area became an additional backdrop for the rain garden as well as a screen for
the neighboring property. We choose a combination of ‘Blue Star’ juniper and creeping jenny to
soften the existing rear wall with creepers. Around the rear patio areas we choose a combination
of Liatris, Rudbeckia and ‘Lo and Behold’ butterfly bush. This combination of plants works in
harmony with the rain garden and attracts additional butterflies.
For the front of the property we worked with an existing Japanese maple that provided
dense shade. We choose a shade-tolerant combination of Heuchera, Astilbe, ferns and hostas for
this area. We added more hydrangeas to the front foundation of the house to provide lush
layering of plant material and visual interest with additional summer blooms.
Overall, we were able to exceed the client’s needs and expectations in transforming their
property into a colorful paradise that attracts wildlife from season to season. The plant palette
provides seasonal interest and the rain garden has successfully decreased storm water runoff.
The new hardscape surfaces were designed and built with a slightly smaller footprint to decrease
impervious surfaces. This project is a positive example of how all properties, regardless of size,
can make an ecological difference by decreasing impervious surfaces and maintaining proper
storm water management.
Photo Credit:
Terren Landscapes
 The Hall Design Group
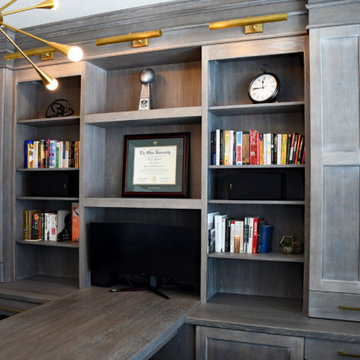
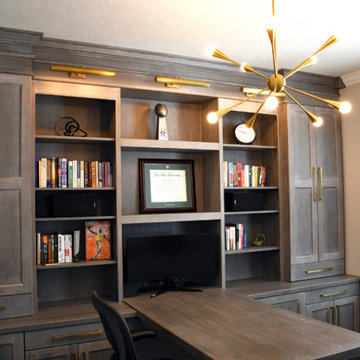
The Homeowner works from home and wanted a retreat area where he can conduct business. To allow more space into the room I designed in a built in desk. The open shelves. The open shelving allows him to display some proud items. To add a touch of class, gold lighting fixtures were used to compliment the hardware. the space also houses a pull out printer and a built in safe.
 The Hall Design Group
The Homeowner works from home and wanted a retreat area where he can conduct business. To allow more space into the room I designed in a built in desk. The open shelves. The open shelving allows him to display some proud items. To add a touch of class, gold lighting fixtures were used to compliment the hardware. the space also houses a pull out printer and a built in safe.
 HUNG HSI STONE CENTER LLC
Overview:
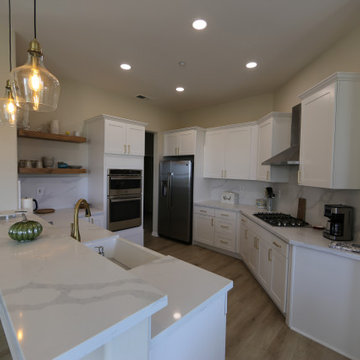
This kitchen remodel project aims to transform the existing kitchen space in Concord into a modern and functional area that meets the needs of the homeowners. The project will involve the removal of old cabinets, the installation of new cabinets, and the addition of a new countertop to enhance both the aesthetics and functionality of the kitchen.
Scope of Work:
Demolition:
Safely remove existing cabinets and countertops.
Dispose of old materials in an environmentally responsible manner.
Cabinet Installation:
Supply and install new cabinets that offer optimal storage solutions and a contemporary design.
Ensure cabinets are securely mounted and aligned properly for durability and ease of use.
Countertop Installation:
Select and install a new countertop that complements the new cabinetry and fits the style of the kitchen.
Ensure proper sealing and finishing to protect against moisture and wear.
Finishing Touches:
Install cabinet hardware (handles and knobs) to enhance functionality and style.
Conduct a thorough cleanup of the work area, ensuring the kitchen is left in pristine condition.
Timeline:
The estimated duration for the project is approximately two weeks, depending on the delivery of materials and any unforeseen circumstances.
Expected Outcome:
The completed kitchen will feature a modern design with improved storage and workspace, providing a welcoming environment for cooking and entertaining. The remodel is expected to increase the overall value of the home while enhancing the daily experience of the homeowners.
Location:
The project will take place in Brentwood, ensuring local suppliers and contractors are utilized to keep the project efficient and community-focused.
We look forward to bringing this kitchen remodel vision to life and creating a beautiful, functional space for the homeowners in Brentwood.
 Elite Construction and Remodel Corp
During our beginning stages for a standard chimney repair, we came across a bigger issue. We found poor roof flashing conducted by a roofer. Screws were used to secure roofing and flashing down around the chimney, this has damaged the home. This roof flashing system collected an excess of water and has caused dry rot down the chimney and wall next to the chimney. The chimney exterior wall needed to be cut out and replaced with new siding in all directions and replaced. We then installed new step flashing, and cricket to divert water and debris. Now, this chimney and roof, and siding are secure, safe, and will last for many more years.
11