
Search results for "Ensuring successful" in Home Design Ideas
 Interiors by Popov
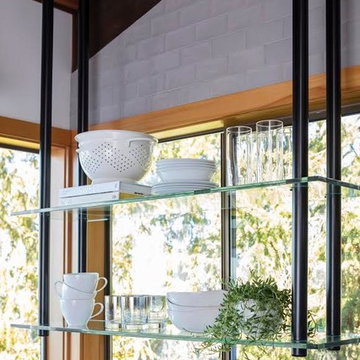
When we drove out to Mukilteo for our initial consultation, we immediately fell in love with this house. With its tall ceilings, eclectic mix of wood, glass and steel, and gorgeous view of the Puget Sound, we quickly nicknamed this project "The Mukilteo Gem". Our client, a cook and baker, did not like her existing kitchen. The main points of issue were short runs of available counter tops, lack of storage and shortage of light. So, we were called in to implement some big, bold ideas into a small footprint kitchen with big potential. We completely changed the layout of the room by creating a tall, built-in storage wall and a continuous u-shape counter top. Early in the project, we took inventory of every item our clients wanted to store in the kitchen and ensured that every spoon, gadget, or bowl would have a dedicated "home" in their new kitchen. The finishes were meticulously selected to ensure continuity throughout the house. We also played with the color scheme to achieve a bold yet natural feel.This kitchen is a prime example of how color can be used to both make a statement and project peace and balance simultaneously. While busy at work on our client's kitchen improvement, we also updated the entry and gave the homeowner a modern laundry room with triple the storage space they originally had.
End result: ecstatic clients and a very happy design team. That's what we call a big success!
John Granen.

 Talon Construction Inc.
Designing and building a kitchen addition is a complex process that involves multiple steps and considerations. Here is a general outline to help you get started on your kitchen addition project:
Define Your Goals and Budget:
• Determine the purpose of the kitchen addition. Is it for more cooking space, a dining area, or a combination of both?
• Establish a realistic budget for your project. Consider all costs, including construction, permits, materials, and furnishings.
Hire a Design Professional:
• Seek the services of a design build company who specializes in kitchen additions.
• Discuss your vision, needs, and budget with the design professional to create a design concept.
Site Evaluation:
• Assess the existing space and structural condition of your home to ensure it can support the addition.
• Consider factors like zoning regulations, setbacks, and building codes.
Design Development:
• Collaborate with your design professional to refine the concept, including the layout, size, and architectural style.
• Choose materials, finishes, and fixtures that fit your design and budget.
Obtain Permits:
• Consult with your local design build contractor to determine the necessary permits and approvals.
• Prepare and submit all required documents, including architectural drawings and engineering plans.
Create Construction Documents:
• Work with your design build professional to develop detailed construction drawings and specifications.
• These documents will serve as a guide for contractors during construction.
Hire a design build contractor:
• Check references, credentials, and licenses before selecting a contractor.
• Sign a detailed contract that outlines the scope of work, timeline, and payment schedule.
Construction Phase:
• Demolition: If needed, remove any existing structures or walls.
• Foundation: Construct the foundation for the addition.
• Framing: Build the structural framework of the addition.
• Plumbing, Electrical, and HVAC: Install or update utilities as required.
• Insulation: Ensure proper insulation for energy efficiency.
• Drywall and Finish Work: Complete the walls and ceilings.
• Flooring and Cabinetry: Install flooring and kitchen cabinets.
• Appliances and Fixtures: Add appliances, plumbing fixtures, and lighting.
• Paint and Finish: Apply paint and finishes to achieve the desired look.
• Final Inspection: Schedule inspections to ensure compliance with building codes.
Final Inspections and Approvals:
• Arrange for final inspections to ensure the addition meets all safety and code requirements.
• Obtain any necessary certificates of occupancy or compliance.
Move In and Enjoy:
• Once all inspections and approvals are received, you can move into your new kitchen addition and start enjoying it.
Remember that every kitchen addition project is unique, so adapt this outline to your specific needs and circumstances. Consulting with professionals and obtaining the required permits and inspections is crucial to a successful and safe project.
 Talon Construction Inc.
Designing and building a kitchen addition is a complex process that involves multiple steps and considerations. Here is a general outline to help you get started on your kitchen addition project:
Define Your Goals and Budget:
• Determine the purpose of the kitchen addition. Is it for more cooking space, a dining area, or a combination of both?
• Establish a realistic budget for your project. Consider all costs, including construction, permits, materials, and furnishings.
Hire a Design Professional:
• Seek the services of a design build company who specializes in kitchen additions.
• Discuss your vision, needs, and budget with the design professional to create a design concept.
Site Evaluation:
• Assess the existing space and structural condition of your home to ensure it can support the addition.
• Consider factors like zoning regulations, setbacks, and building codes.
Design Development:
• Collaborate with your design professional to refine the concept, including the layout, size, and architectural style.
• Choose materials, finishes, and fixtures that fit your design and budget.
Obtain Permits:
• Consult with your local design build contractor to determine the necessary permits and approvals.
• Prepare and submit all required documents, including architectural drawings and engineering plans.
Create Construction Documents:
• Work with your design build professional to develop detailed construction drawings and specifications.
• These documents will serve as a guide for contractors during construction.
Hire a design build contractor:
• Check references, credentials, and licenses before selecting a contractor.
• Sign a detailed contract that outlines the scope of work, timeline, and payment schedule.
Construction Phase:
• Demolition: If needed, remove any existing structures or walls.
• Foundation: Construct the foundation for the addition.
• Framing: Build the structural framework of the addition.
• Plumbing, Electrical, and HVAC: Install or update utilities as required.
• Insulation: Ensure proper insulation for energy efficiency.
• Drywall and Finish Work: Complete the walls and ceilings.
• Flooring and Cabinetry: Install flooring and kitchen cabinets.
• Appliances and Fixtures: Add appliances, plumbing fixtures, and lighting.
• Paint and Finish: Apply paint and finishes to achieve the desired look.
• Final Inspection: Schedule inspections to ensure compliance with building codes.
Final Inspections and Approvals:
• Arrange for final inspections to ensure the addition meets all safety and code requirements.
• Obtain any necessary certificates of occupancy or compliance.
Move In and Enjoy:
• Once all inspections and approvals are received, you can move into your new kitchen addition and start enjoying it.
Remember that every kitchen addition project is unique, so adapt this outline to your specific needs and circumstances. Consulting with professionals and obtaining the required permits and inspections is crucial to a successful and safe project.
Find the right local pro for your project
 Windy City Painters
## Professional Wallpaper Installation Lincoln Park Project
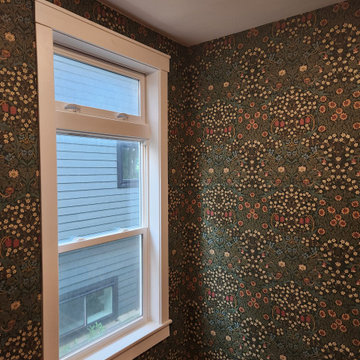
Wallpaper installation Lincoln Park requires expert techniques for this stunning greystone renovation. Lincoln Park's architectural heritage includes beautiful greystones, vintage condos, and historic buildings that demand specialized installation approaches respecting original craftsmanship.
## Materials and Products Used
We utilized premium vinyl wallpaper with fabric backing for durability. Additionally, commercial-grade adhesives from Benjamin Moore ensure long-lasting application. Furthermore, we applied specialized primers designed for vintage plaster surfaces common in Lincoln Park homes.
## Four-Step Installation Process
First, complete removal of existing wallpaper and surface preparation. Second, repair any wall imperfections and apply appropriate primer. Third, precise measurement and cutting with careful pattern matching. Finally, professional installation with seamless application and detailed finishing.
## Chicago Home Challenges
Chicago's harsh winters create expansion and contraction issues requiring flexible adhesives. Moreover, older Lincoln Park buildings often have uneven plaster walls needing extensive preparation. Additionally, potential lead paint concerns in vintage homes require certified safe work practices.
## Results and Quality Standards
Perfect pattern alignment across all seams creates seamless appearance throughout the space. Furthermore, moisture-resistant materials ensure longevity against Chicago's humidity fluctuations. The finished installation enhances the home's architectural character while providing modern durability.
## Professional Tips
Always test adhesive compatibility on small areas first. Moreover, control room temperature and humidity during installation for optimal results. Additionally, choose wallpaper appropriate for Chicago's climate conditions.
See more work and request free estimate at windypainters.com.
## Frequently Asked Questions
Q: How long does wallpaper installation Lincoln Park typically take for one room?
A: Most single rooms completed within one to two days including preparation, removal, and professional wallpaper installation Lincoln Park application.
Q: What wallpaper types work best in Chicago's climate conditions?
A: Vinyl and fabric-backed wallpapers offer superior durability against humidity and temperature changes affecting wallpaper installation Lincoln Park projects.
Q: Can you install wallpaper over existing painted walls in older homes?
A: Yes, with proper surface preparation and primer application, wallpaper installation Lincoln Park works excellently over previously painted surfaces.
Q: Do you handle complete wallpaper removal before new installation?
A: Absolutely, comprehensive wallpaper removal and surface preparation included in all wallpaper installation Lincoln Park project estimates and services.
Q: What preparation is required for vintage Lincoln Park home wallpaper installation?
A: Surface cleaning, repairs, lead paint testing if applicable, and proper primer application essential for successful wallpaper installation Lincoln Park.
Q: How do you ensure perfect pattern matching across large walls?
A: Expert measuring, cutting, and installation techniques guarantee seamless pattern alignment throughout every wallpaper installation Lincoln Park project we complete.
Q: What warranty coverage do you provide for wallpaper installation work?
A: All wallpaper installation Lincoln Park projects include comprehensive warranty coverage protecting your investment and ensuring long-lasting beautiful results.
Q: Can wallpaper installation work in Lincoln Park condos and smaller spaces?
A: Yes, we specialize in all housing types including condos, requiring precise wallpaper installation Lincoln Park techniques for optimal results.
Q: How do Chicago weather conditions affect wallpaper installation timing and materials?
A: We schedule wallpaper installation Lincoln Park during optimal conditions and recommend climate-appropriate materials for Chicago's challenging weather patterns.
Q: What makes Windy City Painters different for wallpaper installation Lincoln Park projects?
A: Local Chicago expertise, understanding of neighborhood architecture, and proven wallpaper installation Lincoln Park experience delivering exceptional quality results.
 Talon Construction Inc.
Designing and building a kitchen addition is a complex process that involves multiple steps and considerations. Here is a general outline to help you get started on your kitchen addition project:
Define Your Goals and Budget:
• Determine the purpose of the kitchen addition. Is it for more cooking space, a dining area, or a combination of both?
• Establish a realistic budget for your project. Consider all costs, including construction, permits, materials, and furnishings.
Hire a Design Professional:
• Seek the services of a design build company who specializes in kitchen additions.
• Discuss your vision, needs, and budget with the design professional to create a design concept.
Site Evaluation:
• Assess the existing space and structural condition of your home to ensure it can support the addition.
• Consider factors like zoning regulations, setbacks, and building codes.
Design Development:
• Collaborate with your design professional to refine the concept, including the layout, size, and architectural style.
• Choose materials, finishes, and fixtures that fit your design and budget.
Obtain Permits:
• Consult with your local design build contractor to determine the necessary permits and approvals.
• Prepare and submit all required documents, including architectural drawings and engineering plans.
Create Construction Documents:
• Work with your design build professional to develop detailed construction drawings and specifications.
• These documents will serve as a guide for contractors during construction.
Hire a design build contractor:
• Check references, credentials, and licenses before selecting a contractor.
• Sign a detailed contract that outlines the scope of work, timeline, and payment schedule.
Construction Phase:
• Demolition: If needed, remove any existing structures or walls.
• Foundation: Construct the foundation for the addition.
• Framing: Build the structural framework of the addition.
• Plumbing, Electrical, and HVAC: Install or update utilities as required.
• Insulation: Ensure proper insulation for energy efficiency.
• Drywall and Finish Work: Complete the walls and ceilings.
• Flooring and Cabinetry: Install flooring and kitchen cabinets.
• Appliances and Fixtures: Add appliances, plumbing fixtures, and lighting.
• Paint and Finish: Apply paint and finishes to achieve the desired look.
• Final Inspection: Schedule inspections to ensure compliance with building codes.
Final Inspections and Approvals:
• Arrange for final inspections to ensure the addition meets all safety and code requirements.
• Obtain any necessary certificates of occupancy or compliance.
Move In and Enjoy:
• Once all inspections and approvals are received, you can move into your new kitchen addition and start enjoying it.
Remember that every kitchen addition project is unique, so adapt this outline to your specific needs and circumstances. Consulting with professionals and obtaining the required permits and inspections is crucial to a successful and safe project.
 Talon Construction Inc.
Designing and building a kitchen addition is a complex process that involves multiple steps and considerations. Here is a general outline to help you get started on your kitchen addition project:
Define Your Goals and Budget:
• Determine the purpose of the kitchen addition. Is it for more cooking space, a dining area, or a combination of both?
• Establish a realistic budget for your project. Consider all costs, including construction, permits, materials, and furnishings.
Hire a Design Professional:
• Seek the services of a design build company who specializes in kitchen additions.
• Discuss your vision, needs, and budget with the design professional to create a design concept.
Site Evaluation:
• Assess the existing space and structural condition of your home to ensure it can support the addition.
• Consider factors like zoning regulations, setbacks, and building codes.
Design Development:
• Collaborate with your design professional to refine the concept, including the layout, size, and architectural style.
• Choose materials, finishes, and fixtures that fit your design and budget.
Obtain Permits:
• Consult with your local design build contractor to determine the necessary permits and approvals.
• Prepare and submit all required documents, including architectural drawings and engineering plans.
Create Construction Documents:
• Work with your design build professional to develop detailed construction drawings and specifications.
• These documents will serve as a guide for contractors during construction.
Hire a design build contractor:
• Check references, credentials, and licenses before selecting a contractor.
• Sign a detailed contract that outlines the scope of work, timeline, and payment schedule.
Construction Phase:
• Demolition: If needed, remove any existing structures or walls.
• Foundation: Construct the foundation for the addition.
• Framing: Build the structural framework of the addition.
• Plumbing, Electrical, and HVAC: Install or update utilities as required.
• Insulation: Ensure proper insulation for energy efficiency.
• Drywall and Finish Work: Complete the walls and ceilings.
• Flooring and Cabinetry: Install flooring and kitchen cabinets.
• Appliances and Fixtures: Add appliances, plumbing fixtures, and lighting.
• Paint and Finish: Apply paint and finishes to achieve the desired look.
• Final Inspection: Schedule inspections to ensure compliance with building codes.
Final Inspections and Approvals:
• Arrange for final inspections to ensure the addition meets all safety and code requirements.
• Obtain any necessary certificates of occupancy or compliance.
Move In and Enjoy:
• Once all inspections and approvals are received, you can move into your new kitchen addition and start enjoying it.
Remember that every kitchen addition project is unique, so adapt this outline to your specific needs and circumstances. Consulting with professionals and obtaining the required permits and inspections is crucial to a successful and safe project.
 Talon Construction Inc.
Designing and building a kitchen addition is a complex process that involves multiple steps and considerations. Here is a general outline to help you get started on your kitchen addition project:
Define Your Goals and Budget:
• Determine the purpose of the kitchen addition. Is it for more cooking space, a dining area, or a combination of both?
• Establish a realistic budget for your project. Consider all costs, including construction, permits, materials, and furnishings.
Hire a Design Professional:
• Seek the services of a design build company who specializes in kitchen additions.
• Discuss your vision, needs, and budget with the design professional to create a design concept.
Site Evaluation:
• Assess the existing space and structural condition of your home to ensure it can support the addition.
• Consider factors like zoning regulations, setbacks, and building codes.
Design Development:
• Collaborate with your design professional to refine the concept, including the layout, size, and architectural style.
• Choose materials, finishes, and fixtures that fit your design and budget.
Obtain Permits:
• Consult with your local design build contractor to determine the necessary permits and approvals.
• Prepare and submit all required documents, including architectural drawings and engineering plans.
Create Construction Documents:
• Work with your design build professional to develop detailed construction drawings and specifications.
• These documents will serve as a guide for contractors during construction.
Hire a design build contractor:
• Check references, credentials, and licenses before selecting a contractor.
• Sign a detailed contract that outlines the scope of work, timeline, and payment schedule.
Construction Phase:
• Demolition: If needed, remove any existing structures or walls.
• Foundation: Construct the foundation for the addition.
• Framing: Build the structural framework of the addition.
• Plumbing, Electrical, and HVAC: Install or update utilities as required.
• Insulation: Ensure proper insulation for energy efficiency.
• Drywall and Finish Work: Complete the walls and ceilings.
• Flooring and Cabinetry: Install flooring and kitchen cabinets.
• Appliances and Fixtures: Add appliances, plumbing fixtures, and lighting.
• Paint and Finish: Apply paint and finishes to achieve the desired look.
• Final Inspection: Schedule inspections to ensure compliance with building codes.
Final Inspections and Approvals:
• Arrange for final inspections to ensure the addition meets all safety and code requirements.
• Obtain any necessary certificates of occupancy or compliance.
Move In and Enjoy:
• Once all inspections and approvals are received, you can move into your new kitchen addition and start enjoying it.
Remember that every kitchen addition project is unique, so adapt this outline to your specific needs and circumstances. Consulting with professionals and obtaining the required permits and inspections is crucial to a successful and safe project.
 Talon Construction Inc.
Designing and building a kitchen addition is a complex process that involves multiple steps and considerations. Here is a general outline to help you get started on your kitchen addition project:
Define Your Goals and Budget:
• Determine the purpose of the kitchen addition. Is it for more cooking space, a dining area, or a combination of both?
• Establish a realistic budget for your project. Consider all costs, including construction, permits, materials, and furnishings.
Hire a Design Professional:
• Seek the services of a design build company who specializes in kitchen additions.
• Discuss your vision, needs, and budget with the design professional to create a design concept.
Site Evaluation:
• Assess the existing space and structural condition of your home to ensure it can support the addition.
• Consider factors like zoning regulations, setbacks, and building codes.
Design Development:
• Collaborate with your design professional to refine the concept, including the layout, size, and architectural style.
• Choose materials, finishes, and fixtures that fit your design and budget.
Obtain Permits:
• Consult with your local design build contractor to determine the necessary permits and approvals.
• Prepare and submit all required documents, including architectural drawings and engineering plans.
Create Construction Documents:
• Work with your design build professional to develop detailed construction drawings and specifications.
• These documents will serve as a guide for contractors during construction.
Hire a design build contractor:
• Check references, credentials, and licenses before selecting a contractor.
• Sign a detailed contract that outlines the scope of work, timeline, and payment schedule.
Construction Phase:
• Demolition: If needed, remove any existing structures or walls.
• Foundation: Construct the foundation for the addition.
• Framing: Build the structural framework of the addition.
• Plumbing, Electrical, and HVAC: Install or update utilities as required.
• Insulation: Ensure proper insulation for energy efficiency.
• Drywall and Finish Work: Complete the walls and ceilings.
• Flooring and Cabinetry: Install flooring and kitchen cabinets.
• Appliances and Fixtures: Add appliances, plumbing fixtures, and lighting.
• Paint and Finish: Apply paint and finishes to achieve the desired look.
• Final Inspection: Schedule inspections to ensure compliance with building codes.
Final Inspections and Approvals:
• Arrange for final inspections to ensure the addition meets all safety and code requirements.
• Obtain any necessary certificates of occupancy or compliance.
Move In and Enjoy:
• Once all inspections and approvals are received, you can move into your new kitchen addition and start enjoying it.
Remember that every kitchen addition project is unique, so adapt this outline to your specific needs and circumstances. Consulting with professionals and obtaining the required permits and inspections is crucial to a successful and safe project.
 Talon Construction Inc.
Designing and building a kitchen addition is a complex process that involves multiple steps and considerations. Here is a general outline to help you get started on your kitchen addition project:
Define Your Goals and Budget:
• Determine the purpose of the kitchen addition. Is it for more cooking space, a dining area, or a combination of both?
• Establish a realistic budget for your project. Consider all costs, including construction, permits, materials, and furnishings.
Hire a Design Professional:
• Seek the services of a design build company who specializes in kitchen additions.
• Discuss your vision, needs, and budget with the design professional to create a design concept.
Site Evaluation:
• Assess the existing space and structural condition of your home to ensure it can support the addition.
• Consider factors like zoning regulations, setbacks, and building codes.
Design Development:
• Collaborate with your design professional to refine the concept, including the layout, size, and architectural style.
• Choose materials, finishes, and fixtures that fit your design and budget.
Obtain Permits:
• Consult with your local design build contractor to determine the necessary permits and approvals.
• Prepare and submit all required documents, including architectural drawings and engineering plans.
Create Construction Documents:
• Work with your design build professional to develop detailed construction drawings and specifications.
• These documents will serve as a guide for contractors during construction.
Hire a design build contractor:
• Check references, credentials, and licenses before selecting a contractor.
• Sign a detailed contract that outlines the scope of work, timeline, and payment schedule.
Construction Phase:
• Demolition: If needed, remove any existing structures or walls.
• Foundation: Construct the foundation for the addition.
• Framing: Build the structural framework of the addition.
• Plumbing, Electrical, and HVAC: Install or update utilities as required.
• Insulation: Ensure proper insulation for energy efficiency.
• Drywall and Finish Work: Complete the walls and ceilings.
• Flooring and Cabinetry: Install flooring and kitchen cabinets.
• Appliances and Fixtures: Add appliances, plumbing fixtures, and lighting.
• Paint and Finish: Apply paint and finishes to achieve the desired look.
• Final Inspection: Schedule inspections to ensure compliance with building codes.
Final Inspections and Approvals:
• Arrange for final inspections to ensure the addition meets all safety and code requirements.
• Obtain any necessary certificates of occupancy or compliance.
Move In and Enjoy:
• Once all inspections and approvals are received, you can move into your new kitchen addition and start enjoying it.
Remember that every kitchen addition project is unique, so adapt this outline to your specific needs and circumstances. Consulting with professionals and obtaining the required permits and inspections is crucial to a successful and safe project.

 Southern Perfection Painting Inc.
Choose Low-VOC or Zero-VOC Paints
Winter often means more time spent indoors, so you want to ensure that the air quality is as good as possible. Opt for low-VOC or zero-VOC paints, which produce fewer fumes and are safer for indoor use. These paints dry quickly and don’t release strong odors, keeping your home smelling fresh.
Ensure Proper Ventilation
Even with low-VOC paints, it's essential to keep the air moving while you paint. Open windows slightly (if it’s not too cold) and use fans to circulate the air. This helps with both drying times and reducing paint fumes, making your home more comfortable while the paint is curing.
Prep Your Walls for Success
Before you start painting, take the time to prep your walls properly. Clean the surfaces, patch up any cracks or holes, and sand them smooth. Prepping the walls ensures a flawless finish and will help your paint last longer, making your investment go further.
Use the Right Paint for the Job
Pick the right type of paint for each room. Satin and semi-gloss finishes are great for kitchens and bathrooms, as they are easier to clean. For living rooms and bedrooms, consider matte or eggshell finishes for a soft, warm look. If you have kids or pets, opt for paints that are more durable and washable.
Layer Up for Comfort While You Paint
Winter temperatures can be chilly, but that shouldn’t stop you from tackling your painting project. Layer up with comfortable clothing to stay warm while you work. A well-insulated room will also help the paint dry faster, so keep your home at a comfortable temperature for both you and your paint!
Consider Hiring a Professional Painter
If you're feeling overwhelmed or simply want the best results, consider hiring a professional painting service. Experienced contractors can ensure a high-quality, long-lasting finish, saving you time and effort. Plus, they know all the tricks to get the job done quickly and efficiently—just in time for your winter gatherings!
 Hansen's Renovations
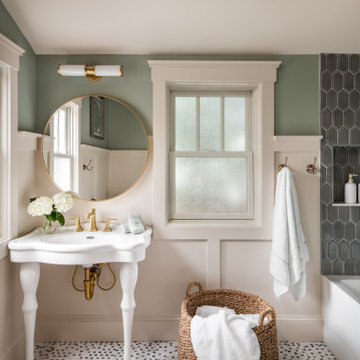
Completed in partnership with LAM Studios Inc., this Fall 2024 renovation transformed multiple areas of a Dilworth home into a cohesive, functional, and beautifully updated living environment. The project included a complete kitchen remodel, living room renovation, bathroom remodel, laundry room update, dining room renovation, fireplace enhancement, and hallway improvements.
The kitchen serves as the centerpiece of the renovation, featuring improved functionality, modern finishes, and a layout designed to support everyday living and entertaining. Adjacent living and dining spaces were thoughtfully redesigned to create a seamless flow throughout the home, while the updated fireplace provides a warm and inviting focal point.
Additional improvements to the bathroom, laundry room, and hallway enhanced both comfort and efficiency, ensuring every space contributes to the home's overall functionality and style. Through careful planning, quality craftsmanship, and timeless design choices, this renovation successfully blends modern living with lasting elegance.
The result is a beautifully refreshed home that feels brighter, more connected, and perfectly tailored to the homeowners' lifestyle.
 Cantoni Irvine
Design by Blue Heron in Partnership with Cantoni. Photos By: Stephen Morgan
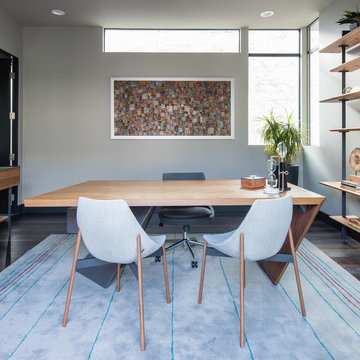
For many, Las Vegas is a destination that transports you away from reality. The same can be said of the thirty-nine modern homes built in The Bluffs Community by luxury design/build firm, Blue Heron. Perched on a hillside in Southern Highlands, The Bluffs is a private gated community overlooking the Las Vegas Valley with unparalleled views of the mountains and the Las Vegas Strip. Indoor-outdoor living concepts, sustainable designs and distinctive floorplans create a modern lifestyle that makes coming home feel like a getaway.
To give potential residents a sense for what their custom home could look like at The Bluffs, Blue Heron partnered with Cantoni to furnish a model home and create interiors that would complement the Vegas Modern™ architectural style. “We were really trying to introduce something that hadn’t been seen before in our area. Our homes are so innovative, so personal and unique that it takes truly spectacular furnishings to complete their stories as well as speak to the emotions of everyone who visits our homes,” shares Kathy May, director of interior design at Blue Heron. “Cantoni has been the perfect partner in this endeavor in that, like Blue Heron, Cantoni is innovative and pushes boundaries.”
Utilizing Cantoni’s extensive portfolio, the Blue Heron Interior Design team was able to customize nearly every piece in the home to create a thoughtful and curated look for each space. “Having access to so many high-quality and diverse furnishing lines enables us to think outside the box and create unique turnkey designs for our clients with confidence,” says Kathy May, adding that the quality and one-of-a-kind feel of the pieces are unmatched.
rom the perfectly situated sectional in the downstairs family room to the unique blue velvet dining chairs, the home breathes modern elegance. “I particularly love the master bed,” says Kathy. “We had created a concept design of what we wanted it to be and worked with one of Cantoni’s longtime partners, to bring it to life. It turned out amazing and really speaks to the character of the room.”
The combination of Cantoni’s soft contemporary touch and Blue Heron’s distinctive designs are what made this project a unified experience. “The partnership really showcases Cantoni’s capabilities to manage projects like this from presentation to execution,” shares Luca Mazzolani, vice president of sales at Cantoni. “We work directly with the client to produce custom pieces like you see in this home and ensure a seamless and successful result.”
And what a stunning result it is. There was no Las Vegas luck involved in this project, just a sureness of style and service that brought together Blue Heron and Cantoni to create one well-designed home.
To learn more about Blue Heron Design Build, visit www.blueheron.com.
 EK ARCHITECTURE, PLLC
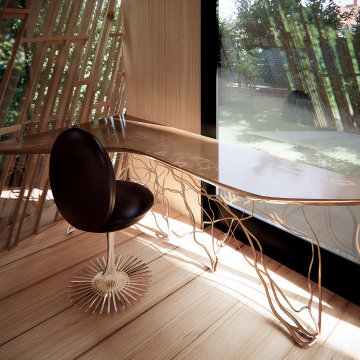
Discover our revolutionary line of customizable biophilic home-office furniture WellthyFlex. WellthyFlex is crafted from natural stone and carbon-fiber-reinforced plastic with its tree branch-inspired form. It brings the beauty of nature indoors. Each piece is thoughtfully designed to create a harmonious and soothing environment, allowing you to thrive in your work. Immerse yourself in the tranquility of your surroundings as our furniture's gentle curves and organic textures evoke a sense of calm and balance. Experience the power of biophilia as you tap into the therapeutic qualities of nature, boosting your focus, creativity, and overall well-being. Embrace the future of work with our biophilic home workplace furniture and create a sanctuary that inspires success.
Lightweight carbon-fiber-reinforced plastic, which would be algae-based in the near future, is used for table structure. With tensile strength at one-quarter the weight of steel, and lighter than aluminum, carbon-fiber-reinforced plastic legs are further optimized with generative design algorithms to use less material.
Algae-based carbon fiber:
https://www.compositesworld.com/articles/technical-university-of-munich-researchers-explore-using-algae-to-make-carbon-fiber

 the workroom
A boutique Interior Design & styling studio biased in Wanaka New Zealand specialising in personalised solutions. With mindful attention to space, style and function we craft Interiors that are reflective of you. To compliment our design philosophy, we have carefully selected a network of craft and trades people to ensure the successful outcome of your project.
 HomeClick
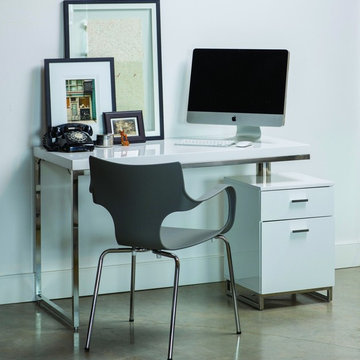
Mobital Span 47" Desk with File Cabinet in High Gloss White and Polished Stainless Steel
Never compromising quality. Mobital made sure to use the highest standard of raw materials evailable to them to ensure market success. It was at this time Mobital began aligning wit partners from around the world. Mobital's vision is to high fashion. Impeccable, and affordable modern furniture designs for people everywhere.
 Kansas City Masonry /City Of Fountains
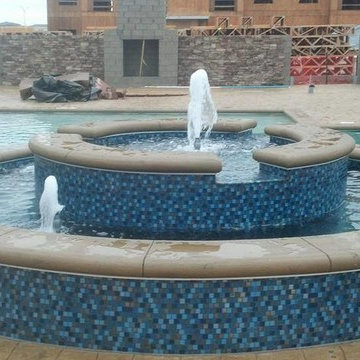
We Install Kansas City Water FeatureS,Water Walls & Waterfalls Kansas City Bubble Wall Panels
Rain Curtain Water Features landscape
Rain Curtain Waterfalls Kansas City
Bubble Wall Panels
Wall Mounted Water Walls
Acrylic Water Walls
Glass & Mirror Waterfalls
Stainless Steel Waterfalls Kansas City
Copper Water Walls
Stone & Tile Water Walls
Water Feature Displays
Bubble Tubes & Columns
Reflection Pools Kansas City
Aquariums
Water Sculptures & Art Kansas City
 HomeClick
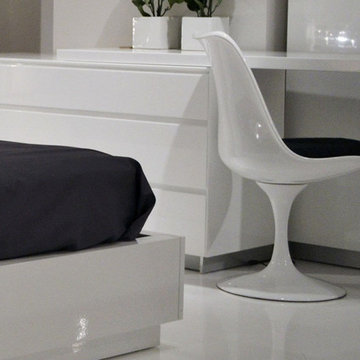
Mobital Savvy Extension Dresser in White with Aluminum Base
Never compromising quality. Mobital made sure to use the Highest standard of raw materials available to them to ensure market success. It was at this time Mobital began aligning wit partners from around the world. Mobital's vision is to High fashion. Impeccable, and affordable modern furniture designs for people everywhere.
 the workroom
A boutique Interior Design & styling studio biased in Wanaka New Zealand specialising in personalised solutions. With mindful attention to space, style and function we craft Interiors that are reflective of you. To compliment our design philosophy, we have carefully selected a network of craft and trades people to ensure the successful outcome of your project.

 The Masons Co and Dionysian Artificers Landscape
Pond, garden water features, Kansas City Fountain Design Group , the Fountain Builders in Kansas City, is an innovative firm of fountain restoration Kansas City, fountain installation Kansas City, historic fountain repair Kansas City with specific skills in fountain design, pond, garden water features Kansas City, strategic and open space planning, open space master planning, urban and environmental design and community consultation with high standards of graphic and technical outputs. We pride ourselves on the development of aquascape and hardscape design ,site responsive and implementable concept, with demonstrated technical and project skills to ensure the successful translation of innovative designs to high quality constructed works.
Large and small fountains Kansas City
Large and small water gardens Kansas City
Waterfalls and streams Kansas City
Waterwalls and architectural water features Kansas City
Architectural and Statuary Fountains Kansas City
Custom Fountains, Rock Fountains Kansas City
Pool installation & management Kansas City
Lake Management Kansas City
Sprayring and jet manifolds Kansas City
Reflecting Pools Kansas City
Fountain LED Lights Kansas City
Floating fountains Kansas City
Lake Fountains Kansas City
 Patagonia Development, LLC
PROJECT SCOPE & OBJECTIVES
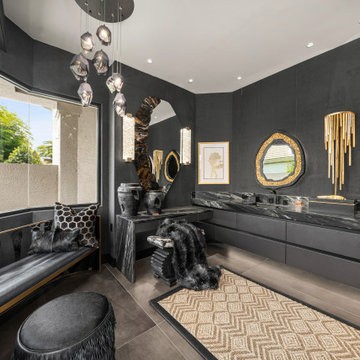
The homeowners are avid admirers of the Versace lifestyle and aesthetic and challenged our team to create a highly personalized primary suite that embodied the drama, sophistication, glamour, and artistic expression associated with the iconic fashion house. The objective was not simply to renovate an aging bathroom, but to completely reimagine the entire primary suite experience—including both the bathroom and adjoining walk-in closet—as a luxury wellness and dressing retreat.
The existing bathroom and closet featured traditional finishes, compartmentalized spaces, builder-grade storage solutions, and a dated design vocabulary that no longer reflected the homeowners’ tastes or lifestyle. The scope of work included a complete demolition and redesign of the primary bathroom and custom walk-in closet, encompassing all finishes, cabinetry, plumbing fixtures, lighting, architectural details, decorative elements, custom storage systems, and specialty millwork.
The design intent centered on creating a bold, immersive environment utilizing dramatic monochromatic tones, custom fabricated elements, statement lighting, oversized stone applications, curated artwork, and a sophisticated interplay of texture and materiality. Every component was carefully selected to contribute to a cohesive luxury experience where the bathroom and closet function as a unified extension of one another.
The resulting design transformed a conventional primary suite into a highly customized sanctuary that reflects the owners’ passion for fashion, art, luxury, and contemporary design.
PROJECT CHALLENGES
One of the primary challenges was translating the essence of the Versace brand into a residential environment without creating a literal or themed interpretation. The goal was to capture the emotion, elegance, and drama associated with high fashion while ensuring the spaces remained timeless, refined, and highly functional.
Another significant challenge involved balancing a predominantly dark color palette throughout both the bathroom and dressing room environments. Dark materials can easily feel heavy or oppressive if not carefully executed. Particular attention had to be given to lighting design, material selection, visual layering, and texture to ensure the spaces remained inviting while maintaining their dramatic character.
The walk-in closet presented its own unique design challenge. The owners desired a dressing room that would function as an extension of the luxury bathroom experience rather than a separate utilitarian storage area. The challenge was to transform a standard builder-grade closet into a sophisticated fashion-inspired environment capable of displaying clothing, handbags, accessories, and collectibles in a manner consistent with the overall design vision.
Additionally, the project required the successful integration of numerous statement elements—including oversized stone surfaces, custom lighting installations, decorative mirrors, artwork, architectural wall treatments, bespoke cabinetry, and specialty storage systems—while maintaining visual harmony and preventing the space from feeling overly busy or cluttered.
PROJECT SOLUTIONS
To achieve the desired aesthetic, our team developed a comprehensive design strategy centered around contrast, texture, craftsmanship, and visual drama. A sophisticated palette of charcoal, black, graphite, and metallic gold tones was employed throughout the suite, creating an atmosphere reminiscent of luxury hospitality environments and haute couture fashion houses.
The focal point of the bathroom became the sculptural freestanding soaking tub positioned on a custom stone platform with LED lighting and framed by an oversized feature wall clad in dramatically veined stone. This installation establishes an immediate sense of luxury and serves as the visual anchor of the entire suite.
The walk-in closet was reimagined as a boutique-inspired dressing room featuring custom-designed black oak cabinetry, integrated LED lighting, specialty display shelving, illuminated storage niches, custom accessory organization, and a central dressing vanity. The design intentionally blurs the line between residential closet and luxury retail environment, allowing fashion, accessories, and personal collections to become part of the overall design composition.
To offset the darker finishes throughout both spaces, layered lighting was incorporated using recessed illumination, integrated LED accents, decorative fixtures, display lighting, and reflective surfaces. These elements create depth and dimension while highlighting the richness of the materials and craftsmanship.
Custom fabricated cabinetry, oversized stone surfaces, designer mirrors, curated artwork, architectural wall treatments, and carefully selected decorative elements were utilized throughout the suite to create a fully immersive environment where every detail contributes to a unified design narrative.
The completed project successfully transformed a dated primary suite into an extraordinary luxury retreat that merges the worlds of fashion, hospitality, wellness, and residential design. The result is a highly personalized environment that reflects the homeowners’ lifestyle while demonstrating exceptional craftsmanship, innovative design thinking, and meticulous execution.
10