
Search results for "Essential tips" in Home Design Ideas



 HiveMind
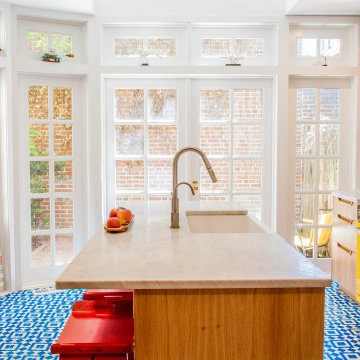
Inspiration for an eclectic galley cement tile floor and blue floor kitchen remodel in Philadelphia with a farmhouse sink, beige cabinets, white backsplash, colored appliances and white countertops
Find the right local pro for your project


 Camden Grace LLC
The Wharton House is located in Berwyn, PA about 20 miles outside of Philadelphia. The surrounding neighborhood is diverse, with historical stone homes of modest size built by farmers when they cleared land, and grander Victorians built by robber barons. The dining room opens to the home’s foyer and living room, all with tall ceilings and substantial millwork, making it feel slightly formal. We connected the dining room to the living room and entry color palettes by going a little lighter and brighter. A long dining table was essential because our client’s extended family surrounds her on neighboring streets. The chair shape was an ode to the "farmhouse" but we wanted it to look more elevated so we used a pop of blue and leather seats. A standout wallpaper was a must, beautifully tying all the hues and textures together.
 Save home
For the best effect when looking for fabrics to furnish your house, it is best to use fabrics that have varying textures. This is the only way to avoid getting a flat and bland look. When furnishing, consider collecting different types of fabrics and then mixing them until you get a result you find appealing. Do not be afraid of trying out as many fabrics as possible. Remember it is only through carrying out trials that you will be able to identify the right color schemes as well as find what works best for your items or house. Voyage Maison share some tips to make the most of your soft furnishing.
When Choosing Fabrics, Consider Where You Want Them To Go
When selecting a fabric scheme, consider where you want the fabrics to go. If you look at the back of most fabrics, you will find that most manufacturers usually indicate the most suitable area where they should be placed such as on upholstery or for windows. You will also find that most fabrics usually come with labelled with their composition and rubs. Understanding the rubs on a fabric will help you know more about the durability of the material as well as the most suitable areas of use. The number of rubs on a fabric are typically found on little icons on the material or they can be indicated in the form of a number after a Martindale test has been carried out by the manufacturer. The number of rubs is the best way to know how to purpose a fabric. For example: • Fabrics with less than 10,000 rubs are most ideal for decorative uses • Fabrics with between 10,000-15,000 rubs are ideal for light domestic uses • Fabrics with between 15,000-25,000 rubs are ideal for general domestic uses • Fabrics with between 25,000-30,000 rubs are ideal for heavy duty uses When Choosing Fabrics For Furnishing, Consider Their Practicality and Maintenance Needs
It is best that you select your fabrics based on your existing needs while at the same time looking at the care that will be required to keep the material in prime condition. For example, if you have pets and kids, you should go for fabrics that can easily be wiped or cleaned. Most of the fabrics in the market today can be easily cleaned but you should ensure that you specify to your retailer that you need a material that is easy to clean when making a purchase. On finding your fabric of choice, you can also acquire Scotchgard – A strong fabric cover that repels most spills making cleaning of fabrics easier.
When selecting fabrics, you should also consider the orientation of the room where they will be used. This will help you pick the right material of fabric as well as select the right fabric color. For example, if your room has a southern orientation, light will be filtering into the room in such a way that it will not be prudent to use fabrics made of silk material for your cushions and windows.
Tips On How To Accentuate The Appeal Of a Room By Adding Throws & Cushions
In the market, you will find cushions and throws in all shapes, sizes and colors. These fittings can essentially be said to be the cherry on top of the cake when it comes to accentuating the décor in a room. After planning out the furnishings for the rest of the room, cushions and throws can help you brighten up a room and further, they can help you transform it entirely. For example, you can change the look of a room from formal to informal just by selecting the right cushions. You can also transform the look of a room to suit the season at hand, say from summer to winter by simply changing cushions and playing around with the fabric covers. You can also achieve different effects by changing the sizes of cushions and throws in a room. Changing cushions and fabrics to suit different occasions, moods or seasons is a great way to achieve your desired look without breaking the bank.
When selecting a fabric scheme, consider where you want the fabrics to go. If you look at the back of most fabrics, you will find that most manufacturers usually indicate the most suitable area where they should be placed such as on upholstery or for windows. You will also find that most fabrics usually come with labelled with their composition and rubs. Understanding the rubs on a fabric will help you know more about the durability of the material as well as the most suitable areas of use. The number of rubs on a fabric are typically found on little icons on the material or they can be indicated in the form of a number after a Martindale test has been carried out by the manufacturer. The number of rubs is the best way to know how to purpose a fabric. For example: • Fabrics with less than 10,000 rubs are most ideal for decorative uses • Fabrics with between 10,000-15,000 rubs are ideal for light domestic uses • Fabrics with between 15,000-25,000 rubs are ideal for general domestic uses • Fabrics with between 25,000-30,000 rubs are ideal for heavy duty uses When Choosing Fabrics For Furnishing, Consider Their Practicality and Maintenance Needs
It is best that you select your fabrics based on your existing needs while at the same time looking at the care that will be required to keep the material in prime condition. For example, if you have pets and kids, you should go for fabrics that can easily be wiped or cleaned. Most of the fabrics in the market today can be easily cleaned but you should ensure that you specify to your retailer that you need a material that is easy to clean when making a purchase. On finding your fabric of choice, you can also acquire Scotchgard – A strong fabric cover that repels most spills making cleaning of fabrics easier.
When selecting fabrics, you should also consider the orientation of the room where they will be used. This will help you pick the right material of fabric as well as select the right fabric color. For example, if your room has a southern orientation, light will be filtering into the room in such a way that it will not be prudent to use fabrics made of silk material for your cushions and windows.
Tips On How To Accentuate The Appeal Of a Room By Adding Throws & Cushions
In the market, you will find cushions and throws in all shapes, sizes and colors. These fittings can essentially be said to be the cherry on top of the cake when it comes to accentuating the décor in a room. After planning out the furnishings for the rest of the room, cushions and throws can help you brighten up a room and further, they can help you transform it entirely. For example, you can change the look of a room from formal to informal just by selecting the right cushions. You can also transform the look of a room to suit the season at hand, say from summer to winter by simply changing cushions and playing around with the fabric covers. You can also achieve different effects by changing the sizes of cushions and throws in a room. Changing cushions and fabrics to suit different occasions, moods or seasons is a great way to achieve your desired look without breaking the bank.

 Home service
Your kitchen is more than just a cooking space; it's the heart of your home—a place for family gatherings, shared meals, and unforgettable memories. If you're here, chances are you're dreaming of a kitchen upgrade that better serves your needs while enhancing its beauty and functionality. Whether you're aiming for a sleek modern design, a functional workspace, or a charming rustic vibe, finding the right kitchen remodel services is key to turning that dream into reality.
This guide will walk you through everything you need to know about choosing the best kitchen remodel near me. From understanding your specific needs to identifying reliable services, we've got you covered.
Understanding Your Unique Kitchen Remodeling Needs
Before hiring a kitchen remodel service, it’s essential to pinpoint why you're looking to remodel in the first place. Knowing your priorities will help you make informed decisions and ensure you choose a service that aligns with your vision.
1. Functionality Upgrades
Is your kitchen outdated or inefficient? Maybe you're dealing with limited countertop space or outdated appliances that make cooking a hassle. A remodel can help optimize the layout and incorporate modern solutions, such as smart appliances or ergonomic cabinets.
2. Aesthetic Enhancements
Perhaps you’re looking to give your kitchen a fresh, stylish look that reflects your personality. Whether it’s a chic industrial design or a cozy farmhouse style, professional remodelers can help bring your aesthetic dreams to life.
3. Improved Home Value
A beautifully renovated kitchen is one of the top features potential buyers look for. According to real estate experts, a well-designed kitchen remodel can deliver up to a 70%-80% return on investment.
4. Lifestyle Changes
Has your family grown? Do you cook at home more often now? Your kitchen should adapt to these shifts, accommodating more people or making meal prep seamless.
Clearly outlining your specific goals will make it easier to choose home remodeling contractor professionals who can meet (and exceed) your expectations.
Researching for the Best Kitchen Remodel Services Near Me
Once you’ve defined your needs, the next step is to start researching. But how do you pinpoint the best kitchen remodelers in your area? Here are actionable tips:
1. Read Reviews and Testimonials
Start by checking online reviews on platforms like Google, Yelp, and Houzz. Look for consistently positive feedback, with special attention paid to customer comments about quality, communication, and timelines.
2. Check Portfolios
A picture is worth a thousand words—and reading about a remodeling company’s success isn’t enough. Browse their portfolio to ensure the quality of their work aligns with what you’re envisioning.
3. Ask for Recommendations
Word of mouth is still one of the best ways to find trustworthy services. Ask friends, family, or coworkers if they’ve worked with a remodeling service they’d recommend.
4. Look for Professional Credentials
Make sure the companies you’re vetting hold all required licenses, certifications, and insurance. It’s a sign of their professionalism and ensures accountability.
5. Conduct Interviews
Consider meeting with a few top contenders. Ask about their experience, approach to projects similar to yours, and estimated costs. Don’t shy away from asking detailed questions—it’s important to feel confident in your choice.
By thoroughly researching, you'll narrow down your options and find a remodeler who matches your vision, budget, and style.
Key Factors to Consider Before Hiring
Deciding on the right kitchen remodel near me is about more than just skills. Here are some critical factors to weigh before signing any contracts.
1. Set a Clear Budget
It’s important to have a realistic budget in mind before you begin. A reliable remodeler will respect your financial boundaries and offer solutions that maximize your investment without overspending.
2. Outline Your Timeline
Discussing deadlines ensures the project starts and finishes on time. Make sure the remodeler can meet your schedule without compromising quality.
3. Communication is Key
Clear communication is essential. You want experts who listen carefully to your needs, explain their process, and keep you updated throughout the project.
4. Warranties and Guarantees
Always ask if the service provides warranties for craftsmanship and materials. It’s a sign they stand by the quality of their work.
Why RightWay Home Builders is the Solution to Your Kitchen Remodeling Needs
Looking for trusted experts who deliver stunning, functional kitchens? Meet RightWay Home Builders, a leading name in local remodeling services. Here's why they're a standout choice for your kitchen remodel project.
1. Proven Expertise: With over 10 years of experience in the industry, their portfolio boasts beautifully transformed kitchens that reflect each client’s unique style.
2. Customer-Centric Approach: RightWay prioritizes the client experience. From the initial consultation to the project's completion, their team ensures you’re heard every step of the way.
3. Comprehensive Services: From initial designs to installation, RightWay Home Builders handles every stage of remodeling with precision and care.
Their happy customers say it all. “RightWay took my outdated kitchen and turned it into something from a magazine. Their attention to detail was amazing, and they were a pleasure to work with!” - Sarah M.
Why Visit RightWayHomeBuilders.com?
Booking your dream remodel has never been simpler. RightWay’s website offers a streamlined process where you can request a consultation, view portfolios, and even access exclusive home remodeling tips. Don’t wait! Visit https://www.rightwayhomebuilders.com to kick-start your remodeling adventure.
FAQs About Kitchen Remodeling
1. How much does a kitchen remodel cost?
The cost depends on the size of your kitchen and the scope of the project, but the average remodel.
2. How long does the remodeling process take?
Most remodeling projects take 6 to 12 weeks, depending on the complexity.
3. Will a kitchen remodel increase my home’s value?
Absolutely! A well-done remodel can boost your home value significantly and make it more appealing to buyers.
4. Can I stay home during the remodel?
While it’s possible, the noise and dust might be inconvenient. Many clients prefer staying elsewhere temporarily.
Conclusion
Your dream kitchen is closer than you think. Whether you're upgrading for better functionality, fresh aesthetics, or added value, investing in the right kitchen remodel service will ensure your vision comes to life.
Explore your options, do your research, and don’t hesitate to reach out to trusted experts like RightWay Home Builders. Begin the first step today—schedule your consultation at RightWayHomeBuilders.com and take the leap toward the ultimate kitchen transformation.

Sponsored
Sunbury, OH

J.Holderby - Renovations
Franklin County's Leading General Contractors - 2X Best of Houzz!

 Armor Poxy
Epoxy flooring has emerged as a popular choice for both residential and commercial spaces, offering durability, versatility, and aesthetic appeal. However, achieving the desired results with epoxy flooring requires careful planning, precise execution, and diligent maintenance. In this comprehensive guide, we’ll delve into the dos and don’ts of epoxy flooring to ensure a successful installation and long-term maintenance plan.
Mastering the dos and don’ts of epoxy flooring installation and maintenance is essential for achieving beautiful, long-lasting results. By following these guidelines and best practices, you can ensure a successful epoxy flooring project that enhances the aesthetics, durability, and value of your space for years to come.


 Windy City Painters
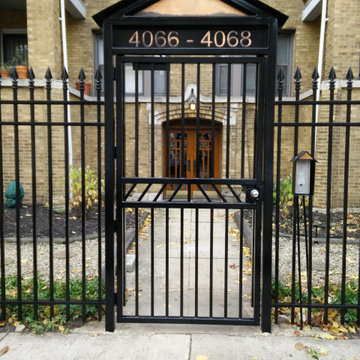
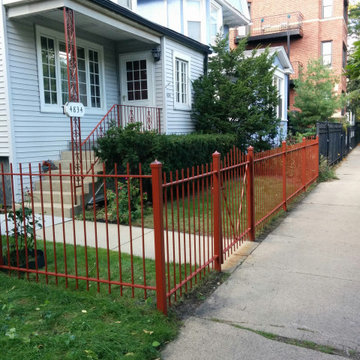
s your ornamental iron fence flaking rust onto the sidewalk every time Chicago wind kicks up? That is not a cosmetic problem - it is a sign that bare metal is exposed to moisture and the corrosion cycle is accelerating. Windy City Painters restores iron fencing on Chicago greystones, two-flats, Victorian brownstones, and courtyard buildings using professional-grade rust conversion and rust-inhibitive systems designed for the Midwest climate.
PROJECT OVERVIEW
Ornamental iron fence painting in Chicago is a multi-stage restoration process, not a simple brush-and-go job. Chicago properties - particularly the dense residential streetscapes of the North Side and Near West Side - feature decorative iron fencing that ranges from simple tubular picket to elaborate spear-top and scroll designs. When paint fails on iron, rust accelerates quickly. Windy City Painters evaluates each fence for structural rust-through, surface rust, and paint adhesion before recommending a scope of work.
MATERIALS AND PRODUCTS
Rust conversion: Ospho (phosphoric acid-based) or Corroseal (latex rust converter) depending on rust severity and surface porosity. Both chemically convert iron oxide into a stable compound that primer bonds to permanently rather than simply coating over active rust.
Primer: Rust-Oleum DTM (Direct to Metal) rust-inhibitive primer or Sherwin-Williams DTM Acrylic Coating primer, both formulated to penetrate weld seams, crevices, and pitted metal surfaces where brush application is essential.
Finish coat: Sherwin-Williams DTM Acrylic in satin or semi-gloss for UV resistance, color retention, and flexibility through freeze-thaw cycles. Two finish coats applied by brush for full coverage on ornamental profiles.
THE PROCESS
Step 1 - Mechanical Preparation: Wire wheel grinding with angle grinders removes loose rust and failing paint across flat rail surfaces. Needle gun descaling reaches weld joints, picket bases, and decorative scroll details where wire wheels cannot access. Windy City Painters inspects for rust-through after mechanical prep and flags any sections needing welding before painting proceeds.
Step 2 - Rust Conversion: Ospho or Corroseal is applied by brush to all remaining rust-affected surfaces. Ospho reacts with iron oxide over 24 hours, converting it to iron phosphate. Corroseal encapsulates and converts simultaneously. Both products create a chemically stable surface that dramatically improves primer adhesion on previously rusted iron fence sections.
Step 3 - Primer Application: Rust-Oleum DTM or Sherwin-Williams DTM rust-inhibitive primer is worked into every joint, crevice, and ornamental detail by brush - never sprayed alone on open ironwork where overspray and thin coverage risk undercutting. Full wet film thickness is verified before drying. Windy City Painters does not rush cure times between coats.
Step 4 - Finish Coats: Two coats of Sherwin-Williams DTM Acrylic topcoat are applied by brush for maximum film build on vertical pickets and horizontal rails. Color is matched to original or updated per homeowner preference. Semi-gloss finish resists dirt accumulation and makes future cleaning easier between repainting cycles.
CHICAGO-SPECIFIC CHALLENGES
Chicago presents iron fence painting conditions that milder climates do not. Road salt spray from city streets migrates onto fence bases through snowplow activity and foot traffic. Freeze-thaw cycling - sometimes occurring 30 or more times per winter - expands and contracts metal faster than paint can flex if film build is inadequate. High summer humidity slows cure times and risks blushing in topcoats applied too early in the morning. Windy City Painters schedules iron fence work during appropriate temperature and humidity windows and never applies coatings when rain is forecast within 24 hours.
WHAT TO EXPECT LONG-TERM
A properly prepped and primed iron fence in Chicago should hold a quality DTM finish for 5-8 years before needing significant maintenance. Annual inspection of base welds and picket bottoms - areas where water pools - catches early rust before it requires full mechanical prep again. Touch-up painting of isolated spots extends coating life significantly.
PRO TIPS
Tip 1: Never let a painter skip straight to topcoat on a rusty fence. Active rust under paint fails within one or two seasons. Ospho or Corroseal conversion is non-negotiable on Chicago iron.
Tip 2: Inspect fence picket bases at ground level every fall. That is where water collects, salt concentrates, and rust begins its worst work. Early touch-up costs far less than full restoration.
Tip 3: Request brush application on ornamental ironwork rather than spray-only. Brush work ensures wet paint is physically worked into every joint and crevice where rust originates.
Ready to restore your iron fence? Visit windypainters.com to schedule a free estimate with Windy City Painters.
Q: What does iron fence painting cost in Chicago? A: Iron fence painting in Chicago typically runs $8-$18 per linear foot. Rust severity, fence height, ornamental detail complexity, and whether welding repairs are needed all affect the final cost for professional iron fence restoration.
Q: How do you treat rust before painting an iron fence? A: Windy City Painters uses Ospho or Corroseal rust converters after mechanical prep. These products chemically neutralize iron oxide, creating a stable surface that rust-inhibitive primer bonds to permanently rather than painting over active corrosion.
Q: What primer is best for painting a rusty iron fence in Chicago? A: Rust-Oleum DTM and Sherwin-Williams DTM rust-inhibitive primers are our go-to products for iron fence painting in Chicago. Both are formulated for direct metal application and resist the moisture and freeze-thaw stress Chicago winters produce.
Q: How long does painted iron fencing last in Chicago? A: A professionally prepped and primed iron fence in Chicago holds a quality DTM finish for 5-8 years. Annual inspection of base welds and low points, with spot touch-up as needed, extends that service life considerably.
Q: Do I need a welder before painting my iron fence? A: If rust has eaten through fence rails or pickets structurally, Windy City Painters will identify those sections during prep and recommend welding before any primer or paint is applied. Painting over structurally failed metal is a waste of money.
Q: Can I paint an iron fence myself? A: DIY iron fence painting without proper rust conversion and DTM primer systems almost always fails within two seasons in Chicago. Professional prep, product selection, and application technique are why Windy City Painters results last 5-8 years.
Q: What neighborhoods does Windy City Painters serve for iron fence work? A: Windy City Painters serves Chicago North Side and Near West Side neighborhoods, working on greystones, two-flats, Victorian brownstones, courtyard buildings, and coach houses throughout the city.


 Everlasting Pools & Landscape
Outdoor spaces should be designed around real daily use, not just aesthetics. Understanding how people gather, relax, and move through the space is essential to long-term comfort and functionality.

 Savvy Zen Organizer
When organizing your kitchens, one idea is to create a hierarchy in your kitchen cabinets, placing the most commonly used items on the bottom shelves, and stashing infrequently used supplies on the higher shelves. This way, everyday essentials are within reach and then you are more likely to enjoy the task of cooking.
Sponsored
Sunbury, OH
J.Holderby - Renovations
Franklin County's Leading General Contractors - 2X Best of Houzz!

 William Lee Architect & Associates, LLC
Example of a beach style vaulted ceiling and light wood floor home gym design in Boston
 Windy City Painters
ver look at your iron fence and wonder how rust crept up so fast? For homeowners across Chicago's North Side and Near West Side, that moment of recognition often comes too late. Windy City Painters built this project guide to help you understand exactly what a professional iron fence restoration involves, what products matter, and what Chicago's climate demands from every coat of paint applied to exposed metal.
PROJECT OVERVIEW
This iron fence restoration involved a multi-unit property featuring an ornamental iron perimeter fence typical of Chicago's greystone and courtyard building streetscape. The fence presented moderate-to-severe surface rust, multiple areas of paint delamination, and two sections with deep pitting requiring needle gun descaling before any coating could be applied. The goal was full rust remediation and a durable topcoat finish built for Chicago's demanding climate. Windy City Painters completed the project in two days with zero damage to surrounding hardscape.
MATERIALS AND PRODUCTS
Ospho Rust Converter - A phosphoric acid-based treatment that chemically transforms iron oxide into iron phosphate, halting active corrosion before primer is applied. Essential on Chicago iron exposed to decades of salt air and freeze-thaw cycling.
Corroseal Rust-Inhibitive Primer - A water-based latex primer with built-in rust inhibitors, applied over converted surfaces to seal and prepare metal for topcoating.
Sherwin-Williams DTM Acrylic Coating - Direct-to-Metal formulation delivering exceptional adhesion, flexibility, and corrosion resistance. Available in satin and semi-gloss, ideal for ornamental iron fence painting across Chicago properties.
THE PROCESS
Step 1 - Mechanical Surface Preparation: Wire wheel grinding with angle grinder attachments removed all loose rust scale, failing paint, and surface contamination. Heavily pitted sections received needle gun descaling to expose clean stable metal beneath. This step determines everything. No primer or topcoat performs correctly over compromised metal, regardless of product quality. Windy City Painters treats prep as the primary investment on every iron fence project.
Step 2 - Rust Conversion: Ospho was applied liberally to all areas showing active rust. The phosphoric acid reaction was allowed to complete fully before any priming began. On severely oxidized sections, a second Ospho application ensured complete conversion. This step is non-negotiable in Chicago where freeze-thaw cycles push moisture into every surface irregularity.
Step 3 - Priming with Corroseal: Full coverage Corroseal primer coat sealed the converted surface and established adhesion for the finish coats. Corroseal's rust-inhibitive chemistry adds a secondary barrier against moisture penetration, extending the effective life of the topcoat by years in Chicago's humid lakefront environment.
Step 4 - DTM Topcoat Application: Two coats of Sherwin-Williams DTM acrylic in satin black were applied by brush to ensure full penetration into ornamental detail. DTM's flexibility accommodates the metal expansion and contraction Chicago temperatures demand, from minus-15 winters to 95-degree July afternoons. Final coverage was uniform and true to color.
CHICAGO-SPECIFIC CHALLENGES
Chicago iron faces challenges most other markets do not. Lake Michigan humidity accelerates surface oxidation year-round. Road salt from winter de-icing migrates to fence bases and lower rails. Freeze-thaw cycling cracks poorly adhered coatings within a single winter. Greystones, two-flats, and Victorian brownstones often feature original ornamental ironwork with decades of layered paint that must be assessed before any new coating is added. Windy City Painters factors all of these conditions into every iron fence estimate and material selection.
WHAT TO EXPECT LONG-TERM
A properly prepared and coated iron fence using the Ospho, Corroseal, and Sherwin-Williams DTM system should deliver 5-8 years of performance in Chicago conditions. Annual visual inspection for chips or scratches, followed by prompt spot priming, extends that timeline significantly. Full refinishing cycles become less frequent when the initial prep work is done correctly.
PRO TIPS
Tip 1 - Never skip the rust converter. Painting over active rust with even the best topcoat guarantees early failure. Ospho or a comparable phosphoric acid treatment must precede any primer on iron showing orange or brown oxidation.
Tip 2 - Assess for weld repairs before scheduling painting. If rust has eaten through the metal creating structural voids or broken sections, a welder must address those areas before painting begins. Windy City Painters identifies weld repair needs during the free estimate.
Tip 3 - Choose satin or semi-gloss finish on iron. Flat finishes on metal hold moisture and show wear faster. Satin DTM provides enough sheen to shed water while maintaining the traditional look Chicago ornamental iron demands.
Ready to restore your iron fence the right way? Visit windypainters.com to schedule your free estimate with Windy City Painters.
FAQ
Q: What does iron fence painting cost in Chicago?
A: Most residential iron fence projects range from $500 to $1,800 depending on linear footage, rust severity, and prep requirements. Windy City Painters provides free detailed on-site estimates for accurate iron fence painting cost in Chicago.
Q: How do I know if my fence needs rust conversion or just repainting?
A: Any visible orange or brown rust requires chemical conversion before priming. Windy City Painters evaluates every fence during the estimate to determine whether Ospho, mechanical prep, or weld repair is needed before coating begins.
Q: Can you paint iron in cold Chicago weather?
A: DTM coatings have lower application temperature thresholds than standard exterior paint, but we avoid application below 35 degrees Fahrenheit. Windy City Painters schedules iron fence projects for appropriate weather windows throughout the season.
Q: How long does iron fence paint last in Chicago?
A: With complete rust conversion, Corroseal priming, and Sherwin-Williams DTM topcoat, iron fence painting in Chicago lasts 5-8 years. Annual inspections and prompt touch-ups of chips extend that timeline further.
Q: Do I need a welder before an iron fence can be painted?
A: Only if rust has created structural voids or breaks in the metal. Windy City Painters assesses this during the free estimate and can coordinate with welders when needed before our painting crew begins.
Q: What is the difference between Ospho and Corroseal?
A: Ospho is a rust converter applied directly to active rust to chemically neutralize it. Corroseal is a rust-inhibitive primer applied over converted or clean metal. Windy City Painters often uses both in sequence for maximum protection on Chicago iron.
Q: How often should Chicago iron fences be inspected?
A: Annual inspection is recommended, ideally in early spring after winter salt and freeze-thaw exposure. Catching small chips and bare spots early allows simple touch-up rather than full iron fence repainting, saving significant cost.

 Tensegrity Homes
Example of a large tuscan backyard stone patio design in Los Angeles with a fireplace and a roof extension



 Five Star Tree Care
Winter has arrived and this means many months of snow and ice are ahead. When trees shed their leaves and go dormant for the winter, this is like how bears hibernate; they are both sleeping through the cold and waiting until the warm spring weather comes back. But unlike hibernating bears, who are safe and snuggled up in a warm cave somewhere, trees are left to withstand the harsh, cold elements throughout the entire winter. This means that they are more impacted than you might believe.
It is easier for mature trees to be able to handle the long winter months due to their extensive root system and thick bark. But saplings and other newly planted trees are not yet fully equipped with these natural defenses to handle the cold. No matter if you have new or older trees, following our tips will help them prosper during the cold Canadian winter ahead. Our team at Five Star Tree Services has come up with some winter maintenance essentials for your trees that will give them an extra hand over the winter.
One Last Water
Getting one last good watering in before the ground freezes is helpful to newly planted and young trees. Always make sure to water your tree slowly and gently. This allows the water to seep down into the root system as opposed to it running off the top and freezing.
Apply Mulch
When you use mulch, it acts like a barrier between the tree roots and the cold snow, it helps to insulate it. When you are applying mulch, make sure you spread it around the base of the tree so that it is no more than 3 inches deep. You also need to make sure to spread the mulch all the way to the drip line surrounding the tree. Make sure to not exceed 3 inches around your entire tree and keep the mulch away from the trunk of the tree.
Wrap Tree Trunks
There is a condition called sunscalding that can occur during the winter months. This happens when there is a temperature change that happens quickly. You might notice it when the sun warms the trees, which thaws the bark but during the night, when it gets cold again, it causes the melted water in the bark to rupture, causing cracks in the tree’s trunk. Young trees are especially susceptible to this happening. To help stop this from happening, it is best to wrap your trees with tree wraps or a plastic guard. It is advisable to wrap the trunk from the ground up and stop just below the first branch.
Shelter Your Trees
Young or newly planted trees are fairly defenseless for the first handful of years. Older and more mature trees have had time to develop a strong root system and hardy bark that help to protect them against things like animals and the freezing cold. If you want to help your little sapling along this winter, you can build a shelter that can handle having snow piled on it. You can also periodically use a broom to brush off the snow that accumulates on a tree’s branches. But try to avoid breaking off any ice that has formed on the branches, as this can actually end up hurting the tree if you accidentally break one of its branches instead.
Keep Road Salt Away
It’s no big secret that the use of road salt is detrimental to trees. When it gets on them, the end result come springtime is a dead tree, or at least, a severely damaged one. As much as you can, protect your trees and limit their exposure to salt over the winter.
Protect Your Trees
Winter is not only limiting for trees, but for a lot of other animals as well. This includes rabbits, mice, moles, squirrels, and other furry little creatures, who like to use trees as a food source during the summer months. During the winter, this food is now cut off when the trees go dormant. This only leaves the tree’s bark as an alternative food source for these critters. They seem to especially like young tree bark to chew on over the winter. In order to stop this from happening, you need to protect the bark with things like a fence surrounding your tree, wrapping the trunk with a plastic guard or hardware cloth.
Winter Pruning
The best time to prune any tree is during the winter months when the tree is dormant. Pruning allows you to rid the tree of any excess branches and control disease. Winter pruning is highly beneficial and lets your tree improve branch development in the spring.
Don’t Use
Always make sure to avoid products that are known to hurt trees, especially ones containing sodium chloride. Products like that cause negative reactions in trees or any plants, as it hinders their water intake. Instead, look for products that have potassium, calcium, and magnesium chloride.
How Five Star Tree Services Can Help
For newly planted and young trees, it is especially important to help them through the winter as best you can. We here at Five Star Tree Services are here to help you get your trees through the winter. If you require Toronto Tree Care, make sure to give us a call at (416) 990-3355.
 Jane Vorbrodt
Photo: Jane Vorbrodt © 2015 Houzz
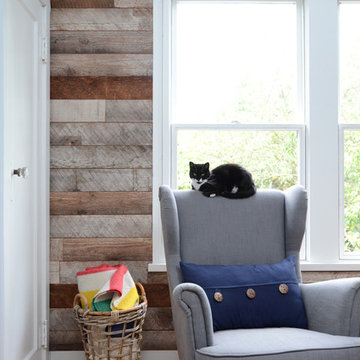
Inspiration for a victorian home office remodel in Vancouver
Inspiration for a victorian home office remodel in Vancouver

 9design Architects
4 Design Tips for Creating a Luxury Home:
As professionals and business leaders, creating a luxurious and comfortable home is essential for unwinding and enjoying the fruits of your hard work. Here are some expert design tips to elevate your living space:
1. Embrace Timeless Elegance
Opt for classic, timeless pieces that never go out of style. High-quality materials like marble, granite, and solid wood not only look luxurious but also stand the test of time.
2. Focus on Comfort and Functionality
Luxury is not just about aesthetics; it's also about comfort and functionality. Invest in plush, comfortable furniture and consider the flow and usability of each space.
3. Use a Neutral Palette with Bold Accents
A neutral color palette exudes sophistication. Add bold accents through artwork, cushions, or rugs to inject personality and style.
4. Pay Attention to Lighting
Good lighting is crucial in luxury interiors. Combine ambient, task, and accent lighting to create a warm, inviting glow.
Integrate Technology Discreetly
Incorporate smart home technology in a way that enhances convenience without compromising on aesthetics. Hidden tech solutions ensure a sleek, uncluttered look.
By following these tips, you can create a luxurious haven that not only impresses but also provides a sanctuary for relaxation and rejuvenation.
We would be delighted to assist you in bringing your future luxury projects to life, ensuring every detail is crafted to perfection.
Roy Boustani
www.9designarchitects.com
10