
Search results for "Excessive levels" in Home Design Ideas



 Mom's Design Build
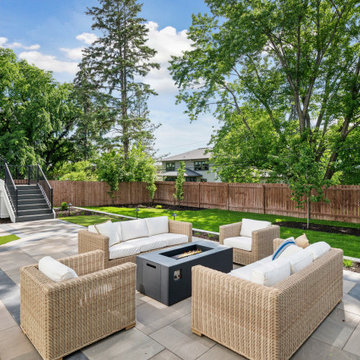
This project transformed a basic builder-grade deck and unlandscaped yard into a beautifully designed outdoor living space. The renovation included elevating the architectural finish of the deck with low-maintenance fascia, trim, and wrapped columns as well as the addition of a pergola for shade and style. A new fireplace was added to create a cozy seating arrangement, adding both privacy and visual interest.
The landscaping was enhanced with a patio and a gas fire pit seating area, perfect for relaxation and gatherings. Additionally, a dining area was incorporated to facilitate hosting and entertaining. To address the yard’s excessive slope, a retaining wall was constructed, leveling the terrain and providing a more functional and aesthetically pleasing outdoor space.
 Mom's Design Build
This project transformed a basic builder-grade deck and unlandscaped yard into a beautifully designed outdoor living space. The renovation included elevating the architectural finish of the deck with low-maintenance fascia, trim, and wrapped columns as well as the addition of a pergola for shade and style. A new fireplace was added to create a cozy seating arrangement, adding both privacy and visual interest.
The landscaping was enhanced with a patio and a gas fire pit seating area, perfect for relaxation and gatherings. Additionally, a dining area was incorporated to facilitate hosting and entertaining. To address the yard’s excessive slope, a retaining wall was constructed, leveling the terrain and providing a more functional and aesthetically pleasing outdoor space.
Find the right local pro for your project
 Visbeen Architects
To the manor born… or at least it will feel like it in this elegant yet easygoing French Country home designed by Visbeen Architects with a busy family who wants the best of the past and the present in mind. Drawn from both French and English traditional architecture, this two-story 5,463-square-foot home is a pleasing and timeless blend of two perennially popular styles.
Driving up the circular driveway, the home’s front façade impresses with its distinctive details, including a covered porch, iron and stone accents, a roofline with multiple peaks, large windows and its central turret capping two bay windows. The back is no less eye-catching, with a series of large central windows on all three floors overlooking the backyard, two private balconies and both a covered second-floor screen porch and an open-air main-level patio perfect for al fresco entertaining.
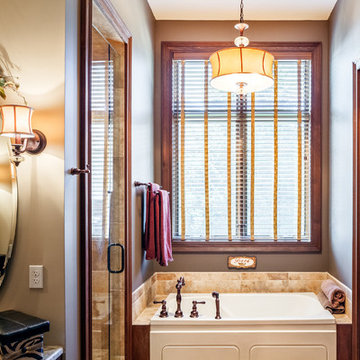
There’s magic on the inside too. The expansive 2,900-square-foot main level revolves around a welcoming two-story foyer with a grand curved staircase that leads into the rest of the luxurious yet not excessive floor plan. Highlights of the public spaces on the left include a spacious two-story light-filled living room with a wall of windows overlooking the backyard and a fireplace, an adjacent dining room perfect for entertaining with its own deck, and a open-plan kitchen with central island, convenient home management area and walk-in pantry. A nearby screened porch is the perfect place for enjoying outdoors meals bug-free. Private rooms are concentrated on the first-floor’s right side, with a secluded master suite that includes spa-like bath with his and her vanities and a large tub as well as a private balcony, large walk-in closet and secluded nearby study/office.
Upstairs, another 1,100 square feet of living space is designed with family living in mind, including two bedrooms, each with private bath and large closet, and a convenient kids study with peaked ceiling overlooking the street. The central circular staircase leads to another 1,800 square-feet in the lower level, with a large family room with kitchen /bar, a guest bedroom suite, a handy exercise area and access to a nearby covered patio.
Photographer: Brad Gillette

 John
JohnCoco coir is a versatile and sustainable growing medium that is gaining popularity among gardeners. Made from the fibrous husk of coconuts, it’s an eco-friendly alternative to peat moss and can greatly enhance the quality of your soil. In gardening, it is often utilized in systems like Coco Coir Hydroponic, where it helps create an efficient water and nutrient delivery system.
What is Coco Coir?
Coco coir is a natural fiber extracted from coconut husks. It has a neutral pH, excellent water retention, and is reusable, making it a favorite among gardeners who prefer organic and sustainable practices. It is available in different forms such as blocks, bricks, or loose coir, each requiring some preparation before use in gardening.
Benefits of Using Coco Coir in Gardening
Coco coir offers several advantages for gardening. Here are the benefits of using coco coir in gardening:
Holds up to 10 times its weight in water, ensuring plants have consistent moisture.
Promotes oxygen flow to plant roots, leading to healthier root systems.
Coco coir is a renewable and eco-friendly alternative to peat moss.
It can be washed, rehydrated, and reused, reducing waste.
Naturally pH neutral, making it suitable for various plants without major adjustments.
Enhances the texture and moisture retention of garden soil.
How to Prepare Coco Coir for Planting
Preparing coco coir for planting involves a few essential steps. First, you need to hydrate the coir block, as it typically comes in a compressed form. Place the block in a large container and add warm water, allowing the block to expand and absorb the water. Once fully expanded, the coir should be fluffed up by breaking it apart with your hands or a tool to ensure it becomes loose and airy. After the coir has been fluffed, it is important to drain any excess water, as overly wet coir can lead to root suffocation. Finally, since coco coir is inert and does not contain nutrients, it’s a good idea to add organic compost or liquid fertilizer to enrich the coir before planting.
Do You Need to Soak Coco Coir Before Planting?
Yes, soaking coco coir before planting is necessary. Since it comes in a compressed form, it needs to be broken down and hydrated for proper use. The soaking process allows the coir to expand and release the fibers, making it usable as a growing medium. After soaking, the coir should be fluffed to ensure the water is evenly distributed. Draining any excess water is crucial because overly wet coir may impede plant root health.
How to Prepare Coco Peat for Planting
Coco peat, a fine, powdery form of coco coir, is highly beneficial for seed starting and improving water retention in soil. To prepare coco peat, it first needs to be hydrated, similar to how you prepare coir blocks. Slowly add water to the peat in a container and allow it to absorb and fluff up. Once hydrated, coco peat can be used on its own or mixed with other growing media such as perlite or vermiculite for added aeration and drainage. It is advisable to check the pH level of your final mix, as coco peat generally has a neutral pH, but adjustments may be necessary depending on the plants being grown.
Can You Use Just Coco Coir for Plants?
Yes, coco coir can be used by itself to grow plants, especially in hydroponic systems or as a seed-starting medium. However, because coco coir does not naturally contain nutrients, you will need to provide regular fertilizer to support plant growth. This makes it particularly suitable for plants grown in controlled environments, such as hydroponics, where nutrient solutions can be carefully managed. In traditional soil-based gardening, mixing coco coir with other organic materials like compost is recommended to provide essential nutrients and improve the overall soil structure.
How to Use Coco Coir in Hydroponics
Coco coir is widely used in hydroponic systems due to its water retention and aeration properties. To use coco coir in hydroponics, it first needs to be soaked and hydrated, as discussed earlier. Once the coir is fully prepared, it can be placed in the hydroponic system. Since coco coir does not contain natural nutrients, you will need to supply a balanced nutrient solution tailored for hydroponic plants. Regular monitoring of water and nutrient levels is essential to prevent nutrient imbalances or root rot. One of the benefits of coco coir in hydroponics is its reusability. After completing a growing cycle, the coir can be washed, rehydrated, and used again in future plantings.
Using Coco Coir as a Soil Amendment
Coco coir is also an excellent soil amendment, as it improves the texture and moisture retention of garden soil. To use coco coir in this way, mix loose coir with your existing garden soil at a ratio of one part coco coir to two parts soil. This will help retain moisture without compacting the soil, improving both water drainage and root growth. For optimal results, you can also add organic compost to the mix, ensuring that the nutrient levels are sufficient for plant growth. Coco coir works particularly well in raised beds, where it helps maintain proper soil structure over time.
Advantages of Using Coco Coir Over Peat Moss
While peat moss has been traditionally used as a growing medium, coco coir offers several advantages over it. Coco coir is a renewable resource, as it is a byproduct of coconut processing, while peat moss is harvested from peat bogs that take centuries to regenerate. Coco coir is also more durable, as it can be reused multiple times without breaking down, while peat moss disintegrates after a single use. Another key benefit is its neutral pH, whereas peat moss is more acidic and may require balancing to meet the needs of specific plants.
Conclusion
Coco coir is a highly versatile and sustainable growing medium that benefits both novice and experienced gardeners alike. Whether you are using it for hydroponics, as a soil amendment, or as a standalone medium for growing plants, knowing how to properly prepare and use it is key to maximizing its benefits. By following the steps detailed above, you can improve water retention, aeration, and overall plant health in your garden, all while contributing to eco-friendly gardening practices.
 Mom's Design Build
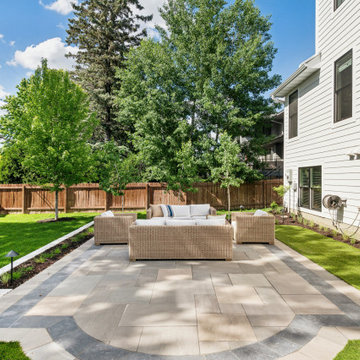
This project transformed a basic builder-grade deck and unlandscaped yard into a beautifully designed outdoor living space. The renovation included elevating the architectural finish of the deck with low-maintenance fascia, trim, and wrapped columns as well as the addition of a pergola for shade and style. A new fireplace was added to create a cozy seating arrangement, adding both privacy and visual interest.
The landscaping was enhanced with a patio and a gas fire pit seating area, perfect for relaxation and gatherings. Additionally, a dining area was incorporated to facilitate hosting and entertaining. To address the yard’s excessive slope, a retaining wall was constructed, leveling the terrain and providing a more functional and aesthetically pleasing outdoor space.
 Mom's Design Build
This project transformed a basic builder-grade deck and unlandscaped yard into a beautifully designed outdoor living space. The renovation included elevating the architectural finish of the deck with low-maintenance fascia, trim, and wrapped columns as well as the addition of a pergola for shade and style. A new fireplace was added to create a cozy seating arrangement, adding both privacy and visual interest.
The landscaping was enhanced with a patio and a gas fire pit seating area, perfect for relaxation and gatherings. Additionally, a dining area was incorporated to facilitate hosting and entertaining. To address the yard’s excessive slope, a retaining wall was constructed, leveling the terrain and providing a more functional and aesthetically pleasing outdoor space.
Sponsored
Columbus, OH

Hope Restoration & General Contracting
Columbus Design-Build, Kitchen & Bath Remodeling, Historic Renovations
 Rain Garden Nursery LandscapeMakeoverDesignStaging
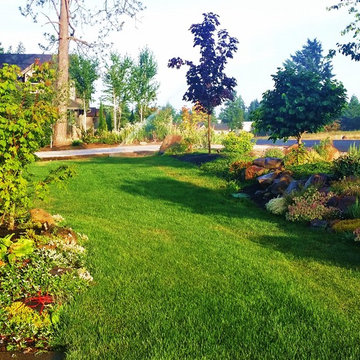
Scott & Catherine Buley, HTT&T, High Tech Turf & Trees, Rain Garden Nursery, LandscapeMakeover.biz. AFTER PHOTO, of the same area. The area of the gravel piles has been re-graded, and dropped 2+ feet. The otherwise steep bed on the right was shored up with large boulders, and rock garden plantings with trees atop it all. Drainage runs around the end of the building into expansive new seeded lawn. Ground for lawn here is leveled and drainage installed to protect home and its shrub bed from excessive drainage. All blended and transitioned from driveway, entry and banked shrub beds into a welcoming graded lawn that expands dramatically.
 Architectural Resource LLC
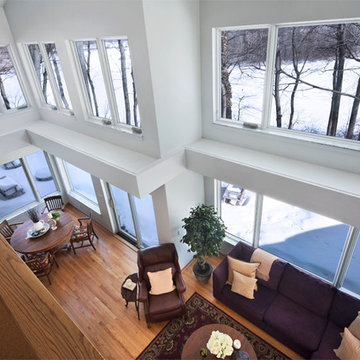
Architectural Resource is extremely excited to share with you the 'River View' house. This very special remodeling project was the first remodeling project in S.E. Michigan to achieve Emerald Certification (the highest level possible) in the National Association of Home Builder’s (NAHB) National Green Building Certification Program. This home combines smart, sustainable design; advanced construction techniques; and integrated solar panels for renewable energy capture. The result… our clients received a Credit for net excess electrical production in July of 2014, the hottest July on record to date! This state of the art remodel and addition project includes a new two-story addition, master suite and kitchen remodel, and a view of the Huron River valley that one reporter exclaimed was "the most beautiful view in Ann Arbor!"
-Beth Singer Photography

 Pennsylvania Landscape & Nursery Association
Terren Landscapes http://www.terrenlandscapes.com
Project Entry: Pembrooke Estate Rain Garden
2014 PLNA Awards for Landscape Excellence Winner
Category: Sustainable Landscape &60,000-$120,000
Award Level: Silver
Project Description:
The client contracted our company to solve multiple existing drainage problems. In a heavy rain event the existing French drain system would overflow, causing water to pool in the driveway. After investigating the system we found that the capacity of the French drain was undersized for the amount of storm water from the large rain events received in recent years. As a result of our findings and at the request of the homeowner, we designed a storm water management system to capture all storm water from the structures on the property and regenerate the underground aquifers for the volume of a 5.8” rainstorm. In addition to the new drain system, the homeowners wanted a rain garden to provide a backdrop for an existing formal garden, provide a habitat for wildlife, and provide screening from an adjacent neighbor.
Throughout the design process many challenges were presented, including an existing gas line, which ran directly through the area that best suited the bioswale. The existence of the gas line caused us to alter the shape and depth of the bioswale in some areas. We also inspected the existing downspouts to make sure there were no obstructions that would impede the system’s efficiency, and then conducted a test pit dig to make sure we had sufficient percolation rates for disposal of storm water.
To effectively capture the storm water runoff, the existing downspouts were piped from the main house and the large detached garage to a large catch basin located at the low point in the driveway. The driveway catch basin contains two outlet pipes at different elevations within the basin allowing water from smaller rain events to enter the bioswale and rain garden area to percolate into the soil before excess water overflows into a sediment trap which filters out any debris and is then piped to an underground StormTech® pit to slowly percolate into the ground. The other outlet pipe in the driveway catch basin is used for larger storm water events, taking the water directly to the StormTech® pit.
Accepting and slowing the velocity of the storm water, mitigation of erosion, and filtering out pollutants contained in the “first flush” of rainfall are the primary functions of the bioswale and rain garden. Planting these areas with mostly native plant species helps carry out these functions while attracting and providing shelter for wildlife.
The ‘Niobe’ weeping willow is the centerpiece of the rain garden, connecting with the axis of the existing formal garden. To screen the neighboring property we chose Chamaecyparis nootkatensis ‘Pendula’ for its graceful evergreen habit and tolerance of wet sites. ‘Ivory Halo’ dogwood and Panicum ‘Cloud Nine’ were used for screening as well as winter interest. To provide deciduous structure to the garden Taxodium distichum and Magnolia virginiana were used in conjunction with witch hazel. Mostly native wetland perennials were used due to their tolerance of wet conditions and occasional drought.
The area above the StormTech® pit provides space for the client’s family to relax. The rain garden and bioswale provide screening, storm water management, a habitat for wildlife, and plants that enhance the adjacent formal garden.
Photo Credit: Terren Landscapes
 LINKORI Luxury Lighting & Chandeliers
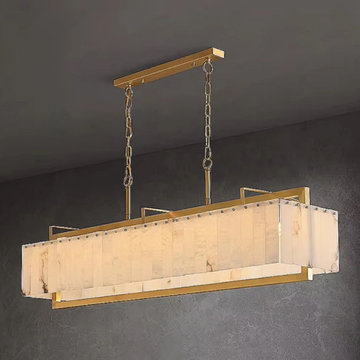
Seen against a dark textured ground, the LINKORI STELLOQ Linear makes its structure legible — the dual-chain suspension, the rectangular copper ceiling plate, and the precise alabaster paneling that wraps every face of the form.
Each alabaster tile is individually selected from natural Spanish stone, its veining continuous across the surface, diffusing light through the full length of the fixture in an even, warm wash.
The brushed gold copper frame defines the geometry with architectural clarity — four clean edges, no excess — making the Linear as considered from above as it is from eye level.
Suited to dining tables, kitchen islands, and open-plan interiors, it functions as both a light source and a structural design element.
Available in 39.4"L and 49.2"L.
Contact us for trade pricing, customization, or project consultation.

 kmjee
kmjeePepper plants are a delightful addition to any garden, offering a vibrant burst of color and spice to your culinary creations. However, even experienced gardeners can encounter challenges when growing pepper plants. In this blog, we'll explore some common issues you might face and provide practical solutions to help your pepper plants thrive.
1. Slow or Stunted Growth
Issue: Slow or stunted growth in pepper plants can be discouraging, but there are specific steps you can take to address this issue effectively.
Solution:
a. Soil Health:
- Well-Draining Soil: Ensure your pepper plants are in well-draining soil to prevent waterlogged roots, which can inhibit growth.
- Organic Matter: Incorporate plenty of organic matter, such as compost or well-rotted manure, into the soil to improve its texture and nutrient content.
- pH Level: Test the soil pH and adjust it to the ideal range between 6.0 and 6.8 using lime or sulfur as needed.
b. Fertilization:
- Balanced Fertilizer: Use a balanced, slow-release fertilizer designed for vegetables to provide essential nutrients steadily throughout the growing season.
- Compost: Amend the soil with compost to enhance nutrient availability and soil structure. This can promote healthier growth.
c. Watering:
- Consistent Moisture: Maintain consistent soil moisture levels by watering your pepper plants regularly but avoid waterlogging. Aim for 1-2 inches of water per week, adjusting based on your local climate and weather conditions.
- Mulching: Apply mulch around the base of the plants to retain soil moisture and regulate temperature.
2. Yellowing Leaves
Issue: Yellowing leaves can be a sign of various underlying problems, but addressing them promptly can restore the vibrancy of your pepper plants.
Solution:
a. Nutrient Deficiencies:
- Balanced Fertilization: Use a well-balanced fertilizer that includes micronutrients to address nutrient deficiencies.
- Specific Nutrients: If you suspect a particular deficiency, such as magnesium, iron, or nitrogen, apply the appropriate nutrient supplement following package instructions.
b. Pest and Disease Control:
- Pest Inspection: Regularly inspect the leaves and stems for common pests like aphids and mites. Remove affected leaves and treat with organic pesticides if necessary.
- Disease Management: Look out for signs of diseases like bacterial leaf spot or fungal issues. Apply organic fungicides or bactericides as recommended.
3. Blossom Drop
Issue: When pepper plants drop their blossoms prematurely, it can hinder fruit development and lead to disappointment.
Solution:
a. Temperature Control:
- Stable Temperatures: Ensure your pepper plants are exposed to consistent temperatures between 70°F and 80°F (21°C to 27°C) during flowering. Avoid sudden temperature fluctuations by providing shelter or using row covers.
b. Pollination:
- Assist with Pollination: If growing peppers indoors or in a greenhouse, help with pollination by gently shaking the plants or using a small brush to transfer pollen between flowers. Outdoor pepper plants are usually pollinated by insects.
4. Wilting Plants
Issue: Wilting or drooping pepper plants can be a sign of various problems, but proper care can revive them.
Solution:
a. Watering:
- Consistent Moisture: Adjust your watering routine to keep the soil consistently moist but not waterlogged. Water early in the day to prevent fungal issues.
- Drainage: Ensure proper soil drainage by amending the soil or using raised beds to prevent waterlogged roots.
b. Pest Control:
- Pest Inspection: Examine the undersides of leaves for signs of pests like aphids, spider mites, or whiteflies. Treat infestations promptly with biological insecticides.
5. Curling Leaves
Issue: Curling or misshapen leaves indicate stress in pepper plants, which can be caused by various factors.
Solution:
a. Environmental Stress:
- Stable Conditions: Ensure your pepper plants are in an environment with stable humidity, temperature, and adequate air circulation. Avoid sudden changes in conditions.
- Proper Ventilation: Adequate air circulation can reduce humidity and prevent fungal issues.
b. Pest and Disease Management:
- Pest Inspection: Regularly inspect your plants for pests and diseases, addressing them promptly with organic remedies as needed.
6. Sunscald
Issue: Sunscald can lead to discolored, leathery patches on pepper fruits when exposed to intense sunlight.
Solution:
a. Shade Cloth:
- Sun Protection: Shield your pepper plants from harsh sunlight during the hottest part of the day using shade cloth or by planting them where they receive some filtered sunlight.
b. Pruning:
- Fruit Shading: Prune excess foliage to allow better fruit shading, reducing the risk of sunscald. Ensure that there's a balance between foliage and fruit.
7. Pepper Plant Pests and Diseases
Issue: Aphids, mites, whiteflies, and various diseases can affect pepper plants, but you can manage them effectively.
Solution:
a. Regular Inspection:
- Vigilant Monitoring: Regularly inspect your pepper plants for signs of pests or diseases, paying close attention to the undersides of leaves and stems.
b. Organic Remedies:
- Pest Control: Use organic remedies like neem oil, insecticidal soap, or diatomaceous earth for pest control.
- Disease Management: Apply organic fungicides or bactericides as recommended to manage diseases like powdery mildew or bacterial spot.
While growing pepper plants can present various challenges, these common issues are manageable with the right knowledge and care. Regular monitoring, proper soil preparation, and timely intervention can help you enjoy a bountiful harvest of vibrant, spicy peppers. Remember that gardening is a learning experience, and each challenge you face is an opportunity to improve your skills and enjoy the rewards of homegrown peppers in your favorite dishes.
 Seven Rivers Design Build
Headwaters Park
Public Event Space.
Highlight
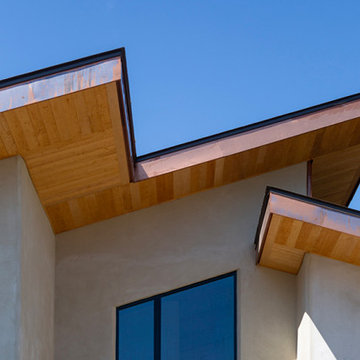
The combination of Hebel (Autoclaved Aerated Concrete) walls, an exposed structural steel roof system, and bespoke craftsmanship makes for a very interesting building. The individual spaces within the structure are striking in themselves, but we think the integration of form and function in the building as a whole makes it a unique and successful project.
Detail
This building serves as the main event and meeting space in Headwaters Park, which is just outside Lewisburg WV and is a project of the WV nonprofit Appalachian Headwaters. The main building is an 8500 sq ft single level structure with an expansive exterior flagstone patio. We designed and constructed the building, and also built the hardscape and water feature. Allegheny Design Services from Morgantown WV performed the structural engineering and we worked with Cole Burrell of Charlottesville VA for the landscaping design.
The interior of the building contains quite a few interesting features and spaces. The main event space is about 3000 sq ft, and is connected to a commercial kitchen. Custom copper light fixtures were built by Molly Must, a local artist. There are also custom wooden light fixtures in the hallways and conference room, built by local woodworker Ryan Brady. We built wooden sound dampening panels to improve acoustic quality in a few of the large rooms.
The building is heated with an in slab hydronic radiant system powered by a geothermal heat pump. In-floor radiant is one of the most comfortable ways to heat a building and when combined with a geothermal heat pump, is highly efficient. The building is also designed for passive solar heat gain in the wintertime, with large south facing windows. We added awnings on the south and west sides of the building to prevent overheating from the sun in the summer.
A 90 kW rooftop PV solar system will provide most of the electricity consumed by the building, if not all of it. We’re hoping that the project ends up being net zero or better - we’ll know after a full year of electric bills. It’s a grid tied system, so any excess electricity produced will be sent into the grid. The building is fully electric - HVAC, water heating, and the commercial kitchen are all propane/natural gas free.
For more information about Appalachian Headwaters and Headwaters Park, please visit their website at: https://appheadwaters.org

 Mom's Design Build
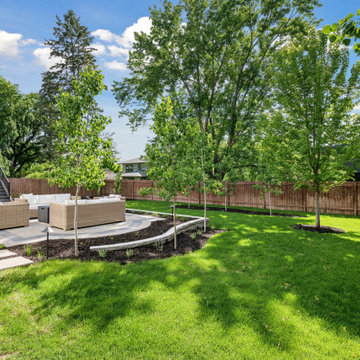
This project transformed a basic builder-grade deck and unlandscaped yard into a beautifully designed outdoor living space. The renovation included elevating the architectural finish of the deck with low-maintenance fascia, trim, and wrapped columns as well as the addition of a pergola for shade and style. A new fireplace was added to create a cozy seating arrangement, adding both privacy and visual interest.
The landscaping was enhanced with a patio and a gas fire pit seating area, perfect for relaxation and gatherings. Additionally, a dining area was incorporated to facilitate hosting and entertaining. To address the yard’s excessive slope, a retaining wall was constructed, leveling the terrain and providing a more functional and aesthetically pleasing outdoor space.
 Boss Design Ltd
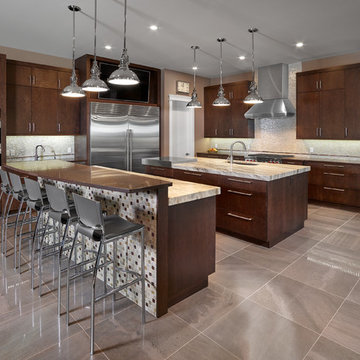
The simplicity of this kitchen can be appreciated with this home. Everything else is very grand and oversized. While this kitchen is still larger than your typical, it doesn't leave you feeling overwhelmed with excessive details. They've taken specific elements, such as the tile and pendants, and left those as the features of the eye in this kitchen. Seeing past those design elements, we see they have a gorgeous Wolf Range and built-in Miele OneTouch bean-to- cup coffee machine (which btw makes a phenomenal cup-a-joe). We see the consistency of the asymmetry in the first island raised bar top and the wall of wine that we all want to dive into. The other small detail that adds a lot to a kitchen is the double thickness of the countertop. It is always a subtle but stunning addition and I have yet to see it go "wrong" in the design element of the kitchen.
What kitchen feature is your favourite?
Would you change anything about this kitchen?
Granite: "Calera: from CimStone - mitered to 2.5" thickness

 1st Choice Heating & Air Conditioning, Inc.
Existing 2-Ton Lennox Air Conditioner
Patio - small backyard patio idea in Orange County
Patio - small backyard patio idea in Orange County
 Signature Home Services
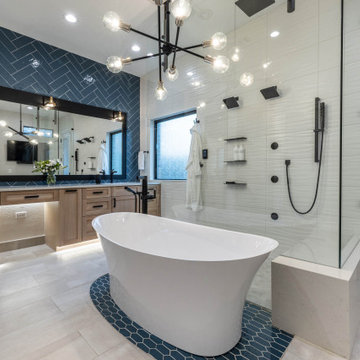
The original bathroom in this home was relatively large. More space, however, does not automatically make a space easier to use.
The extra space in this bathroom made the flow impractical. The two sinks were on either side of a LARGE corner tub, and the shower on the other side of that.
The FOUR separate bath mats the family had on the floor was a sign of how unrealistic this layout was…just look at the “before” photos.
The cabinets, too, were hard to organize personal items in with an excess of flat drawers and NO pull-outs designed for typical bathroom accessories.
To add to the scene, the finishes in the bathroom were so outdated that it was downright disagreeable to walk in…the opposite of what a spa-like bathroom experience provides.
The husband and wife had different opinions on the shower, too. They agreed on wanting a luxury-level shower experience, but they defined that experience differently. The solution would need an exquisite spa-level design with just about every showerhead type they could imagine!
 SKOLNICK Architecture & Design Partnership
Pool
Photo by Thomas Skou
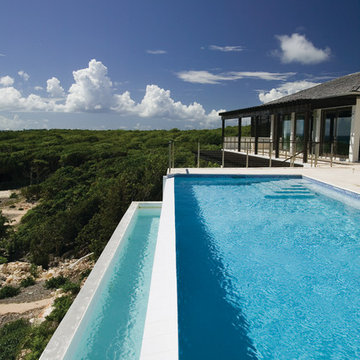
Large island style backyard rectangular infinity pool photo in Other
Large island style backyard rectangular infinity pool photo in Other
 Seven Rivers Design Build
Headwaters Park
Public Event Space.
Highlight
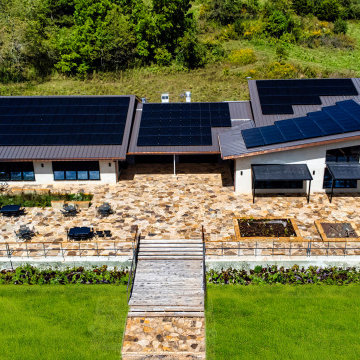
The combination of Hebel (Autoclaved Aerated Concrete) walls, an exposed structural steel roof system, and bespoke craftsmanship makes for a very interesting building. The individual spaces within the structure are striking in themselves, but we think the integration of form and function in the building as a whole makes it a unique and successful project.
Detail
This building serves as the main event and meeting space in Headwaters Park, which is just outside Lewisburg WV and is a project of the WV nonprofit Appalachian Headwaters. The main building is an 8500 sq ft single level structure with an expansive exterior flagstone patio. We designed and constructed the building, and also built the hardscape and water feature. Allegheny Design Services from Morgantown WV performed the structural engineering and we worked with Cole Burrell of Charlottesville VA for the landscaping design.
The interior of the building contains quite a few interesting features and spaces. The main event space is about 3000 sq ft, and is connected to a commercial kitchen. Custom copper light fixtures were built by Molly Must, a local artist. There are also custom wooden light fixtures in the hallways and conference room, built by local woodworker Ryan Brady. We built wooden sound dampening panels to improve acoustic quality in a few of the large rooms.
The building is heated with an in slab hydronic radiant system powered by a geothermal heat pump. In-floor radiant is one of the most comfortable ways to heat a building and when combined with a geothermal heat pump, is highly efficient. The building is also designed for passive solar heat gain in the wintertime, with large south facing windows. We added awnings on the south and west sides of the building to prevent overheating from the sun in the summer.
A 90 kW rooftop PV solar system will provide most of the electricity consumed by the building, if not all of it. We’re hoping that the project ends up being net zero or better - we’ll know after a full year of electric bills. It’s a grid tied system, so any excess electricity produced will be sent into the grid. The building is fully electric - HVAC, water heating, and the commercial kitchen are all propane/natural gas free.
For more information about Appalachian Headwaters and Headwaters Park, please visit their website at: https://appheadwaters.org

 VISTA TILES
There are 97 leaf tile tiles in 1 m2.
The product size is 9cmx15 cmx 1cm. The back side is matt-based and serrated, the front side is glazed and glossy polished.
Leaf Çini ceramic tile features are a dimension that expresses the structure as a multi-colored color with the tile tiles decorations.
- Material made of ceramic material. Tiles are converted into water and cleaning materials.
- Decorating the leaf tile tile for many years. Color and pattern do not exist.
- Water and moisture clean thanks to the glossy glazed polished.
- It does not form mold.
- In places where Leaf Tile tiles are used, we breathe cool and warm in summer.
- Figure the days of sound waves taking advantage of the reflective feature of the days in the regions caused by Leafy Tiles.
- Kütahya tiles are against the sun, wind and exterior.
- Leaf Tiles and easy to use.
- Kütahya and Iznik patterned shaped tile tile models and prices are the most suitable examples.
It is used between countertops in kitchens.
Ceramic-based hexagons are suitable for use as wall tiles in bathrooms.
Production is made in pools, flooring, pool interior flooring, design design and design.
For floor tiles, it can be designed to be comprehensive in detail to floor tiles.
Leaf Tile Tile Application
First of all, the area to be applied should be flat, if not, it should be corrected. Thin plaster should be applied to the area. Cement-based adhesive mortar should be used as adhesive mortar. The adhesive mortar is applied to the surface to be applied regularly and evenly with a fine notched trowel. Kütahya and İznik patterned tile tiles are placed on the surface to be laid. For non-slip and a flat application, you can press on it using a spirit level or wedge. It is an important issue that the Kütahya and Iznik tiles with Ottoman and Seljuk motifs complement each other.
After bonding the tile tiles to the surface, the grouting is ready for application. Normally, tiles are laid without joints. After the grouting material is prepared in accordance with the instructions, it is applied on the tile tiles. We recommend that you prefer antibacterial grouts, especially for patterned tile ceramic tiles that you will apply in your kitchens and bathrooms. After the joint application, the excess joints remaining on the tiles whose flooring has been completed are removed by wiping them with a wet sponge.
Please note that international buyers are responsible for any duties/customs charges and import taxes associated with shipping to their respective countries. These fees are calculated and imposed by your country when the item arrives in the country.
7