
Search results for "Extra basic" in Home Design Ideas

 Balestri Architects
This renovation project updates an existing New York 1920s apartment with a modern sensibility.
Replacing the cellular pre-war layout of the central spaces with a built-in walnut credenza and white lacquer side board effectively opens the plan to create a unified and spacious living area. The back side of the full-height dining room side-board screens views from the entrance foyer. The modern design of the new built-ins at center of the space is balanced by perimeter radiator covers and a full-height bookshelf which work with the period trim detail.
The new kitchen has been relocated to open directly onto the dining room, and features a long, solid mahogany island serving counter. An operable white lacquer and translucent glass partition pulls out from behind a concealed panel to separate the two rooms, providing flexibility for both casual and formal arrangements. The relocation of the kitchen allows for the addition of a small private study, and a powder room, both absent from the original layout.
Photography: Mikiko Kikuyama
 Tile Doctor Ltd
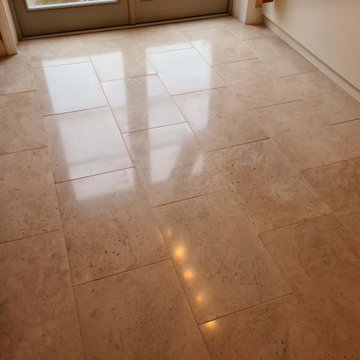
I recently went to survey a floor in Harrogate which I immediately recognised as beige Moleanos Limestone which comes from Portugal. If you have been reading my previous posts you will remember I am not a fan of this type of stone as it is very difficult to clean, polish or seal. This particular floor was laid around 5 years prior and was now looking quite dull and was in need of reviving.
The client didn’t want to spend much so l suggested l could spray burnish the floor to get her shine back again and remove the splash marks. We do this a lot for owners of polished stone floors as part of an annual maintenance package, it is a low cost option that uses a very fine 3,000 grit burnishing pad to renovate the stone and bring up the shine. However, I pointed out to her that this process wouldn’t clean her grout which was making her floor look scruffy.
I priced up the different options and after weighing up the quotes I’m pleased to say she decided to go for a full clean and seal. The full process involves the use of different grades of diamond encrusted burnishing pads from low to very fine grits to renovate the Limestone and also a chemical clean of the grout followed by a fresh seal.
I returned on the scheduled date and after preparing the floor I started cleaning the Limestone by running over the tiles with a 400-grit coarse burnishing pad lubricated with water. The soil was rinsed off with more water and extracted with a wet vacuum. This process was repeated with the 800 and 1500-grit pads which starts to build-up the polish on the stone.
I then turned my attention to the grout with a strong dilution of Tile Doctor Pro-Clean which was left to soak into the grout for ten minutes before scrubbing it by hand with a stiff brush. After a final rinse and extraction with the wet vacuum the tile and grout were looking much cleaner and was left to dry off overnight.
On Day 2 I stated with the application of the 3,000-grit pad which is the last step in the polishing processed and builds up a lovely satin finish on the stone floor. This is done using only a little water and is basically the spray burnish technique I referred to earlier. This process has the added advantage of leaving the floor dry.
With the stone tiles looking lovely and the grout clean the last step was to seal it all in and protect it from dirt and future staining with the application of a sealer. For this I used two coats of Tile Doctor Ultra Seal.
My client was very pleased she had spent the extra money to achieve the floor she had always wanted, apparently it had never looked this good even when new. We discussed the annual maintenance plan to ensure the floor remained looking this good.
Nigel Stoker
North West Yorkshire TIle Doctor

 Irene Designs
This Master Suite while being spacious, was poorly planned in the beginning. Master Bathroom and Walk-in Closet were small relative to the Bedroom size. Bathroom, being a maze of turns, offered a poor traffic flow. It only had basic fixtures and was never decorated to look like a living space. Geometry of the Bedroom (long and stretched) allowed to use some of its' space to build two Walk-in Closets while the original walk-in closet space was added to adjacent Bathroom. New Master Bathroom layout has changed dramatically (walls, door, and fixtures moved). The new space was carefully planned for two people using it at once with no sacrifice to the comfort. New shower is huge. It stretches wall-to-wall and has a full length bench with granite top. Frame-less glass enclosure partially sits on the tub platform (it is a drop-in tub). Tiles on the walls and on the floor are of the same collection. Elegant, time-less, neutral - something you would enjoy for years. This selection leaves no boundaries on the decor. Beautiful open shelf vanity cabinet was actually made by the Home Owners! They both were actively involved into the process of creating their new oasis. New Master Suite has two separate Walk-in Closets. Linen closet which used to be a part of the Bathroom, is now accessible from the hallway. Master Bedroom, still big, looks stunning. It reflects taste and life style of the Home Owners and blends in with the overall style of the House. Some of the furniture in the Bedroom was also made by the Home Owners.
Find the right local pro for your project


 Renovisions
This South Shore of Boston client approached the team of Renovisions to remodel her existing basement bathroom. This bath, with an outdated fiberglass shower stall was cracked and leaking into the concrete floor below. The room had inadequate storage, was dark and did not boost this home’s overall market value.
It was definitely time for a Renovision and the client was excited to get started! She was looking forward to sharing the new space with guests that stay at her home and use the bathroom often.
Working alongside this client was fun and productive as great design and product choices were selected together. In the design process, Renovisions presented a unique idea; using the basement foundation ledge for a shelf that ran into the shower area, gaining extra space for shampoos and soaps, eliminating the need for a niche. Another great idea was to implement a Grohe Smart Control valve which brings this shower experience to another level; they can choose ways to spray with the right degree of warmth. The stunning stream-lined shower trims in brushed nickel finish match the style and finish on the single-lever vanity faucet.
The contrasting dark grey, large format porcelain floor tile’s texture resembles a linen-look pattern the client requested while complimenting the darker veining in the quartz curb, shelf and vanity countertop.
The Carrera-look porcelain shower wall tiles boast no-maintenance and provides a clean, brighter appeal seen through the beautiful custom shower glass enclosure. We lightened up the bath with a light blue paint color which added a fresh look, giving the illusion of a bigger space.
As you can see, with the right colors, textures and accessories, we transformed this basement bath from Drab to Fab. The client was thrilled with her basement Renovision, a true Breath of Fresh Flair’!

 Cypress Design Co.
Stunning bathroom suite with laundry room located in North Kingstown, Rhode Island. Candlelight Cabinetry custom English Linen vanity is a showpiece in this suite. Brooks Custom Eco-walnut countertop is the perfect match for the vanity. The clients own custom sink is highlighted by the Brizo Faucet Rook in venetian bronze and the Top Knobs brookline hardware in oil rubbed bronze. The amazing MAAX Optic Hydrofeel soaking tub is also enclosed with English Linen panels, the tub deck Great In Counters Rainforest granite highlights the tub. Emilamerica Fusion tub and shower wall tile in white, Schluter-Systems North America corner molding in antique bronze and Symmons Industries elm tub filler complete this oasis. The custom glass enclosed shower is a masterpiece showcasing the Fusion white wall tile, Elm shower system, Moen grab bar and Daltile Veranda Porcelain tile in Dune. Toto Drake Elongated toilet and Elm accessories complete this design. And finally the Brickwork floor tile in Studio is not only beautiful but it is warm also. Nuheat Floor Heating Systems custom radiant floor mat will keep our client's warm this winter. Designed Scott Trainor Installation J.M. Bryson Construction Management Photography by Jessica Pohl #RhodeIslandDesign #ridesign #rhodeisland #RI #customcabinets #RIBathrooms #RICustombathroom #RIBathroomremodel #bathroomcabinets #Candlelightcabinetry #whitevanity #masterbathroomsuiteremodel #woodvanitycountertop #topknobs #Brizo #oilrubbedbronzefaucet #customvesselsink #customglassshower #symmonsindustries #Daltile #emilamerica #showertile #porcelaintile #whitetile #maax #soakingtub #oilrubbedbronzeaaccessories #rainforestgranite #tubdeck #tubfiller #moen #nuheatflooringsystems #shlutersystemsbrookscustomdesign #customdesign #designer #designpro #remodel #remodeling #Houzz #nkba30_30 #dreamhouse #dreamhome #dreammastersuite #BostonDesignGuide #NewEnglandHome #homeimprovement #tiledesign #NEDesign #NEDesigner #DesignerBathroom #Style #Contractor #Home #dreambathroom

 Brown Bros. Masonry
Custom built and designed Lake Oswego Estate now complete! Entire front of this estate is veneered in natural stone, carrying the same stone inside to the living room and kitchen (see Indoor Fireplace gallery), and out to the backyard outdoor fireplace (see Outdoor Fireplace gallery). Utilizing this natural stone choice with its gray tones and textures complimented the craftsman and modern design of this particular home beautifully! Stone choice is spot on!
Exterior of home is accented with dark brick and keystone arches over the front entry and garage with stone columns at entry.
Sponsored
Columbus, OH

Hope Restoration & General Contracting
Columbus Design-Build, Kitchen & Bath Remodeling, Historic Renovations

 Zelaya Properties LLC
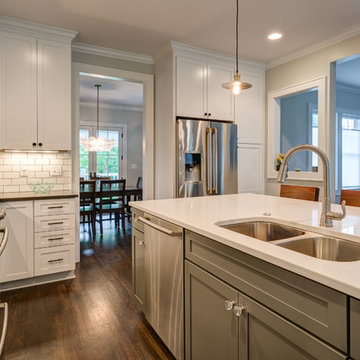
We used: Custom cherry cabinetry in Arts & Crafts Shaker style by Kabinart in Boulder and Espresso stains. Liberty Hardware Venetian bronze 1-1/2" cabinet knobs. KitchenAid Architect II Series 22 CF counter-depth French door refrigerator. KitchenAid Architect Series II 27" convection single wall oven. KitchenAid 36" 6-burner dual fuel freestanding commercial-style range. KitchenAid Architect II Series 24" dishwasher. Sharp Insight Pro Series 24" built-in microwave drawer (Model #KB6524PS). Crystorama Solaris 12" wide pendant lights in English bronze. Granite countertops in Brown Fantasy. 3"x6" polished marble backsplash.
Paint colors:
Walls: Glidden Silver Cloud 30YY 63/024
Ceilings/Trims/Doors: Glidden Swan White GLC23
Robert B. Narod Photography

 Moss Yaw Design studio
Engineered cedar siding creates beautiful gray-blue tones at the exterior of the home, while adding a textural element to activate the simple exterior design.

 Eco Star Painting
Step #1 Apply BM CLEAN
As you can see in the 'Before' picture above, this cedar deck was extremly dirty. This required an extra step in comparison to the typical deck stripping process. My paint rep at Benjamin Moore recommended a product called CLEAN. It comes in one gallon plastic containers and can be applied out of a plastic pail or with a garden sprayer. We used a Garden sprayer and chose a flat tip for application. The three gallon garden sprayer was filled with 2 gallons of water and one gallon of the CLEAN solution. This is a strong mixture and can be reduced to up to 6 parts water and one part of the Benjamin Moore CLEAN.
This approximately 22x20 deck had a board running perpindicular to the rest of the floor boards which divided it into 2 equal parts. Our method was to apply the solution to 3-4 of these 10' boards at a time. Allow it to set up for a few minutes and then scrub away with the deck brush. The agitation loosens up the dirt and grime and is then removed with a pressure washer a board a time. The flat tip on the pressure washer was almost the same width as the floor board. It is important to clean the sides of the board too because any remaining dirt or stain will be visible.
Benjamin Moore Deck Restoration products named Clean,Restore,brighten
Step #2 Apply BM RESTORE
The second step is exactly the same as the first step but with a different solution called Benjamin Moore RESTORE. The deck was dry before we started the 2nd step becuase it was baking hot outside. You use the same 2/1 mixture of water to chemical. This chemical will remove the stain still present in the deck floor. Make sure to rinse the garden sprayer clean before adding the restore solution. Unlike the BM CLEAN, the BM RESTORE has an orange-ish color in appearance. It did a fine job of removing most of the stain, but not 100% of it. There were a few areas that required a 3rd coat of restore but the process was quicker.
Step #3 Apply BM BRIGHTEN
The third step is exactly the same as the first two step but the chemical solution used was Benjamin Moore 'BRIGHTEN'. Again, the garden sprayer was cleaned and filled with 2 parts water and one part Brighten. The brightener not only lightens the wood but it also neutralizes the previous stripper solution. As stated before the Restore adds a bit of color and the Brighten will remove any traces of it. you still have to agitate the brightener with a scrub brush and either pressure wash it off or use a garden hose. We used the pressure washer for faster results. After it dries the wood look a lot brighter but we still found some spots of stain that had not come off.
Apply Sikkens Stain
As stated above the stain we used is called "Sikkens Proluxe" which is basically just a slight re-branding of the classic Sikkens Stain. The formula is exactly the same. In fact, the secondary name is still called 'Cetol' SRD RE. The color chosen was "CEDAR".
The weather was quite hot for a typical Calgary Spring day so we stained a 10' section of floor board at a time. The deck has a metal railing so the supporting feet had to be brushed in with a 2.5" natural bristle paint brush. for the rest of the job a 6" Wooster natural bristle deck brush was used. The handle was remove and a broom handle was inserted. The stain was stirred frequently and poured into a plastic Simms brand roller pan. Semi transparent Oil based stain has the consistency of water so you need to be careful not to spill any of it. When applying to a board you hit the sides first with the brush and then fillin the rest. Ten feet of floor board can be stain in a short period of time. it's important not to leave any streaks so it is adviseable to back-brush the entie length before moving on to the next board. The staining only took about 2.5 hours to complete. One coat is the manufacturers recommendation.
One last thing about Sikkens Stain. To maintain this beautiful look the deck should be re- coated once a year, preferably every spring. It's like applying sunscreen yearly to protect the wood against further damage. Two gallons was enough to cover this 450 sq foot deck.

 Floor Coverings International of East Lake
Example of a large classic hallway design in Tampa with yellow walls

 Alair Homes Plano
Our clients house was built in 2012, so it was not that outdated, it was just dark. The clients wanted to lighten the kitchen and create something that was their own, using more unique products. The master bath needed to be updated and they wanted the upstairs game room to be more functional for their family.
The original kitchen was very dark and all brown. The cabinets were stained dark brown, the countertops were a dark brown and black granite, with a beige backsplash. We kept the dark cabinets but lightened everything else. A new translucent frosted glass pantry door was installed to soften the feel of the kitchen. The main architecture in the kitchen stayed the same but the clients wanted to change the coffee bar into a wine bar, so we removed the upper cabinet door above a small cabinet and installed two X-style wine storage shelves instead. An undermount farm sink was installed with a 23” tall main faucet for more functionality. We replaced the chandelier over the island with a beautiful Arhaus Poppy large antique brass chandelier. Two new pendants were installed over the sink from West Elm with a much more modern feel than before, not to mention much brighter. The once dark backsplash was now a bright ocean honed marble mosaic 2”x4” a top the QM Calacatta Miel quartz countertops. We installed undercabinet lighting and added over-cabinet LED tape strip lighting to add even more light into the kitchen.
We basically gutted the Master bathroom and started from scratch. We demoed the shower walls, ceiling over tub/shower, demoed the countertops, plumbing fixtures, shutters over the tub and the wall tile and flooring. We reframed the vaulted ceiling over the shower and added an access panel in the water closet for a digital shower valve. A raised platform was added under the tub/shower for a shower slope to existing drain. The shower floor was Carrara Herringbone tile, accented with Bianco Venatino Honed marble and Metro White glossy ceramic 4”x16” tile on the walls. We then added a bench and a Kohler 8” rain showerhead to finish off the shower. The walk-in shower was sectioned off with a frameless clear anti-spot treated glass. The tub was not important to the clients, although they wanted to keep one for resale value. A Japanese soaker tub was installed, which the kids love! To finish off the master bath, the walls were painted with SW Agreeable Gray and the existing cabinets were painted SW Mega Greige for an updated look. Four Pottery Barn Mercer wall sconces were added between the new beautiful Distressed Silver leaf mirrors instead of the three existing over-mirror vanity bars that were originally there. QM Calacatta Miel countertops were installed which definitely brightened up the room!
Originally, the upstairs game room had nothing but a built-in bar in one corner. The clients wanted this to be more of a media room but still wanted to have a kitchenette upstairs. We had to remove the original plumbing and electrical and move it to where the new cabinets were. We installed 16’ of cabinets between the windows on one wall. Plank and Mill reclaimed barn wood plank veneers were used on the accent wall in between the cabinets as a backing for the wall mounted TV above the QM Calacatta Miel countertops. A kitchenette was installed to one end, housing a sink and a beverage fridge, so the clients can still have the best of both worlds. LED tape lighting was added above the cabinets for additional lighting. The clients love their updated rooms and feel that house really works for their family now.
Design/Remodel by Hatfield Builders & Remodelers | Photography by Versatile Imaging

 Peter Q Brown Innovative Design
The decision to go small is about her personal values, committing to a lifestyle, and living within her means. The move to design small is a subjective decision that weighs in on a number of factors that can’t possibly be summed up in one statement, but the obvious benefits jump to the front...easier to maintain, less cleaning, less expensive, less debt, less environmental impact, less temptation to accumulate. Her design requirements were simple, small footprint less than 1000 sq. ft., garage below the living area, and take advantage of the amazing view. It’s smaller than the average house, but designed in a way that it won’t feel like a shoebox. My client thought long and hard about downsizing her home and her lifestyle, and she couldn’t be happier
Sponsored
Columbus, OH
Hope Restoration & General Contracting
Columbus Design-Build, Kitchen & Bath Remodeling, Historic Renovations

 Victor Mulbauer
New Installation of Red Oak Wood, 3 1/4 in width. White-washed Bona Stain was used, Bona Finish, as well as Bona Traffic HD. Dustless sanding.
Living room - contemporary living room idea in Detroit
Living room - contemporary living room idea in Detroit
 Revival House
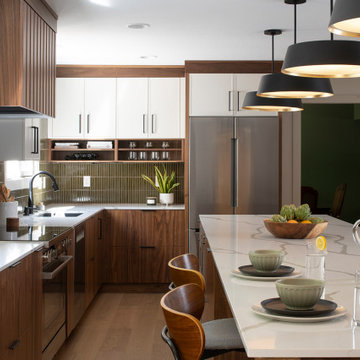
This kitchen remodel of a 70’s home reflects the character of the existing home and some design features of that era while giving it a fresh, modern look. The client wanted the remodeled space to blend in with the rest of the home, retaining some of the 1970’s character while including all the best features of today’s kitchens.
Removing the wall separating the informal eating area from the family room provided a nice open space allowing for a larger kitchen footprint and plenty of light throughout.
A combination of Decor's Dove Wing painted and Natural stained Walnut cabinetry was chosen. The dark walnut, slab lower cabinets unite the kitchen with the darker wood theme found throughout the home, while the white, slim-shaker upper cabinets give the space a light and airy feeling. The beautiful vertical grain of the walnut is the foundation of a theme that is echoed throughout the space: tall & thin vertical lines without bulk or needless ornamentation. The unique design detail gives the kitchen a great balance of depth and character while still brightening the space. Walnut crown molding throughout defines the space and ties everything together.
The vertical-set green Japanese tile from Virginia Tile, also characteristic of the 1970’s, serves as the backsplash and fills the range wall. The tall & slim theme is underscored by several design elements from the vertical tile and tall cabinet pulls in matte black from Top Knobs, to the thin quartz countertops, skinny shaker cabinet door style, and tall, slim refrigerator doors, all meant to eliminate excess bulk and lighten up the space.
An impressive focal point in this kitchen is the custom walnut reeded hood, designed to reflect a popular 1970’s feature. Narrow walnut shelves below the white upper cabinets near the refrigerator provide a nice surprise to the eye. An extra long island, decked in polished 2cm Corian Quartz countertop in Novello, provides ample seating, storage, and task space, making it an ideal surface for serving, eating, meal prep, gathering, and entertaining. The client desired a long island with comfortable counter seating at one end for a family of five, including space for a baby’s high chair.
High-end Bosch appliances and functional storage were also priorities. The dry bar on the opposite wall features additional storage and an Elica beverage refrigerator, framed by tall walnut larder cabinets on each end. The white larder cabinet doors pocket into the sides, revealing beautiful finished walnut interiors.
Wall cabinets feature Decor’s integrated under-cabinet lighting, while puck lights illuminate the beverage center counter. This kitchen is bursting with integrated storage. Many deep drawers feature interior double drawers making smaller items more accessible. Decor’s spice drawer to the right of the range keeps spices organized, while divided tray storage on the left of the range keeps these taller items handy.
While the design is inspired by the 1970’s, it exemplifies the best of the 2020’s, and the new space is open, bright, and functional for this family with young children.
 highland
Plumbing issues rarely occur at a convenient moment. When selecting whom to install plumbing in Melbourne homes, one must find someone who is licensed, readily available and has the right to tell you the costs upfront before work is commenced. This guide includes what to look at prior to hiring a plumber melbourne and common hiring mistakes to avoid.
Explaining how to choose the right plumber Melbourne homeowners
Why choosing the right plumber matters
Poor plumbing repair may be more expensive to repair than the original problem. Experience, licensing, and communication are also all issues that impact on a job being done right the first time round. A few minutes checking credentials will save later on down the line. Difficult hiring choices may result in:
● Repeat callouts: Incomplete repairs, which fail once again in the matter of weeks, necessitate a visit by another tradesperson, and additional expense. ● Hidden charges: Unclear price estimates that become unexpected bills after the project has begun. ● Property damage: Rushing or unlicensed work that causes damage to pipes, fittings and adjacent walls and floors.
Check licensing and qualifications first
All plumbers operating in Victoria have to have the valid licence issued by the Building and Plumbing Commission. Licensing validates the formal training as well as legal responsibility of the work done. This is checked within a few minutes prior to securing any job. Pre-hiring ensure the following before the hiring:
● Licence number: A registered plumber is able to issue a licence number which is confirmed by the appropriate authority. ● Insurance coverage: Public liability insurance insures the property in the case of damage at the time of plumbing work. ● Trade specialization: Gas fitting and hot water work need to be covered by certain qualifications other than, in general, a plumbing licence. ● Membership bodies: The association with established industry organizations is usually an indication of continued training and accountability benchmarks.
Ask about availability and response time
Plumbing emergencies do not follow business hours. An explosion of a pipe or gas break should be addressed immediately, irrespective of the days or the time of the day. Skill is no more crucial than availability in the matter of picking a plumber. Some useful questions to ask before making a reservation are:
● Emergency availability: Checking that the callouts are not provided on weekends, evenings or during public holidays with long delays. ● Response time: Inquiring about the speed at which a plumber can commonly arrive to address an emergency in the house under contact. ● Call-out fee: An explanation of whether or not a call-out fee is charged and whether or not the fee is waived when the work is carried out. ● Service area: In this case, it will be necessary to check whether the plumber visits the given suburb of Melbourne on a regular basis.
Understand pricing before work begins
The most frustrating aspect among the plumbing customers is unclear pricing. An honest plumber discusses prices and alternatives with him/her prior to commencing any job. Written quotes insure the homeowner and the tradesperson. Fair pricing practices normally involve:
● Fixed quotes: An open quote properly quoted and then inspected, not an hourly estimate. ● Written breakdowns: Detailed expenses showing labour, materials as well as any other expenses prior to beginning of work. ● No pressure tactics: Time to study the options without requesting a decision to be made immediately on-site. ● Transparent extras: All other costs including after-hours costs would be explicitly known prior to the job.
Common errors one should not make when employing a plumber
Hasty judgments made in the plumbing crisis tended to come back to bite. The failure to do basic checks may lead to low-quality workmanship or high prices. Most frequent hiring issues are avoided with a brief wait before making a booking. Frequent mistakes include:
● Skipping licence checks: Recruiting solely on price without first ensuring they are properly licensed and insured. ● Accepting verbal quotes only: Accepting oral estimates rather than writing down, making itemised price explanations. ● Ignoring reviews: Finding a plumber without examining customer feedback in the past few reviews on different independent review sites. ● Overlooking guarantees: Not enquiring of work done, whether it comes with any part or labour warranty.
A look at the frequently asked questions
What is the average price of a Melbourne plumber?
Prices are depending on the type of job hence a written estimate is always advisable.
Is a call-out fee always charged?
Not necessarily; lots of plumbers cancel a charge after the job is done.
Is there a plumber who can do gas fitting?
No, the other licence qualification is a separate gas fitting licence qualification.
Is it necessary to base a hiring decision on reviews?
Yes, there are some patterns in the quality of reliability and workmanship according to recent reviews.
Is emergency plumbing available on weekends?
There are numerous certified plumbers who have emergency services available on weekends and after hours.
Explaining how to choose the right plumber Melbourne homeowners
Why choosing the right plumber matters
Poor plumbing repair may be more expensive to repair than the original problem. Experience, licensing, and communication are also all issues that impact on a job being done right the first time round. A few minutes checking credentials will save later on down the line. Difficult hiring choices may result in:
● Repeat callouts: Incomplete repairs, which fail once again in the matter of weeks, necessitate a visit by another tradesperson, and additional expense. ● Hidden charges: Unclear price estimates that become unexpected bills after the project has begun. ● Property damage: Rushing or unlicensed work that causes damage to pipes, fittings and adjacent walls and floors.
Check licensing and qualifications first
All plumbers operating in Victoria have to have the valid licence issued by the Building and Plumbing Commission. Licensing validates the formal training as well as legal responsibility of the work done. This is checked within a few minutes prior to securing any job. Pre-hiring ensure the following before the hiring:
● Licence number: A registered plumber is able to issue a licence number which is confirmed by the appropriate authority. ● Insurance coverage: Public liability insurance insures the property in the case of damage at the time of plumbing work. ● Trade specialization: Gas fitting and hot water work need to be covered by certain qualifications other than, in general, a plumbing licence. ● Membership bodies: The association with established industry organizations is usually an indication of continued training and accountability benchmarks.
Ask about availability and response time
Plumbing emergencies do not follow business hours. An explosion of a pipe or gas break should be addressed immediately, irrespective of the days or the time of the day. Skill is no more crucial than availability in the matter of picking a plumber. Some useful questions to ask before making a reservation are:
● Emergency availability: Checking that the callouts are not provided on weekends, evenings or during public holidays with long delays. ● Response time: Inquiring about the speed at which a plumber can commonly arrive to address an emergency in the house under contact. ● Call-out fee: An explanation of whether or not a call-out fee is charged and whether or not the fee is waived when the work is carried out. ● Service area: In this case, it will be necessary to check whether the plumber visits the given suburb of Melbourne on a regular basis.
Understand pricing before work begins
The most frustrating aspect among the plumbing customers is unclear pricing. An honest plumber discusses prices and alternatives with him/her prior to commencing any job. Written quotes insure the homeowner and the tradesperson. Fair pricing practices normally involve:
● Fixed quotes: An open quote properly quoted and then inspected, not an hourly estimate. ● Written breakdowns: Detailed expenses showing labour, materials as well as any other expenses prior to beginning of work. ● No pressure tactics: Time to study the options without requesting a decision to be made immediately on-site. ● Transparent extras: All other costs including after-hours costs would be explicitly known prior to the job.
Common errors one should not make when employing a plumber
Hasty judgments made in the plumbing crisis tended to come back to bite. The failure to do basic checks may lead to low-quality workmanship or high prices. Most frequent hiring issues are avoided with a brief wait before making a booking. Frequent mistakes include:
● Skipping licence checks: Recruiting solely on price without first ensuring they are properly licensed and insured. ● Accepting verbal quotes only: Accepting oral estimates rather than writing down, making itemised price explanations. ● Ignoring reviews: Finding a plumber without examining customer feedback in the past few reviews on different independent review sites. ● Overlooking guarantees: Not enquiring of work done, whether it comes with any part or labour warranty.
A look at the frequently asked questions
What is the average price of a Melbourne plumber?
Prices are depending on the type of job hence a written estimate is always advisable.
Is a call-out fee always charged?
Not necessarily; lots of plumbers cancel a charge after the job is done.
Is there a plumber who can do gas fitting?
No, the other licence qualification is a separate gas fitting licence qualification.
Is it necessary to base a hiring decision on reviews?
Yes, there are some patterns in the quality of reliability and workmanship according to recent reviews.
Is emergency plumbing available on weekends?
There are numerous certified plumbers who have emergency services available on weekends and after hours.

 Merillat
5 Ways to Create the Casual Lifestyle in Your Kitchen
Inspiration for a transitional kitchen remodel in Detroit with white cabinets
Inspiration for a transitional kitchen remodel in Detroit with white cabinets


 Custom Surface Solutions
 (www.css-tile.com) - Owner Craig Thompson (512) 430-1215. This project shows new 12 x 24 tile installed vertically with offset layout pattern on wall and floor. Includes shower box with linear glass accent tile back and vertical glass accent band. Tile edges are finished with Schluter Jolly satin aluminum profile edge trim.


 Interior Pros - Design Studio
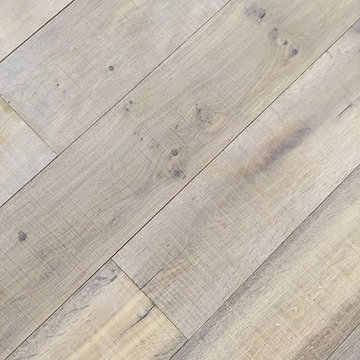
The grey trend has evolved in the last twelve months. Nowadays browns, beige and a touch of grey are in demand. Greige is the new buzzword.
Heavier hand scraped or contoured products, the rage that started around 2005 has taken a back seat in most areas, while a softer wire brushed "ceruse effect" seen mostly on White Oak has been remarkably strong showing no effects of becoming “dated” like the others mentioned.
Ceruse Color Possibilities
There are numerous color combinations to the "cerused" process with the most popular being white or off white. This design trend in hardwood flooring can have darker gray white oak with a mild ceruse off white effect.
There are limitless possibilities in either a prefinished hardwood floor or with what we can create for you in a custom on-site finished hardwood floor.
If something suits your fancy, contact us and we can work on creating just the look and sense of style you are looking for.
78