
Search results for "Extract" in Home Design Ideas
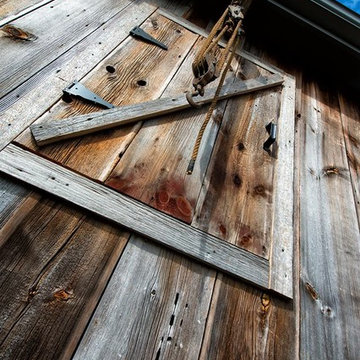
 Olde Wood Ltd.
J. Albert Studios
Huge traditional brown two-story wood exterior home idea in Cleveland
Huge traditional brown two-story wood exterior home idea in Cleveland
 Tile Doctor Ltd
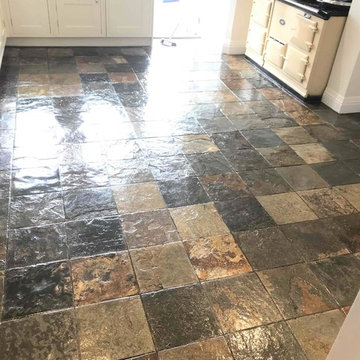
I recently completed the renovation of a Multi-Coloured Slate tiled kitchen floor in Sutton Coldfield. I was actually at the property before Christmas to survey the floor and quote for the work however the owners had planned to have a new kitchen installed in the new year, so we decided it was best for me to wait until after the installation to complete the work.
The slate was in good condition but like any stone floor you do need to maintain the sealer to prevent dirt becoming ingrained in the stone. Sealer do wear off overtime especially in the high foot traffic areas such as Kitchens and within a few years the tiles become dull and difficult to clean effectively.
The kitchen was installed on schedule and I got the call to arrange a visit to deep clean and reseal the floor which would take to two days, one to clean and one to seal.
To begin the restoration, I soaked the slate in a strong dilution of Tile Doctor Pro-Clean and left it to soak in for about ten minutes re-applying extra solution where it dried. Pro-Clean is a powerful tile cleaner that will strip old sealers when applied in concentrated form. I agitated the product using a black pad fitted to a rotary buffing machine. I paid particular attention to the grout which the customer had trouble keeping clean. The rotary pad struggles to reach into the recesses of the grout lines so I also made sure to scrub the solution into the grout with a grout brush.
Once I was satisfied that the Slate and the Grout was clean and clear of old sealers, I gave the whole floor a thorough rinse with water using a wet vacuum to extract the soil and get the floor as dry as possible. The floor was then left to dry off fully overnight.
Returning to the property the next day, I ran some quick damp tests to check for any excess moisture that might have prevented me from sealing the floor. We will always do this as excess moisture can affect the sealer curing.
The customer was very happy with the clean and the floor was dry, so we discussed sealer options to find out their preference for Matt or Satin finish. With the decision made to go with a Satin finish I began the application of the Tile Doctor Seal and Go which enhances the look of the stone with an aesthetically pleasing low-sheen finish, as well as providing on-going protection against ingrained dirt and staining.
A total of four coats of Seal and Go were needed to seal the Slate tiles and as you can see from the photos the sealer really put the life back into the floor.
Trevor Preece
Staffordshire Tile Doctor
 Tile Doctor Ltd
Victorian tiles are very hard-wearing and historically a popular choice for heavy traffic areas such as hallways. Still popular today they are nonetheless like most tiles and can become ingrained with dirt over time.
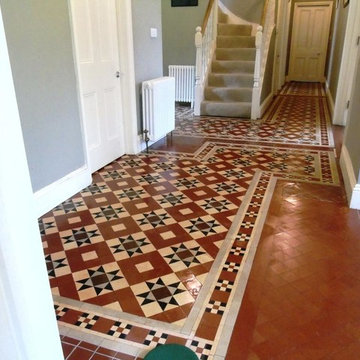
This particular floor, located in a property in the old market town of Tewkesbury is a good example of a floor that was in good physical condition, but heavily ingrained with dirt due to a lack of regular maintenance. At a loss for how to remedy the situation by themselves, the property owner asked me to pay a visit to restore the tiles back to their best possible condition.
In this particular scenario, I opted to mix and apply a solution of different cleaning products from our professional range, each serving a different purpose. These products were Tile Doctor Pro Clean, Tile Doctor Remove and Go, and Tile Doctor NanoTech HBU. Remove and Go serves the purpose of stripping away any old sealer on the tiles, while Pro Clean is an alkaline cleaner that reliably removes dirt and staining. NanoTech HBU is a particularly powerful cleaner which utilises nano-sized particles to penetrate deep into the pores of the stone, get underneath difficult stains and lift them out.
I spread this potent solution across the length and width of the tiled hallway and left it to soak for approximately 10 minutes, before using a black scrubbing pad fitted to my buffing machine to give the tiles a deep scrub. Next, I rinsed the soiled solution away and neutralised the chemicals with plain water, before extracting any residue using a wet vacuum. I repeated the cleaning process several times to achieve the best results possible, and I also employed the aid of a steam cleaner to spot clean any particularly stubborn marks.
Cleaning the floor took two days in total. At the end of the second day, I gave the floor a thorough and final rinse before leaving it to dry completely overnight. The next day, I returned to the property to seal the floor after checking the floor was dry. Ensuring before sealing that the floor is completely dry is crucial – even the smallest quantity of moisture remaining can potentially cloud the sealer and damage its performance.
My choice of sealer was Tile Doctor Colour Grow, an impregnating sealer that penetrates and fills the pores of the tile to prevent trapped dirt and makes regular cleaning much easier. Colour Grow is a great choice of sealer for Victorian tiles because it really enhances the colourful patterns which are characteristic of this type of tile.
My customer was very impressed with the service and remarked on the huge improvement to the appearance of the floor. You can see this for yourself – just take a look at the before and after photos!
Malcolm Crowther
Gloucester Tile Doctor
Find the right local pro for your project
 First State Building & Design
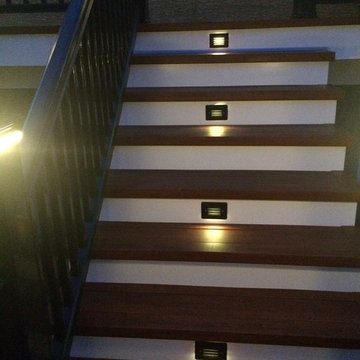
We expanded an existing deck with new stairs, railing, decking, deck board design, lighting, complete with all post and beam wraps. All decking you see is Zuri decking with Timbertech Rail Systems. We installed riser lights up the stairs with post caps on top of all posts.
 Regenesis Ecological Design
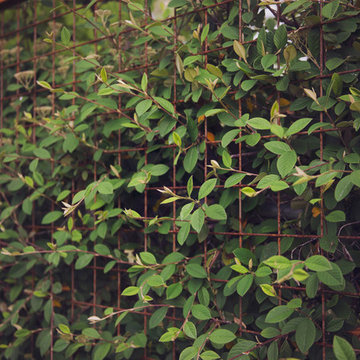
A modern steel mesh fence contrasts with spring growth of Cotoneaster multiflorus
http://annacaitlinphotography.com/
 Tile Doctor Ltd
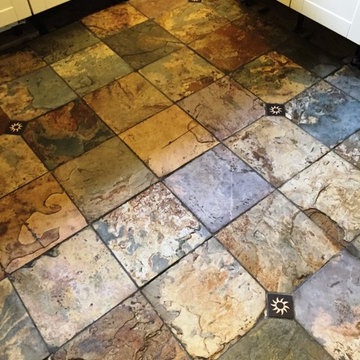
I recently visited a client living in the market town of Woodstock in Oxfordshire to rejuvenate a fantastic multi-coloured Slate floor that had been hidden under several years’ worth of dirt in their kitchen. Slate is a typically hard-wearing tile used for flooring high traffic areas of houses and public buildings but does need sealing to bring out its best features and in this case the sealer had long since worn off and dirt had become ingrained in the stone.
My first task in the cleaning process was to mix a strong solution of Tile Doctor Pro-Clean, which is a strong alkaline cleaner safe to use on Tile and Stone, and NanoTech HBU (Heavy Build-up Remover), which is a particularly powerful product that uses nano-sized particles to tackle muck in areas of the stone where typical cleaners simply can’t reach. I spread this solution across the floor and left it to seep into the stone, to get underneath and lift out the ingrained dirt.
After allowing the solution adequate time to dwell, I scrubbed the floor with a carbon brush to gradually reveal the fantastic natural colours of the Slate hidden beneath. Following this, I rinsed the entire floor several times with clean water, before soaking up the resulting soiled residue with a wet vacuum.
The next part of the cleaning process entailed paying particular attention to the grout lines. I used Tile Doctor Grout Clean-Up to scrub the grout lines and also to treat a small amount of efflorescence. The resulting residue was promptly extracted with the wet vacuum and I finished by giving the whole floor a rinse with Tile Doctor pH Neutral Tile Cleaner. This is a day to day tile cleaning product which is recommended for stone floors, many supermarket tile cleaning products are only suitable for ceramic tiles due to their acidic formula and can damage a floor over years of use so you should always read the label. I then left the floor to dry completely overnight.
On day two, the Slate tiled floor was dry and ready to seal. The floor had to be completely dry, as any excess moisture has the potential to the damage the performance of the sealer. Since my client had specifically requested a matte finish, I opted to use Tile Doctor Colour Grow. Colour Grow is an impregnating sealer that provides durable surface protection from within while also enhancing all of the natural mineral shades.
My client was very pleased with the results, particularly as they hadn’t realised they had such a great looking floor in their house when they had first purchased it!
Barry Woodward
Oxfordshire Tile Doctor
 Tile Doctor Ltd
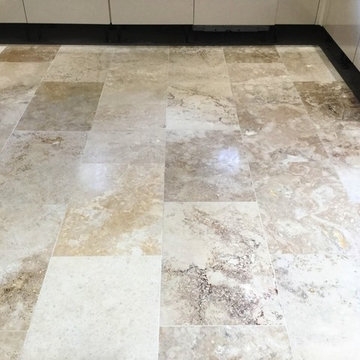
Travertine floor tiles are very appealing and very hardwearing, but without the protection of a sealer to stop dirt becoming ingrained in the pores of the stone their appearance will degrade. Fortunately, this can be remedied as demonstrated in these pictures of a Travertine floor I recently polished at a house in Weston Favell, Northampton.
This owner of the property had called me out as their kitchen floor was looking very sorry for itself and he was concerned that a lot of holes were appearing which was making cleaning the floor difficult as dirt was getting trapped in the holes. I went over and carried out a test clean on two separate tiles in the kitchen and the customer was amazed at how clean they came up and especially the grout.
The kitchen was stunning, but unfortunately the state of the Travertine tiled floor was bringing down its overall appearance. Impressed with the test clean they were keen to get the whole floor renovated so we agreed a price and I scheduled the work in for the following month.
I returned on the agreed data and made a start by protecting the kitchen units by removing the plinths and covering base units and the appliances with a protective film. We then commenced the cleaning process to remove surface dirt by cleaning with Tile Doctor Pro-Clean paying special attention to the grout lines. The holes in the Travertine were filled with a stone resin, mixing it to closely match the colours of the stone.
The resin was allowed to dry before starting to re-polish the Travertine using a set of Tile Doctor Diamond encrusted burnishing pads. These pads are applied individually to each tile in sequence starting with a coarse 400-grit pad before moving onto the 800-grit and finishing with the fine 1500 grit pad. A little water is used to lubricate the process along the way and the floor is rinsed in between each pad with the resulting residue extracted from the floor using a wet vacuum. The process takes some time, but it really brings up the polished appearance of the stone and the results are well worth the effort. After a final rinse the floor was inspected and then left to dry off fully overnight.
When we returned the next day, the floor had dried, and we were able to give the floor a final polish with a very fine 3000-grit burnishing pad applied with a little water sprayed onto the tile. Finally, the floor was then sealed with two coats of Tile Doctor Ultra-Seal which provides excellent protection without changing the colour of the stone to provide a natural look.
The client was over the moon with the outcome and surprised at the improvement. They were left with a floor that would be easy to clean and maintain.
Phil Vissian
Northamptonshire Tile Doctor
 Tile Doctor Ltd
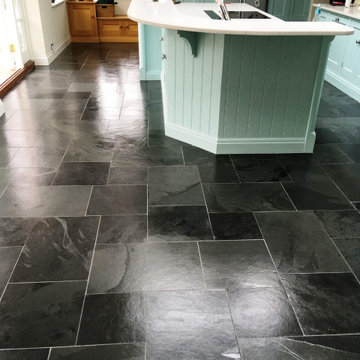
Our client had previously employed another company to tackle this large Slate floor in Walton on Thames but they hadn’t managed to remove the old sealer due to it being an old varnish seal. Varnish was used as a traditional way of sealing stone but can be damaged by scratching and it does little to improve the look of the stone. Varnish is also very difficult to break down which is a problem as it’s important to remove the old sealant before applying new, applying a new sealer onto Varnish simply wouldn’t work.
I visited the property to survey the floor and work out which combination of products and methods would work best and after some testing and I was able to confirm that not only could the old varnish be removed but once re-sealed with a modern sealer the slate would be transformed.
The client was over the moon to hear this news as they had thought there was nothing, they could do to improve the floor.
With a price and schedule agreed I returned to the property at a later date and started by tackling the varnish. The method I used was to apply Tile Doctor Remove and Go, let it soak into the floor for ten minutes and then work it in with a heavy rotary scrubbing machine fitted with a black pad. The soil was then rinsed with water and extracted off the floor with a wet vacuum.
The floor was then inspected, and each tile checked to ensure the varnish was completely gone, any stubborn areas were then spot treated and scrubbed by hand. Once I was satisfied, I set about giving the stone a deep clean by repeating the same process with Tile Doctor Pro-Clean. As before all the soil and cleaning products were then low pressure rinsed off the stone and vacuumed away. The floor was then left to dry overnight.
I returned the following day to apply a new modern sealer. First, I tested the floor was dry using the moisture meter. It was in the acceptable readings range, so I was able to start applying the sealer straight away.
For this floor I chose to apply Tile Doctor Seal and Go, it works really well on Slate tiles and as you can see from the photographs it completely transformed the appearance of the stone. Seal and Go is a water-based blend of acrylic polymers that provides both a stain resistant surface seal and a durable low-sheen finish, being water based it has the added advantage of not giving off any odour as it dries. The client had specified earlier that they didn’t want the floor to look shiny to the resultant silky appearance was the perfect solution. Thee coats were applied, and my client was very pleased with the finish.
Jonathan Oldham
South Middlesex Tile Doctor
 Tile Doctor Ltd
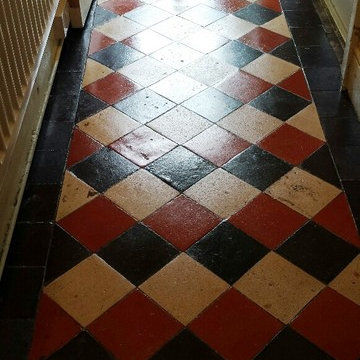
The pictures below were taken at a house in the town of Merthyr Tydfil, which is located not too far north of Cardiff. My client was keen to keep her very old Quarry tiled floor – which dated back to 1905 – intact. The floor had understandably seen a large amount of traffic in its lifetime, and was now in dire need of a professional restoration, including a thorough clean and seal.
First, I completed a survey of the area and provided my client with a quote. After completing many similar jobs in the past, I generally have a good idea of what the final result will look like. I passed on some images of a final result to my client, who was happy for me to begin my work.
On the first day, my first task was to take run some damp tests which were fine; it’s always good to know up front if there are likely to be any damp issues. Next I covered the floor with water to take the surface suction out and waited fifteen minutes before applying a cocktail of Tile Doctor NanoTech Heavy Build-Up cleaner mixed with Pro-Clean and Grout clean-up covering the whole floor. I then immediately starting to work the solution into the floor with a rotary machine fitted with a coarse black pad. The solution was then rinsed off with water which was then extracted with a wet vacuum as I worked. For stubborn areas I applied more of the previously mixed solution scrubbed into the floor with coarse wire wool by hand followed by further rinsing with water.
Each of the products used serves a particular purpose. Pro-Clean is a strong high-alkaline cleaner for natural stone, while NanoTech HBU is a particularly powerful cleaner that uses nano-sized particles to penetrate deep into the stone to get underneath and lift out ingrained dirt and stains. Grout Clean-Up, as the name implies, is a product for resolving grout related problems such as removing grout smears from tile surfaces aka grout haze.
After completing the clean I left the house for 48 hours, to leave enough time for the floor to dry completely in preparation for sealing. Upon my arrival back at the house I conducted some more damp tests to check that the floor was dry enough to seal using the previous readings as a benchmark. The results indicated that I was fine to proceed with the seal, so I applied a total of eight coats of Tile Doctor Seal & Go for durable protection. This was the product I recommended to my client as she wanted a nice, soft shine for her surface seal.
As you can see from the photos, the desired result was achieved to a high standard and needless to say my client was delighted with the transformation.
Julian Iancono
South East Wales
 Paul Arcoite
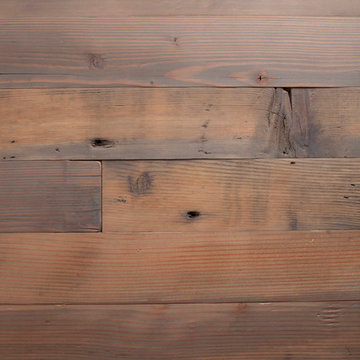
Reclaimed fir T&G with faded grey finish.
Photo: Sterling Lorence
Example of a beach style deck design in Vancouver
Example of a beach style deck design in Vancouver


 Tile Doctor Ltd
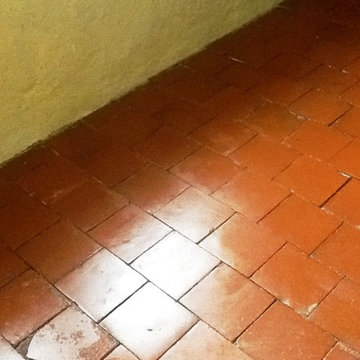
Here’s an interesting work I recently completed on a red Quarry tiled floor at a house in the town of Abington, Northampton. In post-war Britain (more specifically in the 1940s and 1950s), many new homes were built with Quarry tiled hallways and kitchens, so quite a popular feature back then. These floors are typically quite hard wearing and therefore ideal for such high traffic areas; additionally they don’t need a great deal of maintenance but their appearance will degrade over time.
In this particular house, the Quarry tiled floor had been covered with linoleum for many years, causing significant patches of visible black mould. The floor also had a loose tile (which I promptly reset to mitigate the potential tripping hazard) and splashes of paint due to a lack of precaution while the house was being renovated. Needless to say, the floor needed a lot of work.
Before beginning the cleaning I made sure to vacuum up all of the loose debris from the floor. I then applied Tile Doctor Remove & Go to the tiles, left it to dwell for a short period, and then agitated the area with a black stripping pad, adding water to aid the process. This helped to break down any old and ineffectual sealer, along with the paint splashes marking the tiles, leaving a much cleaner and more refined appearance.
I followed this up with Tile Doctor Grout Clean-Up to eliminate the odd speck of cement and grout haze dating back to when the floor was first installed; Gout Clean-up has an acid base so it’s not advised to leave it on the tiles for too long, consequently as soon as I was happy it had done the job I rinsed it off with water and give the floor a thorough wash down.
I used a wet-vacuum machine to extract as much water as possible and gave the floor a once over with steam cleaner which improves the evaporation of any remaining moisture by heating up the tiles.
After completing the cleaning process, I left the house to allow time for the floor to dry completely. Upon my return, I conducted a damp test which showed the floor needed to dry further before sealing so I left an industrial fan in place for a couple of hours to help speed things up.
Once I was satisfied that the floor was dry enough to take the sealant, I sealed the floor using Tile Doctor Colour Grow which is an interesting product that will not only provide durable stain protection but also improves the natural colours of the tile.
While the floor required a lot of time and work to restore, I think you will agree the results were certainly worth waiting for.
Phil Vissian
Northamptonshire Tile Doctor

 Tile Doctor Ltd
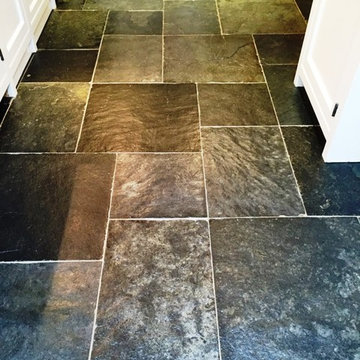
These photographs below are of a Slate Tiled Kitchen floor taken at a customer’s house in Henley-on-Thames which, as its name suggests, sits alongside the River Thames in Oxfordshire. My client’s Slate kitchen floor had recently been cleaned with unsuitable cleaning products which I suspect impacted the sealer leaving it looking dull. Sealers really to improve the look of a stone floor so unsurprisingly once the sealer had been damaged my client had been unable to find a cleaning product that could have any kind of positive effect on the tiles.
It’s fairly well known that many supermarket quality cleaners are only really designed for use on Ceramic or Porcelain tiled floors as they contain acids which strip away at sealers and acid sensitive stone floors, leaving the stone beneath vulnerable. So your select a cleaning product for your floor always read the small print on the back of the label and make sure you avoid anything that mentions not for use on acid sensitive stone; belter still Tile Doctor have a number of products for cleaning tiled floors including Neutral Cleaner and Stone Soap.
To clean the floor and remove any remaining sealer I first made a strong dilution of Tile Doctor Pro Clean which is a strong alkaline cleaner and then spread this over the floor, leaving it to dwell. This allows the cleaner to seep into the slate and get underneath, breakdown sealers and start to lift out ingrained dirt.
Following a dwelling period of roughly ten minutes, I agitated the floor periodically with a rotary machine fitted with a black scrubbing pad and scrubbed along the grout lines with a stiff grout brush. I then used a wet vacuum to extract the resultant slurry away and then followed up by rinsing the floor with clean water, and once again vacuumed up the residue.
Any stubborn areas were retreated until I was happy with the floor and then I left the floor to dry off completely overnight, in preparation for sealing the following day.
Upon my return to the house the following day, I ran some damp tests on different parts of the floor to check for any excess moisture which could potentially damage the performance of the sealer. Once I was satisfied that the floor was completely dry, I proceeded to seal the tiles using Tile Doctor Seal & Go. This will provide a robust surface seal for the future, along with an aesthetically pleasing low-sheen finish.
This sealer works particularly well on Slate tiles and, being a water-based sealant, additionally Seal & Go does not emit an unpleasant smell as it dries. Slate is quite a porous stone so I applied six coats of seal to provide long-lasting protection.
Barry Woodward
Oxfordshire Tile Doctor
 Gaile Guevara
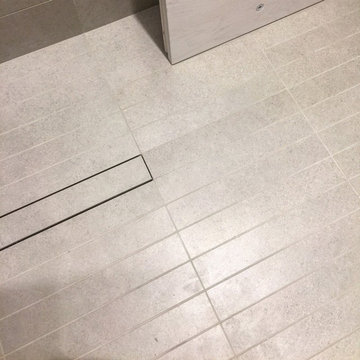
| DETAILS | in concrete constructed condos it's very rare that we ever want to have to core new drain locations. For the Master Ensuite more and more when we do full renovations down to studs we are removing the terrible 5' tubs and tiny itty bitty 3x3' showers. For some reason the idea of luxury meant squeeze as much as you can so you have a long list of features when you go to market. More and more we are doing oversized his and hers showers. So when you have a drain that you are repurposing from previous plumbing fixtures and the drain isn't centred, it's pretty much magic to have the team surprise you after several site meetings and evaluations - we opted for the plumbers favourite to use Schluter linear tile over drains and have the oversized tile cut to fit and provide the necessary grout lines for a flush shower threshold. This might seem like nothing but is everything when we have the perfect tile layout be inline with the what we think is a centred drain. These are the kind of details that make my OCD sister inside so happy, we call it the centre flush drain happy dance. Kudos to @caisleydevelopments @4thdimensionconstruction with the help of @stonetilevancouver for finding a perfect subtle sand toned oversized porcelain. A large format tile in a shade and same tone value as our hardwood floor and one shade darker than our Baltic Birch flush panels for ease of cleaning and hiding dirt. When you want things clean I opt for showers with minimal detailing to be in shades darker than white. Cleaning becomes less treacherous. Also gone is this idea of ugly accent tile, we opt for uniform tile one material throughout a bathroom floor to ceiling and if possible all walls. Construction geekery 101 continues
 User
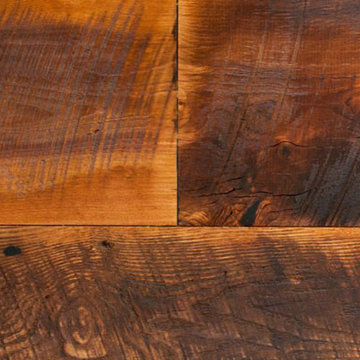
UserJewett Farms + Co’s Reclaimed Antique Historic Wide Plank flooring is harvested from century old barns and wooden industrial structures. Antique historic plank truly captures the feel of reclaimed flooring material. With a rich mixture of hardwoods these boards are wonderfully eye catching and make for a unique floor, wall or ceiling solution.
Our Reclaimed Antique Historic Plank flooring features a blend of band and circular saw marks and the marks of many years of use. The blend of species results in a rich mixture of grain and varied light and dark colors. These characteristics are seen in addition to the more common reclaimed traits of sound knots, cracks, saw kerfs, insect marks and nail holes.
Jewett Farms + Co’s Reclaimed Antique Historic Wide Plank flooring is available to be shipped throughout the United States from our New England headquarters.

 Tile Doctor Ltd
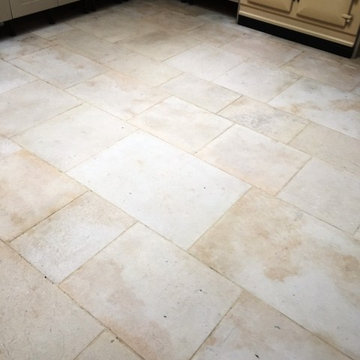
Bridgwater is known to be one of Somerset’s liveliest towns. With a history dating back over 1000 years, it has many traditions, including a carnival which happens every November, and is hailed as the world’s largest illumination procession.
What wasn’t looking lively, however, was this Limestone tiled kitchen floor at a house in the town. It had been laid five years previously but at the time of laying hadn’t been sealed with adequate amounts of sealer.
As a result, the Limestone had absorbed a lot of wet footprints and other dirty stains. The sealer simply broke down after a while, leaving the homeowner with a floor that never looked clean no matter how much they cleaned it – using all kinds of products. In fact, the tiles looked blackened and mouldy, as you can see in the photos below.
It was time for the homeowner to seek out professional assistance, so she decided to contact her local Tile Doctor. I was asked to completely restore the look of the floor – something the homeowner had deemed impossible at this point.
In practice, I knew the floor could be restored using the right products and methods including a really deep clean and resealing with the right type of sealer for these tiles.
I scrubbed in Tile Doctor Remove and Go, which is a powerful coatings remover which draws out ingrained stains and strips away any old sealer remaining on the tiles. The floor was then rinsed thoroughly with plain water to neutralise it, and the resulting soiled solution was extracted using a wet vacuum. I repeated the process on stubborn areas, eventually transforming the floor back to its natural and clean state.
I allowed the Limestone to dry out completely overnight before returning to the property to seal the tiles. This is important as the slightest amount of excess moisture can damage the performance of the sealer, and we would’ve been back to square one!
After checking with a damp meter, I could see everything was fine, so I proceeded to seal the floor with Tile Doctor Colour Grow, which is not only a robust impregnating sealer that will protect the floor going forward but also enhancing the natural colours in the stone at the same time.
In the space of two days, the Limestone tiles had been completely transformed. Now it had been properly sealed, the floor will be much easier to clean and therefore should stay looking great for a long time to come. The customer was very happy to have finally resolved the problem with some assistance from the Somerset Tile Doctor!
Dave Hurst
Somerset Tile Doctor
 Tile Doctor Ltd
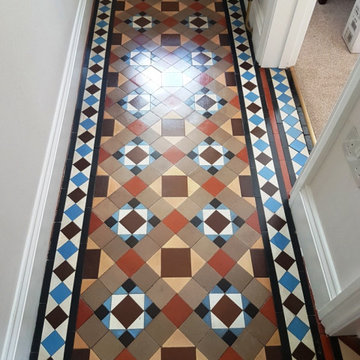
I was contacted by a homeowner who had moved into a property in the small Yorkshire market town of Masham and discovered a Victorian tiled floor under the hallway carpet. Realising this was a valuable period feature he was keen to see if it could be restored. As you can imagine he was delighted when I told him that it should be possible, and he was keen to get it uncovered and back on show.
After discussing the floor on the phone, I visited the property and removed the carpet so we could take a long look at the Victorian tile’s underneath. The carpet had protected the floor well and it was in good physical order, (i.e. no cracks etc.) it was just very dirty but was also marked with paint splashes from some untidy decorating work from the past. I confirmed none of these issues should present a problem and got the go ahead for the work to start.
There was no sealer on the floor, so I started the cleaning process using a medium dilution of Tile Doctor Pro-Clean which was worked into the tiles using a coarse 200-grit pad fitted to a rotary floor buffer. I then used a 400-grit hand-held diamond block to clean the edges which couldn’t be reached by the machine. This also removed the paint splashes which should have been on the skirting boards and not the floor!
The floor was then rinsed with water and the soil extracted with a wet vacuum. I was able to inspect the floor at this stage and spot treat areas that needed more work as they were a little stubborn. It wasn’t a large hallway and except for the paint it only needed a light clean. The result was I was able to complete the cleaning process by lunch time. I dried the floor as much as possible and left an air blower in the space for a couple of hours.
I returned later that afternoon and checked the floor for moisture using a damp meter. The floor was mostly dry, but some areas needed some more help with a heat gun. It was late summer and so still warm and so there was no need on this occasion to leave the floor overnight.
Once I was happy the floor was dry, I started sealing the tiles with the first of four coats of Tile Doctor Seal and Go. This is a specially formulated water-based blend of acrylic polymers that provides both a stain resistant surface seal and a durable low-sheen finish. It is perfect for a floor of this age as it allows moisture vapour to pass through, this is an important feature when considering a sealer for old floors which will not have a damp-proof membrane installed. If you were to apply a non-breathable sealer moisture can get trapped under the floor causing it to spread out to the walls resulting in rising damp.
The combination of the cleaning and new sealer brought the floor back to life and it now looked in keeping with the rest of the property which had numerous other period features. My client was over the moon with the difference and very happy to see the back of the grubby carpet.
Nigel Stoker
North West Yorkshire Tile Doctor
 Cloud Hunter
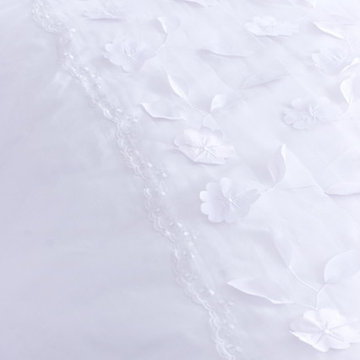
Have you been searching for your ‘Happily Ever After’? Look no more! This dreamy duvet cover topped with pure white textured floral and leaves trimmed with clear beading IS your happy end to a tiring day. It’s whimsical design is storybook friendly! Classically white but modernly individualistic with it’s unique feminine detail. Inspirations of french, vintage and natural elements come together to create this clean crisp bed set.
Freshly cut flower and leaves adorn the top of the duvet with a soft-to-the-touch but sturdy-through-the-wear chiffon overlay. Tear drop and leaf translucent beads trim the sides and foot. Top off the look with coordinating shams that are sold separately. Trimmed with beautiful high quality feathers to complete your new incredible nest look!
Support USA made products with Cloud Hunter, handmade in California with high end materials and a passion for quality. We’re a fashion minded home decor company who believes your bed should be as well dressed as you! Please view our unique bedding collections at www.cloudhunterco.com or contact us for our custom decor needs- we work with every style.
-Dry cleaning recommended
-Zipper closure
-Twin and queen ready to ship
-King and custom sizes available
-Coordinating shams and decor pillows sold separately
-Made in the USA
MADE WITH LOVE IN C A L I F O R N I A
34