
Search results for "Final method" in Home Design Ideas
 D-Trac Construction Inc.
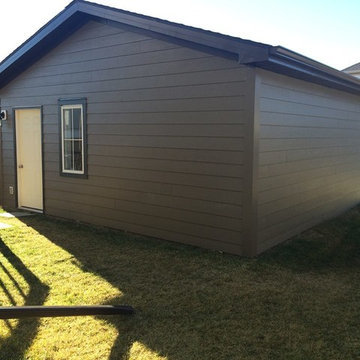
D-Trac Construction was contracted to address install issues from a previous contractor related to the workmanship and install of the exterior hardie board package. Because of the issues, the local county would not pass building permit inspection due to non-compliance with the Alberta Building Code and the Safety Codes Act.
Issues and corrective actions included:
1. Aluminum J and corner trim does not allow for the plank to be sealed (caulked at termination).
Corrective Action: Install 5/4" Smart Trim and color match caulk at all terminations.
2. Flashing detail on primary head flashings are cut and bent, creating point of entry on each end dam at the back side of drip.
Corrective Action: Install new primary head flashings using the fold method to create end dam.
3: Incorrect stagger on plank install, Not enough distance between butt joints on stagger, no slip plates at butt joints.
Corrective Action: Install new plank using a either a 24" or 32" stagger pattern, with aluminum slip plates behind all butt joints.
4: Many terminations through plank siding have no trim block, not sealed correctly.
Corrective Action: Install 5/4" trim blocks to allow plank to be sealed(caulked to termination.
At the end of the project, a final inspection was completed and the local county passed the building permit inspection.
 Free Lancing
Effective residential construction project management is crucial in today’s fast-moving building industry. It means overseeing every step of building a home, from planning to finishing, to ensure projects are completed time, within budget, and with high quality. Unlike commercial projects, residential projects require special attention to meet homeowners' unique needs and wishes, requiring a customized approach from the beginning to the end.
In 2025, the construction sector will use advanced technologies like AI and integrated project delivery (IPD) to streamline processes and improve stakeholder collaboration. However, project managers face significant challenges, including managing risks, maintaining quality control, and ensuring effective communication among team members.
A WIP Report (Work-in-Progress Report) is a key tool that helps track a project's budget, progress, and resource use. It provides clear insights, making managing costs easier, avoiding delays, and making informed decisions.
By adopting best practices and using modern construction management tools, project managers can overcome these challenges and deliver successful residential construction projects that meet client expectations and contribute to a sustainable future.
This article provides a brief overview of residential construction project management, highlights its importance, and touches on the challenges faced by project managers while incorporating the latest trends and technologies in the field.
Types of Residential Construction Management
Here are the different types of Residential Construction Management:
Single-Family Homes: These are standalone houses built for individual families. Managing these projects involves overseeing construction from planning to completion, ensuring that the home meets the owner's preferences and budget.
Multi-Family Housing: This includes apartments, condominiums, and townhouses. Projects of this type require managing multiple units, often with shared facilities, and ensuring compliance with local building codes.
Custom Home Building: This involves constructing homes tailored to specific client needs. Close collaboration with architects and designers is required to ensure the house reflects the owner's personality and preferences.
Home Renovation and Remodeling: These projects focus on updating or expanding existing homes. They often involve working with subcontractors for specialized tasks like electrical or plumbing work.
Components of Residential Construction Project Management
Managing a residential construction project requires carefully coordinating people, materials, and timelines. A well-structured approach ensures efficiency, cost control, and high-quality results.
Roles and Responsibilities
A project manager plays a vital role in residential construction. They oversee every step from planning to completion and ensure the project stays on schedule, within budget, and meets quality standards.
Project Manager’s Role in Home Construction
The project manager is responsible for organizing tasks, managing resources, and solving problems that arise during construction. They coordinate between different teams, track progress, and ensure safety regulations are followed.
Collaboration with Contractors, Architects, and Stakeholders
Successful residential construction requires teamwork. Project managers work closely with architects to bring designs to new heights, coordinate with contractors to manage labor and materials, and keep stakeholders (such as homeowners and investors) informed about project updates.
Client Communication and Expectations Management
Clear communication with clients is essential. The project manager keeps homeowners updated on timelines, changes, and challenges. Setting realistic expectations and providing regular updates, they help avoid misunderstandings and keep the project running smoothly.
Project Scope & Planning
Practical project planning sets the foundation for a successful residential construction project. It ensures clear goals, minimizes risks, and keeps the project on track.
Defining Project Objectives and Deliverables:
Clearly outlining what needs to be done and what the final result should look like is essential. This involves setting specific, measurable goals that align with the homeowner's vision and budget.
Managing Homeowner Expectations and Scope Creep:
Homeowners often have changing needs or ideas. Effective project managers must manage these expectations to prevent "scope creep," which can delay projects and increase costs. This involves open communication and setting clear boundaries.
Ensuring Compliance with Zoning Laws and Permits:
Before construction begins, it's crucial to ensure that all necessary permits are obtained and that the project complies with local zoning laws. This step avoids costly fines and delays, ensuring the project moves forward smoothly.
Budgeting & Cost Control
Proper budgeting is essential for keeping residential construction projects financially viable. Effective cost management prevents overspending and ensures profitability.
Accurate Cost Estimation for Residential Projects
A precise cost estimate considers labor, materials, permits, and unexpected expenses. Using historical data and Sage 300 CRE for financial management improves accuracy and helps set realistic budgets.
Budget Allocation and Tracking
Allocating funds efficiently ensures that each phase of the project receives the necessary resources. Tracking expenses through Construction & Financial Dashboards allows for real-time monitoring and early detection of budget deviations.
Preventing Budget Overruns
Uncontrolled costs can derail a project. Regular financial reviews, automated alerts for overspending, and contingency planning help keep expenses in check and prevent financial strain.
Scheduling & Timeline Management
Timely project completion is crucial in residential construction. Effective scheduling minimizes delays and ensures a smooth workflow.
Creating Detailed Project Schedules
A structured schedule outlines all tasks, deadlines, and dependencies. Breaking down the project into phases, planning, execution, and finishing, helps maintain order and clarity.
Preventing Delays & Meeting Deadlines
Delays can result from labor shortages, weather conditions, or supply chain issues. To avoid problems, it’s good to check for risks ahead of time, add extra time to schedules, and keep everyone on the same page.
Using Gantt Charts and Critical Path Methods
CPM for Construction helps identify critical activities that directly impact project completion, while Gantt charts provide a visual timeline of tasks. Both tools optimize scheduling and improve efficiency.
Residential Construction Project Management Phases
Managing a residential construction project effectively requires a structured approach through various phases. Each phase plays a critical role in ensuring the project's success, from initial planning to completion.
Pre-Construction Phase
The pre-construction phase sets the foundation for a smooth and efficient building process. Proper planning at this stage helps prevent costly changes and delays later.
Site Analysis & Approvals: A thorough site analysis assesses soil conditions, topography, and environmental factors. Feasibility studies evaluate project viability, including costs and regulatory compliance. Obtaining zoning approvals, permits, and other legal clearances is crucial before breaking ground.
Selecting Materials and Procurement Strategies: Choosing the right materials impacts durability, sustainability, and cost efficiency. A well-planned procurement strategy, including bulk purchasing and reliable supplier partnerships, ensures timely delivery and cost savings. Using Sage 300 CRE for procurement management helps streamline material sourcing and financial planning.
Construction Phase
The construction phase transforms plans into reality. Effective coordination and strict quality control ensure a successful build.
Resource Allocation and Workflow Coordination: Efficiently managing labor, equipment, and materials is key to maintaining progress. Using CPM for Construction, project managers can allocate resources strategically, prevent bottlenecks, and optimize workflows for timely completion.
Project Closeout & Handover
The final phase of residential construction project management is crucial for ensuring a smooth transition from construction to occupancy. Proper closeout procedures guarantee quality, client satisfaction, and long-term project success.
Final Inspections and Quality Assurance: Before finishing the project, a final inspection checks that everything meets safety rules and quality standards. Any problems need to be fixed quickly. Using Procore helps make inspections and tracking issues easier, ensuring a high-quality final product.
Client Walkthrough and Support: A final check helps homeowners see the finished work, ask questions, and make sure it meets their expectations. This is also a chance to explain important home features and maintenance tips. Good communication here builds trust and strengthens relationships.
Warranty Management and Feedback: Efficient warranty management ensures clients get quick help for any issues after construction. A clear process for tracking requests and keeping in touch with homeowners boosts satisfaction. Collecting feedback helps improve future projects. Using S-Curve Forecasting tracks performance trends and refines management strategies.
Software for Residential Construction Project Management
The integration of technology in residential construction project management has revolutionized the way projects are planned, executed, and monitored. Digital tools streamline operations, reduce costs, and improve communication, making them essential for modern construction firms.
Importance of Digital Tools
Investing in digital tools is crucial for construction firms as it transforms the industry by enhancing efficiency, accuracy, and collaboration across the entire project lifecycle. They also improve project management by streamlining processes, automating tasks, and facilitating real-time stakeholder communication.
Top Construction Management Software for Residential Projects
Several software solutions are available for managing residential construction projects:
Procore: Known for its comprehensive project management features, including document management and collaboration tools.
Sage 300 CRE: Offers robust accounting and financial management capabilities, ideal for large-scale construction projects.
Buildertrend: Specializes in residential construction, providing tools for project scheduling, budgeting, and client communication.
CoConstruct: Focuses on custom home building and remodeling, offering features for estimating, scheduling, and project management.
WIP Reports: Useful for tracking work-in-progress and managing project finances effectively.
Features Comparison and Best Use Cases:
Procore: Best for large projects requiring extensive collaboration and document management.
Sage 300 CRE: Ideal for firms needing robust financial management.
Buildertrend: Suitable for residential builders focusing on client communication and project scheduling.
CoConstruct: Perfect for custom home builders who need detailed estimating and scheduling tools.
WIP Reports: Useful for firms needing to track project finances closely.
How Software Improves Project Efficiency
Construction management software significantly enhances project efficiency in several ways:
Automating Accounting and Job Costing: Software like Sage 300 CRE automates financial tasks, reducing manual errors and improving budget tracking.
Streamlining Document Management and Communication: Tools like Procore centralize documents and facilitate real-time communication among team members, reducing misunderstandings and delays.
Mobile-Friendly Solutions for Real-Time Tracking: Mobile apps from platforms like Buildertrend allow for on-site access to project data, enabling real-time tracking and decision-making.
These digital tools and software solutions are essential for modern residential construction project management, offering benefits such as improved efficiency, enhanced collaboration, and better financial control.
Challenges in Residential Construction Project Management
Residential construction projects face a variety of challenges that can impact their success. Here are some of the key issues project managers encounter:
Managing Subcontractors and Labor Shortages
One of the biggest challenges in residential construction is managing subcontractors and dealing with labor shortages. Subcontractors often have their own schedules and priorities, which can lead to delays if not coordinated properly. Additionally, labor shortages can slow down projects and increase costs due to the need for overtime or hiring temporary workers.
Budget Overruns and Unexpected Costs
Budget overruns are common in residential construction due to factors like material price fluctuations, unexpected site conditions, or changes in project scope. Effective budget management involves regularly monitoring expenses and having contingency plans for unexpected costs.
Changing Construction and Eco Rules
Construction and Eco Rules are always changing, so project managers need to keep up with the latest regulations. This involves following guidelines for saving energy, protecting the environment, and ensuring safety. Ignoring these rules can lead to fines, delays, or even stopping the project.
Best Practices
To ensure your residential construction projects run smoothly and successfully, follow these essential best practices:
Setting Clear Project Goals and Milestones
Clearly defining what you want to achieve is the first step to success. Set specific, measurable, achievable, relevant, and time-bound (SMART) goals. This helps everyone involved understand what needs to be done and by when. For example, instead of saying "build a house," say "build a house with three bedrooms and two bathrooms within the next nine months."
Stakeholder Collaboration
Good communication is key to keeping everyone on the same page. Regular meetings with contractors, suppliers, and homeowners help prevent misunderstandings and ensure that everyone knows what's happening and what's next. This open dialogue also helps resolve issues quickly, preventing small problems from becoming big delays.
Using Data-Driven Insights for Decision-Making
Making decisions based on facts rather than guesses is crucial. Use data and analytics to understand project progress, identify potential issues early, and make informed decisions. For instance, if data shows that a particular material is consistently causing delays, you can plan ahead to avoid those delays in the future.
Proactive Risk Management Strategies
Things don't always go as planned, so being prepared is essential. Identify potential risks early and have a plan to manage them. This might include having backup suppliers, planning for weather conditions, or setting aside extra funds for unexpected expenses. Being proactive can prevent small issues from turning into major problems.
Conclusion
Effective residential construction project management requires careful planning, clear communication, and the right digital tools. From single-family homes to multi-family housing and custom projects, managing timelines, budgets, and quality is essential for success.
By following best practices, using project management software, and staying ahead of industry trends, project managers can ensure smooth execution and client satisfaction despite challenges like labor shortages, budget overruns, and regulatory compliance; modern technology and strategic planning help mitigate risks.
Construction firms can improve efficiency, enhance collaboration, and maintain financial control by adopting advanced tools like Procore, Sage 300 CRE, and Buildertrend. A well-managed project delivers a quality home and builds trust and long-term success in the industry.
FAQs
What is residential construction project management?
It involves overseeing all aspects of building residential properties, from initial planning and design to construction and completion, ensuring projects are completed on time, within budget, and to the desired quality standards.
How can I prevent budget overruns in my construction project?
Accurate cost estimation, continuous budget tracking, and having contingency plans for unexpected expenses are key strategies to prevent budget overruns.
What are the main stages of a residential construction project?
The primary stages include design, pre-construction, procurement, and construction.
How does construction management software improve project efficiency?
It streamlines processes like scheduling, budgeting, and communication, providing real-time data access and collaboration among stakeholders, which enhances overall project efficiency.
How can I ensure my project complies with local building codes and regulations?
Engage professionals familiar with local laws, obtain all necessary permits before starting, and conduct regular inspections to ensure adherence to building codes and regulations.
 Edgewood
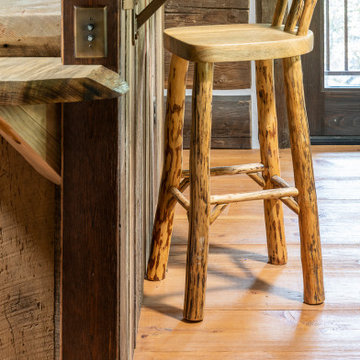
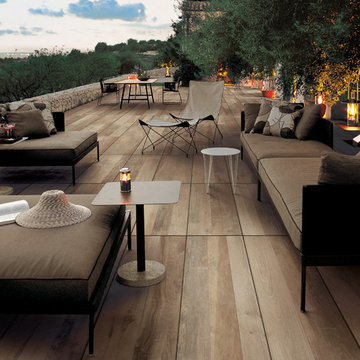
If your architect could invent a method that provided wood products for your home with just the right amount of aging, it would look like this.
The SchaferWoodTM process starts with helping you customize a full materials package, including structural timbers/logs, interior paneling, case/base, flooring, exterior siding and trim, all in your preferred colors and textures, and in sizes beyond what mainstream suppliers can offer.
We then sustainably harvest the highest grade, large residual logs, and custom cut each piece for your order (leaving nothing to waste).
The wood acquires its beautifully aged appearance through a proprietary process that combines heavy double brushing/hewning, charring,
and finish coloring with organic, water-based materials.
Finally, we deliver the complete package to your site when you need it– never too early or late.
Timeless. Antique. Accurate. Intelligent. This is SchaferWood.
Find the right local pro for your project
 Windy City Painters
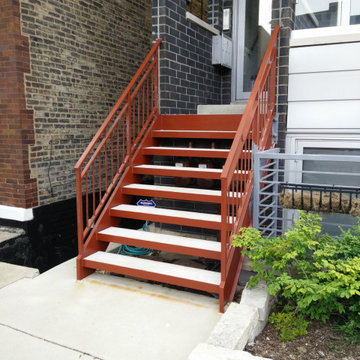
Does your iron fence look like Chicago winters have been winning the battle for years? That slow orange spread across pickets and rails is not just an eyesore - it is active corrosion undermining the structural integrity of metalwork that frames some of Chicago's most architecturally significant residential properties. Windy City Painters addresses iron fence rust at the source, using professional-grade rust conversion chemistry and direct-to-metal coatings engineered for the specific abuse Chicago's climate delivers.
PROJECT OVERVIEW
This project involved a heavily rusted ornamental iron fence on a Chicago North Side residential property. Rust had progressed beyond surface oxidation into moderate pitting on lower rails, a pattern Windy City Painters sees frequently on properties within blocks of treated roadways where salt drift accelerates corrosion. The scope included mechanical descaling, chemical rust conversion, DTM priming, and a durable gloss topcoat matched to the original fence color.
MATERIALS AND PRODUCTS
Ospho Rust Converter: A phosphoric acid-based treatment that chemically reacts with iron oxide, converting it to iron phosphate - a stable, paintable compound. Corroseal Water-Based Rust Converter is an alternative for situations requiring lower VOC handling. Rust-Oleum Professional DTM Primer and Sherwin-Williams DTM Acrylic Coating serve as the primary coating system, formulated for direct metal adhesion with built-in rust inhibitors. For structurally compromised sections, welding is coordinated before any chemical or coating work begins.
THE PROCESS
Step 1 - Mechanical Preparation: Wire wheel grinding on an angle grinder removes loose rust scale, mill scale, and flaking paint. For advanced pitting, Windy City Painters deploys a needle gun descaler, which impacts the metal surface thousands of times per minute to drive scale from deep cavities. This step determines whether the fence can be coated or needs welding first.
Step 2 - Chemical Rust Conversion: Ospho or Corroseal is brushed onto all remaining rust surface. These products do not simply seal rust - they react with it. The conversion process takes 24 hours to fully cure before topcoating. Skipping this step is the single most common reason iron fence paint jobs fail prematurely.
Step 3 - DTM Priming: Sherwin-Williams DTM or Rust-Oleum DTM primer is applied by brush to ensure full penetration around decorative elements, picket tips, and weld joints. Spray application is used on open sections for even film build. DTM formulations bond directly to prepared metal without a separate shop primer.
Step 4 - Finish Coating: A DTM topcoat in gloss or semi-gloss provides the final weather barrier. Gloss is preferred for iron fencing because the harder surface sheds water more effectively and resists dirt adhesion between maintenance cycles. Windy City Painters applies two finish coats for maximum film thickness.
CHICAGO-SPECIFIC CHALLENGES
Chicago's freeze-thaw cycle is the primary enemy of iron fence coatings. Water infiltrates micro-cracks in paint film, freezes, expands, and delaminate coating from beneath. Properties on the North Side and Near West Side also contend with lake-effect humidity that keeps metal surfaces damp for extended periods, slowing cure times and promoting under-film corrosion if preparation is inadequate. Greystones and Victorian brownstones typically feature ornate cast iron or wrought iron fencing with complex geometries that trap moisture and demand hand-brush application to fully coat recesses.
WHAT TO EXPECT LONG-TERM
A properly prepared and coated iron fence in Chicago should hold 5-8 years before requiring recoating. Annual inspection of weld joints, picket tips, and base rails closest to grade will identify early rust return. Addressing small spots with touch-up converter and primer extends service life significantly between full recoats.
PRO TIPS
Tip 1: Never pressure wash a rusted iron fence immediately before painting. Water drives moisture into pits and delays the surface drying needed for chemical converter adhesion. Allow 48 hours of dry weather before prep begins.
Tip 2: Picket tips and rail ends are the first failure points. These end-grain equivalent areas on metal concentrate corrosion. Ask your painter to apply an extra brush coat to every tip and terminus.
Tip 3: Black is the traditional and most durable color choice for iron fencing. Dark pigments absorb UV rather than reflecting it, reducing thermal cycling stress on the paint film at color change boundaries.
FAQ
Q: What does iron fence painting cost in Chicago?
A: Most residential iron fence painting in Chicago ranges from $400 to $1,200 depending on linear footage, rust severity, prep method required, and whether structural welding is needed before Windy City Painters can coat the surface.
Q: How do I know if my fence needs a welder before painting?
A: If you can press a screwdriver through a rail or picket, the metal wall has failed. Windy City Painters inspects all fencing before quoting and identifies weld-required sections so repairs happen before any coating investment.
Q: Is Ospho or Corroseal better for my fence?
A: Both convert rust effectively. Ospho is solvent-based and fast-acting, preferred for heavy rust. Corroseal is water-based with lower odor, preferred in enclosed or residential settings where off-gassing is a concern. Windy City Painters selects based on site conditions.
Q: Can iron fence painting be done in winter in Chicago?
A: Application requires temperatures above 50 degrees Fahrenheit for DTM coatings to cure properly. Most iron fence painting in Chicago runs April through October, with scheduling flexibility based on extended warm stretches.
Q: How do I maintain my fence between professional recoats?
A: Inspect annually in spring. Sand any rust spots to bare metal with 80-grit paper, apply Ospho, let cure 24 hours, then spot-prime with DTM primer and touch up with finish coat. Windy City Painters offers maintenance inspections.
Q: Do you paint courtyard building fences and coach house gates?
A: Yes. Multi-unit courtyard buildings and coach houses are common in the North Side neighborhoods Windy City Painters serves. We coordinate with property managers and HOAs for larger perimeter fence projects.
Q: How long after painting can I touch the fence?
A: DTM coatings are typically dry to touch in 2-4 hours and hard dry in 24 hours. Full cure for maximum hardness takes 7 days. Windy City Painters advises against pressure washing or heavy contact during that cure window.
Visit windypainters.com to request your free iron fence assessment and project quote.
 Light it Up AV & Turf
Project Description
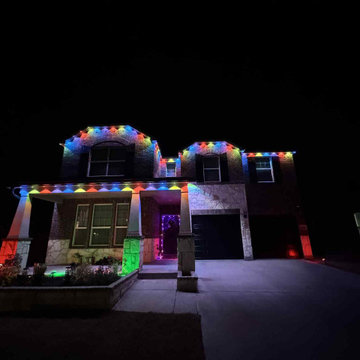
Govee Permanent Outdoor Lights 2 Precision Home Installation
This project features the professional installation of the next-generation Govee Permanent Outdoor Lights 2 system. Known for their upgraded brightness and enhanced color rendering, these lights require a precise, calculated layout—especially since the manufacturer guidelines restrict cutting into the main line, presenting a unique installation challenge.
Key Features of This Installation:
Next-Gen Exterior Illumination: Outfitted with the newly released Govee Permanent Outdoor Lights 2, delivering brilliant architectural down-lighting, incredible holiday presets, and daily accent lighting.
Creative Technical Problem Solving: Because these specialized strands could not be cut without voiding the integrity of the system, we meticulously engineered the run layout. To achieve a perfectly flush finish at the roofline edge, we successfully executed a custom shortening and capping technique on the final strands.
Flawless Eave Integration: The lights were mounted at the optimal distance from the fascia to ensure a perfectly uniform, triangular cone wash down the home's exterior walls, eliminating hot spots and dark gaps.
Smart Ecosystem Control: Fully integrated into the homeowner's smart ecosystem, allowing for voice control, scheduled automation, and endless customization through the native app interface.
Our Specialized Lighting Expertise
Smart lighting systems require more than just hanging a strand—they require precision planning. We specialize in handling high-end retail and commercial systems, providing:
Advanced Layout Mapping: Ensuring your runs look symmetrical and perfectly tailored to your roofline before a single clip is mounted.
Out-of-the-Box Troubleshooting: Finding safe, manufacturer-approved technical workarounds for complex roof lines where standard plug-and-play methods fall short.
Clean Wire Management: Tucking and hiding all jump wires and power supplies for a seamless daytime appearance.
 Windy City Painters
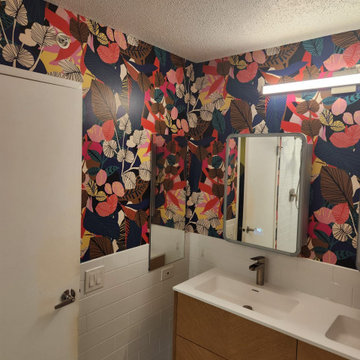
Expert wallpaper installer Lakeview services transform Chicago homes with precision and style. This stunning project showcases our commitment to quality craftsmanship in one of Chicago's most desirable neighborhoods.
Project Overview and Architecture
This beautiful Lakeview greystone required careful wallpaper installation that would complement the home's original architectural details. The vintage building's unique character demanded specialized techniques to ensure perfect results while preserving the historic charm that makes these homes so special.
Materials and Products
We utilized premium wallpaper adhesive, professional smoothing tools, and high-quality materials specifically chosen for Chicago's climate conditions. Our team selected products that work exceptionally well with the plaster walls common in vintage Lakeview homes.
Installation Process
First, we thoroughly prepared surfaces by repairing imperfections and priming walls. Next, we precisely measured and cut each strip, ensuring perfect pattern alignment. Then, we applied adhesive evenly and positioned wallpaper with expert precision. Finally, we eliminated bubbles, trimmed edges, and completed finishing touches.
Chicago Home Challenges
Lakeview's vintage homes present unique challenges including uneven plaster walls, settling issues, and temperature fluctuations. Our wallpaper installer Lakeview expertise addresses these concerns with specialized preparation techniques and climate-appropriate materials that ensure lasting results.
Results and Quality
The finished installation showcases flawless pattern matching, smooth surfaces, and crisp edges that enhance the room's architectural features. This wallpaper installer Lakeview project demonstrates our commitment to excellence and attention to detail.
Professional Tips
Homeowners should always hire experienced professionals for wallpaper installation. Proper surface preparation is crucial for longevity. Additionally, choosing quality materials appropriate for Chicago's climate ensures your investment lasts for years.
See more work and request free estimate at windypainters.com.
Q: Why choose professional wallpaper installer Lakeview services over DIY? / A: Professional installation prevents costly mistakes, ensures proper adhesion, and guarantees beautiful results that enhance your home's value and appearance.
Q: How do you handle vintage Lakeview home challenges? / A: Our wallpaper installer Lakeview team addresses plaster walls, settling issues, and architectural details with specialized techniques and appropriate materials.
Q: What preparation is required before wallpaper installation? / A: We repair wall imperfections, apply primer, ensure smooth surfaces, and address any moisture issues for optimal wallpaper installer Lakeview results.
Q: How long does professional wallpaper installation take? / A: Most rooms require 1-2 days depending on complexity, though our wallpaper installer Lakeview team works efficiently while maintaining quality standards.
Q: Can you work with designer or specialty wallpapers? / A: Absolutely, our wallpaper installer Lakeview experts handle luxury papers, grasscloth, murals, and specialty materials with appropriate techniques and care.
Q: Do you remove existing wallpaper before installation? / A: Yes, we provide complete removal services using safe methods that protect your walls and prepare surfaces for new wallpaper installer Lakeview projects.
Q: How do you ensure pattern alignment and matching? / A: Our wallpaper installer Lakeview professionals use precise measuring, professional tools, and years of experience to achieve perfect pattern continuity.
Q: What types of walls can accommodate wallpaper? / A: We install wallpaper on various surfaces including drywall, plaster, and painted walls after proper preparation for wallpaper installer Lakeview projects.
Q: How do you handle corners and trim work? / A: Our wallpaper installer Lakeview team uses specialized techniques for inside corners, outside corners, and detailed trim work ensuring professional results.
Q: What warranty do you provide on installation? / A: Windy City Painters guarantees our wallpaper installer Lakeview work with comprehensive warranty coverage protecting your investment and ensuring satisfaction.
 Light it Up AV & Turf
Project Description
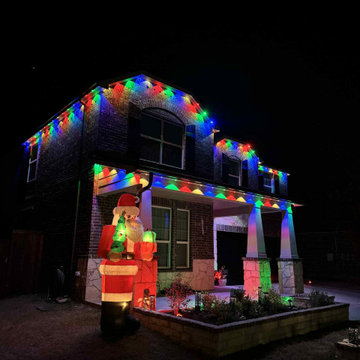
Govee Permanent Outdoor Lights 2 Precision Home Installation
This project features the professional installation of the next-generation Govee Permanent Outdoor Lights 2 system. Known for their upgraded brightness and enhanced color rendering, these lights require a precise, calculated layout—especially since the manufacturer guidelines restrict cutting into the main line, presenting a unique installation challenge.
Key Features of This Installation:
Next-Gen Exterior Illumination: Outfitted with the newly released Govee Permanent Outdoor Lights 2, delivering brilliant architectural down-lighting, incredible holiday presets, and daily accent lighting.
Creative Technical Problem Solving: Because these specialized strands could not be cut without voiding the integrity of the system, we meticulously engineered the run layout. To achieve a perfectly flush finish at the roofline edge, we successfully executed a custom shortening and capping technique on the final strands.
Flawless Eave Integration: The lights were mounted at the optimal distance from the fascia to ensure a perfectly uniform, triangular cone wash down the home's exterior walls, eliminating hot spots and dark gaps.
Smart Ecosystem Control: Fully integrated into the homeowner's smart ecosystem, allowing for voice control, scheduled automation, and endless customization through the native app interface.
Our Specialized Lighting Expertise
Smart lighting systems require more than just hanging a strand—they require precision planning. We specialize in handling high-end retail and commercial systems, providing:
Advanced Layout Mapping: Ensuring your runs look symmetrical and perfectly tailored to your roofline before a single clip is mounted.
Out-of-the-Box Troubleshooting: Finding safe, manufacturer-approved technical workarounds for complex roof lines where standard plug-and-play methods fall short.
Clean Wire Management: Tucking and hiding all jump wires and power supplies for a seamless daytime appearance.
 Darlene Shaw Design Inc.
kwestimages.com
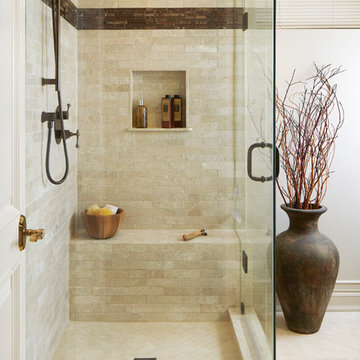
Inspiration for a transitional beige tile bathroom remodel in Toronto with a niche
Inspiration for a transitional beige tile bathroom remodel in Toronto with a niche

 Light it Up AV & Turf
Project Description
Govee Permanent Outdoor Lights 2 Precision Home Installation
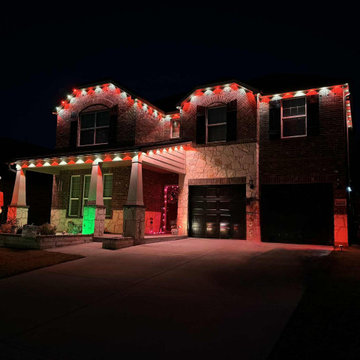
This project features the professional installation of the next-generation Govee Permanent Outdoor Lights 2 system. Known for their upgraded brightness and enhanced color rendering, these lights require a precise, calculated layout—especially since the manufacturer guidelines restrict cutting into the main line, presenting a unique installation challenge.
Key Features of This Installation:
Next-Gen Exterior Illumination: Outfitted with the newly released Govee Permanent Outdoor Lights 2, delivering brilliant architectural down-lighting, incredible holiday presets, and daily accent lighting.
Creative Technical Problem Solving: Because these specialized strands could not be cut without voiding the integrity of the system, we meticulously engineered the run layout. To achieve a perfectly flush finish at the roofline edge, we successfully executed a custom shortening and capping technique on the final strands.
Flawless Eave Integration: The lights were mounted at the optimal distance from the fascia to ensure a perfectly uniform, triangular cone wash down the home's exterior walls, eliminating hot spots and dark gaps.
Smart Ecosystem Control: Fully integrated into the homeowner's smart ecosystem, allowing for voice control, scheduled automation, and endless customization through the native app interface.
Our Specialized Lighting Expertise
Smart lighting systems require more than just hanging a strand—they require precision planning. We specialize in handling high-end retail and commercial systems, providing:
Advanced Layout Mapping: Ensuring your runs look symmetrical and perfectly tailored to your roofline before a single clip is mounted.
Out-of-the-Box Troubleshooting: Finding safe, manufacturer-approved technical workarounds for complex roof lines where standard plug-and-play methods fall short.
Clean Wire Management: Tucking and hiding all jump wires and power supplies for a seamless daytime appearance.
6