
Search results for "Framework" in Home Design Ideas
 Cassoni Furniture & Accessories
- RIPPLES TABLE.
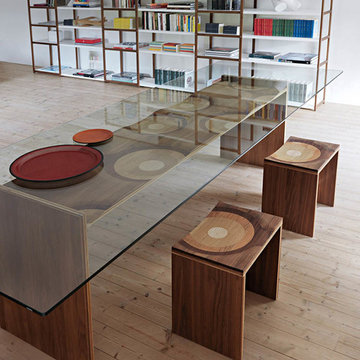
The Ripples bench by Toyo Ito, winner of the 2004 Compasso d'Oro, has blossomed into a collection of different furniture types. Amongst them, we may highlight the Ripples table, featuring a transparent glass table top that presents its impressive structure, fabricated with a laminated composite of five different solid woods namely, walnut, mahogany, cherry, oak and ash. The fibre colors and directions are purposefully defined to produce an elegant polychromatic effect. This unique and poetic woodwork, created within a strict aesthetic framework, is reminiscent of fluid motion, not unlike the ripple-effect produced by a stone tossed in the water.
98''3/8W x 39''3/8D x 29''1/2H.
98''3/8W x 43''3/8D x 29''1/2H.
110''1/4W x 39''3/8D x 29''1/2H.
110''1/4W x 43''3/8D x 29''1/2H.
http://ow.ly/3yApfZ
- RIPPLES STOOL.
The Ripples bench by Toyo Ito, winner of the 2004 Golden Compass, has blossomed into a collection of different furniture complements. Amongst them, we may highlight the Ripples stool, fabricated with a laminated composite of five different solid woods. The seat shape, carved with industrial technology yet entirely hand-finished, feels soft and rich due to both the ductility of wood and Horm's passion for craftsmanship. Slide your hand along the surface to feel the seamless transition between walnut, mahogany, cherry, oak and ash.
16''1/8W x 16''1/8D x 17''3/4H.
16''1/8W x 16''1/8D x 30''3/8H.
http://ow.ly/3yzwu5
- ’93-’08 BOOKCASE.
The '93-'08 bookcase features a solid wood structure that never breaks the MDF shelves flow nor resorts to backs. The result is a composition of great visual lightness and excellent stability. Each shelf presents a different shoulder and height to create an orthogonal, ever-present, visual rhythm. Is a versatile bookcase system that allows you to build many combinations.
80''3/4W x 13''5/8D x 85''7/8H.
Other widths: 89''3/8 - 107''- 122,83.
http://ow.ly/3yzTGT
 Talon Construction Inc.
Designing and building a kitchen addition is a complex process that involves multiple steps and considerations. Here is a general outline to help you get started on your kitchen addition project:
Define Your Goals and Budget:
• Determine the purpose of the kitchen addition. Is it for more cooking space, a dining area, or a combination of both?
• Establish a realistic budget for your project. Consider all costs, including construction, permits, materials, and furnishings.
Hire a Design Professional:
• Seek the services of a design build company who specializes in kitchen additions.
• Discuss your vision, needs, and budget with the design professional to create a design concept.
Site Evaluation:
• Assess the existing space and structural condition of your home to ensure it can support the addition.
• Consider factors like zoning regulations, setbacks, and building codes.
Design Development:
• Collaborate with your design professional to refine the concept, including the layout, size, and architectural style.
• Choose materials, finishes, and fixtures that fit your design and budget.
Obtain Permits:
• Consult with your local design build contractor to determine the necessary permits and approvals.
• Prepare and submit all required documents, including architectural drawings and engineering plans.
Create Construction Documents:
• Work with your design build professional to develop detailed construction drawings and specifications.
• These documents will serve as a guide for contractors during construction.
Hire a design build contractor:
• Check references, credentials, and licenses before selecting a contractor.
• Sign a detailed contract that outlines the scope of work, timeline, and payment schedule.
Construction Phase:
• Demolition: If needed, remove any existing structures or walls.
• Foundation: Construct the foundation for the addition.
• Framing: Build the structural framework of the addition.
• Plumbing, Electrical, and HVAC: Install or update utilities as required.
• Insulation: Ensure proper insulation for energy efficiency.
• Drywall and Finish Work: Complete the walls and ceilings.
• Flooring and Cabinetry: Install flooring and kitchen cabinets.
• Appliances and Fixtures: Add appliances, plumbing fixtures, and lighting.
• Paint and Finish: Apply paint and finishes to achieve the desired look.
• Final Inspection: Schedule inspections to ensure compliance with building codes.
Final Inspections and Approvals:
• Arrange for final inspections to ensure the addition meets all safety and code requirements.
• Obtain any necessary certificates of occupancy or compliance.
Move In and Enjoy:
• Once all inspections and approvals are received, you can move into your new kitchen addition and start enjoying it.
Remember that every kitchen addition project is unique, so adapt this outline to your specific needs and circumstances. Consulting with professionals and obtaining the required permits and inspections is crucial to a successful and safe project.
 Contemporary Home Construction, LLC
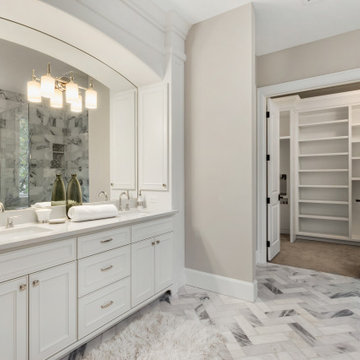
Nestled in the charming city of Powell, Ohio, the "Serenity Flow" project transforms a conventional master bathroom into a luxurious retreat, featuring an advanced body spray shower system. This renovation focuses on creating a spa-like atmosphere, where functionality meets relaxation, crafting an escape within the comfort of home. Designed for homeowners seeking a sanctuary to unwind, this master bath offers the ultimate showering experience, combining modern technology with timeless aesthetics.
Design Highlights:
Body Spray Shower System: At the heart of the renovation is a state-of-the-art body spray shower system, designed to envelop the body in a comforting embrace of water. Adjustable body jets, combined with a rain shower head, deliver a fully immersive experience, customizable to each user’s preference for intensity and temperature.
Elegant Aesthetics: The shower area is encased in frameless glass, accentuating the open, airy feel of the space. The walls and floors are adorned with premium marble tiles, creating a seamless look that elevates the overall design. Brushed nickel fixtures add a touch of sophistication, perfectly complementing the neutral color palette.
Integrated Lighting: Soft, recessed LED lighting is strategically placed to enhance the serene atmosphere. Dimmable controls allow for adjustable lighting levels, ensuring the space can be tailored to various moods and times of the day.
Functional Elegance: The master bath also features a double vanity with ample storage, a freestanding soaking tub, and a private toilet area. Each element is carefully selected to maintain the balance between beauty and practicality, ensuring the space is both inviting and efficient.
Project Execution:
The transformation of the Powell, Ohio master bath into the "Serenity Flow" oasis was executed with meticulous attention to detail. From the initial design phase to the final touches, every aspect was crafted to achieve a harmonious blend of luxury and comfort. The body spray shower system, serving as the centerpiece, required precise installation and integration with the bathroom's existing plumbing framework, showcasing the skill and expertise of our team.
The Outcome:
"Serenity Flow" emerges as a beacon of relaxation and rejuvenation. This master bath renovation in Powell, Ohio, redefines the concept of a private retreat, offering homeowners an exclusive spa experience every day. The combination of the advanced body spray shower system with the elegant design elements ensures this master bath is not just a functional space but a haven of tranquility.
Reflections:
This project illustrates the transformative power of thoughtful design and innovative technology in creating spaces that nurture the body and soul. The "Serenity Flow" master bath in Powell, Ohio, stands as a testament to our commitment to delivering bespoke living experiences, where every detail contributes to the well-being and comfort of the homeowners.
Find the right local pro for your project
 Talon Construction Inc.
Designing and building a kitchen addition is a complex process that involves multiple steps and considerations. Here is a general outline to help you get started on your kitchen addition project:
Define Your Goals and Budget:
• Determine the purpose of the kitchen addition. Is it for more cooking space, a dining area, or a combination of both?
• Establish a realistic budget for your project. Consider all costs, including construction, permits, materials, and furnishings.
Hire a Design Professional:
• Seek the services of a design build company who specializes in kitchen additions.
• Discuss your vision, needs, and budget with the design professional to create a design concept.
Site Evaluation:
• Assess the existing space and structural condition of your home to ensure it can support the addition.
• Consider factors like zoning regulations, setbacks, and building codes.
Design Development:
• Collaborate with your design professional to refine the concept, including the layout, size, and architectural style.
• Choose materials, finishes, and fixtures that fit your design and budget.
Obtain Permits:
• Consult with your local design build contractor to determine the necessary permits and approvals.
• Prepare and submit all required documents, including architectural drawings and engineering plans.
Create Construction Documents:
• Work with your design build professional to develop detailed construction drawings and specifications.
• These documents will serve as a guide for contractors during construction.
Hire a design build contractor:
• Check references, credentials, and licenses before selecting a contractor.
• Sign a detailed contract that outlines the scope of work, timeline, and payment schedule.
Construction Phase:
• Demolition: If needed, remove any existing structures or walls.
• Foundation: Construct the foundation for the addition.
• Framing: Build the structural framework of the addition.
• Plumbing, Electrical, and HVAC: Install or update utilities as required.
• Insulation: Ensure proper insulation for energy efficiency.
• Drywall and Finish Work: Complete the walls and ceilings.
• Flooring and Cabinetry: Install flooring and kitchen cabinets.
• Appliances and Fixtures: Add appliances, plumbing fixtures, and lighting.
• Paint and Finish: Apply paint and finishes to achieve the desired look.
• Final Inspection: Schedule inspections to ensure compliance with building codes.
Final Inspections and Approvals:
• Arrange for final inspections to ensure the addition meets all safety and code requirements.
• Obtain any necessary certificates of occupancy or compliance.
Move In and Enjoy:
• Once all inspections and approvals are received, you can move into your new kitchen addition and start enjoying it.
Remember that every kitchen addition project is unique, so adapt this outline to your specific needs and circumstances. Consulting with professionals and obtaining the required permits and inspections is crucial to a successful and safe project.
 SM Design
Bridle Path Residence — Formal Dining Room
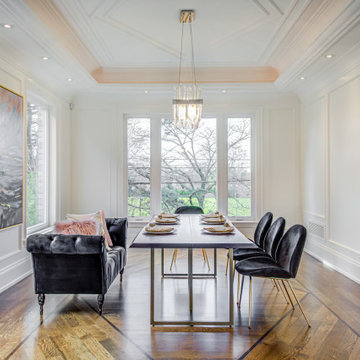
This Bridle Path Residence dining room is designed as a refined architectural setting where classic detailing provides the foundation for a more contemporary interpretation of formal entertaining. The room feels intentionally composed rather than overly decorated, allowing proportion, natural light, material contrast, and carefully selected furnishings to create its character.
The architecture is the quiet luxury of the space. Floor-to-ceiling wall panelling frames the room with a strong sense of rhythm and proportion, while the elaborately detailed coffered ceiling draws the eye upward and gives the dining area a greater sense of volume. Warm concealed illumination within the ceiling detail adds a subtle layer of glow, particularly in the evening, and reinforces the architectural geometry without making the lighting feel theatrical.
Large surrounding windows are central to the design. Rather than treating the dining room as an enclosed formal space, the expansive glazing opens the room toward the mature landscape outside, allowing natural light and views of the greenery to become part of the interior composition. This connection to the landscape softens the formality of the architecture and gives the room a relaxed residential quality.
The furniture introduces a deliberate contemporary counterpoint. A sleek dining table with a refined metal base sits comfortably within the traditional architectural envelope, while the sculptural black dining chairs bring a stronger graphic element. Their curved silhouettes soften the linear wall panelling and create an elegant contrast against the predominantly light interior.
The deep charcoal lounge chairs at the end of the table add another layer of intimacy, transforming the dining room into more than a space for formal meals. They create a secondary seating moment and introduce tactile upholstery, making the room feel comfortable and lived-in.
The dark-toned area rug visually anchors the dining arrangement against the warm hardwood flooring, while the large-scale artwork introduces an expressive, painterly element. Its muted palette complements the room without competing with the architectural detailing.
A suspended crystal chandelier provides the final layer of refinement, positioned centrally within the coffered ceiling to emphasize symmetry and create a luminous focal point over the dining table. The combination of crystal, dark upholstery, warm wood flooring, polished metal, and crisp white millwork creates a sophisticated material dialogue.
The overall design is rooted in modern elegance within a classic architectural framework. Traditional millwork and proportion establish permanence, while contemporary furnishings, sculptural forms, artwork, and restrained colour create a fresher interpretation of formal dining. The result is an elegant entertaining space that feels sophisticated, welcoming, and distinctly tailored to the character of the Bridle Path Residence.
 Talon Construction Inc.
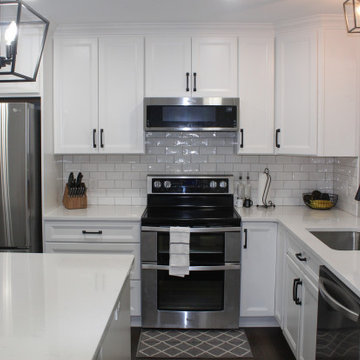
Designing and building a kitchen addition is a complex process that involves multiple steps and considerations. Here is a general outline to help you get started on your kitchen addition project:
Define Your Goals and Budget:
• Determine the purpose of the kitchen addition. Is it for more cooking space, a dining area, or a combination of both?
• Establish a realistic budget for your project. Consider all costs, including construction, permits, materials, and furnishings.
Hire a Design Professional:
• Seek the services of a design build company who specializes in kitchen additions.
• Discuss your vision, needs, and budget with the design professional to create a design concept.
Site Evaluation:
• Assess the existing space and structural condition of your home to ensure it can support the addition.
• Consider factors like zoning regulations, setbacks, and building codes.
Design Development:
• Collaborate with your design professional to refine the concept, including the layout, size, and architectural style.
• Choose materials, finishes, and fixtures that fit your design and budget.
Obtain Permits:
• Consult with your local design build contractor to determine the necessary permits and approvals.
• Prepare and submit all required documents, including architectural drawings and engineering plans.
Create Construction Documents:
• Work with your design build professional to develop detailed construction drawings and specifications.
• These documents will serve as a guide for contractors during construction.
Hire a design build contractor:
• Check references, credentials, and licenses before selecting a contractor.
• Sign a detailed contract that outlines the scope of work, timeline, and payment schedule.
Construction Phase:
• Demolition: If needed, remove any existing structures or walls.
• Foundation: Construct the foundation for the addition.
• Framing: Build the structural framework of the addition.
• Plumbing, Electrical, and HVAC: Install or update utilities as required.
• Insulation: Ensure proper insulation for energy efficiency.
• Drywall and Finish Work: Complete the walls and ceilings.
• Flooring and Cabinetry: Install flooring and kitchen cabinets.
• Appliances and Fixtures: Add appliances, plumbing fixtures, and lighting.
• Paint and Finish: Apply paint and finishes to achieve the desired look.
• Final Inspection: Schedule inspections to ensure compliance with building codes.
Final Inspections and Approvals:
• Arrange for final inspections to ensure the addition meets all safety and code requirements.
• Obtain any necessary certificates of occupancy or compliance.
Move In and Enjoy:
• Once all inspections and approvals are received, you can move into your new kitchen addition and start enjoying it.
Remember that every kitchen addition project is unique, so adapt this outline to your specific needs and circumstances. Consulting with professionals and obtaining the required permits and inspections is crucial to a successful and safe project.
 Talon Construction Inc.
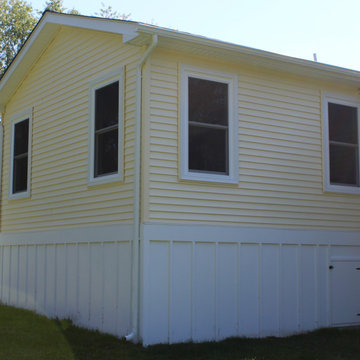
Designing and building a kitchen addition is a complex process that involves multiple steps and considerations. Here is a general outline to help you get started on your kitchen addition project:
Define Your Goals and Budget:
• Determine the purpose of the kitchen addition. Is it for more cooking space, a dining area, or a combination of both?
• Establish a realistic budget for your project. Consider all costs, including construction, permits, materials, and furnishings.
Hire a Design Professional:
• Seek the services of a design build company who specializes in kitchen additions.
• Discuss your vision, needs, and budget with the design professional to create a design concept.
Site Evaluation:
• Assess the existing space and structural condition of your home to ensure it can support the addition.
• Consider factors like zoning regulations, setbacks, and building codes.
Design Development:
• Collaborate with your design professional to refine the concept, including the layout, size, and architectural style.
• Choose materials, finishes, and fixtures that fit your design and budget.
Obtain Permits:
• Consult with your local design build contractor to determine the necessary permits and approvals.
• Prepare and submit all required documents, including architectural drawings and engineering plans.
Create Construction Documents:
• Work with your design build professional to develop detailed construction drawings and specifications.
• These documents will serve as a guide for contractors during construction.
Hire a design build contractor:
• Check references, credentials, and licenses before selecting a contractor.
• Sign a detailed contract that outlines the scope of work, timeline, and payment schedule.
Construction Phase:
• Demolition: If needed, remove any existing structures or walls.
• Foundation: Construct the foundation for the addition.
• Framing: Build the structural framework of the addition.
• Plumbing, Electrical, and HVAC: Install or update utilities as required.
• Insulation: Ensure proper insulation for energy efficiency.
• Drywall and Finish Work: Complete the walls and ceilings.
• Flooring and Cabinetry: Install flooring and kitchen cabinets.
• Appliances and Fixtures: Add appliances, plumbing fixtures, and lighting.
• Paint and Finish: Apply paint and finishes to achieve the desired look.
• Final Inspection: Schedule inspections to ensure compliance with building codes.
Final Inspections and Approvals:
• Arrange for final inspections to ensure the addition meets all safety and code requirements.
• Obtain any necessary certificates of occupancy or compliance.
Move In and Enjoy:
• Once all inspections and approvals are received, you can move into your new kitchen addition and start enjoying it.
Remember that every kitchen addition project is unique, so adapt this outline to your specific needs and circumstances. Consulting with professionals and obtaining the required permits and inspections is crucial to a successful and safe project.
 Talon Construction Inc.
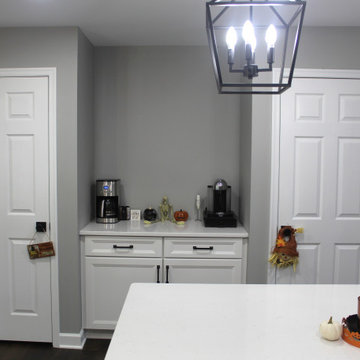
Designing and building a kitchen addition is a complex process that involves multiple steps and considerations. Here is a general outline to help you get started on your kitchen addition project:
Define Your Goals and Budget:
• Determine the purpose of the kitchen addition. Is it for more cooking space, a dining area, or a combination of both?
• Establish a realistic budget for your project. Consider all costs, including construction, permits, materials, and furnishings.
Hire a Design Professional:
• Seek the services of a design build company who specializes in kitchen additions.
• Discuss your vision, needs, and budget with the design professional to create a design concept.
Site Evaluation:
• Assess the existing space and structural condition of your home to ensure it can support the addition.
• Consider factors like zoning regulations, setbacks, and building codes.
Design Development:
• Collaborate with your design professional to refine the concept, including the layout, size, and architectural style.
• Choose materials, finishes, and fixtures that fit your design and budget.
Obtain Permits:
• Consult with your local design build contractor to determine the necessary permits and approvals.
• Prepare and submit all required documents, including architectural drawings and engineering plans.
Create Construction Documents:
• Work with your design build professional to develop detailed construction drawings and specifications.
• These documents will serve as a guide for contractors during construction.
Hire a design build contractor:
• Check references, credentials, and licenses before selecting a contractor.
• Sign a detailed contract that outlines the scope of work, timeline, and payment schedule.
Construction Phase:
• Demolition: If needed, remove any existing structures or walls.
• Foundation: Construct the foundation for the addition.
• Framing: Build the structural framework of the addition.
• Plumbing, Electrical, and HVAC: Install or update utilities as required.
• Insulation: Ensure proper insulation for energy efficiency.
• Drywall and Finish Work: Complete the walls and ceilings.
• Flooring and Cabinetry: Install flooring and kitchen cabinets.
• Appliances and Fixtures: Add appliances, plumbing fixtures, and lighting.
• Paint and Finish: Apply paint and finishes to achieve the desired look.
• Final Inspection: Schedule inspections to ensure compliance with building codes.
Final Inspections and Approvals:
• Arrange for final inspections to ensure the addition meets all safety and code requirements.
• Obtain any necessary certificates of occupancy or compliance.
Move In and Enjoy:
• Once all inspections and approvals are received, you can move into your new kitchen addition and start enjoying it.
Remember that every kitchen addition project is unique, so adapt this outline to your specific needs and circumstances. Consulting with professionals and obtaining the required permits and inspections is crucial to a successful and safe project.
 Talon Construction Inc.
Designing and building a kitchen addition is a complex process that involves multiple steps and considerations. Here is a general outline to help you get started on your kitchen addition project:
Define Your Goals and Budget:
• Determine the purpose of the kitchen addition. Is it for more cooking space, a dining area, or a combination of both?
• Establish a realistic budget for your project. Consider all costs, including construction, permits, materials, and furnishings.
Hire a Design Professional:
• Seek the services of a design build company who specializes in kitchen additions.
• Discuss your vision, needs, and budget with the design professional to create a design concept.
Site Evaluation:
• Assess the existing space and structural condition of your home to ensure it can support the addition.
• Consider factors like zoning regulations, setbacks, and building codes.
Design Development:
• Collaborate with your design professional to refine the concept, including the layout, size, and architectural style.
• Choose materials, finishes, and fixtures that fit your design and budget.
Obtain Permits:
• Consult with your local design build contractor to determine the necessary permits and approvals.
• Prepare and submit all required documents, including architectural drawings and engineering plans.
Create Construction Documents:
• Work with your design build professional to develop detailed construction drawings and specifications.
• These documents will serve as a guide for contractors during construction.
Hire a design build contractor:
• Check references, credentials, and licenses before selecting a contractor.
• Sign a detailed contract that outlines the scope of work, timeline, and payment schedule.
Construction Phase:
• Demolition: If needed, remove any existing structures or walls.
• Foundation: Construct the foundation for the addition.
• Framing: Build the structural framework of the addition.
• Plumbing, Electrical, and HVAC: Install or update utilities as required.
• Insulation: Ensure proper insulation for energy efficiency.
• Drywall and Finish Work: Complete the walls and ceilings.
• Flooring and Cabinetry: Install flooring and kitchen cabinets.
• Appliances and Fixtures: Add appliances, plumbing fixtures, and lighting.
• Paint and Finish: Apply paint and finishes to achieve the desired look.
• Final Inspection: Schedule inspections to ensure compliance with building codes.
Final Inspections and Approvals:
• Arrange for final inspections to ensure the addition meets all safety and code requirements.
• Obtain any necessary certificates of occupancy or compliance.
Move In and Enjoy:
• Once all inspections and approvals are received, you can move into your new kitchen addition and start enjoying it.
Remember that every kitchen addition project is unique, so adapt this outline to your specific needs and circumstances. Consulting with professionals and obtaining the required permits and inspections is crucial to a successful and safe project.
 Talon Construction Inc.
Designing and building a kitchen addition is a complex process that involves multiple steps and considerations. Here is a general outline to help you get started on your kitchen addition project:
Define Your Goals and Budget:
• Determine the purpose of the kitchen addition. Is it for more cooking space, a dining area, or a combination of both?
• Establish a realistic budget for your project. Consider all costs, including construction, permits, materials, and furnishings.
Hire a Design Professional:
• Seek the services of a design build company who specializes in kitchen additions.
• Discuss your vision, needs, and budget with the design professional to create a design concept.
Site Evaluation:
• Assess the existing space and structural condition of your home to ensure it can support the addition.
• Consider factors like zoning regulations, setbacks, and building codes.
Design Development:
• Collaborate with your design professional to refine the concept, including the layout, size, and architectural style.
• Choose materials, finishes, and fixtures that fit your design and budget.
Obtain Permits:
• Consult with your local design build contractor to determine the necessary permits and approvals.
• Prepare and submit all required documents, including architectural drawings and engineering plans.
Create Construction Documents:
• Work with your design build professional to develop detailed construction drawings and specifications.
• These documents will serve as a guide for contractors during construction.
Hire a design build contractor:
• Check references, credentials, and licenses before selecting a contractor.
• Sign a detailed contract that outlines the scope of work, timeline, and payment schedule.
Construction Phase:
• Demolition: If needed, remove any existing structures or walls.
• Foundation: Construct the foundation for the addition.
• Framing: Build the structural framework of the addition.
• Plumbing, Electrical, and HVAC: Install or update utilities as required.
• Insulation: Ensure proper insulation for energy efficiency.
• Drywall and Finish Work: Complete the walls and ceilings.
• Flooring and Cabinetry: Install flooring and kitchen cabinets.
• Appliances and Fixtures: Add appliances, plumbing fixtures, and lighting.
• Paint and Finish: Apply paint and finishes to achieve the desired look.
• Final Inspection: Schedule inspections to ensure compliance with building codes.
Final Inspections and Approvals:
• Arrange for final inspections to ensure the addition meets all safety and code requirements.
• Obtain any necessary certificates of occupancy or compliance.
Move In and Enjoy:
• Once all inspections and approvals are received, you can move into your new kitchen addition and start enjoying it.
Remember that every kitchen addition project is unique, so adapt this outline to your specific needs and circumstances. Consulting with professionals and obtaining the required permits and inspections is crucial to a successful and safe project.

 Distinctive Landscaping
Susan Teare
This is an example of a mid-sized rustic partial sun backyard garden path in Burlington for summer.
This is an example of a mid-sized rustic partial sun backyard garden path in Burlington for summer.

 Simply Perfect
Advice on interior design is available everywhere—from TV shows and websites to books, magazines and apps.
We love seeing people become engaged in design and educated on the wide range of possibilities. But we hope you’ll proceed with caution.
It’s not that style errors are a matter of life and death. It’s just that it’s easy to choose designs that aren’t necessarily reflective of your own personality and character. And since you’re typically stuck with your interior design decisions for years, styles that don’t quite fit can tend to grate on you.
Interiors that give one person comfort may unleash chaos in someone else. This goes beyond favorite colors or hot trends, right to the heart of interior design, where you find questions of composition, balance, repetition, space and more.
The goal is to find that unique combination of design elements that gives you comfort, support and balance.
In one home, that perfect balance was struck through the use of symmetry. A pair of comfortable swivel chairs sit beneath matching indigo patterned paintings. Matching bookcases below the paintings contain similar, but not identical, arrangements of books, vases and bowls. Woods and bronzes help warm up the simple white bookcase shelving.
Two matching poufs in front of the fireplace provide additional seating. The sofa is accented with a pair of pillows with a blue pattern that echoes the artwork.
The effect of the symmetry is to achieve order and simplicity, which I promote at every opportunity. After all, your home interiors should be the setting or the backdrop of your life—not center stage.
Antique bronze and blue are complementary colors. Together, they offer a rich palette of richness and depth, which brings out the beauty of wood and stone.
In the home office, a unique, whitewash-stained wooden desk rests on metal, Sawhorse-inspired legs for a warm, rustic look. The black leather chair features a contemporary silhouette with an antique brass frame. An adjustable desk lamp has bronze accents.
The bookcase combines a sleek, black metal frame with concrete shelves, for another unusual pairing. It’s kept uncluttered for an orderly, peaceful look. Items on the shelves include a bronze-accented lamp and a pair
of high gloss-finished wooden bookends.
The elegant artwork behind the desk is a simple midnight-blue and bronze with mottled white. Deep blues are again picked up in the rug, which adds a stately vibe with a modern pattern and satisfying texture.
Within the framework of symmetry, the living room repeats the blue-and-bronze color scheme.
A large midcentury brass clock above the fireplace keeps the natural stone visible, rather than hidden behind a painting or television, while its straight lines and color create a beautiful contrast.
The sofa is a soft, neutral blue. The pattern on the round brass side table features echoes the darker blue-patterned rug, as well as the rug in the office, tying the rooms together.
Indigo blue books adjacent to bronze vases on the shelves repeat the color scheme. The soapstone-topped coffee table echoes the shape of the fireplace. A pair of tall, matching floor lamps with long wooden bases, brass pulls and simple linen shades combine both the colors and symmetry found throughout the home.

 Ganshert Nursery & Landscapes
Lattice woodwork around deck
Inspiration for a large timeless backyard deck remodel in Milwaukee with a pergola
Inspiration for a large timeless backyard deck remodel in Milwaukee with a pergola
 Green Decks
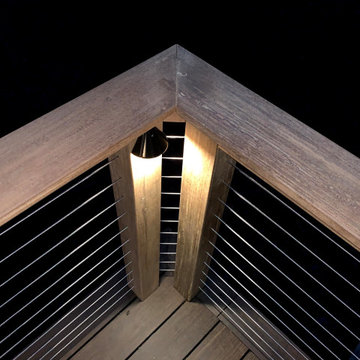
We completed this deck for another contractor. The homeowner wanted a better grade deck surface and was excited by our green MOSO Bamboo X-treme deck material. They also wanted a cable railing to keep an open view of the ravine below. This was a complex project which was very satisfying to do.

 Ehrlich Yanai Rhee Chaney Architects
The ground floor volumes wrapped in an elongated hand-fired brick, emphasizing the horizontality of the architecture that lays solidly on the land.
(Photography by: Matthew Millman)
 Simply Perfect
Advice on interior design is available everywhere—from TV shows and websites to books, magazines and apps.
We love seeing people become engaged in design and educated on the wide range of possibilities. But we hope you’ll proceed with caution.
It’s not that style errors are a matter of life and death. It’s just that it’s easy to choose designs that aren’t necessarily reflective of your own personality and character. And since you’re typically stuck with your interior design decisions for years, styles that don’t quite fit can tend to grate on you.
Interiors that give one person comfort may unleash chaos in someone else. This goes beyond favorite colors or hot trends, right to the heart of interior design, where you find questions of composition, balance, repetition, space and more.
The goal is to find that unique combination of design elements that gives you comfort, support and balance.
In one home, that perfect balance was struck through the use of symmetry. A pair of comfortable swivel chairs sit beneath matching indigo patterned paintings. Matching bookcases below the paintings contain similar, but not identical, arrangements of books, vases and bowls. Woods and bronzes help warm up the simple white bookcase shelving.
Two matching poufs in front of the fireplace provide additional seating. The sofa is accented with a pair of pillows with a blue pattern that echoes the artwork.
The effect of the symmetry is to achieve order and simplicity, which I promote at every opportunity. After all, your home interiors should be the setting or the backdrop of your life—not center stage.
Antique bronze and blue are complementary colors. Together, they offer a rich palette of richness and depth, which brings out the beauty of wood and stone.
In the home office, a unique, whitewash-stained wooden desk rests on metal, Sawhorse-inspired legs for a warm, rustic look. The black leather chair features a contemporary silhouette with an antique brass frame. An adjustable desk lamp has bronze accents.
The bookcase combines a sleek, black metal frame with concrete shelves, for another unusual pairing. It’s kept uncluttered for an orderly, peaceful look. Items on the shelves include a bronze-accented lamp and a pair
of high gloss-finished wooden bookends.
The elegant artwork behind the desk is a simple midnight-blue and bronze with mottled white. Deep blues are again picked up in the rug, which adds a stately vibe with a modern pattern and satisfying texture.
Within the framework of symmetry, the living room repeats the blue-and-bronze color scheme.
A large midcentury brass clock above the fireplace keeps the natural stone visible, rather than hidden behind a painting or television, while its straight lines and color create a beautiful contrast.
The sofa is a soft, neutral blue. The pattern on the round brass side table features echoes the darker blue-patterned rug, as well as the rug in the office, tying the rooms together.
Indigo blue books adjacent to bronze vases on the shelves repeat the color scheme. The soapstone-topped coffee table echoes the shape of the fireplace. A pair of tall, matching floor lamps with long wooden bases, brass pulls and simple linen shades combine both the colors and symmetry found throughout the home.
 Magnolia Home Remodeling Group
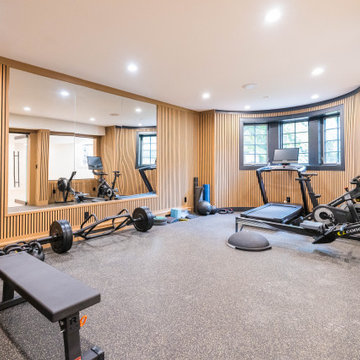
Project Highlight: Custom Home Gym & Complete Multi-Zone Basement Remodeling in Franklin Lakes, New Jersey
A comprehensive, multi-zone lower-level transformation completed by Magnolia Home Remodeling Group in Bergen County. This expansive project highlights our capacity as a full-service New Jersey general contractor, taking a raw basement layout and engineering it into highly functional, distinct luxury living zones: a dedicated private home fitness center, a spacious bedroom suite, a completely upgraded full bathroom, and a direct-replacement half-bath.
Architectural & Spatial Highlights:
* Custom Home Fitness Center: The center jewel of this renovation is a 136 SF dedicated home gym space. Our carpentry team constructed custom structural knee walls specially framed to receive custom-fit glass panel viewing walls, offering a modern, open-concept line of sight into the main living areas. The space is optimized for high-impact workouts featuring durable rubber mat flooring with custom transitions, custom wood paneling applied across the gym walls and ceiling, a built-in filtered water line system, and dedicated column boxing to seamlessly conceal structural posts, ducts, and mechanical headers.
* The Electrical Framework: To maintain a clean, ultra-bright subterranean environment, our electrical division mapped out and wired an extensive layout featuring thirty (30) 6-inch recessed LED ceiling lights, fourteen (14) dimmable wall switches, and code-required perimeter wall outlets tied directly into the main panel.
* Luxury Basement Bathrooms: A complete remodel of a three-fixture full bathroom featuring a spacious 30” x 60” standing shower with an integrated acrylic base, thermostat-controlled rain shower head, handheld wand extensions, and a custom vanity system. The room is wrapped in premium customer-supplied Artistic Tile ceramic layouts across 52 SF of flooring and 90 SF of floor-to-ceiling wet-wall surfaces. The secondary powder room features a direct replacement vanity with integrated vanity power extensions and a modern toilet swap.
* Flooring & Staircase Entry: The high-traffic zones of the 890 SF open area are finished in luxury vinyl tile (LVT) with premium sound-dampening underlayment over a meticulous subfloor-leveled base. The main staircase entry was updated with structural vinyl tread covers over the fifteen box steps, paired with a custom carpet runner.
Managed from day-one demolition through rough building inspections to the final paint walkthrough, this Franklin Lakes project represents the benchmark of our family-owned team’s 30+ year commitment to transparent, full-service New Jersey home transformations.
 Simply Perfect
Advice on interior design is available everywhere—from TV shows and websites to books, magazines and apps.
We love seeing people become engaged in design and educated on the wide range of possibilities. But we hope you’ll proceed with caution.
It’s not that style errors are a matter of life and death. It’s just that it’s easy to choose designs that aren’t necessarily reflective of your own personality and character. And since you’re typically stuck with your interior design decisions for years, styles that don’t quite fit can tend to grate on you.
Interiors that give one person comfort may unleash chaos in someone else. This goes beyond favorite colors or hot trends, right to the heart of interior design, where you find questions of composition, balance, repetition, space and more.
The goal is to find that unique combination of design elements that gives you comfort, support and balance.
In one home, that perfect balance was struck through the use of symmetry. A pair of comfortable swivel chairs sit beneath matching indigo patterned paintings. Matching bookcases below the paintings contain similar, but not identical, arrangements of books, vases and bowls. Woods and bronzes help warm up the simple white bookcase shelving.
Two matching poufs in front of the fireplace provide additional seating. The sofa is accented with a pair of pillows with a blue pattern that echoes the artwork.
The effect of the symmetry is to achieve order and simplicity, which I promote at every opportunity. After all, your home interiors should be the setting or the backdrop of your life—not center stage.
Antique bronze and blue are complementary colors. Together, they offer a rich palette of richness and depth, which brings out the beauty of wood and stone.
In the home office, a unique, whitewash-stained wooden desk rests on metal, Sawhorse-inspired legs for a warm, rustic look. The black leather chair features a contemporary silhouette with an antique brass frame. An adjustable desk lamp has bronze accents.
The bookcase combines a sleek, black metal frame with concrete shelves, for another unusual pairing. It’s kept uncluttered for an orderly, peaceful look. Items on the shelves include a bronze-accented lamp and a pair
of high gloss-finished wooden bookends.
The elegant artwork behind the desk is a simple midnight-blue and bronze with mottled white. Deep blues are again picked up in the rug, which adds a stately vibe with a modern pattern and satisfying texture.
Within the framework of symmetry, the living room repeats the blue-and-bronze color scheme.
A large midcentury brass clock above the fireplace keeps the natural stone visible, rather than hidden behind a painting or television, while its straight lines and color create a beautiful contrast.
The sofa is a soft, neutral blue. The pattern on the round brass side table features echoes the darker blue-patterned rug, as well as the rug in the office, tying the rooms together.
Indigo blue books adjacent to bronze vases on the shelves repeat the color scheme. The soapstone-topped coffee table echoes the shape of the fireplace. A pair of tall, matching floor lamps with long wooden bases, brass pulls and simple linen shades combine both the colors and symmetry found throughout the home.
 Designs by Dian Window Treatments
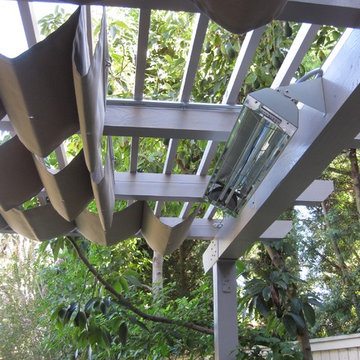
Sunbrella Marine Canvas manually operated pergola shades on stainless steel cabling system.
Trendy home design photo in Los Angeles
Trendy home design photo in Los Angeles
 SM Design
Bridle Path Residence — Family Room & Media Lounge
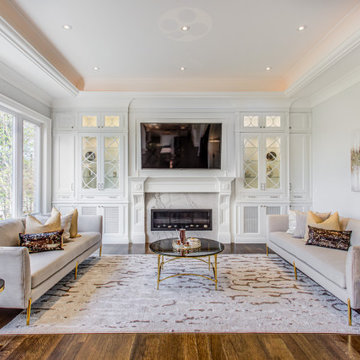
This Bridle Path Residence family room is conceived as a sophisticated yet comfortable gathering space, balancing the formality of the home's architectural language with a more relaxed approach to everyday living. The design creates a sense of quiet luxury through symmetry, tailored millwork, layered texture, and restrained glamour, rather than relying on excessive decoration.
The built-in fireplace and media wall form the architectural centre of the room. Custom white cabinetry frames the television and fireplace with carefully proportioned panels, glass-front display niches, and decorative moulding. This integrated approach allows technology to become part of the architecture rather than visually dominating the room.
The fireplace surround introduces a natural stone focal point beneath the television, adding subtle movement and material depth to an otherwise crisp white composition. Its placement establishes a strong central axis, while the symmetrical cabinetry on either side reinforces the room's sense of order and balance.
The expansive window along the left side is equally important to the design. It floods the room with natural light and establishes a direct visual connection to the mature landscape outside. This relationship with nature softens the structured architecture and prevents the room from feeling overly formal.
Two generously proportioned sofas are positioned opposite one another to create an intentional conversational arrangement. Their light upholstery keeps the room visually open, while layered cushions introduce warmer tones, pattern, and tactile contrast. The symmetry of the seating arrangement gives the space a composed architectural quality while remaining highly functional for family gatherings and entertaining.
The metallic furniture introduces a subtle note of contemporary glamour. Gold-toned frames, sculptural side tables, and glass surfaces reflect light throughout the room without overwhelming the neutral palette. The combination of transparent glass and polished metal also keeps the furniture visually light against the substantial architectural detailing.
A large area rug anchors the seating group and introduces an organic pattern that contrasts with the linear wall panelling and cabinetry. Its muted tones create continuity between the soft furnishings, wood flooring, and architectural finishes.
The lighting strategy is deliberately layered. Recessed lighting provides functional illumination, while decorative lamps and concealed architectural lighting create a softer atmosphere. The result is a room capable of transitioning easily from bright daytime family use to a more intimate evening setting.
The overall design is an expression of contemporary comfort within a classic architectural framework. Custom millwork, symmetry, traditional detailing, natural stone, warm hardwood, sculptural furniture, and soft textiles come together to create a family room that feels polished without becoming precious. It is designed as a room for both everyday life and elevated entertaining, comfortable enough to live in, yet refined enough to belong naturally within a luxury Bridle Path residence.
148