
Search results for "Growing founding" in Home Design Ideas

 E_ Designs
1950’s kitchens need love too and make great remodels. These Homeowners contacted Castle for help on the kitchen remodel. The biggest wishlist items included a larger and more functional kitchen layout with expanded views into the previously completed rear addition/dining room. After some conceptual design concepts were assessed, we chose to keep the kitchen in the existing footprint and expanded the site lines into the rear dining space with a new drywall opening. We expanded the function of the kitchen by wrapping the peninsula around into the dining room with an additional pantry space for kitchen overflow storage. Each cabinet was well thought out for the homeowners use of the space to include functional storage accessories like plate divides, utensil pull-outs, and trash/recycle bins.
Working with the designer, the homeowners found a beautiful balance of some contemporary aesthetics like the overall color scheme combined with some classic elements such as the detailed cabinetry and herringbone tile backsplash. One of our favorite details in the kitchen is the new tile floor that continues into the dining room. The wood texture plank tile adds depth and texture and contrasts nicely to the more soft and refined finishes above. New Cambria quartz countertops, new cabinetry, herringbone tile backsplash, new tile floors, custom lighting, and new plumbing fixtures complete the space. The new transitional styled kitchen can grow with the family for many years to come. With a swap out of some furniture the whole space can transition to both contemporary or traditional. Timeless.
 Tile Doctor Ltd
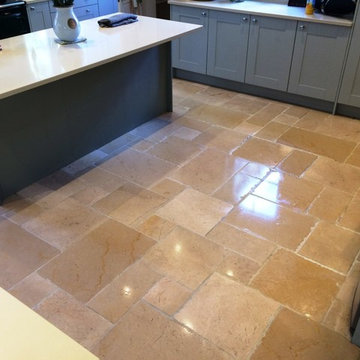
Earlier this year I was contacted by a lady in Icklesham which is a small village near Hastings. My client requested a deep clean for her Limestone tiled kitchen floor which had, over time, become quite dirty, with the grout in particular being very much worse for wear. Limestone is a popular choice for tiled floors however it needs to be sealed to ensure dirt doesn’t get into the pores of the stone otherwise it becomes difficult to clean and if the sealer is not maintained it will wear down and the floor will lose its protection especially in high traffic areas such as kitchens.
Cleaning a Limestone tiled kitchen floor
My product of choice for cleaning this floor was Tile Doctor Pro-Clean, which I found to be particularly effective in lifting ingrained dirt out of the grout. I used a stiff grout brush to work the solution of Pro-Clean diluted with warm water to work the cleaner deep into the grout. I also used a buffing machine fitted with a scrubbing pad and more Pro-Clean to lift the dirt out of the Limestone tiles. It wasn’t long before the dirty grout lines began to disappear, and the floor was well on its way to looking great again.
Once I’d also cleaned the nearby utility room, bathroom and cloakroom in a similar manner, I gave the floor a thorough rinse with fresh water before using a wet-dry vac machine to remove the soiled water from the surface of the tiles. I removed as much moisture from the Limestone tile and grout as possible to speed up the drying process as it’s important to ensure a stone floor is bone dry before sealing it as any excess moisture will compromise the sealer.
Applying Tile Doctor Colour Grow sealer to Limestone tiles
I left the floor for three days to dry before returning and used a damp meter on my return to confirm the floor was in-deed dry, spring had arrived and the sunshine really helped. My choice of sealer for the Limestone tiles was Tile Doctor Colour Grow, a product which soaks into the pores of the stone to enhance the colour of tiles whilst also providing durable protection. In this case two coats of Colour Grow were applied and as you can see from the photographs this really did bring out the fantastic natural colours in the Limestone and exaggerate the shading. At the same time, the added surface protection will help the floor stay looking great for longer, even with a lot of usage.
When she returned from dog walking, my client was so pleased with the final result that she almost screamed the house down! She was so pleased, in fact, that she promised to have me return every year to ensure her floor was maintained to a high standard. I was also really happy with my work, particularly in terms of getting the grout into far better condition than it had been before.
 E_ Designs
1950’s kitchens need love too and make great remodels. These Homeowners contacted Castle for help on the kitchen remodel. The biggest wishlist items included a larger and more functional kitchen layout with expanded views into the previously completed rear addition/dining room. After some conceptual design concepts were assessed, we chose to keep the kitchen in the existing footprint and expanded the site lines into the rear dining space with a new drywall opening. We expanded the function of the kitchen by wrapping the peninsula around into the dining room with an additional pantry space for kitchen overflow storage. Each cabinet was well thought out for the homeowners use of the space to include functional storage accessories like plate divides, utensil pull-outs, and trash/recycle bins.
Working with the designer, the homeowners found a beautiful balance of some contemporary aesthetics like the overall color scheme combined with some classic elements such as the detailed cabinetry and herringbone tile backsplash. One of our favorite details in the kitchen is the new tile floor that continues into the dining room. The wood texture plank tile adds depth and texture and contrasts nicely to the more soft and refined finishes above. New Cambria quartz countertops, new cabinetry, herringbone tile backsplash, new tile floors, custom lighting, and new plumbing fixtures complete the space. The new transitional styled kitchen can grow with the family for many years to come. With a swap out of some furniture the whole space can transition to both contemporary or traditional. Timeless.
Find the right local pro for your project

 FormLA Landscaping
Hedges containing Catalina Cherry have blooms in the spring. In fall, deep red edible cherries will fill their branches.
Photo of a large rustic drought-tolerant and partial sun side yard stone garden path in Los Angeles for fall.
Photo of a large rustic drought-tolerant and partial sun side yard stone garden path in Los Angeles for fall.
 E_ Designs
1950’s kitchens need love too and make great remodels. These Homeowners contacted Castle for help on the kitchen remodel. The biggest wishlist items included a larger and more functional kitchen layout with expanded views into the previously completed rear addition/dining room. After some conceptual design concepts were assessed, we chose to keep the kitchen in the existing footprint and expanded the site lines into the rear dining space with a new drywall opening. We expanded the function of the kitchen by wrapping the peninsula around into the dining room with an additional pantry space for kitchen overflow storage. Each cabinet was well thought out for the homeowners use of the space to include functional storage accessories like plate divides, utensil pull-outs, and trash/recycle bins.
Working with the designer, the homeowners found a beautiful balance of some contemporary aesthetics like the overall color scheme combined with some classic elements such as the detailed cabinetry and herringbone tile backsplash. One of our favorite details in the kitchen is the new tile floor that continues into the dining room. The wood texture plank tile adds depth and texture and contrasts nicely to the more soft and refined finishes above. New Cambria quartz countertops, new cabinetry, herringbone tile backsplash, new tile floors, custom lighting, and new plumbing fixtures complete the space. The new transitional styled kitchen can grow with the family for many years to come. With a swap out of some furniture the whole space can transition to both contemporary or traditional. Timeless.

 Windhill+Co.
Eric Roth - Photo
INSIDE OUT, OUTSIDE IN – IPSWICH, MA
Downsizing from their sprawling country estate in Hamilton, MA, this retiring couple knew they found utopia when they purchased this already picturesque marsh-view home complete with ocean breezes, privacy and endless views. It was only a matter of putting their personal stamp on it with an emphasis on outdoor living to suit their evolving lifestyle with grandchildren. That vision included a natural screened porch that would invite the landscape inside and provide a vibrant space for maximized outdoor entertaining complete with electric ceiling heaters, adjacent wet bar & beverage station that all integrated seamlessly with the custom-built inground pool. Aside from providing the perfect getaway & entertainment mecca for their large family, this couple planned their forever home thoughtfully by adding square footage to accommodate single-level living. Sunrises are now magical from their first-floor master suite, luxury bath with soaker tub and laundry room, all with a view! Growing older will be more enjoyable with sleeping quarters, laundry and bath just steps from one another. With walls removed, utilities updated, a gas fireplace installed, and plentiful built-ins added, the sun-filled kitchen/dining/living combination eases entertaining and makes for a happy hang-out. This Ipswich home is drenched in conscious details, intentional planning and surrounded by a bucolic landscape, the perfect setting for peaceful enjoyment and harmonious living
 Batt + Lear
“House with the Common View,” Wallingford
AWARDS: Best of Wallingford, Built Green Hammer Award
Description
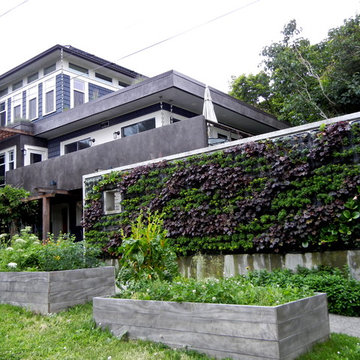
Artistic, sustainable addition to a small Wallingford bungalow which was necessary to allow a growing family to continue to thrive in a neighborhood that they love.
Challenge
Growing family needed more space but they didn’t want to move. They knew that they would have to build up but don’t want to block views or ruin the experience for their neighbor friends. Because of the size and shape of the lot, there were also permitting and structuring challenges.
Inspiration
We found inspiration in the family and their commitment to the place, neighborhood and friends. We wanted to create a house that is not only functional and respectful of the neighbor’s view, but that actually gives back to the neighborhood. We had to lean in hard in the design process to pull all of that off.
Solutions + Innovations
We engaged in a meticulous design process included literal “boots on the ground” elements like standing on the property with sticks to measure the neighbor’s view. We not only maintained that view but enhanced it by giving the neighbors a view of green roof gardens on 4 sides of the house. To support that work, we had to rebuild the foundation. As an amenity for the neighborhood at large, we created a rain path that channeled into living wall and structured rain garden that was adjacent to the sidewalk.
How is it sustainable?
We salvaged or repurposed all of the materials that we could, including salvaging painted shingles on from house and repurposing them for a tiny play house (which also has a green roof). The old beams from basement became a cabinet in the new bathroom. We also used orchard-salvaged walnut which matched the horizontal grain already existing in the kitchen.
We economized on space, saving the footprint on the main floor, and only added 600 feet upstairs which house two bedrooms and one batch. We used casework to create walls, used the stairs for part of the cabinets, and built walk-n cabinets, creating adaptable space for long term needs. More adaptable space included a sharable bathroom/wetroom which is functional for both adults and kids.
We developed a green roof system, rain gardens, and a green wall along sidewalk.
We took the opportunity to improve the envelope, insulating outside the building before the siding went back on. We also incorporated solar into the design, created the opportunity for natural daylighting all day on upper level and stairwell, as well as using resin-based eco countertops.
Sponsored
Columbus, OH

Hope Restoration & General Contracting
Columbus Design-Build, Kitchen & Bath Remodeling, Historic Renovations


 Carolyn Reyes
Photo: Carolyn Reyes © 2015 Houzz
Example of a mid-century modern living room design in Los Angeles
Example of a mid-century modern living room design in Los Angeles
 Michael Nash Design, Build & Homes
This home located in prominent neighborhood in Mclean had a lot of potential to grow.
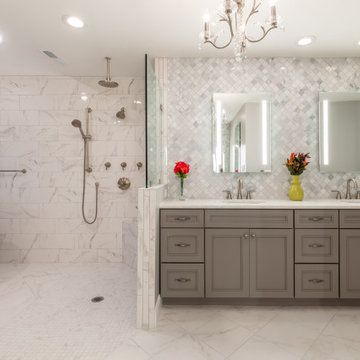
The owners dreamt of an open concept Master bathroom suite. A roman style open shower and wet area. Soft color tones and airy feel for it.
There was a dead space on the adjacent attic that was a perfect addon space for bathroom.
They wanted a large and open shower. A free-standing tub.
The tub was moved into new space and an open wet shower area was added next to it.
Our staff used floor to ceiling large scale marble looking tiles, complimented with mosaic for shower area
By relocating the bathroom and closet door, we have found a perfect place to install linen cabinet and long vanities and counter space for their much-needed daily activities.
The toilet was move into old shower space behind door.
The transformation of bathroom was huge. We delivered their desired bathroom.
The coordination of soft taupe cabinetry with white marble with slight taupe veins and marble counter tops unimaginably has made this master suite gorgeous. Couple hidden medicine cabinets with lights have given them extra space for storage.
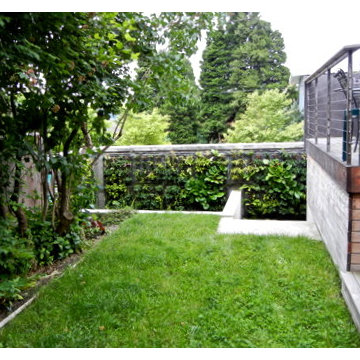 Batt + Lear
“House with the Common View,” Wallingford
AWARDS: Best of Wallingford, Built Green Hammer Award
Description
Artistic, sustainable addition to a small Wallingford bungalow which was necessary to allow a growing family to continue to thrive in a neighborhood that they love.
Challenge
Growing family needed more space but they didn’t want to move. They knew that they would have to build up but don’t want to block views or ruin the experience for their neighbor friends. Because of the size and shape of the lot, there were also permitting and structuring challenges.
Inspiration
We found inspiration in the family and their commitment to the place, neighborhood and friends. We wanted to create a house that is not only functional and respectful of the neighbor’s view, but that actually gives back to the neighborhood. We had to lean in hard in the design process to pull all of that off.
Solutions + Innovations
We engaged in a meticulous design process included literal “boots on the ground” elements like standing on the property with sticks to measure the neighbor’s view. We not only maintained that view but enhanced it by giving the neighbors a view of green roof gardens on 4 sides of the house. To support that work, we had to rebuild the foundation. As an amenity for the neighborhood at large, we created a rain path that channeled into living wall and structured rain garden that was adjacent to the sidewalk.
How is it sustainable?
We salvaged or repurposed all of the materials that we could, including salvaging painted shingles on from house and repurposing them for a tiny play house (which also has a green roof). The old beams from basement became a cabinet in the new bathroom. We also used orchard-salvaged walnut which matched the horizontal grain already existing in the kitchen.
We economized on space, saving the footprint on the main floor, and only added 600 feet upstairs which house two bedrooms and one batch. We used casework to create walls, used the stairs for part of the cabinets, and built walk-n cabinets, creating adaptable space for long term needs. More adaptable space included a sharable bathroom/wetroom which is functional for both adults and kids.
We developed a green roof system, rain gardens, and a green wall along sidewalk.
We took the opportunity to improve the envelope, insulating outside the building before the siding went back on. We also incorporated solar into the design, created the opportunity for natural daylighting all day on upper level and stairwell, as well as using resin-based eco countertops.
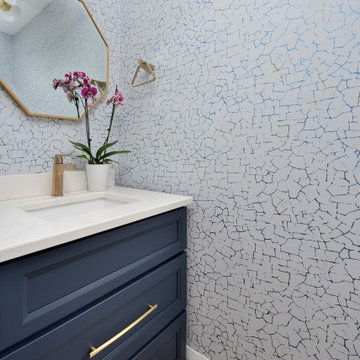
 Monaco Interiors
This home underwent a massive renovation. Walls were removed, some replaced with stunning archways.
A mid-century modern vibe took over, inspiring the white oak floos, white and oak cabinetry throughout, terrazzo tiles and overall vibe.
Our whimiscal side, wanting to pay homage to the clients meditteranean roots, and their desire to entertain as much as possible, found amazing vintage-style tiles to incorporate into the laundry room along with a terrazzo floor tile.
The living room boasts built-ins, a huge porcelain slab that echos beach/ocean views and artwork that establishes the client's love of beach moments.
A dining room focussed on dinner parties includes an innovative wine storage wall, two hidden wine fridges and enough open cabinetry to display their growing collection of glasses. To enhance the space, a stunning blue grasscloth wallpaper anchors the wine rack, and the stunning gold bulbous chandelier glows in the space.
Custom dining chairs and an expansive table provide plenty of seating in this room.
The primary bathroom echoes all of the above. Watery vibes on the large format accent tiles, oak cabinetry and a calm, relaxed environment are perfect for this luxe space.
 Furniture Row
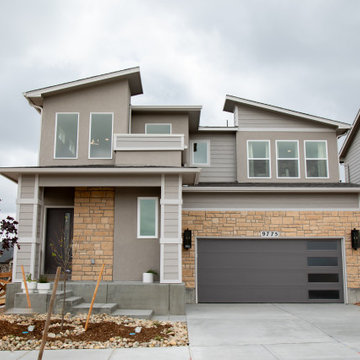
The exterior of the 2026 St. Jude Dream Home in Colorado Springs sets the tone for the warm, modern design found throughout the home. Built by Empire Homes, this thoughtfully designed residence blends clean architectural lines with welcoming curb appeal, creating a timeless look that feels both contemporary and approachable.
Situated in a growing Colorado Springs community, the home features inviting outdoor living spaces, a spacious patio for relaxing and entertaining, and a thoughtfully planned layout that maximizes both function and comfort. Large windows fill the interior with natural light while enhancing the connection between indoor and outdoor living.
With four bedrooms, a finished basement, flexible loft space, and over 2,600 square feet of beautifully designed living space, this home showcases the perfect balance of modern style, everyday livability, and family-friendly functionality. As part of the St. Jude Dream Home Giveaway, every detail reflects a commitment to creating a home that inspires while supporting the life-saving mission of St. Jude Children's Research Hospital.

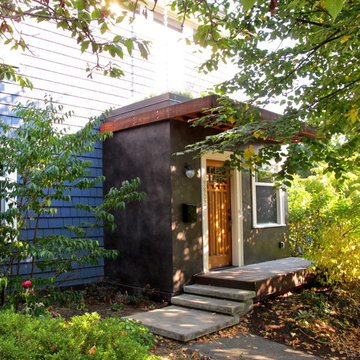 Batt + Lear
“House with the Common View,” Wallingford
AWARDS: Best of Wallingford, Built Green Hammer Award
Description
Artistic, sustainable addition to a small Wallingford bungalow which was necessary to allow a growing family to continue to thrive in a neighborhood that they love.
Challenge
Growing family needed more space but they didn’t want to move. They knew that they would have to build up but don’t want to block views or ruin the experience for their neighbor friends. Because of the size and shape of the lot, there were also permitting and structuring challenges.
Inspiration
We found inspiration in the family and their commitment to the place, neighborhood and friends. We wanted to create a house that is not only functional and respectful of the neighbor’s view, but that actually gives back to the neighborhood. We had to lean in hard in the design process to pull all of that off.
Solutions + Innovations
We engaged in a meticulous design process included literal “boots on the ground” elements like standing on the property with sticks to measure the neighbor’s view. We not only maintained that view but enhanced it by giving the neighbors a view of green roof gardens on 4 sides of the house. To support that work, we had to rebuild the foundation. As an amenity for the neighborhood at large, we created a rain path that channeled into living wall and structured rain garden that was adjacent to the sidewalk.
How is it sustainable?
We salvaged or repurposed all of the materials that we could, including salvaging painted shingles on from house and repurposing them for a tiny play house (which also has a green roof). The old beams from basement became a cabinet in the new bathroom. We also used orchard-salvaged walnut which matched the horizontal grain already existing in the kitchen.
We economized on space, saving the footprint on the main floor, and only added 600 feet upstairs which house two bedrooms and one batch. We used casework to create walls, used the stairs for part of the cabinets, and built walk-n cabinets, creating adaptable space for long term needs. More adaptable space included a sharable bathroom/wetroom which is functional for both adults and kids.
We developed a green roof system, rain gardens, and a green wall along sidewalk.
We took the opportunity to improve the envelope, insulating outside the building before the siding went back on. We also incorporated solar into the design, created the opportunity for natural daylighting all day on upper level and stairwell, as well as using resin-based eco countertops.
 Fixi Handyman Services
WHOLE-HOME REFRESH — HANDYMAN KATY TO PEARLAND, TX (77584)
Client: Joyce
Location: Pearland, TX 77584
Scope of Work: Hallway patch and paint, interior wall cleaning and painting with corner bead repair, master bathroom tile replacement, and smoke/CO alarm batteries
Joyce had a list that had been building for a while. We worked through all of it in one project.
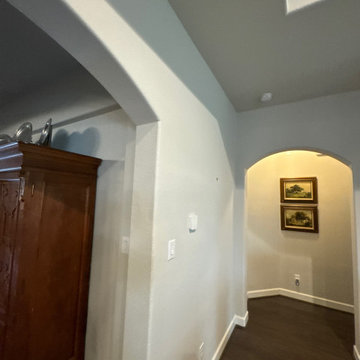
The main hallway came first: 25 to 30 pinholes filled, sanded, spot-primed, then two coats of matching paint across both side walls, corner to corner.
From there we moved through the designated walls around the house, cleaning scuffs and buildup, degreasing near the bathroom switch, patching minor damage, and repairing a damaged corner bead near the living area with the texture restored to match before painting.
In the master bathroom, we pulled two mismatched cut tiles at the doorway, removed the old setting material, prepped the substrate, cut and set her matching tiles, and grouted, with the adjacent carpet and trim protected throughout.
Last item on the list: fresh batteries in eight smoke and CO alarms, covers back on, every unit tested.
Joyce, thank you for trusting our Katy handyman crew with this much of your home at once.
And thank you for the 5-star review! Wishing you’d found us five years ago is about the best thing we could read.
Got a list that keeps growing in Katy or Pearland? Text a handyman a photo and we’ll respond same day.

 User
The couple requested that an alcove be converted into a homework space for their two children. They hoped for 2 separate desks plus storage space.
The space is 5’-6” x 8’-6”. The long wall has a large bank of windows and a 12” x 12” electrical chase running along the floor under the windows. The children are aged 4 and 7 right now, and the space needs to accommodate them as they grow.
The space could not accommodate two back-to-back desks with sufficient circulation space. Thus, the corner space was leveraged for both desks and storage. The custom designed desks provide plenty of layout space and elbow room for the student along the front edge. The deep corners are fitted with custom wall units for storage. More storage is found above, below and between the desks.
The desk and deep corner storage units are designed to accommodate the children’s growth. The desks have a second set of legs to raise them to standard adult height. The corner units have an open storage space at the bottom that becomes hidden under the desk top when the desk top is raised in the coming years. The design provides a finished look now, when only one desk top is raised, and when both desks are eventually raised.
The design also encourages concentration. The desks face away from each other. Cabinet placement ensures that chairs won’t bump into one another when pushing away from the desk. The balance between neutral and colored surfaces is designed to provide enough color to attract a child’s interest, but not enough to overstimulate or distract.
Photo by Alex Steinberg Photography

 Donald A. Gardner Architects
Stone and siding combine with a shed dormer, creating a Craftsman look to this exterior. This three-bedroom design is perfect for growing families, with large, open living spaces, and many storage options found throughout. From the side-entry, oversized garage with extra storage space and shelves, to the built-in shelves and coat closet off the rear hall, families will have plenty of options to keep their home clutter-free and organized.
The gourmet kitchen features a large island and is open to the dining room, which includes a convenient e-space that will be great for mom to oversee homework while getting dinner on the table. The luxurious master suite offers a tray ceiling in the bedroom, and dual walk-in closets that lead the way to the well-appointed master bath with dual sinks and a large tub. The outdoor living space abounds with a rear porch that leads to a large screen porch with fireplace and a patio with a spa. A large bonus space adds even more flexibility to this plan.
Built by Senter & Weigand Home Builders: http://www.houzz.com/pro/sandwbuilders/sandw-home-builders
Sponsored
Columbus, OH
Hope Restoration & General Contracting
Columbus Design-Build, Kitchen & Bath Remodeling, Historic Renovations
 Tile Doctor Ltd
When used to clean natural stone, supermarket products can often cause more harm than good as this recent customer of mine discovered this the hard way!
Originally from South Africa, she had lived in a flat in Clapham for a couple of years, but had to suddenly return home earlier than expected. However, part of her flat rental agreement required her to leave the property clean and as she found it, including the fantastic Slate shower cubicle.
In a rush, the customer had attempted to clean the Slate using a popular supermarket bathroom cleaner. She left the product to sit on the base of the shower before scrubbing it in with an abrasive pan scourer.
This was a big mistake – and the customer called me in a panic after discovering that her attempts had left the Slate severely stained. I traveled to the property to see what could be done to set the situation straight.
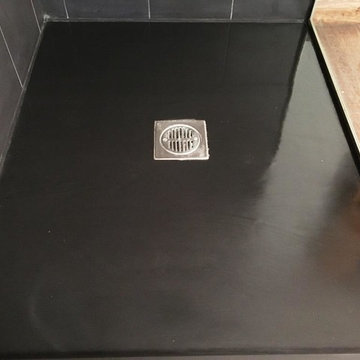
Upon observing the damage in person, I decided that the best course of action would be to use a process known as burnishing to grind away the stains. I tested a small area of the cubicle with one of our handheld diamond encrusted burnishing blocks.
Happy with the results of the test Clean, I started to burnish the whole cubicle using our system of four burnishing blocks, starting with the coarsest first and working my way down to the finest. A small amount of water was used as lubrication for each pad.
Through the burnishing process, the white stains started to disappear, exposing the lighter grey coloured Slate shower base.
After drying the area completely with a heat gun, I was able to seal the stone with two coats of Tile Doctor Colour Grow.
This impregnating sealer not only protects the stone but also importantly it restores the natural dark shades in the Slate, enhancing its overall appearance. As an impregnating sealer, Colour Grow penetrates the pores in the stone to fill them and prevent trapped dirt.
To say the customer was very relieved would be a complete understatement! By hiring in professional assistance, the customer was able to resolve the situation quickly and painlessly – and more importantly hold onto her £3,000 deposit!
Rupert Mcleod
West Surrey Tile Doctor

 Donald A. Gardner Architects
Stone and siding combine with a shed dormer, creating a Craftsman look to this exterior. This three-bedroom design is perfect for growing families, with large, open living spaces, and many storage options found throughout. From the side-entry, oversized garage with extra storage space and shelves, to the built-in shelves and coat closet off the rear hall, families will have plenty of options to keep their home clutter-free and organized.
The gourmet kitchen features a large island and is open to the dining room, which includes a convenient e-space that will be great for mom to oversee homework while getting dinner on the table. The luxurious master suite offers a tray ceiling in the bedroom, and dual walk-in closets that lead the way to the well-appointed master bath with dual sinks and a large tub. The outdoor living space abounds with a rear porch that leads to a large screen porch with fireplace and a patio with a spa. A large bonus space adds even more flexibility to this plan.
Built by Senter & Weigand Home Builders: http://www.houzz.com/pro/sandwbuilders/sandw-home-builders
27