
Search results for "Handled issues" in Home Design Ideas
 Phoenix Home Remodeling
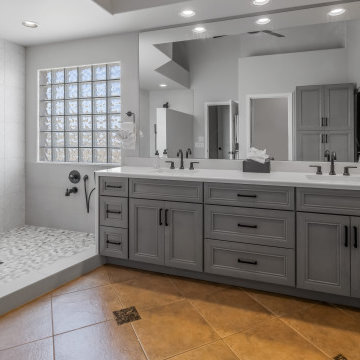
Barbara and Gary's master bathroom had lost its spark. The colors were muted and monotonous, giving the room a tired feel. Functionality was another significant issue; the space was disjointed and inefficient.
During the design phase, they collaborated with our in-house designer and one of the initial steps involved updating the color palette to infuse the design with a contemporary and quietness sense.
The outdated cabinets were lacking in storage space, so we upgraded them to Solid Designer Series Corona Oyster Clear Alder cabinets, paired with Bianco Pearl Quartz countertops with a waterfall edge on the left side.
The Jeffrey Alexander Boswell cabinet handles, coupled with the Delta Trinsic Widespread Faucets, infuse the space with a sense of elegance and vintage feel, completely transforming the room's overall feel.
The old bathtub was no longer working, so they decided to add a large custom shower that included a wet area, pony wall, and dry-off area. They chose the Annie Selke Flora Coconut Milk Porcelain 18x18" tile to create a stunning wall.
To craft a showstopper, we adorned the shower floor with Pebble Mosaic Warm Blend, achieving a breathtaking result. The remaining shower fixtures were impeccably selected to bring the dream shower to life.
With the expertise and guidance from our team, Barbara & Gary have turned their old bathroom into their dream space, enhancing not only the property's value but also their daily living experience.
 Reico Kitchen & Bath
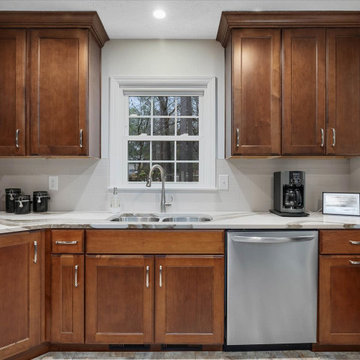
Nancy Knickerbocker of Reico Kitchen and Bath in Southern Pines, NC, worked with Chris Sowell to design a traditional-style kitchen with Masterpiece cabinetry. The cabinets are in the Rockwell door style, in Maple with a Cognac finish, paired with Cambria Brittanicca Warm countertops.
The kitchen also includes a 3x12 and 3x6 Bashful Beige Silk backsplash, a KitchenAid Induction Range, and a Whirlpool range vent.
The clients shared, “The hardest part of the remodel was waiting. We were eager to get started. It’s hard to pick just one favorite feature, but the transformation of our kitchen was amazing. Nancy did a great job blending the colors and textures of the countertop and wall tiles. We love the in-cabinet trash bin and the corner lazy susan. The space couldn’t be expanded, so Nancy used the existing footprint to create a kitchen that is both beautiful and functional. She handled any issues quickly and professionally. It was a very good experience.”
Nancy added, "The kitchen needed an update to match the rest of the house. While the layout stayed the same, we improved functionality and added storage with new cabinetry. Extending the cabinets to the ceiling and adding a lazy susan were key to making the space more efficient. My favorite part is the Cambria countertop. It’s durable and brings everything together. The homeowners were a pleasure to work with, and I appreciate their patience when we faced challenges!"
Photos courtesy of ShowSpaces Photography.
 Talon Construction Inc.
Finding a reputable contractor to design and build your kitchen remodel in Maryland with quality results involves several steps. Here are some general guidelines to help you find the right professional for your project:
1. Ask for Recommendations: Start by asking friends, family, neighbors, or colleagues who have recently completed kitchen remodels for recommendations. Personal referrals can be a valuable source of trustworthy contractors.
2. Check Online Reviews: Websites like Yelp, Angie's List, and Google Reviews can provide insights into the experiences of previous clients. Look for contractors with consistently positive feedback.
3. Check Credentials: Verify that the contractor has the necessary licenses and insurance to work in Maryland. You can typically check this information on your state's licensing board website.
4. Ask for References: Request references from the contractor and contact previous clients to inquire about their experiences. Visit some of their completed projects if possible.
5. Review Portfolios: Examine the contractor's portfolio of past kitchen remodels. Look for examples of work that match your style and preferences.
6. Check for Permits: Ensure that the contractor will handle any necessary permits and inspections for your remodel. Avoid contractors who suggest bypassing required permits, as this can lead to legal and safety issues.
7. Discuss Communication: Clear communication is crucial throughout the project. Discuss how the contractor will keep you updated on progress and address any concerns or changes during the remodel.
8. Get Everything in Writing: Never rely solely on verbal agreements. Ensure that all project details, warranties, and expectations are documented in a written contract.
9. Check for Red Flags: Be wary of contractors who pressure you into making quick decisions, lack a physical business address, or have a history of disputes or legal issues.
10. Trust Your Instincts: Choose a contractor you feel comfortable working with. Trust your instincts and select someone who listens to your ideas and concerns.
11. Visit Completed Projects: If possible, visit some of the contractors’ completed kitchen remodels to assess the quality of their work in person.
Once you've completed your due diligence and gathered all the necessary information, you'll be better equipped to make an informed decision about which contractor to hire for your kitchen remodel in Maryland. Remember that quality results often come from working with experienced, licensed professionals who prioritize clear communication and transparency throughout the project.
Find the right local pro for your project
 Talon Construction Inc.
Finding a reputable contractor to design and build your kitchen remodel in Maryland with quality results involves several steps. Here are some general guidelines to help you find the right professional for your project:
1. Ask for Recommendations: Start by asking friends, family, neighbors, or colleagues who have recently completed kitchen remodels for recommendations. Personal referrals can be a valuable source of trustworthy contractors.
2. Check Online Reviews: Websites like Yelp, Angie's List, and Google Reviews can provide insights into the experiences of previous clients. Look for contractors with consistently positive feedback.
3. Check Credentials: Verify that the contractor has the necessary licenses and insurance to work in Maryland. You can typically check this information on your state's licensing board website.
4. Ask for References: Request references from the contractor and contact previous clients to inquire about their experiences. Visit some of their completed projects if possible.
5. Review Portfolios: Examine the contractor's portfolio of past kitchen remodels. Look for examples of work that match your style and preferences.
6. Check for Permits: Ensure that the contractor will handle any necessary permits and inspections for your remodel. Avoid contractors who suggest bypassing required permits, as this can lead to legal and safety issues.
7. Discuss Communication: Clear communication is crucial throughout the project. Discuss how the contractor will keep you updated on progress and address any concerns or changes during the remodel.
8. Get Everything in Writing: Never rely solely on verbal agreements. Ensure that all project details, warranties, and expectations are documented in a written contract.
9. Check for Red Flags: Be wary of contractors who pressure you into making quick decisions, lack a physical business address, or have a history of disputes or legal issues.
10. Trust Your Instincts: Choose a contractor you feel comfortable working with. Trust your instincts and select someone who listens to your ideas and concerns.
11. Visit Completed Projects: If possible, visit some of the contractors’ completed kitchen remodels to assess the quality of their work in person.
Once you've completed your due diligence and gathered all the necessary information, you'll be better equipped to make an informed decision about which contractor to hire for your kitchen remodel in Maryland. Remember that quality results often come from working with experienced, licensed professionals who prioritize clear communication and transparency throughout the project.
 Talon Construction Inc.
Finding a reputable contractor to design and build your kitchen remodel in Maryland with quality results involves several steps. Here are some general guidelines to help you find the right professional for your project:
1. Ask for Recommendations: Start by asking friends, family, neighbors, or colleagues who have recently completed kitchen remodels for recommendations. Personal referrals can be a valuable source of trustworthy contractors.
2. Check Online Reviews: Websites like Yelp, Angie's List, and Google Reviews can provide insights into the experiences of previous clients. Look for contractors with consistently positive feedback.
3. Check Credentials: Verify that the contractor has the necessary licenses and insurance to work in Maryland. You can typically check this information on your state's licensing board website.
4. Ask for References: Request references from the contractor and contact previous clients to inquire about their experiences. Visit some of their completed projects if possible.
5. Review Portfolios: Examine the contractor's portfolio of past kitchen remodels. Look for examples of work that match your style and preferences.
6. Check for Permits: Ensure that the contractor will handle any necessary permits and inspections for your remodel. Avoid contractors who suggest bypassing required permits, as this can lead to legal and safety issues.
7. Discuss Communication: Clear communication is crucial throughout the project. Discuss how the contractor will keep you updated on progress and address any concerns or changes during the remodel.
8. Get Everything in Writing: Never rely solely on verbal agreements. Ensure that all project details, warranties, and expectations are documented in a written contract.
9. Check for Red Flags: Be wary of contractors who pressure you into making quick decisions, lack a physical business address, or have a history of disputes or legal issues.
10. Trust Your Instincts: Choose a contractor you feel comfortable working with. Trust your instincts and select someone who listens to your ideas and concerns.
11. Visit Completed Projects: If possible, visit some of the contractors’ completed kitchen remodels to assess the quality of their work in person.
Once you've completed your due diligence and gathered all the necessary information, you'll be better equipped to make an informed decision about which contractor to hire for your kitchen remodel in Maryland. Remember that quality results often come from working with experienced, licensed professionals who prioritize clear communication and transparency throughout the project.
 Talon Construction Inc.
Finding a reputable contractor to design and build your kitchen remodel in Maryland with quality results involves several steps. Here are some general guidelines to help you find the right professional for your project:
1. Ask for Recommendations: Start by asking friends, family, neighbors, or colleagues who have recently completed kitchen remodels for recommendations. Personal referrals can be a valuable source of trustworthy contractors.
2. Check Online Reviews: Websites like Yelp, Angie's List, and Google Reviews can provide insights into the experiences of previous clients. Look for contractors with consistently positive feedback.
3. Check Credentials: Verify that the contractor has the necessary licenses and insurance to work in Maryland. You can typically check this information on your state's licensing board website.
4. Ask for References: Request references from the contractor and contact previous clients to inquire about their experiences. Visit some of their completed projects if possible.
5. Review Portfolios: Examine the contractor's portfolio of past kitchen remodels. Look for examples of work that match your style and preferences.
6. Check for Permits: Ensure that the contractor will handle any necessary permits and inspections for your remodel. Avoid contractors who suggest bypassing required permits, as this can lead to legal and safety issues.
7. Discuss Communication: Clear communication is crucial throughout the project. Discuss how the contractor will keep you updated on progress and address any concerns or changes during the remodel.
8. Get Everything in Writing: Never rely solely on verbal agreements. Ensure that all project details, warranties, and expectations are documented in a written contract.
9. Check for Red Flags: Be wary of contractors who pressure you into making quick decisions, lack a physical business address, or have a history of disputes or legal issues.
10. Trust Your Instincts: Choose a contractor you feel comfortable working with. Trust your instincts and select someone who listens to your ideas and concerns.
11. Visit Completed Projects: If possible, visit some of the contractors’ completed kitchen remodels to assess the quality of their work in person.
Once you've completed your due diligence and gathered all the necessary information, you'll be better equipped to make an informed decision about which contractor to hire for your kitchen remodel in Maryland. Remember that quality results often come from working with experienced, licensed professionals who prioritize clear communication and transparency throughout the project.

 Castle Building & Remodeling
This family and had been living in their 1917 Tangletown neighborhood, Minneapolis home for over two years and it wasn’t meeting their needs.
The lack of AC in the bathroom was an issue, the bathtub leaked frequently, and their lack of a shower made it difficult for them to use the space well. After researching Design/Build firms, they came to Castle on the recommendations from others.
Wanting a clean “canvas” to work with, Castle removed all the flooring, plaster walls, tiles, plumbing and electrical fixtures. We replaced the existing window with a beautiful Marvin Integrity window with privacy glass to match the rest of the home.
A bath fan was added as well as a much smaller radiator. Castle installed a new cast iron bathtub, tub filler, hand shower, new custom vanity from the Woodshop of Avon with Cambria Weybourne countertop and a recessed medicine cabinet. Wall sconces from Creative lighting add personality to the space.
The entire space feels charming with all new traditional black and white hexagon floor tile, tiled shower niche, white subway tile bath tub surround, tile wainscoting and custom shelves above the toilet.
Just outside the bathroom, Castle also installed an attic access ladder in their hallway, that is not only functional, but aesthetically pleasing.
Come see this project on the 2018 Castle Educational Home Tour, September 29 – 30, 2018.
Sponsored
Sunbury, OH

J.Holderby - Renovations
Franklin County's Leading General Contractors - 2X Best of Houzz!

 Reborn Cabinets Inc.
If you haven’t heard the term “aging in place” already, you’re going to hear it more and more in the next ten years. The term as emerged as more and more adults expressed their desire to stay in their own homes for as long as possible. Rather than moving into a community built around increased accessibility needs, home owners are looking to the kitchen and bath remodeling industry to innovate the spaces in their home where they perform the most important tasks.
As most long-time home owners realize, the need for accessibility and safety first presents itself in the bathroom. If balance is becoming an issue for a homeowner, the first concern that tends to arise is an exponentially increased fall-risk in the bathroom. Each year, one-third of individuals report a fall, and two thirds of those who fall will fall again in the next six months. Finally, falls are the leading cause of death from injury for people over 65. Individuals coping with injury, recovering from surgery, arthritis and other similar health issues are at an even higher risk of falling. In other words, every day, more and more people are finding the act of bathing or showering difficult, worrisome or even painful!
For those seeking to age in place, this is where acrylic tub-to-shower conversions, like Reborn Cabinets Bath Solutions, are incredibly helpful, and can dramatically improve a person’s quality of life. Highly customizable to meet anyone’s daily bathing needs, acrylic tub-to-shower conversions give home owners the option to add benches, safety rails, and even the ability to install a barrier-free design—easy entry for those who require wheelchairs or walkers.
But the aging in place-crowd isn’t simply looking for strictly functional solutions to their daily routine. Since these innovations are changing their already-existing bathroom, there is a need to move these accessible spaces beyond function and keep them stylish. Again, aging in place is all about keeping your house a home—not a “facility.”
Reborn Bath Solutions is a versatile product, allowing home-owners to choose from a great selection of colors and a wide array of fixtures. Sure, the “bathroom of your dreams” may look a little different these days, but you deserve it! Give us a call, and we’ll help you stay in your home and keep your daily sense of confidence!

 Crystal Kitchen + Bath
An entry door that collided with the toilet and a tub enclosure that was unsightly were just the beginning of the issues the homeowner had with this bathroom. Besides needing to update the plumbing fixtures in this 1930’s home, a new layout was in order. The existing bathtub was very narrow, so finding a 27-1/2 wide fixture was one of our biggest challenges. The homeowner’s requested the style of the new bathroom to be in keeping with the age of this traditional home.
By relocating the toilet to the other side of the room and tucking it behind the tub, the entry door can now fully open, plus the half wall acts as a privacy barrier. The old pedestal sink was replaced with a new large furniture style vanity with a beautiful marble counter top. Much needed lighting was added to the room, including two wall sconces on each side of the tilting mirror. The old windows were replaced and have an etched design on the glass to give privacy to the room without having to add a window treatment.
A new clear glass shower surround allows for more natural light to enter the tub area, so bathing no longer feels like you are in a cave. A shampoo niche is tucked in the corner where soaps and hair care products are easily accessed when showering. The porcelain tile on the floor and shower walls mimics the look of travertine without the higher price of a natural stone. This bathroom still has its traditional charm, but with all the updated luxuries of a new bathroom.

 Tiffany Brooks, HGTV Host & Interior Designer
Inquire About Our Design Services
When we first started talking in the spring of 2015, I was impressed. She was witty, realistic, and understood that as much as she loves my shows on HGTV, design does not does not happen in 43 minutes! She told me about her space, and how she felt that her bedroom seemed “blah” to her. She had no retreat. Molly desperately longed for a place that she could spend time in, read in, play in and above all, relax in.
What we did:
Many people are terrified of hiring a designer. Rightfully so, they are investing a pretty penny in their homes. They want to make sure that everything, down to the last floral arrangement, is to their liking, because they will have to live it (and pay for it). Unfortunately, a client can unintentionally stifle a designer’s creativity through micro-management. This can produce lackluster results and ultimately cause more time (and money) to be spent on a project than is really necessary.
With Molly, that was never an issue. Before she even showed me the room in question, she said that I could have full creative license to do what I needed to do to her bedroom. SAY WHAAH!?
With Molly giving me complete creative freedom, I planned everything out and got down to business. The result: Bite-your-bottom-lip sexy. I don’t get jealous of too many of my clients’ spaces, but this one still takes my breath away every time I look at the pics!
The craziest part was that by adding more furniture, it actually made the space feel larger.
Molly and her husband Patrick loved the finished space, and promised me I will be back to finish the rest of the house!
Here’s the highlights of the rest of the project:
I came up with a space plan with three options.
Next, we reviewed mood boards and fabric schemes that would work for both Molly and her hubby Patrick.
We started with the bed. My goal was to add edge to its otherwise traditional style.
We decided to spice things up by painting the trim work in the room black.
We built in layers of lighting with dimmers. In a bedroom everything should be on dimmers, right? Right.
We designed and customized bedding, chairs and window treatments.
Together with Molly, we selected the most perfect wallpaper. This geometric “grasscloth” adds so much depth and dimension that was just missing before.
What I love:
That light fixture. I mean it is really, really amazing in person.
The porcupine mirror. This thing came packaged like it was the hope diamond, and everyone was terrified to handle it. But it really became a highlight of the room.
 KitchenLab Interiors
’ first, entirely new construction project in collaboration with GTH architects who designed the residence. KLI was responsible for all interior finishes, fixtures, furnishings, and design including the stairs, casework, interior doors, moldings and millwork. KLI also worked with the client on selecting the roof, exterior stucco and paint colors, stone, windows, and doors. The homeowners had purchased the existing home on a lakefront lot of the Valley Lo community in Glenview, thinking that it would be a gut renovation, but when they discovered a host of issues including mold, they decided to tear it down and start from scratch. The minute you look out the living room windows, you feel as though you're on a lakeside vacation in Wisconsin or Michigan. We wanted to help the homeowners achieve this feeling throughout the house - merging the causal vibe of a vacation home with the elegance desired for a primary residence. This project is unique and personal in many ways - Rebekah and the homeowner, Lorie, had grown up together in a small suburb of Columbus, Ohio. Lorie had been Rebekah's babysitter and was like an older sister growing up. They were both heavily influenced by the style of the late 70's and early 80's boho/hippy meets disco and 80's glam, and both credit their moms for an early interest in anything related to art, design, and style. One of the biggest challenges of doing a new construction project is that it takes so much longer to plan and execute and by the time tile and lighting is installed, you might be bored by the selections of feel like you've seen them everywhere already. “I really tried to pull myself, our team and the client away from the echo-chamber of Pinterest and Instagram. We fell in love with counter stools 3 years ago that I couldn't bring myself to pull the trigger on, thank god, because then they started showing up literally everywhere", Rebekah recalls. Lots of one of a kind vintage rugs and furnishings make the home feel less brand-spanking new. The best projects come from a team slightly outside their comfort zone. One of the funniest things Lorie says to Rebekah, "I gave you everything you wanted", which is pretty hilarious coming from a client to a designer.
 Tiffany Brooks, HGTV Host & Interior Designer
Inquire About Our Design Services
When we first started talking in the spring of 2015, I was impressed. She was witty, realistic, and understood that as much as she loves my shows on HGTV, design does not does not happen in 43 minutes! She told me about her space, and how she felt that her bedroom seemed “blah” to her. She had no retreat. Molly desperately longed for a place that she could spend time in, read in, play in and above all, relax in.
What we did:
Many people are terrified of hiring a designer. Rightfully so, they are investing a pretty penny in their homes. They want to make sure that everything, down to the last floral arrangement, is to their liking, because they will have to live it (and pay for it). Unfortunately, a client can unintentionally stifle a designer’s creativity through micro-management. This can produce lackluster results and ultimately cause more time (and money) to be spent on a project than is really necessary.
With Molly, that was never an issue. Before she even showed me the room in question, she said that I could have full creative license to do what I needed to do to her bedroom. SAY WHAAH!?
With Molly giving me complete creative freedom, I planned everything out and got down to business. The result: Bite-your-bottom-lip sexy. I don’t get jealous of too many of my clients’ spaces, but this one still takes my breath away every time I look at the pics!
The craziest part was that by adding more furniture, it actually made the space feel larger.
Molly and her husband Patrick loved the finished space, and promised me I will be back to finish the rest of the house!
Here’s the highlights of the rest of the project:
I came up with a space plan with three options.
Next, we reviewed mood boards and fabric schemes that would work for both Molly and her hubby Patrick.
We started with the bed. My goal was to add edge to its otherwise traditional style.
We decided to spice things up by painting the trim work in the room black.
We built in layers of lighting with dimmers. In a bedroom everything should be on dimmers, right? Right.
We designed and customized bedding, chairs and window treatments.
Together with Molly, we selected the most perfect wallpaper. This geometric “grasscloth” adds so much depth and dimension that was just missing before.
What I love:
That light fixture. I mean it is really, really amazing in person.
The porcupine mirror. This thing came packaged like it was the hope diamond, and everyone was terrified to handle it. But it really became a highlight of the room.

 Renovisions
It’s no surprise these Hanover clients reached out to Cathy and Ed of Renovisions for design and build services as they wanted a local professional bath specialist to turn their plain builder-grade bath into a luxurious handicapped accessible master bath.
Renovisions had safety and universal design in mind while creating this customized two-person super shower and well-appointed master bath so their clients could escape to a special place to relax and energize their senses while also helping to conserve time and water as it is used simultaneously by them.
This completely water proofed spacious 4’x8’ walk-in curb-less shower with lineal drain system and larger format porcelain tiles was a must have for our senior client –with larger tiles there are less grout lines, easier to clean and easier to maneuver using a walker to enter and exit the master bath.
Renovisions collaborated with their clients to design a spa-like bath with several amenities and added conveniences with safety considerations. The bench seat that spans the width of the wall was a great addition to the shower. It’s a comfortable place to sit down and stretch out and also to keep warm as electric mesh warming materials were used along with a programmable thermostat to keep these homeowners toasty and cozy!
Careful attention to all of the details in this master suite created a peaceful and elegant environment that, simply put, feels divine. Adding details such as the warming towel rack, mosaic tiled shower niche, shiny polished chrome decorative safety grab bars that also serve as towel racks and a towel rack inside the shower area added a measure of style. A stately framed mirror over the pedestal sink matches the warm white painted finish of the linen storage cabinetry that provides functionality and good looks to this space. Pull-down safety grab bars on either side of the comfort height high-efficiency toilet was essential to keep safety as a top priority.
Water, water everywhere for this well deserving couple – multiple shower heads enhances the bathing experience for our client with mobility issues as 54 soft sprays from each wall jet provide a soothing and cleansing effect – a great choice because they do not require gripping and manipulating handles yet provide a sleek look with easy cleaning. The thermostatic valve maintains desired water temperature and volume controls allows the bather to utilize the adjustable hand-held shower on a slide-bar- an ideal fixture to shower and spray down shower area when done.
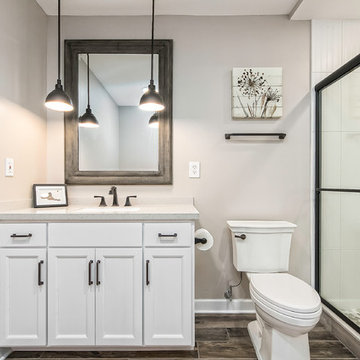
A beautiful, frameless clear glass enclosure maintains a clean, open look without taking away from the stunning and richly grained marble-look tiles and decorative elements inside the shower. In addition to its therapeutic value, this shower is truly a design focal point of the master bath with striking tile work, beautiful chrome fixtures including several safety grab bars adding aesthetic value as well as safety benefits.
Sponsored
Sunbury, OH
J.Holderby - Renovations
Franklin County's Leading General Contractors - 2X Best of Houzz!

 Good Earth Plant Company and GreenScaped Buildings
A client who had seen our stunning installation at Spring Hill Suites in Oceanside, California wanted to surprise his wife for her birthday and give her a 112 square foot living wall at the front entry of their house. He was set on the style of the wall being succulents in a tight pattern. This raised two huge challenges:
1) How to overcome his three week lead time: First, the manufacturer's lead time to get us the wall materials is four weeks. The plants in this type of system usually require three months to get rooted.
2) How to attach a system meant for flat surfaces onto his CURVED front wall. Square peg, meet curved hole.
Operations Manager Kerry Bauer made drawings and a mock up for a system created from the green ROOF components GreenScaped Buildings has used on certain projects. She chose parts she knew shipped within one week to eliminate the lead time issue. A landscape edging element, specifically designed to handle curves, could also overcome the challenge of the curved wall.
But what about the time needed for growing the plants? By using an advanced soil replacement media block, the wall installation could allow the plants to root while installed vertically.
GreenScaped Buildings collaborated with the client and supplier Green Meadow Growers to choose appropriate sedums and succulents for the east-facing coastal climate of Encinitas and lay out a pattern of organic wave shapes. Katelyn Hutchings tackled the procurement aspects of the project while construction foreman John Rodenbo prepared the site and installation logistics.
Installation took three days. How do you think it turned out?
The final product exceeded the client's expectations, and he has already invited GreenScaped Buildings to collaborate on his upcoming commercial hotel project with the goal of integrating a living wall there to enhance his hotel as much as it has enhanced his home.

 Reverse Architecture
During the renovation a hollow space was discovered in the wall which allowed for a generous niche with shelves for storage in the shower. Every inch counts in city living!
Photo by Heidi Solander
 Renovisions
It’s no surprise these Hanover clients reached out to Cathy and Ed of Renovisions for design and build services as they wanted a local professional bath specialist to turn their plain builder-grade bath into a luxurious handicapped accessible master bath.
Renovisions had safety and universal design in mind while creating this customized two-person super shower and well-appointed master bath so their clients could escape to a special place to relax and energize their senses while also helping to conserve time and water as it is used simultaneously by them.
This completely water proofed spacious 4’x8’ walk-in curb-less shower with lineal drain system and larger format porcelain tiles was a must have for our senior client –with larger tiles there are less grout lines, easier to clean and easier to maneuver using a walker to enter and exit the master bath.
Renovisions collaborated with their clients to design a spa-like bath with several amenities and added conveniences with safety considerations. The bench seat that spans the width of the wall was a great addition to the shower. It’s a comfortable place to sit down and stretch out and also to keep warm as electric mesh warming materials were used along with a programmable thermostat to keep these homeowners toasty and cozy!
Careful attention to all of the details in this master suite created a peaceful and elegant environment that, simply put, feels divine. Adding details such as the warming towel rack, mosaic tiled shower niche, shiny polished chrome decorative safety grab bars that also serve as towel racks and a towel rack inside the shower area added a measure of style. A stately framed mirror over the pedestal sink matches the warm white painted finish of the linen storage cabinetry that provides functionality and good looks to this space. Pull-down safety grab bars on either side of the comfort height high-efficiency toilet was essential to keep safety as a top priority.
Water, water everywhere for this well deserving couple – multiple shower heads enhances the bathing experience for our client with mobility issues as 54 soft sprays from each wall jet provide a soothing and cleansing effect – a great choice because they do not require gripping and manipulating handles yet provide a sleek look with easy cleaning. The thermostatic valve maintains desired water temperature and volume controls allows the bather to utilize the adjustable hand-held shower on a slide-bar- an ideal fixture to shower and spray down shower area when done.
A beautiful, frameless clear glass enclosure maintains a clean, open look without taking away from the stunning and richly grained marble-look tiles and decorative elements inside the shower. In addition to its therapeutic value, this shower is truly a design focal point of the master bath with striking tile work, beautiful chrome fixtures including several safety grab bars adding aesthetic value as well as safety benefits.

 Edgewater Design Group
The family purchased the 1950s ranch on Mullet Lake because their daughter dreamed of being married on its shores. The home would be used for the wedding venue and then as a wedding gift to the young couple. We were originally hired in August 2014 to help with a simple renovation of the home that was to be completed well in advance of the August 2015 wedding date. However, thorough investigation revealed significant issues with the original foundation, floor framing and other critical elements of the home’s structure that made that impossible. Based on this information, the family decided to tear down and build again. So now we were tasked with designing a new home that would embody their daughter’s vision of a storybook home – a vision inspired by another one of our projects that she had toured. To capture this aesthetic, traditional cottage materials such as stone and cedar shakes are accentuated by more materials such as reclaimed barn wood siding and corrugated CORTEN steel accent roofs. Inside, interior finishes include hand-hewn timber accents that frame openings and highlight features like the entrance reading nook. Natural materials shine against white walls and simply furnished rooms. While the house has nods to vintage style throughout, the open-plan kitchen and living area allows for both contemporary living and entertaining. We were able to capture their daughter’s vision and the home was completed on time for her big day.
- Jacqueline Southby Photography


 Gallery KBNY
This brownstone renovation was a full gut project in every sense of the word. On top of installing new floors, a kitchen and bath renovation, and all the typical restoration and refinishing involved in a brownstone built in 1899, we also completely updated the exterior, constructed a balcony that was not originally there, and converted the space from a single-family home into an an owner’s triplex. A newly separated studio rental on the garden level offers the opportunity for supplemental income, an uncommon and welcome addition to a New York brownstone.
A TRANSITIONAL GEM
The result is a two-family brownstone that perfectly combines classic townhouse living with today’s modern needs, including SmartHome technology that we installed to control Bluetooth speakers, Nest thermostats, and the security system.
The overall aesthetic goal was to pay homage to the historical periods the brownstone has lived through in a cohesive way that is the hallmark of modern transitional style.
In the kitchen, white Shaker-style cabinetry, a subway tile backsplash, and marble rather than quartz countertops bring a classically upscale sensibility. To modernize the space further, we opened up the back wall to create floor-to-ceiling windows that are also doors, opening up into the newly built balcony.
TIMELY TOUCHES
This brownstone renovation included many quintessential elements, such as millwork like the ceiling medallions. We restored some and custom built others, perfectly recreating their original appearance.
The heated master bathroom is now serene, with a walk-in shower featuring a subtly modern linear drain. A herringbone Carrera marble tiled floor and marble slab sink complete the scene. In the powder room, we embraced a contemporary look by pairing dark hexagonal floors with light chevron tiles, accented with dramatic navy blue wallpaper. With its clear-cut 1920s-style, we selected the wall sconce to reference one of the brownstone’s earlier eras.
DESIGN DETAILS
Natural oak herringbone floors we installed throughout the entire home bring a modern yet warm touch. We restored the wood-burning marble fireplace, which is fully functioning. An elegant staircase with a custom-crafted black wooden banister and white balusters winds up and down alongside a real brick interior wall that we restored and refinished.
In this brownstone renovation, we were also able to create ceiling height, an unexpected yet aesthetically pleasing side benefit. When working on the joists and beams to level out the floors (a common issue in pre-war renovations) we added ceiling height in the main parlor floor by taking the second floor and raising the ceiling an entire foot. The end result is a main floor with stunning 9-foot ceilings.
SOME HIGHLIGHTS
- Solid natural oak herringbone floors throughout
- A fully restored, refinished, and functioning wood burning fireplace with a marble mantle
- Complete exterior renovation of the facade, cornices, windows, mouldings, and even the ironwork, including the railings leading up to the stoop and those facing the street
- A brand new central air and heating system with uniquely modern vents – look above the couch in the living room with the fuzzy rug and large painting
Considering a brownstone renovation? Contact us today! We specialize in brownstone renovations in New York as well as all pre-war apartments. When you work with a design-and-build firm like Gallery to renovate your brownstone, you get the full range of our expertise in working with all the finest details and pre-war architectural elements of these classic New York spaces. We also handle every step of the process, from filing permits and organizing schedules to sourcing custom pieces and building entirely new rooms (or even balconies). Call us for a free initial consultation when you’re ready.
 Tiffany Brooks, HGTV Host & Interior Designer
Inquire About Our Design Services
When we first started talking in the spring of 2015, I was impressed. She was witty, realistic, and understood that as much as she loves my shows on HGTV, design does not does not happen in 43 minutes! She told me about her space, and how she felt that her bedroom seemed “blah” to her. She had no retreat. Molly desperately longed for a place that she could spend time in, read in, play in and above all, relax in.
What we did:
Many people are terrified of hiring a designer. Rightfully so, they are investing a pretty penny in their homes. They want to make sure that everything, down to the last floral arrangement, is to their liking, because they will have to live it (and pay for it). Unfortunately, a client can unintentionally stifle a designer’s creativity through micro-management. This can produce lackluster results and ultimately cause more time (and money) to be spent on a project than is really necessary.
With Molly, that was never an issue. Before she even showed me the room in question, she said that I could have full creative license to do what I needed to do to her bedroom. SAY WHAAH!?
With Molly giving me complete creative freedom, I planned everything out and got down to business. The result: Bite-your-bottom-lip sexy. I don’t get jealous of too many of my clients’ spaces, but this one still takes my breath away every time I look at the pics!
The craziest part was that by adding more furniture, it actually made the space feel larger.
Molly and her husband Patrick loved the finished space, and promised me I will be back to finish the rest of the house!
Here’s the highlights of the rest of the project:
I came up with a space plan with three options.
Next, we reviewed mood boards and fabric schemes that would work for both Molly and her hubby Patrick.
We started with the bed. My goal was to add edge to its otherwise traditional style.
We decided to spice things up by painting the trim work in the room black.
We built in layers of lighting with dimmers. In a bedroom everything should be on dimmers, right? Right.
We designed and customized bedding, chairs and window treatments.
Together with Molly, we selected the most perfect wallpaper. This geometric “grasscloth” adds so much depth and dimension that was just missing before.
What I love:
That light fixture. I mean it is really, really amazing in person.
The porcupine mirror. This thing came packaged like it was the hope diamond, and everyone was terrified to handle it. But it really became a highlight of the room.
 Murphy Bros. Design | Build | Remodel
The list was long. Very long. And the level of remodeling they needed was a too demanding for these very capable empty nester DIYers to handle on their own. That’s not surprising since they wanted to remodel their kitchen, living room, entryway, and add a garage/office/bedroom addition off the side of their home.
“I think what was really driving this remodel was the shared desire to liberate this home from its 60’s style (dark paneling) and confined layout,” recalls Murphy Bros. designer Courtney Cartee. “They needed more space everywhere, from the kitchen to the adjoining entryway and living room. In short they really needed a whole new look and layout.”
So we suggested a three-part solution. A completely new kitchen, which required the removal of a giant stone fireplace, that was causing all kinds of space issues in both living room, entry and kitchen.
The second part of the design involved an addition to the side of the property, which added another garage stall and an office/bedroom above. “I can remember going in front of the city hall officials to get approval for the variance to add on the garage addition,” remembers Cartee. “They were very impressed with how our design integrated the addition with the existing exterior of the home. They remarked that so many remodels in their city now are just tear downs instead of taking the time and imagination to work with what’s already there.”
The third aspect of the design had to do with the entry and upgrading the exterior of the home. The entry is now wider and the whole house was painted to achieve much better curb appeal, which can have a big impact on first impressions for resale and simple pride.
“Before they had just enough room for barely two people in their kitchen. I mean it was really tight. Once we got that fireplace out, that opened up everything. Now they can have the whole family in that space and still be able to move around and entertain,” says Cartee.
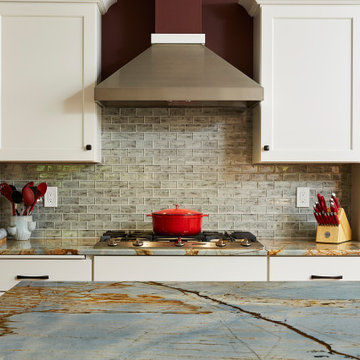
Island & perimeter countertop: Azure Quartzite slab from Brazil.
Backsplash: Dockside Gale Stria porcelain and glass wall tile
45