
Search results for "High risk" in Home Design Ideas
 EK ARCHITECTURE, PLLC
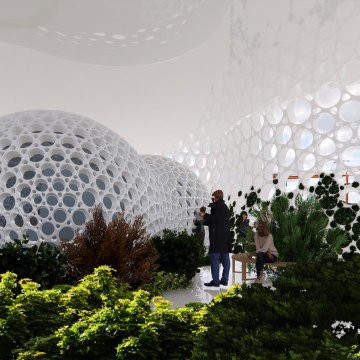
Today’s skyscrapers do not accommodate ever-changing uses, health, and energy crisis.
onE.GLobe proposes organically grown, flexible, and scalable live-work-play structures which can adapt to any condition.
Stress increases the risk of chronic diseases, the leading cause of death and disability with around 75% (Source 1a, 1b).
Improving human health through a thoughtfully designed environment is as important as energy conservation and carbon sequestration. We can also address all three goals with similar solutions, such as allocating large green areas, water features, and diverse uses in proximity. Nature makes people happier and healthier, and it also absorbs stormwater and can be used for renewable energy production. Therefore, we can achieve resiliency for both environment and society easily together.
Amoeba Fusion aims to empower societies by providing a space for decentralized, innovative start-up communities. onE.GLobe considers the built environment a living, breathing, multiplying organism, evolving in nature with harmony. The structure can grow horizontally and vertically by adding new cores in different directions per each site condition. It creates public plazas shaded and shielded by the building as it grows. Fully self-sufficient structure houses flexible 3D printed dwellings and workspaces surrounded by semi-open garden spaces and atrium. Thirty feet deep floor plates receive daylight from the exterior and atrium and can conveniently be used as open-plan office space. Electrical, plumbing, and HVAC systems are distributed through modular floor plates, on which 3D printed modules are flexibly plugged in. 3D printed inflatable shells with indoor air cleaning plants house a plug-in kitchen, bedroom, workspace, and bathroom modules. The bridge-connected clusters have decentralized systems with the off-grid micro-grid integrating renewable energy sources and excess energy storage.
Compact layouts provide space for an increasing number of entrepreneurs, making them socialize and inspire near their accommodation. Eliminating corridors in dwelling units with an efficient design and replacing them with the garden space surrounding units achieve this endeavor.
Amoeba Fusion New York is located at a General Commercial Zoning district in NYC with residential and commercial uses. The site currently accommodates six towers. This project explores a more resilient design solution for an innovative, diverse community for the post-pandemic world. Located in the Lincoln Square neighborhood in Manhattan, bordering Hell’s Kitchen with countless restaurants, the site is close to various public transportation, universities, cultural spaces, and businesses, making it ideal for an innovative, creative crowd. Mixed-use commercial and residential buildings are allowed with a floor area bonus of 20% with a public plaza. With tower regulation, there is no minimum lot coverage requirement, and no rule regarding the distribution of floor area allows the tallest buildings in the city.
There are plenty of luxury residential buildings in New York City, but they don’t serve innovative young people and entrepreneurs. Co-living buildings do not provide proper workspaces within the facility. For these reasons, onE.GLobe aims to investigate ways to design long-term live-work-play environments for innovative young people and ease the effects of the future pandemics with its efficient, flexible dwelling units and workspaces surrounded by semi-open garden spaces, atrium, rooftops, public plazas, and wet ponds.
 dSPACE Studio Architecture
Built on a dune overlooking Lake Michigan, this residence appears to emerge from the landscape. The project brief called for an artful house that promotes wellness and outdoor living. Rugged beauty and four-season adventure drew the owners to the area but presented challenges, including wildfire risk. The site needed a durable shelter that responsibly integrates with the environment.
Clad in sand-colored stucco, the house will intentionally be obscured by grasses and junipers over time. Outdoor spaces are layered to match the undulating topography. A steel superstructure enables an ultra-thin roof with overhangs for passive solar design that withstand gale-force winds and heavy snow loads.
A crushed-granite courtyard offers refuge on windy days. This space is enclosed by operable Cor-Ten panels that rotate open to reveal dune views or close for a cloistered experience. The courtyard is further defined by a deconstructed roof with an aperture that frames sky views.
Expansive glazing and porcelain flooring unites interior and exterior, evoking a sense of inhabiting an infinity house. A screen porch, concealed by louvers, is a contemporary interpretation of a time-honored lake house vernacular. Layers of light and an edited palette of materials unify the interior and evoke a laid-back feeling of beach towns. On both levels, bronze glass walls artfully define rooms while preserving views.

 Industrial Projects
Creating a comfortable outdoor living space is a priority for many homeowners and DIY enthusiasts. With rising summer temperatures, installing a shade tarp in your backyard offers an affordable and effective solution for sun protection. We’ve developed this detailed, step-by-step guide to help you confidently install a shade tarp that not only shields you from the sun but also adds aesthetic appeal to your outdoor area.
Benefits of Installing a Backyard Shade Tarp
Before diving into the installation process, let’s explore the key benefits of having a backyard shade tarp:
Provides UV Protection: Keeps your family and guests safe from harmful sun exposure.
Reduces Outdoor Temperatures: Creates a cooler, more enjoyable outdoor space.
Protects Outdoor Furniture: Extends the life of patio furniture by reducing sun damage.
Enhances Outdoor Aesthetics: Adds a modern, stylish look to your yard.
Budget-Friendly: More affordable compared to permanent structures like pergolas.
Materials and Tools You’ll Need
To begin your DIY backyard shade project, gather the following materials and tools:
Materials:
Shade tarp (UV-resistant and breathable)
Sturdy posts or existing structures (trees, fences, walls)
Mounting hardware (eye bolts, D-rings, turnbuckles, snap hooks)
Nylon or polyester rope, or stainless-steel wire
Concrete (if installing new posts)
Tools:
Power drill
Measuring tape
Level
Ladder
Wrench or adjustable spanner
Post hole digger (if installing new posts)
Step 1: Plan Your Shade Tarp Layout
The first step in installing your backyard shade tarp is careful planning. Take time to assess your outdoor area and answer these key questions:
Where is the sun’s path throughout the day?
What size and shape of tarp best suits your space?
Will you anchor the tarp to existing structures or install new posts?
What height do you want the tarp to sit at for maximum shade and airflow?
Pro Tip: Use string or garden hoses to visualize the tarp layout on the ground before making permanent decisions.
Step 2: Measure and Mark Anchor Points
Once you’ve determined the tarp’s location and orientation:
Measure the tarp dimensions.
Mark the exact points where each corner of the tarp will be anchored.
Ensure that the anchor points are at least 5–10% longer than the tarp size to allow for tensioning and slight adjustments.
Consider slope angles for water runoff. Aim for at least a 20-degree angle to prevent water pooling on the tarp.
Step 3: Install Support Posts (If Necessary)
If your backyard lacks existing anchor points like trees or fences, you’ll need to install sturdy support posts:
Dig post holes at least 24 inches deep and 8-12 inches wide for stability.
Set posts in concrete, making sure they remain plumb and level.
Allow the concrete to cure for at least 24–48 hours before applying tension from the tarp.
We recommend using pressure-treated wood, galvanized steel poles, or aluminum posts for longevity and strength.
Step 4: Install Mounting Hardware
With your anchor points ready, it’s time to install the necessary hardware:
Attach eye bolts or pad eyes securely into walls, posts, or other fixed structures.
For added flexibility and adjustability, install turnbuckles or tensioners to fine-tune the tarp’s tightness.
Connect snap hooks, D-rings, or carabiners to make assembly and disassembly easier.
Make sure all hardware is rated for outdoor use to prevent rust and corrosion.
Step 5: Attach and Tension the Shade Tarp
Now it’s time for the most satisfying part—mounting the shade tarp:
Begin by attaching one corner of the tarp to an anchor point.
Gradually attach the remaining corners, moving diagonally for even tension.
Adjust each connection point using your turnbuckles, ropes, or cables.
Pull the tarp tight enough to avoid sagging, but not so tight that it risks tearing.
Check that the tarp maintains the desired slope for rainwater runoff and adjust tension as needed.
Step 6: Final Adjustments and Safety Check
Before enjoying your new shaded area:
Inspect all anchor points and hardware for stability.
Test the tarp’s tension and make adjustments for even distribution.
Ensure that no sharp edges or loose connections remain that could damage the tarp or pose a safety hazard.
Confirm that the tarp is secure in windy conditions by giving it a gentle tug.
If you live in an area with frequent high winds, consider removing the tarp during storms to prevent damage.
Step 7: Enjoy Your Shaded Backyard Oasis
Once installed, your backyard shade tarp provides a comfortable and protective space for outdoor gatherings, relaxation, or family activities. You can decorate underneath with outdoor furniture, string lights, or potted plants to create a personalized outdoor retreat.
Maintenance Tips for Long-Lasting Shade Tarp Performance
To extend the life of your shade tarp, follow these maintenance guidelines:
Regularly check for wear and tear, especially around anchor points and seams.
Clean the tarp periodically with mild soap and water to prevent mildew buildup.
Store the tarp indoors during harsh weather seasons if it's not designed for year-round use.
Tighten hardware as needed to maintain proper tension and avoid sagging.
By following these simple care steps, your shade tarp will continue to deliver years of sun protection and outdoor comfort.
Conclusion: Upgrade Your Outdoor Space with a DIY Shade Tarp
Installing a shade tarp in your backyard is a cost-effective and rewarding DIY project. With careful planning, quality materials, and proper installation techniques, you’ll enjoy cool, shaded outdoor living all season long. This step-by-step guide ensures your project goes smoothly from start to finish.
Find the right local pro for your project
 Vanguard Development
The best interior designers & architects in NYC!
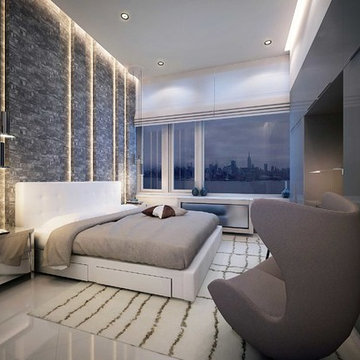
Residential interior design, Common area design, Hospitality design, Exterior design, Commercial design - any interior or architectural design basically from a unique design team :)
Our goal is to provide clients in Manhattan, New York, New Jersey & beyond with outstanding architectural & interior design services and installation management through a unique approach and unparalleled work quality.
Our mission is to create Dream Homes that change people's lives!
Working with us is a simple two step process - Design & Installation. The core is that all our design ideas (interior design of an apartment, restaurant, hotel design or architectural design of a building) are presented through exceptionally realistic images, delivering the exact look of your future interior/exterior, before you commit to investing. The Installation then abides to the paradigm of 'What I See Is What I Get', replicating the approved design. All together it gives you full control and eliminates the risk of having an unsatisfactory end product - no other interior designer or architect can offer.
Our team's passion, talent & professionalism brings you the best possible result, while our client-oriented philosophy & determination to make the process easy & convenient, saves you great deal of time and concern.
In short, this is Design as it Should be...
Other services: Lobby design, Store & storefront design, Hotel design, Restaurant design, House design
www.vanguard-development.com
 Drury Design
The Setup:
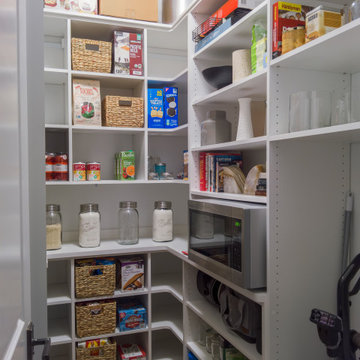
After purchasing this home, the homeowners faced a unique opportunity to reimagine their kitchen and nearby spaces. Water damage from a burst pipe had left much of the home’s interior in need of repair, and while the existing kitchen was functional and in relatively good shape, it didn’t align with the family’s vision for their new home. The layout included a peninsula that wasn’t ideal, and there were some druthers with the nearby pantry.
Since the space needed to be rebuilt anyway, the homeowners saw this as a chance to create a kitchen that was both highly functional for their four young children and timeless in its design. The project also included a refresh of the adjacent message center and dining room — spaces that play key roles in the family’s daily life. The goal was to create a cohesive flow between these areas, balancing modern functionality with the craftsman-inspired character of the rest of the home.
Design Objectives:
- Replace the outdated peninsula with a large island to maximize counter space and create new seating options.
- Open up the space visually by removing soffits and rethinking the cabinetry layout.
Incorporate concealed refrigeration and freezer units to provide significant storage for the family while maintaining a streamlined aesthetic.
- Integrate black cabinetry into the design without making the space feel harsh or heavy.
- Ensure the lighting plan balances functional task lighting with ambient accent lighting.
- Avoid visual clutter in the cabinetry design while still giving a nod to the craftsman aesthetic.
- Incorporate a slab backsplash as a key design feature.
Design Challenges:
- The outdated peninsula left dead space in the kitchen and lacked sufficient seating for the family.
- The cooktop wall was cramped, with small cabinets flanking the hood, limited storage, and soffits that made the space feel closed-in.
- The family needed significant refrigeration space (two refrigerators and a freezer) but wanted to avoid a cluttered look with visible stainless steel appliances.
- Adding black cabinetry risked making the space feel too dark or heavy.
- The original lighting plan was insufficient, particularly over the dining table where a decorative fixture proved too dim.
- The family wanted shaker-style drawer fronts to match the home’s arts-and-crafts design but worried that too much shaker cabinetry might look overly busy.
- Prioritizing a slab backsplash in the wish list priority planning.
The Renewed Space
Design Solutions:
- A functional island: The peninsula was replaced with a large island that provides continuous countertop space for prepping and serving. The island also features seating for four people, creating a central hub for informal meals and activities.
- Streamlined cooktop wall: The soffits were removed, and the upper cabinets on the cooktop wall were eliminated to create a more open, streamlined design. A custom oversized hood became the focal point of the wall, with the blower unit offset inside it to align with the cooktop while maintaining exterior visual symmetry.
- Concealed refrigeration: Two column refrigerators and one freezer were integrated into the cabinetry, concealing them behind wood paneling that blends seamlessly with the overall design.
- Warm black cabinetry: The black cabinetry was crafted from hickory with a visible grain, softening its appearance and adding warmth. The grain detail gives the cabinetry a rich, textured look that avoids feeling stark or overpowering.
- Additional lighting: In the dining area, recessed can lights were added during an additional installation phase to supplement the gorgeous decorative fixture’s dim output. The new lighting plan creates a layered effect, combining functional task lighting with softer ambient lighting.
- Simplified cabinetry details: Slab drawer fronts were used on the upper drawers, while five-piece shaker fronts (with slightly less prominent rail and stile pieces) were reserved for the middle and lower drawers. This approach simplified the overall look while maintaining the craftsman-inspired aesthetic.
- Slab backsplash priority: The slab backsplash was prioritized by making thoughtful adjustments elsewhere, like opting not to extend cabinetry to the ceiling, which also helped visually prioritize the gorgeous slab backsplash. This decision also enhanced the kitchen’s furniture-like feel, aligning with the home’s craftsman character.
- This kitchen perfectly balances practicality with timeless style. By addressing the family’s functional needs — ample seating, smart storage, and effective lighting — while incorporating thoughtful design elements like warm black cabinetry and a striking slab backsplash, Alicia created a space that works beautifully for a busy household. The result is a cohesive, inviting kitchen that honors the home’s craftsman roots and will serve the family well for years to come.
 dSPACE Studio Architecture
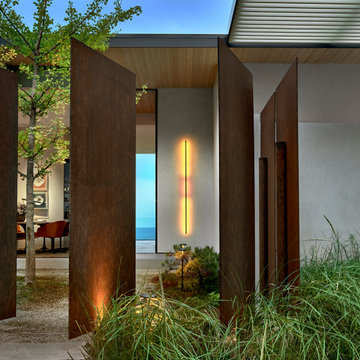
Built on a dune overlooking Lake Michigan, this residence appears to emerge from the landscape. The project brief called for an artful house that promotes wellness and outdoor living. Rugged beauty and four-season adventure drew the owners to the area but presented challenges, including wildfire risk. The site needed a durable shelter that responsibly integrates with the environment.
Clad in sand-colored stucco, the house will intentionally be obscured by grasses and junipers over time. Outdoor spaces are layered to match the undulating topography. A steel superstructure enables an ultra-thin roof with overhangs for passive solar design that withstand gale-force winds and heavy snow loads.
A crushed-granite courtyard offers refuge on windy days. This space is enclosed by operable Cor-Ten panels that rotate open to reveal dune views or close for a cloistered experience. The courtyard is further defined by a deconstructed roof with an aperture that frames sky views.
Expansive glazing and porcelain flooring unites interior and exterior, evoking a sense of inhabiting an infinity house. A screen porch, concealed by louvers, is a contemporary interpretation of a time-honored lake house vernacular. Layers of light and an edited palette of materials unify the interior and evoke a laid-back feeling of beach towns. On both levels, bronze glass walls artfully define rooms while preserving views.
 RRS Design + Build, LLC
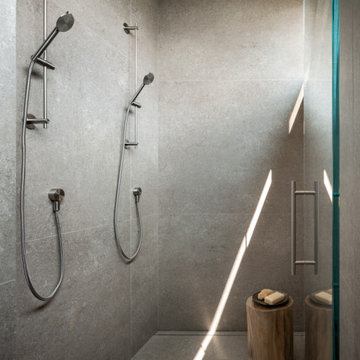
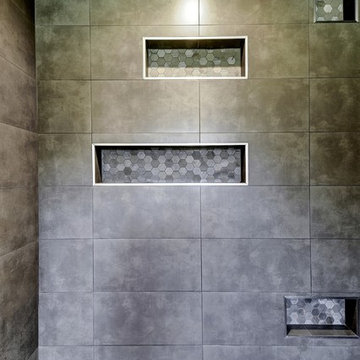
The stunning niches in this large walk in shower were placed a various heights to serve specific purposes. The lowest niche was added in place of a shower bench and provides a perch for shaving legs without taking up floor space. Higher niches provide for storage of bath products, candles and other decorative items as desired. The niches were edged with metal Schluter for a clean modern look. The hexagon tiles were repeated within the niche to add interest and connection to the shower floor. Safety is improved by using small format textured tiles on the shower floor which reduces risk of slipping.
RRS Design + Build is a Austin based general contractor specializing in high end remodels and custom home builds. As a leader in contemporary, modern and mid century modern design, we are the clear choice for a superior product and experience. We would love the opportunity to serve you on your next project endeavor. Put our award winning team to work for you today!
Sponsored
Fredericksburg, OH

High Point Cabinets
Columbus' Experienced Custom Cabinet Builder | 4x Best of Houzz Winner
 Barkman Concrete Ltd.
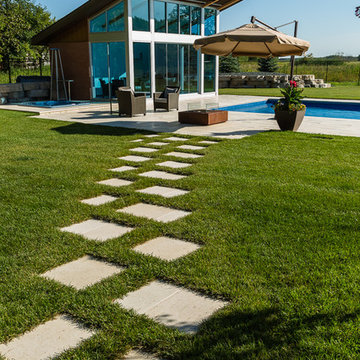
Travertine tile combines the look of polished travertine stone with the enduring strength and cost effective savings of concrete to complete the upscale look you deserve. The chamfered edging reduces the risk of chipping during installation while maintaining the look of high end travertine. Photo: Barkman Concrete Ltd.
 dSPACE Studio Architecture
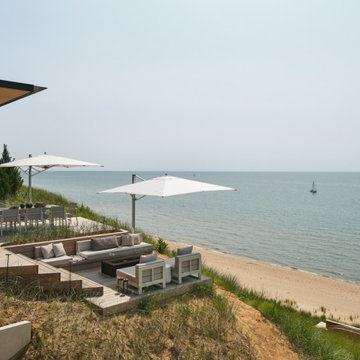
Built on a dune overlooking Lake Michigan, this residence appears to emerge from the landscape. The project brief called for an artful house that promotes wellness and outdoor living. Rugged beauty and four-season adventure drew the owners to the area but presented challenges, including wildfire risk. The site needed a durable shelter that responsibly integrates with the environment.
Clad in sand-colored stucco, the house will intentionally be obscured by grasses and junipers over time. Outdoor spaces are layered to match the undulating topography. A steel superstructure enables an ultra-thin roof with overhangs for passive solar design that withstand gale-force winds and heavy snow loads.
A crushed-granite courtyard offers refuge on windy days. This space is enclosed by operable Cor-Ten panels that rotate open to reveal dune views or close for a cloistered experience. The courtyard is further defined by a deconstructed roof with an aperture that frames sky views.
Expansive glazing and porcelain flooring unites interior and exterior, evoking a sense of inhabiting an infinity house. A screen porch, concealed by louvers, is a contemporary interpretation of a time-honored lake house vernacular. Layers of light and an edited palette of materials unify the interior and evoke a laid-back feeling of beach towns. On both levels, bronze glass walls artfully define rooms while preserving views.
 Hebai Furniture | Smart Nightstand
Many buyers ask the same question when sourcing bedside tables from China:
“Why is the MOQ so high?”
For OEM bedside table and nightstand projects, MOQ is not only a sales rule. It is connected with material purchasing, machine setup, finishing process, hardware ordering, packaging, and production efficiency.
For standard ODM bedside tables, MOQ is usually easier to manage because the factory already has the structure, material plan, and production process ready.
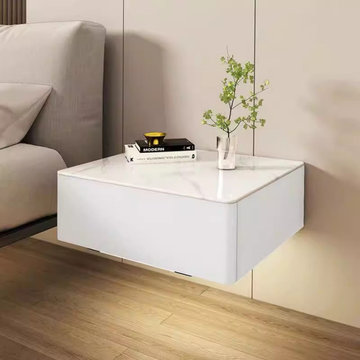
For custom OEM nightstands, MOQ is usually higher because the project may involve custom size, color, drawer structure, legs, handles, finish, logo, packaging, or smart functions such as USB-C, wireless charging, LED lighting, Bluetooth speaker, fingerprint lock, or password lock.
For importers, distributors, hotel buyers, e-commerce sellers, and private label furniture brands, the best solution is not always to ask for the lowest MOQ.
A better approach is:
- Start with existing ODM models
- Keep the material and finish simple
- Use mixed SKUs under one material plan
- Accept a reasonable small-order price increase
- Build long-term cooperation with the factory
- Test the market first before placing a larger order
Hebai Furniture, operated by Ganzhou Hebai Wood Products Co., Ltd., is a China-based OEM bedside table and nightstand manufacturer supporting OEM/ODM projects for global buyers.
We support:
- Modern bedside tables
- Leather nightstands
- Upholstered nightstands
- Smart nightstands
- Hotel bedside tables
- Wireless charging nightstands
- USB-C bedside tables
- LED nightstands
- Bluetooth speaker nightstands
- Fingerprint lock nightstands
- Custom packaging
- Private label furniture projects
If you are sourcing bedside tables or nightstands from China, understanding MOQ can help you reduce risk, control cost, and negotiate with suppliers more professionally.
Full MOQ guide:
https://hebaifurniture.com/blog/bedside-table-moq-guide
Browse product catalog:
https://hebaifurniture.com/category
Request catalogue and quotation:
https://hebaifurniture.com/catalogue
Hebai Furniture | OEM Bedside Table & Nightstand Manufacturer in China
 Isla Homes
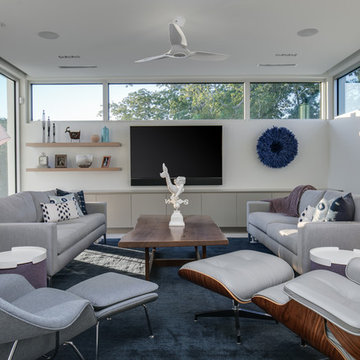
BeachHaus is built on a previously developed site on Siesta Key. It sits directly on the bay but has Gulf views from the upper floor and roof deck.
The client loved the old Florida cracker beach houses that are harder and harder to find these days. They loved the exposed roof joists, ship lap ceilings, light colored surfaces and inviting and durable materials.
Given the risk of hurricanes, building those homes in these areas is not only disingenuous it is impossible. Instead, we focused on building the new era of beach houses; fully elevated to comfy with FEMA requirements, exposed concrete beams, long eaves to shade windows, coralina stone cladding, ship lap ceilings, and white oak and terrazzo flooring.
The home is Net Zero Energy with a HERS index of -25 making it one of the most energy efficient homes in the US. It is also certified NGBS Emerald.
Photos by Ryan Gamma Photography
 The Wine Square | Wine Cellars & Cooling Units
Nothing is left to chance.
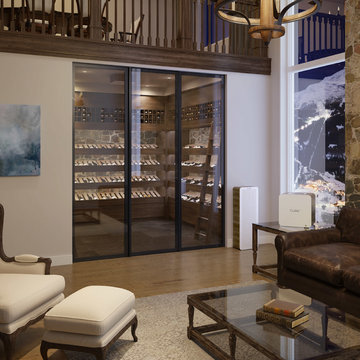
The value of your wine collection highly depends on the quality of the storing conditions found in your wine cellar.
A poorly insulated wine cellar along with a temperamental compressor can drastically damage the value of your investment. Don’t jeopardize your cellar temperature and storage conditions. Instead, choose a sustainable wine cellar cooling system that will provide years of peace of mind, while achieving long-term savings.
Thanks to the accurate and effective control of the storage conditions of your wine by The Cube, our offer will protect your investment by reducing the risk associated with owning a wine reserve.
Protect the value of your investment with TheWineSquare cellar innovations.
 dSPACE Studio Architecture
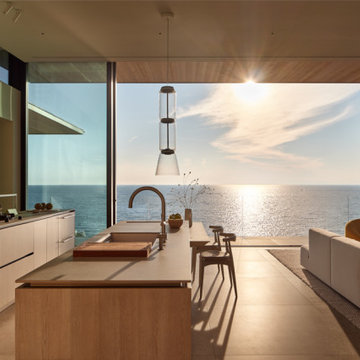
Built on a dune overlooking Lake Michigan, this residence appears to emerge from the landscape. The project brief called for an artful house that promotes wellness and outdoor living. Rugged beauty and four-season adventure drew the owners to the area but presented challenges, including wildfire risk. The site needed a durable shelter that responsibly integrates with the environment.
Clad in sand-colored stucco, the house will intentionally be obscured by grasses and junipers over time. Outdoor spaces are layered to match the undulating topography. A steel superstructure enables an ultra-thin roof with overhangs for passive solar design that withstand gale-force winds and heavy snow loads.
A crushed-granite courtyard offers refuge on windy days. This space is enclosed by operable Cor-Ten panels that rotate open to reveal dune views or close for a cloistered experience. The courtyard is further defined by a deconstructed roof with an aperture that frames sky views.
Expansive glazing and porcelain flooring unites interior and exterior, evoking a sense of inhabiting an infinity house. A screen porch, concealed by louvers, is a contemporary interpretation of a time-honored lake house vernacular. Layers of light and an edited palette of materials unify the interior and evoke a laid-back feeling of beach towns. On both levels, bronze glass walls artfully define rooms while preserving views.
Sponsored
Sunbury, OH

J.Holderby - Renovations
Franklin County's Leading General Contractors - 2X Best of Houzz!
 dSPACE Studio Architecture
Built on a dune overlooking Lake Michigan, this residence appears to emerge from the landscape. The project brief called for an artful house that promotes wellness and outdoor living. Rugged beauty and four-season adventure drew the owners to the area but presented challenges, including wildfire risk. The site needed a durable shelter that responsibly integrates with the environment.
Clad in sand-colored stucco, the house will intentionally be obscured by grasses and junipers over time. Outdoor spaces are layered to match the undulating topography. A steel superstructure enables an ultra-thin roof with overhangs for passive solar design that withstand gale-force winds and heavy snow loads.
A crushed-granite courtyard offers refuge on windy days. This space is enclosed by operable Cor-Ten panels that rotate open to reveal dune views or close for a cloistered experience. The courtyard is further defined by a deconstructed roof with an aperture that frames sky views.
Expansive glazing and porcelain flooring unites interior and exterior, evoking a sense of inhabiting an infinity house. A screen porch, concealed by louvers, is a contemporary interpretation of a time-honored lake house vernacular. Layers of light and an edited palette of materials unify the interior and evoke a laid-back feeling of beach towns. On both levels, bronze glass walls artfully define rooms while preserving views.
 Duradek
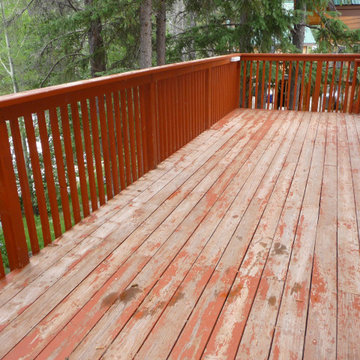
With cabins or other vacation properties, the priorities of what you need from a deck can be amplified and this cabin’s existing high-maintenance, drip-through deck certainly highlighted a problem. In this case, the original deck boards were much overdue for maintenance. The owners knew they had to take action before wood rot became an issue risking structural damage, making it a much bigger job.
Photo Credit: Dekcetera
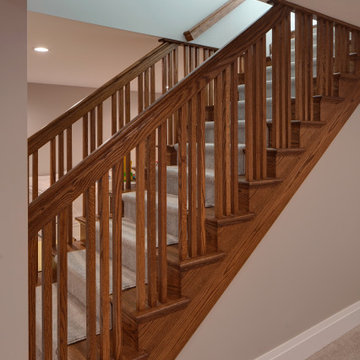 Drury Design
The Setup:
After purchasing this home, the homeowners faced a unique opportunity to reimagine their kitchen and nearby spaces. Water damage from a burst pipe had left much of the home’s interior in need of repair, and while the existing kitchen was functional and in relatively good shape, it didn’t align with the family’s vision for their new home. The layout included a peninsula that wasn’t ideal, and there were some druthers with the nearby pantry.
Since the space needed to be rebuilt anyway, the homeowners saw this as a chance to create a kitchen that was both highly functional for their four young children and timeless in its design. The project also included a refresh of the adjacent message center and dining room — spaces that play key roles in the family’s daily life. The goal was to create a cohesive flow between these areas, balancing modern functionality with the craftsman-inspired character of the rest of the home.
Design Objectives:
- Replace the outdated peninsula with a large island to maximize counter space and create new seating options.
- Open up the space visually by removing soffits and rethinking the cabinetry layout.
Incorporate concealed refrigeration and freezer units to provide significant storage for the family while maintaining a streamlined aesthetic.
- Integrate black cabinetry into the design without making the space feel harsh or heavy.
- Ensure the lighting plan balances functional task lighting with ambient accent lighting.
- Avoid visual clutter in the cabinetry design while still giving a nod to the craftsman aesthetic.
- Incorporate a slab backsplash as a key design feature.
Design Challenges:
- The outdated peninsula left dead space in the kitchen and lacked sufficient seating for the family.
- The cooktop wall was cramped, with small cabinets flanking the hood, limited storage, and soffits that made the space feel closed-in.
- The family needed significant refrigeration space (two refrigerators and a freezer) but wanted to avoid a cluttered look with visible stainless steel appliances.
- Adding black cabinetry risked making the space feel too dark or heavy.
- The original lighting plan was insufficient, particularly over the dining table where a decorative fixture proved too dim.
- The family wanted shaker-style drawer fronts to match the home’s arts-and-crafts design but worried that too much shaker cabinetry might look overly busy.
- Prioritizing a slab backsplash in the wish list priority planning.
The Renewed Space
Design Solutions:
- A functional island: The peninsula was replaced with a large island that provides continuous countertop space for prepping and serving. The island also features seating for four people, creating a central hub for informal meals and activities.
- Streamlined cooktop wall: The soffits were removed, and the upper cabinets on the cooktop wall were eliminated to create a more open, streamlined design. A custom oversized hood became the focal point of the wall, with the blower unit offset inside it to align with the cooktop while maintaining exterior visual symmetry.
- Concealed refrigeration: Two column refrigerators and one freezer were integrated into the cabinetry, concealing them behind wood paneling that blends seamlessly with the overall design.
- Warm black cabinetry: The black cabinetry was crafted from hickory with a visible grain, softening its appearance and adding warmth. The grain detail gives the cabinetry a rich, textured look that avoids feeling stark or overpowering.
- Additional lighting: In the dining area, recessed can lights were added during an additional installation phase to supplement the gorgeous decorative fixture’s dim output. The new lighting plan creates a layered effect, combining functional task lighting with softer ambient lighting.
- Simplified cabinetry details: Slab drawer fronts were used on the upper drawers, while five-piece shaker fronts (with slightly less prominent rail and stile pieces) were reserved for the middle and lower drawers. This approach simplified the overall look while maintaining the craftsman-inspired aesthetic.
- Slab backsplash priority: The slab backsplash was prioritized by making thoughtful adjustments elsewhere, like opting not to extend cabinetry to the ceiling, which also helped visually prioritize the gorgeous slab backsplash. This decision also enhanced the kitchen’s furniture-like feel, aligning with the home’s craftsman character.
- This kitchen perfectly balances practicality with timeless style. By addressing the family’s functional needs — ample seating, smart storage, and effective lighting — while incorporating thoughtful design elements like warm black cabinetry and a striking slab backsplash, Alicia created a space that works beautifully for a busy household. The result is a cohesive, inviting kitchen that honors the home’s craftsman roots and will serve the family well for years to come.
 The Design House
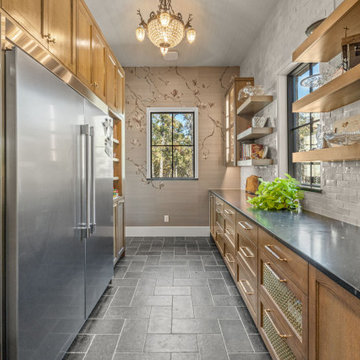
The "Old World" Execution:
The Stone: We topped the perimeter cabinets with Leathered Black Stone. This classic material is incredibly heat resistant and develops a natural patina over time, giving the room a lived-in, historic feel perfect for a working pantry. Fabricated in-house at Stonemeyer Granite, the edges are honed to a soft matte finish.
The Flooring: To handle heavy foot traffic, we installed Dark Slate-Look Porcelain Tile in a classic varied pattern. This provides the rustic look of natural stone without the maintenance or chipping risks of real slate.
The Tile Work: We installed a Textured White Brick Backsplash on the right wall, adding brightness to balance the dark floors and counters.
Materials Highlights:
Countertop: Leathered Black Stone
Flooring: Slate-Look Porcelain Tile
Backsplash: Glazed White Brick Tile
If you are designing a custom home in North Texas and need a partner to execute complex, multi-textured spaces like this scullery, contact The Design House today.

 Van Kirk & Sons Pools and Spas
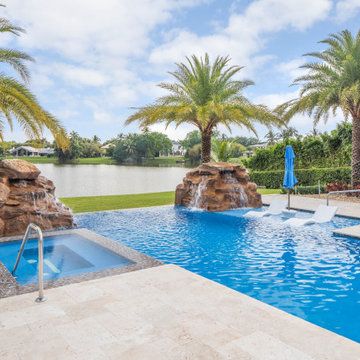
This amazing vanishing edge overlooks a beautiful lake and the spa is handicapped accessible! the beautiful
symmetric waterfalls on each side accentuates the rustic look of the architecture of the house! The tile that was
selected is quite unique as it displays a huge variety of different shades of browns and blues to match those
waterfalls!

 dSPACE Studio Architecture
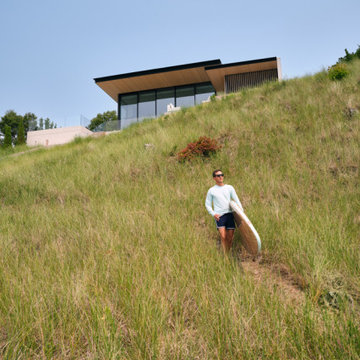
Built on a dune overlooking Lake Michigan, this residence appears to emerge from the landscape. The project brief called for an artful house that promotes wellness and outdoor living. Rugged beauty and four-season adventure drew the owners to the area but presented challenges, including wildfire risk. The site needed a durable shelter that responsibly integrates with the environment.
Clad in sand-colored stucco, the house will intentionally be obscured by grasses and junipers over time. Outdoor spaces are layered to match the undulating topography. A steel superstructure enables an ultra-thin roof with overhangs for passive solar design that withstand gale-force winds and heavy snow loads.
A crushed-granite courtyard offers refuge on windy days. This space is enclosed by operable Cor-Ten panels that rotate open to reveal dune views or close for a cloistered experience. The courtyard is further defined by a deconstructed roof with an aperture that frames sky views.
Expansive glazing and porcelain flooring unites interior and exterior, evoking a sense of inhabiting an infinity house. A screen porch, concealed by louvers, is a contemporary interpretation of a time-honored lake house vernacular. Layers of light and an edited palette of materials unify the interior and evoke a laid-back feeling of beach towns. On both levels, bronze glass walls artfully define rooms while preserving views.
22