
Search results for "Improvements appears" in Home Design Ideas
 Tile Doctor Ltd
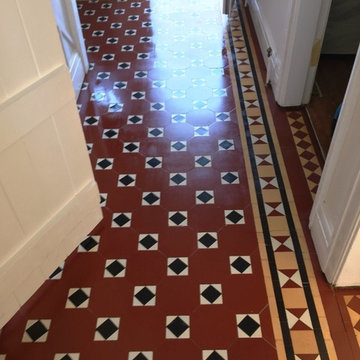
This Victorian tiled hallway was one of the most beautiful Victorian floors I have ever had the pleasure to work on. With the wide range of patterns and colours they are available in, it seems no two Victorian tiled floors are exactly the same, and this uniqueness is part of what makes them so appealing to property owners.
Unfortunately, this floor had been poorly maintained over the years, even suffering from a few loose and missing tiles. There was a thick coating of dust and dirt soiling its appearance, and the property owner was understandably keen to remedy the situation. Having realised that everyday household cleaners are not likely to achieve great results, she asked me to carry out a full professional restoration, including making some repairs where necessary. I was pleasantly surprised to find out that this property was situated in the town of Wyken, which is a few miles outside of Coventry city centre and in fact just down the road from where I live myself!
Before making a start on the cleaning process, it was first necessary to re-fix the small number of loose tiles and replace a single missing tile by the radiator. Fortunately, I’ve been working on these types of floors for some time and have built up a good collection of replacement Victorian tiles so I was able to find one that matched in nicely with the rest of the floor without too much problem.
To clean the tiles, I began by applying a layer of Tile Doctor Oxy-Gel directly into the floor with a small brush. This product is very similar to the popular Tile Doctor Pro Clean: both are strong alkaline cleaners, strippers and degreasers, with the main difference being that Oxy-Clean comes in a gel form, making it easier to control and therefore ideal for precise cleaning, or for application to vertical surfaces. Like Pro Clean and being an alkaline base it is suitable for use on all types of natural stone and tile. The Oxy-Gel was left to soak into the tiles for around ten minutes before being scrubbed in and then rinsed off carefully with water, I then used a wet vacuum to extract the now soiled cleaning solution off the floor.
The next step was to acid wash the floor using Tile Doctor Acid Gel; this served to break down alkaline mineral deposits inherent in the grout along with some excess grout that had been left on the untidily left on tile from installation. It is recommended not to use this product on acid-sensitive soon such as Marble and Limestone as it can cause irreparable etching but its fine on Victorian tiles as long as you don’t leave it on too long.
Finally, the floor was given a rinse with clean water to remove any trace of chemicals from the cleaning and to neutralise the area in preparation for sealing.
I left the floor for 48 hours to dry before returning to the property to seal the tiles. This allowed plenty of time for the floor to dry completely, which is important as any excess moisture can damage the ability of the sealer to protect against dirt and stains.
My choice of sealer for this floor was Tile Doctor High Shine; three coats in total were applied, providing – as the product name suggests – the high shine finish that the customer had requested. The sealer will provide durable surface protection going forward preventing dirt from becoming ingrained into the pores of the tile and ensuring it remains easy to clean and keeping its appearance for some time to come.
As a big fan of Victorian tiles, it was a great pleasure to restore this floor, and my customer was certainly pleased too. It’s amazing how far a little professional maintenance can go to improving the appearance of these fantastic types of floor.
Mick Gayton
Warwickshire Tile Doctor
 Tile Doctor Ltd
I was recently contacted by a client who had just moved into a large Victorian property in the West Cheshire village of Tarvin about renovating their Victorian tiled hallway. Apparently, the floor was in good condition, and it would just be a case of removing what was left of the old sealer, deep cleaning the tiles and then applying a fresh seal. Unless the floor has been regularly maintained with the same sealer it’s important to remove all traces of old sealers before applying fresh.
Victorian Hallway Before Cleaning Tarvin Cheshire
A lot of the work we do at Tile Doctor can be a lot more involved, often requiring the sourcing of matching replacement tiles and rebuilding large sections of tiled flooring so straight forward clean and seal job is always welcome.
To remove what was left of the sealer and the ingrained dirt from the pores of the Victorian tile I dressed the floor with a strong dilution of Tile Doctor Pro-Clean. On this occasion I used a 1:3 dilution with water and applied it to the floor with a mop. I left it to soak into the tile for fifteen minutes before scrubbing so it could get to work breaking down the old sealer.
During this time, I set up a weighted floor buffer and fitted a black buffing pad, these pads are designed for scrubbing hard floors and lifting out the dirt. I applied a little water as required during this process to ensure the pad was lubricated. Shortly the cleaning solution darkened as the old sealer and dirt was released from the tile.
The soil was rinsed away with water and then removed using a wet vacuum. Once clear the floor was inspected and the process repeated until I was satisfied it was as clean as it could be and free of sealer.
I left the floor to dry off overnight and returned the next day to apply a new sealer. Before doing so however I like to use a damp meter to take moisture readings from the floor. This is needed to ensure it is dry enough to seal which is important as any moisture in the tile can affect the sealer and lead to an inconsistent finish.
To seal I started with the application of a single coat of Tile Doctor Colour Grow which is a colour intensifying breathable impregnator that soaks into the tile improving appearance and adding protection from within. Any excess sealant was removed by wiping the floor with a microfibre cloth and then it was left to dry for an hour.
This was followed with four coats of Tile Doctor Seal and Go Extra which is an acrylic breathable sealer which adds a pleasing subtle shine to the tile. This is an important feature when choosing a sealer for old floors where moisture needs to be allowed to rise through the tile, otherwise it can become trapped under the floor and reach out to the walls causing rising damp.
The customer was very happy with the revamped hallway which made the house a lot brighter and welcoming. Before closing I should mention that for aftercare cleaning I recommend Tile Doctor Neutral cleaner which is designed for the daily cleaning for sealed tiles, this is important as most domestic supermarket cleaners are simply too strong and can prematurely erode the sealer.
Alastair Robb
West Cheshire Tile Doctor
 Western Cabinets
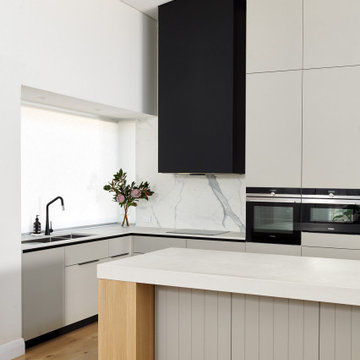
An existing 70’s brick home nestled streets away from the beach, is in dire need of a transformation. The existing home had the bones to accommodate a substantial renovation, some modifications to the layout, adding an extension and exaggerating the existing raked ceilings in the main living area impacts the new home.
The home itself is a relatively disjointed 70’s home, so cleaver planning was imperative to make the most of the interior space. Large open plan living areas with adjoining outdoor entertaining was important. The owners are a young family who enjoy family and entertaining so interaction with the outdoor alfresco was essential not only for quality of living but to appear as a continuation of the main living area to increase the zone visually.
My client’s fresh approach; introduction of modern materials with a hint of Scandinavian and industrial, an improved working area and a functional space for cooking and preparing meals.
Find the right local pro for your project
 Tile Doctor Ltd
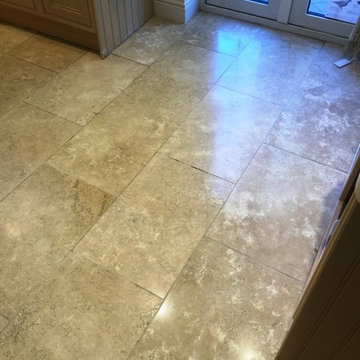
This customer, who lives in East Byfleet had been experiencing difficulties in keeping her fantastic Travertine tiled kitchen floor in good condition. Over the years it had suffered from a heavy build up of dirt and oily stains, not to mentioned a number of cracks and small holes. Needless to say, the customer was keen to restore the Travertine tiles to their former glory.
To begin the restoration, I applied Tile Doctor Remove and Go across the entirety of the large tiled area. This heavy duty remover breaks down any old sealers and other coatings, leaving the area ready to cleaned or, in this case, burnished.
Burnishing is a method for cleaning and polishing certain types of high-end stone, including Travertine, Marble, and Limestone. Our burnishing system involves the application of four diamond encrusted pads of varying grits. Firstly, I applied the Coarse grit pad, which helps to break down any dirt and stains on the surface of the tiles. Then, I worked my way through the Medium, Fine, and Very Fine pads, using a little water as lubricant, to gradually refine the polish on the Travertine. It was then rinsed and left to dry.
To round off the first day of work, I filled any cracks and holes using our two-part resin system which greatly improved the look of the tile.
The following day I returned to the property to seal the tiles checking first that the floor had dried. All was well so I proceeded to seal the floor using our colour intensifying impregnating sealer Tile Doctor Colour Grow. Once that was dry, I added the finishing touches by buffing the floor with a soft white buffing pad. As you can see from the photographs, the combination of a fresh seal and polish worked wonders.
We did such a good job with the floor that the customer asked if we could also improve the appearance of their natural stone fireplace which was suffering from bad rust and oil stains however I do a separate write up on that.
Wayne White
West Surrey Tile Doctor
 Tile Doctor Ltd
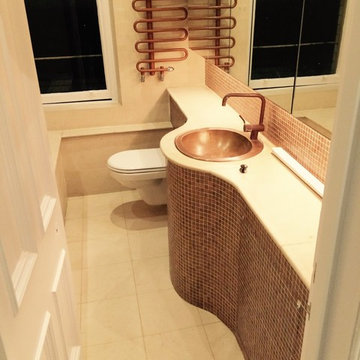
This was a substantial engagement at a luxury rental apartment in Brighton rejuvenating the Limestone tiles in two bathrooms and a hallway taking six days of hard work. In addition, I would be working around two decorators, making for even more testing work conditions.
I first set to work on the smallest bathroom, which featured limestone tiles from floor to ceiling, as well as a large bath, copper sink and a tiled surround. Limestone is a very popular choice for interior and exterior decoration, but the tiles in this bathroom were in need of some care to get them looking their best again. My initial task was to strip away any previous sealer by hand; this was done using a mixture of warm water and Tile Doctor Pro-Clean which, along with Limestone, is also suitable for use on other types of natural stone, such as Granite, Slate and Travertine. Pro-Clean serves both as an effective stripper and cleaner, meaning that once the sealer had been stripped away, the tiles also received a thorough clean. Once I had cleaned the tiles, I sucked up any excess water and residue using a Wet-Dry Vac machine.
Since the tiles would have to be left to dry for a couple of days, I offered to restore the copper sink for the customer, even though this was not actually part of my job description. After conducting some research into copper cleaning, I opted to use a combination of lemon juice, vinegar and salt. The research paid off as, once I began to apply the solution to the sink, the bright orange and brown colours of the copper quickly rose to the surface. Within the space of an hour, I had transformed what initially appeared to be a ruined sink into a lovely, shimmering copper feature for the bathroom. Both the decorators and I were truly amazed at the results – but all credit goes to Google!
The larger of the two bathrooms was a much stiffer test for the Tile Doctor products. It had not been left in great condition, as the shower area had clearly not been sealed correctly, and the tiles had been left in such a manner that soap scum from shampoos, soaps and shower gels had built up on the window sill. In fact, the damage was significant enough that I had to explain to the customer before starting the work that whilst I could greatly improve the appearance of the tiles, I would not be able to restore them to new. This is because many shampoo and body wash products are acidic and can cause permanent damage to stone work especially when left to dwell for a long time.
My choice of product was Tile Doctor Mould Away, a formula which, over time, seeps deeply into the pores of the stone, effectively lifting away the muck. In cases of particularly stubborn areas, it is necessary to apply another covering of Mould Away and leave it for an extended period of time. This is exactly what I did over the next few days, leaving the product overnight to work its magic. The change was certainly drastic, if not perfect.
As both bathrooms required extended periods of drying, I spent two days working on the hallway, which had been partially covered with a plastic sealing for the previous six months due to building work. Needless to say, the hallway was in need of a good clean. I set about cleaning the hallway with a solution of warm water and Tile Doctor Pro-Clean, before once again using a Wet-Dry Vac machine to remove any excess water to prepare the floor for sealing at a later point. It is very important to remove any residue of cleaning solution before sealing, as this may impact the performance of the sealer. Following this, I left the hallway to dry for two days, providing the builders with strict instructions to cover it with blankets for protection while they were working.
While the floor was drying, I sealed the bathrooms – both now fully dried – with Tile Doctor Colour Grow Sealer, a solvent-based sealer that was highly effective at enhancing the colour of the brown tiles around the sinks. The product will also provide durable surface protection. I spent the final of the six days sealing the hallway floor with Tile Doctor Seal & Go, which provides both a stain-resistant surface seal and a durable, low-sheen finish. This was an ideal choice of product, as the customer requested a hard-wearing, yet shiny finish.
The hard work really paid off, as both the customer and the decorators were very impressed with the final results in the two bathrooms and the hallway. I was extremely pleased that I was able to complete this big job to the highest possible standards.
 Tile Doctor Ltd
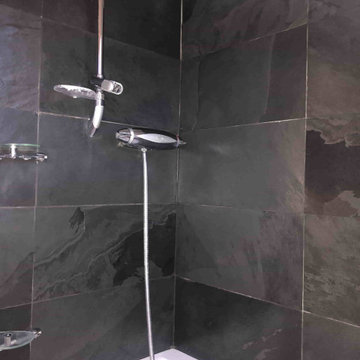
The photographs below are from a bathroom in Maida Vale W9 which had a lovely Slate tiled wall over a bath with shower. Unfortunately, the Slate tiles had been ruined by the use of harsh cleaning chemicals in an attempt to remove the limescale caused by hard water. The slate had now lost all its natural colour and looked completely washed out. The property had recently changed hands and the new owner was keen to have it renovated.
I went over to take a look and work out a solution, this in itself is a lot trickier these days with all the COVID precautions we need to take when working in someone’s house. It was clear that a strong acidic limescale remover had been used on the slate and this had etched the stone, leached all the natural oils away and generally ruined its appearance.
Fortunately, we have a solution for this (see below) and after conducting a small test I was able to confirm the problem could be resolved and gave them a quote which included a day’s labour, abrasive pads, stone oil and sealer. Our quote was gratefully accepted, and we booked a time in to carry out the work.
I returned to the property and I set about burnishing the slate wall tiles using a very coarse 200-grit six-inch burnishing pad fitted to a handheld buffing machine. This process resurfaces the stone slightly to remove the etching caused by the limescale remover. I used a medium dilution of Tile Doctor Grout Clean-up to lubricate the process and to remove the remaining limescale. Once done the slurry that is generated is rinsed off with more water. In a bathroom, it is easy the slurry can just be drained away. In other areas we would use a wet vacuum.
After the 200-grit pad the surface of the Slate was further refined using a 400-grit pad and then an 800-grit pad, this time only using water and giving the stone a thorough rinse after each pad to remove the soil.
The slate was then left to dry off over lunch and given more encouragement with a heat gun afterwards so I could move onto the next step. This involved applying a coat of Tile Doctor Stone Oil which puts back the natural oils back into the stone improving its appearance.
Once the Stone Oil had fully dried, I moved onto sealing for which I applied two coats of Tile Doctor Ultra-Seal; this is penetrating sealer that soaks into the stone to provide maximum stain protection without changing the colour of the stone. It is also an excellent grout sealer which is a bonus.
Before leaving I talked the client about how best to maintain the Slate and left them a complimentary bottle of Tile Doctor Aqua Pro tile cleaner which will help keep the limescale at bay. It is gentle enough to use every day but will help prevent the previous build-up and unlike the previous products used will not damage the newly applied sealer.
Jackson Davis
Central London Tile Cleaning
 Tile Doctor Ltd
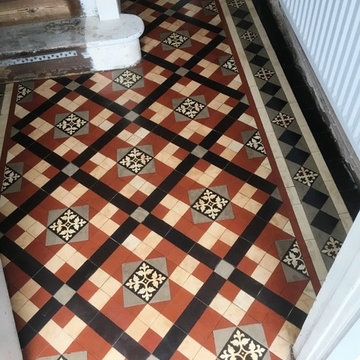
The owner of this house in Chaplefields near Coventry had bought this property as an investment and was keen to improve its appearance. As part of this work he had lifted the vinyl tiles in the hallway and discovered a lovely Edwardian tiled floor. Unfortunately, whoever had laid the Vinyl tiles had decided to use Tar as an adhesive and this had left a black mess all over the floor.
Realising the potential value an original feature such as this could add to the property he was keen to restore the tiles but not so keen to deal with the Tar, so we were asked to deal with the problem and restore the floor as close to its original condition as possible.
To get the tiles clean and remove the horrible tar I applied a strong dilution of Tile Doctor Remove and Go, which as its name suggest is great for removing coverings from tiles. I applied the Remove and Go with a mop, left it to soak in for a few minutes and then worked it in using a rotary machine fitted with a black scrubbing pad. The soil was extracted off the floor using a wet and dry vacuum and then the process repeated until I was happy all the tar was gone.
I then gave the tiles an acid wash using Tile Doctor Acid Gel; this serves to break down alkaline mineral deposits such as cement and grout smears, it also counters any efflorescence problems which can be an issue with these old floors where no damp proof membrane has been installed.
Finally, the floor was given a rinse with clean water and a steam clean to remove any trace of cleaning products and to neutralise the tiles in preparation for sealing.
I left the floor to dry off overnight and returned to the property to seal the tiles the next day. To seal the tiles, I used three coats of Tile Doctor Seal and Go which is a water based sealer that leaves a subtle sheen finish and being water based doesn’t leave a smell as it dries. The sealer will provide durable protection going forward preventing dirt from becoming ingrained into the pores of the tile and ensuring it remains easy to clean and keeping its appearance for some time to come.
The floor now looks fantastic and gives a great impression when you come into the property which is exactly what the owner wanted.
Mick Gayton
Warwickshire Tile Doctor
Sponsored
Delaware County, OH

Whisler Home Improvement
Franklin County's Committed Home Improvement Professionals
 Tile Doctor Ltd
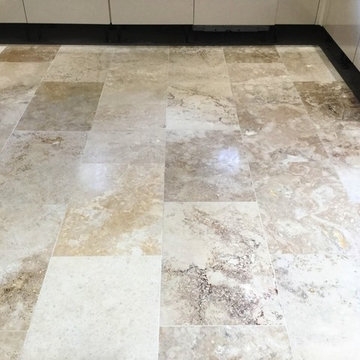
Travertine floor tiles are very appealing and very hardwearing, but without the protection of a sealer to stop dirt becoming ingrained in the pores of the stone their appearance will degrade. Fortunately, this can be remedied as demonstrated in these pictures of a Travertine floor I recently polished at a house in Weston Favell, Northampton.
This owner of the property had called me out as their kitchen floor was looking very sorry for itself and he was concerned that a lot of holes were appearing which was making cleaning the floor difficult as dirt was getting trapped in the holes. I went over and carried out a test clean on two separate tiles in the kitchen and the customer was amazed at how clean they came up and especially the grout.
The kitchen was stunning, but unfortunately the state of the Travertine tiled floor was bringing down its overall appearance. Impressed with the test clean they were keen to get the whole floor renovated so we agreed a price and I scheduled the work in for the following month.
I returned on the agreed data and made a start by protecting the kitchen units by removing the plinths and covering base units and the appliances with a protective film. We then commenced the cleaning process to remove surface dirt by cleaning with Tile Doctor Pro-Clean paying special attention to the grout lines. The holes in the Travertine were filled with a stone resin, mixing it to closely match the colours of the stone.
The resin was allowed to dry before starting to re-polish the Travertine using a set of Tile Doctor Diamond encrusted burnishing pads. These pads are applied individually to each tile in sequence starting with a coarse 400-grit pad before moving onto the 800-grit and finishing with the fine 1500 grit pad. A little water is used to lubricate the process along the way and the floor is rinsed in between each pad with the resulting residue extracted from the floor using a wet vacuum. The process takes some time, but it really brings up the polished appearance of the stone and the results are well worth the effort. After a final rinse the floor was inspected and then left to dry off fully overnight.
When we returned the next day, the floor had dried, and we were able to give the floor a final polish with a very fine 3000-grit burnishing pad applied with a little water sprayed onto the tile. Finally, the floor was then sealed with two coats of Tile Doctor Ultra-Seal which provides excellent protection without changing the colour of the stone to provide a natural look.
The client was over the moon with the outcome and surprised at the improvement. They were left with a floor that would be easy to clean and maintain.
Phil Vissian
Northamptonshire Tile Doctor
 Tile Doctor Ltd
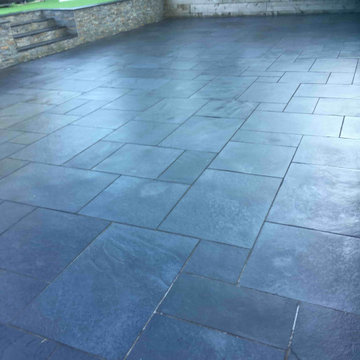
The photographs below are of an 80m2 Black Limestone Patio that was laid in rear garden of a property in Sandbach. All was going well until the installer decided to clean up the stone and remove the excess grout (aka grout haze) using brick acid. This is common practice in the trade after laying a patio however what they failed to realise is that Limestone can be marked by acids and in fact can be dissolved over time. This left the patio looking drained and in quite a state as you can imagine.
In an attempt to restore the black colour of the stone, the tiler painted on a restoration product however with the grout haze still present on the stone all this did was to add to the problems. Frustrated the customer decided to call Tile Doctor and so I went over to see what could be done.
I quickly deducted that the brick acid will have damaged the surface of the stone so to restore it I ran some tests on a small part of the patio that I been badly affected using a series of diamond encrusted burnishing pads of different grits. The pads successfully demonstrated that the appearance could be restored and impressed with the difference I was given the job of renovating all 80m2.
Being outside weather was an issue and I had to reschedule until a dry weather window appeared. Cleaning during damp weather isn’t a problem, it’s the sealer which needs to be applied when the sone is dry to get the right result.
Made with industrial diamonds and available in different sizes and grits, burnishing pads are ideal for restoring the appearance of polished stone floors. The first step was to work on the most badly damaged tiles with a coarse 100 and then 200-grit diamond milling pad fitted to a weighted rotary machine and lubricated with water. This took off the ruined top layer of the limestone bringing up the virgin stone underneath.
Next the patio was worked on with a 400-grit diamond burnishing pad, followed by 800-grit, and then 1500-grit pad. Each pad further renovates the appearance of the stone (Honing) and had to be rinsed after each pad to remove the slurry that is generated.
With 80m2 of Limestone paving to cover it took four days to completely restore all the stone using this method. It was tough work, but it made an incredible difference and naturally was far more cost effective than replacing the patio.
With the stone cleaned up the last step was to restore the natural black colour in the Limestone with an application of Tile Doctor Stone-Oil which restores the deep black colour and adds texture to the stone, it’s also an impregnating sealer in its own right that adds protection and improves mechanical strength once cured.
I allowed this to dry overnight then returned the next day to finish the patio restoration with a further coat of Tile Doctor Ultra-Seal, a no-sheen natural-looking sealer formulated to provide maximum stain protection without altering the colour of the stone.
The customer was delighted with the transformation, what was one an uninviting ugly area now looks fantastic and welcoming. Impressed with the result they left the following glowing feedback:
“Kamila is A M A Z I N G! From discussing our issue over the phone to meeting her in person, her advice and professionalism was second to none. She worked hard to repair our outdoor patio and we are thrilled with her results! We would happily recommend Kamila and wish her every success with her business in the future! Thank you Kamila! X
Kamila Logonzy
East Cheshire Tile Doctor
 Tile Doctor Ltd
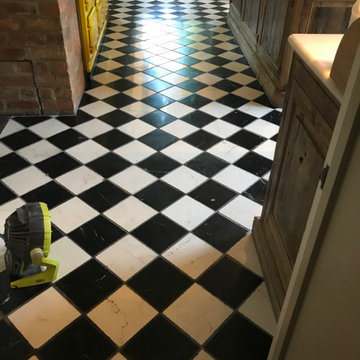
The tiles shown in the photographs below are classic distressed Black and White Italian Marble installed in the kitchen of a property in Bamber Bridge which is South of Preston. Some of the tiles had an issue with loose grout which I suspect was due to the suspended wooden floor and a small amount of movement had resulted in the grout cracking.
Ideally more support would be needed under the floor to prevent this, in the meantime however I recommended removing the grout and replacing with a flexible grout product that could cope with the movement. The tiles also needed a clean, polish and reseal so it made sense to address the issue with the grout as part of the work.
Working as a two-man team we started by cleaning the floor with a set of diamond burnishing pads starting with a coarse 400-grit, followed by 800 and 1500 grit. Water was used to lubricate the process and the floor was rinsed with water between pads with the fine slurry generated by the process extracted using a wet vacuum. These pads remove ingrained dirt and then slowly refine the appearance of the Marble building up its polished appearance in the process.
The next step was to rake out all the grout which as discussed was compromised and needed replacing. We had to be very careful when removing the grout due to the electric heating mat under the floor, any damage to that would require ripping the floor up. With the old grout removed and the floor cleaned the floor was then grouted using Mapei Ultra-colour which is a flexible and fully waterproof grout more than suitable for this situation.
Between us we managed to pack a lot into day one which was tough, however with the hardest tasks out of the way day two should be a lot easier.
Day two started with an initial clean making sure to remove any excess grout smeared on the surface that can affect the look of the tile if not removed. This was followed by the application of the last of the set of burnishing pads which is a 3,000-grit pad that really brings up the polish on the marble. You only need a small amount of water sprayed onto the floor when applying this last pad so by late morning the floor was dry and ready for sealing. The customer wanted a better sheen appearance than they previously had, fortunately we find the Diamond burnishing pads do this well, they also tighten up the pores of the stone as well which means less sealer is needed.
The floor was then sealed with Tile Doctor Colour Grow which is an impregnating sealer that improves colour and soaks into the stone occupying the pores and thereby preventing dirt from becoming ingrained. Once complete the floor looked great and the client was very happy.
Sealers and Polish do wear down with use over time so before leaving I discussed our annual maintenance plan option which will ensure the appearance of the Marble floor always looks good. The plan involves returning once a year to further polish the floor with a high-grade burnishing pad and to add more sealer if required. We also discussed the use of Tile Doctor Stone Soap for regular cleaning, it is a pH neutral cleaner which is ideal for stone floors like Marble which are acid sensitive.
Russell Taylor
Lancashire Tile Doctor

 Maverick City Builders
This whole home interior painting and trim upgrade project in Lancaster highlights how a professionally executed finish can completely transform the look, feel, and flow of an entire living space. The project began with a dated interior featuring worn paint, visible wall imperfections, and aging trim that no longer reflected a clean, modern aesthetic. While the home’s structure remained solid, the overall appearance felt dull and lacked the brightness, consistency, and refinement homeowners are looking for today.
Our team began with a comprehensive preparation process across the entire home, which is one of the most critical steps in achieving a high-quality and long-lasting paint finish. Every surface was carefully cleaned, patched, and sanded to create a smooth and uniform base. All floors, fixtures, and furnishings were fully protected using professional-grade coverings, and trim lines throughout the home were precisely taped to ensure sharp, clean edges. This level of preparation not only enhances the final appearance but also ensures durability and consistency from room to room.
As the project progressed, premium-quality paints were applied using a combination of rolling and precision cutting techniques to achieve a smooth, even finish across all wall and ceiling surfaces. The selected color palette focused on modern, neutral tones designed to maximize natural light and create a cohesive, open feel throughout the home. At the same time, all trim, baseboards, and interior details were upgraded with a crisp white finish, adding contrast, depth, and a polished look that ties every space together.
During the final stages, detailed touch-ups and trim refinements were completed in every room to achieve a flawless, professional-grade result. Each edge, corner, and transition was carefully inspected and perfected, ensuring consistency and craftsmanship at every level. The transformation is especially noticeable when comparing the before and after, as the home evolves from a worn, outdated environment into a bright, modern, and refreshed living space.
Once completed, the home was staged to highlight its full potential and demonstrate how a whole home painting upgrade can dramatically improve both aesthetics and functionality. The final result is a clean, cohesive, and welcoming interior that feels updated, spacious, and move-in ready.
Projects like this showcase the value of expert craftsmanship and attention to detail in full-home interior renovations. Whether you are preparing your property for sale or looking to modernize your living space, a whole home interior painting and trim upgrade remains one of the most effective ways to increase both visual appeal and overall property value in Lancaster, MA and surrounding areas.
Our team started with a detailed preparation process, which is one of the most critical steps in achieving a high-quality paint finish. All surfaces were carefully cleaned, patched, and sanded to ensure a smooth and even base. Floors and furniture were fully protected using professional-grade coverings, and trim areas were precisely taped to guarantee clean, sharp lines. This level of preparation ensures that the final result is not only visually appealing but also long-lasting.
As the painting phase progressed, high-quality paints were applied using a combination of rolling and cutting techniques to create a consistent, smooth finish across all wall surfaces. The color selection focused on modern, neutral tones that enhance natural light and create a more open, inviting atmosphere. At the same time, the trim and baseboards were upgraded with a crisp, clean white finish, adding contrast and definition throughout the space.
During the final stages, detailed touch-ups and trim work were completed to achieve a flawless result. Every corner, edge, and transition was carefully inspected and refined, ensuring a professional-grade finish that stands out. The transformation is most noticeable when comparing the before and after stages, where the room evolves from a dated and worn environment into a bright, modern living area.
The completed space was then staged to showcase its full potential, demonstrating how a simple upgrade like interior painting and trim work can dramatically improve both aesthetics and functionality. The result is a clean, polished, and welcoming environment that feels refreshed and ready for everyday living.
Projects like this demonstrate the impact of expert craftsmanship and attention to detail in interior renovations. Whether you are preparing your home for sale or simply looking to update your living space, professional painting and trim upgrades offer one of the most effective ways to enhance your home’s value and appearance.

 Five Star Tree Care
It’s important to make sure that all trees on your property are healthy and in good condition. This means hiring professional tree trimming services to maintain your trees yearly in order to keep them looking beautiful and healthy. In late winter or early spring is the best time to trim your trees. Doing so will help to improve the new growth that happens later in the spring. But fruit bearing trees and damaged trees can benefit from careful pruning in the summer. It takes an expert to skillfully trim trees during the summer without damaging them or causing harm and our team at Five Star Tree Services is just a call away to help you with your tree trimming needs!
Why Trim Your Trees?
By trimming your trees annually, this will not only open up your landscaping, which allows more sunlight to get to your property, but there are many other benefits.
These can include:
-Keep Trees Healthy and Promote Growth
When you trim your trees in the spring, before they start producing buds, this helps to stimulate more new growth, which helps to keep trees in excellent condition. This can be especially important for saplings as it encourages them to fill out nicely and in a controlled and structurally sound way. If you are not maintaining your trees properly, they can become too dense, which causes a bunch of problems. One being that it restricts the amount of sunlight getting to all the leaves and it reduces the amount of nutrient circulation needed to support the tree.
Professional tree pruning properly aids in tree growth and its overall aesthetic. Cutting off unneeded or unwanted branches allows other parts of the tree to grow easier. Ridding the tree of these extra branches also stimulates more leaf and fruit production.
-Increased Safety
Your landscape is affected when you neglect to take care of your trees, along with everything else on your property. If you have any dead trees remaining on your property, not only are you putting yourself at risk of injury, but you are putting your family, neighbours, pedestrians, and guests at risk as well. Dead or damaged branches can also be a hazard as they could fall at any time and impact with anyone standing too close to it, or it can fall on your house, which is another issue altogether, if it causes damage. Luckily, you are able to avoid all of this by simply having regular trimmings that will keep your trees healthy. You also need to make sure that all branches close to power lines are cut. This especially, should only be done by a trained professional in order to avoid potential electrocution.
-Increase Production of Fruit
If you are lucky enough to have a fruit bearing tree, it is especially important to have it professionally trimmed before and after it fruits. Doing so helps to improve its overall health and ability to bear fruit by getting rid of unhealthy branches. New fruit also develops and spurs for bearing fruit for the following year.
-Manage Spreading Diseases
Tree branches that are damaged tend to be prone to diseases which are able to spread to other plants and trees in your yard. Branches that are dead also have the potential to easily fall with any wind and especially during a storm. Severely damaged branches can even fall without reason. When you get your trees trimmed and pruned regularly, this prevents these things from happening. It also prevents spreading disease to other trees. Any disease branches should especially be trimmed if they are close to where kids play, people walk, or by doors.
-Increase the Value of Your Property and Overall Appearance
Continuous maintenance and trilling will improve the aesthetic of your property. It controls clutter and opens up the space of the landscaping. Meaning that the curbside appeal to your property increases. This is especially important if you are planning to sell your house, which will actually raise the value of your property. The first step in enhancing the appearance of your property is properly taking care of your trees. The first thing people see when they pull up to or go past your house is the trees. By simply pruning your trees you can make a good impression on potential buyers and your neighbours as well.
-Safeguarding Your Property
Owning a house is the biggest investment you will probably ever make. Making the effort to maintain and increase its value by keeping it in good condition should be your first priority. By trimming your trees regularly, you will be protecting your investment. Not to mention this also allows you to enjoy a nicely manicured property.
Why Professionals Are Essential
Professionals help to improve the health and overall condition of your trees. Trying to trim or prune your trees when you don’t know how can be detrimental. This is why hiring a professional, who has the right knowledge and tools, is better than trying to do it yourself.
-Cost-Effective
Think of it as a short-term expense for a long-term return on your investment. Allowing professional arborists to do your tree maintenance can potentially help to negate the costs of injuries attained from DIY home improvements related to trees, replacements and repairs.
-Skilled and Experienced
Real tools required for trimming a tree need to be handled properly and by the appropriate people. If a regular person were to try and use these tools, the end result could be injury and property damage. This is especially true for any trimming required around power lines. All professionals will have the right experience and skills required to wield these tools in a safe way. This minimizes the likelihood of hazards, injuries, and life-threatening incidents.
-Proper Tools
Heavy-duty chainsaws, ladders, and protective gear are all needed to safely and properly trim a tree. When you hire a professional, they have all the required tools and more. Meaning that you won’t have to go out and buy these tools yourself. As a professional, they also make sure that their tools are reliable and well-maintained in order to efficiently get the job done well.
-Insured
Professionals are also always insured with liability insurance when doing jobs to cover any damages or injuries attained while working. They are able to also provide a guarantee for the safety of your property and belongings while they are doing a job for you.
How Five Star Tree Services Can Help
Although trimming your tree might seem like an easy job, it’s always best to trust the professionals. Proper execution of the task requires the right skills, experience, and knowledge. Our team at Five Star Tree Services have all of this and more! Give us a call at (416) 990-3355 to enlist us for all your Toronto Tree Trimming needs!
 Tile Doctor Ltd
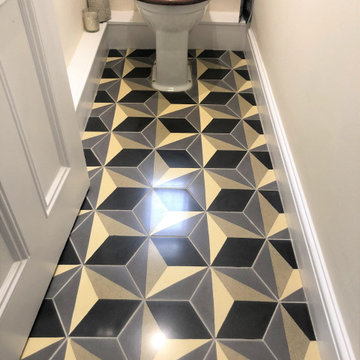
These photographs were taken of a bathroom and WC in a property in Histon The client had just had these modern Encaustic tiles laid a couple of months prior. The owner had never been happy with the final look of them and from the markings on the surface it looked like had been damaged in storage or left outside and neglected. They are a pretty unusual design so I can only assume the tiler thought their appearance was perfectly normal at the time of installation.
I was confident I could improve the appearance of the tiles and gave the client a quote for the work. Whilst she didn’t want to spend more money on her new floor, she did want it to look as it should, so rather reluctantly she agreed to go ahead.
Histon is next to Impington, they are small villages in Cambridgeshire, over the years the two villages have grown and have entwined together. Many villagers in fact do not know where one village starts and the other ends. The have 6 pubs in total!
I wasn’t sure what had been applied to the tiles so after adding protective tape to the wooden skirting I gave them a deep clean with Tile Doctor Remove and Go which was worked into the tiles with a black scrubbing pad. Then to renovate the surface and remove the markings I honed the surface with 400-grit and then 800-grit burnishing pad using water to lubricate the process and rinsing and extracting the soil away after each pad with the wet vacuum.
There were two areas that needed work so whilst one area was drying, I was able to get to work on the second and then return to the first later to apply a sealer. My product of choice for this floor was Tile Doctor Colour Grow which is an impregnating sealer which improves the colour and works by penetrating the pores of the tile and protecting it from within. I applied three coats allowing each one to dry before applying the next. The bathroom now looked as it should have done from the beginning.
My client was very happy with the improvement and left the following 5-Star review.
I only had my floor tiles fitted a few months or so ago and was so disappointed with them. I called Tom and within a few hours, he had transformed them! They look absolutely fantastic! Great value for money as well!
I recommended that in order to maintain the tiles, she should use Tile Doctor Neutral Cleaner, this is a pH neutral cleaner which will keep the floor without harming the sealer. Many tile cleaning products are only designed for Ceramic or Porcelain tiles and are too strong for use on sealed floors where they will strip the sealer off with time.
Tom Conlon
Cambridge Tile Doctor

Sponsored
Delaware County, OH
Whisler Home Improvement
Franklin County's Committed Home Improvement Professionals
 Tile Doctor Ltd
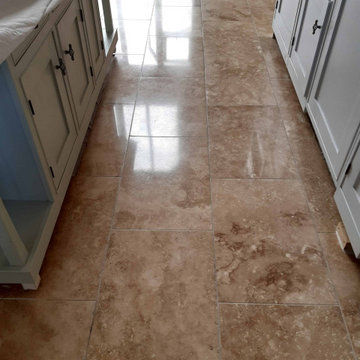
Located in Burgh Castle West of Great Yarmouth, this Travertine stone floor was a classic example of an incomplete installation. By incomplete I mean the tiler had done a fine job of laying and grouting the tiles but had left it at that and not sealed the stone. Natural stone like Travertine is porous and needs a sealer to stop dirt becoming ingrained in its pores, a sealer will also improve its appearance.
Without a sealer this floor now looked very dull, pale, rather damaged with pitting and heavily soiled with ingrained dirt. Pitting in stone like this is a natural feature of Travertine however it can be exacerbated with the use of acid cleaning products. This was a floor in urgent need of a face lift, and I was confident it could be transformed into a very beautiful floor.
I think it is true to say that most tilers will skilfully lay a floor for you but usually don’t have the knowledge, experience or equipment to finish the surface properly and when it comes to sealing many will recommend a product and suggest you take care of it yourself. Naturally if your find yourself in that position don’t insist the tiler does it, better to give us a call and have it done properly.
Our first job was to backfill the larger pits in the stone which as I mentioned are a natural feature of travertine material, but they can trap dirt and so its best if they are plugged with a suitably rigid filler. Also, if left alone the larger holes can quickly become larger as their edges crumble and break up leading to the entire tile becoming unstable. Replacing a tile in a floor like this is possible however its an extremely awkward job to do and it can be difficult to find an exact match for replacement.
Filling was done using a two-part, neutral cream-coloured polyester compound which gels in about fifteen minutes after addition of the catalyst. After this initial period, the excess product is trimmed off level with the surface of the tile before it sets harder than the stone itself in around sixty minutes. The fully cured compound can then be cut and machined as though it were part of the stone structure.
Our second job was to remove deep scratches caused by the unprotected feet of workmen’s ladders. This was done using Tile Doctor 50-grit and 100-grit diamond hand burnishing pads with a little water as a cutting medium. Shallower scratching present across the rest of the floor was removed using a Tile Doctor 200-grit soft milling pad driven by our Klindex 17″ rotary machine.
This abrasive action produces a fine slurry which was then rinsed with water and extracted using our 400psi Ninja machine in preparation for the next stage of the refinishing process. These machines were an expensive investment for our business however they are very robust and effective producing a good result that saves time.
Next task was to restore the polished appearance of the Travertine which was done using the application of a set of Tile Doctor burnishing pads. The process starts by applying a coarse 400-grit diamond pad, again fitted to the Klindex rotary machine. This cleans the tile and improves the matt finish left by the milling pad; again, the slurry was rinse-extracted before moving on to the next pad in the set. Next came the finer diamond polishing stages of 800 grit and 1500 grit, slurry being removed as before between the grades. By this time, all the scratches had been removed and the Travertine floor had visually pleasing even sheen across the whole surface. The last pad in the set is applied dry with a little water sprayed onto the tile so we left the area to dry out thoroughly overnight with the assistance of our large capacity dehumidifier.
Returning the following morning, we found that the floor had dried out perfectly and was ready to be vacuumed and spray burnished with the last pad in the set which is a 3000-grit very fine pad applied using a small amount of water sprayed from a trigger bottle resulting in a deep, rich shine across the floor surface.
Last step in the face lift was to seal the floor with a generous coat of Tile Doctor Ultra-Seal, a premium grade penetrating sealer recommended for use in Kitchens and food preparation areas. Having left the floor to soak up as much of the Tile Doctor Ultra-Seal as it could, the excess product was removed and the whole area allowed to dry completely with the assistance of our industrial air moving fan. Finally, the floor was spray buffed to a deep shine using a white maintenance pad.
The client was extremely pleased with our results and was amazed at the variation of colours within the stone which had never been visible previously.
Nick White
Norfolk Tile Doctor
 Tile Doctor Ltd
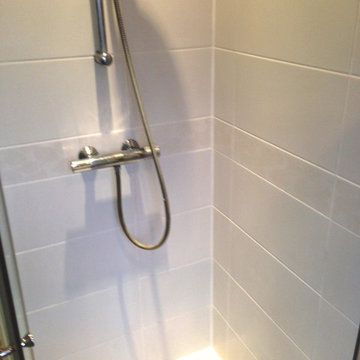
Shower cubicles can be the most difficult of tiled features to keep clean. Most are exposed to various acid-based soaps and shampoos on a daily basis, allowing mould and general muck to quickly build up along the grout lines and silicone. This leaves the entire area looking quite unappealing. In some cases, the grout lines become stained beyond a point where they can be restored to their original condition, so property owners will typically request to have the grout cut out and replaced however a faster and cheaper method is to have the grout completely recoloured.
Such was the case with this Ceramic tiled shower cubicle at a house in Wigan. It would take a lot to get the cubicle looking great again, having not been cleaned properly for a long time. The property owner decided to contact me for a professional refresh, including cleaning, new silicone sealer and recolouring of the grout.
I started the refresh by applying Tile Doctor Mould Away spray to the tiles and grout, and leaving it to dwell for an hour. As the name of the product suggests, Mould Away is a fast and effective cleaner for the removal of mould from silicone and grout, making it ideal for use on shower cubicles similar to this one. I then rinsed the entire area down with water before scrubbing the grout lines and tiles with a stiff grout brush to remove any remaining mould and lime scale, leaving them looking a lot cleaner.
The cleaning process made a big improvement however the grout was still too stained so after removing the silicone strip from around the base of the shower I proceeded to recolour with our white Grout Colourant. The colourant is painted onto the grout and any excess is wiped of the tile before it dries which both improves the appearance of the grout and seals it in to protect it from further staining. The last step was to apply fresh white silicone along the base of the shower.
The customer was very pleased with the refreshed appearance of their shower and you must admit it looks much more inviting now.
Steve Keary
Greater Manchester Tile Doctor
 Tile Doctor Ltd
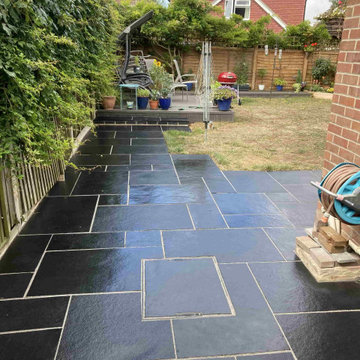
We were called out to look at this new Black Limestone patio in Ashford which was not looking as it should. The client had laid it himself but unfortunately had not managed to polish off all the grout from the surface of the Limestone thereby degrading the appearance of the stone.
Grout Smearing or Grout Haze is a common problem when it comes to tiling and this problem seems to be on the increase due to new grout formula’s which are tougher but dry a lot faster. Usually, the excess grout can be removed using a mild acid however it is not possible to do that on Limestone as this Stone is acid sensitive and as well as etching the stone can cause it to turn white. I know Tile Doctor has resolved a few jobs like this in the past for builders who do not always understand the unique characteristics of the stone.
I discussed with the client how Tile Doctor could help and gave him a quote for the work to be carried out. He was happy to go ahead so having consulted the weather forecast for a couple of dry days we agreed a date to return.
To remove the Grout Haze and clean the appearance of the Limestone I applied a Tile Doctor Brick and Patio Cleaner and worked it in with a coarse 400 grit diamond encrusted burnishing pad. The coarse pad does leave the stone looking a little rough, so the surface was then renovated using the finer burnishing pads of 800 and 1500 grit using water for lubrication. By using the pads in sequence, it gradually smooths the surface of the stone. Once done the tiles were rinsed with water and the soil removed with an industrial wet vacuum. The patio was looking good, the day was nice and bright, so we left the patio for a few hours to dry in the sun.
Once the stone was dry the patio was sealed with single coat of Tile Doctor Stone Oil which is an impregnating sealer that improves strength and restores colour to the stone.
Once dry the Stone Oil was followed by a coat of Tile Doctor Colour Grow sealer which like the Stone Oil penetrates the pores of the stone improving colour and adding protection. The treatment and combination of products transformed the appearance of the patio and provided the client with exactly the look he required.
As you can see from the after pictures the patio had a rich black colour and looked as it should. The client was over the moon with the result and was thankful that we had managed to rescue his work. Lesson learned for any future project he might take on, beware of grout haze!
Michael Conlon
South Kent Tile Doctor
 Tile Doctor Ltd
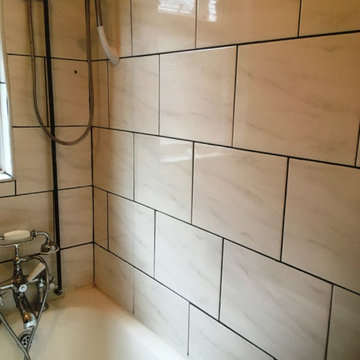
We were contacted by a client from the Levenshulme area of Greater Manchester who had just purchased a property there and hated the state of the grout which despite cleaning did not improve. The owner said she could not use the bathroom in this state as it looked disgusting and unclean and was keen to have it renovated. The rest of the house was being redecorated so whilst that was going on, I was called over to have a proper look at the grout and quote for sorting it out.
It didn’t take long to understand the issue, is seems the previous owner in an attempt to improve the appearance of the grout had touched it up by applying another thin layer of grout on top of the original. Now both the new and old was starting to flake off making a real mess.
I explained to the client we would need to scrape out the new layer, clean the original and then apply a grout colourant to improve the overall appearance. I gave her a price for the work, and she was happy for me to go ahead with the job.
My first task was to scrape off the new layer of grout, so I had a stable grout line to work from. I then started cleaning the grout up using a Tile Doctor Grout Colourant Pre-Treater cleaner, this cleans up the grout and being acidic it etches the surface to provide a better base for the grout colourant to adhere to. The dirt was rinsed off and then the area was dried using a heat gun.
Once dry I used a Tile Doctor Grout Colourant in Charcoal Grey (one bottle was sufficient). This product is equally effective for interior or exterior applications including bathrooms and kitchens and it is available in ten different colours. The client had requested to darken the grout and give it a completely new modern look. The colourant is painted onto the grout with a small brush and any excess which gets onto the tile is removed with a cloth before it dries.
The best thing about the grout colourant is it forms an easy to clean seal over the grout which ensures the grout is protected. Given Ceramic tiles are glazed and therefore don’t need sealing the new combination should ensure the tiles keep their appearance for a very long time with minimal cleaning. The silicone sealant between the bath and the wall tiles looked in good condition and had not discoloured so there was no need for this to be replaced.
The bathroom now looked clean and inviting and I’m pleased to report my client was very happy with the completed renovation and was finally happy to use the bathroom!
I recommended that for on-going cleaning that they use Tile Doctor Aqua-Pro, this is a pH neutral cleaner with a trigger action for easy application. It can be used in the bathroom every day. It helps to keep soap scum and limescale at bay and has a pleasant lemon smell so cleaning should not be too much of a chore.
Alex Logonzy
Greater Manchester Tile Doctor
Sponsored
Columbus, OH

EverHome Improvement & Design
Top Choice for Reliable Tile & Stone | Franklin County, Ohio

 Driftwood Builders Roofing
Another high-end standing seam metal roof completed in Westlake, TX. This project involved replacing an aging roofing system with a modern metal roof designed to provide long-term durability, improved energy efficiency, and a clean architectural appearance that fits the style of many Westlake homes.
The installation included a full tear-off, upgraded waterproof underlayment, custom flashing details, ventilation improvements, and precision-installed standing seam metal panels built to handle Texas heat, hail, wind, and heavy rain. Our team focused heavily on waterproofing critical areas such as valleys, penetrations, and roof transitions to help maximize long-term performance and protection.
Many homeowners in Westlake are choosing metal roofing because of its lifespan, low maintenance requirements, storm resistance, and ability to improve overall curb appeal. Standing seam systems are especially popular for custom homes due to their sleek appearance and strong weather performance in Central Texas conditions.
From the initial inspection to final walkthrough, the project was managed with detailed communication, professional craftsmanship, and careful job site protection throughout the process. If you are researching metal roof replacement in Westlake, standing seam roofing contractors in Austin, luxury roofing systems, or hail-resistant roofing options, investing in a professionally installed metal roof can provide decades of reliable protection.
 Enhanced Home Services, LLC
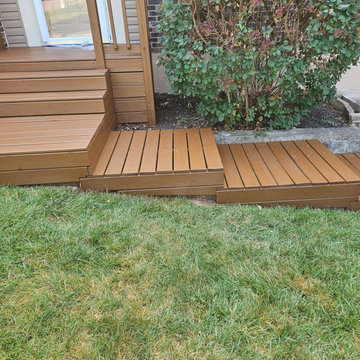
This front entry deck was transformed with a rich, warm semi-transparent stain that enhances the natural beauty of the wood while providing long-lasting protection against the elements. The refreshed finish highlights the grain, creates a clean, uniform appearance, and adds instant curb appeal.
Every surface—including the stairs, railings, landings, and connecting walkway—was carefully prepared and professionally stained to ensure even coverage and a durable finish. Proper preparation and premium products help extend the life of the wood while giving this entryway a fresh, welcoming look.
Whether your deck needs a complete restoration or simply a new protective coat, a professionally applied stain can dramatically improve both appearance and longevity.
 Maverick City Builders
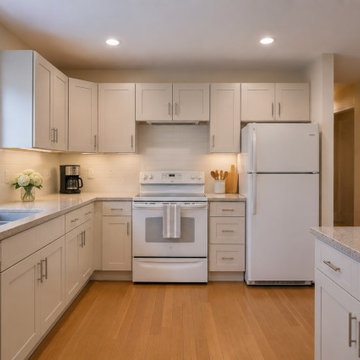
This kitchen cabinet installation project in Lancaster, MA features a clean and slightly more refined kitchen upgrade designed to improve both appearance and everyday functionality. The home already had good potential, but the kitchen needed a more updated cabinet layout, improved storage, and a brighter, more polished finish.
The project began with careful preparation and demolition of the existing kitchen cabinets. Our team protected the surrounding floors and work areas before removing the older cabinetry and preparing the space for the new installation. The goal was to keep the kitchen practical and comfortable while giving it a more upscale and finished appearance.
As the renovation progressed, new cabinets were installed with attention to alignment, spacing, and detail. The design focused on a balanced look with clean cabinet lines, improved storage, and a more modern feel without making the space overly extravagant. This approach helped create a kitchen that feels updated, functional, and appropriate for the home.
Once the cabinets were fully installed, the final details were completed and the kitchen was cleaned and staged. The finished space feels brighter, more organized, and more inviting while still maintaining a comfortable New England home style.
Projects like this show how a well-planned kitchen cabinet installation can completely refresh the heart of the home. With the right layout, clean finishes, and quality craftsmanship, a kitchen can feel more valuable, functional, and enjoyable for everyday living.
8