
Search results for "Inspecting" in Home Design Ideas

 New England Overhead Door
who may be interested in New England Overhead Door.
Photos
See All
https://scontent-bos3-1.xx.fbcdn.net/v/t1.0-0/s600x600/122440855_3699472876770453_5130193353790148903_o.jpg?_nc_cat=100&ccb=2&_nc_sid=730e14&_nc_ohc=lGeMWOi7CqsAX9lIFZf&_nc_ht=scontent-bos3-1.xx&tp=7&oh=48b39001fa3296300a8484061fbb3375&oe=5FBB631B
https://scontent-bos3-1.xx.fbcdn.net/v/t1.0-0/p235x350/118626633_3544956762222066_1401902762494421989_n.jpg?_nc_cat=105&ccb=2&_nc_sid=730e14&_nc_ohc=EZMzPh06OJIAX-ibWr0&_nc_ht=scontent-bos3-1.xx&tp=6&oh=a618cfd64ab9c7b902e5251abbef2323&oe=5FBC4E62
https://scontent-bos3-1.xx.fbcdn.net/v/t1.0-0/p350x350/116427838_3458805414170535_5439332882631817520_o.jpg?_nc_cat=110&ccb=2&_nc_sid=730e14&_nc_ohc=wl4prWyEzXIAX8OGcYr&_nc_ht=scontent-bos3-1.xx&tp=6&oh=48fdd935b7cebdea0512fd4043c1060b&oe=5FBC8302
https://scontent-bos3-1.xx.fbcdn.net/v/t1.0-0/p350x350/116429512_3458805754170501_8545399322401356846_o.jpg?_nc_cat=105&ccb=2&_nc_sid=730e14&_nc_ohc=fc_OgV9jUlQAX-gMs-K&_nc_ht=scontent-bos3-1.xx&tp=6&oh=ee517d3fd6c3066980b2854beb3b82e9&oe=5FBD5AA4
https://scontent-bos3-1.xx.fbcdn.net/v/t1.0-0/p350x350/116807883_3458805957503814_1531271228116251007_o.jpg?_nc_cat=104&ccb=2&_nc_sid=730e14&_nc_ohc=3eAk54bLZqwAX94XmLv&_nc_ht=scontent-bos3-1.xx&tp=6&oh=6a250d2f1ee1a7387f1bb012afee3f22&oe=5FBE16DA
https://scontent-bos3-1.xx.fbcdn.net/v/t1.0-0/p350x350/116429512_3458806180837125_8639440518626099217_o.jpg?_nc_cat=101&ccb=2&_nc_sid=730e14&_nc_ohc=zd8FPOXlfEYAX-hsqpn&_nc_ht=scontent-bos3-1.xx&tp=6&oh=3d0a36f0cbf94fb0d640160eae146428&oe=5FBD0A43
Videos
See All
We are your local garage door experts! Call Today (800) 696-7723 for all of your garage door needs. Email Us: sales@newenglandoverheaddoor.com Visit Us: https://www.newenglandoverheaddoor.com/ - - - #garagedoors #newgaragedoor #garagedoorinstallation #garagedooropener #garagedoorrepair #garagedoorservice
123 Views · 14 weeks ago
Page Transparency
See All
Facebook is showing information to help you better understand the purpose of a Page. See actions taken by the people who manage and post content.
Page created - June 21, 2011
Privacy · Terms · Advertising · Ad Choices · Cookies · · Facebook © 2020
Create
PINNED POST
OTHER POSTS
New England Overhead Door
tSpAuSnguonmssornsigthm 1e8do ·
Design your own door! At New England Overhead Door we have a 'Design Your Own Door' feature. We strive to fit every type and style of home and we look to meet all of our customers wants and needs. Installing a new garage door on your home can completely transform your house!
Click the link below to create the garage door of your dreams:
https://www.newenglandoverheaddoor.com/garage-doors
Comments
Comment as New England Overhead Door
New England Overhead Door
tSpAuSnguonmssornsigthm 1e7do ·
Garage Door Tips for Homeowners!
- Tighten up the Hardware
- Test the Garage Door Balance
- Inspect/Replace Rollers (Done by a Professional)… See More
Comments
Comment as New England Overhead Door
New England Overhead Door
tSpAuSnguonmssornsigthm 1e2do ·
Before & After of New Installation in Hopkinton, MA!
Labor and materials to furnish and install the following:
(2) 9'0" x 7'0" Haas Model 663 Steel Insulated Garage Doors.
Design: Recessed Long Panel. Color: White. Windows: 4 Pane Rectangular (DSB Glass Non Insulated). Window Section: 3rd Section. 12" Radius Tracking. Torsion Springs. Full Weather Seal (White) Heavy 45 Degree Corners (6) 9'. 1 3/8" Thick Door.… See More
Comments
Comment as New England Overhead Door
New England Overhead Door
AhstuSfgpoeeustanco sho1r1edh ·
Winchester, MA
11 Stars out of 10 - FABULOUS REVIEW!
"From my first call with Robyn to my last goodbye with Dave at the end of the job, New England Garage Doors received a score of 11 out of a possible 10! Having owned and run two companies of my own, I know excellent service and attention to detail is what makes one company a winner over another. You guys did a phenomenal job!
For anyone reading this as a reference, I do not take putting claims like this in writing light… See More
Comments
Comment as New England Overhead Door
New England Overhead Door
AhstuSfgpoeeustanco sho1r0edh ·
New England Overhead Door updated their website address.
New England Overhead Door updated their website address.
Comments
Comment as New England Overhead Door
New England Overhead Door updated their status.
AhstuSfgpoeeustanco sho1r0edh ·
Comments
Comment as New England Overhead Door
New England Overhead Door updated their status.
AuotgSugpdonssaoth crr1hmere0d ·
Garage doors are the main point of access and entry in many homes today. You always want to make sure your garage doors are safely operating and running properly.
Our technicians perform 12-point safety inspections and offer a wide variety of repair services.
Call today to schedule an appointment (800) 696-7723 or go online at https://www.newenglandoverheaddoor.com/.… See More
Comments
Comment as New England Overhead Door
New England Overhead Door
AtougShghpounsortesctdih hr7 ·
New Installation in Winchester, MA!
Labor and materials furnished and installed:
Size: (2) 9' 0" X 6' 3". Gallery® Steel - Premium Series with Intellicore® - GD2SU. 3-Layer. 2" Intellicore® Insulated. R-Value 18.4. c Color: Ultra-Grain® Oak Dark Finish. Design: Short Panel Bead Board. Top Section: Short Solid - Bead Board. Glass Type: Not Applicable With Solid Top Section. Spring: Extension. Track Size: 3" Low Headroom Track. Track Type: Standard Mount. Type: Bracket. Track … See More
Comments
Comment as New England Overhead Door
New England Overhead Door
AtougShghpounsortesctdih hr5 ·
Residential Service Call in Sudbury, MA!
Labor and materials furnished and installed:
Installed New High Lift Track with Springs Hardware and Side Mount Opener. Extension Cord. (3) 8’ 1”x 4” Inside Wood Jambs to Allow Track to Follow Wall Properly. 76” Inches of Space, 120 lbs. Door Weight. Wireless Keypad & Battery Backup Installed.

 Pennsylvania Landscape & Nursery Association
Terren Landscapes http://www.terrenlandscapes.com
Project Entry: Pembrooke Estate Rain Garden
2014 PLNA Awards for Landscape Excellence Winner
Category: Sustainable Landscape &60,000-$120,000
Award Level: Silver
Project Description:
The client contracted our company to solve multiple existing drainage problems. In a heavy rain event the existing French drain system would overflow, causing water to pool in the driveway. After investigating the system we found that the capacity of the French drain was undersized for the amount of storm water from the large rain events received in recent years. As a result of our findings and at the request of the homeowner, we designed a storm water management system to capture all storm water from the structures on the property and regenerate the underground aquifers for the volume of a 5.8” rainstorm. In addition to the new drain system, the homeowners wanted a rain garden to provide a backdrop for an existing formal garden, provide a habitat for wildlife, and provide screening from an adjacent neighbor.
Throughout the design process many challenges were presented, including an existing gas line, which ran directly through the area that best suited the bioswale. The existence of the gas line caused us to alter the shape and depth of the bioswale in some areas. We also inspected the existing downspouts to make sure there were no obstructions that would impede the system’s efficiency, and then conducted a test pit dig to make sure we had sufficient percolation rates for disposal of storm water.
To effectively capture the storm water runoff, the existing downspouts were piped from the main house and the large detached garage to a large catch basin located at the low point in the driveway. The driveway catch basin contains two outlet pipes at different elevations within the basin allowing water from smaller rain events to enter the bioswale and rain garden area to percolate into the soil before excess water overflows into a sediment trap which filters out any debris and is then piped to an underground StormTech® pit to slowly percolate into the ground. The other outlet pipe in the driveway catch basin is used for larger storm water events, taking the water directly to the StormTech® pit.
Accepting and slowing the velocity of the storm water, mitigation of erosion, and filtering out pollutants contained in the “first flush” of rainfall are the primary functions of the bioswale and rain garden. Planting these areas with mostly native plant species helps carry out these functions while attracting and providing shelter for wildlife.
The ‘Niobe’ weeping willow is the centerpiece of the rain garden, connecting with the axis of the existing formal garden. To screen the neighboring property we chose Chamaecyparis nootkatensis ‘Pendula’ for its graceful evergreen habit and tolerance of wet sites. ‘Ivory Halo’ dogwood and Panicum ‘Cloud Nine’ were used for screening as well as winter interest. To provide deciduous structure to the garden Taxodium distichum and Magnolia virginiana were used in conjunction with witch hazel. Mostly native wetland perennials were used due to their tolerance of wet conditions and occasional drought.
The area above the StormTech® pit provides space for the client’s family to relax. The rain garden and bioswale provide screening, storm water management, a habitat for wildlife, and plants that enhance the adjacent formal garden.
Photo Credit: Terren Landscapes
 Tile Doctor Ltd
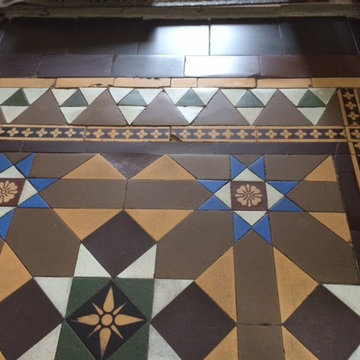
Recently Heidi and I worked on a Victorian tiled hallway floor at a house in Turton, Lancashire, an area which lies on the southern slopes of the West Pennine Moors. Victorian tile floors are commonly found in the reception area and hallways of older houses and public buildings, many of which date back to the reign of Queen Victoria (hence ‘Victorian’ tiles). It was during this time that the tile industry really started to boom.
Upon inspection it was evident that the floor in question had suffered from some settlement in the past resulting in a crack in the base under the tiles which had lifted one side and dropped the other; this is quite common in old houses resulting in some of the tiles becoming loose and would need to be fixed back in place before the floor could be given a good clean and re-seal.
Removing Lippage from Victorian Tiles
The concrete floor under the tile was patched as best as could be without pulling up more of the floor and the tiles were fixed in place, unfortunately however many of the triangular tiles in the adjacent border would not lay flat resulting in a lippage issue between them which naturally the customer was not very happy about.
Not wishing to cause the customer the extra expense of pulling up more tiles and relaying the concrete subfloor I left the tiles to fully set and then came back a few days later with a handheld Flex Machine fitted with a small 220 Grit Diamond pad to grind the tiles flat. As the pictures show, this made the difference and the diamond did not scratch the tiles despite the surface being dry.
Diamond pads are usually used on stone floors but after some investigation back at the Tile Doctor training centre we also realised they can be used on other types of tile including Victorian.
Once this was resolved the entire floor was given a thorough clean using a strong dilution of Tile Doctor Pro-Clean worked in with a scrubbing pad. As well as cleaning the tile and grout it also removed any remaining sealer which is important if you don’t know the history of the floor as the previous coating maybe incompatible with the new sealer. Once done the floor was given a thorough rinse with water which was then extracted from the floor with a wet vacuum.
Sealing Victorian Tiles
The floor was left to dry and I returned later to seal the tiles with a couple of coats of Tile Doctor Colour Grow which is an impregnating sealer that soaks into the pores of the tile and intensifies colour whilst also providing durable protection from within. Normally I use Seal and Go on Victorian Tiles however in this case the customer had specified a matt finish.
The results were fantastic and the client was very pleased with the now flat Victorian tiled floor which, thanks to the cleaning and sealing, was back to looking its best. Another happy customer for the Lancashire Tile Doctor!
Find the right local pro for your project

 CRES Builders Corp.
The Smith’s hired us to do several home improvement projects to the exterior of their house, which were inspired by two other homes in the neighborhood. To start, they were looking to add a front porch with a more prominent entrance, as well as a garage eyebrow. In addition, since they were also not happy with the color of their home’s stucco or brick, we were asked to design a new color palette which would utilize the new window color, while also reducing the focus of the stucco.
With that, since the homeowners were concerned about efficiency and making sure the house was properly maintained, they requested new windows, as well as new gutters, downspouts, and covers. Their siding was also an issue since a large portion of it had started to rot and since the rear sunroom and deck had sunk 4+ inches, structural issues were also a problem.
Our Process: In an effort to create the pleasing exterior that was requested, we reached out to an architectural team member who helped us envision a four color paint palette. We installed a rustic cedar porch post, craftsman-style shutters, and metal roof details for a very pleasing result.
As requested, we also installed all-new windows throughout the home and replaced their gutters, downspouts, and covers, as well as the siding that had rotted away.
Since their deck was improperly installed, we removed the old sun room and deck footings, and poured new ones. However, I was not comfortable fixing the issue without knowing the cause, so upon closer inspection, we discovered that water from the neighbor’s house, the driveway, and the Smith’s roof was causing drainage issues. To fix the problem, we installed two main underground drainage lines which would divert water away from the home. From there, we were able to bring both structures to level heights where they could be properly secured and as a finishing touch, we added new tile to the sunroom to give it a more rustic feel.
As a result of the drainage issues, a large section of the driveway had sunk as well, so we removed the concrete and poured it with proper underlayment, rebar, stronger concrete, and a proper pitch.
Extras: While working at the home, the owners asked us to install a new wood-burning fireplace, as well as a new front door and an exhaust fan in the master bathroom. In addition, since we overheard the homeowner say that they wanted to be able to park their car in the garage, we made a point to organize it for them so there was adequate space for a vehicle.
Result: The Smith’s had originally found us on Houzz.com and were incredibly pleased with our quality of work, as well as our ability to stay within their budget and stick to a set timeline. Not only did they give us an excellent review, but hugs were given upon our final goodbye as well. It was a great day.

 Lolly & Me
 Cogan 4-in-1 Convertible Crib/Changing Table Combo, White
Ideal for smaller spaces, this 4-in-1 crib, and changing table adapts to your growing child. The crib can be converted to toddler bed to daybed to full-size bed. Open slats all the way around the crib provide a clear view to your little one, while a classic headboard awaits your child's growth into a young adult. Engineered as a transitional combination unit, the changing table detaches from the crib. When your toddler has outgrown the changer, it's easily removed to unveil an attached bookshelf or nightstand. When you convert the crib to a full-size bed, you can detach the changing table altogether so it stands alone as a tasteful dresser or table. Raised moldings, recessed panels, and clean lines look fresh in a white finish. The paint and protective clear coat are applied by hand in three steps for extra durability. Rigorously tested to exceed US-safety standards, the crib has extra safety bolts and thick slats to keep your baby safe and sound. The changing table comes with foot levelers and anti-tip hardware. Constructed of high-quality materials, it features beveled edges, a deep drawer with a reinforced bottom and two open shelves for easy access to all your diapering needs. The removable changer tray includes a 1-inch, custom-fit changing pad for added comfort. A brushed nickel knob gives it a little urban flair. User-friendly instructions eliminate assembly headaches so even the busiest parents can put it together. All our Lolly & Me products are created by two moms, dedicated to dressing up today's nursery with affordable style that's fresh, functional and safe.
- Crib grows with your child: converts from toddler bed to day bed to full-size bed
- Certifications: JPMA, CPSIA, ASTM; USA-inspected
- Construction: solid New Zealand pine, yellow poplar, 5-ply birch and maple veneers, MDF, formaldehyde-free adhesives
- 3-step finish: hand-applied, rich paint color and protective clear coat
- Maximum weight capacity: 50.0 lb.
- Removable changer kit includes a 1� custom-fit changing pad
- Assembled dimensions: 42.9" H x 74.3" W x 30.7" D
- Care: Clean with mild soap and water
- 3-position metal mattress support
- Conversion kit included
- Mattress and standard-size bed frame sold separately
- Warranty: one year for all manufacturing defects

 Christiane Holmquist Landscape Design
With this client who has been passionate about plants all his life, there was naturally a close collaboration and a lot of input from him. Upon closer inspection you'd find some very exceptional plants that are sort of experimental but "all worth the try" in Gordon's eyes. And he is right! I relished the opportunity to use Star Magnolia stellata, Redbud Cercis 'Avondale' and 'Silver Cloud', Arabian Lilac 'Grand Duke of Tuscany', Royal Bromeliad Vriesea imperialis, also many unusual bulbs such as Scilla.
Besides structure providing shrubs and trees (Tecoma, existing Indian Hawthorne with beautiful structures, Sweet Pea Bush, Golden Breath of Heaven, Ilex, Ginkgo, Bronze Loquat etc.) you'll see here also my favorite perennials, succulents and grasses, all as low care and undemanding as well as low-water as possible, to keep the landscape colorful and interesting year round.
One of the highlights of this garden are the dry stream beds, bird bath and garden bench that we added. Built originally by himself and his wife, the dry stream beds were overgrown, mostly hidden by plant debris, or half rolling down hill. We had fun selecting a mixed collection of colorful and richly textured boulders of various sizes over, and with the input from 7 team members: Gordon, me, the contractor, the supervisor and three workers, we re-created the stream beds, making sure that anchor stones on the sides were well embedded in the slope, and that stone shelves and “top dressing” with smaller pebbles would add to the visual interest. Now these beds form very pleasing architectural features that look like they have always been there.
We were all surprised how quickly all plants adapted to the site and started growing and putting out bloom. Now the old birdbath, a traditional white thing with dove figurines resting on the scalloped bowl, looked out of place, and I suggested to replace it with a stone bowl. And that part of the garden just called for a bench under the Macademia nut tree, to observe the birds and contemplate the whole creation. Only stone would do, but not any stone! Gordon picked a Basalt boulder that was naturally bowl shaped. It’s so heavy that it took 8 men to heave it into place! The Basalt bench was not much lighter, and together they make a very inviting scene. This job should last for a while.
Photographed by Emma Almendarez at http://www.emmatheodoraphotography.com/
 Christiane Holmquist Landscape Design
With this client who has been passionate about plants all his life, there was naturally a close collaboration and a lot of input from him. Upon closer inspection you'd find some very exceptional plants that are sort of experimental but "all worth the try" in Gordon's eyes. And he is right! I relished the opportunity to use Star Magnolia stellata, Redbud Cercis 'Avondale' and 'Silver Cloud', Arabian Lilac 'Grand Duke of Tuscany', Royal Bromeliad Vriesea imperialis, also many unusual bulbs such as Scilla.
Besides structure providing shrubs and trees (Tecoma, existing Indian Hawthorne with beautiful structures, Sweet Pea Bush, Golden Breath of Heaven, Ilex, Ginkgo, Bronze Loquat etc.) you'll see here also my favorite perennials, succulents and grasses, all as low care and undemanding as well as low-water as possible, to keep the landscape colorful and interesting year round.
One of the highlights of this garden are the dry stream beds, bird bath and garden bench that we added. Built originally by himself and his wife, the dry stream beds were overgrown, mostly hidden by plant debris, or half rolling down hill. We had fun selecting a mixed collection of colorful and richly textured boulders of various sizes over, and with the input from 7 team members: Gordon, me, the contractor, the supervisor and three workers, we re-created the stream beds, making sure that anchor stones on the sides were well embedded in the slope, and that stone shelves and “top dressing” with smaller pebbles would add to the visual interest. Now these beds form very pleasing architectural features that look like they have always been there.
We were all surprised how quickly all plants adapted to the site and started growing and putting out bloom. Now the old birdbath, a traditional white thing with dove figurines resting on the scalloped bowl, looked out of place, and I suggested to replace it with a stone bowl. And that part of the garden just called for a bench under the Macademia nut tree, to observe the birds and contemplate the whole creation. Only stone would do, but not any stone! Gordon picked a Basalt boulder that was naturally bowl shaped. It’s so heavy that it took 8 men to heave it into place! The Basalt bench was not much lighter, and together they make a very inviting scene. This job should last for a while.
Photographed by Emma Almendarez at http://www.emmatheodoraphotography.com/

 All Marble Tiles
Crema Marfil Marble Tile and Mosaic
Crema Marfil marble tile is not new in construction; its popularity spreads worldwide thanks to its qualities as a stone tile. It is tough, durable and has a unique gloss that gives any home that hotel styled theme. It may feel expensive to buy at first, but when you window shop for discounts you will have the tiles with you sooner than you think.
This stone tile is appreciated by most builders and home owners because of the swirling and diversity seen on its surface patterns. It is easy to work with as well, and one doesn’t have to hire help to install if you have a little DIY skill in you. Though tough in nature, Crema Marfil Marble is easy to cut with a normal tile cutter and you can shape it to whatever style or size you want. Speaking more on size, the stone tile is normally cut in large sizes which make it easy to cover as much room as possible within a short time.
The Crema look is definitely covetable whether used on walls or floors. Marfil marble suits any area of your house where you need some sophisticated tweak. It beautifies your bathroom décor and accentuates the details of your kitchen. Its color is a perfect backdrop for your living room furniture and you are at will to add any other decorative details like paintings or sculptors. The best way to decorate with Crema Marfil marble tile is to play around with neutral tones, then build up interesting color designs with your furniture or other items in your house.
This Crema luxurious feel is available in the market at different prices. You can purchase it locally if there is a local store available or alternatively ship it from overseas. While buying, you can choose to be creative and order mosaic Marfil marble. It still bears the Crema hue like its counterparts but it adds other colors, texture feel or even veining on the surface. Crema Marfil Mosaic tile is perfect if you have an artistic mind in interior décor.
There are certain pointers you need to know while purchasing this stone tile. Make sure you are available to inspect the delivery to make sure all tiles match the colors you ordered and are also in the shape required. The tile condition is also important as some may arrive chipped or broken and may need replacing.
Let a mosaic interior inspire you while purchasing Crema Marfil marble tile, you won’t regret the decision.
 Christiane Holmquist Landscape Design
With this client who has been passionate about plants all his life, there was naturally a close collaboration and a lot of input from him. Upon closer inspection you'd find some very exceptional plants that are sort of experimental but "all worth the try" in Gordon's eyes. And he is right! I relished the opportunity to use Star Magnolia stellata, Redbud Cercis 'Avondale' and 'Silver Cloud', Arabian Lilac 'Grand Duke of Tuscany', Royal Bromeliad Vriesea imperialis, also many unusual bulbs such as Scilla.
Besides structure providing shrubs and trees (Tecoma, existing Indian Hawthorne with beautiful structures, Sweet Pea Bush, Golden Breath of Heaven, Ilex, Ginkgo, Bronze Loquat etc.) you'll see here also my favorite perennials, succulents and grasses, all as low care and undemanding as well as low-water as possible, to keep the landscape colorful and interesting year round.
One of the highlights of this garden are the dry stream beds, bird bath and garden bench that we added. Built originally by himself and his wife, the dry stream beds were overgrown, mostly hidden by plant debris, or half rolling down hill. We had fun selecting a mixed collection of colorful and richly textured boulders of various sizes over, and with the input from 7 team members: Gordon, me, the contractor, the supervisor and three workers, we re-created the stream beds, making sure that anchor stones on the sides were well embedded in the slope, and that stone shelves and “top dressing” with smaller pebbles would add to the visual interest. Now these beds form very pleasing architectural features that look like they have always been there.
We were all surprised how quickly all plants adapted to the site and started growing and putting out bloom. Now the old birdbath, a traditional white thing with dove figurines resting on the scalloped bowl, looked out of place, and I suggested to replace it with a stone bowl. And that part of the garden just called for a bench under the Macademia nut tree, to observe the birds and contemplate the whole creation. Only stone would do, but not any stone! Gordon picked a Basalt boulder that was naturally bowl shaped. It’s so heavy that it took 8 men to heave it into place! The Basalt bench was not much lighter, and together they make a very inviting scene. This job should last for a while.
Photographed by Emma Almendarez at http://www.emmatheodoraphotography.com/
 Tile Doctor Ltd
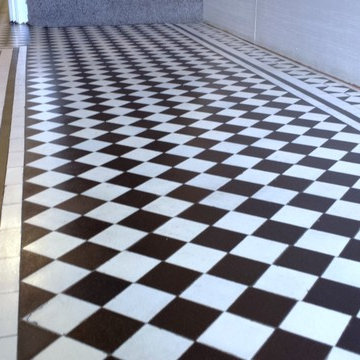
Sometimes you survey a job and you know that if you get the chance to restore it the results will be totally fantastic! This was the case with this Victorian black & white chequer tiled floor in the hallway of a large terraced Victorian house in Cardiff which dated back to around 1900 and was now looking well past its best, I know this because my family used to live in the house opposite. It was a well laid floor with no readings of dampness; I believe it’s imperative you check a floor for dampness before starting so you know what the baseline damp level is and which sealers will work with the floor.
My first action was to hoover the floor and then scrape as much debris off the surface as possible, and then as always I mixed 50/50 Tile Doctor HBU (Heavy Build-Up) remover with Pro-Clean and on this occasion because I wanted the white tiles to become really white I added the same amount of Tile Doctor Grout Clean-Up. This special recipe created a very formidable and strong cleaning solution which is what the job called for. I swept it over the whole floor letting it soak in for about ten minutes and then worked it into the floor using a scrubbing machine fitted with a coarse black pad adding more of the solution to the floor where it was drying out as I went.
The next step was to rinse the floor twice with water and extract the now filthy cleaning solution using a wet vacuum. At this point I inspected the tiles and I could see there were still a few stubborn areas with spots of paint and glue which I addressed with a decorators steam plate together with a scraper and hand held scrubbing pad.
I was now happy that the floor was clean and ready to be sealed, before sealing though it’s important to remove any trace of cleaning solution as it may contaminate the sealer so I gave the floor a thorough rinse and extracted as much of the water as possible to reduce drying times.
I left the floor to dry for 48hrs before coming back to seal the tiles taking a reader on my damp meter first to establish they had indeed dried out. To seal the floor I used eight coats of Tile Doctor Seal & Go which really works well on Victorian tiles and in this case made the whites really stand out.
The customer wanted this floor to look good because they were selling the property and were due to have an open day. The clean tiles really gave the house the wow factor and period features are so desirable these days so I don’t think it will take long to sell.
 Pool Environments, Inc.
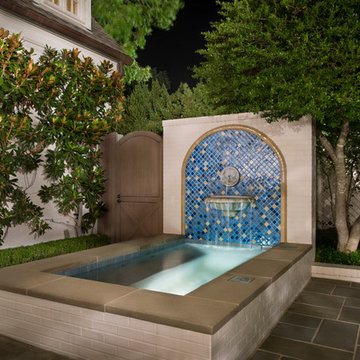
Originally designed by one of the most notable landscape architects in town, this once impressive project had faltered in recent years. The pool and spa still functioned well, and the client wanted to keep it intact. In addition, they wanted to keep as much of the existing landscaping as possible. The surrounding decks, walls, and steps were fair game. At first glance, one might think that our changes were simple material changes. Upon closer inspection, however, one can see the subtle, yet transformative changes that come together to update this classic pool in a tasteful, timeless manner, and improve the flow and usability of the deck areas, while softening the feel of the massive hardscape.
The subtle changes begin as soon as you walk out the back door of the house. The existing decking had a lot of what we call “tweeners”; areas that are overly generous walkways, yet not large enough to house furniture. The awkwardly small bluestone patio was expanded to accommodate a generous seating area, by pushing the step-down closer to the pool. Our talented stone mason carefully married the new bluestone into the existing, resulting in an imperceptible difference between the two. As you descend the new bluestone steps to the pool level, your bare feet will be thankful for the new smooth-finished limestone colored concrete, with a hand cut pattern carefully etched into its surface. The old red brick decking was so hot that the owners could not walk around the pool in bare feet. The brick coping was also replaced with an eased edge Pennsylvania Premier Stone which matches the new step treads throughout the project. Between the house and the pool, a large raised planter was reconfigured, giving additional space to the pool deck for a shaded lounge chair area.
Across the pool, a bank of rather tall painted brick retaining walls were cut down, shortened, and moved. This lessened the visual impact of the walls, which were rather overwhelming in the space, as well as opening up a new seating area, nestled under the arms of the massive pecan at the back of the property. Rather than continuing solid decking around the entire pool, the area near these walls has been transformed to large stone stepper pads set in a sea of beautiful St. Augustine lawn. This creates a visually softened area that is still suited to setting tables and chairs when the guest list calls for additional seating.
The spa area is quite possibly the most dramatic change on this project. Yet more raised planter walls divided this area into awkward spaces, unsuited to proper furniture placement. The planters were removed, new stone decks, once again expertly married into the existing, opening the area to house a large dining table and new built in bbq area. The spa itself was re-imagined with the bluestone coping, and painted brick veneer. The most impressive addition though is the new handmade glazed tiles that surround the existing cast stone water feature. This water feature was almost unnoticeable against the painted brick wall, but now the dramatic arch and pop of color draw the eye to this quaint little corner of the property.
 Christiane Holmquist Landscape Design
With this client who has been passionate about plants all his life, there was naturally a close collaboration and a lot of input from him. Upon closer inspection you'd find some very exceptional plants that are sort of experimental but "all worth the try" in Gordon's eyes. And he is right! I relished the opportunity to use Star Magnolia stellata, Redbud Cercis 'Avondale' and 'Silver Cloud', Arabian Lilac 'Grand Duke of Tuscany', Royal Bromeliad Vriesea imperialis, also many unusual bulbs such as Scilla.
Besides structure providing shrubs and trees (Tecoma, existing Indian Hawthorne with beautiful structures, Sweet Pea Bush, Golden Breath of Heaven, Ilex, Ginkgo, Bronze Loquat etc.) you'll see here also my favorite perennials, succulents and grasses, all as low care and undemanding as well as low-water as possible, to keep the landscape colorful and interesting year round.
One of the highlights of this garden are the dry stream beds, bird bath and garden bench that we added. Built originally by himself and his wife, the dry stream beds were overgrown, mostly hidden by plant debris, or half rolling down hill. We had fun selecting a mixed collection of colorful and richly textured boulders of various sizes over, and with the input from 7 team members: Gordon, me, the contractor, the supervisor and three workers, we re-created the stream beds, making sure that anchor stones on the sides were well embedded in the slope, and that stone shelves and “top dressing” with smaller pebbles would add to the visual interest. Now these beds form very pleasing architectural features that look like they have always been there.
We were all surprised how quickly all plants adapted to the site and started growing and putting out bloom. Now the old birdbath, a traditional white thing with dove figurines resting on the scalloped bowl, looked out of place, and I suggested to replace it with a stone bowl. And that part of the garden just called for a bench under the Macademia nut tree, to observe the birds and contemplate the whole creation. Only stone would do, but not any stone! Gordon picked a Basalt boulder that was naturally bowl shaped. It’s so heavy that it took 8 men to heave it into place! The Basalt bench was not much lighter, and together they make a very inviting scene. This job should last for a while.
Photographed by Emma Almendarez at http://www.emmatheodoraphotography.com/
 Christiane Holmquist Landscape Design
With this client who has been passionate about plants all his life, there was naturally a close collaboration and a lot of input from him. Upon closer inspection you'd find some very exceptional plants that are sort of experimental but "all worth the try" in Gordon's eyes. And he is right! I relished the opportunity to use Star Magnolia stellata, Redbud Cercis 'Avondale' and 'Silver Cloud', Arabian Lilac 'Grand Duke of Tuscany', Royal Bromeliad Vriesea imperialis, also many unusual bulbs such as Scilla.
Besides structure providing shrubs and trees (Tecoma, existing Indian Hawthorne with beautiful structures, Sweet Pea Bush, Golden Breath of Heaven, Ilex, Ginkgo, Bronze Loquat etc.) you'll see here also my favorite perennials, succulents and grasses, all as low care and undemanding as well as low-water as possible, to keep the landscape colorful and interesting year round.
One of the highlights of this garden are the dry stream beds, bird bath and garden bench that we added. Built originally by himself and his wife, the dry stream beds were overgrown, mostly hidden by plant debris, or half rolling down hill. We had fun selecting a mixed collection of colorful and richly textured boulders of various sizes over, and with the input from 7 team members: Gordon, me, the contractor, the supervisor and three workers, we re-created the stream beds, making sure that anchor stones on the sides were well embedded in the slope, and that stone shelves and “top dressing” with smaller pebbles would add to the visual interest. Now these beds form very pleasing architectural features that look like they have always been there.
We were all surprised how quickly all plants adapted to the site and started growing and putting out bloom. Now the old birdbath, a traditional white thing with dove figurines resting on the scalloped bowl, looked out of place, and I suggested to replace it with a stone bowl. And that part of the garden just called for a bench under the Macademia nut tree, to observe the birds and contemplate the whole creation. Only stone would do, but not any stone! Gordon picked a Basalt boulder that was naturally bowl shaped. It’s so heavy that it took 8 men to heave it into place! The Basalt bench was not much lighter, and together they make a very inviting scene. This job should last for a while.
Photographed by Emma Almendarez at http://www.emmatheodoraphotography.com/


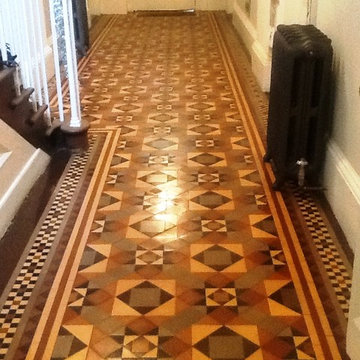 Tile Doctor Ltd
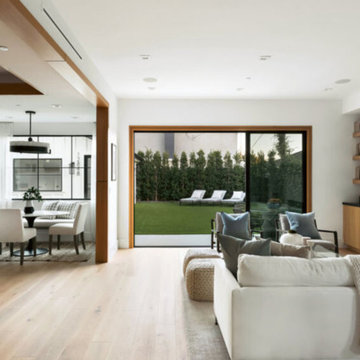
This hallway floor was actually at a house in the town of Stamford which is just over the northern border of Northamptonshire and slightly out of my area; however I was recommended to the owner by another client which is always welcome and a testimonial in itself. I work right across the county so it wasn’t long before I was in the general area and arranged a visit to carry out an inspection of the Victorian Quarry tiled floor and provide a quote for a full restoration.
The owner of the house had just moved in recently and although the floor was in good overall physical, it was in need of a thorough clean and new seal to bring back some life to the tiles. Additionally she was having lots of other building work done to the house and she wanted to retain this as an original feature of the property. My quote was accepted and I was able to book the work in for the following week.
These first photos show how dull the floor looked due to a build-up of builder’s dust and general wear and tear. They also show some of the equipment needed to undertake the following cleaning process.
I used a brush and vacuum to remove as much loose debris and dust from the surface of the floor as possible. I then applied a strong dilution of Tile Doctor Pro Clean to the floor which is a strong alkaline cleaner which can also be used to remove sealers; the solution was left it to dwell for roughly ten minutes before agitating it with scrubbing pads and brushes to remove the muck that was lifted to the surface. This was then wet-vacuumed twice to remove all the slurry and neutralise any chemicals.
As it was such an old property I then used a steamer to heat up the tiles and draw up any contaminants and assist with the drying process. I also chose to install two fans and a dehumidifier to dry the floor even further.
With the cleaning process complete – and achieving a marked difference to the appearance of the floor – I left the tiles to finish drying for 24 hours.
Upon my return to the house, I checked for any excess moisture by running damp tests as this has the potential to affect the performance of the sealer. Once satisfied with the results, I sealed the floor with two coats of Tile Doctor Colour Grow, a colour enhancing sealant which offers both a robust surface seal and an aesthetically pleasing finish.
I also carried out water repellency tests to ensure the sealer was working as expected and the floor had sufficient protection and will be hard-wearing for a hallway which is a high traffic area.
On my client’s return to the house she was very happy with the final results – in fact, she was also in contact about some further work in the New Year!
Phil Vissian
Northamptonshire Tile Doctor
 Christiane Holmquist Landscape Design
With this client who has been passionate about plants all his life, there was naturally a close collaboration and a lot of input from him. Upon closer inspection you'd find some very exceptional plants that are sort of experimental but "all worth the try" in Gordon's eyes. And he is right! I relished the opportunity to use Star Magnolia stellata, Redbud Cercis 'Avondale' and 'Silver Cloud', Arabian Lilac 'Grand Duke of Tuscany', Royal Bromeliad Vriesea imperialis, also many unusual bulbs such as Scilla.
Besides structure providing shrubs and trees (Tecoma, existing Indian Hawthorne with beautiful structures, Sweet Pea Bush, Golden Breath of Heaven, Ilex, Ginkgo, Bronze Loquat etc.) you'll see here also my favorite perennials, succulents and grasses, all as low care and undemanding as well as low-water as possible, to keep the landscape colorful and interesting year round.
One of the highlights of this garden are the dry stream beds, bird bath and garden bench that we added. Built originally by himself and his wife, the dry stream beds were overgrown, mostly hidden by plant debris, or half rolling down hill. We had fun selecting a mixed collection of colorful and richly textured boulders of various sizes over, and with the input from 7 team members: Gordon, me, the contractor, the supervisor and three workers, we re-created the stream beds, making sure that anchor stones on the sides were well embedded in the slope, and that stone shelves and “top dressing” with smaller pebbles would add to the visual interest. Now these beds form very pleasing architectural features that look like they have always been there.
We were all surprised how quickly all plants adapted to the site and started growing and putting out bloom. Now the old birdbath, a traditional white thing with dove figurines resting on the scalloped bowl, looked out of place, and I suggested to replace it with a stone bowl. And that part of the garden just called for a bench under the Macademia nut tree, to observe the birds and contemplate the whole creation. Only stone would do, but not any stone! Gordon picked a Basalt boulder that was naturally bowl shaped. It’s so heavy that it took 8 men to heave it into place! The Basalt bench was not much lighter, and together they make a very inviting scene. This job should last for a while.
Photographed by Emma Almendarez at http://www.emmatheodoraphotography.com/
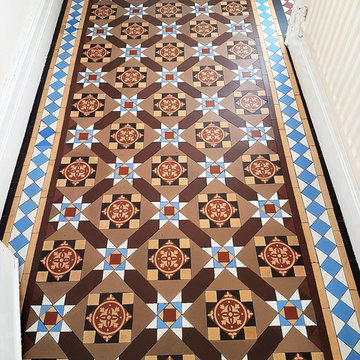 Tile Doctor Ltd
Most stone and tile benefit from the protection that a sealer provides to stop dirt becoming ingrained into its pores. However, the act of walking on the tile causes wear and this over time will lead to the sealer wearing off and dirt reaching the pores; the worse thing is you rarely notice it happening because it takes a long time to wear down a sealer.
Most of my customers have this problem and call on me to clean and reseal the floors every few years when it becomes difficult to clean effectively. The alternative which I do for a number of my clients is to have the floor lightly cleaned and a new layer of sealer added every six to twelve months.
This Victorian tiled entrance at a period house in Ilkley was not in too bad a shape just a little dirty and dull and the owner was keen to have is renovated in the run up to the Christmas holidays. Ilkley is a lovely town in West Yorkshire which became very fashionable in the Victorian era due to the health benefits of the local water, this led to a lot of Victorian architecture and tiled entrance floors like this one are very typical in the area.
To get the dirt out of the tile and grout I applied a strong dilution of Tile Doctor Pro-Clean to the tiles and left it to soak in for fifteen minutes. Pro-Clean is a very reliable cleaner for all types of tile and grout including natural stone, Limestone, Slate and Travertine, amongst others; additionally, when used in a strong dilution it will strip off old sealers. The solution was then worked into the tile using a black scrubbing pad fitted to a rotary machine and the soil extracted using a wet vacuum.
I gave the floor a light rinse with water to remove any trace of cleaning products and then inspected the floor to ensure it was up to standard. At this point I could see there were flecks of paint on the tile around the edges of the floor from previous decorating work and, so I removed carefully removed these with a scrapper and a hand-held diamond block.
The floor was given a final rinse and the wet vacuum used to extract as much moisture from the floor as possible before leaving it to dry for the evening.
I returned the next day to seal the floor first discussing the finish that the customer wanted for the tiles. Typically, I recommend using a satin sealer for Victorian tiles as it adds a nice sheen to the tile however surprisingly the owner wanted a matt finish.
Tile Doctor has a full range of sealers available to cater for all requirements so for this floor I applied three coats of Tile Doctor Colour Grow which leaves a matt finish whilst enriching the colours in the tile.
The tiles are now full of life and with the paint specs removed there is now a crisp black edge between the floor and the skirting which the customer also picked up on.
Nigel Stoker
North West Yorkshire Tile Doctor
 Christiane Holmquist Landscape Design
With this client who has been passionate about plants all his life, there was naturally a close collaboration and a lot of input from him. Upon closer inspection you'd find some very exceptional plants that are sort of experimental but "all worth the try" in Gordon's eyes. And he is right! I relished the opportunity to use Star Magnolia stellata, Redbud Cercis 'Avondale' and 'Silver Cloud', Arabian Lilac 'Grand Duke of Tuscany', Royal Bromeliad Vriesea imperialis, also many unusual bulbs such as Scilla.
Besides structure providing shrubs and trees (Tecoma, existing Indian Hawthorne with beautiful structures, Sweet Pea Bush, Golden Breath of Heaven, Ilex, Ginkgo, Bronze Loquat etc.) you'll see here also my favorite perennials, succulents and grasses, all as low care and undemanding as well as low-water as possible, to keep the landscape colorful and interesting year round.
One of the highlights of this garden are the dry stream beds, bird bath and garden bench that we added. Built originally by himself and his wife, the dry stream beds were overgrown, mostly hidden by plant debris, or half rolling down hill. We had fun selecting a mixed collection of colorful and richly textured boulders of various sizes over, and with the input from 7 team members: Gordon, me, the contractor, the supervisor and three workers, we re-created the stream beds, making sure that anchor stones on the sides were well embedded in the slope, and that stone shelves and “top dressing” with smaller pebbles would add to the visual interest. Now these beds form very pleasing architectural features that look like they have always been there.
We were all surprised how quickly all plants adapted to the site and started growing and putting out bloom. Now the old birdbath, a traditional white thing with dove figurines resting on the scalloped bowl, looked out of place, and I suggested to replace it with a stone bowl. And that part of the garden just called for a bench under the Macademia nut tree, to observe the birds and contemplate the whole creation. Only stone would do, but not any stone! Gordon picked a Basalt boulder that was naturally bowl shaped. It’s so heavy that it took 8 men to heave it into place! The Basalt bench was not much lighter, and together they make a very inviting scene. This job should last for a while.
Photographed by Emma Almendarez at http://www.emmatheodoraphotography.com/

 Solar Luminance
 – Semi-Custom Daylight Light Fixture
Model#: DLF-149
Style: Semi-Flush Pendant
Finish: Brushed Nickel
*Note: Price does not include Daylight Tube Product and/or Installation
Semi-Custom Product Shipment Lead Time: 6-10 Weeks*
The Solar Luminance DLF-149, is an Architectural Element Transitional Semi Flush Pendant, designed to assist the home owner, retail location and/or office location, the ability to benefit from Natural Daylight available with Tubular Skylight systems, while also reflecting your custom interior design and décor theme and needs.
Natural Daylight provides incredible mental and physical health and wellness benefits that help the human body and mind maintain a sense of time, absorb natural vitamins, and work with the human eye to perceive color and definition in clarity and contrast to increase visual awareness. Our hope is that your friends, colleagues and guests will be “Inspired & Design” in a way that is both elegant and considerate of the impact we have on the earth and its resources.
The DLF-149 is a Semi-Custom Fixture. Full Custom Versions and Options are available for price quote. Please feel free to contact a Solar Luminance Design Assistant for Full Custom Options.
Product Specification (List Price based on the following)
Over All Dimensions:
Over All Height: 22”
Shade Dims: 10” H. X 24” Dia. – ¾” Metal Trim with 1” Opening Square Weld Metal Mesh
Drop Length: 12”
Column Sleeve Diameter: 11 3/4” Dia.
Center Wireway: (1) 3/8” Dia. Wireway
Hangers: (4) Medium Oval Standard Chain (3 and 4 Hanger Options Available) (Chain available in Various Size Options, pricing may vary)
Lamping Specification
Daylight Tube System*: 10” Dia. Daylight Tube System – Includes Dome, Flashing, 8’-0” Length of Tube Extension, Tube Manufacturer provided Installation, Product and Installation Warranty
10” Diameter Tube provides the Equivalent of (10) 100Watt White Lamps
Secondary Lamping
Canopy Lamping: (1) 1.8 Watts (Per Foot) - 48”L. - LED Flex Strip, 5,000K - 12 Volts DC (Lamp Life: 50,000 Hour Rating)
Candelabra Lamping: (6) 3.5Watt LED Candelabra Based Screw in Torpedo Warm White Bulbs, 120v 2700K (25Watt Equiv.) (Provided by Solar Luminance)
Finish Specification and Materials
Metal Finish: Brushed Nickel
(Available in other Color Options – Some Color Options may require a price adjustment)
Glass Diffuser: Clear Glass (Sandblasted Interior) (Not Tempered)
Product Notes
Daylight Tubular Product is Supplied and Installed by Tube Product Manufacturer. Tube Product Manufacturer is responsible for all Product, Installation, Warranty, and Service of Tube Related issues. Solar Luminance is not responsible for any errors and/or omissions related the tube related issues that may arise. Solar Luminance will assist in sourcing a local and/or regional Daylight Tubular Product Supplier and Installer, to assist with Roof and Ceiling inspection and Tube supply and Installation. Solar Luminance is not responsible for the Tube Installers quality of work or service.
All Secondary Electrical must be performed by a Licensed and/or certified Electrician and/or General Contractor. Solar Luminance is not responsible for the Installation of the fixture. Solar Luminance is not responsible for any errors and/or omissions, damaged and or fault or injury caused by the general contractor.
Shipping and Payments
Shipping and/or Freight is the responsibility of the purchaser. Solar Luminance will supply a quote based on the fixture size, weight, crating method and delivery location, prior to commencement of fabrication and production. All Finishes and Semi-Custom Modifications must be Signed and Approved via the Solar Luminance Client Approval Drawings, in order for your Custom Daylight Light Fixture to begin Fabrication and Production. Any and all Price adjustments and shipping and/or freight must be paid in full prior to shipment of product.
Semi-Custom Product Shipment Lead Time is estimated at 6-10 Weeks, to begin upon receipt of all of the following:
• Receipt of full payment
• Receipt of signed & approved Client Approval Drawings
• Receipt and Confirmation of Approved Finish and Materials
• And Verification and Approval of All Price adjustments for Custom Modifications and Shipping and/or Freight Cost
Return Policy
Product must be inspected upon arrival and receipt of product, at the designated delivery location. Any damage must be reported to Solar Luminance in a written statement of reported damage, by email (Sales@SolarLuminance.com), along with dated and time stamped photo documentation of reported damage. Report of product damage must emailed within 24 hours of receipt of product. Solar Luminance will work with Purchaser and/or Purchasers Agents, to replace and/or fix any damaged and/or missing parts in a timely manner. If damage occurs and/or is reported beyond the 24 hour reporting period Solar Luminance maintains no liability and/or responsibility for the product and/or its condition. Solar Luminance does take pride in our work, craftsmanship, and product, so we do promise to provide exceptional support in remedying any situation that may arise related to your fixture. We do promise to do all that we can to make you happy with your Custom Solar Luminance Daylight Light Fixture.
Please feel free to contact us with any Questions or Concerns you may have.
Sales@SolarLuminance.com
(855) 687-6233
A California based company.
167