
Search results for "Involved removing" in Home Design Ideas

 Design Directions
This 4000+ square foot home is situated on a hard to find lakefront lot right in the heart of the city. As you can see by the before photos it was in obvious need of updating, but the young and super active homeowners wanted an open floor plan similar to the new construction they were moving from and full views of the lake. Multiple walls were removed, ceilings were raised and a half bath near the kitchen was taken over to add even more space to this huge cooks kitchen. Two bathrooms were updated as were four of the five bedrooms. The client/owners were actively involved in decision making and material selections. This project was completed in 72 days.

 Corinthian Fine Homes
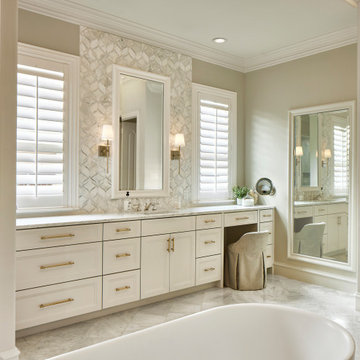
These clients requested a first-floor makeover of their home involving an outdated sunroom and a new kitchen, as well as adding a pantry, locker area, and updating their laundry and powder bath. The new sunroom was rebuilt with a contemporary feel that blends perfectly with the home’s architecture. An abundance of natural light floods these spaces through the floor to ceiling windows and oversized skylights. An existing exterior kitchen wall was removed completely to open the space into a new modern kitchen, complete with custom white painted cabinetry with a walnut stained island. Just off the kitchen, a glass-front "lighted dish pantry" was incorporated into a hallway alcove. This space also has a large walk-in pantry that provides a space for the microwave and plenty of compartmentalized built-in storage. The back-hall area features white custom-built lockers for shoes and back packs, with stained a walnut bench. And to round out the renovation, the laundry and powder bath also received complete updates with custom built cabinetry and new countertops. The transformation is a stunning modern first floor renovation that is timeless in style and is a hub for this growing family to enjoy for years to come.
 Geshtalt homes
This full-scale remodel transformed a dated traditional home into an elegant, modernized retreat. The project involved reimagining every room—from the formal living spaces to the kitchen, bathrooms, and private suites—blending classic design elements with luxurious modern amenities.
High-end finishes, custom millwork, and thoughtfully curated materials were used throughout to elevate and further develop the home’s character. The kitchen now features elegant lines, marble countertops, and luxury appliances, designed for both beauty and functionality. Bathrooms were reconfigured for spa-like comfort, with features such , focal tiling, and freestanding tubs.
Additional hardwood flooring connects to original, and designer lighting create continuity and sophistication across the spaces. We also enhanced flow and openness by selectively removing and combining islands, and expanding key areas to accommodate contemporary living without sacrificing traditional elegance.
From concept to completion, this project exemplifies USI's design-build approach—seamlessly integrating architecture, interior design, and craftsmanship to deliver a cohesive, upscale home tailored to modern lifestyles.
Find the right local pro for your project

 Mariano & Co., LLC
Extensive Kitchen, living area remodel complete!
There was a lot of demo, reframing and rearranging involved in this beautiful remodel to get it to it’s final result. We first had to remove every surface including several walls to open up the Kitchen to the living room and what is now a bar area where our clients can relax, play pool and watch TV. Off the Kitchen is a new laundry with extra storage and countertop space. In removing the walls in the kitchen, we were able to create a large island, move the appliances around and created a new open concept living space. The cabinets in the bar area, laundry and Kitchen perimeter are a white shaker style cabinet with the Island being a separate beautiful Grey color. All of the cabinets were topped with a gorgeous Vittoria white quartz countertop. The Kitchen was then completed with the stand out Grey Glazed Brick backsplash. Finally, the flooring! The home was also updated with a new 12x48 Aequa Tur wood look tile. We created a custom design with this tile at the entry way and transitioned between rooms with a soldier pattern. Lots of detail went into creating this beautiful space, let us know if you have any questions!

 Jonn Spradlin Design LLC
This tired kitchen needed an update for some serious cooks moving in. A young couple, accompanied by her Mother, were used to cooking three fresh meals each day, utilizing almost every appliance and cooking utensil to be found. I started by blowing out the space, scraping the peninsula and all that was left was a custom stainless range hood to begin with. The clients needs were 2 36" Refrigerators and only 2 freezer drawers. Hence, fresh cooking. The number of large appliances was so great that we decided to use flush front cabinets to yield clean lines and remove focus from the multitude of appliances. The 12' island housed 2 freezer drawers, a steam oven, a warming drawer, and a drawer microwave oven along with seating for 4 mid-way along the island. Authentic Quartzite was the only choice for these cooks who had no time to worry of stains.A wood look floor was desired, but not practical and I used a 7" x 48" wood tile plank. Opposite the stove is a TV and sitting area for those wanting to be a part of the action, but not involved.
Photography by Jonn Spradlin
 Mariano & Co., LLC
Extensive Kitchen, living area remodel complete!
There was a lot of demo, reframing and rearranging involved in this beautiful remodel to get it to it’s final result. We first had to remove every surface including several walls to open up the Kitchen to the living room and what is now a bar area where our clients can relax, play pool and watch TV. Off the Kitchen is a new laundry with extra storage and countertop space. In removing the walls in the kitchen, we were able to create a large island, move the appliances around and created a new open concept living space. The cabinets in the bar area, laundry and Kitchen perimeter are a white shaker style cabinet with the Island being a separate beautiful Grey color. All of the cabinets were topped with a gorgeous Vittoria white quartz countertop. The Kitchen was then completed with the stand out Grey Glazed Brick backsplash. Finally, the flooring! The home was also updated with a new 12x48 Aequa Tur wood look tile. We created a custom design with this tile at the entry way and transitioned between rooms with a soldier pattern. Lots of detail went into creating this beautiful space, let us know if you have any questions!
 Tile Doctor Ltd
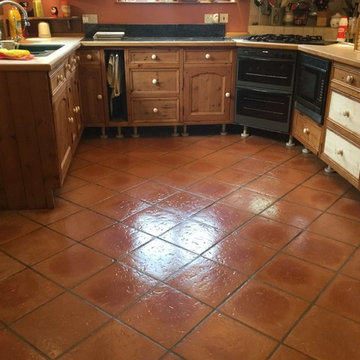
This Terracotta tiled floor was installed in the kitchen of a cottage in the small village of Maidford near Towcester. The tiles were not looking their best and the owner of the property realised it was time to do something about it and contacted Tile Doctor to have the floor stripped and resealed. Stripping and Sealing tile and stone floors is our bread and butter so I was more than happy to pop round and survey the floor which was approximately 9m2.
The grout had darkened with dirt and the previous tile sealer was failing so dirt was now getting ingrained in the Terracotta making it difficult to clean in places and leading to a patchy appearance. We discussed the work involved, my quote was accepted, and a date agreed for me to return and complete the work which would take two days, one to clean and one to seal.
After tidying up the Kitchen and removing the kickboards from underneath the kitchen units I set about working on cleaning and stripping the Terracotta floor of old sealers. To start I tested a small area with a strong dilution of Tile Doctor Wax Away. Wax was quite often used on Terracotta so I figured this product would be a good place to start. My suspicions were proved correct, and I found this to be the best product for removing the many layers of sealant on the floor. Wax Away is a new alkaline product by Tile Doctor and ideal for cleaning clay-based tiles such as Terracotta.
With my sights set on the rest of the floor Wax Away was scrubbed into the tile using a 17” rotary floor scrubbing machine and a black scrubbing pad running on a slow speed which helps to reduce splashing. This activity soon brought the dirt off the floor and the soiled cleaning solution was removed using a wet vacuum and the floor was rinsed down with clean water. The cleaning process was repeated a couple of times until I was happy with the floor, a stiff hand brush was then used along the grout lines with a dilution of Tile Doctor Pro-Clean to clean up the grout.
After rinsing and extracting the floor again the floor was inspected, and I noticed there were a few stubborn paint splashes on the tiles. I managed to remove these and these by spot treating the affected area with Tile Doctor Remove and Go and a steamer to lift the stain out of the clay tile. Once happy the floor was clean it was given a thorough rinse to neutralise it and remove any trace of cleaning products and then left it to dry.
I allowed the floor to dry for several days before returning to seal the Terracotta using numerous coats of Tile Doctor Seal and Go which is an ideal sealer for Terracotta and provides durable stain protection together with a low sheen finish. Terracotta is by its nature very porous and so it’s not unknown for it to take up to nine coats of sealer, which can take some time to apply as like paint you have to wait until it’s dry before it will take the next coat.
The customer was so impressed by the results I achieved in their kitchen they decided to go ahead and book me in to carry out this process throughout the whole of the ground floor which included lounge, study and hallway.
Phil Vissian
Northamptonshire Tile Doctor

 Windy City Painters
 response to water damage in a kitchen:
Assessment and Inspection:
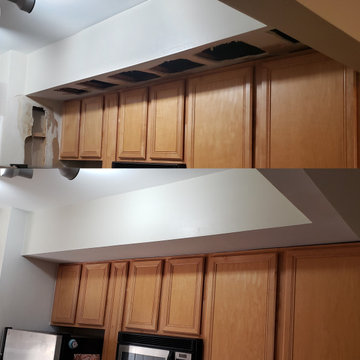
Windy City Painters initiates the process by conducting a thorough assessment of the water damage in the kitchen. This involves inspecting the soffit above the kitchen cabinets and the side wall to identify the areas that require repair. The severity of the damage is carefully evaluated to determine the scope of the restoration.
Insulation Replacement:
In cases where water has damaged insulation, Windy City Painters removes and replaces the affected insulation to ensure proper restoration of the affected areas. This step is crucial for preventing future issues related to moisture and maintaining the integrity of the space.
Drywall Replacement:
Damaged drywall is carefully removed and replaced during the repair process. This includes removing sections of drywall that have been compromised by water, ensuring that the new drywall seamlessly integrates with the existing structure.
Sealing Water Spots with Oil-Based Primer:
To prevent any potential water stains from bleeding through the new paint, Windy City Painters applies an oil-based primer to seal water spots. This step not only ensures a smooth and uniform finish but also provides additional protection against future water damage.
Cleaning and Restoration:
After completing the repair work, Chicago painter takes the extra step of cleaning the entire area to ensure a neat and polished final result. This includes removing any debris or dust generated during the repair process, leaving the kitchen in a clean and presentable condition.
Efficient Completion by Skilled Painter:
Windy City Painters prides itself on efficiency, and the entire drywall repair job is completed within one day by a skilled painter. This quick turnaround minimizes disruptions to the homeowner's routine and allows for a prompt return to normalcy.
Scheduling and Estimates:
Customers looking to schedule an appointment or obtain an online estimate can easily do so by visiting the official website at www.windypainters.com. The user-friendly platform facilitates convenient scheduling and access to estimates.
Customer Assurance and Reviews:
Windy City Painters emphasizes customer satisfaction and provides the highest quality service. Potential customers are encouraged to check the company's 5-star reviews on Yelp ( https://www.yelp.com/biz/windy-city-painters-chicago-2) and Google, offering a glimpse into the positive experiences of previous clients.
Windy City Painters offers a comprehensive and efficient drywall repair service, addressing water damage in kitchens with expertise, professionalism, and a commitment to customer satisfaction.

 J. Francis Company LLC
About this Project:
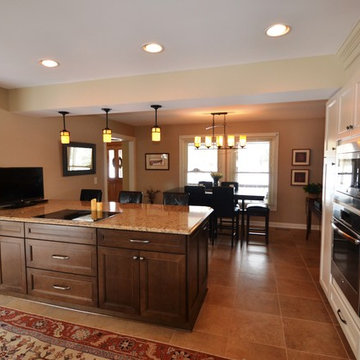
Kitchen remodeling included complete gut of the existing galley kitchen involving removal of the surrounding walls to create a feeling of openness of space. The thoroughly modern kitchen features impressive charcoal finish cabinetry, stunning granite countertops, and Grohe faucet with Dacor & JennAire stainless steel appliances. The cabinetry extends into the dining room, including glass panel doors & interior cabinet lighting. Recessed lighting design accents the hood vent and Brazilian cherry hardwood flooring.
-------------------------------------------------------------------------
Testmonial:
"Our sincere thanks for doing such an outstanding job on our Gateway Towers Condominium. All of your work was excellent and the entire job was completed on time and within budget. Being away for most of the project could have been a problem, but you kept us informed and up-to-date all the way through completion. We were especially pleased with the fine quality work by everyone connected with the project and your thorough handling of the final job wrap-up."

 Classic Home Improvements
This kitchen remodel involved removing a wall in replace of this beautiful exposed wooden beam to create an open concept kitchen. The two-toned kitchen island and seating allows for more functionality no matter what room these homeowners are in!
Perimeter cabinets: Starmark Crew, Maple wood, Roseville Style in a Marshmallow Creme Finish.
Perimeter Countertops: Della Terra Tullamore Quartz
Island Cabinets: Woodland, Hickory Wood, Rustic Farmstand style, reclaimed patina finish.
Island Countertop: Della Terra Nouveau Calacatta quartz.
Backplash is a stunning: Province Town bevel lantern, flat liner and bead in Surfside Blue with customes bleached wood grout.
Tile floor is Barrique Vert and the walls are painted SW7009 Pearly whites (eggshell) with ceiling paint in SW7004 Snowbound (flat)
photos by Preview First

 J Design Group - Interior Designers Miami - Modern
Home and Living Examiner said:
Modern renovation by J Design Group is stunning
J Design Group, an expert in luxury design, completed a new project in Tamarac, Florida, which involved the total interior remodeling of this home. We were so intrigued by the photos and design ideas, we decided to talk to J Design Group CEO, Jennifer Corredor. The concept behind the redesign was inspired by the client’s relocation.
Andrea Campbell: How did you get a feel for the client's aesthetic?
Jennifer Corredor: After a one-on-one with the Client, I could get a real sense of her aesthetics for this home and the type of furnishings she gravitated towards.
The redesign included a total interior remodeling of the client's home. All of this was done with the client's personal style in mind. Certain walls were removed to maximize the openness of the area and bathrooms were also demolished and reconstructed for a new layout. This included removing the old tiles and replacing with white 40” x 40” glass tiles for the main open living area which optimized the space immediately. Bedroom floors were dressed with exotic African Teak to introduce warmth to the space.
We also removed and replaced the outdated kitchen with a modern look and streamlined, state-of-the-art kitchen appliances. To introduce some color for the backsplash and match the client's taste, we introduced a splash of plum-colored glass behind the stove and kept the remaining backsplash with frosted glass. We then removed all the doors throughout the home and replaced with custom-made doors which were a combination of cherry with insert of frosted glass and stainless steel handles.
All interior lights were replaced with LED bulbs and stainless steel trims, including unique pendant and wall sconces that were also added. All bathrooms were totally gutted and remodeled with unique wall finishes, including an entire marble slab utilized in the master bath shower stall.
Once renovation of the home was completed, we proceeded to install beautiful high-end modern furniture for interior and exterior, from lines such as B&B Italia to complete a masterful design. One-of-a-kind and limited edition accessories and vases complimented the look with original art, most of which was custom-made for the home.
To complete the home, state of the art A/V system was introduced. The idea is always to enhance and amplify spaces in a way that is unique to the client and exceeds his/her expectations.
To see complete J Design Group featured article, go to: http://www.examiner.com/article/modern-renovation-by-j-design-group-is-stunning
Living Room,
Dining room,
Master Bedroom,
Master Bathroom,
Powder Bathroom,
Miami Interior Designers,
Miami Interior Designer,
Interior Designers Miami,
Interior Designer Miami,
Modern Interior Designers,
Modern Interior Designer,
Modern interior decorators,
Modern interior decorator,
Miami,
Contemporary Interior Designers,
Contemporary Interior Designer,
Interior design decorators,
Interior design decorator,
Interior Decoration and Design,
Black Interior Designers,
Black Interior Designer,
Interior designer,
Interior designers,
Home interior designers,
Home interior designer,
Daniel Newcomb
 Tile Doctor Ltd
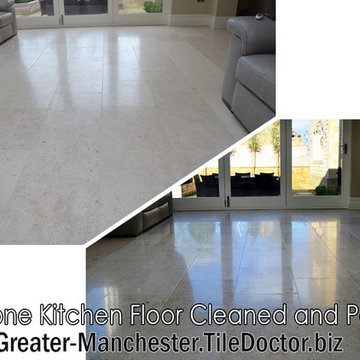
This beautiful Limestone kitchen tiled floor at a property in Peel Green was only a year old and, while it wasn’t in too bad of a state, the customer told me the floor had not been sealed properly due to issues with retaining moisture. The lack of an adequate sealer had allowed the Limestone to become duller over time after exposure to dirt and muck. It also had some more obvious marks and stains in some place and needed some grouting to be done around the corners and edges of the room.
I travelled to the property in Peel Green, which is within the Greater City of Salford in Greater Manchester, to see what could be done to restore the condition of the tiles.
Upon closer inspection of the tiles, I recommended to the customer that we proceed with the process known as burnishing, which we use primarily on Limestone, Marble, and Travertine. Burnishing, which involves the application of diamond encrusted burnishing pads, breaks down old sealers, gets rid of marks, stains and ingrained dirt, and gradually builds and evens out the polish on the tiles.
I started burnishing the Limestone kitchen tiles straight away when I arrived at the property as it was a big area and would require lots of hard work to achieve the desired results within the space of a day.
Our burnishing system consists of four diamond encrusted pads: Coarse, Medium, a Fine and Very Fine. Each pad was applied to the Limestone in sequence in tandem with a small amount of water to act as lubrication, gradually smoothing and polishing the surface of the tiles. After every pad, I also used my wet vac machine to remove any dirty water left on the floor and, after the Fine pad I rinsed the floor thoroughly to remove any dirt left on floor. I then left it to dry.
When I was satisfied that the floor was completely dry, it was time to seal the Limestone tiles. However, I first went over the floor with Very Fine grit pad to provide a final polish before sealing.
My choice of sealer was the impregnating Tile Doctor Colour Grow, a product which enhances the natural colours in the stone whilst also offering robust protection against dirt and stains. Remembering that the tiles had never been properly sealed, I applied plenty of sealer and left it to dry for 10 minutes. Following this, I carefully removed any excess sealer left on the surface with a dry cotton cloth. After sealing I went over the floor once final time with the Very Fine pad, just to smoothen things down and leave an exceptionally neat finish.
When the job was finished, I gave the owner some tips and recommendations on the cleaning of the floor going forward and a complimentary bottle of neutral cleaner to get them started.
The customer was very pleased with the finish, so much so that she opted and take up the Tile Doctor Maintenance Plan to keep the floor looking good for years to come! This involves popping round every 6-12 months to top up the sealer and give the floor a quick polish.
Tony Olmet
Greater Manchester Tile Doctor
 Tile Doctor Ltd
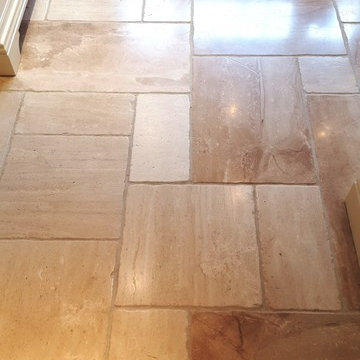
I was recently at a property in the North Yorkshire town of Harrogate, undertaking what I initially thought would be the cleaning and polishing of a Cream Limestone tiled kitchen. However, as I began the cleaning process I quickly discovered that under the dirty grout lines someone had taken a lot of effort to paint with a small brush directly onto the grout using varnish!
In a normal situation, I would have covered the whole floor with Tile Doctor Remove & Go to solve the problem, however compared to, say, adhesive or paint staining, varnish is very difficult to remove. So instead I opted for the long, yet necessary process of cleaning the grout manually with several thin wire brushes. Over the course of two days I managed to remove approximately 90% of the stubborn varnish – and could finally move onto cleaning and polishing the Limestone as originally planned.
The polish had been lost from the Limestone kitchen tiles over time, so I set about restoring it using a type of polishing known as burnishing. This involves the application of diamond encrusted pads of varying grit to the floor to gradually buff the stone and achieve an aesthetic and durable shine. Burnishing is most commonly used on high-end stone such as Marble, Travertine and, of course, Limestone.
At Tile Doctor, our burnishing system comprises four burnishing pads, ranging from a Coarse grit to a Very Fine grit. After applying the first three pads (Coarse, Medium and Fine), I gave the tiles a further clean with Tile a Doctor Pro Clean, which is our alkaline cleaner, to remove any residue from the burnishing process. I then rinsed the floor with clean water and soaked up the residue with a wet vacuum, before leaving it to dry.
The floor was then polished to a satin finish using the fourth and final Extra Fine burnishing pad. I sealed it using a couple of coats of Tile Doctor Ultra-Seal, an impregnating sealer designed to provide maximum protection against dirt and stains.
The combination of burnishing and sealing always makes a huge difference to Limestone tiles. Here, the finished result was almost like a new floor! The customer was both amazed and very pleased with the transformation.
Nigel Stoker
North West Yorkshire Tile Doctor

 Lesley Brookes Design
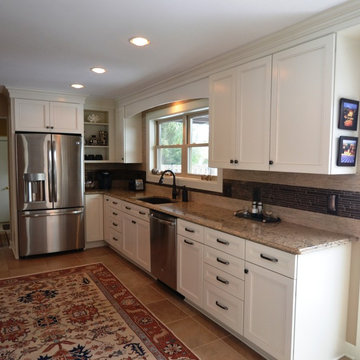
Alcove shower - mid-sized scandinavian master white tile and ceramic tile ceramic tile alcove shower idea in Toronto with flat-panel cabinets, light wood cabinets, an undermount tub, a one-piece toilet, gray walls, an undermount sink, wood countertops, a hinged shower door and gray countertops
 Mariano & Co., LLC
Extensive Kitchen, living area remodel complete!
There was a lot of demo, reframing and rearranging involved in this beautiful remodel to get it to it’s final result. We first had to remove every surface including several walls to open up the Kitchen to the living room and what is now a bar area where our clients can relax, play pool and watch TV. Off the Kitchen is a new laundry with extra storage and countertop space. In removing the walls in the kitchen, we were able to create a large island, move the appliances around and created a new open concept living space. The cabinets in the bar area, laundry and Kitchen perimeter are a white shaker style cabinet with the Island being a separate beautiful Grey color. All of the cabinets were topped with a gorgeous Vittoria white quartz countertop. The Kitchen was then completed with the stand out Grey Glazed Brick backsplash. Finally, the flooring! The home was also updated with a new 12x48 Aequa Tur wood look tile. We created a custom design with this tile at the entry way and transitioned between rooms with a soldier pattern. Lots of detail went into creating this beautiful space, let us know if you have any questions!
 Mariano & Co., LLC
Extensive Kitchen, living area remodel complete!
There was a lot of demo, reframing and rearranging involved in this beautiful remodel to get it to it’s final result. We first had to remove every surface including several walls to open up the Kitchen to the living room and what is now a bar area where our clients can relax, play pool and watch TV. Off the Kitchen is a new laundry with extra storage and countertop space. In removing the walls in the kitchen, we were able to create a large island, move the appliances around and created a new open concept living space. The cabinets in the bar area, laundry and Kitchen perimeter are a white shaker style cabinet with the Island being a separate beautiful Grey color. All of the cabinets were topped with a gorgeous Vittoria white quartz countertop. The Kitchen was then completed with the stand out Grey Glazed Brick backsplash. Finally, the flooring! The home was also updated with a new 12x48 Aequa Tur wood look tile. We created a custom design with this tile at the entry way and transitioned between rooms with a soldier pattern. Lots of detail went into creating this beautiful space, let us know if you have any questions!
 Mariano & Co., LLC
Extensive Kitchen, living area remodel complete!
There was a lot of demo, reframing and rearranging involved in this beautiful remodel to get it to it’s final result. We first had to remove every surface including several walls to open up the Kitchen to the living room and what is now a bar area where our clients can relax, play pool and watch TV. Off the Kitchen is a new laundry with extra storage and countertop space. In removing the walls in the kitchen, we were able to create a large island, move the appliances around and created a new open concept living space. The cabinets in the bar area, laundry and Kitchen perimeter are a white shaker style cabinet with the Island being a separate beautiful Grey color. All of the cabinets were topped with a gorgeous Vittoria white quartz countertop. The Kitchen was then completed with the stand out Grey Glazed Brick backsplash. Finally, the flooring! The home was also updated with a new 12x48 Aequa Tur wood look tile. We created a custom design with this tile at the entry way and transitioned between rooms with a soldier pattern. Lots of detail went into creating this beautiful space, let us know if you have any questions!
 Mariano & Co., LLC
Extensive Kitchen, living area remodel complete!
There was a lot of demo, reframing and rearranging involved in this beautiful remodel to get it to it’s final result. We first had to remove every surface including several walls to open up the Kitchen to the living room and what is now a bar area where our clients can relax, play pool and watch TV. Off the Kitchen is a new laundry with extra storage and countertop space. In removing the walls in the kitchen, we were able to create a large island, move the appliances around and created a new open concept living space. The cabinets in the bar area, laundry and Kitchen perimeter are a white shaker style cabinet with the Island being a separate beautiful Grey color. All of the cabinets were topped with a gorgeous Vittoria white quartz countertop. The Kitchen was then completed with the stand out Grey Glazed Brick backsplash. Finally, the flooring! The home was also updated with a new 12x48 Aequa Tur wood look tile. We created a custom design with this tile at the entry way and transitioned between rooms with a soldier pattern. Lots of detail went into creating this beautiful space, let us know if you have any questions!
 Mariano & Co., LLC
Extensive Kitchen, living area remodel complete!
There was a lot of demo, reframing and rearranging involved in this beautiful remodel to get it to it’s final result. We first had to remove every surface including several walls to open up the Kitchen to the living room and what is now a bar area where our clients can relax, play pool and watch TV. Off the Kitchen is a new laundry with extra storage and countertop space. In removing the walls in the kitchen, we were able to create a large island, move the appliances around and created a new open concept living space. The cabinets in the bar area, laundry and Kitchen perimeter are a white shaker style cabinet with the Island being a separate beautiful Grey color. All of the cabinets were topped with a gorgeous Vittoria white quartz countertop. The Kitchen was then completed with the stand out Grey Glazed Brick backsplash. Finally, the flooring! The home was also updated with a new 12x48 Aequa Tur wood look tile. We created a custom design with this tile at the entry way and transitioned between rooms with a soldier pattern. Lots of detail went into creating this beautiful space, let us know if you have any questions!
 Craftsman's Choice Inc.
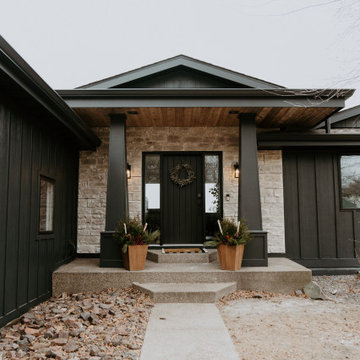
Black siding transformed this home in Maple Grove. This project left a lasting impression, transforming a home with worn and outdated vinyl siding which had been damaged by hail and Minnesota’s harsh climate, in a lakeside retreat. The homeowners sought a fresh look that would elevate both the aesthetic and functionality of their property, making the most of the beautiful lakeside views.
The first major update involved replacing the tired vinyl siding with James Hardie board and batten siding in the striking Shou Sugi Ban color. This deep, rich color brings an elegant, modern look to the home, offering both timeless appeal and exceptional durability. The board and batten style adds texture and sophistication, making the home stand out in the neighborhood.
To complement the dark siding, light-colored cultured stone was added to the front and lakeside, creating a beautiful contrast and enhancing the home’s curb appeal. The cultured stone not only adds a natural, rustic feel but also integrates seamlessly with the overall design, providing a warm, inviting entrance and lakeside view.
Another key element of the remodel was the transformation of the home’s windows. A bank of smaller windows was removed, replaced by a massive Marvin window that now serves as the focal point of the living room, offering unobstructed views of the serene lake. The project also included the removal of several diamond-shaped windows and a six-foot patio door, which were replaced with a sleek 16-foot patio door. This new installation opened up the space, flooding the home with natural light and creating a seamless connection between the interior and the outdoor beauty of the lake.
With these updates, the home in Maple Grove is now a stunning showcase of modern design and functionality, blending sophisticated materials with breathtaking views.
62