
Search results for "Involved removing" in Home Design Ideas


 AJW Designs, Inc.
Chris Little Photography
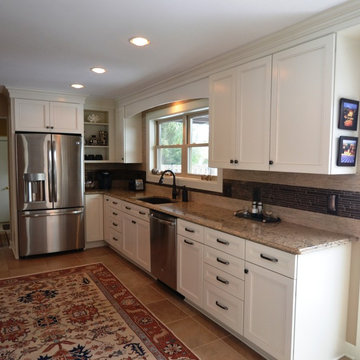
Mid-sized transitional l-shaped light wood floor and beige floor enclosed kitchen photo with shaker cabinets, gray cabinets, granite countertops, white backsplash, porcelain backsplash, stainless steel appliances and an island
Mid-sized transitional l-shaped light wood floor and beige floor enclosed kitchen photo with shaker cabinets, gray cabinets, granite countertops, white backsplash, porcelain backsplash, stainless steel appliances and an island

 J. Francis Company LLC
About this Project:
Kitchen remodeling included complete gut of the existing galley kitchen involving removal of the surrounding walls to create a feeling of openness of space. The thoroughly modern kitchen features impressive charcoal finish cabinetry, stunning granite countertops, and Grohe faucet with Dacor & JennAire stainless steel appliances. The cabinetry extends into the dining room, including glass panel doors & interior cabinet lighting. Recessed lighting design accents the hood vent and Brazilian cherry hardwood flooring.
-------------------------------------------------------------------------
Testmonial:
"Our sincere thanks for doing such an outstanding job on our Gateway Towers Condominium. All of your work was excellent and the entire job was completed on time and within budget. Being away for most of the project could have been a problem, but you kept us informed and up-to-date all the way through completion. We were especially pleased with the fine quality work by everyone connected with the project and your thorough handling of the final job wrap-up."
Find the right local pro for your project
 Tile Doctor Ltd
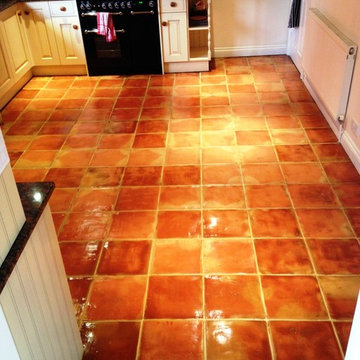
Terracotta may be one of the most aesthetically pleasing types of tiled floor, but as many of our customers will tell you can be particularly difficult to keep clean. This is due to the naturally high porosity of clay, which allows dirt to become very easily trapped. Quite commonly this situation is made worse by a lack of an adequate sealer to block the intrusion of muck. Of course, poor quality cleaning products also make it difficult for property owners to keep their Terracotta tiles clean, and a combination of the two problems can leave these floors looking a lot like this one, located in the kitchen of a house in the beautiful Forest of Dean.
The property owner was keen to have me restore some character to her dull Terracotta tiles. It was proving increasingly difficult for her to keep them clean due to the reasons described before, and the grout had also become very dirty. So, the customer turned to me for some professional assistance.
While these Terracotta tiles had been sealed previously it had, over time, lost its ability to protect the stone against ingrained dirt. To remove the old excess sealer my product of choice was the heavy duty soil remover and stripper, Tile Doctor Remove & Go, which I applied liberally across the surface and scrubbed in to the tile used a rotary machine fitted with a scrubbing pad. This also helped to remove the trapped dirt and left the stone looking fresher.
Once the old sealer was removed – to be replaced with a fresh sealer once cleaning was complete – I was free to focus on the troublesome grout lines with Tile Doctor Pro Clean, an alkaline cleaner that reliably breaks down dirt. When cleaning the grout, I opted to use a handheld grout brush that allowed for more precise, careful application of the product.
As per usual, the floor was given a good rinse and left to dry for 24 hours.
Upon returning to the property I checked the floor was completely dry, ready for sealing. My process for sealing actually involved the application of two different kinds of sealer; initially I applied a single coat of Tile Doctor Colour Grow which has soaks into the pores of the tile and has the added bonus of enhancing its natural colours.
Once this had dried I then applied ix coats of Tile Doctor Seal and Go, a product which forms a durable layer of protection of the surface of the tiles and at the same time provides a lovely sheen finish.
The combination of the two sealers will certainly offer a long-term solution to the ingrained dirt problem, and the appearance-enhancing properties in the products really helped to transform the tiles from dull and dirty to lively and eye-catching. Nonetheless, before departing the property, I also left my very pleased customer with some cleaning advice for the future.
Paul Wales
Monmouthshire Tile Doctor

 Nar Design Group
Creating this open airy master retreat involved removing a space consuming corner W.C. and an awkwardly deep linen closet. Using tall glass panels to separate the shower and toilet gives privacy while maintaining the newly acquired spaciousness. The glass panels transition from frosted around the toilet to clear around the roomy barrier free shower. By reducing the original closet opening, we gained necessary wall space for a modern freestanding tub. Tall cabinets provide plenty of storage space for linens and toiletries. A pair of pull-out cabinets – one on each side of the sink – conceal convenient grooming stations. An extra wide sink can easily accommodate two and still leaves plenty of counterspace on either side. The large mirror is mounted to a shallow framework concealing recessed lighting and softly illuminating the wall behind. The faucets and hand-held shower feature a knurled detail lending a bit of biker industrial to the modern surroundings. Access to the walk-in-closet is through a clean open doorway, while a wide modern style barn door slides open on the master bedroom side.
Photo credit: Fred Donham of Photographerlink

 Sync Design
This stunning transformation involved opening up a wall between the kitchen and sunroom to create a larger sense of space. The original Cherry cabinets with dropped soffit below the ceiling were removed and replaced with 42" High, 14" deep upper cabinets trimmed with a beaded riser and crown to the ceiling and light rail below. Shaker flat panel doorstyle, full overlay with soft close hinges and accented with warm brass cabinet hardware. Cabinet features include roll out shelves, spice and utentsil bin pullouts flanking each side of the range, custom silverware/utensil tray, reinforced 1 1/2" drawer bottoms for pots and pans.
Island top is 2 1/2" "Super White" marble with mitered edges - accommodates seating for 3 with a large surface area for prepping as well as entertaining. Perimeter tops are 3 cm "Super White" with eased edge.
Kitchen features professional grade Sub-Zero/Wolf appliances - 42" french door refrigerator/freezer, 18" wide wine column with dual temp zone, 48" Wolf dual fuel range with grill, Sharp microwave drawer, Bosch dishwasher and Monogram paneled refrigerator drawers in Butler's Pantry
 Billdr Renovation
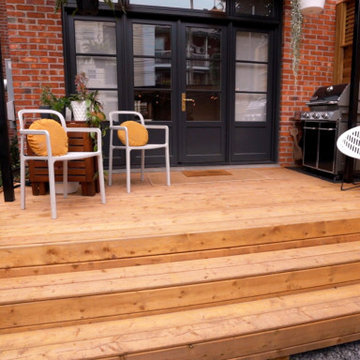
L'objectif de ce projet était d'apporter de l'intimité et de la polyvalence à une cour arrière en duplex avec l'installation d'un nouveau patio, d'un jardin, d'un cabanon et d'une clôture en bois traité.
Le projet comprenait l'enlèvement du sol existant, l'aménagement paysager, l'installation de clôtures, la construction d'un patio et d'un cabanon. Le client en a également profité pour installer une borne de recharge pour son véhicule électrique.
__________
The aim of this project was to bring intimacy and versatility to a duplex backyard with the installation of a new patio, garden, shed, and fencing sourced from treated woods.
The project involved removing the existing soil, landscaping, installing fences, building a patio and a shed. The client also took the opportunity to install a charging station for their electric vehicle.

 Tile Doctor Ltd
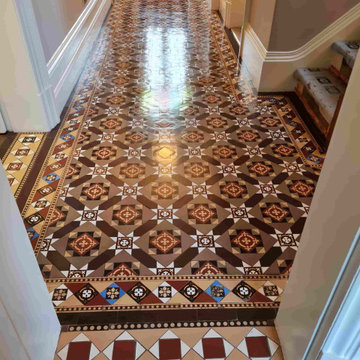
I was recently contacted by a client who had just moved into a large Victorian property in the West Cheshire village of Tarvin about renovating their Victorian tiled hallway. Apparently, the floor was in good condition, and it would just be a case of removing what was left of the old sealer, deep cleaning the tiles and then applying a fresh seal. Unless the floor has been regularly maintained with the same sealer it’s important to remove all traces of old sealers before applying fresh.
Victorian Hallway Before Cleaning Tarvin Cheshire
A lot of the work we do at Tile Doctor can be a lot more involved, often requiring the sourcing of matching replacement tiles and rebuilding large sections of tiled flooring so straight forward clean and seal job is always welcome.
To remove what was left of the sealer and the ingrained dirt from the pores of the Victorian tile I dressed the floor with a strong dilution of Tile Doctor Pro-Clean. On this occasion I used a 1:3 dilution with water and applied it to the floor with a mop. I left it to soak into the tile for fifteen minutes before scrubbing so it could get to work breaking down the old sealer.
During this time, I set up a weighted floor buffer and fitted a black buffing pad, these pads are designed for scrubbing hard floors and lifting out the dirt. I applied a little water as required during this process to ensure the pad was lubricated. Shortly the cleaning solution darkened as the old sealer and dirt was released from the tile.
The soil was rinsed away with water and then removed using a wet vacuum. Once clear the floor was inspected and the process repeated until I was satisfied it was as clean as it could be and free of sealer.
I left the floor to dry off overnight and returned the next day to apply a new sealer. Before doing so however I like to use a damp meter to take moisture readings from the floor. This is needed to ensure it is dry enough to seal which is important as any moisture in the tile can affect the sealer and lead to an inconsistent finish.
To seal I started with the application of a single coat of Tile Doctor Colour Grow which is a colour intensifying breathable impregnator that soaks into the tile improving appearance and adding protection from within. Any excess sealant was removed by wiping the floor with a microfibre cloth and then it was left to dry for an hour.
This was followed with four coats of Tile Doctor Seal and Go Extra which is an acrylic breathable sealer which adds a pleasing subtle shine to the tile. This is an important feature when choosing a sealer for old floors where moisture needs to be allowed to rise through the tile, otherwise it can become trapped under the floor and reach out to the walls causing rising damp.
The customer was very happy with the revamped hallway which made the house a lot brighter and welcoming. Before closing I should mention that for aftercare cleaning I recommend Tile Doctor Neutral cleaner which is designed for the daily cleaning for sealed tiles, this is important as most domestic supermarket cleaners are simply too strong and can prematurely erode the sealer.
Alastair Robb
West Cheshire Tile Doctor
 Renovate Paint and Design
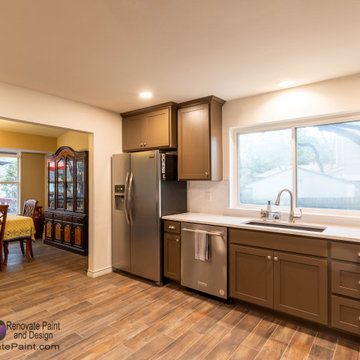
The outdated, 1980's kitchen needed some serious updating. Renovate Paint and Design helped the customer realize the space potential by redesigning it while balancing a contemporary updated look with whites and natural light and medium browns. A larger opening was created along with a large passthrough opening to the living room.
A breakout of all the work involved:
- All popcorn ceiling textured in the kitchen and throughout the house was removed, new texture was applied, and 2 coats of Sherwin Williams flat sheen was applied.
- Demolition of entire kitchen.
- Large opening framed out in Kitchen with LVL beam added for support.
- A kitchen pass-through opening also framed out and completed.
- Old kitchen light box removed, drywall repaired, and 4 6" LED recessed lighting even spaced installed.
- Shaker style cabinets custom made and painted, with soft-close doors-drawers, spice rack pull outs, lazy-susan, and wine-rack built.
- New stainless steel appliances installed: vent hood, microwave, stovetop, ovens, refrigerator, and dishwasher
- Kitchen level-3 Quartz countertops with eased edge profile installed.
- White ceramic backsplash installed
- Luxury vinyl tile installed throughout kitchen area.
- New baseboards installed and caulked.
- Kitchen walls painted with 2-coats of Sherwin Williams Super Paint, and trim painted with Pro Classic Oil.
- More installations: electrical outlets, stainless steel sink basin, faucets, and additional storage cabinets in laundry room.

 Corinthian Fine Homes
These clients requested a first-floor makeover of their home involving an outdated sunroom and a new kitchen, as well as adding a pantry, locker area, and updating their laundry and powder bath. The new sunroom was rebuilt with a contemporary feel that blends perfectly with the home’s architecture. An abundance of natural light floods these spaces through the floor to ceiling windows and oversized skylights. An existing exterior kitchen wall was removed completely to open the space into a new modern kitchen, complete with custom white painted cabinetry with a walnut stained island. Just off the kitchen, a glass-front "lighted dish pantry" was incorporated into a hallway alcove. This space also has a large walk-in pantry that provides a space for the microwave and plenty of compartmentalized built-in storage. The back-hall area features white custom-built lockers for shoes and back packs, with stained a walnut bench. And to round out the renovation, the laundry and powder bath also received complete updates with custom built cabinetry and new countertops. The transformation is a stunning modern first floor renovation that is timeless in style and is a hub for this growing family to enjoy for years to come.
 Tile Doctor Ltd
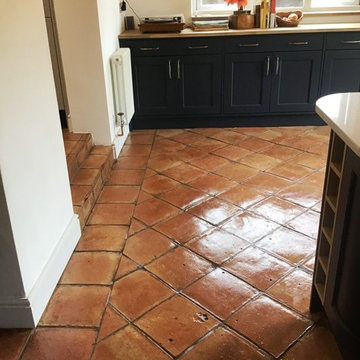
We were contacted by the owner of a property in Moulton with a problematic Terracotta tiled kitchen floor. She was seriously considering ripping up the entire area of tiling and replacing it as she was having a new kitchen installed. Both her and her husband were concerned that unless I could restore this floor to somewhere near to its original condition, they would need to replace it.
I went over to inspect the Terracotta tiles and could see the entire surface was deeply ingrained with soiling and the grout lines were filthy. After carrying out a test it became obvious that the previous sealer had been applied very sparingly and had mostly worn away, leaving the stone prone to staining. Terracotta is a very porous tile and dirt had become ingrained in the pores leaving it looking very dull and difficult to clean.
I completed the test on a small part of the floor and the customer could see the results which could be achieved. Happy with the result they agreed my quote and we set a date for my return to complete the floor.
The tiles turned out to be made of a fairly soft Terracotta which meant that we were able to deep clean them extremely effectively using a strong dilution of Tile Doctor Pro-Clean. We used Tile Doctor Remove and Go in particularly stubborn areas.
The process I use is to spray the Pro-Clean onto the floor and leave it to soak in for about ten minutes before being worked in using a heavy rotary machine fitted with a black scrubbing pad. The resulting slurry is removed using a wet pick up vacuum. All the dirt and virtually all of the old sealer was removed at this stage; the remaining patches around the edges of the area being finished by hand with a 200-grit burnishing block. The grout lines were then cleaned by hand with an angled grout brush.
Finally, the deep-seated oil stains in front of the cooker were brought out using Tile Doctor Oxy-Gel which was left to dwell on the marks for an hour before being agitated with a diamond burnishing pad and rinsed away with a wet pick up machine. The floor was rinsed with water and allowed to dry off overnight.
The following day I inspected the floor and checked it was ready to be sealed. All was well so I applied an initial coat of Tile Doctor Colour Grow which is an impregnating sealer that occupies the pores in the tile enhancing the natural colours of the Terracotta and provide a base layer of protection from staining.
I returned at a convenient time once the kitchen was completely installed to finish the job. This involves carrying out a light maintenance clean with Tile Doctor Neutral Cleaner and once the floor was dry, I applied 5 further coats of Tile Doctor Seal and Go which provides a pleasing satin finish which is really suited to this type of floor.
The customer was very happy with the results and has left the following feedback.
“We were really pleased with the results, thank you!”
Phil Vissian
Northamptonshire Tile Doctor
 Nar Design Group
Creating this open airy master retreat involved removing a space consuming corner W.C. and an awkwardly deep linen closet. Using tall glass panels to separate the shower and toilet gives privacy while maintaining the newly acquired spaciousness. The glass panels transition from frosted around the toilet to clear around the roomy barrier free shower. By reducing the original closet opening, we gained necessary wall space for a modern freestanding tub. Tall cabinets provide plenty of storage space for linens and toiletries. A pair of pull-out cabinets – one on each side of the sink – conceal convenient grooming stations. An extra wide sink can easily accommodate two and still leaves plenty of counterspace on either side. The large mirror is mounted to a shallow framework concealing recessed lighting and softly illuminating the wall behind. The faucets and hand-held shower feature a knurled detail lending a bit of biker industrial to the modern surroundings. Access to the walk-in-closet is through a clean open doorway, while a wide modern style barn door slides open on the master bedroom side.
Photo credit: Fred Donham of Photographerlink
 Renovate Paint and Design
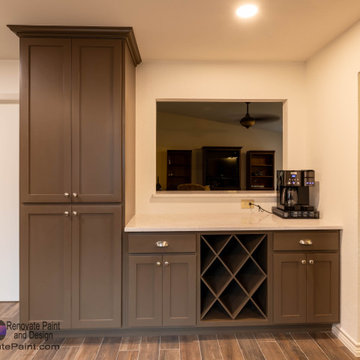
The outdated, 1980's kitchen needed some serious updating. Renovate Paint and Design helped the customer realize the space potential by redesigning it while balancing a contemporary updated look with whites and natural light and medium browns. A larger opening was created along with a large passthrough opening to the living room.
A breakout of all the work involved:
- All popcorn ceiling textured in the kitchen and throughout the house was removed, new texture was applied, and 2 coats of Sherwin Williams flat sheen was applied.
- Demolition of entire kitchen.
- Large opening framed out in Kitchen with LVL beam added for support.
- A kitchen pass-through opening also framed out and completed.
- Old kitchen light box removed, drywall repaired, and 4 6" LED recessed lighting even spaced installed.
- Shaker style cabinets custom made and painted, with soft-close doors-drawers, spice rack pull outs, lazy-susan, and wine-rack built.
- New stainless steel appliances installed: vent hood, microwave, stovetop, ovens, refrigerator, and dishwasher
- Kitchen level-3 Quartz countertops with eased edge profile installed.
- White ceramic backsplash installed
- Luxury vinyl tile installed throughout kitchen area.
- New baseboards installed and caulked.
- Kitchen walls painted with 2-coats of Sherwin Williams Super Paint, and trim painted with Pro Classic Oil.
- More installations: electrical outlets, stainless steel sink basin, faucets, and additional storage cabinets in laundry room.

 Charlie Allen Renovations, Inc.
Several years go, the owners of a recently built contemporary home in Brookline asked us to introduce the traditional, period design aesthetic that they prefer. This year, our work involved rebuilding a staircase and remodeling the family room and the living room.
In the living room, we focused on the fireplace, which had been very modern in design. We installed a more traditional stove and added a refinished 100+ year-old mantel, found at Restoration Resources. We also built custom-fabricated shelving and added a new stone tile surround.
The fireplace was also the focus of our work in the family room, where we added new doors to the firebox and introduced a new stone hearth. We also introduced a one-of-a-kind mantel made from a piece of old growth oak, formerly part of a ladder at Boston Harbor that we discovered at Long Leaf Lumber in Cambridge. After cutting the mantel, we used the remainder of the wood to create a coffee table.
Finally, the original modern wrought-iron staircase was removed. In its place, we built a more traditional grand staircase with stained red oak wood and anchored it with a refinished antique newel post found at a salvage yard in New Hampshire. Smaller posts for the stair landing and at the top of the staircase were built and stained to match.
Photo by Shelly Harrison
 Corinthian Fine Homes
These clients requested a first-floor makeover of their home involving an outdated sunroom and a new kitchen, as well as adding a pantry, locker area, and updating their laundry and powder bath. The new sunroom was rebuilt with a contemporary feel that blends perfectly with the home’s architecture. An abundance of natural light floods these spaces through the floor to ceiling windows and oversized skylights. An existing exterior kitchen wall was removed completely to open the space into a new modern kitchen, complete with custom white painted cabinetry with a walnut stained island. Just off the kitchen, a glass-front "lighted dish pantry" was incorporated into a hallway alcove. This space also has a large walk-in pantry that provides a space for the microwave and plenty of compartmentalized built-in storage. The back-hall area features white custom-built lockers for shoes and back packs, with stained a walnut bench. And to round out the renovation, the laundry and powder bath also received complete updates with custom built cabinetry and new countertops. The transformation is a stunning modern first floor renovation that is timeless in style and is a hub for this growing family to enjoy for years to come.
 Renovate Paint and Design
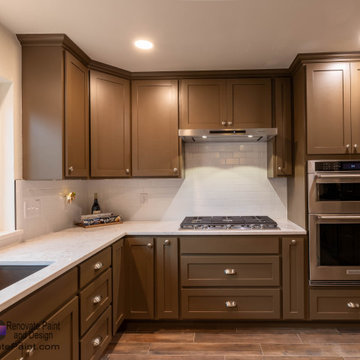
The outdated, 1980's kitchen needed some serious updating. Renovate Paint and Design helped the customer realize the space potential by redesigning it while balancing a contemporary updated look with whites and natural light and medium browns. A larger opening was created along with a large passthrough opening to the living room.
A breakout of all the work involved:
- All popcorn ceiling textured in the kitchen and throughout the house was removed, new texture was applied, and 2 coats of Sherwin Williams flat sheen was applied.
- Demolition of entire kitchen.
- Large opening framed out in Kitchen with LVL beam added for support.
- A kitchen pass-through opening also framed out and completed.
- Old kitchen light box removed, drywall repaired, and 4 6" LED recessed lighting even spaced installed.
- Shaker style cabinets custom made and painted, with soft-close doors-drawers, spice rack pull outs, lazy-susan, and wine-rack built.
- New stainless steel appliances installed: vent hood, microwave, stovetop, ovens, refrigerator, and dishwasher
- Kitchen level-3 Quartz countertops with eased edge profile installed.
- White ceramic backsplash installed
- Luxury vinyl tile installed throughout kitchen area.
- New baseboards installed and caulked.
- Kitchen walls painted with 2-coats of Sherwin Williams Super Paint, and trim painted with Pro Classic Oil.
- More installations: electrical outlets, stainless steel sink basin, faucets, and additional storage cabinets in laundry room.
 Renovate Paint and Design
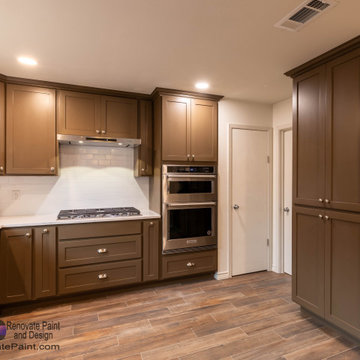
The outdated, 1980's kitchen needed some serious updating. Renovate Paint and Design helped the customer realize the space potential by redesigning it while balancing a contemporary updated look with whites and natural light and medium browns. A larger opening was created along with a large passthrough opening to the living room.
A breakout of all the work involved:
- All popcorn ceiling textured in the kitchen and throughout the house was removed, new texture was applied, and 2 coats of Sherwin Williams flat sheen was applied.
- Demolition of entire kitchen.
- Large opening framed out in Kitchen with LVL beam added for support.
- A kitchen pass-through opening also framed out and completed.
- Old kitchen light box removed, drywall repaired, and 4 6" LED recessed lighting even spaced installed.
- Shaker style cabinets custom made and painted, with soft-close doors-drawers, spice rack pull outs, lazy-susan, and wine-rack built.
- New stainless steel appliances installed: vent hood, microwave, stovetop, ovens, refrigerator, and dishwasher
- Kitchen level-3 Quartz countertops with eased edge profile installed.
- White ceramic backsplash installed
- Luxury vinyl tile installed throughout kitchen area.
- New baseboards installed and caulked.
- Kitchen walls painted with 2-coats of Sherwin Williams Super Paint, and trim painted with Pro Classic Oil.
- More installations: electrical outlets, stainless steel sink basin, faucets, and additional storage cabinets in laundry room.
 Renovate Paint and Design
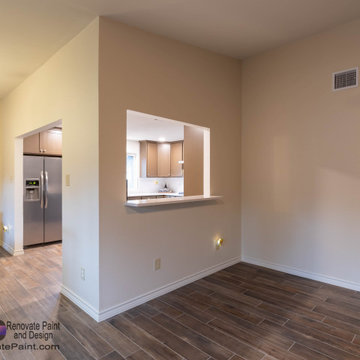
The outdated, 1980's kitchen needed some serious updating. Renovate Paint and Design helped the customer realize the space potential by redesigning it while balancing a contemporary updated look with whites and natural light and medium browns. A larger opening was created along with a large passthrough opening to the living room.
A breakout of all the work involved:
- All popcorn ceiling textured in the kitchen and throughout the house was removed, new texture was applied, and 2 coats of Sherwin Williams flat sheen was applied.
- Demolition of entire kitchen.
- Large opening framed out in Kitchen with LVL beam added for support.
- A kitchen pass-through opening also framed out and completed.
- Old kitchen light box removed, drywall repaired, and 4 6" LED recessed lighting even spaced installed.
- Shaker style cabinets custom made and painted, with soft-close doors-drawers, spice rack pull outs, lazy-susan, and wine-rack built.
- New stainless steel appliances installed: vent hood, microwave, stovetop, ovens, refrigerator, and dishwasher
- Kitchen level-3 Quartz countertops with eased edge profile installed.
- White ceramic backsplash installed
- Luxury vinyl tile installed throughout kitchen area.
- New baseboards installed and caulked.
- Kitchen walls painted with 2-coats of Sherwin Williams Super Paint, and trim painted with Pro Classic Oil.
- More installations: electrical outlets, stainless steel sink basin, faucets, and additional storage cabinets in laundry room.
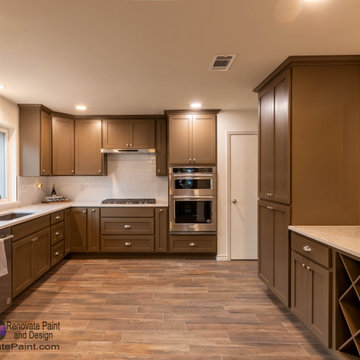 Renovate Paint and Design
The outdated, 1980's kitchen needed some serious updating. Renovate Paint and Design helped the customer realize the space potential by redesigning it while balancing a contemporary updated look with whites and natural light and medium browns. A larger opening was created along with a large passthrough opening to the living room.
A breakout of all the work involved:
- All popcorn ceiling textured in the kitchen and throughout the house was removed, new texture was applied, and 2 coats of Sherwin Williams flat sheen was applied.
- Demolition of entire kitchen.
- Large opening framed out in Kitchen with LVL beam added for support.
- A kitchen pass-through opening also framed out and completed.
- Old kitchen light box removed, drywall repaired, and 4 6" LED recessed lighting even spaced installed.
- Shaker style cabinets custom made and painted, with soft-close doors-drawers, spice rack pull outs, lazy-susan, and wine-rack built.
- New stainless steel appliances installed: vent hood, microwave, stovetop, ovens, refrigerator, and dishwasher
- Kitchen level-3 Quartz countertops with eased edge profile installed.
- White ceramic backsplash installed
- Luxury vinyl tile installed throughout kitchen area.
- New baseboards installed and caulked.
- Kitchen walls painted with 2-coats of Sherwin Williams Super Paint, and trim painted with Pro Classic Oil.
- More installations: electrical outlets, stainless steel sink basin, faucets, and additional storage cabinets in laundry room.
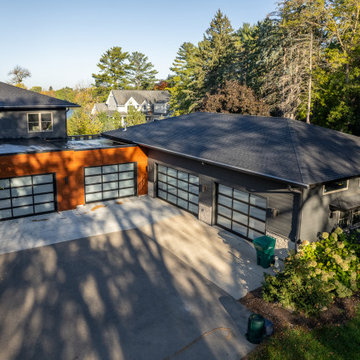
 Xpand Inc. | Homes of Xcellence
At the outset, this project began with the transformation of a 2-car attached garage. The goal was to create a mudroom, an exercise room, and a breezeway to seamlessly connect the spacious detached garage with the main part of the house. Additionally, the project involved partial roof removal and the addition of a new front entry.
But then came an unexpected twist – scope creep.
We found ourselves veering away from the initial client-supplied architectural plans. After numerous consultations with the clients and several iterations of the design, we arrived at a significantly improved plan for the remodel and addition.
Our journey commenced with the demolition of almost the entire former 2-car garage, making space for a new, oversized 3-car garage measuring 40′ x 28′. This garage was strategically placed between the existing house and the large detached garage. We introduced a custom low-sloped flat roof, designed to address historical drainage issues.
To mitigate water pooling, we created a custom concrete step at the back corner of the garage, equipped with a sturdy metal grate that sits flush with the step. We also installed a PVC drainage system, commencing at the step and running beneath a newly designed patio, ultimately draining into the yard. These measures have significantly reduced water accumulation around the house.
The new garage boasts several features, including Longboard aluminum siding, custom full glass garage doors, interior drywall finished to a level 4, an abundance of can lights, an epoxy floor coating, vinyl base trim, a new forced air garage heater, and more.
The clients also requested a designated space for their three kids and their friends to enjoy, thus giving birth to the “Kid Zone.” We partitioned a section of the existing oversized garage, resulting in a space measuring approximately 22′ x 32′, brimming with entertainment possibilities. To enhance control over the temperature in the Kid Zone, we collaborated with our licensed HVAC partner to install a cold weather mini-split system.
One of the most significant challenges was the modernization and consolidation of the home’s main electrical systems. We reconfigured and combined 6-7 different electrical panels into just two. One panel serves the main house, while the second is dedicated to backup power from a generator. These panels, along with the boiler for the in-floor heating system, are housed in a newly constructed mechanical room within the Kid Zone.
Inside the main house, we completed various tasks, such as removing the ceiling in the hallway from the new garage to address prior water damage, improve insulation, and rework electrical and HVAC systems. We also replaced the ceiling from the front door to the base of the stairs, adding new can lighting and enhancing insulation. Skilled drywall specialists then installed and finished new drywall to a level 5 standard.
The exterior of the house underwent a complete overhaul. Before installing new roofing on the entire house and garage, we modified an existing flat roof by adding custom lumber and plywood to enhance the pitch, preventing future ice dams. A new rubber roof was expertly installed on the oversized 3-car garage, and the flat roof section we re-framed.
Our meticulous exterior team removed old white aluminum soffit, fascia, and gutters, replacing them with new framing to accommodate Longboard soffit material. This task was particularly challenging due to the age of the house and the non-standard wall and roof framing. Our skilled exterior subcontractors ensured a perfect fit.
Near the pool area, we discovered severe rot and decay from years of water intrusion. After informing the homeowners, we ordered and installed five new commercial-style block framed windows and a custom 8′ high Anderson patio door. This involved careful removal and replacement of window headers from the outside to avoid disturbing the finished part of the house. We reframed the large openings to fit the new windows, and our skilled trim carpenters installed new walnut casing, base, and window sills.
In total, we replaced around 900 lineal feet of soffit and installed approximately 32 squares of aluminum siding. The entire house was meticulously prepped, repaired, and painted according to the client’s chosen color.
Throughout the project, we incorporated numerous custom touches and unique design elements, some of which you can see in the pictures. Our team also addressed various unforeseen challenges, from soil issues to rot and decay repair, roof leaks, drainage problems, electrical and HVAC complexities, and much more.
At Xpand Inc., we take pride in making it all happen, turning your remodeling and renovation dreams into reality.
69