
Search results for "L'impact" in Home Design Ideas
 Drury Design
THE SETUP
Multiple ovens, multiple workspaces, multiple sinks – when you think about it, non-jewish kitchens have been adapting the criteria of kosher kitchens for years.
Gladys’ clients in West Rogers Park are Orthodox Jewish. The house they bought already had a kosher kitchen – it just wasn’t done that well. It needed some more things to be duplicated for the dairy side and the meat side. Plus, it was dark and the configuration wasn’t very conducive for a family of eight.
It was time for a remodel.
Design Objectives
Improve kosher kitchen
Add more storage in the island
Better lighting
More open, lighter feel
Change the wood floor in the kitchen to tile
THE REMODEL
Design Challenges
- We had originally planned on removing a wing wall by the breakfast area. During demolition, we learned it contained a support beam.
- The kitchen is a substantial size, but having two sinks, dishwashers, and ovens presented a challenge – how do we fit it all in and make it flow with the storage still accessible near the work areas?
Where do you stop the materials for the new space? - -- The right tile, paint, lighting, etc. would be needed to make the remodeled area cohesive with the rest of the main floor.
- An existing column limited cabinet options and thus, storage capacity. Could we conceal it without disrupting the cabinetry flow?
Design Solutions
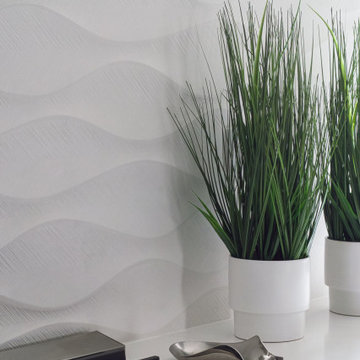
- We had to keep the wing wall, but decided to continue the tile on the sides of the cabinets and maintain the height of the tile to line up with the rest of the backsplash. This actually presented a very nice and cohesive look, especially since the opposite side has a wing wall to the left of the refrigerator.
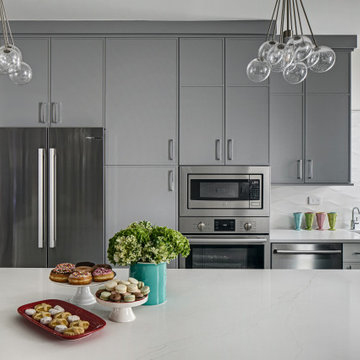
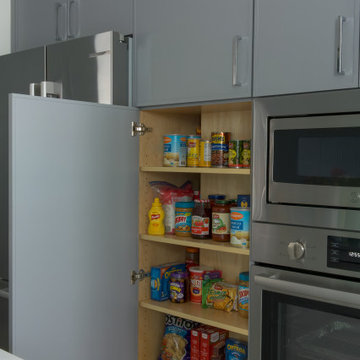
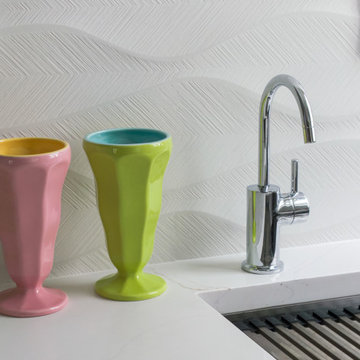
- We used “L-shaped” corner sinks instead of the rectangular ones set on an angle. This gave us more of the legs of the triangles versus the hypotenuse, which allowed for the two dishwashers, and the pullout utensil canisters and spice pullouts while still keeping the 3-drawer cabinets on either side of the range (by the sinks). The old island had the recess for stools which the family never used. By extending the width of the island 6” and utilizing this leg space, we were able to fit 18”-deep cabinets on this side – adding lots of accessible storage. The family can now work simultaneously on the dairy side (the side with the fridge) and the meat side (opposite) without getting in each other’s way. We separated the cooking by using the range oven for the meat and a built-in microwave in the base cabinet. The wall oven with built-in microwave on top is for dairy.
- Corner sinks opened up the middle area for a wider range – we went from a 30” to a 36”. Removing all the wall cabinets (on the range wall) made a big difference. That opened up the entire space while adding some visual impact. (Not pictured: We also made the cabinets directly opposite the range wall tall and removed the countertop, resulting in more room for rollouts and even more storage!) The kitchen now has more storage than it did before.
- We ended up painting the ceiling of the kitchen into the hallway that leads to the foyer. The living and dining rooms were separated by a soffit, so that became a natural boundary. We kept the tile in the kitchen by stopping it short of the hallway and lining it up with the pantry wall. This creates a border between the breakfast area and family room. The rest of the existing wood floors were refinished to refresh and make the hue darker. We also painted a dark accent wall and carried it into the breakfast area to make the rooms look deeper.
- The in-the-way column housed plumbing and couldn’t be moved. We still built cabinets in that spot – we just had to build a chase inside it to conceal the pipes. There was still plenty of room for new storage. We also took the cabinets all the way to the ceiling. The continuous tall cabinets added a functional elegance to the space.
THE RENEWED SPACE
The client’s long-awaited dream of a better kosher kitchen has finally been achieved, beautifully combining enhanced storage solutions with adherence to the family’s orthodox dietary laws. The kitchen’s standout feature, an expanded island, now offers a spacious and efficient workspace. This allows several family members to cook together comfortably, without the inconvenience of bumping into each other, ensuring a harmonious and productive cooking environment.
 Drury Design
THE SETUP
Multiple ovens, multiple workspaces, multiple sinks – when you think about it, non-jewish kitchens have been adapting the criteria of kosher kitchens for years.
Gladys’ clients in West Rogers Park are Orthodox Jewish. The house they bought already had a kosher kitchen – it just wasn’t done that well. It needed some more things to be duplicated for the dairy side and the meat side. Plus, it was dark and the configuration wasn’t very conducive for a family of eight.
It was time for a remodel.
Design Objectives
Improve kosher kitchen
Add more storage in the island
Better lighting
More open, lighter feel
Change the wood floor in the kitchen to tile
THE REMODEL
Design Challenges
- We had originally planned on removing a wing wall by the breakfast area. During demolition, we learned it contained a support beam.
- The kitchen is a substantial size, but having two sinks, dishwashers, and ovens presented a challenge – how do we fit it all in and make it flow with the storage still accessible near the work areas?
Where do you stop the materials for the new space? - -- The right tile, paint, lighting, etc. would be needed to make the remodeled area cohesive with the rest of the main floor.
- An existing column limited cabinet options and thus, storage capacity. Could we conceal it without disrupting the cabinetry flow?
Design Solutions
- We had to keep the wing wall, but decided to continue the tile on the sides of the cabinets and maintain the height of the tile to line up with the rest of the backsplash. This actually presented a very nice and cohesive look, especially since the opposite side has a wing wall to the left of the refrigerator.
- We used “L-shaped” corner sinks instead of the rectangular ones set on an angle. This gave us more of the legs of the triangles versus the hypotenuse, which allowed for the two dishwashers, and the pullout utensil canisters and spice pullouts while still keeping the 3-drawer cabinets on either side of the range (by the sinks). The old island had the recess for stools which the family never used. By extending the width of the island 6” and utilizing this leg space, we were able to fit 18”-deep cabinets on this side – adding lots of accessible storage. The family can now work simultaneously on the dairy side (the side with the fridge) and the meat side (opposite) without getting in each other’s way. We separated the cooking by using the range oven for the meat and a built-in microwave in the base cabinet. The wall oven with built-in microwave on top is for dairy.
- Corner sinks opened up the middle area for a wider range – we went from a 30” to a 36”. Removing all the wall cabinets (on the range wall) made a big difference. That opened up the entire space while adding some visual impact. (Not pictured: We also made the cabinets directly opposite the range wall tall and removed the countertop, resulting in more room for rollouts and even more storage!) The kitchen now has more storage than it did before.
- We ended up painting the ceiling of the kitchen into the hallway that leads to the foyer. The living and dining rooms were separated by a soffit, so that became a natural boundary. We kept the tile in the kitchen by stopping it short of the hallway and lining it up with the pantry wall. This creates a border between the breakfast area and family room. The rest of the existing wood floors were refinished to refresh and make the hue darker. We also painted a dark accent wall and carried it into the breakfast area to make the rooms look deeper.
- The in-the-way column housed plumbing and couldn’t be moved. We still built cabinets in that spot – we just had to build a chase inside it to conceal the pipes. There was still plenty of room for new storage. We also took the cabinets all the way to the ceiling. The continuous tall cabinets added a functional elegance to the space.
THE RENEWED SPACE
The client’s long-awaited dream of a better kosher kitchen has finally been achieved, beautifully combining enhanced storage solutions with adherence to the family’s orthodox dietary laws. The kitchen’s standout feature, an expanded island, now offers a spacious and efficient workspace. This allows several family members to cook together comfortably, without the inconvenience of bumping into each other, ensuring a harmonious and productive cooking environment.
 Drury Design
THE SETUP
Multiple ovens, multiple workspaces, multiple sinks – when you think about it, non-jewish kitchens have been adapting the criteria of kosher kitchens for years.
Gladys’ clients in West Rogers Park are Orthodox Jewish. The house they bought already had a kosher kitchen – it just wasn’t done that well. It needed some more things to be duplicated for the dairy side and the meat side. Plus, it was dark and the configuration wasn’t very conducive for a family of eight.
It was time for a remodel.
Design Objectives
Improve kosher kitchen
Add more storage in the island
Better lighting
More open, lighter feel
Change the wood floor in the kitchen to tile
THE REMODEL
Design Challenges
- We had originally planned on removing a wing wall by the breakfast area. During demolition, we learned it contained a support beam.
- The kitchen is a substantial size, but having two sinks, dishwashers, and ovens presented a challenge – how do we fit it all in and make it flow with the storage still accessible near the work areas?
Where do you stop the materials for the new space? - -- The right tile, paint, lighting, etc. would be needed to make the remodeled area cohesive with the rest of the main floor.
- An existing column limited cabinet options and thus, storage capacity. Could we conceal it without disrupting the cabinetry flow?
Design Solutions
- We had to keep the wing wall, but decided to continue the tile on the sides of the cabinets and maintain the height of the tile to line up with the rest of the backsplash. This actually presented a very nice and cohesive look, especially since the opposite side has a wing wall to the left of the refrigerator.
- We used “L-shaped” corner sinks instead of the rectangular ones set on an angle. This gave us more of the legs of the triangles versus the hypotenuse, which allowed for the two dishwashers, and the pullout utensil canisters and spice pullouts while still keeping the 3-drawer cabinets on either side of the range (by the sinks). The old island had the recess for stools which the family never used. By extending the width of the island 6” and utilizing this leg space, we were able to fit 18”-deep cabinets on this side – adding lots of accessible storage. The family can now work simultaneously on the dairy side (the side with the fridge) and the meat side (opposite) without getting in each other’s way. We separated the cooking by using the range oven for the meat and a built-in microwave in the base cabinet. The wall oven with built-in microwave on top is for dairy.
- Corner sinks opened up the middle area for a wider range – we went from a 30” to a 36”. Removing all the wall cabinets (on the range wall) made a big difference. That opened up the entire space while adding some visual impact. (Not pictured: We also made the cabinets directly opposite the range wall tall and removed the countertop, resulting in more room for rollouts and even more storage!) The kitchen now has more storage than it did before.
- We ended up painting the ceiling of the kitchen into the hallway that leads to the foyer. The living and dining rooms were separated by a soffit, so that became a natural boundary. We kept the tile in the kitchen by stopping it short of the hallway and lining it up with the pantry wall. This creates a border between the breakfast area and family room. The rest of the existing wood floors were refinished to refresh and make the hue darker. We also painted a dark accent wall and carried it into the breakfast area to make the rooms look deeper.
- The in-the-way column housed plumbing and couldn’t be moved. We still built cabinets in that spot – we just had to build a chase inside it to conceal the pipes. There was still plenty of room for new storage. We also took the cabinets all the way to the ceiling. The continuous tall cabinets added a functional elegance to the space.
THE RENEWED SPACE
The client’s long-awaited dream of a better kosher kitchen has finally been achieved, beautifully combining enhanced storage solutions with adherence to the family’s orthodox dietary laws. The kitchen’s standout feature, an expanded island, now offers a spacious and efficient workspace. This allows several family members to cook together comfortably, without the inconvenience of bumping into each other, ensuring a harmonious and productive cooking environment.
Find the right local pro for your project
 Drury Design
THE SETUP
Multiple ovens, multiple workspaces, multiple sinks – when you think about it, non-jewish kitchens have been adapting the criteria of kosher kitchens for years.
Gladys’ clients in West Rogers Park are Orthodox Jewish. The house they bought already had a kosher kitchen – it just wasn’t done that well. It needed some more things to be duplicated for the dairy side and the meat side. Plus, it was dark and the configuration wasn’t very conducive for a family of eight.
It was time for a remodel.
Design Objectives
Improve kosher kitchen
Add more storage in the island
Better lighting
More open, lighter feel
Change the wood floor in the kitchen to tile
THE REMODEL
Design Challenges
- We had originally planned on removing a wing wall by the breakfast area. During demolition, we learned it contained a support beam.
- The kitchen is a substantial size, but having two sinks, dishwashers, and ovens presented a challenge – how do we fit it all in and make it flow with the storage still accessible near the work areas?
Where do you stop the materials for the new space? - -- The right tile, paint, lighting, etc. would be needed to make the remodeled area cohesive with the rest of the main floor.
- An existing column limited cabinet options and thus, storage capacity. Could we conceal it without disrupting the cabinetry flow?
Design Solutions
- We had to keep the wing wall, but decided to continue the tile on the sides of the cabinets and maintain the height of the tile to line up with the rest of the backsplash. This actually presented a very nice and cohesive look, especially since the opposite side has a wing wall to the left of the refrigerator.
- We used “L-shaped” corner sinks instead of the rectangular ones set on an angle. This gave us more of the legs of the triangles versus the hypotenuse, which allowed for the two dishwashers, and the pullout utensil canisters and spice pullouts while still keeping the 3-drawer cabinets on either side of the range (by the sinks). The old island had the recess for stools which the family never used. By extending the width of the island 6” and utilizing this leg space, we were able to fit 18”-deep cabinets on this side – adding lots of accessible storage. The family can now work simultaneously on the dairy side (the side with the fridge) and the meat side (opposite) without getting in each other’s way. We separated the cooking by using the range oven for the meat and a built-in microwave in the base cabinet. The wall oven with built-in microwave on top is for dairy.
- Corner sinks opened up the middle area for a wider range – we went from a 30” to a 36”. Removing all the wall cabinets (on the range wall) made a big difference. That opened up the entire space while adding some visual impact. (Not pictured: We also made the cabinets directly opposite the range wall tall and removed the countertop, resulting in more room for rollouts and even more storage!) The kitchen now has more storage than it did before.
- We ended up painting the ceiling of the kitchen into the hallway that leads to the foyer. The living and dining rooms were separated by a soffit, so that became a natural boundary. We kept the tile in the kitchen by stopping it short of the hallway and lining it up with the pantry wall. This creates a border between the breakfast area and family room. The rest of the existing wood floors were refinished to refresh and make the hue darker. We also painted a dark accent wall and carried it into the breakfast area to make the rooms look deeper.
- The in-the-way column housed plumbing and couldn’t be moved. We still built cabinets in that spot – we just had to build a chase inside it to conceal the pipes. There was still plenty of room for new storage. We also took the cabinets all the way to the ceiling. The continuous tall cabinets added a functional elegance to the space.
THE RENEWED SPACE
The client’s long-awaited dream of a better kosher kitchen has finally been achieved, beautifully combining enhanced storage solutions with adherence to the family’s orthodox dietary laws. The kitchen’s standout feature, an expanded island, now offers a spacious and efficient workspace. This allows several family members to cook together comfortably, without the inconvenience of bumping into each other, ensuring a harmonious and productive cooking environment.
 Drury Design
THE SETUP
Multiple ovens, multiple workspaces, multiple sinks – when you think about it, non-jewish kitchens have been adapting the criteria of kosher kitchens for years.
Gladys’ clients in West Rogers Park are Orthodox Jewish. The house they bought already had a kosher kitchen – it just wasn’t done that well. It needed some more things to be duplicated for the dairy side and the meat side. Plus, it was dark and the configuration wasn’t very conducive for a family of eight.
It was time for a remodel.
Design Objectives
Improve kosher kitchen
Add more storage in the island
Better lighting
More open, lighter feel
Change the wood floor in the kitchen to tile
THE REMODEL
Design Challenges
- We had originally planned on removing a wing wall by the breakfast area. During demolition, we learned it contained a support beam.
- The kitchen is a substantial size, but having two sinks, dishwashers, and ovens presented a challenge – how do we fit it all in and make it flow with the storage still accessible near the work areas?
Where do you stop the materials for the new space? - -- The right tile, paint, lighting, etc. would be needed to make the remodeled area cohesive with the rest of the main floor.
- An existing column limited cabinet options and thus, storage capacity. Could we conceal it without disrupting the cabinetry flow?
Design Solutions
- We had to keep the wing wall, but decided to continue the tile on the sides of the cabinets and maintain the height of the tile to line up with the rest of the backsplash. This actually presented a very nice and cohesive look, especially since the opposite side has a wing wall to the left of the refrigerator.
- We used “L-shaped” corner sinks instead of the rectangular ones set on an angle. This gave us more of the legs of the triangles versus the hypotenuse, which allowed for the two dishwashers, and the pullout utensil canisters and spice pullouts while still keeping the 3-drawer cabinets on either side of the range (by the sinks). The old island had the recess for stools which the family never used. By extending the width of the island 6” and utilizing this leg space, we were able to fit 18”-deep cabinets on this side – adding lots of accessible storage. The family can now work simultaneously on the dairy side (the side with the fridge) and the meat side (opposite) without getting in each other’s way. We separated the cooking by using the range oven for the meat and a built-in microwave in the base cabinet. The wall oven with built-in microwave on top is for dairy.
- Corner sinks opened up the middle area for a wider range – we went from a 30” to a 36”. Removing all the wall cabinets (on the range wall) made a big difference. That opened up the entire space while adding some visual impact. (Not pictured: We also made the cabinets directly opposite the range wall tall and removed the countertop, resulting in more room for rollouts and even more storage!) The kitchen now has more storage than it did before.
- We ended up painting the ceiling of the kitchen into the hallway that leads to the foyer. The living and dining rooms were separated by a soffit, so that became a natural boundary. We kept the tile in the kitchen by stopping it short of the hallway and lining it up with the pantry wall. This creates a border between the breakfast area and family room. The rest of the existing wood floors were refinished to refresh and make the hue darker. We also painted a dark accent wall and carried it into the breakfast area to make the rooms look deeper.
- The in-the-way column housed plumbing and couldn’t be moved. We still built cabinets in that spot – we just had to build a chase inside it to conceal the pipes. There was still plenty of room for new storage. We also took the cabinets all the way to the ceiling. The continuous tall cabinets added a functional elegance to the space.
THE RENEWED SPACE
The client’s long-awaited dream of a better kosher kitchen has finally been achieved, beautifully combining enhanced storage solutions with adherence to the family’s orthodox dietary laws. The kitchen’s standout feature, an expanded island, now offers a spacious and efficient workspace. This allows several family members to cook together comfortably, without the inconvenience of bumping into each other, ensuring a harmonious and productive cooking environment.
 Drury Design
THE SETUP
Multiple ovens, multiple workspaces, multiple sinks – when you think about it, non-jewish kitchens have been adapting the criteria of kosher kitchens for years.
Gladys’ clients in West Rogers Park are Orthodox Jewish. The house they bought already had a kosher kitchen – it just wasn’t done that well. It needed some more things to be duplicated for the dairy side and the meat side. Plus, it was dark and the configuration wasn’t very conducive for a family of eight.
It was time for a remodel.
Design Objectives
Improve kosher kitchen
Add more storage in the island
Better lighting
More open, lighter feel
Change the wood floor in the kitchen to tile
THE REMODEL
Design Challenges
- We had originally planned on removing a wing wall by the breakfast area. During demolition, we learned it contained a support beam.
- The kitchen is a substantial size, but having two sinks, dishwashers, and ovens presented a challenge – how do we fit it all in and make it flow with the storage still accessible near the work areas?
Where do you stop the materials for the new space? - -- The right tile, paint, lighting, etc. would be needed to make the remodeled area cohesive with the rest of the main floor.
- An existing column limited cabinet options and thus, storage capacity. Could we conceal it without disrupting the cabinetry flow?
Design Solutions
- We had to keep the wing wall, but decided to continue the tile on the sides of the cabinets and maintain the height of the tile to line up with the rest of the backsplash. This actually presented a very nice and cohesive look, especially since the opposite side has a wing wall to the left of the refrigerator.
- We used “L-shaped” corner sinks instead of the rectangular ones set on an angle. This gave us more of the legs of the triangles versus the hypotenuse, which allowed for the two dishwashers, and the pullout utensil canisters and spice pullouts while still keeping the 3-drawer cabinets on either side of the range (by the sinks). The old island had the recess for stools which the family never used. By extending the width of the island 6” and utilizing this leg space, we were able to fit 18”-deep cabinets on this side – adding lots of accessible storage. The family can now work simultaneously on the dairy side (the side with the fridge) and the meat side (opposite) without getting in each other’s way. We separated the cooking by using the range oven for the meat and a built-in microwave in the base cabinet. The wall oven with built-in microwave on top is for dairy.
- Corner sinks opened up the middle area for a wider range – we went from a 30” to a 36”. Removing all the wall cabinets (on the range wall) made a big difference. That opened up the entire space while adding some visual impact. (Not pictured: We also made the cabinets directly opposite the range wall tall and removed the countertop, resulting in more room for rollouts and even more storage!) The kitchen now has more storage than it did before.
- We ended up painting the ceiling of the kitchen into the hallway that leads to the foyer. The living and dining rooms were separated by a soffit, so that became a natural boundary. We kept the tile in the kitchen by stopping it short of the hallway and lining it up with the pantry wall. This creates a border between the breakfast area and family room. The rest of the existing wood floors were refinished to refresh and make the hue darker. We also painted a dark accent wall and carried it into the breakfast area to make the rooms look deeper.
- The in-the-way column housed plumbing and couldn’t be moved. We still built cabinets in that spot – we just had to build a chase inside it to conceal the pipes. There was still plenty of room for new storage. We also took the cabinets all the way to the ceiling. The continuous tall cabinets added a functional elegance to the space.
THE RENEWED SPACE
The client’s long-awaited dream of a better kosher kitchen has finally been achieved, beautifully combining enhanced storage solutions with adherence to the family’s orthodox dietary laws. The kitchen’s standout feature, an expanded island, now offers a spacious and efficient workspace. This allows several family members to cook together comfortably, without the inconvenience of bumping into each other, ensuring a harmonious and productive cooking environment.
 Drury Design
THE SETUP
Multiple ovens, multiple workspaces, multiple sinks – when you think about it, non-jewish kitchens have been adapting the criteria of kosher kitchens for years.
Gladys’ clients in West Rogers Park are Orthodox Jewish. The house they bought already had a kosher kitchen – it just wasn’t done that well. It needed some more things to be duplicated for the dairy side and the meat side. Plus, it was dark and the configuration wasn’t very conducive for a family of eight.
It was time for a remodel.
Design Objectives
Improve kosher kitchen
Add more storage in the island
Better lighting
More open, lighter feel
Change the wood floor in the kitchen to tile
THE REMODEL
Design Challenges
- We had originally planned on removing a wing wall by the breakfast area. During demolition, we learned it contained a support beam.
- The kitchen is a substantial size, but having two sinks, dishwashers, and ovens presented a challenge – how do we fit it all in and make it flow with the storage still accessible near the work areas?
Where do you stop the materials for the new space? - -- The right tile, paint, lighting, etc. would be needed to make the remodeled area cohesive with the rest of the main floor.
- An existing column limited cabinet options and thus, storage capacity. Could we conceal it without disrupting the cabinetry flow?
Design Solutions
- We had to keep the wing wall, but decided to continue the tile on the sides of the cabinets and maintain the height of the tile to line up with the rest of the backsplash. This actually presented a very nice and cohesive look, especially since the opposite side has a wing wall to the left of the refrigerator.
- We used “L-shaped” corner sinks instead of the rectangular ones set on an angle. This gave us more of the legs of the triangles versus the hypotenuse, which allowed for the two dishwashers, and the pullout utensil canisters and spice pullouts while still keeping the 3-drawer cabinets on either side of the range (by the sinks). The old island had the recess for stools which the family never used. By extending the width of the island 6” and utilizing this leg space, we were able to fit 18”-deep cabinets on this side – adding lots of accessible storage. The family can now work simultaneously on the dairy side (the side with the fridge) and the meat side (opposite) without getting in each other’s way. We separated the cooking by using the range oven for the meat and a built-in microwave in the base cabinet. The wall oven with built-in microwave on top is for dairy.
- Corner sinks opened up the middle area for a wider range – we went from a 30” to a 36”. Removing all the wall cabinets (on the range wall) made a big difference. That opened up the entire space while adding some visual impact. (Not pictured: We also made the cabinets directly opposite the range wall tall and removed the countertop, resulting in more room for rollouts and even more storage!) The kitchen now has more storage than it did before.
- We ended up painting the ceiling of the kitchen into the hallway that leads to the foyer. The living and dining rooms were separated by a soffit, so that became a natural boundary. We kept the tile in the kitchen by stopping it short of the hallway and lining it up with the pantry wall. This creates a border between the breakfast area and family room. The rest of the existing wood floors were refinished to refresh and make the hue darker. We also painted a dark accent wall and carried it into the breakfast area to make the rooms look deeper.
- The in-the-way column housed plumbing and couldn’t be moved. We still built cabinets in that spot – we just had to build a chase inside it to conceal the pipes. There was still plenty of room for new storage. We also took the cabinets all the way to the ceiling. The continuous tall cabinets added a functional elegance to the space.
THE RENEWED SPACE
The client’s long-awaited dream of a better kosher kitchen has finally been achieved, beautifully combining enhanced storage solutions with adherence to the family’s orthodox dietary laws. The kitchen’s standout feature, an expanded island, now offers a spacious and efficient workspace. This allows several family members to cook together comfortably, without the inconvenience of bumping into each other, ensuring a harmonious and productive cooking environment.

Sponsored
Sunbury, OH

J.Holderby - Renovations
Franklin County's Leading General Contractors - 2X Best of Houzz!

 Caela McKeever
Photo: Caela McKeever © 2017 Houzz
Inspiration for an eclectic home design remodel in Seattle
Inspiration for an eclectic home design remodel in Seattle

 Colwynn Garden Design
This section of the front yard was excavated and filled in with drainage rocks to create a Rain Garden. This is situated in a spot that captures storm-water flow coming down the hillside and provides a basin to store rainwater that normally would have run straight off the slope.
Blue River Rocks cover the area and create an illusion of water when wet.
 Neumann & Rudy Architecture
**I. Spatial Composition & Architectural Volume**
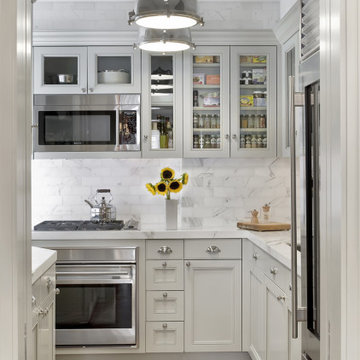
The photograph frames the space through a deep, cased opening — a device that immediately establishes a proscenium condition, compressing the viewer's aperture and heightening the sense of discovery beyond. The room reads as an ancillary galley or scullery-pantry: a compact, U-shaped plan whose counter runs return at the right to form an L, generating an efficient work triangle within a footprint of considerable modesty. Vertical ambition compensates for lateral restraint. The wall cabinetry rises in a tall, unbroken register, terminating in a stepped cornice and a subtle crown that carries the eye to a ceiling plane of generous height, while a bracketed corbel at the upper left signals the transition to the adjoining volume. The millwork is the primary architectural gesture here: inset, beaded-face frame construction with recessed panel doors, mitred stiles and rails, and a rhythmic alternation between solid and glazed fronts. Those mullioned glass doors — divided into two- and three-light configurations — perforate the cabinet mass, dissolving what could have been a monolithic wall into a permeable, vitrine-like screen. The lower casework counters this with a disciplined stack of graduated drawer banks, the deepest at the counter line and diminishing downward, a compositional hierarchy borrowed from classical apothecary and butler's-pantry precedent. Sightlines are deliberately layered: the herringbone floor draws forward, the sunflower stem anchors the center axis, and the pendant fixtures descend in perspectival sequence, reinforcing depth along the room's short axis.
**II. Materiality, Color & Texture**
The palette operates within a narrow tonal bandwidth, deriving its interest from textural rather than chromatic contrast. Cabinetry is finished in a cool, greige-inflected pale gray — a low-saturation hue with just enough green-gray undertone to read as architectural rather than decorative — hand-applied to a satin sheen that registers the shadow-lines of the beaded frames with precision. Against this, the backsplash of honed marble subway tile, laid in a running bond with tight, matched grout, introduces linear grain and soft gray veining that echoes the cabinetry's undertone. The countertop and the returning waterfall-edge marble continue the vein pattern in a broader, more sculptural expression, its polished-to-honed surface catching light in diffuse planes. Metals are curated with restraint and consistency: polished nickel bin pulls, knobs, and cup handles supply a warm-silver punctuation across the casework, while brushed and mirror-polished stainless steel — the wall oven, the microwave drawer, the professional refrigerator with its cylindrical tubular handle — introduces a cooler, more industrial register. The oak flooring, laid in a fine-scale herringbone with a pale, wire-brushed, matte finish, delivers the room's essential warmth and its only pronounced pattern, grounding the cool upper volume. Small accents of natural material — an end-grain butcher block, turned wooden pepper mills, a hammered silver kettle — reintroduce the tactile and the hand-made against so much precision-milled surface. The sunflowers, in a matte white vessel, provide the single saturated chromatic event, and their yellow is deliberately reprised in the pantry's glazed shelves of packaged goods, transforming provisions into intentional color composition.
**III. Lighting, Atmosphere & Style Profile**
The lighting strategy is unapologetically artificial and theatrical. Three oversized, spun-metal industrial pendants — polished nickel or chrome domes with heavy cast collars and flush opal-glass diffusers — hang in a linear array, their scale intentionally disproportionate to the room, which is precisely the source of their impact. They function simultaneously as luminaires and as sculptural objects, their reflective canopies mirroring the ceiling and multiplying the light. Illumination beneath the wall cabinets grazes the marble tile at a raking angle, revealing its subtle relief and the depth of its veining, while the interior-lit glazed cabinets glow as illuminated vitrines, converting storage into display. Natural light is inferred rather than shown — a suggestion of daylight from the right — leaving the space in a controlled, even, shadow-managed luminosity that reads as both crisp and enveloping. The atmosphere is one of ordered domestic industry: pristine, quietly luxurious, and legibly functional. Stylistically, the room resolves as *Transitional Classicism with a Warm Industrial inflection* — the inset, beaded millwork and stepped cornices citing Georgian and Edwardian butler's-pantry tradition; the professional-grade stainless appliances and factory-scale pendants asserting a contemporary, utilitarian counterpoint; and the herringbone oak and marble mediating between them. It is a synthesis in which historical grammar governs the composition while modern hardware and lighting supply the accent, producing a space that feels neither pastiche nor austere, but assured, timeless, and thoroughly of the present moment.

 T.A. French - Custom Builder
Example of a mid-sized transitional dark wood floor and brown floor double front door design in Austin with gray walls and a black front door

 Coral Pool's
Coral Pool and Spa
Hot tub - large contemporary backyard stamped concrete and custom-shaped natural hot tub idea in San Francisco
Hot tub - large contemporary backyard stamped concrete and custom-shaped natural hot tub idea in San Francisco

 Custom Surface Solutions
 (www.css-tile.com) - Owner Craig Thompson (512) 430-1215. This project shows new 12 x 24 tile installed vertically with offset layout pattern on wall and floor. Includes shower box with linear glass accent tile back and vertical glass accent band. Tile edges are finished with Schluter Jolly satin aluminum profile edge trim.

 Custom Surface Solutions
 (www.css-tile.com) - Owner Craig Thompson (512) 430-1215. This project shows the remodel of a small 1950's vintage home master bathroom. 8"" x 18" Calcutta gold marble tile was used on the shower walls and floor wall base and ceramic gray penny tile on the floor. Shower includes curbless pan / floor, dual shower boxes, frameless glass slider, trough duel fixture sink and chrome fixtures.


 threshold interiors
Location: New York, NY, United States
This Loft was tastefully renovated back in the '90s, but was due for an update and an expansion of the kitchen and dining areas to accommodate the client's cooking skills and entertaining needs. EnlargIing the island and adding cabinetry to delineate the office, bar and dining areas was a priority. The bathroom was updated to feel like a tranquil spa with beautiful new tile, plumbing fixtures and cabinets. Our biggest challenge was coordinating the entire renovation while our client was out of town for the Summer!
Photographed by: James Salomon
 TreHus Architects+Interior Designers+Builders
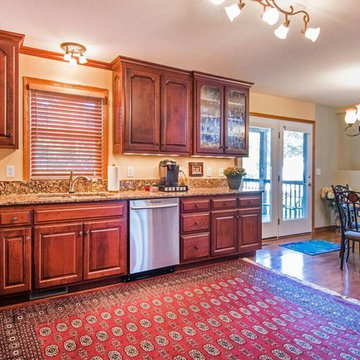
Example of a large classic u-shaped dark wood floor eat-in kitchen design in Minneapolis with a double-bowl sink, recessed-panel cabinets, white cabinets, white backsplash, stainless steel appliances, an island and black countertops


 Solar Luminance
 – Semi-Custom Daylight Light Fixture
Model#: DLF-152
Style: Semi-Flush Pendant
Finish: Powder Coat Matte Black
Shade(s): (1) Large Fabric Drum Shade with Gold Paper Backing and (4) Laura Beige Linen Clip-On Shades
*Note: Price does not include Daylight Tube Product and/or Installation
Semi-Custom Product Shipment Lead Time: 6-10 Weeks*
The Solar Luminance DLF-152, is an Architectural Element Transitional Semi Flush Pendant, designed to assist the home owner, retail location and/or office location, the ability to benefit from Natural Daylight available with Tubular Skylight systems, while also reflecting your custom interior design and décor theme and needs.
Natural Daylight provides incredible mental and physical health and wellness benefits that help the human body and mind maintain a sense of time, absorb natural vitamins, and work with the human eye to perceive color and definition in clarity and contrast to increase visual awareness. Our hope is that your friends, colleagues and guests will be “Inspired & Design” in a way that is both elegant and considerate of the impact we have on the earth and its resources.
The DLF-152 is a Semi-Custom Fixture. Full Custom Versions and Options are available for price quote. Please feel free to contact a Solar Luminance Design Assistant for Full Custom Options.
Product Specification (List Price based on the following)
Over All Dimensions:
Over All Height: 25”
Shade Dims: 10” H. X 24” Dia. – Large Fabric Drum Shade with Gold Paper Backing
Drop Length: 12”
Column Sleeve Diameter: 11 3/4” Dia.
Center Wireway: (1) 3/8” Dia. Wireway
Hangers: (4) Medium Oval Standard Chain (3 and 4 Hanger Options Available) (Chain available in Various Size Options, pricing may vary)
Lamping Specification
Daylight Tube System*: 10” Dia. Daylight Tube System – Includes Dome, Flashing, 8’-0” Length of Tube Extension, Tube Manufacturer provided Installation, Product and Installation Warranty
10” Diameter Tube provides the Equivalent of (10) 100Watt White Lamps
Secondary Lamping
Canopy Lamping: (1) 1.8 Watts (Per Foot) - 48”L. - LED Flex Strip, 5,000K - 12 Volts DC (Lamp Life: 50,000 Hour Rating)
Candelabra Lamping: (4) 3.5Watt LED Candelabra Based Screw in Torpedo Warm White Bulbs, 120v 2700K (25Watt Equiv.) (Provided by Solar Luminance)
Finish Specification and Materials
Metal Finish: Powder Coat Matte Black (Available in other Color Options – Some Color Options may require a price adjustment)
Shade(s): Shown with (1) Large Fabric Drum Shade with Gold Paper Backing and (4) Laura Beige Linen Clip-On Shades (Available in other Color Options – Some Color Options may require a price adjustment)
Glass Diffuser: Clear Glass (Sandblasted Interior) (Not Tempered)
Product Notes
Daylight Tubular Product is Supplied and Installed by Tube Product Manufacturer. Tube Product Manufacturer is responsible for all Product, Installation, Warranty, and Service of Tube Related issues. Solar Luminance is not responsible for any errors and/or omissions related the tube related issues that may arise. Solar Luminance will assist in sourcing a local and/or regional Daylight Tubular Product Supplier and Installer, to assist with Roof and Ceiling inspection and Tube supply and Installation. Solar Luminance is not responsible for the Tube Installers quality of work or service.
All Secondary Electrical must be performed by a Licensed and/or certified Electrician and/or General Contractor. Solar Luminance is not responsible for the Installation of the fixture. Solar Luminance is not responsible for any errors and/or omissions, damaged and or fault or injury caused by the general contractor.
Shipping and Payments
Shipping and/or Freight is the responsibility of the purchaser. Solar Luminance will supply a quote based on the fixture size, weight, crating method and delivery location, prior to commencement of fabrication and production. All Finishes and Semi-Custom Modifications must be Signed and Approved via the Solar Luminance Client Approval Drawings, in order for your Custom Daylight Light Fixture to begin Fabrication and Production. Any and all Price adjustments and shipping and/or freight must be paid in full prior to shipment of product.
Semi-Custom Product Shipment Lead Time is estimated at 6-10 Weeks, to begin upon receipt of all of the following:
• Receipt of full payment
• Receipt of signed & approved Client Approval Drawings
• Receipt and Confirmation of Approved Finish and Materials
• And Verification and Approval of All Price adjustments for Custom Modifications and Shipping and/or Freight Cost
Return Policy
Product must be inspected upon arrival and receipt of product, at the designated delivery location. Any damage must be reported to Solar Luminance in a written statement of reported damage, by email (Sales@SolarLuminance.com), along with dated and time stamped photo documentation of reported damage. Report of product damage must emailed within 24 hours of receipt of product. Solar Luminance will work with Purchaser and/or Purchasers Agents, to replace and/or fix any damaged and/or missing parts in a timely manner. If damage occurs and/or is reported beyond the 24 hour reporting period Solar Luminance maintains no liability and/or responsibility for the product and/or its condition. Solar Luminance does take pride in our work, craftsmanship, and product, so we do promise to provide exceptional support in remedying any situation that may arise related to your fixture. We do promise to do all that we can to make you happy with your Custom Solar Luminance Daylight Light Fixture.
Please feel free to contact us with any Questions or Concerns you may have.
Sales@SolarLuminance.com
(855) 687-6233
A California based company.


 Solar Luminance
 – Semi-Custom Daylight Light Fixture
Model#: DLF-149
Style: Semi-Flush Pendant
Finish: Brushed Nickel
*Note: Price does not include Daylight Tube Product and/or Installation
Semi-Custom Product Shipment Lead Time: 6-10 Weeks*
The Solar Luminance DLF-149, is an Architectural Element Transitional Semi Flush Pendant, designed to assist the home owner, retail location and/or office location, the ability to benefit from Natural Daylight available with Tubular Skylight systems, while also reflecting your custom interior design and décor theme and needs.
Natural Daylight provides incredible mental and physical health and wellness benefits that help the human body and mind maintain a sense of time, absorb natural vitamins, and work with the human eye to perceive color and definition in clarity and contrast to increase visual awareness. Our hope is that your friends, colleagues and guests will be “Inspired & Design” in a way that is both elegant and considerate of the impact we have on the earth and its resources.
The DLF-149 is a Semi-Custom Fixture. Full Custom Versions and Options are available for price quote. Please feel free to contact a Solar Luminance Design Assistant for Full Custom Options.
Product Specification (List Price based on the following)
Over All Dimensions:
Over All Height: 22”
Shade Dims: 10” H. X 24” Dia. – ¾” Metal Trim with 1” Opening Square Weld Metal Mesh
Drop Length: 12”
Column Sleeve Diameter: 11 3/4” Dia.
Center Wireway: (1) 3/8” Dia. Wireway
Hangers: (4) Medium Oval Standard Chain (3 and 4 Hanger Options Available) (Chain available in Various Size Options, pricing may vary)
Lamping Specification
Daylight Tube System*: 10” Dia. Daylight Tube System – Includes Dome, Flashing, 8’-0” Length of Tube Extension, Tube Manufacturer provided Installation, Product and Installation Warranty
10” Diameter Tube provides the Equivalent of (10) 100Watt White Lamps
Secondary Lamping
Canopy Lamping: (1) 1.8 Watts (Per Foot) - 48”L. - LED Flex Strip, 5,000K - 12 Volts DC (Lamp Life: 50,000 Hour Rating)
Candelabra Lamping: (6) 3.5Watt LED Candelabra Based Screw in Torpedo Warm White Bulbs, 120v 2700K (25Watt Equiv.) (Provided by Solar Luminance)
Finish Specification and Materials
Metal Finish: Brushed Nickel
(Available in other Color Options – Some Color Options may require a price adjustment)
Glass Diffuser: Clear Glass (Sandblasted Interior) (Not Tempered)
Product Notes
Daylight Tubular Product is Supplied and Installed by Tube Product Manufacturer. Tube Product Manufacturer is responsible for all Product, Installation, Warranty, and Service of Tube Related issues. Solar Luminance is not responsible for any errors and/or omissions related the tube related issues that may arise. Solar Luminance will assist in sourcing a local and/or regional Daylight Tubular Product Supplier and Installer, to assist with Roof and Ceiling inspection and Tube supply and Installation. Solar Luminance is not responsible for the Tube Installers quality of work or service.
All Secondary Electrical must be performed by a Licensed and/or certified Electrician and/or General Contractor. Solar Luminance is not responsible for the Installation of the fixture. Solar Luminance is not responsible for any errors and/or omissions, damaged and or fault or injury caused by the general contractor.
Shipping and Payments
Shipping and/or Freight is the responsibility of the purchaser. Solar Luminance will supply a quote based on the fixture size, weight, crating method and delivery location, prior to commencement of fabrication and production. All Finishes and Semi-Custom Modifications must be Signed and Approved via the Solar Luminance Client Approval Drawings, in order for your Custom Daylight Light Fixture to begin Fabrication and Production. Any and all Price adjustments and shipping and/or freight must be paid in full prior to shipment of product.
Semi-Custom Product Shipment Lead Time is estimated at 6-10 Weeks, to begin upon receipt of all of the following:
• Receipt of full payment
• Receipt of signed & approved Client Approval Drawings
• Receipt and Confirmation of Approved Finish and Materials
• And Verification and Approval of All Price adjustments for Custom Modifications and Shipping and/or Freight Cost
Return Policy
Product must be inspected upon arrival and receipt of product, at the designated delivery location. Any damage must be reported to Solar Luminance in a written statement of reported damage, by email (Sales@SolarLuminance.com), along with dated and time stamped photo documentation of reported damage. Report of product damage must emailed within 24 hours of receipt of product. Solar Luminance will work with Purchaser and/or Purchasers Agents, to replace and/or fix any damaged and/or missing parts in a timely manner. If damage occurs and/or is reported beyond the 24 hour reporting period Solar Luminance maintains no liability and/or responsibility for the product and/or its condition. Solar Luminance does take pride in our work, craftsmanship, and product, so we do promise to provide exceptional support in remedying any situation that may arise related to your fixture. We do promise to do all that we can to make you happy with your Custom Solar Luminance Daylight Light Fixture.
Please feel free to contact us with any Questions or Concerns you may have.
Sales@SolarLuminance.com
(855) 687-6233
A California based company.
45