
Search results for "Leaving normal" in Home Design Ideas



 Tile Doctor Ltd
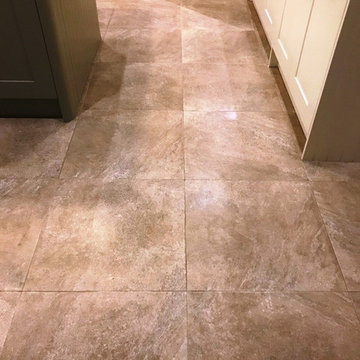
This request came from a client who lives in the Newcastle district of Jesmond who was unhappy with the appearance of their Textured Porcelain floor tiles. The problem was that the Porcelain Tiles were grouted in whilst the underfloor heating was switched on. This resulted in the grout drying out quicker than expected and the tiler struggled to get the excess grout off the tiles. To rectify the problem, the tiler tried to get the dried grout off with acid, but it didn’t work, and the floor was left looking dark and dull. Unable to rectify the problem the client was left with a disappointing pale floor and had searched around the internet for a solution.
Normally grout smears like these (aka Grout Haze) can be removed with an acidic product and Tile Doctor sell Grout Clean-up specially for this purpose. However, some grouts contain acid resistant polymers which need to broken down first. Fortunately, we have a solution for everything tile related and the system we use does not affect the main grout lines only the excess grout. I called in to do a site visit and having surveyed the problem I was confident it could resolved, I gave them a price for the work and agreed a date to return to do the job.
My first task was to spray the tiles with Tile Doctor Remove and Go, this was left to soak into the tile for around ten minutes before being scrubbed in. Remove and Go is a coatings remover that is safe to use on tile and grout; normally we use it to remove old sealers but in this case I applied it to break down the polymers. To work the product into the tile I use a buffing machine fitted with a black scrubbing pad, the mechanical advantage this gives makes the job a lot quicker. Then the slurry generated is rinsed off with water and removed with a wet vacuum. The floor was then left to dry for 30 minutes.
We were then able to remove the excess grout which was done by applying Tile Doctor Grout Clean-Up which I mentioned earlier. The process was the same, i.e. using the buffing machine and a wet vacuum to scrub the floor and extract the soil. The floor was rinsed with water to remove any trace of the products used and dried as much as possible using the wet vacuum. The underfloor heating really helped at this point to dry out the floor.
Once the floor was fully dry including the grout lines a single thin coat of Tile Doctor Colour Grow sealer was applied. The tiles were textured porcelain, so the dirt gets trapped into the textured surface if it is not sealed. We usually find one coat of Tile Doctor Colour Grow is more than enough for this, anything that hadn’t soaked in after three to five minutes was then polished off with clean dry cloths.
The client was very happy with the floor and pleased that the excess grout had been cleaned up and the floor looked as it should. Before leaving I recommended the use a pH Neutral tile cleaner for general cleaning such as Tile Doctor Neutral Tile Cleaner. There is no point sealing the tiles only to have it stripped off later with the use of a bleach based cleaner.
Raf Barrett
Tyneside Tile Doctor
Find the right local pro for your project

 Dura Supreme Cabinetry
Immerse your bathroom in soothing colors and styles to create a classic and familiar atmosphere. Traditional wall paneling with Dura Supreme’s Weathered finish evokes memories of relaxing weekends spent at the lakeshore cottage. A linen cabinet with glass doors beautifully displays stacks of towels and bathroom sundries. The furniture vanity showcases Dura Supreme’s “Style Five” furniture series. Style Five is designed with a selection of turned posts for iconic furniture style to meet your tastes.
A centered sink includes convenient drawers on both sides of the sink for powder room storage. Style Five furniture series offers 10 different configurations (for single sink vanities, double sink vanities, or offset sinks), 15 turn post designs and an optional floor with either plain or slatted detail. A selection of classic post designs offers personalized design choices. Any combination of Dura Supreme’s many door styles, wood species and finishes can be selected to create a one-of-a-kind bath furniture collection.
The bathroom has evolved from its purist utilitarian roots to a more intimate and reflective sanctuary in which to relax and reconnect. A refreshing spa-like environment offers a brisk welcome at the dawning of a new day or a soothing interlude as your day concludes.
Our busy and hectic lifestyles leave us yearning for a private place where we can truly relax and indulge. With amenities that pamper the senses and design elements inspired by luxury spas, bathroom environments are being transformed form the mundane and utilitarian to the extravagant and luxurious.
Bath cabinetry from Dura Supreme offers myriad design directions to create the personal harmony and beauty that are a hallmark of the bath sanctuary. Immerse yourself in our expansive palette of finishes and wood species to discover the look that calms your senses and soothes your soul. Your Dura Supreme designer will guide you through the selections and transform your bath into a beautiful retreat.
Request a FREE Dura Supreme Cabinetry Brochure Packet at:
http://www.durasupreme.com/request-brochure


 Cardello Lighting & Electric Supply
Sleek and chic, the LED, ADA-compliant Alto effortlessly takes center stage. Mastering both form and function, Alto unifies energy-efficiency, durability and sophistication.
 Tile Doctor Ltd
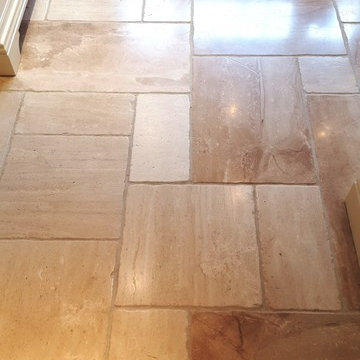
I was recently at a property in the North Yorkshire town of Harrogate, undertaking what I initially thought would be the cleaning and polishing of a Cream Limestone tiled kitchen. However, as I began the cleaning process I quickly discovered that under the dirty grout lines someone had taken a lot of effort to paint with a small brush directly onto the grout using varnish!
In a normal situation, I would have covered the whole floor with Tile Doctor Remove & Go to solve the problem, however compared to, say, adhesive or paint staining, varnish is very difficult to remove. So instead I opted for the long, yet necessary process of cleaning the grout manually with several thin wire brushes. Over the course of two days I managed to remove approximately 90% of the stubborn varnish – and could finally move onto cleaning and polishing the Limestone as originally planned.
The polish had been lost from the Limestone kitchen tiles over time, so I set about restoring it using a type of polishing known as burnishing. This involves the application of diamond encrusted pads of varying grit to the floor to gradually buff the stone and achieve an aesthetic and durable shine. Burnishing is most commonly used on high-end stone such as Marble, Travertine and, of course, Limestone.
At Tile Doctor, our burnishing system comprises four burnishing pads, ranging from a Coarse grit to a Very Fine grit. After applying the first three pads (Coarse, Medium and Fine), I gave the tiles a further clean with Tile a Doctor Pro Clean, which is our alkaline cleaner, to remove any residue from the burnishing process. I then rinsed the floor with clean water and soaked up the residue with a wet vacuum, before leaving it to dry.
The floor was then polished to a satin finish using the fourth and final Extra Fine burnishing pad. I sealed it using a couple of coats of Tile Doctor Ultra-Seal, an impregnating sealer designed to provide maximum protection against dirt and stains.
The combination of burnishing and sealing always makes a huge difference to Limestone tiles. Here, the finished result was almost like a new floor! The customer was both amazed and very pleased with the transformation.
Nigel Stoker
North West Yorkshire Tile Doctor

 Continental Ponds
Pondless Waterfall
Pondless Waterfalls are simply a re-circulating waterfall and/or stream without the presence of a pond. You can enjoy the sight and sound of running water without the maintenance of a pond.
The waterfall is undoubtedly the most beautiful and favored feature in a water garden. If space is lacking in your yard or you have safety concerns with a pond, go Pondless! The name basically explains it all. It’s a waterfall and stream, without the pond. So why would you want a waterfall without a pond? The truth is that a Pondless Waterfall isn’t for everyone, but it can be a great alternative for someone who isn’t quite sure if a pond is right for their family.
Safety
Because there is no pool of water, a Pondless Waterfall is a great option if you are concerned about safety issues associated with a traditional pond.
Cost
Cost can be a big factor when considering the type of pond you want to build. In most cases, the price of a Pondless waterfall will be less than a pond, because there is less labor involved, as well as less rock and materials. Operating costs are also less. Because you’re not dealing with an established ecosystem, it’s not necessary to run the pump 24/7.
Space
The small size of the Pondless Waterfall means you can build and enjoy a beautiful waterfall anywhere in your yard.
Maintenance - Taking care of your Pondless Waterfall is easy. Filling the reservoir every few weeks to compensate for water loss because of evaporation is all that’s required.
Flexibility
Perhaps the best part of the Pondless Waterfall is the possibility for the future. If you change your mind later, wishing you’d build a pond, that’s ok! If you leave enough room around the base of the waterfall, it’s easy to add a pond onto a Pondless Waterfall.
Complete System
It might be difficult to imagine a waterfall and stream without a pond. Where does the water go? A Pondless Waterfall works much like a regular pond. The hole, deeper than a normal pond, is dug then lined with rock and gravel, and filled with water. The water is then circulated from beneath the rocks and gravel by a pump that sits on the bottom, inside a Snorkel Vault and Centipede Module. A pipe runs from there up to a BioFalls Filter and into an overflowing waterfall, where it falls back into the reservoir. Since the water level never pools above the level of the rock and gravel fill, it give the appearance of a waterfall without a pond, when in fact, the “pond” is there but not visible.
The Pondless Waterfall has made many water-lovers who were previously unable to indulge in the sweet sounds of falling water, very happy. It’s a great alternative for those who are trying to get their feet wet, or looking to fit a little bit of paradise into their own backyard. In other words, when all else fails … go Pondless!
 Tile Doctor Ltd
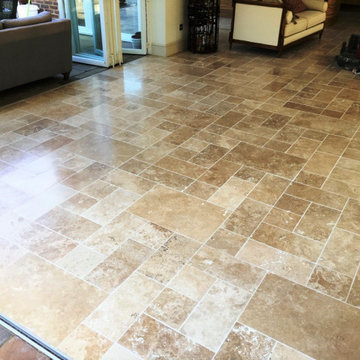
This property in Godalming had the whole downstairs floor tiled with Fired Earth Limestone tiles nine years prior and had never had it cleaned or maintained professionally. The once beautiful stone was now looking dull and the grout had turned black with dirt leaving the floor looking uninviting.
This is quite normal for stone floors as it is the sealer that protects the stone from dirt and enhances its look. Most sealers wear off after three to four years sealer and in this case after nine years it was well overdue a deep clean and reseal.
I visited the property to survey the floor. It was indeed looking in need of some attention and the kitchen was particularly bad. To restore the appearance of the Limestone tile and grout the floor would need to be stripped of what remains of the old sealer, then deep cleaned with attention to the grout, polished with burnishing pads and then finally resealed. I was confident I could get it restored to a nearly new finish and to prove it I completed a small demonstration clean which the homeowner was very happy with. They agreed to my quote and we scheduled in a couple of days to carry out the work.
On day one I started by cleaning the grout using a strong dilution of Tile Doctor Pro-Clean. its run along the grout line and then left to soak in for about ten minutes so it can get to work breaking down dirt and old sealer. The grout is then scrubbed using a grout brush which is then scrubbed backwards and forwards along the grout line until clean. The area is then rinsed with water and all the waste removed with a wet vacuum cleaner.
Next, I turned my attention to the Limestone tiles which needed stripping of any remaining sealer, cleaned and polished. I find the best way to do this is by apply a set of diamond encrusted Burnishing pads in sequence starting with a coarse 400-grit followed by 800, 1500 and finally finishing with an extra fine 3000 grit. Water is used to lubricate the burnishing process and the slurry is rinsed and extracted off the floor between pads. Each pad is run over the tiles three times, and it was a large floor so as you can imagine this process took most of the day.
I left the floor to dry out overnight and returned the next day to seal the Limestone. Before doing that, I reviewed my previous day’s work and I cleaned up any areas that needed further attention. Next step was to ensure the floor was dry as I don’t recommend applying a sealer to damp tile as you won’t get an even appearance, so before sealing a floor I tested for moisture using a damp meter.
To seal the floor, I applied two coats of Tile Doctor Ultra Seal which is an impregnating sealer that works by occupying the small pores in the stone to prevent dirt becoming ingrained there. Limestone is a light stone and most customers like that appearance so I find it best not to use a colour enhancing sealer as it can darken the stone. Ultra-Seal doesn’t contain any colour enhancer and leaves the floor with a natural finish whilst allowing the stone variations and patterns to show through.
Once the sealer was dry, I gave it a further polish with the 3000-grit pad which further brought out the natural beauty of the stone. My client was very happy with the floor, it really lifted the who area and the Kitchen in particular.
Rupert Mcleod
West Surrey Tile Doctor

 TKSL Construction
Patio - small traditional backyard stamped concrete patio idea in Denver with no cover
 RG Cowan Design Build
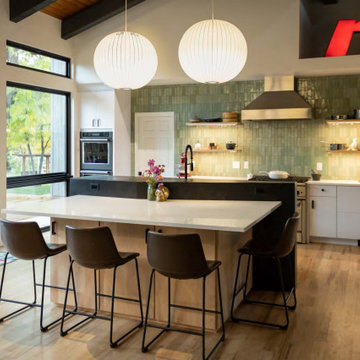
Contrast in the Kitchen – Texture to Taste in a Grand Junction, CO custom home
We normally associate texture with food, clothes, and even sound. In reality, it is a part of every aspect of our lives. In our Grand Junction, Appleton, Fruita, Palisade, and Redlands, Colorado homes, texture lives on everything from our walls to washcloths. It isn’t something we normally consider holistically or view with intent. While designing interiors, texture becomes our way to bring visual interest and emotion into the space.
Adding textures to a space invites touch and evokes an understanding of the design intent. Materials like linen and wood can be combined to make a space feel streamlined yet cozy. Leather and velvet can be paired to create a luxurious retreat. In one of our recent projects, our clients had a distinct vision for their new kitchen and outdoor custom home living spaces. They were in need of a design that combined their kitchen, living, and outdoor spaces into a seamless oasis for their everyday routines. Their home has a unique architectural voice and they wanted to emphasize the character that was already there. Blending textures and colors throughout this project was how everything remained cohesive and spirited.
The purpose of contrasting materials
We used contrasting materials in the cabinetry to distinguish between the perimeter – high gloss – and the natural gathering space – maple. By contrasting the soft nature of maple in the cabinets and in the flooring with the harder textures of concrete and steel, we were able to offset the space’s tendency to feel like an alpine cabin. However, using contrasting textures does not always provide a dynamic interior. The high-gloss cabinets function as a vessel for various textures. They take on whatever happens to be reflected in them, bringing in elements from unexpected sources.
The function of texture
Along with rich black hardware, the unique backsplash adds an element of handcrafted care that naturally draws your eye throughout the space. The unevenness of each tile provides the space with intentional imperfections, giving it life and visual delight. Textures like these are great conversation starters or simply eye candy.
To extend their living and dining spaces to the exterior, our clients also updated the numerous decks around the home, as well as the cladding. This gave us the opportunity to develop a texture and color story for their exteriors. Considering finishes in a location as distinctive as the Western Slope can either be viewed as a challenge or an opportunity. We have the desert, evergreen groves, riversides, and snowstorms to glean inspiration from while designing.
For us, utilizing palettes that compliment the home’s natural surroundings is crucial. This home happens to live on a densely wooded plot of land with mature trees providing plenty of shade. This backdrop informed our color selections, while the existing architecture drove the material selections. The wood decking adds warmth, the horizontal cream siding brightens, the gray cedar leaves a part of the original architectural intent, and the green entry wall adds drama. The existing beams were left original because it is difficult to find materials that match the grandeur of the home.
Recognizing good design
Next time you walk into a well-designed custom home and immediately feel at ease, take some time to notice why you may be feeling that way. The subtlety of blending textures and colors can have a profound impact on how a space is perceived. You can see some of our other design projects here.

 Skill Construction & Design, LLC
If you are looking for twice your normal bath experience, look no more. This master bath has plenty of room for two with double the storage, double the mirrors, sinks and faucets, and bathing is done two-way. The colors are warm and inviting, but it’s the subtle patterning that caught my eye. The overall effect is of a soft wash, yet on closer examination, the striations travel across the walls and criss-cross on the floor.
This expansive vanity was created with our homeowner’s needs in mind. Each “side” has a bank of drawers and under sink cabinet storage. A large undermount sink dips below the gorgeous stone counter top. Gently arching faucets in brushed nickel adorn each sink with a framed mirror above for reflection. Individual task lighting shine upon each sink and is reflected back into the room. For additional storage and to keep elbows from connecting, a large shared bank of drawers separate the two areas.
The vanities are rich with color and texture, from the swirling grain of the wood, to the raised panels and beading. The subtle beading is repeated on the drawers for a custom look. Our wood color is a deeper, more intense tone of the colors in our tiling.
Whether in a hurry or needing to relax and unwind, this bath can do both. Despite having two substantial pieces in the same area, the open glass panel that separate leaves each feeling open and airy.
This tub was made for soaking. The sides and back gently mold into arm and neck support for a truly relaxing experience. The lineal movement in the tile backsplash lend a long and lean feeling. For easy reach, toiletries are stored in a niche with accent multicolored mosaics.
On the other side of the half wall a roomy shower awaits. The long tiles were installed in a brick pattern with striations of color wrapping the walls. The oversized tiles reduce the amount of grout, for a cleaner look. Here too we added a niche for maximum storage and a sprinkle more of the accenting mosaic. We capped the half wall and the generous bench with our vanity’s stone for a rich contrast.
We installed the tile up to the ceiling, which adds to the visual height of the room. We went with clean simple controls and showerhead, enhanced in a brushed nickel finish. So as to not obscure the view, we went frameless on our shower door and panels, using brushed nickel hinges and a simple handle.
At the end of our vanity, a half wall adds backsplash on the vanity side and a bit of privacy on the other. A simple toilet in crisp white is out of sight but functional in its own “alcove”.
Despite all the patterning, there is nothing busy about the room. For the floor we decided to change things up, using a large square version of the wall tiles. To keep the room from feeling too long, we installed them on the diagonal and then criss-crossed the lines for a dramatic look.
This bath is twice as nice and ready to be shared!
http://www.designsbyskill.com/
http://www.rjkconstructioninc.com/
 Tile Doctor Ltd
Esher is a small suburb in Surrey, situated just outside London. It was a fashionable area to live in amongst royalty and the aristocracy in the Victorian period, and during this time many buildings were built.
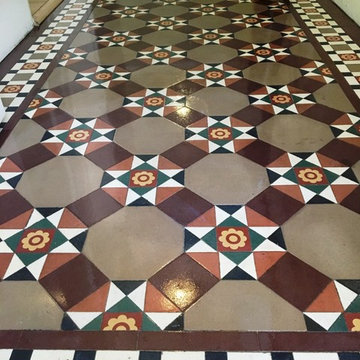
One such building has since been turned into a block of separate flats, and some of the flats still contain the original Victorian tiles in the hallway. I was contacted by one of these flat owners about restoring their tiles back to the best possible condition. Interestingly this customer’s tiles were part of a larger floor that had been divided between two flats.
I began the restoration by spreading Tile Doctor Remove and Go across the entire set of tiles. Remove and Go is a heavy-duty stripper that helped to loosen and remove old glue deposits where carpet had been laid over the tile, it will also strip off old sealers and release ingrained muck.
The Remove and Go was worked into the tile and grout with a stiff brush and then the soiled solution rinsed off and extracted using a wet vacuum. I followed by this applying a coarse 200-grit diamond encrusted burnishing pad, fitted to a handheld buffer, to grind away the particularly stubborn dirt and stains to restore the appearance of the stone. Afterwards, I rinsed the tiles again with water and soaked up the resultant slurry with a wet vacuum.
I noticed that there remained several ingrained stains dotted across the floor, so to remove these I aggressively burnished the affected areas with a very coarse 50-grit handheld diamond block. This essentially removed the very top layer of the stone, taking with it the ingrained marks.
Next, I dried the area with a large blower and heat gun. Under normal circumstances, 48 hours needs to pass before the tiles can be sealed, but as this was a small area I was able to dry it very quickly. After carrying out a damp test, I determined the tiles were ready to be sealed.
To seal the Victorian Tiles, I applied six coats of Tile Doctor Seal and Go sealer, which provides a high-quality sheen finish, as well as plenty of protection for the future. Tile Doctor have a range of suitable sealers available including Colour Grow which provides a matte finish – it’s just a matter of personal choice for the customer.
The outcome of the restoration was fantastic and the customer was very pleased, leaving the following testimonial.
“Promptly organised, delivered when promised. Good looking job when complete. Well done.”
Rupert Mcleod
West Surrey Tile Doctor
 Continental Ponds
Pondless Waterfall
Pondless Waterfalls are simply a re-circulating waterfall and/or stream without the presence of a pond. You can enjoy the sight and sound of running water without the maintenance of a pond.
The waterfall is undoubtedly the most beautiful and favored feature in a water garden. If space is lacking in your yard or you have safety concerns with a pond, go Pondless! The name basically explains it all. It’s a waterfall and stream, without the pond. So why would you want a waterfall without a pond? The truth is that a Pondless Waterfall isn’t for everyone, but it can be a great alternative for someone who isn’t quite sure if a pond is right for their family.
Safety
Because there is no pool of water, a Pondless Waterfall is a great option if you are concerned about safety issues associated with a traditional pond.
Cost
Cost can be a big factor when considering the type of pond you want to build. In most cases, the price of a Pondless waterfall will be less than a pond, because there is less labor involved, as well as less rock and materials. Operating costs are also less. Because you’re not dealing with an established ecosystem, it’s not necessary to run the pump 24/7.
Space
The small size of the Pondless Waterfall means you can build and enjoy a beautiful waterfall anywhere in your yard.
Maintenance - Taking care of your Pondless Waterfall is easy. Filling the reservoir every few weeks to compensate for water loss because of evaporation is all that’s required.
Flexibility
Perhaps the best part of the Pondless Waterfall is the possibility for the future. If you change your mind later, wishing you’d build a pond, that’s ok! If you leave enough room around the base of the waterfall, it’s easy to add a pond onto a Pondless Waterfall.
Complete System
It might be difficult to imagine a waterfall and stream without a pond. Where does the water go? A Pondless Waterfall works much like a regular pond. The hole, deeper than a normal pond, is dug then lined with rock and gravel, and filled with water. The water is then circulated from beneath the rocks and gravel by a pump that sits on the bottom, inside a Snorkel Vault and Centipede Module. A pipe runs from there up to a BioFalls Filter and into an overflowing waterfall, where it falls back into the reservoir. Since the water level never pools above the level of the rock and gravel fill, it give the appearance of a waterfall without a pond, when in fact, the “pond” is there but not visible.
The Pondless Waterfall has made many water-lovers who were previously unable to indulge in the sweet sounds of falling water, very happy. It’s a great alternative for those who are trying to get their feet wet, or looking to fit a little bit of paradise into their own backyard. In other words, when all else fails … go Pondless!
 Skill Construction & Design, LLC
If you are looking for twice your normal bath experience, look no more. This master bath has plenty of room for two with double the storage, double the mirrors, sinks and faucets, and bathing is done two-way. The colors are warm and inviting, but it’s the subtle patterning that caught my eye. The overall effect is of a soft wash, yet on closer examination, the striations travel across the walls and criss-cross on the floor.
This expansive vanity was created with our homeowner’s needs in mind. Each “side” has a bank of drawers and under sink cabinet storage. A large undermount sink dips below the gorgeous stone counter top. Gently arching faucets in brushed nickel adorn each sink with a framed mirror above for reflection. Individual task lighting shine upon each sink and is reflected back into the room. For additional storage and to keep elbows from connecting, a large shared bank of drawers separate the two areas.
The vanities are rich with color and texture, from the swirling grain of the wood, to the raised panels and beading. The subtle beading is repeated on the drawers for a custom look. Our wood color is a deeper, more intense tone of the colors in our tiling.
Whether in a hurry or needing to relax and unwind, this bath can do both. Despite having two substantial pieces in the same area, the open glass panel that separate leaves each feeling open and airy.
This tub was made for soaking. The sides and back gently mold into arm and neck support for a truly relaxing experience. The lineal movement in the tile backsplash lend a long and lean feeling. For easy reach, toiletries are stored in a niche with accent multicolored mosaics.
On the other side of the half wall a roomy shower awaits. The long tiles were installed in a brick pattern with striations of color wrapping the walls. The oversized tiles reduce the amount of grout, for a cleaner look. Here too we added a niche for maximum storage and a sprinkle more of the accenting mosaic. We capped the half wall and the generous bench with our vanity’s stone for a rich contrast.
We installed the tile up to the ceiling, which adds to the visual height of the room. We went with clean simple controls and showerhead, enhanced in a brushed nickel finish. So as to not obscure the view, we went frameless on our shower door and panels, using brushed nickel hinges and a simple handle.
At the end of our vanity, a half wall adds backsplash on the vanity side and a bit of privacy on the other. A simple toilet in crisp white is out of sight but functional in its own “alcove”.
Despite all the patterning, there is nothing busy about the room. For the floor we decided to change things up, using a large square version of the wall tiles. To keep the room from feeling too long, we installed them on the diagonal and then criss-crossed the lines for a dramatic look.
This bath is twice as nice and ready to be shared!
http://www.designsbyskill.com/
http://www.rjkconstructioninc.com/

 Adobe Interiors
Looking for a stunning and unique leather barstool for your home? Look no further than our Chisum Levi Barstool. With a solid hardwood frame and subtle denim blue leather, this barstool is the perfect accent piece for any home, dining room, or living area. The brass-studded accents and worn, comforting feel of the leather give this barstool a perfect motif, while the armrests' gentle curve and sturdy squared base provide comfort and support. Handcrafted from Knotty Alder, the Chisum Levi Barstool is a truly authentic and elegant addition to any space.
But that's not all - the Chisum Levi Barstool also features a full 360 degree swivel mechanism, allowing for easy movement and comfortable seating. Plus, with the option to choose either bar or counter height, this barstool is customizable to fit your needs. Experience the beauty, charm, and stand-alone character of our Chisum Levi Barstool and bring color and life to your home today. These handcrafted, 100% American made barstools are a must-have for any dynamic set.
Overall Barstool Dimensions: 43" H x 26" W x 22" D
Seat Height: 30"
Top of Arm Height: 40"
Overall Counter Stool Dimension: 38" H x 26" W x 22" D
Seat Height: 25"
Top of Arm Height: 35"
Leather Description: Every hide will have personality of its own. Drum dyed, these hides are then hand sanded, giving each one an individual look, accented by the natural markings that Mother Nature has already provided. A coat of silicon completes the process leaving a finished article that will be uniquely rustic without a raspy feel. The leather enthusiast will recognize it as a natural product with the healed scars, fat wrinkles, and range marks. Due to the character of this leather, significant color variations are to be expected and accepted..
100% top grain cowhide leather is characterized by variations in shade, texture, color and grain. Healed marks and scars are to be expected and enhance the natural beauty of the hides. These variations should not be considered defects as they are normal and unique features of genuine 100% top grain cowhide leather.
Frame Construction: Made with American Alder Wood, our frames are glued, screwed and dowelled at the joints. Two coats of high quality stain is hand rubbed on the wood finish and then sealed with industrial grade clear coat.
 Skill Construction & Design, LLC
If you are looking for twice your normal bath experience, look no more. This master bath has plenty of room for two with double the storage, double the mirrors, sinks and faucets, and bathing is done two-way. The colors are warm and inviting, but it’s the subtle patterning that caught my eye. The overall effect is of a soft wash, yet on closer examination, the striations travel across the walls and criss-cross on the floor.
This expansive vanity was created with our homeowner’s needs in mind. Each “side” has a bank of drawers and under sink cabinet storage. A large undermount sink dips below the gorgeous stone counter top. Gently arching faucets in brushed nickel adorn each sink with a framed mirror above for reflection. Individual task lighting shine upon each sink and is reflected back into the room. For additional storage and to keep elbows from connecting, a large shared bank of drawers separate the two areas.
The vanities are rich with color and texture, from the swirling grain of the wood, to the raised panels and beading. The subtle beading is repeated on the drawers for a custom look. Our wood color is a deeper, more intense tone of the colors in our tiling.
Whether in a hurry or needing to relax and unwind, this bath can do both. Despite having two substantial pieces in the same area, the open glass panel that separate leaves each feeling open and airy.
This tub was made for soaking. The sides and back gently mold into arm and neck support for a truly relaxing experience. The lineal movement in the tile backsplash lend a long and lean feeling. For easy reach, toiletries are stored in a niche with accent multicolored mosaics.
On the other side of the half wall a roomy shower awaits. The long tiles were installed in a brick pattern with striations of color wrapping the walls. The oversized tiles reduce the amount of grout, for a cleaner look. Here too we added a niche for maximum storage and a sprinkle more of the accenting mosaic. We capped the half wall and the generous bench with our vanity’s stone for a rich contrast.
We installed the tile up to the ceiling, which adds to the visual height of the room. We went with clean simple controls and showerhead, enhanced in a brushed nickel finish. So as to not obscure the view, we went frameless on our shower door and panels, using brushed nickel hinges and a simple handle.
At the end of our vanity, a half wall adds backsplash on the vanity side and a bit of privacy on the other. A simple toilet in crisp white is out of sight but functional in its own “alcove”.
Despite all the patterning, there is nothing busy about the room. For the floor we decided to change things up, using a large square version of the wall tiles. To keep the room from feeling too long, we installed them on the diagonal and then criss-crossed the lines for a dramatic look.
This bath is twice as nice and ready to be shared!
http://www.designsbyskill.com/
http://www.rjkconstructioninc.com/
 Tile Doctor Ltd
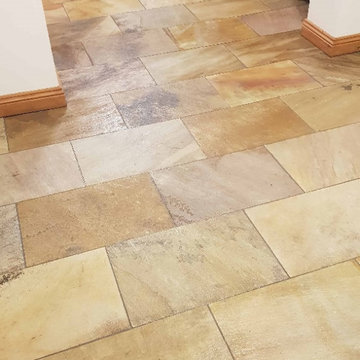
The photos on this page are of a Sandstone Kitchen floor at a house in the High Green suburb of Sheffield. The Sandstone tiles looked grubby and needed some love and attention. Our client was getting fed up trying to keep the stone clean, particularly around the kitchen area where cleaning didn’t seem to make much. You can see how dirty it had become on the before picture below, this is stark contrast to the middle of the of the kitchen where the portable kitchen island normally sits.
I went to the property to get a better look at the problem floor and carried out a small test clean to see which products and methods would have the best impact. The patch came up really clean without much difficulty, so I was confident on being able to restore its appearance.
It was clear to me the original protective sealer had worn off and dirt had become ingrained in the pores of the stone where it was proving difficult to remove. My client was very encouraged by the test clean initial result and agreed to go ahead with the quote. We arranged a suitable time to carry out the work on a day when the family would be out of the way.
I started by taping up the area to make sure the skirting and woodwork were protected from splashing. Once done a strong dilution of Tile Doctor Pro-Clean was sprayed onto Sandstone tile and grout. It was left to dwell for approximately ten minutes to help break down all the grime and dirt and was then worked into the stone using a rotary floor machine fitted with a stiff bristled brush.
This method totally transformed the dull sandstone, the stunning sandstone colours started to leap out and I could see the stone was well on its way to being transformed. The floor was then rinsed several times with water and the now soiled cleaning solution carefully removed with an industrial wet vacuum.
With the floor clean I inspected all the tiles and repeated the process until I was happy the floor was total clean. I should mention It’s not always this easy to clean a stone floor and quite often I find myself having to utilise all sorts of products and methods before I’m totally satisfied it’s as clean as it could possibly be.
With the cleaning done I left the floor to dry out overnight aided with heaters and air blowers.
I returned to seal the floor the next day checking first that the stone was dry with a damp meter. Leaving the blowers on overnight had helped and the readings I took from the floor confirmed it was now ready for sealing.
Earlier I had discussed the different types of sealer available with my clients and they had chosen to have the floor sealed with Tile Doctor Seal & Go. This works really well on Sandstone, enhancing its appearance, improving colour and of course adding protection to the stone to prevent grime and dirt stuck in the pores of the stone. Several coats were applied until I could see if was fully sealed and the right level of finish had been achieved. Sealing a floor can take some time as you need to allow each coat to dry before applying the next.
Once done the floor looked meticulously clean and the new sealer had added a lovely subtle sheen to the stone. My client was very please with the transformation and left the following feedback.
‘Very professional approach, friendly, and offered great advice throughout the job. Very pleased with the finish Cheers Matt we will see you again’
One of the problems we find with many homeowners is that for cleaning they use strong bleach-based cleaning product on their sealed tiles, and this actually strips off the sealer leaving the stone vulnerable to ingrained dirt. As a result, Tile Doctor has developed Tile Doctor Neutral Tile Cleaner, it is pH neutral and gentle enough for everyday use without affecting the sealer.
Matthew Lovett
South Yorkshire Tile Doctor
 Tile Doctor Ltd
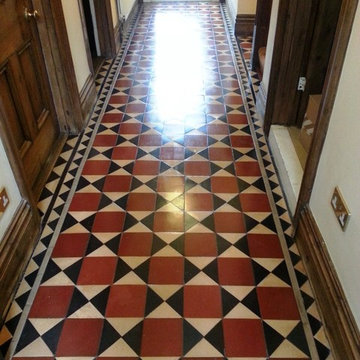
Recently I was contacted by a man in the town of Bedford who was worried that he had damaged his Victorian tiled hallway as a result of dragging a piano across the floor. I went round to the property to get a better look at the problem and, on closer inspection, realised that the tiles were actually fine; however, the piano had torn through the old surface seal.
The 150-year old tiles, dating back – as the name suggests – to the reign of Queen Victoria, had been poorly sealed and additionally had not been maintained correctly with the appropriate cleaning products. I was commissioned to remove the old sealer, clean and re-seal in order to restore this fantastic floor to its former glory.
My first task was to mix a solution of Tile Doctor Pro-Clean and water, which was then spread across the floor. Pro-Clean is a high alkaline cleaner which also contains stripping properties and this helped to break down the old, damaged sealer. The solution was left to dwell for approximately 20 minutes, giving it time to seep into the stone to get underneath, and lift out, any ingrained dirt. Pro-Clean was worked into the tiles using a heavy low speed rotary machine fitted with a black pad.
Once cleaned and stripped, we rinsed the floor using plain, clean water to neutralise the high alkaline Pro-Clean and the removed the resulting slurry using a wet-vac machine.
At this point I noticed that the white/magnolia tiles were particularly well worn and still very dirty and in need of further cleaning. Around this time Tile Doctor had also been discussing the successful use of Burnishing Pads (normally used on polished stone) on Victorian Tiles so I hand burnished the most stained tiles with a small 6 inch diamond encrusted burnishing pad with a little water to help lubricate the process. Following this, I rinsed the entire floor once again.
After leaving the floor to dry for four days, I returned to the house to seal the tiles opting to apply a single coat of Tile Doctor Colour Grow impregnating sealer first followed up with four coats of Tile Doctor Seal & Go. This combination of sealers provides a durable internal and surface stain protection whilst lifting the colours and adding a nice subtle sheen finish.
Once dried and cured, the floor was buffed using micro-fibre clothes to further enhance the appearance of the tiles further. My client was very pleased with the results, and couldn’t believe it was possible to get a floor that was so old appear brand new! The floor will dull with wear so I advised my client on the benefits of a regular maintenance plan going forward to ensure this great flooring feature remains in top condition.
Andrew Evans
Bedfordshire Tile Doctor
 Five Star Tree Care
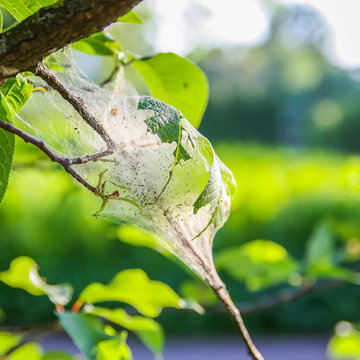
Have you ever looked out at your usually normal tree only to find it draped in hundreds or thousands of eerie looking webs? No, you are not going crazy. Chances are your tree has been visited by seasonal bugs. Typically, Eastern tent caterpillars or fall webworms are the cause of web covered trees. When they visit, they spin nets that resemble spider webs. Five Star Tree Services has put together a quick guide on everything you need to know about web-making caterpillars and how to deal with them.
Eastern Tent Caterpillars vs. Fall Webworms
Both of these pests look similar but there are some differences that set them apart. Eastern tent caterpillars are also called spring webworms. This is mainly because they are often found feeding during the spring seasons, while fall webworms as the name suggest, tend to appear in the autumn months.
The webs of the two pests look different from each other. The eastern tent caterpillar webs have a thick texture that looks like cotton, while the fall webworms have webs that more resemble tulle. Both also prefer to reside in different parts of the tree. Eastern tent caterpillars love to hang out where branches connect, called tree pockets. Fall webworms, on the other hand, like to hang out on the tips of branches.
Each has a different set of preferred tree species for their meals. Fall webworms like more than 100 different types of trees, but they are most often found on:
Black Walnut Trees
Hickory Trees
Wild Cherry Trees
Pecan Trees
Sweetgum Trees
Persimmon Trees
Mulberry Trees
Oak Trees
Pecan Trees
Eastern tent caterpillars also consume many different species of tree, but are most often found on:
Apple Trees
Crabapple Trees
Wild Cherry Trees
Ash Trees
Maple Trees
How to Remove Webworms & Tent Caterpillars
Before you start freaking out about your Halloween tree that suddenly decided to appear in the spring or early fall, it is important to note that these bugs won’t harm your tree. They look gross and will eat a large portion of your leaves, but there are no harmful side effects otherwise.
With that out of the way, getting rid of the webs is pretty simple. You can just remove them by hand and toss them into a bucket of detergent water to prevent sticking. You can also you the end of a stick or broom if you would prefer to avoid touching the sticky webs. For higher branches, we suggest calling a local arborist for assistance to prevent accidental falls.
How to Prevent Webworms & Tent Caterpillar Infestations
If you don’t want to deal with these webs at all, you can prevent an infestation in advance. In the winter, check your trees for tent caterpillar eggs. They are usually reddish in colour and a bit shiny. They can be found along the tree branches and scraped off. Fall webworm eggs look like green clumps and can be found on the bottom of leaves in the summertime. If you are unsure, or if you simply don’t want to deal with the problem on your own, Five Star Tree Services can help. Give us a call at (416) 990-3355 to find out more about our Toronto tree removal and tree care services today.
8