
Search results for "Liberate" in Home Design Ideas
 Donald Lococo Architects
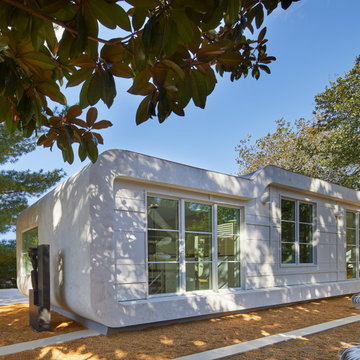
Designed in 1970 for an art collector, the existing referenced 70’s architectural principles. With its cadence of ‘70’s brick masses punctuated by a garage and a 4-foot-deep entrance recess. This recess, however, didn’t convey to the interior, which was occupied by disjointed service spaces. To solve, service spaces are moved and reorganized in open void in the garage. (See plan) This also organized the home: Service & utility on the left, reception central, and communal living spaces on the right.
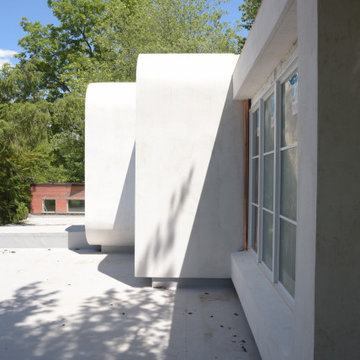
To maintain clarity of the simple one-story 70’s composition, the second story add is recessive. A flex-studio/extra bedroom and office are designed ensuite creating a slender form and orienting them front to back and setting it back allows the add recede. Curves create a definite departure from the 70s home and by detailing it to "hover like a thought" above the first-floor roof and mentally removable sympathetic add.Existing unrelenting interior walls and a windowless entry, although ideal for fine art was unconducive for the young family of three. Added glass at the front recess welcomes light view and the removal of interior walls not only liberate rooms to communicate with each other but also reinform the cleared central entry space as a hub.
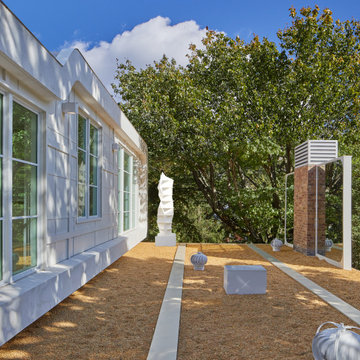
Even though the renovation reinforms its relationship with art, the joy and appreciation of art was not dismissed. A metal sculpture lost in the corner of the south side yard bumps the sculpture at the front entrance to the kitchen terrace over an added pedestal. (See plans) Since the roof couldn’t be railed without compromising the one-story '70s composition, the sculpture garden remains physically inaccessible however mirrors flanking the chimney allow the sculptures to be appreciated in three dimensions. The mirrors also afford privacy from the adjacent Tudor's large master bedroom addition 16-feet away.
 Tile Doctor Ltd
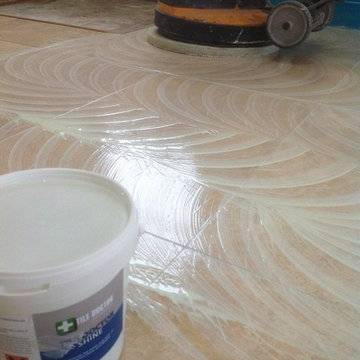
If you want a polished stone floor to keep its appearance, then it will need a regular maintenance plan in place, without it the stone will lose its polish and start to look dull and un-inviting which was the story with this Travertine tiled floor installed throughout much of the grout floor of this house in the village of Great Wilbraham near Cambridge.
I was able to find out from the owner that the floor was last treated six years ago with Lithofin Stain Stop which is a solvent based impregnating sealer which like all sealers will wear off after a few years. Naturally this depends on the amount of wear the floor receives and what tends to happen is this process occurs more rapidly in the high traffic areas leading to an uneven appearance.
The best course of action now would be to remove what was left of the sealer and re-polish and seal the floor.
During my inspection of the floor I had noticed a number of irregular holes in one of the Travertine tiles which needed filling with a colour matching filler; this worked out quite well and as you can see from the photographs below the result looked entirely natural.
After protecting the clients skirting boards with protective film we proceeded to burnish the floor through with a set of Tile Doctor Diamond encrusted honing pads.
During the application of the first coarse pad we also added a strong dilution of Tile Doctor Pro-Clean combined with NanoTech Ultra-Clean to aid the removal of sealer residues from the pores of the Travertine. The floor was then rinsed and the soiled solution extracted using a wet vacuum.
With the sealer remove we were now able to concentrate on building up the polish on the stone by applying the remaining pads from Medium, Fine through to Very Fine, each lubricated with a little water and ensuring to rinse in-between the application of each pad.
With the floor now clean and the polish restored the last step was to protect it so it would keep its appearance for as long as possible. There are a number of solutions for this but for a long durable shine I opted to work Tile Doctor Shine Powder into the Travertine.
The powder is applied liberally to the floor and then ground in using a slow speed floor rotary machine fitted with a white or tan buffing pad lubricated with water.
The shine on the floor has now been restored and the client has a beautiful and durable finish to their Travertine tiles.
Mick Conlon
Cambridge Tile Doctor
 Donald Lococo Architects
Designed in 1970 for an art collector, the existing referenced 70’s architectural principles. With its cadence of ‘70’s brick masses punctuated by a garage and a 4-foot-deep entrance recess. This recess, however, didn’t convey to the interior, which was occupied by disjointed service spaces. To solve, service spaces are moved and reorganized in open void in the garage. (See plan) This also organized the home: Service & utility on the left, reception central, and communal living spaces on the right.
To maintain clarity of the simple one-story 70’s composition, the second story add is recessive. A flex-studio/extra bedroom and office are designed ensuite creating a slender form and orienting them front to back and setting it back allows the add recede. Curves create a definite departure from the 70s home and by detailing it to "hover like a thought" above the first-floor roof and mentally removable sympathetic add.Existing unrelenting interior walls and a windowless entry, although ideal for fine art was unconducive for the young family of three. Added glass at the front recess welcomes light view and the removal of interior walls not only liberate rooms to communicate with each other but also reinform the cleared central entry space as a hub.
Even though the renovation reinforms its relationship with art, the joy and appreciation of art was not dismissed. A metal sculpture lost in the corner of the south side yard bumps the sculpture at the front entrance to the kitchen terrace over an added pedestal. (See plans) Since the roof couldn’t be railed without compromising the one-story '70s composition, the sculpture garden remains physically inaccessible however mirrors flanking the chimney allow the sculptures to be appreciated in three dimensions. The mirrors also afford privacy from the adjacent Tudor's large master bedroom addition 16-feet away.
Find the right local pro for your project
 Tile Doctor Ltd
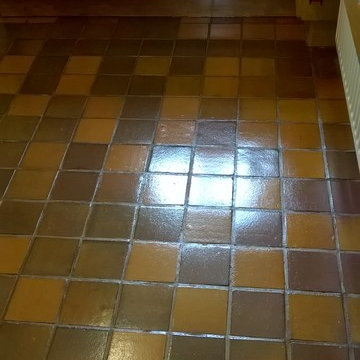
This Quarry tiled kitchen floor was in very good condition, with no cracked or broken tiles. However, my customer, who lives in the town of Tutbury, near Burton-on-Trent, was keen to boost the condition of the tiles further through professional maintenance, including a deep clean and a fresh seal to restore the sheen to the Quarry. NB, did you know it’s estimated that Tutbury has actually been inhabited for 3000 years, having once been the site of an Iron Age hill fort, this house of course was a lot more recent.
To clean the tiles, I chose to use our tried and trusted alkaline cleaner, Tile Doctor Pro Clean. We use Pro Clean on most types of natural stone floor, including Quarry, Slate, and Victorian. I applied Pro Clean liberally across the floor and left it to dwell for a short period, giving it time to seep into the tile to get underneath and lift out any ingrained dirt. The cleaner was then agitated using a scrubbing pad fitted to a rotary machine to remove the dirt and other general muck.
I then rinsed the floor with cold water and soaked up the resulting slurry with a wet-vac machine. Some areas of the floor proved to be quite stubborn to clean, so in these areas the cleaning process was repeated until satisfactory results were achieved. Finally, the floor was given another rinse and left to dry off overnight.
The next day I returned to the property and checked that the floor was ready to seal by running several damp tests, with the results indicating that was no excess moisture remaining on the tiles. We carry out these tests before sealing because moisture can cloud the sealer and prevent it from properly protecting the tiles.
My choice of sealer was Tile Doctor Seal & Go, a cost effective topical sealer that builds up a robust layer of protection on the surface of the floor and provides a durable sheen finish that, as you can see from the photographs, really lifts the appearance of the tiles.
It’s a fact that any sealed tiled floor will need to be regularly maintained as sealers do wear off over time, especially in the high traffic areas, and this is when the floor starts to lose its appearance as dirt becomes trapped in the pores of the stone. The life of the sealer can be extended however by ensuring you only clean the floor with a PH Neutral cleaner.
Trevor Preeece
 Tile Doctor Ltd
Shipley is a town in West Yorkshire that was heavily shaped by the Industrial Revolution and the Victorian period. It became particularly well-known for its textile industry and some of the original mills in which textiles were manufactured still survive in the town today. Being in West Yorkshire, Shipley is also part of what is commonly known as ‘Brontë country’ – once home to the famous Brontë sisters.
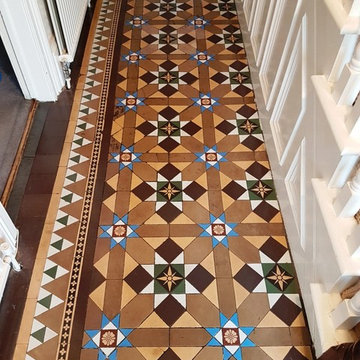
Many Victorian era properties still survive in the area too and all too often the original Victorian tiled floors contained within are not well maintained. I recently visited a customer in Shipley who had a Victorian tiled hallway that was in need of a deep clean and seal. What’s more, the customer told me that there were around 20 loose tiles in the hallway that would need to be reinstalled.
On the first day, I started by refitting the 20 loose tiles in the hallway. The problem however was a lot worse than originally thought and, in the end, I had to take up 108 tiles, so I could rebuild the base of the floor, and then relay them. This process took up most of the day but at least the adhesive and grout would be set in time for cleaning the next day.
On day two I focused on deep cleaning the tiles and removing any remaining sealer by applying a strong dilution of Tile Doctor Pro-Clean. Pro-Clean is a strong alkaline heavy-duty tile and grout cleaner that serves the purpose of both cleaning the stone and when used in a strong dilution will strip off sealers.
I applied the Pro Clean liberally across the length of the hallway and left it to soak into the tiles for about twenty minutes. This allows the product time to breakdown the sealer and dirt before being scrubbed in with a black scrubbing pad.
Special attention had to be paid to parts of the floor which had suffered paint splashes from previous decoration. I was also surprised to find that there were even some chewing gum stains marking the tiles. These were removed using the combination of a steam cleaner, more Pro-Clean and the careful use of a handheld scraper.
The floor was then given a thorough rinse with fresh water and then dried as much as possible with a wet vacuum. It was then also left to dry off overnight.
Upon returning to the property the next day I checked for any moisture issues with a damp tester. Thankfully, the floor proved dry and I could proceed with sealing the tiles which was done using four coats of Tile Doctor Seal and Go that leaves a deep satin finish that the customer had requested.
Nigel Stoker
North West Yorkshire Tile Doctor
 Donald Lococo Architects
Designed in 1970 for an art collector, the existing referenced 70’s architectural principles. With its cadence of ‘70’s brick masses punctuated by a garage and a 4-foot-deep entrance recess. This recess, however, didn’t convey to the interior, which was occupied by disjointed service spaces. To solve, service spaces are moved and reorganized in open void in the garage. (See plan) This also organized the home: Service & utility on the left, reception central, and communal living spaces on the right.
To maintain clarity of the simple one-story 70’s composition, the second story add is recessive. A flex-studio/extra bedroom and office are designed ensuite creating a slender form and orienting them front to back and setting it back allows the add recede. Curves create a definite departure from the 70s home and by detailing it to "hover like a thought" above the first-floor roof and mentally removable sympathetic add.Existing unrelenting interior walls and a windowless entry, although ideal for fine art was unconducive for the young family of three. Added glass at the front recess welcomes light view and the removal of interior walls not only liberate rooms to communicate with each other but also reinform the cleared central entry space as a hub.
Even though the renovation reinforms its relationship with art, the joy and appreciation of art was not dismissed. A metal sculpture lost in the corner of the south side yard bumps the sculpture at the front entrance to the kitchen terrace over an added pedestal. (See plans) Since the roof couldn’t be railed without compromising the one-story '70s composition, the sculpture garden remains physically inaccessible however mirrors flanking the chimney allow the sculptures to be appreciated in three dimensions. The mirrors also afford privacy from the adjacent Tudor's large master bedroom addition 16-feet away.
 Donald Lococo Architects
Designed in 1970 for an art collector, the existing referenced 70’s architectural principles. With its cadence of ‘70’s brick masses punctuated by a garage and a 4-foot-deep entrance recess. This recess, however, didn’t convey to the interior, which was occupied by disjointed service spaces. To solve, service spaces are moved and reorganized in open void in the garage. (See plan) This also organized the home: Service & utility on the left, reception central, and communal living spaces on the right.
To maintain clarity of the simple one-story 70’s composition, the second story add is recessive. A flex-studio/extra bedroom and office are designed ensuite creating a slender form and orienting them front to back and setting it back allows the add recede. Curves create a definite departure from the 70s home and by detailing it to "hover like a thought" above the first-floor roof and mentally removable sympathetic add.Existing unrelenting interior walls and a windowless entry, although ideal for fine art was unconducive for the young family of three. Added glass at the front recess welcomes light view and the removal of interior walls not only liberate rooms to communicate with each other but also reinform the cleared central entry space as a hub.
Even though the renovation reinforms its relationship with art, the joy and appreciation of art was not dismissed. A metal sculpture lost in the corner of the south side yard bumps the sculpture at the front entrance to the kitchen terrace over an added pedestal. (See plans) Since the roof couldn’t be railed without compromising the one-story '70s composition, the sculpture garden remains physically inaccessible however mirrors flanking the chimney allow the sculptures to be appreciated in three dimensions. The mirrors also afford privacy from the adjacent Tudor's large master bedroom addition 16-feet away.

 Michael Lewis Architects PC
The curve of the house continues through the living space, culminating in an exit to the pool deck. The full height glass again emphasizing the connection between the interior space and the pool.
 Tile Doctor Ltd
It’s fairly common for owners of older properties – especially houses those that are over 100 years old or more – to find original Victorian tiled flooring hidden underneath carpet. It can wait years for the tiles to be discovered, by which time they have amassed huge amounts of dirt and dust.
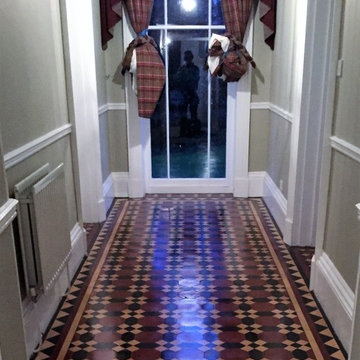
Such was the case at this property in Bridlington, a Yorkshire town through which a stream known as the ‘Gypsey Race’ runs, before emptying in the North Sea at the Bridlington Harbour. Interestingly enough, folklore says that when the stream is flowing, bad fortune is at hand. The stream must not have been running on the day that we restored this Victorian hallway, as we managed to achieve some truly fantastic results!!
The hallway had been severely dulled after going years without professional care. We set about giving it the thorough clean and fresh seal that I’d des partly needed. Here’s how we did it.
Our first task was to remove any old, no longer effectual sealer. We did this by liberally applying a strong dilution of our alkaline-based Tile a Doctor Pro Clean, which doubles as a reliable cleaner and a stripper capable of stripping away old sealer. The product was worked into the tiles using a black stripping pad fitted to a 17″ rotary machine, and the process was repeated three times.
I noticed that there was still some stubborn dirt and old sealer around the edges of the hallway, so I used some of our handheld diamond encrusted burnishing blocks to grind it away. To finish the cleaning process, we washed the floor with Tile Doctor pH Neutral Tile Cleaner, leaving it fresh and ready to be sealed once left to dry overnight.
Upon our return to the property the next day, we ran some quick tests to check for any excess moisture (even a small amount could have damaged the performance of the new sealer). Once satisfied with the the condition of the floor, we proceeded to see it with an impregnating sealer, meaning a sealer that penetrates into the pores of the tile to fill them and therefore prevent trapped dirt and ingrained stains.
Our impregnating sealer, Tile Doctor Colour Grow, has the added benefit of being colour intensifying, which really highlights the unique colourful patterns of the tiles. To give the floor a durable sheen finish, as requested by the customer, we also added a coat of Tile Doctor Seal and Go sealer.
The result was a complete transformation of the condition and appearance of this great Victorian tiled hallway. Our customer is very pleased – the floor is now a complete asset to any property, and will now be easier to keep looking great in future.
Ronnie Phipps
East Yorkshire Tile Doctor
 Tile Doctor Ltd
Terrazzo is a quite a bit different from the natural stone floors we most commonly work with. It’s a type of flooring material that was made popular by Venetian builders in Italy in the 1920s, but is ultimately descended from styles of design that date back hundreds of years. A typical Terrazzo floor consists of chips of marble or granite set in concrete and polished to result in a smooth surface.
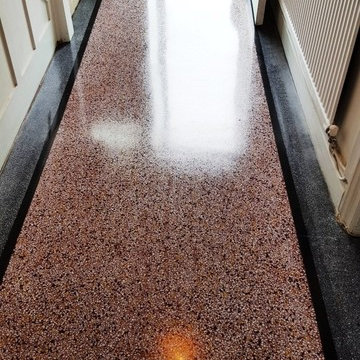
This Terrazzo floor, installed in the hallway of a property in Bridgend, South Wales, was in relatively good physical condition, but it had clearly lost its shine due to the build-up of dirt and muck over the years. In fact, it was first installed in around 1940! The owner was keen to have it rejuvenated to its best possible condition, so they asked me to come in to see what I could do.
My first course of action was to apply Tile Doctor Pro Clean liberally across the floor and leave it to dwell for a short period. This is a high alkaline cleaner that is designed to deal with light to moderate soil build-up, and to strip away any old sealer remaining on the floor. I scrubbed the product in using a black pad fitted to a rotary machine and vacuumed up the resulting cleaning with a wet-vac machine.
Next, to restore the shine to the floor, I undertook a process known as burnishing, which involves the application of diamond encrusted polishing pads. We will typically start with a Coarse grit pad to level off any uneven areas of the floor and grind down any particularly stubborn marks and stains. Then, we gradually refine the polish on the floor using Medium and Fine grit pads. A small amount of water is used as lubrication with each pad.
After I had finished applying the first three pads in our four-pad system, I gave the floor a thorough rinse and left it to dry overnight.
I returned to the property the next day and immediately ran some damp tests to check for excess moisture issues, which one might expect with an old floor like this one. Thankfully, the floor proved dry – and I could finish the burnishing process with the fourth and final Very Fine diamond encrusted burnishing pad, which achieved a beautiful shine finish.
Finally, I sealed the floor with three coats of Tile Doctor Colour Grow, an impregnating sealer which provides robust protection and enhances the coloured patterns in the Terrazzo.
As you can see from the photos above, the floor is looking so much more colourful and bright after a deep clean, polish and a fresh seal. The customer was over the moon!
Julian Iancono
South East Wales Tile Doctor

 Cassoni Furniture & Accessories
- N.C. LANDSCAPE 2016 WALL UNIT. The forms, colors and materials evolve towards a new warmth, a cozy, comfortable mood, which transforms the elegance of the linear shapes into soft, sensory emotions: N.C. Landscape shows new horizons. The large doors made with thin solid wood slats, together with glass that is reflective and transparent at the same time, create an intriguing play of light and shadow, reflection and transparency. The freely sliding doors reveals surprising contrasts of material with the inside of the compartments and the backs of the paneling, emphasizing each time the different functions: concealing and integrating audio-video equipment, displaying books and favorite objects on the shelves or containing them within the spacious closed compartments.
157"1/2W x 15"D x 94"1/2H.
https://cassoni.com/NC_Landscape_2016_01
- HYPER CHAISE LOUNGE. Special bridge structure, slender and linear, that reveals and enhances the decisive forms and the pronounced volumes of the weight-bearing arms, giving an unusual shape to comfort, strictly in leather. The low back creates an unusual contrast between the height and the depth of the seat, while the cushions create a harmony with the severity of the structural lines, liberating a feeling of comfort and relaxation. Its unusual suspended effect creates a dreamy, relaxed atmosphere, soft and at the same time exquisitely squared, with shapes that give a personal character to the living space.
31''1/2W x 59''7/8D x 24''3/8H.
39''3/8W x 59''7/8D x 24''3/8H.
https://cassoni.com/Hyper_Chaise_lounge
- POND COFFEE TABLE. Family of cocktail tables, side tables, occasional tables with different heights and width. While the conical base tends to disappears in the shadow, the top is raised from the ground and lives of intriguing reflections and shades of colors. The reflections of the glass top, whose perfectly glossy surface mirrors everything around, recreating the mystic reflection effect of perfectly still water, or those of the marble top, for the rich grains and mosaic of minerals it is made of. Base made from molded polyurethane BAYDUR®60, lacquered with glossy finishes. Top in back-lacquered glass or in stone. 47"1/4 version on wheels, hidden inside the base.
Ø35''3/8 x 15''H.
Ø47''1/4 x 11''7/8H.
https://cassoni.com/Pond_Coffee_Table
 Cassoni Furniture & Accessories
- HYPER SOFA. A sofa with a special bridge structure, slender and linear, that reveals and enhances the decisive forms and the pronounced volumes of the weight-bearing arms, giving an unusual shape to comfort, strictly in leather. The low back creates an unusual contrast between the height and the depth of the seat, while the cushions create a harmony with the severity of the structural lines, liberating a feeling of comfort and relaxation. Its unusual suspended effect creates a dreamy, relaxed atmosphere, soft and at the same time exquisitely squared, with shapes that give a personal character to the living space.
2 or 3-seaters.
https://cassoni.com/Hyper_Sofa
- N.C. LANDSCAPE 2016 WALL UNIT. The forms, colors and materials evolve towards a new warmth, a cozy, comfortable mood, which transforms the elegance of the linear shapes into soft, sensory emotions: N.C. Landscape shows new horizons. The large doors made with thin solid wood slats, together with glass that is reflective and transparent at the same time, create an intriguing play of light and shadow, reflection and transparency. The freely sliding doors reveals surprising contrasts of material with the inside of the compartments and the backs of the paneling, emphasizing each time the different functions: concealing and integrating audio-video equipment, displaying books and favorite objects on the shelves or containing them within the spacious closed compartments.
189"W x 20"7/8D x 63"H.
https://cassoni.com/NC_Landscape_2016_02
- POND COFFEE TABLE. Family of cocktail tables, side tables, occasional tables with different heights and width. While the conical base tends to disappears in the shadow, the top is raised from the ground and lives of intriguing reflections and shades of colors. The reflections of the glass top, whose perfectly glossy surface mirrors everything around, recreating the mystic reflection effect of perfectly still water, or those of the marble top, for the rich grains and mosaic of minerals it is made of. Base made from molded polyurethane BAYDUR®60, lacquered with glossy finishes. Top in back-lacquered glass or in stone. 47"1/4 version on wheels, hidden inside the base.
Ø35''3/8 x 15''H.
Ø47''1/4 x 11''7/8H.
https://cassoni.com/Pond_Coffee_Table

 Hueber Industries
This railing was the first planned update of the Fort Collins, CO couples home renovation. The wavy lines give the room a natural feel. Design and fabrication by Hueber Industries LLC. Photo: Rory Schaar.


 Tile Doctor Ltd
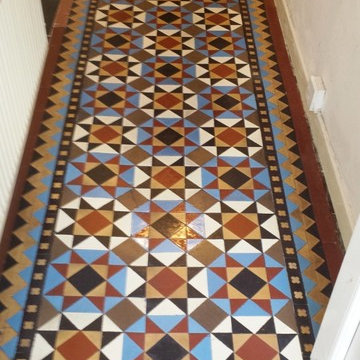
When you uncover a tiled floor after it has been covered by carpet for many years, it’s almost a given that it will be in a bad state. However, my customer, who lives in the town of Lymm, wasn’t expecting the Victorian tiled hallway they had recently uncovered to be in quite so terrible a state. As you can see from the photograph, it has been completely devastated by paint plaster and a big pool of cement floor leveller. Understandably, the formerly colourful appearance of the tiles had completely drained and it would require a through restoration to get them back into a usable condition.
To begin the restoration, I mixed a strong cleaning solution which consisted of Tile Doctor Remove & Go combined 50/50 with Tile Doctor Pro Clean. Remove & Go is a heavy duty remover that breaks down old sealers, along with adhesives, paint stains and other tough soil build up where as Pro-Clean is a versatile alkaline-based cleaner that reliably eradicates dirt on a wide variety of natural stone floors.
The solution was applied liberally across the floor, and left to dwell for a short period, allowing time for it to soften up the paint plaster. Next, I fitted a coarse scrubbing pad to my rotary cleaning machine and began to scrub the solution into the tiles, with a big difference to the appearance of the tiles being made quite quickly. The resulting cleaning slurry was promptly removed using a wet-vac machine.
I repeated the process two times to provide an extra thorough clean and then give the floor a thorough rinse. Some particularly stubborn marks remained on the floor which I was able to remove using Tile a Doctor Acid Gel, a blend of phosphoric and hydrochloric acids in gel form that’s easy to control. The floor was then left to dry fully overnight.
The next morning, I returned to the property and ran some damp tests. This is incredibly important to do before sealing any tiled floor because any excess moisture can cloud the sealer and prevent it from doing its job properly.
Once satisfied that the floor could be sealed, I applied several coats of Tile Doctor Seal and Go, our topical sealer which provides both a robust surface seal and a long-lasting low sheen finish in one and ideal for Victorian tiles.
It would be an understatement to say that this Victorian tiled floor was transformed. The customer was amazed at the results considering how bad a state the tiles had been in just a day earlier. When you have a situation like this, it’s hard to believe the tiles could ever be fully restored. Nonetheless, we could now see them in their full and original glory, and needless to say, the customer was very, very pleased with the result.
Alastair Robb
West Cheshire Tile Doctor

 Tile Doctor Ltd
Along with internal tiled floors at residential and commercial properties, we also specialise in the cleaning, restoration and sealing of all types of external tiled floors, including patios.
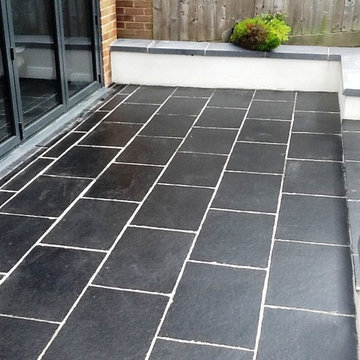
This customer, who lives in the small town of Brackley in Northamptonshire, had made the unfortunate mistake of sealing a brand new Slate tiled patio without removing the layer of grout haze smeared across the surface of the tile first. With the grout trapped between the tile and the new sealant the sealer was unable to fulfil its potential and the entire floor appeared really dull and patchy. The customer contacted me about setting the situation right.
My initial course of action was to remove the new sealer using Tile Doctor Remove & Go, which is specially designed to strip away sealant, as well as adhesives and paints in cases where building and decorating works have left the tiles stained. The product was applied liberally across the surface area of the patio and agitated using a rotary machine fitted with a special stripping pad. Of course, this was necessary because the grout haze could not be treated without removing the sealant first. The soiled cleaning solution was promptly soaked up using a wet-vac machine.
Once the tiles were exposed I applied Tile Doctor Acid Gel, which is a blend of phosphoric and hydrochloric acids in more manageable gel form, all over the patio and allowed it to dwell for ten minutes to begin neutralising the grout haze. I then added a little water and worked the product into the patio with a stiff scrubbing brush and a rotary machine to ensure all grout haze was removed from the surface of the tiles. The remaining slurry was then removed using the wet vacuum, and I rinsed the area twice with plain water to ensure all cleaning products had been removed. It was them left to dry completely.
I returned to the property several days later to give the patio a fresh seal now that it was free from grout haze. First, I gave the patio a vacuum and light mop to remove any dust and debris. The customer wanted the tiles as dark as possible, therefore I suggested we use Tile Doctor Stone Oil before sealing, as this would darken the Slate significantly.
Once this was agreed, I applied one coat of Stone Oil, allowed an hour for the product to dry, and then followed this applying two coats of Tile Doctor Colour Grow sealer. This is our impregnating, colour enhancing sealant which provides maximum protection against ingrained dirt and stains, as well as a durable no-sheen finish.
As you can see from the photographs, the Slate tiles experienced an impressive transformation. The fresh sealant, combined with the Stone Oil, really took the appearance of the tiles to a new level and, what’s more, it will be easier for the happy customer to keep it clean in the future.
Phil Vissian
Northamptonshire Tile Doctor
 Tile Doctor Ltd
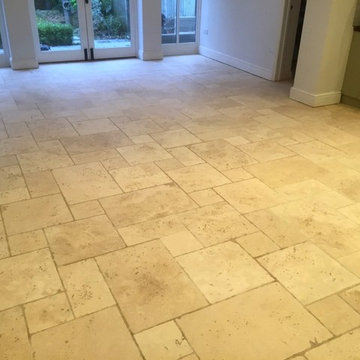
Recently I visited a client in the town of Maidenhead, Berkshire who needed assistance restoring a very dirty pitted Limestone tiled floor which had suffered over the years due to poor maintenance choices. The pressures of a busy family life had, understandably, prevented my client from undertaking regular cleaning and the products and methods used for cleaning were by and large unsuitable for this type of natural stone. In addition, the pits in the tiles had been filled with grout; however, they were not flush to the tile and therefore a large amount of soil had collected in the pockets. The result was a Limestone tiled floor in considerably poor condition that was increasingly difficult to keep clean.
My client had tried and tried to get the floor clean, using methods such as scrubbing with toothbrushes, steam cleaners, and mopping – but they weren’t getting anywhere! I explained to my client that steaming is, in fact, one of the worst cleaning systems to use on natural stone floors. Steam not only damages sealers, it also thins out greasy soils. Some of these soils are absorbed onto the domestic microfiber pads, however a lot of the soil becomes thinner allowing it to penetrate deeper into the pours of the stone and grout. This in itself starts the vicious circle to rapidly soiled and dirty tiles and grout. This happens because the grease soils magnetise dirt!
My first task in the cleaning process was to mix a strong solution of Tile Doctor Pro-Clean, which is a high alkaline cleaner. This solution was applied liberally across the entire Limestone tiled floor and grout. It was allowed to dwell for 30-40 minutes, giving it time to seep into the stone to get underneath and lift the ingrained dirt to the surface. During this time, I scrubbed the grout lines using a specialist stiff grout brush. The Limestone tiles were then scrubbed with heavy mechanical rotary agitation machine.
I then gave the floor a thorough rinse using the latest in cleaning and capture technology, which involves firing hot water at high pressure in a spinning motion across the floor, in effect blasting away the ingrained soils from the grout and pitting in the limestone. The high pressure is delivered from a system mounted inside my van which also contains waste tanks to capture the extracted soiled water.
After being allowed to dry thoroughly for 24 hours, I returned to seal the floor with Tile Doctor Colour Grow which would have brought out the deep colours in the stone, however after discussing the options with the client it became clear that they wanted to keep the floor looking as light as possible so Tile Doctor Ultra Seal was applied. Ultra Seal is a natural look impregnating sealer that soaks into the pores of the stone and protects it from within.
The floor now looks fantastic and the sealer should ensure it remains looking that way for some time to come and before leaving I made sure to provide my client with some professional maintenance advice.
Tim Colenutt
Berkshire Tile Doctor
 MOBILENA
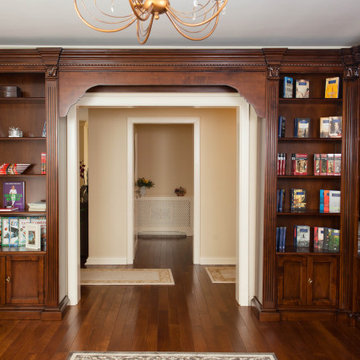
Mobilier / Mobila Biblioteca si masa de birou clasica cu prezenta impunatoare disponibila in mai multe finisaje/culori si customizabila pe dimensiunile dorite. Finisajul standard este nuc, dar la cerere se poate realiza si pe alt finisaj, in ultima poza apar toate finisajele(culorile) disponibile. LA COMANDA PE ALTE DIMENSIUNI Biblioteca se poate realiza la comanda si pe alte dimensiuni decat cele standard, precum sunt configuratiile in L care apar in poze. Configuratia standard este cea pe un singur perete. . Biblioteca se poate face pe un perete * dreapta sau pe colt * in L. Numarul de module si lungimea fiecuri modul depinde de lungimea totala. In funcție de Lungimea dorita va vom spune cate module se pot face. Pretul bibilotecii depinde de detalii precum polite suplimentare sau alte detalii constructive care modifica configuratia standard ( alta înaltime de exemplu) . Pe inaltime la configuratia Standard * ce vedeti in poze, sunt 3 rafturi si rezulta 4 spatii. Sunt mai multe gauri la fiecare din cele 3 locuri unde vin politele asezate pe inaltime in peretii aterali, ceea ce permite asezarea politelor la inaltimea dorit a, ceea ce face ca inaltimea la spatiile rezultate sa fie configurabila, respectiv reconfigurarea așezării politelor daca pe viitor doriti asta. CONSTRUCTIE - ORNAMENTE Se executa din lemn masiv de fag partea din fata, respectiv panel acoperite cu furnir din lemn de nuc, partile laterale. Modificari constructive fata de ce apare in poze - La modeleul in L, pe colt se pune o lezena/sipca pe fiecare parte a coltului * in poza apar coloane * adica soclul ( ornamentul de jos ) si corona ( ornamentul de sus ) vor fi drepte * nu vor mai fi iesite inafara si fara ornamentul sculptat din partea de sus. - Spatiul din spatele lezenelor de pe colt se poate folosi pentru a pune carti - e liber se vede si in poza - Inchiderea la usile de jos se face cu butoni in loc de inchidere cu cheie * in poza de apare inchidere cu cheie -
 Tile Doctor Ltd
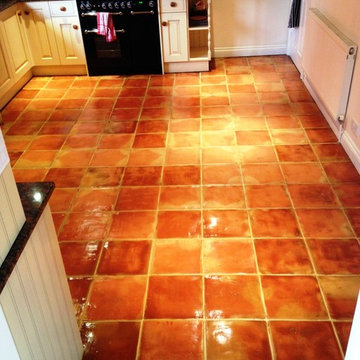
Terracotta may be one of the most aesthetically pleasing types of tiled floor, but as many of our customers will tell you can be particularly difficult to keep clean. This is due to the naturally high porosity of clay, which allows dirt to become very easily trapped. Quite commonly this situation is made worse by a lack of an adequate sealer to block the intrusion of muck. Of course, poor quality cleaning products also make it difficult for property owners to keep their Terracotta tiles clean, and a combination of the two problems can leave these floors looking a lot like this one, located in the kitchen of a house in the beautiful Forest of Dean.
The property owner was keen to have me restore some character to her dull Terracotta tiles. It was proving increasingly difficult for her to keep them clean due to the reasons described before, and the grout had also become very dirty. So, the customer turned to me for some professional assistance.
While these Terracotta tiles had been sealed previously it had, over time, lost its ability to protect the stone against ingrained dirt. To remove the old excess sealer my product of choice was the heavy duty soil remover and stripper, Tile Doctor Remove & Go, which I applied liberally across the surface and scrubbed in to the tile used a rotary machine fitted with a scrubbing pad. This also helped to remove the trapped dirt and left the stone looking fresher.
Once the old sealer was removed – to be replaced with a fresh sealer once cleaning was complete – I was free to focus on the troublesome grout lines with Tile Doctor Pro Clean, an alkaline cleaner that reliably breaks down dirt. When cleaning the grout, I opted to use a handheld grout brush that allowed for more precise, careful application of the product.
As per usual, the floor was given a good rinse and left to dry for 24 hours.
Upon returning to the property I checked the floor was completely dry, ready for sealing. My process for sealing actually involved the application of two different kinds of sealer; initially I applied a single coat of Tile Doctor Colour Grow which has soaks into the pores of the tile and has the added bonus of enhancing its natural colours.
Once this had dried I then applied ix coats of Tile Doctor Seal and Go, a product which forms a durable layer of protection of the surface of the tiles and at the same time provides a lovely sheen finish.
The combination of the two sealers will certainly offer a long-term solution to the ingrained dirt problem, and the appearance-enhancing properties in the products really helped to transform the tiles from dull and dirty to lively and eye-catching. Nonetheless, before departing the property, I also left my very pleased customer with some cleaning advice for the future.
Paul Wales
Monmouthshire Tile Doctor
24