
Search results for "Liberate" in Home Design Ideas
 Aulik Design Build
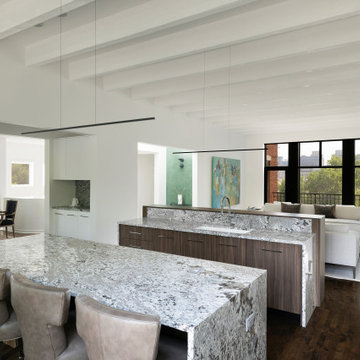
Sharing the primary entertaining space of this centrally located Minneapolis townhouse, this kitchen completed during a remodel in 2022, was designed to integrate and harmonize with a distinctive yet quiet presence.
Liberated from its former enclosure, this stunning kitchen takes center stage at the heart of this contemporary town home. Anchored by dual walnut islands, the new layout is conducive to entertaining and provides both cook and guest with excellent views of the Minneapolis skyline.
Minimizing traditionally identifiable elements of a kitchen, the space, in concert with the surrounding rooms, feels more like an upscale lounge and less like a residential kitchen.
Natural granite is abundant, the waterfalled surfaces adding dramatic effect at the island and behind the induction range where an underlit shelf is integrated into the stone assembly. At the sink, the carefully detailed backsplash is recessed into the surrounding casework which provides additional storage facing the living area.
Streamlined appliances are unobtrusive, either fully-integrated or tucked out of the way. The rear wall is composed almost entirely of white, flat paneled cabinetry, tucked under the soffit and merging into the textured fireplace mass. Heavily distressed beams help mitigate the cavernous volume and add layers visual texture and warmth.
Double openings divide the space from a more intimately scaled dining area (the former home of the kitchen). The interstitial space provides room for a butler’s pantry and wet bar with hanging glass storage. A backlit etched glass panel provides ambient illumination and conceals an awkwardly located existing window.
 Aulik Design Build
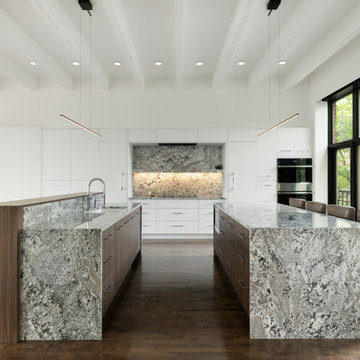
Sharing the primary entertaining space of this centrally located Minneapolis townhouse, this kitchen completed during a remodel in 2022, was designed to integrate and harmonize with a distinctive yet quiet presence.
Liberated from its former enclosure, this stunning kitchen takes center stage at the heart of this contemporary town home. Anchored by dual walnut islands, the new layout is conducive to entertaining and provides both cook and guest with excellent views of the Minneapolis skyline.
Minimizing traditionally identifiable elements of a kitchen, the space, in concert with the surrounding rooms, feels more like an upscale lounge and less like a residential kitchen.
Natural granite is abundant, the waterfalled surfaces adding dramatic effect at the island and behind the induction range where an underlit shelf is integrated into the stone assembly. At the sink, the carefully detailed backsplash is recessed into the surrounding casework which provides additional storage facing the living area.
Streamlined appliances are unobtrusive, either fully-integrated or tucked out of the way. The rear wall is composed almost entirely of white, flat paneled cabinetry, tucked under the soffit and merging into the textured fireplace mass. Heavily distressed beams help mitigate the cavernous volume and add layers visual texture and warmth.
Double openings divide the space from a more intimately scaled dining area (the former home of the kitchen). The interstitial space provides room for a butler’s pantry and wet bar with hanging glass storage. A backlit etched glass panel provides ambient illumination and conceals an awkwardly located existing window.

Find the right local pro for your project
 Aulik Design Build
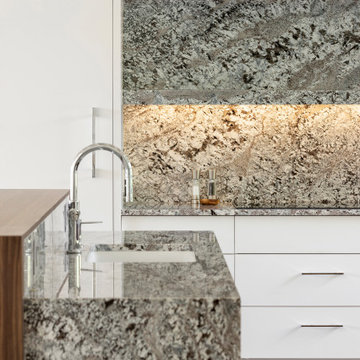
Sharing the primary entertaining space of this centrally located Minneapolis townhouse, this kitchen completed during a remodel in 2022, was designed to integrate and harmonize with a distinctive yet quiet presence.
Liberated from its former enclosure, this stunning kitchen takes center stage at the heart of this contemporary town home. Anchored by dual walnut islands, the new layout is conducive to entertaining and provides both cook and guest with excellent views of the Minneapolis skyline.
Minimizing traditionally identifiable elements of a kitchen, the space, in concert with the surrounding rooms, feels more like an upscale lounge and less like a residential kitchen.
Natural granite is abundant, the waterfalled surfaces adding dramatic effect at the island and behind the induction range where an underlit shelf is integrated into the stone assembly. At the sink, the carefully detailed backsplash is recessed into the surrounding casework which provides additional storage facing the living area.
Streamlined appliances are unobtrusive, either fully-integrated or tucked out of the way. The rear wall is composed almost entirely of white, flat paneled cabinetry, tucked under the soffit and merging into the textured fireplace mass. Heavily distressed beams help mitigate the cavernous volume and add layers visual texture and warmth.
Double openings divide the space from a more intimately scaled dining area (the former home of the kitchen). The interstitial space provides room for a butler’s pantry and wet bar with hanging glass storage. A backlit etched glass panel provides ambient illumination and conceals an awkwardly located existing window.
 Tile Doctor Ltd
Lichen, moss and other plant-based staining is a common sight on patios exposed to the UK climate. For many property owners, it’s a very difficult task to keep patios looking great in the face of the natural effects of the environment. However always happy to help Tile Doctor is available to provide the professional cleaning and sealing needed on a regular basis.
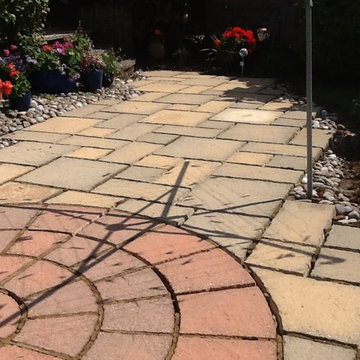
This Sandstone tiled patio in Rushden was certainly a prime candidate for restoration. Not only was it completely covered in lichen and moss, but it was also cracked in parts and missing grout. The patio would therefore need not only cleaning and sealing, but also re-grouting.
To begin the restoration, I opted to power jet wash the entire area to remove as much of the initial layers of moss. Then, I mixed a strong dilution of Tile Doctor Pro Clean, which is a powerful and reliable alkaline cleaner suitable for use on both internal and external natural stone tiles. This was applied liberally to the patio and scrubbed into the stone to cut through the particularly stubborn stains. The two photos below show the fantastic result.
After completing the cleaning phase, I allowed the patio to dry completely overnight before returning to re-grout the entire area with mortar. To finish off I applied a fresh sealer in the form of Tile Doctor Seal and Go Extra, which an acrylic-based, fully breathable sealer appropriate for outside use.
The below pictures show the final result. As you can see, it was a complete transformation – and my very happy customer will agree! With the right products and methods, it’s possible to bring new life back to weathered patios.
Phil Vissian
Northamptonshire Tile Doctor

 Five Star Tree Care
Having evergreens on your property is an extraordinary way to include color that will stay fresh all year long. Knowing how to take care of your evergreens is also important if you want them to thrive long-term. How you plant your evergreens and where you plant them is important, but their maintenance equally critical.
You should always fortify your evergreens by watering them liberally and mulching their soil beds. This will help reduce any damage caused by winds, cold weather, and intense sun exposure. Pruning on a consistent schedule will also ensure that your evergreen always looks neat, healthy, and green.
How to Properly Care for Evergreens
Evergreens are very low-maintenance trees but they still require care. Neglected plants will dry out and wither which has the contrary effect of what you intended for when you planted them.
Mulching & Watering
The level of moisture in the soil will determine how well an evergreen can handle winter conditions and dry conditions. Adding wood chips or shredded bark mulch around the bottom of your plant will help lock in soil moisture. Make sure this is close to the tree’s drip line.
Adding organic materials to your mulch, such as compost, will further boost the nutrient levels in the soil. This, in turn, will help your evergreen grow strong, healthy and green. Make sure you water your plant regularly to maintain soil moisture levels.
Read More: https://www.fivestartreecare.ca/blog/best-way-to-care-for-evergreens/


 Natural Stone Institute
No greater compliment of a material is possible than when stone is selected for a historic property renovation within a home rich in tradition and with a celebrated past. This new feature stair addition to a private residence in Toronto, Canada, has an equally compelling story to tell.
Originally envisioned as a wall-supported, cantilevered stone stair, the owner boldly accepted a unique solution for their showpiece element. The 19-tread stair would be designed with 550 lb. solid stone treads, and fully
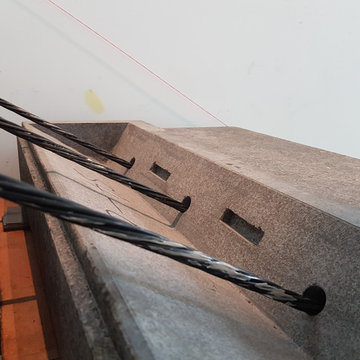
liberated from traditional supports and the adjacent rubble wall. To say, “it would float” is not an exaggeration. The stair would be designed as a monolithic beam spanning 16.5 feet, 10 feet high and 41 inches wide. Aesthetically bold, with a reduced tone from
pure black, the basalt stone was the perfect contrast for the white modern interior of the home. The 3-1/2" tension cables played the most important role by resisting the large bending moment generated by the stone load and stair geometry. Fabrication required precise coordination and care to ensure perfect alignment of the interlocking key, and the corresponding cable holes.
The fabrication challenge was achieving the highest level of accuracy in notching, coring, and replicating each tread identically. Expert precision and skill were key to nesting each tread in sequence and simultaneously with the strands. Meticulous alignment and exacting tolerance assured the true performance and aesthetics were delivered. Hydraulic post-tensioning pulled each cable to 120 kiloNewtons or 27,000 lbs, infusing strength and structural integrity. Removing the temporary support and testing was the last critical step—it was the first time the stone stair would be self-supporting.
The “floating” stair is an ultimate achievement and example of innovation, material strength, fabrication quality, installation precision, and expert coordination. A perfect final chapter to a historical journey and modern ode to stone as structure.
 Natural Stone Institute
No greater compliment of a material is possible than when stone is selected for a historic property renovation within a home rich in tradition and with a celebrated past. This new feature stair addition to a private residence in Toronto, Canada, has an equally compelling story to tell.
Originally envisioned as a wall-supported, cantilevered stone stair, the owner boldly accepted a unique solution for their showpiece element. The 19-tread stair would be designed with 550 lb. solid stone treads, and fully
liberated from traditional supports and the adjacent rubble wall. To say, “it would float” is not an exaggeration. The stair would be designed as a monolithic beam spanning 16.5 feet, 10 feet high and 41 inches wide. Aesthetically bold, with a reduced tone from
pure black, the basalt stone was the perfect contrast for the white modern interior of the home. The 3-1/2" tension cables played the most important role by resisting the large bending moment generated by the stone load and stair geometry. Fabrication required precise coordination and care to ensure perfect alignment of the interlocking key, and the corresponding cable holes.
The fabrication challenge was achieving the highest level of accuracy in notching, coring, and replicating each tread identically. Expert precision and skill were key to nesting each tread in sequence and simultaneously with the strands. Meticulous alignment and exacting tolerance assured the true performance and aesthetics were delivered. Hydraulic post-tensioning pulled each cable to 120 kiloNewtons or 27,000 lbs, infusing strength and structural integrity. Removing the temporary support and testing was the last critical step—it was the first time the stone stair would be self-supporting.
The “floating” stair is an ultimate achievement and example of innovation, material strength, fabrication quality, installation precision, and expert coordination. A perfect final chapter to a historical journey and modern ode to stone as structure.

 Natural Stone Institute
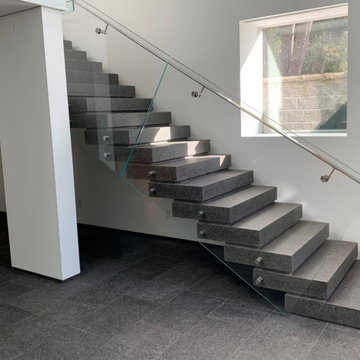
No greater compliment of a material is possible than when stone is selected for a historic property renovation within a home rich in tradition and with a celebrated past. This new feature stair addition to a private residence in Toronto, Canada, has an equally compelling story to tell.
Originally envisioned as a wall-supported, cantilevered stone stair, the owner boldly accepted a unique solution for their showpiece element. The 19-tread stair would be designed with 550 lb. solid stone treads, and fully
liberated from traditional supports and the adjacent rubble wall. To say, “it would float” is not an exaggeration. The stair would be designed as a monolithic beam spanning 16.5 feet, 10 feet high and 41 inches wide. Aesthetically bold, with a reduced tone from
pure black, the basalt stone was the perfect contrast for the white modern interior of the home. The 3-1/2" tension cables played the most important role by resisting the large bending moment generated by the stone load and stair geometry. Fabrication required precise coordination and care to ensure perfect alignment of the interlocking key, and the corresponding cable holes.
The fabrication challenge was achieving the highest level of accuracy in notching, coring, and replicating each tread identically. Expert precision and skill were key to nesting each tread in sequence and simultaneously with the strands. Meticulous alignment and exacting tolerance assured the true performance and aesthetics were delivered. Hydraulic post-tensioning pulled each cable to 120 kiloNewtons or 27,000 lbs, infusing strength and structural integrity. Removing the temporary support and testing was the last critical step—it was the first time the stone stair would be self-supporting.
The “floating” stair is an ultimate achievement and example of innovation, material strength, fabrication quality, installation precision, and expert coordination. A perfect final chapter to a historical journey and modern ode to stone as structure.

 Proven Winners
Covered in icy, violet-blue flowers, Still Waters™ is easy to grow with long-lasting blooms. This plant would look great growing with a dark leafed shrub like Black Lace® sambucus, on a fence, or a trellis.
 Natural Stone Institute
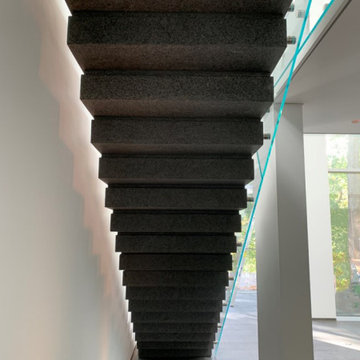
No greater compliment of a material is possible than when stone is selected for a historic property renovation within a home rich in tradition and with a celebrated past. This new feature stair addition to a private residence in Toronto, Canada, has an equally compelling story to tell.
Originally envisioned as a wall-supported, cantilevered stone stair, the owner boldly accepted a unique solution for their showpiece element. The 19-tread stair would be designed with 550 lb. solid stone treads, and fully
liberated from traditional supports and the adjacent rubble wall. To say, “it would float” is not an exaggeration. The stair would be designed as a monolithic beam spanning 16.5 feet, 10 feet high and 41 inches wide. Aesthetically bold, with a reduced tone from
pure black, the basalt stone was the perfect contrast for the white modern interior of the home. The 3-1/2" tension cables played the most important role by resisting the large bending moment generated by the stone load and stair geometry. Fabrication required precise coordination and care to ensure perfect alignment of the interlocking key, and the corresponding cable holes.
The fabrication challenge was achieving the highest level of accuracy in notching, coring, and replicating each tread identically. Expert precision and skill were key to nesting each tread in sequence and simultaneously with the strands. Meticulous alignment and exacting tolerance assured the true performance and aesthetics were delivered. Hydraulic post-tensioning pulled each cable to 120 kiloNewtons or 27,000 lbs, infusing strength and structural integrity. Removing the temporary support and testing was the last critical step—it was the first time the stone stair would be self-supporting.
The “floating” stair is an ultimate achievement and example of innovation, material strength, fabrication quality, installation precision, and expert coordination. A perfect final chapter to a historical journey and modern ode to stone as structure.

 Arbor Illuminations
Driven by a passion for the salt life and a love of the natural beauty of the area, they will leave the Northeast on a trek for the Florida Gulf Coast. The winters there are simply too cold to tolerate for any length of time. And why would they suffer those freezing temperatures when the average temperature on Longboat Key in January is 71 degrees?
However, this is no migration and the subject is not a bird. My clients cannot be referred to as “Snowbirds” either. This is a homecoming. More so, it is a new beginning; a resurrection!
“From the crown of the palm tree, there grew a flame. The flame revealed a nest. As the flames of change kissed the nest, a new being was born. This fantastic creature was born in the image of its predecessor, but it was given a new life. Indeed, it was resurrected. Behold the Phoenix!”
Many years ago, they were pulled from the area in the pursuit of better employment. All the while, they maintained a strong connection with the Gulf Coast. This is where they would spend the best years of their lives. Now is their time of rebirth.
The property they chose is on boating water on the Bay side of Longboat Key. The property is among the few undeveloped lots scattered around the island. Over the years it had been planted with a variety of tropical species including many of the common house varieties such as Ficus, rubber trees, and Areca Palms. Loving the locale, these species quickly outgrew their space. In the shadows, native Sabal Palms stretched their trunks in an effort to survive. A Phoenix Reclinata Palm sat unassumingly beneath the shadow of a large Ficus. We liberated them by removing all of the invasive varieties. We then relocated all ten of the resident Sabal Palms (our State Tree) on site.
The home, designed by celebrated local architect Mark Sultana of DSDG, Inc., is a contemporary flat. The layout is a single living level above parking and grade level outdoor spaces. The architecture is crisp and inspiring and it is sensitive to the smaller scale of the eclectic neighborhood in which it will be constructed. From the elevated balcony, the residents will enjoy watching the many local manatees as they hug the sea wall looking for warmth on chilly mornings. From grade level decks, they will get up close and personal with the abundant schools of mullet in the canal. A northern exposure to the open side of the plan will allow for the amazing breezes offered by passing cool fronts.
 Natural Stone Institute
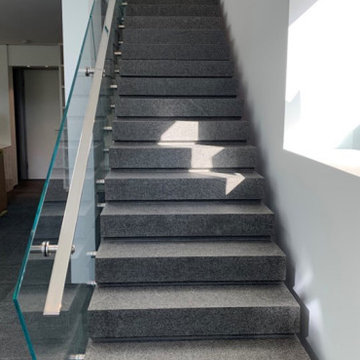
No greater compliment of a material is possible than when stone is selected for a historic property renovation within a home rich in tradition and with a celebrated past. This new feature stair addition to a private residence in Toronto, Canada, has an equally compelling story to tell.
Originally envisioned as a wall-supported, cantilevered stone stair, the owner boldly accepted a unique solution for their showpiece element. The 19-tread stair would be designed with 550 lb. solid stone treads, and fully
liberated from traditional supports and the adjacent rubble wall. To say, “it would float” is not an exaggeration. The stair would be designed as a monolithic beam spanning 16.5 feet, 10 feet high and 41 inches wide. Aesthetically bold, with a reduced tone from
pure black, the basalt stone was the perfect contrast for the white modern interior of the home. The 3-1/2" tension cables played the most important role by resisting the large bending moment generated by the stone load and stair geometry. Fabrication required precise coordination and care to ensure perfect alignment of the interlocking key, and the corresponding cable holes.
The fabrication challenge was achieving the highest level of accuracy in notching, coring, and replicating each tread identically. Expert precision and skill were key to nesting each tread in sequence and simultaneously with the strands. Meticulous alignment and exacting tolerance assured the true performance and aesthetics were delivered. Hydraulic post-tensioning pulled each cable to 120 kiloNewtons or 27,000 lbs, infusing strength and structural integrity. Removing the temporary support and testing was the last critical step—it was the first time the stone stair would be self-supporting.
The “floating” stair is an ultimate achievement and example of innovation, material strength, fabrication quality, installation precision, and expert coordination. A perfect final chapter to a historical journey and modern ode to stone as structure.

 Tile Doctor Ltd
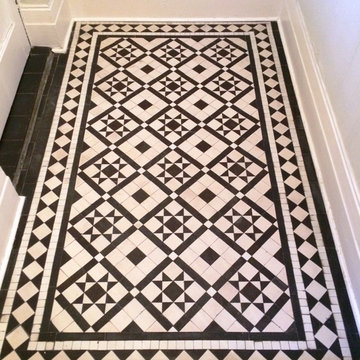
This job was at a house in near Windermere in South Cumbria, a place which is very popular amongst tourists to the Lake District. My client had a Black and White Victorian tiled floor in dire need of a clean and re-seal.
Prior to the application of any cleaning products, my first task was to run damp tests to make sure there were no inherent damp problems. With old floors of this type it’s good to know if there is a damp problem as this will affect the choice of sealer and also the length of time the floor requires to dry.
Fortunately, there were no damp issues present, and I was able to proceed however had the floor been damp and being December I would have offered to carry out the clean and seal in the Summer, when the water tables were lower and the damp levels would be more settled, thus creating a better environment for the sealer to operate in.
I started cleaning the Victorian tiles with Tile Doctor Remove & Go, a product which breaks down old sealers in preparation for a fresh seal to be applied. The product is diluted with water and then scrubbed into the floor with a scrubbing pad fitted to rotary machine; the resulting slurry is then removed using a wet vacuum.
Next step was to apply Tile Doctor Pro-Clean which was applied liberally to the floor, left to dwell for a short period and then agitated with a black scrubbing pad to lift out the ingrained dirt. I also paid special attention to cleaning the grout lines with a stiff scrubbing brush. The floor was then rinsed with clean water, and the resulting residue was extracted using a wet-vac machine.
After the cleaning was completed, the tiles were left for a couple of days to allow them ample time to dry. Upon my return to the house I checked the damp levels again and then applied two coats of the impregnating, colour enhancing sealer Tile Doctor Colour Grow which gives the black tiles more depth of colour, along with the robust surface seal and Matt finish my client had requested.
My client was exceptionally pleased the results – but really, the photographs speak for themselves.
Heidi Taylor
South Cumbria
 Murphy Bros. Design | Build | Remodel
The list was long. Very long. And the level of remodeling they needed was a too demanding for these very capable empty nester DIYers to handle on their own. That’s not surprising since they wanted to remodel their kitchen, living room, entryway, and add a garage/office/bedroom addition off the side of their home.
“I think what was really driving this remodel was the shared desire to liberate this home from its 60’s style (dark paneling) and confined layout,” recalls Murphy Bros. designer Courtney Cartee. “They needed more space everywhere, from the kitchen to the adjoining entryway and living room. In short they really needed a whole new look and layout.”
So we suggested a three-part solution. A completely new kitchen, which required the removal of a giant stone fireplace, that was causing all kinds of space issues in both living room, entry and kitchen.
The second part of the design involved an addition to the side of the property, which added another garage stall and an office/bedroom above. “I can remember going in front of the city hall officials to get approval for the variance to add on the garage addition,” remembers Cartee. “They were very impressed with how our design integrated the addition with the existing exterior of the home. They remarked that so many remodels in their city now are just tear downs instead of taking the time and imagination to work with what’s already there.”
The third aspect of the design had to do with the entry and upgrading the exterior of the home. The entry is now wider and the whole house was painted to achieve much better curb appeal, which can have a big impact on first impressions for resale and simple pride.
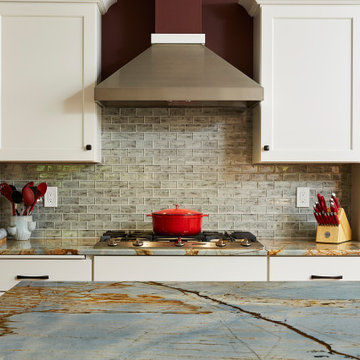
“Before they had just enough room for barely two people in their kitchen. I mean it was really tight. Once we got that fireplace out, that opened up everything. Now they can have the whole family in that space and still be able to move around and entertain,” says Cartee.
Island & perimeter countertop: Azure Quartzite slab from Brazil.
Backsplash: Dockside Gale Stria porcelain and glass wall tile
22