
Search results for "Literal" in Home Design Ideas

 Jolene Rightmyer-Macolini Team at Howard Hanna
With this Cayuga Lake home you are sure to have something to do all day long, all year-round...don't take my word for it -- come check it out Down the long, stone private drive, nestled on a breathtaking hillside, awaits a custom built home -- a vision where love and quality craftsmanship go hand-in-hand Outstanding Cayuga Lake views can be enjoyed throughout most of the home, patios, and deck. The lush perennials frame around the home as if it was an illustration in a classic storybook. This home has a touch of elegance, yet the comforts of home. The new hardwood floors are stunning -- extending throughout most of the main level. A set of French doors welcome you to your place setting in the spacious formal dining room -- a "fine dining" ambiance is instantly created and includes a view into the flourishing garden through the wall of windows. The family room is impeccable with floor to ceiling windows, and French doors that open to the front patio/outdoor screened-in room. A panoramic lake view that extends inside to out. The cozy fireplace will fill the room with warmth, and create a peaceful environment. The eat-in kitchen is a chef’s dream come true with a Viking sub-zero refrigerator, six-burner gas range, Brookhaven cabinets, complimented with granite countertops, a center island with seating for two, and over the counter lake views. For ease of entertaining, there is a dining area centrally located between the kitchen and living room -- and includes an easy access point to the side patio. The dining area has a tray ceiling that illuminates above -- a decadent addition. The living room continues the theme of the wall of windows AND an additional wood burning fireplace. The hallway is a work of art -- quite literally -- the design was inspired by the Isabella Stewart Gardner Museum in Boston. The upper level includes 3 large bedrooms with large closets, a home office, hallway full bathroom (with a separate shower room) and a laundry chute. The master suite is magnificent -- definitely, a room that you wouldn't mind waking up in every morning! The dramatic cathedral ceiling is enhanced by the wall of windows and lake views. Completing this master suite you get a private balcony, TWO walk-in closets (that are the size of small rooms), and an en-suite that includes his & hers granite topped vanities and a tile steam shower with built-in bench. Down to the newly repainted, generously sized finished walkout lower level, you have a media room, bedroom, full bathroom, and large storage/utility room. The French doors open to the back deck where you can find the hot tub, and sturdy steps that lead to the deep water dock and Cayuga Lake! Outbuilding can conveniently hold your outdoor tools and toys. The 9.87 acres allows you room to build a garage This home will leave a lasting impression on you and your guests!
 Sosna Inc
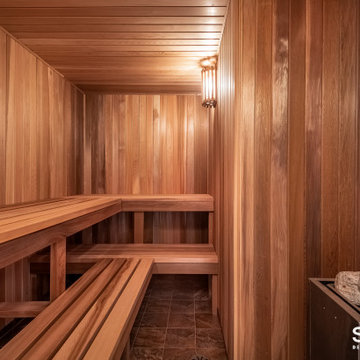
After serving as a rental for some time, this home was ready to be reclaimed by its owner and her son.
Gutting “back to the studs” was an understatement for this one. This transformation involved replanning everything; including the roof, the HVAC system, the entire plumbing system, and relocating the side entrance and staircase to the back of the house. Only the subfloors, the exterior framing structure, and the brick remains from this original 1940’s-built bungalow.
When we’re renovating an old structure, we’re bound to find some surprises. This renovation did not disappoint! From basement to roof, we found more than a few, shall we say, potentially catastrophic surprises along the way.
Let’s start with the basement. The homeowner wanted to update the basement and make it a usable living space for her adult son as well as a spa with a sauna for her. This required bringing the 6 foot ceiling height up to code at 7 feet. To do this, we had to re-think the HVAC system that was in the basement ceiling. When we opened up the basement ceiling to remove the HVAC supply and return trunks, we discovered asbestos! The asbestos had to be removed before we could dismantle and remove the HVAC system.
For the main floor, when we were replanning the existing 2-bedroom layout to create two master bedrooms each with their own ensuites, we looked at the possibility of removing the main load-bearing wall. But our investigations led to the discovery that the load bearing wall was not lined up with the roof or the basement load points, so the load of the house was not continuous throughout. This was a disaster waiting to happen. And as we found out, this lack of alignment was causing major issues with the roof when we went to replace the shingles. We discovered portions of the roof truss in very poor condition, literally moments away from giving out. These were replaced and other truss components were fortified before we went on to re-shingle the roof and replace all the soffits and eavestroughs.
Once the structural and space planning elements were sorted out, we could turn our focus to helping this homeowner select the finishes she and her son wanted for their new spaces. She wanted white all the way, and he wanted bold colours. You will see these color choices reflected in their private bathrooms as well as in the upper kitchen and living area that she will mostly use, and the basement entertainment area that he will mostly use.
To round out the personalization of this made-new-again home, we converted the basement into an entertainment center with a bar for her son, and a sauna and third full bathroom with a jacuzzi tub for a spa-like feel for her.
Without having to build from scratch, this homeowner got the custom home of her dreams.
While you “can’t teach an old dog new tricks”, the sky’s the limit on how you can transform an old home into the home of your dreams. When your “old dog” needs some new tricks, we are the Renovator You Can Count On.

 Westwind Woodworkers Inc.
This new two story home has a very clean and crisp color pallet. Large windows to the back yard bring in the beautiful views and provide a great connection between interior and exterior living spaces.
This pocket office is part of the laundry room and just off the kitchen. Perfect for looking up your favorite recipes!
Find the right local pro for your project
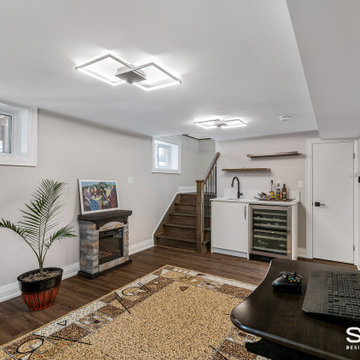 Sosna Inc
After serving as a rental for some time, this home was ready to be reclaimed by its owner and her son.
Gutting “back to the studs” was an understatement for this one. This transformation involved replanning everything; including the roof, the HVAC system, the entire plumbing system, and relocating the side entrance and staircase to the back of the house. Only the subfloors, the exterior framing structure, and the brick remains from this original 1940’s-built bungalow.
When we’re renovating an old structure, we’re bound to find some surprises. This renovation did not disappoint! From basement to roof, we found more than a few, shall we say, potentially catastrophic surprises along the way.
Let’s start with the basement. The homeowner wanted to update the basement and make it a usable living space for her adult son as well as a spa with a sauna for her. This required bringing the 6 foot ceiling height up to code at 7 feet. To do this, we had to re-think the HVAC system that was in the basement ceiling. When we opened up the basement ceiling to remove the HVAC supply and return trunks, we discovered asbestos! The asbestos had to be removed before we could dismantle and remove the HVAC system.
For the main floor, when we were replanning the existing 2-bedroom layout to create two master bedrooms each with their own ensuites, we looked at the possibility of removing the main load-bearing wall. But our investigations led to the discovery that the load bearing wall was not lined up with the roof or the basement load points, so the load of the house was not continuous throughout. This was a disaster waiting to happen. And as we found out, this lack of alignment was causing major issues with the roof when we went to replace the shingles. We discovered portions of the roof truss in very poor condition, literally moments away from giving out. These were replaced and other truss components were fortified before we went on to re-shingle the roof and replace all the soffits and eavestroughs.
Once the structural and space planning elements were sorted out, we could turn our focus to helping this homeowner select the finishes she and her son wanted for their new spaces. She wanted white all the way, and he wanted bold colours. You will see these color choices reflected in their private bathrooms as well as in the upper kitchen and living area that she will mostly use, and the basement entertainment area that he will mostly use.
To round out the personalization of this made-new-again home, we converted the basement into an entertainment center with a bar for her son, and a sauna and third full bathroom with a jacuzzi tub for a spa-like feel for her.
Without having to build from scratch, this homeowner got the custom home of her dreams.
While you “can’t teach an old dog new tricks”, the sky’s the limit on how you can transform an old home into the home of your dreams. When your “old dog” needs some new tricks, we are the Renovator You Can Count On.
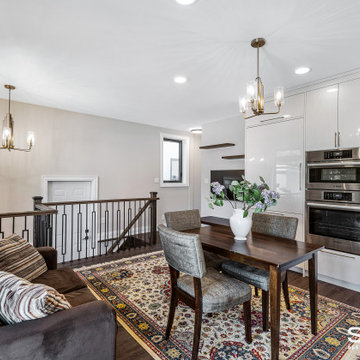 Sosna Inc
After serving as a rental for some time, this home was ready to be reclaimed by its owner and her son.
Gutting “back to the studs” was an understatement for this one. This transformation involved replanning everything; including the roof, the HVAC system, the entire plumbing system, and relocating the side entrance and staircase to the back of the house. Only the subfloors, the exterior framing structure, and the brick remains from this original 1940’s-built bungalow.
When we’re renovating an old structure, we’re bound to find some surprises. This renovation did not disappoint! From basement to roof, we found more than a few, shall we say, potentially catastrophic surprises along the way.
Let’s start with the basement. The homeowner wanted to update the basement and make it a usable living space for her adult son as well as a spa with a sauna for her. This required bringing the 6 foot ceiling height up to code at 7 feet. To do this, we had to re-think the HVAC system that was in the basement ceiling. When we opened up the basement ceiling to remove the HVAC supply and return trunks, we discovered asbestos! The asbestos had to be removed before we could dismantle and remove the HVAC system.
For the main floor, when we were replanning the existing 2-bedroom layout to create two master bedrooms each with their own ensuites, we looked at the possibility of removing the main load-bearing wall. But our investigations led to the discovery that the load bearing wall was not lined up with the roof or the basement load points, so the load of the house was not continuous throughout. This was a disaster waiting to happen. And as we found out, this lack of alignment was causing major issues with the roof when we went to replace the shingles. We discovered portions of the roof truss in very poor condition, literally moments away from giving out. These were replaced and other truss components were fortified before we went on to re-shingle the roof and replace all the soffits and eavestroughs.
Once the structural and space planning elements were sorted out, we could turn our focus to helping this homeowner select the finishes she and her son wanted for their new spaces. She wanted white all the way, and he wanted bold colours. You will see these color choices reflected in their private bathrooms as well as in the upper kitchen and living area that she will mostly use, and the basement entertainment area that he will mostly use.
To round out the personalization of this made-new-again home, we converted the basement into an entertainment center with a bar for her son, and a sauna and third full bathroom with a jacuzzi tub for a spa-like feel for her.
Without having to build from scratch, this homeowner got the custom home of her dreams.
While you “can’t teach an old dog new tricks”, the sky’s the limit on how you can transform an old home into the home of your dreams. When your “old dog” needs some new tricks, we are the Renovator You Can Count On.
 Jolene Rightmyer-Macolini Team at Howard Hanna
With this Cayuga Lake home you are sure to have something to do all day long, all year-round...don't take my word for it -- come check it out Down the long, stone private drive, nestled on a breathtaking hillside, awaits a custom built home -- a vision where love and quality craftsmanship go hand-in-hand Outstanding Cayuga Lake views can be enjoyed throughout most of the home, patios, and deck. The lush perennials frame around the home as if it was an illustration in a classic storybook. This home has a touch of elegance, yet the comforts of home. The new hardwood floors are stunning -- extending throughout most of the main level. A set of French doors welcome you to your place setting in the spacious formal dining room -- a "fine dining" ambiance is instantly created and includes a view into the flourishing garden through the wall of windows. The family room is impeccable with floor to ceiling windows, and French doors that open to the front patio/outdoor screened-in room. A panoramic lake view that extends inside to out. The cozy fireplace will fill the room with warmth, and create a peaceful environment. The eat-in kitchen is a chef’s dream come true with a Viking sub-zero refrigerator, six-burner gas range, Brookhaven cabinets, complimented with granite countertops, a center island with seating for two, and over the counter lake views. For ease of entertaining, there is a dining area centrally located between the kitchen and living room -- and includes an easy access point to the side patio. The dining area has a tray ceiling that illuminates above -- a decadent addition. The living room continues the theme of the wall of windows AND an additional wood burning fireplace. The hallway is a work of art -- quite literally -- the design was inspired by the Isabella Stewart Gardner Museum in Boston. The upper level includes 3 large bedrooms with large closets, a home office, hallway full bathroom (with a separate shower room) and a laundry chute. The master suite is magnificent -- definitely, a room that you wouldn't mind waking up in every morning! The dramatic cathedral ceiling is enhanced by the wall of windows and lake views. Completing this master suite you get a private balcony, TWO walk-in closets (that are the size of small rooms), and an en-suite that includes his & hers granite topped vanities and a tile steam shower with built-in bench. Down to the newly repainted, generously sized finished walkout lower level, you have a media room, bedroom, full bathroom, and large storage/utility room. The French doors open to the back deck where you can find the hot tub, and sturdy steps that lead to the deep water dock and Cayuga Lake! Outbuilding can conveniently hold your outdoor tools and toys. The 9.87 acres allows you room to build a garage This home will leave a lasting impression on you and your guests!
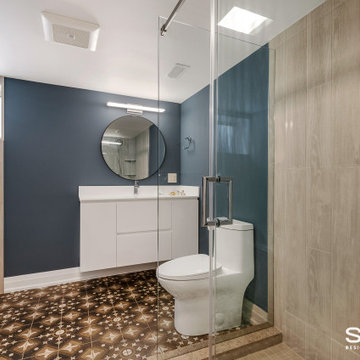 Sosna Inc
After serving as a rental for some time, this home was ready to be reclaimed by its owner and her son.
Gutting “back to the studs” was an understatement for this one. This transformation involved replanning everything; including the roof, the HVAC system, the entire plumbing system, and relocating the side entrance and staircase to the back of the house. Only the subfloors, the exterior framing structure, and the brick remains from this original 1940’s-built bungalow.
When we’re renovating an old structure, we’re bound to find some surprises. This renovation did not disappoint! From basement to roof, we found more than a few, shall we say, potentially catastrophic surprises along the way.
Let’s start with the basement. The homeowner wanted to update the basement and make it a usable living space for her adult son as well as a spa with a sauna for her. This required bringing the 6 foot ceiling height up to code at 7 feet. To do this, we had to re-think the HVAC system that was in the basement ceiling. When we opened up the basement ceiling to remove the HVAC supply and return trunks, we discovered asbestos! The asbestos had to be removed before we could dismantle and remove the HVAC system.
For the main floor, when we were replanning the existing 2-bedroom layout to create two master bedrooms each with their own ensuites, we looked at the possibility of removing the main load-bearing wall. But our investigations led to the discovery that the load bearing wall was not lined up with the roof or the basement load points, so the load of the house was not continuous throughout. This was a disaster waiting to happen. And as we found out, this lack of alignment was causing major issues with the roof when we went to replace the shingles. We discovered portions of the roof truss in very poor condition, literally moments away from giving out. These were replaced and other truss components were fortified before we went on to re-shingle the roof and replace all the soffits and eavestroughs.
Once the structural and space planning elements were sorted out, we could turn our focus to helping this homeowner select the finishes she and her son wanted for their new spaces. She wanted white all the way, and he wanted bold colours. You will see these color choices reflected in their private bathrooms as well as in the upper kitchen and living area that she will mostly use, and the basement entertainment area that he will mostly use.
To round out the personalization of this made-new-again home, we converted the basement into an entertainment center with a bar for her son, and a sauna and third full bathroom with a jacuzzi tub for a spa-like feel for her.
Without having to build from scratch, this homeowner got the custom home of her dreams.
While you “can’t teach an old dog new tricks”, the sky’s the limit on how you can transform an old home into the home of your dreams. When your “old dog” needs some new tricks, we are the Renovator You Can Count On.
 Drury Design
THE SETUP
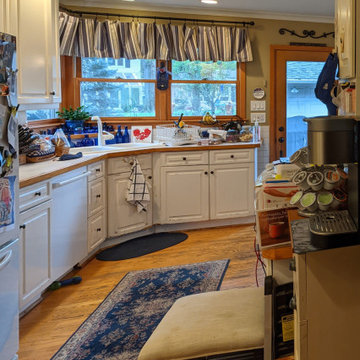
“You have to figure out how to rebuild a life worth living,” Basia Kozub’s client says. Her husband passed away suddenly three years ago. Holidays with family became more important, and she found herself struggling with a 37-year old kitchen that was falling apart. “I made a decision to move forward,” she says. “I went, ‘You know what? I’m redoing the kitchen.'”
The big task of getting started was as easy as having a conversation – literally. Basia was on the job, helping the client sort through priorities, wishes and ideas. Basia’s client is 5′ 4″, likes keeping an eye on the kiddoes in the backyard and wanted certain things to have their own place.
THE REMODEL
The objectives were:
Enlarge and open the space
Find a classic look that incorporates blues
Upgrade to easy-to-use appliances
Hide an office space within the space
Ample storage for dishes
Design challenges:
Uneven window alignment on the back wall
Original kitchen smaller than desired, stuctural concerns if walls to be moved
Keep folks close – figure out seating for entertaining
Main sink in corner is ideal, but windows are hard to reach
Lots of storage needed for dishes, glass collection, pantry items, bar bottles and office supplies
Specific storage needs for oft-used spices and utensils
THE RENEWED SPACE
Design solutions:
Replace back wall windows, establish window size continuity
Take out two walls to open up the space, tall shallow cabinet and a tall filler added to conceal a new header
Large island that seats six easily
Custom corner sink cabinet with recessed edge allows vertically challenged homeowner to reach the windows
Mindful storage planning features: plenty of cabinets, pull-out bar bottle storage, file drawers & cubbies with pocket doors for office appliances, magic corner pullouts, and appliance garages with pocket doors
Shelf behind range for easy access to daily-use spices and oils. Also: spice and utensil pullouts on either side of range
The clients says every priority and wish box got checked. The highly functional design absorbed everything that used to be in that area of the house, but now those things are out of the way.
“In the past, we were all spread out when we gathered for the holidays, because we had to spread out. Now, we’re all in here together, including my 92-year old mother. We’re visiting, cooking, laughing… everyone is here. And I’m really learning how to use these appliances. This kitchen has given me a whole new life.”
 Sosna Inc
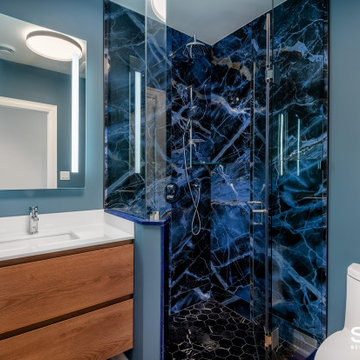
After serving as a rental for some time, this home was ready to be reclaimed by its owner and her son.
Gutting “back to the studs” was an understatement for this one. This transformation involved replanning everything; including the roof, the HVAC system, the entire plumbing system, and relocating the side entrance and staircase to the back of the house. Only the subfloors, the exterior framing structure, and the brick remains from this original 1940’s-built bungalow.
When we’re renovating an old structure, we’re bound to find some surprises. This renovation did not disappoint! From basement to roof, we found more than a few, shall we say, potentially catastrophic surprises along the way.
Let’s start with the basement. The homeowner wanted to update the basement and make it a usable living space for her adult son as well as a spa with a sauna for her. This required bringing the 6 foot ceiling height up to code at 7 feet. To do this, we had to re-think the HVAC system that was in the basement ceiling. When we opened up the basement ceiling to remove the HVAC supply and return trunks, we discovered asbestos! The asbestos had to be removed before we could dismantle and remove the HVAC system.
For the main floor, when we were replanning the existing 2-bedroom layout to create two master bedrooms each with their own ensuites, we looked at the possibility of removing the main load-bearing wall. But our investigations led to the discovery that the load bearing wall was not lined up with the roof or the basement load points, so the load of the house was not continuous throughout. This was a disaster waiting to happen. And as we found out, this lack of alignment was causing major issues with the roof when we went to replace the shingles. We discovered portions of the roof truss in very poor condition, literally moments away from giving out. These were replaced and other truss components were fortified before we went on to re-shingle the roof and replace all the soffits and eavestroughs.
Once the structural and space planning elements were sorted out, we could turn our focus to helping this homeowner select the finishes she and her son wanted for their new spaces. She wanted white all the way, and he wanted bold colours. You will see these color choices reflected in their private bathrooms as well as in the upper kitchen and living area that she will mostly use, and the basement entertainment area that he will mostly use.
To round out the personalization of this made-new-again home, we converted the basement into an entertainment center with a bar for her son, and a sauna and third full bathroom with a jacuzzi tub for a spa-like feel for her.
Without having to build from scratch, this homeowner got the custom home of her dreams.
While you “can’t teach an old dog new tricks”, the sky’s the limit on how you can transform an old home into the home of your dreams. When your “old dog” needs some new tricks, we are the Renovator You Can Count On.

 Jasper + Phoenix
Amber works from home and was sacrificing a dining room for her home office. By utilizing the double wide closet space in her guest bedroom, she now walks into her home without the reminder of work, and can have guests over for a meal in her dining room (dining room reveal coming soon). The walls were freshly painted Sea Salt by Sherwin Williams. This gives the room a fresh, clean look and also adds contrast to the beige carpet.
Amber had her homework assignments cut out for her as she had to do some major purging in her throw all guest room. Once she started letting go, she was on a roll and continually surprised me as she cleaned out closets throughout the house. One dresser was filled with cds, dvds, books, albums, scrap-booking materials; items taking up precious real estate in her life that she didn't even know were there. There really wasn't a storage problem after-all, she was just holding on to a collection of things that no longer served her. Each time I would visit, and her space would become more open, I could see the weight lifting off her and her self love building. Amber had a recent breakup with her boyfriend and this makeover helped her not only focus on making a home sanctuary for herself, but helped her let go of the pains of the past and focus on the exciting future ahead. At one point when we were moving sofas in the living room (which we will also reveal soon), we found an ex's flip-flop. We were figuratively and literally sweeping away the past. Editing your home and your life makes room for your future; for new people and things. We are so happy to finally reveal the room to you! We can't wait to unveil the rest of Amber's home, once we complete the finishing touches.
Challenges:
Amber's home was filled with mix-matched furniture from family and college. She had no idea what her decorating style was. After shopping together and exchanging somepinterest boards, I was finally able to get a sense of what she loves.
I had to work on a tight budget, which meant really digging out the creativity and utilizing other items in the home. See how I transformed a table from the discard pile into a faux marble bedside table by clicking web link.
Amber's dad was able to help with the desk materials and building to cut costs.
We wanted to save the closet doors in the event she sold her home or no longer needed an office someday. There wasn't any extra space to store these closet doors, so I used them as a headboard.
The only items purchased were: Curtains, Curtain Rod, Bedspread Set, Throw Pillows, 2 Lamps and Paint.

 Robin's Nest Interiors
Updated Spec Home: Basement Living Area
I promised you there would be a Season 2 of our series Updated Spec Home and here it is – Basement Family Room. My mom and sister found themselves spending more and more time in this room because it was a great open space to watch television and hang out with my sister’s two border collies.
Color Scheme
We pulled our color scheme from a floral fabric that they saw on a chair at my store, and we used it to reupholster their existing wood accent chairs. We used pops of turquoise and green throughout the space including the long back wall which was perfect to make a feature with this vibrant wallpaper in a geometric design.
Defining the Space
The room was so large that we needed to define different areas. The large rug in the oversized pattern was perfect for the seating area.
Lighting
Since there is only one small window bringing natural light into the space, we painted the remaining walls a light warm gray (Sherwin Williams’ City Loft SW7631) and added several table lamps and a floor lamp for task lighting.
Reusing Existing Furniture
Fortunately the space was large enough so my sister could keep her fabulous worn leather chair and ottoman and my mom could have an upholstered chair and ottoman in a subtle blue and green tweed.
The large hallway leading to the storage area was the perfect place for these small bookcases which house family photos in various silver frames. The bookcases have a special place in our hearts – they belonged to my grandparents. We accessorized with a long painted box which was the perfect scale for the bookcases and a grouping of vibrant botanical prints.
In lieu of a conventional media cabinet, my mom and sister found this one with a built-in fireplace. It brings a lot of warmth into the space – literally!
Painted Furniture
We had Kelly Sisler of Kelly Faux Creations paint their existing glass front cabinet this awesome apple green. Accessories include turquoise floral vases, a metallic circular vase, and a beautiful floral print.
Reading Nook
We positioned this original oil painting in the landing so it would be visible from the seating area. The landing was the perfect spot to display my sister’s collection of art glass. I love the small reading nook created with this rattan wooden accent chair and lantern floor lamp. We were able to make good use of the ledge in the stairwell by leaning these vibrant watercolors.
The dogs even have their own space. Meet my two “nephews” – Dill and Atticus (the one with his back to us pouting). We used this colorful oversized canvas to define their space and break up the long wall.
As you know, one good thing leads to another. Be sure to tune in next week for a surprise addition to this Updated Spec Home. In the meantime, check out this Basement Family Room designed by Robin’s Nest Interiors. Enjoy!

 RAJ Kitchen and Bath, LLC
“Full apartment design”.
IF you have not yet seen this apartment conversion before, we strongly urge you to go to the bottom left of this page and click on the short 2-minutes video. It would put a lot of things into perspective when you come back and continue reading this.
It is true we were literally handed the keys and told a list of things that they wanted to have happen and we were to go into the apartment, look at the space and come up with a design that would satisfy all of that need. UNTIL we showed up! The unit had really seen some better days but we knew we had to look past that and come up with a concept that would work for them.
The immediate challenges were centered around 3 big ideas:
1. Adding a second bedroom to the already small footprint
2. Figuring out a way to make the kitchen bigger, better and brighter
3. Creating a master room walk in closet
It’s always difficult to add new rooms into existing footprint without expanding out or up and not incurring any opportunity cost. In this case, that was exactly what we had to do. Item one and two above had to be tackled as one. We went ahead and switched out the location of the dining room and eliminating an area where there was a “nook” type eat-in area. By doing so, we were able to cut right into that footprint and change the layout of the kitchen.
That one move allowed us to dig into the kitchen design because it was now the main focal point in the apartment. It was no longer an option to keep it in that tiny hole where it was, so we had to ensure that this design was functional and aesthetically pleasing at the same time. By adding the table into the space where an Island typically would go, we were able to both cut cost and still provide a dining experience. The Table serves as an Island as well when cooking.
We then proceeded to block in the existing doorway to the dining room. By doing this, we were able to create a full room which allowed us to put a door on the other side and called that room Bedroom #2. This was easier to do because all of the mechanicals were already in that space (light, heater and windows). By shifting things around, we also achieved a huge wall to wall closet from inside. PERFECT!
Then we moved into the Single bedroom. We thought it was a big room with a small closet, so by creatively adding an L shaped wall and steal some footprint into the bedroom side, we were able to put a door on that new room and design it for the walk-in closet. Even after this, the bedroom still holds a queen size bed with 2 night stands, a TV on the wall, a sitting chair and plenty of room to walk around. This was done by rethinking the location for the bed and night stands.
The bathroom was gutted to make sure there was no leaks and rebuild from the ground up. We kept all of the plumbing where it was, added a new vanity, medicine cabinet, tiles and lighting and it was done.
From there, the rest of the unit had new flooring all throughout, paint, and lighting. After completion and walk through, this project was handed over back to the clients.
Execution and collaboration between all the trades were: Reggie and his team from Premier Interiors and Rohan from RD Mechanical Services.
p.s. Please see our website to see the video.


 Robin's Nest Interiors
Updated Spec Home: Basement Living Area
I promised you there would be a Season 2 of our series Updated Spec Home and here it is – Basement Family Room. My mom and sister found themselves spending more and more time in this room because it was a great open space to watch television and hang out with my sister’s two border collies.
Color Scheme
We pulled our color scheme from a floral fabric that they saw on a chair at my store, and we used it to reupholster their existing wood accent chairs. We used pops of turquoise and green throughout the space including the long back wall which was perfect to make a feature with this vibrant wallpaper in a geometric design.
Defining the Space
The room was so large that we needed to define different areas. The large rug in the oversized pattern was perfect for the seating area.
Lighting
Since there is only one small window bringing natural light into the space, we painted the remaining walls a light warm gray (Sherwin Williams’ City Loft SW7631) and added several table lamps and a floor lamp for task lighting.
Reusing Existing Furniture
Fortunately the space was large enough so my sister could keep her fabulous worn leather chair and ottoman and my mom could have an upholstered chair and ottoman in a subtle blue and green tweed.
The large hallway leading to the storage area was the perfect place for these small bookcases which house family photos in various silver frames. The bookcases have a special place in our hearts – they belonged to my grandparents. We accessorized with a long painted box which was the perfect scale for the bookcases and a grouping of vibrant botanical prints.
In lieu of a conventional media cabinet, my mom and sister found this one with a built-in fireplace. It brings a lot of warmth into the space – literally!
Painted Furniture
We had Kelly Sisler of Kelly Faux Creations paint their existing glass front cabinet this awesome apple green. Accessories include turquoise floral vases, a metallic circular vase, and a beautiful floral print.
Reading Nook
We positioned this original oil painting in the landing so it would be visible from the seating area. The landing was the perfect spot to display my sister’s collection of art glass. I love the small reading nook created with this rattan wooden accent chair and lantern floor lamp. We were able to make good use of the ledge in the stairwell by leaning these vibrant watercolors.
The dogs even have their own space. Meet my two “nephews” – Dill and Atticus (the one with his back to us pouting). We used this colorful oversized canvas to define their space and break up the long wall.
As you know, one good thing leads to another. Be sure to tune in next week for a surprise addition to this Updated Spec Home. In the meantime, check out this Basement Family Room designed by Robin’s Nest Interiors. Enjoy!

 Advance Design Studio, Ltd.
Quinn and Paige, residents of this tired 1960’s tri-level home hated their kitchen. As a matter of fact, prior to making plans to renovate the first floor - they considered selling the home, but were reluctant because of its enviable location near the heart of downtown Barrington which was within walking distance to local stores and all their favorite places. So instead they contacted Advance Design Studio after hearing about them from a neighbor, to rescue their tired home and give it new life.
The very first plan was to remove the constricting walls surrounding the original kitchen, and open the expansive first floor living room and dining area to the new heart of the space; a stunning state of the art coastal designed kitchen. Exposing attractive beams in the vaulted ceiling created an interesting structural detail that suits the open plan and salutes the original architecture of the home, further emphasizing the height of the new space enjoyed now by the family as a great room.
The stage was set for the seaside feel of this kitchen by pairing crisp white painted maple cabinets with Dura Supreme’s one of kind hand weathered finish on the island in soft blue-green finish. But the authentic feeling of being on your favorite beach was supremely achieved by the matching of unique Mt. Claire marble on the island and the specialty Wareham acid washed stone on the perimeter counter tops. Pictures don’t do justice to the feel of this stone under your hand; its water-washed texture reminds instantly of summer vacations collecting rocks softly etched by hundreds of waves.
Stainless steel appliances and satin nickel hardware shine brightly against the backdrop of bright white subway tiles accentuated by subtle grey grout lines contributing to the nautical feel of this comfortable kitchen. Seeded glass door cabinetry reminiscent of beach grasses dress up the space just enough, and a proud 6” stacked crown molding extends above 36” wall cabinets into the expanse of the now taller space; balancing this kitchen nicely within its newly integrated home.
Features in this kitchen include a built in standard depth refrigerator, pull out spice racks, tall tray dividers and wood super Susan with double pull out trash and recycling. A cutlery divider holds sharp knives, and an angled cabinet was customized to hold a secret USB charging station. The bright white Kohler farm sink is graced by an elegant bridge faucet in brushed nickel. This now airy and spacious kitchen has room for guest and family to congregate around the large island, complete with stools and attractive hidden storage for seldom used entertainment pieces.
“I was sold when I saw the drawings. My designer nailed it, down to every last storage idea and coastal detail I envisioned, it was all in there. It was unbelievable how accurate her interpretation was of what was in my head; working with her made my kitchen renovation so easy, it’s as if she literally read my mind”, said Paige enthusiastically.
The woman of the house expressed upon completion not only her love for her fantastic new cooking space, but how renovating her kitchen has given new life to the entire home. Talk of moving has been relegated to the recycling bin, and instead the family is discussing plans to renovate the master bath now that they’ve decided to stay for the long term. Friends who visit the home do a double-take as they recognize the new space’s dramatic transformation from original cramped and closed spaces - to the now amazingly fresh open kitchen that has become the center of every gathering and family meal.
Designer: Nicole Ryan
Photographer: Joe Nowak
 Jolene Rightmyer-Macolini Team at Howard Hanna
With this Cayuga Lake home you are sure to have something to do all day long, all year-round...don't take my word for it -- come check it out Down the long, stone private drive, nestled on a breathtaking hillside, awaits a custom built home -- a vision where love and quality craftsmanship go hand-in-hand Outstanding Cayuga Lake views can be enjoyed throughout most of the home, patios, and deck. The lush perennials frame around the home as if it was an illustration in a classic storybook. This home has a touch of elegance, yet the comforts of home. The new hardwood floors are stunning -- extending throughout most of the main level. A set of French doors welcome you to your place setting in the spacious formal dining room -- a "fine dining" ambiance is instantly created and includes a view into the flourishing garden through the wall of windows. The family room is impeccable with floor to ceiling windows, and French doors that open to the front patio/outdoor screened-in room. A panoramic lake view that extends inside to out. The cozy fireplace will fill the room with warmth, and create a peaceful environment. The eat-in kitchen is a chef’s dream come true with a Viking sub-zero refrigerator, six-burner gas range, Brookhaven cabinets, complimented with granite countertops, a center island with seating for two, and over the counter lake views. For ease of entertaining, there is a dining area centrally located between the kitchen and living room -- and includes an easy access point to the side patio. The dining area has a tray ceiling that illuminates above -- a decadent addition. The living room continues the theme of the wall of windows AND an additional wood burning fireplace. The hallway is a work of art -- quite literally -- the design was inspired by the Isabella Stewart Gardner Museum in Boston. The upper level includes 3 large bedrooms with large closets, a home office, hallway full bathroom (with a separate shower room) and a laundry chute. The master suite is magnificent -- definitely, a room that you wouldn't mind waking up in every morning! The dramatic cathedral ceiling is enhanced by the wall of windows and lake views. Completing this master suite you get a private balcony, TWO walk-in closets (that are the size of small rooms), and an en-suite that includes his & hers granite topped vanities and a tile steam shower with built-in bench. Down to the newly repainted, generously sized finished walkout lower level, you have a media room, bedroom, full bathroom, and large storage/utility room. The French doors open to the back deck where you can find the hot tub, and sturdy steps that lead to the deep water dock and Cayuga Lake! Outbuilding can conveniently hold your outdoor tools and toys. The 9.87 acres allows you room to build a garage This home will leave a lasting impression on you and your guests!

 Mosaic & Co.
White Carrara honed 3x12 installed in a Herringbone pattern in a master bathroom floor.
Transitional white tile marble floor bathroom photo in Miami
Transitional white tile marble floor bathroom photo in Miami
 Advance Design Studio, Ltd.
Quinn and Paige, residents of this tired 1960’s tri-level home hated their kitchen. As a matter of fact, prior to making plans to renovate the first floor - they considered selling the home, but were reluctant because of its enviable location near the heart of downtown Barrington which was within walking distance to local stores and all their favorite places. So instead they contacted Advance Design Studio after hearing about them from a neighbor, to rescue their tired home and give it new life.
The very first plan was to remove the constricting walls surrounding the original kitchen, and open the expansive first floor living room and dining area to the new heart of the space; a stunning state of the art coastal designed kitchen. Exposing attractive beams in the vaulted ceiling created an interesting structural detail that suits the open plan and salutes the original architecture of the home, further emphasizing the height of the new space enjoyed now by the family as a great room.
The stage was set for the seaside feel of this kitchen by pairing crisp white painted maple cabinets with Dura Supreme’s one of kind hand weathered finish on the island in soft blue-green finish. But the authentic feeling of being on your favorite beach was supremely achieved by the matching of unique Mt. Claire marble on the island and the specialty Wareham acid washed stone on the perimeter counter tops. Pictures don’t do justice to the feel of this stone under your hand; its water-washed texture reminds instantly of summer vacations collecting rocks softly etched by hundreds of waves.
Stainless steel appliances and satin nickel hardware shine brightly against the backdrop of bright white subway tiles accentuated by subtle grey grout lines contributing to the nautical feel of this comfortable kitchen. Seeded glass door cabinetry reminiscent of beach grasses dress up the space just enough, and a proud 6” stacked crown molding extends above 36” wall cabinets into the expanse of the now taller space; balancing this kitchen nicely within its newly integrated home.
Features in this kitchen include a built in standard depth refrigerator, pull out spice racks, tall tray dividers and wood super Susan with double pull out trash and recycling. A cutlery divider holds sharp knives, and an angled cabinet was customized to hold a secret USB charging station. The bright white Kohler farm sink is graced by an elegant bridge faucet in brushed nickel. This now airy and spacious kitchen has room for guest and family to congregate around the large island, complete with stools and attractive hidden storage for seldom used entertainment pieces.
“I was sold when I saw the drawings. My designer nailed it, down to every last storage idea and coastal detail I envisioned, it was all in there. It was unbelievable how accurate her interpretation was of what was in my head; working with her made my kitchen renovation so easy, it’s as if she literally read my mind”, said Paige enthusiastically.
The woman of the house expressed upon completion not only her love for her fantastic new cooking space, but how renovating her kitchen has given new life to the entire home. Talk of moving has been relegated to the recycling bin, and instead the family is discussing plans to renovate the master bath now that they’ve decided to stay for the long term. Friends who visit the home do a double-take as they recognize the new space’s dramatic transformation from original cramped and closed spaces - to the now amazingly fresh open kitchen that has become the center of every gathering and family meal.
Designer: Nicole Ryan
Photographer: Joe Nowak
 RAJ Kitchen and Bath, LLC
“Full apartment design”.
IF you have not yet seen this apartment conversion before, we strongly urge you to go to the bottom left of this page and click on the short 2-minutes video. It would put a lot of things into perspective when you come back and continue reading this.
It is true we were literally handed the keys and told a list of things that they wanted to have happen and we were to go into the apartment, look at the space and come up with a design that would satisfy all of that need. UNTIL we showed up! The unit had really seen some better days but we knew we had to look past that and come up with a concept that would work for them.
The immediate challenges were centered around 3 big ideas:
1. Adding a second bedroom to the already small footprint
2. Figuring out a way to make the kitchen bigger, better and brighter
3. Creating a master room walk in closet
It’s always difficult to add new rooms into existing footprint without expanding out or up and not incurring any opportunity cost. In this case, that was exactly what we had to do. Item one and two above had to be tackled as one. We went ahead and switched out the location of the dining room and eliminating an area where there was a “nook” type eat-in area. By doing so, we were able to cut right into that footprint and change the layout of the kitchen.
That one move allowed us to dig into the kitchen design because it was now the main focal point in the apartment. It was no longer an option to keep it in that tiny hole where it was, so we had to ensure that this design was functional and aesthetically pleasing at the same time. By adding the table into the space where an Island typically would go, we were able to both cut cost and still provide a dining experience. The Table serves as an Island as well when cooking.
We then proceeded to block in the existing doorway to the dining room. By doing this, we were able to create a full room which allowed us to put a door on the other side and called that room Bedroom #2. This was easier to do because all of the mechanicals were already in that space (light, heater and windows). By shifting things around, we also achieved a huge wall to wall closet from inside. PERFECT!
Then we moved into the Single bedroom. We thought it was a big room with a small closet, so by creatively adding an L shaped wall and steal some footprint into the bedroom side, we were able to put a door on that new room and design it for the walk-in closet. Even after this, the bedroom still holds a queen size bed with 2 night stands, a TV on the wall, a sitting chair and plenty of room to walk around. This was done by rethinking the location for the bed and night stands.
The bathroom was gutted to make sure there was no leaks and rebuild from the ground up. We kept all of the plumbing where it was, added a new vanity, medicine cabinet, tiles and lighting and it was done.
From there, the rest of the unit had new flooring all throughout, paint, and lighting. After completion and walk through, this project was handed over back to the clients.
Execution and collaboration between all the trades were: Reggie and his team from Premier Interiors and Rohan from RD Mechanical Services.
p.s. Please see our website to see the video.
 Robin's Nest Interiors
Updated Spec Home: Basement Living Area
I promised you there would be a Season 2 of our series Updated Spec Home and here it is – Basement Family Room. My mom and sister found themselves spending more and more time in this room because it was a great open space to watch television and hang out with my sister’s two border collies.
Color Scheme
We pulled our color scheme from a floral fabric that they saw on a chair at my store, and we used it to reupholster their existing wood accent chairs. We used pops of turquoise and green throughout the space including the long back wall which was perfect to make a feature with this vibrant wallpaper in a geometric design.
Defining the Space
The room was so large that we needed to define different areas. The large rug in the oversized pattern was perfect for the seating area.
Lighting
Since there is only one small window bringing natural light into the space, we painted the remaining walls a light warm gray (Sherwin Williams’ City Loft SW7631) and added several table lamps and a floor lamp for task lighting.
Reusing Existing Furniture
Fortunately the space was large enough so my sister could keep her fabulous worn leather chair and ottoman and my mom could have an upholstered chair and ottoman in a subtle blue and green tweed.
The large hallway leading to the storage area was the perfect place for these small bookcases which house family photos in various silver frames. The bookcases have a special place in our hearts – they belonged to my grandparents. We accessorized with a long painted box which was the perfect scale for the bookcases and a grouping of vibrant botanical prints.
In lieu of a conventional media cabinet, my mom and sister found this one with a built-in fireplace. It brings a lot of warmth into the space – literally!
Painted Furniture
We had Kelly Sisler of Kelly Faux Creations paint their existing glass front cabinet this awesome apple green. Accessories include turquoise floral vases, a metallic circular vase, and a beautiful floral print.
Reading Nook
We positioned this original oil painting in the landing so it would be visible from the seating area. The landing was the perfect spot to display my sister’s collection of art glass. I love the small reading nook created with this rattan wooden accent chair and lantern floor lamp. We were able to make good use of the ledge in the stairwell by leaning these vibrant watercolors.
The dogs even have their own space. Meet my two “nephews” – Dill and Atticus (the one with his back to us pouting). We used this colorful oversized canvas to define their space and break up the long wall.
As you know, one good thing leads to another. Be sure to tune in next week for a surprise addition to this Updated Spec Home. In the meantime, check out this Basement Family Room designed by Robin’s Nest Interiors. Enjoy!
187