
Search results for "Loose dirt" in Home Design Ideas


 Tile Doctor Ltd
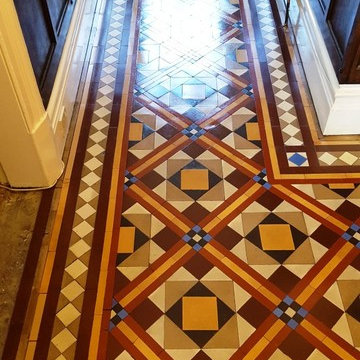
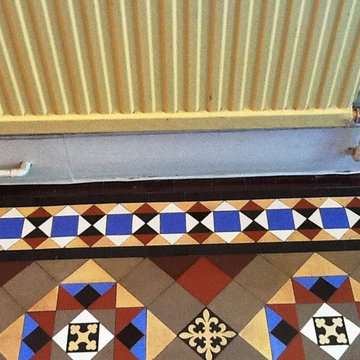
The colourful and diverse geometric patterns of a Victorian tiled floor can give a property a regal, elegant and timeless feel, making it a popular choice even in the 21st century. However, as time passes without regular care and maintenance, Victorian tiles can quickly lose their colour and appear deadened by the buildup of dirt and dust over several months (and sometimes years).
This property owner in Hebden a very small village in North Yorkshire of less than 300 people, had this common problem. Her Victorian tiled hallway had not been adequately maintained and was now more difficult to keep clean than ever. To add to the problem, most of the tiles along the edges were either broken, cracked, or filled with holes, probably I suspect from the installation of carpet grippers at some point in the past.
At this point, the property owner turned to Tile Doctor to see what could be done.
Before beginning a deep clean of the entire length of the hallway, it was first necessary to source and install replacement tiles for those that had been broken and damaged. I also relaid any that were loose.
When finished, I left the tiles to set and returned the next day to start the clean. My choice of cleaner in this situation was Tile Doctor Pro Clean, which was scrubbed into the floor with a special pad fitted to a rotary machine to break down ingrained dirt and stains. Pro Clean does this very effectively on all types of tile, including natural stone and of course Victorian tiles.
The floor was then rinsed with water and the soiled cleaning solution extracted from the floor using a vet vacuum. Stubborn areas were re-treated with more Pro Clean, and when I was satisfied with the condition of the tiles the floor was given a final but thorough rinse to remove any trace of cleaning product.
The floor was then left to dry completely overnight to ensure all excess moisture had disappeared, leaving it fresh to be sealed. I returned in the morning for a third day of work to seal the Victorian tiles with four coats of Tile Doctor Seal and Go, a topical sealer which provides a rich satin finish to really add depth to the colours in the tile while protecting it against dirt and stains.
The customer was delighted with the restoration and couldn’t quite believe the huge improvement in the appearance of the tiles, especially in regards to the enhancement in the different colours. Another satisfied customer!
Nigel Stoker
North West Yorkshire Tile Doctor
 Macson Construction Inc.
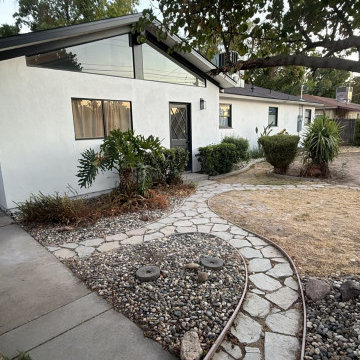
For this exterior renovation, we began by thoroughly preparing all surfaces to ensure a long-lasting, professional finish. The home was pressure washed to remove dirt and debris, loose and peeling paint was scraped away, damaged areas were repaired as needed, and all gaps around windows, doors, and trim were sealed with high-quality exterior caulking. We carefully masked and protected all windows, doors, concrete, roofing, and landscaping before painting.
We applied premium Sherwin-Williams exterior paint, finishing the body of the home in White Picket Fence and the fascia, trim, and accents in Iron Ore to create a clean, modern look with excellent curb appeal. Multiple coats were applied as needed to achieve full coverage, consistent color, and a durable finish designed to withstand the California climate.
Find the right local pro for your project
 Tile Doctor Ltd
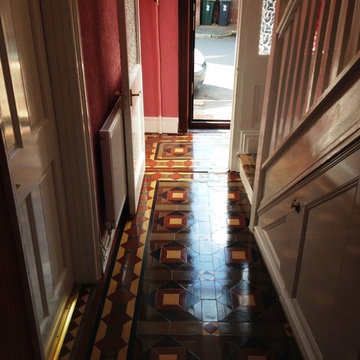
This Victorian tiled hallway at a house in the Forest of Dean had a very interesting pattern, consisting of an array of different colours, including shades of red, yellow and blue. Unfortunately, as you can see from the first photograph below, the tiles had lost all life, with the colours largely masked by months’ – or maybe even years’ – worth of ingrained dirt and muck. The floor as a whole was also suffering from a number of loose tiles that needed to be reset before it could be cleaned.
The property owner was keen to employ some professional assistance to restore the appearance of the floor and prevent it from getting in an even wrote state, and so contacted Tile Doctor who have a lot of experience working with Victorian tiled floors.
As mentioned, the loose tiles had to be repaired before the cleaning process could be started. I removed the tiles and extracted excess grout and old adhesive from the exposed concrete substrate using a vacuum, before putting the original tiles back into place and fixing them back into position carefully using fresh adhesive and matching grout.
Once happy the replaced tiles had set, I started the process of cleaning the entire area of hallway tiles using a combination of Tile Doctor Remove and Go to strip away the old sealer and Tile Doctor NanoTech HBU (formerly Ultra Clean) remover to get the tiles as clean as possible. The latter product contains nano-sized cleaning particles (hence the name) to reach difficult areas of trapped dirt, making it more effective than your run-of-the-mill tile cleaner. These two products were scrubbed into the tiles using a rotary machine fitted with a black scrubbing pad. The floor was then rinsed with water and the soiled residue was extracted with a wet vacuum.
I then paid particular attention to the grout, applying our alkaline-based multi-purpose cleaner Tile Doctor Pro-Clean to the grout lines, before scrubbing them with a narrow grout brush. This quickly had the grout looking clean again: I’d even go as far as to say that it matched it seamlessly with the fresh grout that had just been laid.
With the tile and grout as clean as it was possible to get it, I gave the whole floor a final rinse to neutralise the excess chemicals. I extracted as much water as possible with a wet vacuum and left the floor to dry overnight.
My first task upon returning to the property the next day was to check for any dampness. If you neglect to remove all excess moisture from the surface of the tiles before sealing it is more than likely going to cloud the sealer, rendering it less effective I’m protecting the stone against ingrained dirt and stains.
Once satisfied that the floor was completely dry, I proceeded to seal the tiles using multiple costs of Tile Doctor Seal and Go. Seal and Go is what we would classify as a topical sealer, meaning it rests on the surface of the tiles to act as a durable layer of protection against all kinds of muck. While providing surface protection, Seal and Go also adds a nice subtle sheen to the tiles, as per the customer’s request.
The customer was quite amazed at how quickly the appearance of the tiles had been restored. It was fantastic to see the colours we both knew were hidden in the tiles come to life once again. Another satisfied customer for sure!
Paul Wales
Monmouthshire Tile Doctor
 Tile Doctor Ltd
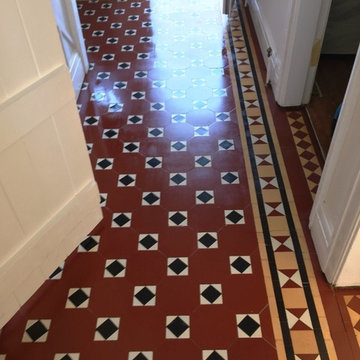
This Victorian tiled hallway was one of the most beautiful Victorian floors I have ever had the pleasure to work on. With the wide range of patterns and colours they are available in, it seems no two Victorian tiled floors are exactly the same, and this uniqueness is part of what makes them so appealing to property owners.
Unfortunately, this floor had been poorly maintained over the years, even suffering from a few loose and missing tiles. There was a thick coating of dust and dirt soiling its appearance, and the property owner was understandably keen to remedy the situation. Having realised that everyday household cleaners are not likely to achieve great results, she asked me to carry out a full professional restoration, including making some repairs where necessary. I was pleasantly surprised to find out that this property was situated in the town of Wyken, which is a few miles outside of Coventry city centre and in fact just down the road from where I live myself!
Before making a start on the cleaning process, it was first necessary to re-fix the small number of loose tiles and replace a single missing tile by the radiator. Fortunately, I’ve been working on these types of floors for some time and have built up a good collection of replacement Victorian tiles so I was able to find one that matched in nicely with the rest of the floor without too much problem.
To clean the tiles, I began by applying a layer of Tile Doctor Oxy-Gel directly into the floor with a small brush. This product is very similar to the popular Tile Doctor Pro Clean: both are strong alkaline cleaners, strippers and degreasers, with the main difference being that Oxy-Clean comes in a gel form, making it easier to control and therefore ideal for precise cleaning, or for application to vertical surfaces. Like Pro Clean and being an alkaline base it is suitable for use on all types of natural stone and tile. The Oxy-Gel was left to soak into the tiles for around ten minutes before being scrubbed in and then rinsed off carefully with water, I then used a wet vacuum to extract the now soiled cleaning solution off the floor.
The next step was to acid wash the floor using Tile Doctor Acid Gel; this served to break down alkaline mineral deposits inherent in the grout along with some excess grout that had been left on the untidily left on tile from installation. It is recommended not to use this product on acid-sensitive soon such as Marble and Limestone as it can cause irreparable etching but its fine on Victorian tiles as long as you don’t leave it on too long.
Finally, the floor was given a rinse with clean water to remove any trace of chemicals from the cleaning and to neutralise the area in preparation for sealing.
I left the floor for 48 hours to dry before returning to the property to seal the tiles. This allowed plenty of time for the floor to dry completely, which is important as any excess moisture can damage the ability of the sealer to protect against dirt and stains.
My choice of sealer for this floor was Tile Doctor High Shine; three coats in total were applied, providing – as the product name suggests – the high shine finish that the customer had requested. The sealer will provide durable surface protection going forward preventing dirt from becoming ingrained into the pores of the tile and ensuring it remains easy to clean and keeping its appearance for some time to come.
As a big fan of Victorian tiles, it was a great pleasure to restore this floor, and my customer was certainly pleased too. It’s amazing how far a little professional maintenance can go to improving the appearance of these fantastic types of floor.
Mick Gayton
Warwickshire Tile Doctor

 PI Photography Wall Art & Fine Art
 https://pipafineart.com/pages/a-tranquil-trail-photorealistic-digital-art-rustic-landscape-art-prints-downloadable-artwork-and-backgrounds. Embark on a visual journey with "A Tranquil Trail." This breathtaking artwork captures the serenity of a winding dirt road as it meanders through a sun-drenched valley. The warm glow of the setting sun bathes the landscape in golden hues, casting long shadows and highlighting the textures of the rugged terrain. Printed on high-quality photo paper with premium inks, this loose art print brings the beauty of the great outdoors into your home, inviting you to explore the tranquil depths of nature.
"A Tranquil Trail" evokes a sense of adventure and the peacefulness of solitude in nature. Hang it in your living room, bedroom, dining room, or office to create a captivating focal point that inspires wanderlust and a connection to the natural world. The rich colors and sweeping vistas create a sense of depth and grandeur, while the winding trail draws the eye into the scene, inviting you to imagine yourself embarking on a journey of discovery.
This artwork is made in the USA and printed on demand, ensuring a high-quality piece that will be cherished for years to come. Available in a variety of sizes, "A Tranquil Trail" is a perfect gift for nature lovers, adventurers, and art enthusiasts alike.
 Pro-Tile & Marble
How to Clean Ceramic & Porcelain Tile Floors
Ceramic tile and porcelain tile floors are incredibly durable but there are a few things that can make keeping them clean and looking good easy. Here's the simple process we follow:
1. Clean up loose debris: Sweep or vacuum your tile floors regularly to keep them from getting dull. Ceramic tiles may be resistant to dirt, but sand and grit can dull the glazed surfaces.
2. Choose the right floor mop: Clean tile with mild detergent and clean water using a rag or chamois-type mop rather than a sponge mop. Rag and chamois-style mops are best for cleaning tile because sponge mops tend to push dirty water into the grout lines, making them harder to clean. Be sure to change the water frequently while mopping; dirty water equals a cloudy floor.
3. Be on the look for tile stains: If you find a discoloration, try to determine what type substance made the stain and use the right cleaner to remove.
4. Watch for soap residue: If your tiles look hazy even after cleaning, you might be dealing with soapy residue. Remove the film with a nonabrasive all-purpose cleaner.
5. Dry tiles too: Don't let your glazed tile floors air-dry—the sitting water will form water spots. Take care of that by drying the floor with a clean, lint-free cloth immediately after washing.

 Libby Raab Architecture
Paul Dyer
Example of a mid-sized transitional black one-story wood house exterior design in San Francisco with a hip roof and a shingle roof
Example of a mid-sized transitional black one-story wood house exterior design in San Francisco with a hip roof and a shingle roof
 Tellurian Construction
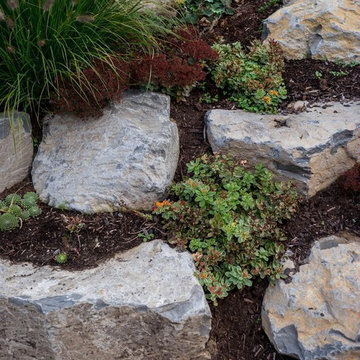
Inspiration for a mid-sized traditional full sun front yard retaining wall landscape in Portland.
 Tile Doctor Ltd
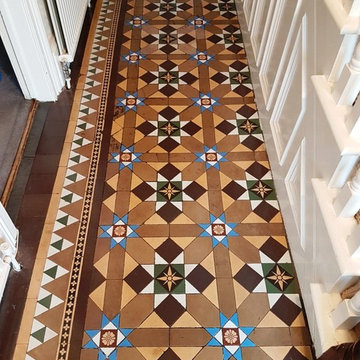
Shipley is a town in West Yorkshire that was heavily shaped by the Industrial Revolution and the Victorian period. It became particularly well-known for its textile industry and some of the original mills in which textiles were manufactured still survive in the town today. Being in West Yorkshire, Shipley is also part of what is commonly known as ‘Brontë country’ – once home to the famous Brontë sisters.
Many Victorian era properties still survive in the area too and all too often the original Victorian tiled floors contained within are not well maintained. I recently visited a customer in Shipley who had a Victorian tiled hallway that was in need of a deep clean and seal. What’s more, the customer told me that there were around 20 loose tiles in the hallway that would need to be reinstalled.
On the first day, I started by refitting the 20 loose tiles in the hallway. The problem however was a lot worse than originally thought and, in the end, I had to take up 108 tiles, so I could rebuild the base of the floor, and then relay them. This process took up most of the day but at least the adhesive and grout would be set in time for cleaning the next day.
On day two I focused on deep cleaning the tiles and removing any remaining sealer by applying a strong dilution of Tile Doctor Pro-Clean. Pro-Clean is a strong alkaline heavy-duty tile and grout cleaner that serves the purpose of both cleaning the stone and when used in a strong dilution will strip off sealers.
I applied the Pro Clean liberally across the length of the hallway and left it to soak into the tiles for about twenty minutes. This allows the product time to breakdown the sealer and dirt before being scrubbed in with a black scrubbing pad.
Special attention had to be paid to parts of the floor which had suffered paint splashes from previous decoration. I was also surprised to find that there were even some chewing gum stains marking the tiles. These were removed using the combination of a steam cleaner, more Pro-Clean and the careful use of a handheld scraper.
The floor was then given a thorough rinse with fresh water and then dried as much as possible with a wet vacuum. It was then also left to dry off overnight.
Upon returning to the property the next day I checked for any moisture issues with a damp tester. Thankfully, the floor proved dry and I could proceed with sealing the tiles which was done using four coats of Tile Doctor Seal and Go that leaves a deep satin finish that the customer had requested.
Nigel Stoker
North West Yorkshire Tile Doctor
 Tile Doctor Ltd
These pictures of a Victorian Tiled Hallway are from a property in Canterbury that was once a nursing home and was now being renovated to become a children’s home. The building was being gutted and extended at the same time and when the carpet was pulled up in the hallway, they were surprised to find a relatively intact Victorian tiled floor underneath.
Whilst they thought it bizarre that anyone would want to cover up such an attractive floor the carpet had protected it over the years. They realized it would make a marvellous feature at the entrance to the property, but professional restoration would be needed to do it justice. After a bit of research, they came across Tile Doctor and got in touch.
Canterbury comes under my North Kent designation, so I went to visit the property and survey the floor and quote for doing the restoration. There were a few missing and loose tiles that would need replacing and refixing also there was a lot of ingrained dirt so a deep clean and application of a new sealer would be required. I gave them a price for the work which they readily accepted, and we arranged a suitable time to carry out the work. Subject to the building schedule I had calculated the floor would take three days to restore.
On the first day I set about replacing and re-fixing the missing, broken, and loose tiles. This is delicate work as you need to extract the old tile without disturbing its neighbours and then clean up the area ready for its replacement. Being a Tile Doctor I keep a selection of stock tiles for repairs, some are reclaimed, and some are replica. Also, there are several companies still making Victorian style tiles so I can usually source what I need.
After the individual missing and broken tiles had been replaced and the adhesive had set, it was then a matter of renovating the floor as a whole. The tiles were covered in a thick layer of carpet adhesive which needed a combination of specialist tools and products to remove. First, a liberal layer of Tile Doctor Remove and Go was applied and left to dwell for thirty minutes. Next, Tile Doctor Pro-Clean was added and scrubbed in with a black pad.
This process softened the adhesive sufficiently in readiness for the next stage which involves using a set of diamond burnishing pads on a weighted buffing machine. Several applications were needed, each time with a successively finer grade of diamond pad and rinsing off the slurry in between. The tiles were first milled using a very coarse 50-grit pad, followed by 100, 200 and finally burnished with a 400-grit burnishing pads. This removed all the adhesive and dirt in the tiles, which was cleaned up using the wet vacuum.
Old Victorian floors like this do not have a damp proof membrane installed under the floor, and with a lot of water being used in the cleaning process I was concerned White efflorescence salts could appear later as the floor dried. To counter this, I gave the floor an acid wash using Tile Doctor Acid Gel to counter and dissolve the salts, it also gives the tiles another clean and will remove any old grout smears further improving the appearance of the tiles. Once done the floor was left to dry overnight.
On my return I tested the floor was dry by taking several moisture readings around the floor with a damp meter. Applying sealer to a damp floor is never advised and can lead to clouding and an unwanted finish.
Happy that the tiles were dry, a single coat of Tile Doctor Colour Grow sealer was applied. This is an impregnating sealer with a colour enhancing component to ‘lift’ the stronger colours of the floor. Colour Grow however does leave a matt appearance and as the client had asked for a shiny finish it was topped up with five coats of Tile Doctor Seal and Go. This is a compatible topical sealer which added a mid to high sheen.
By the end of the third day the Victorian floor looked brand new, and I received the following feedback from the client. Its rare to receive feedback from commercial customers so they were clearly overwhelmed with the transformation.
Did not think this glued covered bad old floor could look sooooo good Fabulous Fantastic job Looks Amazing Thank you
For aftercare I recommend the use of Tile Doctor Neutral Cleaner which isn’t as harsh as many of the products you find in supermarket. Stronger products can actually strip off the sealer over time leaving it vulnerable to dirt and detracting from its appearance.
Graham Davis
North Kent Tile Doctor
 Tile Doctor Ltd
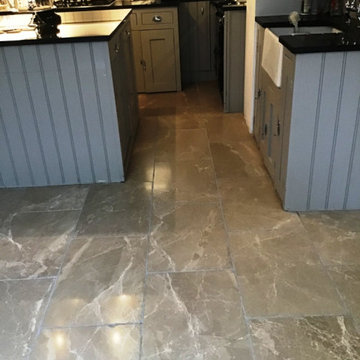
This Limestone tiled floor installed in a kitchen and family room at a property in Wellingborough is a great example of how this material can lose its appearance without a regular maintenance plan in place.
The customer called me as not only was she concerned that the floor had lost its lustre the grey grout had become very stained and almost black in heavy traffic areas, in fact my customer had originally asked about re-grouting but I was confident it could be cleaned.
I provided a quote which they were happy to accept.
The area was a nice wide 6 metre by 5 metre space and except for a few items of furniture that would need moving around there were relatively few obstacles. I reasoned the most efficient way to restore the polished appearance of the Limestone would be to use a set of diamond encrusted Burnishing Pads. These are fitted to a rotary machine and applied to the stone in sequence from coarse to smooth. It’s an effective process that cuts back the layer of dirt on the floor and then we build back up the polish.
We started burnishing the Limestone with a coarse 400-grit pad fitted to a rotary machine and applied with a little water for lubrication. The coarse pad is very good at removing dirt and old sealers from stone and once completed the resultant surface water and loose dirt is removed using a wet vacuum.
At this point I turned my attention to the badly stained grout lines, and applied a strong solution of Tile Doctor Pro-Clean which was scrubbed in along the grout lines using a stiff grout brush, this is necessary as the recessed nature of the grout makes it difficult for the rotary pads to reach it.
I then repeated the burnishing process with the medium 800-grit pad and fine 1500-grit pad, the 800-grit pad removes any small surface scratches and the 1500-grit further refines the look of the Limestone slowly restoring its polished appearance.
After the whole floor had been burnished in this way it was given a further rinse with water and the soil extracted as before. I then inspected the floor to see if more work would be needed.
I was not fully happy with how some of the grout lines had responded, some were still slightly stained, and some marks were visible in the high traffic areas. I had already discussed on my initial visit with the client that this might be the case and it was agreed between us that should this be the case I would apply a Tile Doctor Grout Colourant in Light Grey to recolour all the grout lines and achieve a uniform finish.
The stone and grout was still damp from cleaning and polishing, so I decided to leave the grout colouring until the following day.
On day two I started by grout recolouring all the grout lines, it’s a straight forward process but can be a little tedious where there is a lot of grout to cover. Once complete I allowed the grout colour to dry for a couple of hours before moving onto the next step.
The last pad to be applied in the stone burnishing process is the very fine 3000-grit polishing pad which is applied dry to the tiles using a small amount of water sprayed onto the floor and leaves the stone dry and with a polished silk finish.
The floor was then sealed using two coats of Tile Doctor Ultra Seal Sealant allowing the first coat to dry before applying the second. Ultra-Seal is an impregnating sealer that works by occupying the pores in the stone thereby preventing dirt from becoming ingrained there. It’s also a natural look sealer that doesn’t affect the appearance of the stone.
My customer was very happy with the transformation of her floor and provided the feedback copies below. In-fact she was so impressed with the results that she also used our services to restore the grout and silicon in one of her bathrooms.
“Phil was on time & easy to deal with and did an amazing job on my kitchen and bathroom floors and the carpets & sofa. No fuss, just a great job. Liz O.”
Phil Vissian
Northamptonshire Tile Doctor
 Tile Doctor Ltd
This detailed Victorian tiled hallway at a property in Camden was overdue some much-needed repair and maintenance. The owners of the property appreciated that original period features like this add a lot of value to a property and asked me to visit the property to quote for renovating it. The property was in a terrace of similar properties most of which appeared to have retained their Victorian character.
I inspected the floor and found there were a couple of loose, cracked, worn and broken tiles that needed to be replaced. In addition, the floor tiles needed a deep clean and then seal to bring back the wow factor. I was confident we could renovate the floor but at that point unsure if we would be able to find exact match replacements for the damaged tiles. Fortunately, Victorian tiles are still in demand and I knew of several companies I could check with so I was confident they could be found.
We discussed how long the work would take and assuming I could source the replacements agreed a price for the full restoration of the floor. After doing some research I managed to find suitable replacements with a company called Original Style and the work was scheduled for the following month.
Firstly, we prepared all areas with protective tapes to threshold edges and skirting.
This was followed by spaying the tiles with a strong dilution of Tile Doctor Remove & Go which is product designed to remove old sealers and coatings. After about ten minutes the tiles were scrubbed with black scrubbing pads and scrubbing brushes. Fresh water was used to rinse the floor and the slurry was extracted using a wet vacuum.
The floor was inspected and then a second clean carried out, this time using Tile Doctor Pro-Clean which is a Tile and Grout cleaning agent. The same process of application was used and after rinsing and extracting the dirt the tiles were given a steam clean. This ensured all the dirt was lifted out of the pores of the tile and the floor was now as clean as it possible could be.
The next step was the remove the loose and cracked tiles using the reclaimed tiles we had sourced earlier. Some cuts were necessary to get the replacements to match the originals but overall the plan worked. A quick drying adhesive was used to secure the tiles so we could apply the grout shortly after. The whole floor was then re-grouted and cleaned off to ensure a good match. The floor was left to dry off overnight, and you could already see it was now looking considerably improved.
Returning the next morning we checked the floor was dry using a moisture meter, this is important as to apply a sealer to damp tiles will lead to a patchy experience. All was well so we were ready to apply the sealer.
To start a single base coat of Tile Doctor Colour Grow sealer was applied to the floor and left to dry. This sealer is an impregnator that protects from within by occupying the pores in the clay tile improving colour in the process. This sealer does leave a matt finish however and the client wanted a subtle shine so one dry it was followed by four coats of Tile Doctor Seal & Go. The combination of the two sealers works really well to add long lasting protection to the tiles and provide the desired finish to the floor.
The floor was much improved, and the client was delighted. The detailed pattern and colours were now much more prominent, and the hallway looked much more inviting for both the owner and their guests. For the aftercare of Victorian tiles, I recommended the use of Tile Doctor Neutral Cleaner which is pH neutral and won’t prematurely erode the life of the sealer.
Nigel Voyce
North London Tile Doctor
 Tile Doctor Ltd
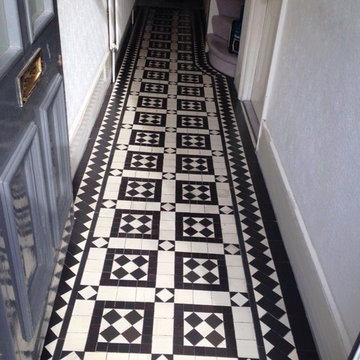
The photographs below are from a Victorian tiled hallway floor at a property in Stoke Newington in London. The floor was in need of repair with a large area very uneven and partly sunk in the middle of the pattern. The repairs were made using as many existing tiles as possible.
The first task was to set about cleaning the tiles using Tile Doctor Pro-Clean and Remove & Go on the stubborn areas. Both products were applied in the same way using black scrubbing pads to work the products into the tile to release the dirt. Hand brushes were used to clean up the grout lines and the floor was rinsed and soil removed using a wet vacuum.
At this point the large loose area of tiles were removed to be cleaned of grout/adhesive for use later and the sunken area that was revealed was levelled in line with the rest of the floor base. Once the new cement base had set and the tiles useable again they were re-laid and set in position to fit the matching pattern of the remaining floor.
Once the tile adhesive had set the last thing to do was to re-grout the repaired area making the hallway whole again and left to go off.
When we returned the whole floor was ready to be sealed and for this we used five coats of Tile Doctor Seal and Go which adds a nice shine to the floor as well as providing a surface seal that will help protect the tiles from stains going forward.
A lot of effort went into the restoration but what a transformation and well worth the work, certainly the customer was pleased and left the following testimonial.
Rob Voyce responded very quickly to my request for a quote, and was able to complete the work to a very good standard in the agreed time. The work caused minimum disruption to the household and everything was left clean and tidy at the end of each day. I would certainly recommend the services of the Tile Doctor and I am very happy with the work that has been done on old tiles in my Victorian hallway.
Nigel Voyce
North London Tile Doctor
 Tile Doctor Ltd
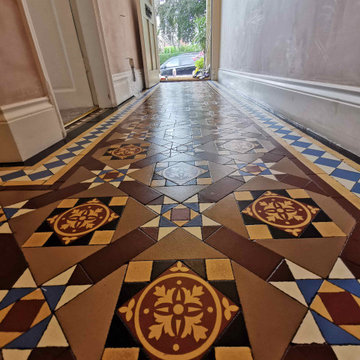
A young couple recently bought a house in Barnsley and were renovating it from top to bottom, included in the plan was the desire to have the previously unloved Victorian floor made beautiful again. The house stands in an area of Barnsley famous for its’ big Victorian villas and quite rightly they felt it was important to ensure period features like this original floor were correctly maintained.
Due to the floor being covered up for many years the floor had developed damp staining, it also had a lot of paint splattered on it. There were also some loose tiles that needed fixing back in place and the layer of old floor polish was present which would need removing.
I started by protecting all the skirting boards, doors and carpets bordering the tiles from splashing. The loose tiles were then cleaned up and then secured back in place using a fast-setting adhesive.
Once the adhesive was set, I turned my attention to stripping and cleaning the floor starting with the application of a coarse 200-grit diamond pad fitted to a weighted rotary buffing machine. The pad was lubricated using a dilution of Tile Doctor Remove & Go which was applied to small sections of the floor and left to soak in for ten minutes first. I run the buffing machine at a slow speed to minimise splashing. Remove & Go is amazing at removing old floor coatings (i.e. sealers), dirt and grime from the floor. When the diamond pad had been used on each section of the floor for five minutes the slurry was vacuumed up using a wet vac machine and I moved onto the next section. Once the whole floor had been cleaned in this way it was time to start the next step.
Old floors like this which don’t have the benefit of a damp proof membrane, and have been covered up for a long time, can suffer from efflorescence issues due to moisture being trapped in the tile. This will result in white salt staining appearing on the tiles for days, weeks and sometimes months afterwards. To counter this the alkaline salts are neutralised by giving the floor an acid rinse using Tile Doctor Acid Gel and leaving it to dwell for five minutes before going over the floor again with the coarse diamond pad. The slurry was again removed with a wet vacuum and the floor was scrubbed clean with damp cloths.
I returned a few days later once the floor had dried to seal the floor. The client wanted a satin finish so knowing the floor had damp and efflorescence issues I opted for Tile Doctor Seal and Go Extra. This is a topical sealer which leaves a lovely satin finish but also allows for the floor to breathe. six coats were required to make the floor look perfect, allowing the lovely colours to come through.
Once complete the floor looked much brighter and the colours really shone through. The owners were really happy with the renovation we carried out and before leaving I took time to discuss how best to maintain the tiles going forward including the use of Neutral Tile cleaner.
Matthew Lovett
South Yorkshire Tile Doctor

 Tile Doctor Ltd
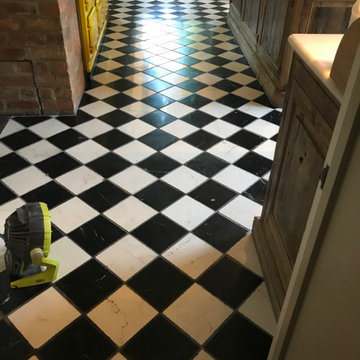
The tiles shown in the photographs below are classic distressed Black and White Italian Marble installed in the kitchen of a property in Bamber Bridge which is South of Preston. Some of the tiles had an issue with loose grout which I suspect was due to the suspended wooden floor and a small amount of movement had resulted in the grout cracking.
Ideally more support would be needed under the floor to prevent this, in the meantime however I recommended removing the grout and replacing with a flexible grout product that could cope with the movement. The tiles also needed a clean, polish and reseal so it made sense to address the issue with the grout as part of the work.
Working as a two-man team we started by cleaning the floor with a set of diamond burnishing pads starting with a coarse 400-grit, followed by 800 and 1500 grit. Water was used to lubricate the process and the floor was rinsed with water between pads with the fine slurry generated by the process extracted using a wet vacuum. These pads remove ingrained dirt and then slowly refine the appearance of the Marble building up its polished appearance in the process.
The next step was to rake out all the grout which as discussed was compromised and needed replacing. We had to be very careful when removing the grout due to the electric heating mat under the floor, any damage to that would require ripping the floor up. With the old grout removed and the floor cleaned the floor was then grouted using Mapei Ultra-colour which is a flexible and fully waterproof grout more than suitable for this situation.
Between us we managed to pack a lot into day one which was tough, however with the hardest tasks out of the way day two should be a lot easier.
Day two started with an initial clean making sure to remove any excess grout smeared on the surface that can affect the look of the tile if not removed. This was followed by the application of the last of the set of burnishing pads which is a 3,000-grit pad that really brings up the polish on the marble. You only need a small amount of water sprayed onto the floor when applying this last pad so by late morning the floor was dry and ready for sealing. The customer wanted a better sheen appearance than they previously had, fortunately we find the Diamond burnishing pads do this well, they also tighten up the pores of the stone as well which means less sealer is needed.
The floor was then sealed with Tile Doctor Colour Grow which is an impregnating sealer that improves colour and soaks into the stone occupying the pores and thereby preventing dirt from becoming ingrained. Once complete the floor looked great and the client was very happy.
Sealers and Polish do wear down with use over time so before leaving I discussed our annual maintenance plan option which will ensure the appearance of the Marble floor always looks good. The plan involves returning once a year to further polish the floor with a high-grade burnishing pad and to add more sealer if required. We also discussed the use of Tile Doctor Stone Soap for regular cleaning, it is a pH neutral cleaner which is ideal for stone floors like Marble which are acid sensitive.
Russell Taylor
Lancashire Tile Doctor
 Tile Doctor Ltd
This customer from Bedford, the county town of one of England’s smallest counties Bedfordshire, called me out because they have bought a house and, upon lifting the glued down carpet, had discovered a beautiful Victorian tiled floor. They decided to call me in to see if this original feature could be restored to its former glory having already tried household products to remove the glue and clean the tiles with limited success.
We often find customers who discover old tiles under carpet or linoleum struggle with the standard cleaning products available in supermarket which are only designed for everyday cleaning. The products Tile Doctor sells are far stronger; naturally however to achieve the best results it also helps if you have the right equipment, knowledge and experience and that where we come in.
I popped round to take a look at the floor and having tackled quite a few of these restorations before was confident we could restore the floor so a quote was given and the work was booked in for the next week.
My first course of action was to vacuum the floor to remove any loose debris. This gave me a better picture of the condition of the floor overall, and so I could assess how best to proceed. I opted for our tried and trusted method of applying a diluted solution of Tile Doctor Pro-Clean, which is a very reliable high alkaline cleaner suitable for all types of natural stone and tile. The solution was applied with a pump-up sprayer and left to dwell for 20 minutes to seep into the pores of the tile.
Next, I worked the solution into the tiles using a black scrubbing pad fitted to a rotary machine and hand brushes. The resulting cleaning slurry was then rinsed off – and I found that this had removed most of the glue and surface dirt. There were a few stubborn deposits of glue remaining, but I was able to remove them by using hand brushes and scrapers in combination with Tile Doctor Remove and Go, which is as its name suggest can remove most things including old sealers, epoxy grout haze, urethane coatings, synthetic finishes, adhesives and event paint.
Even after this there were still some patches of glue, so I decided to spray the whole floor with Remove and Go and worked it into the stubborn areas with brushes. I left it to dwell for 15 minutes and then rinsed the floor with a wet pick-up extraction machine. This did the job and the floor was left fresh and clean, ready to be sealed once it had dried.
The floor was left to dry for several days, which is typically necessary for old tiled floors that don’t have a damp proof membrane installed. The customer wanted the floor to look traditional and therefore requested a matt finish. This was achieved by applying two coats of Tile Doctor Colour Grow, which is also breathable thereby allowing any damp to evaporate as gases through the sealer, without affecting the finish.
As I previously mentioned, floors of this age can sometimes have damp issues, so this sealer is ideal for these older floors. Colour Grow is an impregnating sealer, meaning it penetrates the pores of the stone to fill them and prevent trapped dirt. It also intensifies the colours in the tiles to really bring them to life.
The customer was shocked and amazed by the great results as she thought nothing could be done to restore such an old floor. Before leaving the property, I gave her some maintenance instructions to help her keep the floor looking its best in the future. Another satisfied customer!
David Vissian
Bedfordshire Tile Doctor

 Urban Oasis Design & Construction LLC
Our clients wanted to create a backyard that would grow with their young family as well as with their extended family and friends. Entertaining was a huge priority! This family-focused backyard was designed to equally accommodate play and outdoor living/entertaining.
The outdoor living spaces needed to accommodate a large number of people – adults and kids. Urban Oasis designed a deck off the back door so that the kitchen could be 36” height, with a bar along the outside edge at 42” for overflow seating. The interior space is approximate 600 sf and accommodates both a large dining table and a comfortable couch and chair set. The fire pit patio includes a seat wall for overflow seating around the fire feature (which doubles as a retaining wall) with ample room for chairs.
The artificial turf lawn is spacious enough to accommodate a trampoline and other childhood favorites. Down the road, this area could be used for bocce or other lawn games. The concept is to leave all spaces large enough to be programmed in different ways as the family’s needs change.
A steep slope presents itself to the yard and is a focal point. Planting a variety of colors and textures mixed among a few key existing trees changed this eyesore into a beautifully planted amenity for the property.
Jimmy White Photography

 Plan-it Earth Design
Itea 'Little Henry' plays a starring roll in this residential rain garden with it's astounding fall color. Design by Plan-it Earth Design, Installation and photo by Donna Burdick of D&J Landscape Contractors
3