
Search results for "Machine tools" in Home Design Ideas

 Ehrlich Yanai Rhee Chaney Architects
The ground floor volumes wrapped in an elongated hand-fired brick, emphasizing the horizontality of the architecture that lays solidly on the land.
(Photography by: Matthew Millman)
 Tile Doctor Ltd
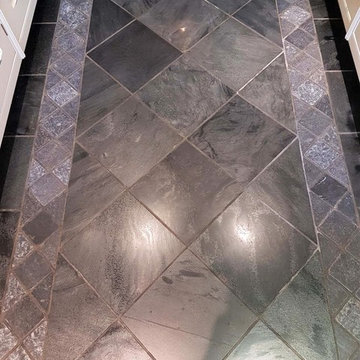
I was recently asked to survey an unusual stone floor at a house in in Harrogate comprising of Slate inlaid with Granite. The client advised that it had not been cleaned properly for 20 years and wanted it renovating! It was now definitely overdue a deep clean and professional attention. Fortunately, having worked on these floors for many years I knew I could make a substantial impact and transform its appearance. Fossilized slate is a beautiful stone when cleaned and sealed correctly.
The owner confessed they had actually been sealing the floor every two years but without a deep clean first, so they were effectively sealing in the dirt each time. I discussed with them the process I would use to clean and re-seal the floor and we agreed a price to carry to out the work.
To remove the layers of old sealer and dirt used a set of Tile Doctor Diamond Burnishing pads. The pads are attached to a rotary floor machine starting with the coarse 400-grit pad which was lubricated with a dilution of Tile Doctor Remove and Go to help strip the floor of dirt and layers of sealer. After rinsing and extracting the soil I worked through the different grades of pads in sequence finishing with the 1500-grit and this time using just water for lubrication.
A set of diamond handheld burnishing blocks were then used to clean up the edges and corners where the large 17” pads struggle to reach. This ensures all areas are treated and free of dirt and old sealer.
The floor was then rinsed and extracted again to remove the remaining soil. I find a wet vacuum is an invaluable tool for this. The floor was then left to dry out overnight ready for sealing the next day.
I returned the next day to seal the floor, first checking with a damp meter that the floor was dry, and the moisture reading was below the acceptable level. These results were fine, so I had a green light to continue and seal the stone.
The customer wanted a shine on the floor so rather than apply a satin sealer which I felt wouldn’t adhere to the stone properly I decided to polish the floor further with a the last of the four burnishing pads which is a very fine 3000-grit pad. You don’t need to use a lot of water with this last pad just a small amount sprayed onto the floor using a technique we refer to as a ‘Spray Burnish’.
To seal the floor, two coats of Tile Doctor Colour Grow were applied. This is an impregnating matt sealer which intensifies the natural colours of this beautiful stone and provides long lasting durable protection.
Even I was impressed with the finished result but more importantly the client was over the moon. To keep the floor looking its best I recommended they use Tile Doctor Stone Soap which is pH neutral. You should always read the label in detail when choosing a floor cleaning product as many are too strong and not recommended for sealed stone surfaces as they will prematurely erode the sealer.
Nigel Stoker
North West Yorkshire Tile Doctor

 Cypress Design Co.
Inspiration for a mid-sized 1960s master white tile and subway tile porcelain tile and white floor corner shower remodel in Providence with a two-piece toilet, gray walls, a pedestal sink and a hinged shower door
Find the right local pro for your project

 Gerhard’s Kitchen, Bath & Lighting Store
Backsplash: Oriental White Echelon by Olympia Tile + Stone. http://j.mp/1mUoZN6

 Shakertown Inc
Shakertown is specified by more architects than any other cedar shingle manufacturer. There is no equal. Shakertown's Tahoe Shingle Panel wraps the sidewalls of the Craftsman Style home. Brown trim, stone work, and copper downspouts complete the architectural style.
Builder: Kunz and Wendt Builders
Photos: Mark Rutledge

 Envision Web
Stuart Wade, Envision Virtual Tours
Mountain Reflections on Lake Burton
Recently renovated both inside and out, this 5 bedroom, 5.5 bath home with sweeping views of Lake Burton is fit for entertaining large crowds. The open floor plan features a spacious great room with a 2-story stacked stone fireplace, abundant natural ligthing, dining for 10+ and a large chef's kitchen with granite countertops, custom cabinets to house every utensil, exposed beams and access to a lakeside porch. Three sets of french doors open to a magnificent curved veranda accented by columns. Western sunsets make this the place to be in the cool evenings watching the sun reflect off the jewel tone water. A private master bedroom on the main floor provides access to the covered porch. The master bath features a double vanity with granite countertops, built-in storage drawers and cabinets, jetted tub and seperate shower. Spacious guest bedrooms feature private baths and lake views. Mature landscaping including an incredible array of pink and purple rhododendron, eyebrow windows, columns and curved porches highlight the newly painted exterior.
The terrace level features a second family room/rec room with a stacked stone fireplace, wet bar, and a wall of triple french doors that open to a lakeside stone terrace. Two additional guest bedrooms with full baths also have access to the terrace patio. A large laundry room and gym/art studio with outside entrance, double sink and ample storage completes the terrace level.
Lake Burton is a unique Life Style. Cherry Lane is a paved street accessed by 4 single family homes. This home features a private, gated driveway off Cherry Lane. There is not a homeowner’s association, there are no fees or dues. Over 800 lake properties are managed and leased by the Georgia Power Company.
Location is a major advantage for this property with close proximity to Clayton, the hospital, Waterfall Country Club, the Appalachian Trail, shopping, quaint restaurants and only about a 45 minute drive to Highlands, N.C. This house is located on deep water and has breathtaking lake and mountain views that will capture your heart!
General Information:
• 5 bedrooms and 5 ½ baths
• All bathrooms have new updated granite counter tops.
• 2 fireplaces ( 1 gas non vent logs and 1 wood burning with gas starter and built in wood storage)
• Both fireplaces have raised hearths.
• House has poured concrete walls with reinforced steel.
• All Floor trusses were engineered for proper application.
• During construction the house and grounds were pre-treated for termites. The house is inspected for termites annually. To date, no termites have been found. The termite bond is with American Pest control out of Toccoa, GA.
• The main entrance has double Mahogany leaded glass door. All other exterior doors and windows are deluxe Anderson thermo pane. All Anderson windows are tilt out for easy inside cleaning. Windows have Planter shutter and/or wood blinds.
• All lake side doors are 8 feet. Doors have triple locks and are adjustable for the best fit.
• All exterior walls have house wrap and heavy insulation- R-17 for walls and R 30 in the attic.
• House has 3 levels. Each level has its own Trane High Efficiency Weathertron heat pump XE 1200. The 2 units for the main and basement levels also have dual fuel, propane gas for extra heat if needed.
• Beam Central Vacuum system for all 3 levels.
• All 3 levels are wired for Stereo speakers as well as the main level outside deck.
• All ceilings are 10 ft. or higher.
• Bar sinks have granite counter tops
*Brand new (2014) roof with HD architectural shingles has transferable lifetime warranty
Entry Foyer:
-Double Mahogany lead glass doors
-2 lead glass side windows
-Marble floor, heavy moldings, tray ceiling
Great Room:
-Vaulted wood ceiling with multi light chandelier
-Doors can be adjusted in many different positions for easy operations
-Anderson Windows and doors
-All doors facing lake side are 8 ft. doors
-Planter shutters in all windows on main floor
Kitchen:
-Vaulted ceiling with beadboard and exposed beams
-Custom Gillespie cabinets with space for every utensil
-Large kitchen island with breakfast bar
-Walk-in pantry
-Granite counter tops with plenty of prep space
-Breakfast nook
-Access to lakeside porch
-Central Vac and crumb catcher
-GE Monogram Fridge
-Kitchenaid built in oven and microwave
-Jen-air 4 burner gas stove with exhaust
-Kitchenaid trash compactor
-Scotsman Ice Machine
-Over and under counter accent lighting
Master Bedroom:
-Heavy Molding, hardwood flooring,
-Plantation shutters on bedroom French doors opening to deck
-4 closets
Master Bath:
-Granite counter tops with double sinks
-Separate shower with glass door and delta shower system
-Jetted Tub
-14 drawer built-in cabinets for clothing
Upstairs level:
-Two bedrooms, each with full baths, tile floors, double vanities, granite countertops, ample closets and linen closets
Terrace Level:
-Spacious family room with stone fireplace and wet bar
-Guest bedroom with full bath
-Office with full bath
-Art studio or exercise room with double sink
-Separate tool room
-Laundry room/utility room with tile floors and cabinets
-Covered stone terrace with access to boathouse
Boat House:
-Two stall for up to 25 ft. boat
-2 electric boat lifts
-Large deck on top of boathouse with ½ covered roof
-Large storage area for boat supplies
-Swim dock
 Envision Web
Stuart Wade, Envision Virtual Tours
Mountain Reflections on Lake Burton
Recently renovated both inside and out, this 5 bedroom, 5.5 bath home with sweeping views of Lake Burton is fit for entertaining large crowds. The open floor plan features a spacious great room with a 2-story stacked stone fireplace, abundant natural ligthing, dining for 10+ and a large chef's kitchen with granite countertops, custom cabinets to house every utensil, exposed beams and access to a lakeside porch. Three sets of french doors open to a magnificent curved veranda accented by columns. Western sunsets make this the place to be in the cool evenings watching the sun reflect off the jewel tone water. A private master bedroom on the main floor provides access to the covered porch. The master bath features a double vanity with granite countertops, built-in storage drawers and cabinets, jetted tub and seperate shower. Spacious guest bedrooms feature private baths and lake views. Mature landscaping including an incredible array of pink and purple rhododendron, eyebrow windows, columns and curved porches highlight the newly painted exterior.
The terrace level features a second family room/rec room with a stacked stone fireplace, wet bar, and a wall of triple french doors that open to a lakeside stone terrace. Two additional guest bedrooms with full baths also have access to the terrace patio. A large laundry room and gym/art studio with outside entrance, double sink and ample storage completes the terrace level.
Lake Burton is a unique Life Style. Cherry Lane is a paved street accessed by 4 single family homes. This home features a private, gated driveway off Cherry Lane. There is not a homeowner’s association, there are no fees or dues. Over 800 lake properties are managed and leased by the Georgia Power Company.
Location is a major advantage for this property with close proximity to Clayton, the hospital, Waterfall Country Club, the Appalachian Trail, shopping, quaint restaurants and only about a 45 minute drive to Highlands, N.C. This house is located on deep water and has breathtaking lake and mountain views that will capture your heart!
General Information:
• 5 bedrooms and 5 ½ baths
• All bathrooms have new updated granite counter tops.
• 2 fireplaces ( 1 gas non vent logs and 1 wood burning with gas starter and built in wood storage)
• Both fireplaces have raised hearths.
• House has poured concrete walls with reinforced steel.
• All Floor trusses were engineered for proper application.
• During construction the house and grounds were pre-treated for termites. The house is inspected for termites annually. To date, no termites have been found. The termite bond is with American Pest control out of Toccoa, GA.
• The main entrance has double Mahogany leaded glass door. All other exterior doors and windows are deluxe Anderson thermo pane. All Anderson windows are tilt out for easy inside cleaning. Windows have Planter shutter and/or wood blinds.
• All lake side doors are 8 feet. Doors have triple locks and are adjustable for the best fit.
• All exterior walls have house wrap and heavy insulation- R-17 for walls and R 30 in the attic.
• House has 3 levels. Each level has its own Trane High Efficiency Weathertron heat pump XE 1200. The 2 units for the main and basement levels also have dual fuel, propane gas for extra heat if needed.
• Beam Central Vacuum system for all 3 levels.
• All 3 levels are wired for Stereo speakers as well as the main level outside deck.
• All ceilings are 10 ft. or higher.
• Bar sinks have granite counter tops
*Brand new (2014) roof with HD architectural shingles has transferable lifetime warranty
Entry Foyer:
-Double Mahogany lead glass doors
-2 lead glass side windows
-Marble floor, heavy moldings, tray ceiling
Great Room:
-Vaulted wood ceiling with multi light chandelier
-Doors can be adjusted in many different positions for easy operations
-Anderson Windows and doors
-All doors facing lake side are 8 ft. doors
-Planter shutters in all windows on main floor
Kitchen:
-Vaulted ceiling with beadboard and exposed beams
-Custom Gillespie cabinets with space for every utensil
-Large kitchen island with breakfast bar
-Walk-in pantry
-Granite counter tops with plenty of prep space
-Breakfast nook
-Access to lakeside porch
-Central Vac and crumb catcher
-GE Monogram Fridge
-Kitchenaid built in oven and microwave
-Jen-air 4 burner gas stove with exhaust
-Kitchenaid trash compactor
-Scotsman Ice Machine
-Over and under counter accent lighting
Master Bedroom:
-Heavy Molding, hardwood flooring,
-Plantation shutters on bedroom French doors opening to deck
-4 closets
Master Bath:
-Granite counter tops with double sinks
-Separate shower with glass door and delta shower system
-Jetted Tub
-14 drawer built-in cabinets for clothing
Upstairs level:
-Two bedrooms, each with full baths, tile floors, double vanities, granite countertops, ample closets and linen closets
Terrace Level:
-Spacious family room with stone fireplace and wet bar
-Guest bedroom with full bath
-Office with full bath
-Art studio or exercise room with double sink
-Separate tool room
-Laundry room/utility room with tile floors and cabinets
-Covered stone terrace with access to boathouse
Boat House:
-Two stall for up to 25 ft. boat
-2 electric boat lifts
-Large deck on top of boathouse with ½ covered roof
-Large storage area for boat supplies
-Swim dock
Sponsored
Delaware, OH

Buckeye Basements, Inc.
Central Ohio's Basement Finishing ExpertsBest Of Houzz '13-'21

 Caela McKeever
Photo: Caela McKeever © 2017 Houzz
Inspiration for an eclectic home design remodel in Seattle
Inspiration for an eclectic home design remodel in Seattle

 Elizabeth Aldrich
10 Ideas for Turning Your Garage into a Modern Industrial Neighborhood Bar
By Elizabeth Aldrich
Host happy hours and cocktail parties worthy of a full page spread – in your own garage.
Leave the brick exposed, the concrete floors as is, and the wood unfinished and it costs more? The sophisticated older brother of the shabby-chic trend, urban industrial style, is taking over. Real estate agents are able to tack on a few extra grand to a flat if they can include “exposed brick” in their advertisements, and designer chefs and master mixologists are moving into warehouses and industrial districts in urban areas across the nation. A friend recently invited me to dinner at Portland, Oregon’s newest, hippest charcuterie spot, and when we pulled up to the building it was in a warehouse where I used to go to underground raves in high school.
These industrial style spaces that were once seen as unfinished or lacking in coziness are now seriously coveted. Their rawness is considered authentic, their grit a mark of character. But if you’re a homeowner, there’s a good chance you already have one of them built right into your house: your garage.
I like to preach about how much people underutilize their garage spaces, piling them full of storage bins they never touch. Whether you turn it into a workspace or a playroom, there’s a lot of value in a creatively-used garage space. For the overly ambitious, the design lover, or the hostess with the mostess, here’s one idea that blows the rest out of the water.
Turn your garage into a multi-purpose, urban industrial wonderland for work and play.
Originally outfitted for factories and warehouses, the industrial style facilitates productivity. Now that it’s also being appreciated as a great aesthetic for bars and restaurants, these rooms can serve both form and function, doubling as work and entertaining spaces. This is great for people who have always dreamed of having that extra basement space for hosting friends, complete with a wet bar and a billiards table, but lack the square footage. Just keep in mind that your friends might love it so much, they’ll start ditching their favorite happy hour spot and showing up at your doorstep instead.
Here are ten ideas forbuilding the perfect workshop by day and cocktail bar by night in your garage.
1. Clean out the space. Get rid of everything you don’t need. Part of the beauty of industrial style designs is their simplicity and abundance of open space. Excessive clutter can make people feel boxed in, and that’s not conducive to productivity or to social activity. Out of sight, out of mind. Build shelving up high for storing must-keep belongings, much like a warehouse.
For bonus points, store your belongings in wooden crates for aesthetic consistency. Or consider stacking them on a pallet, wrapping them in excessive amounts of plastic wrap, and loading them onto the next cross-country freighter. You won’t miss them.
2. Install storage for frequently used objects. The brilliant thing about the urban industrial look is that your tools, tool boxes, and tool storage cabinets already fit right in. Metal storage cabinets and file cabinets are perfect additions to the space. While grey is certainly the color pallet for this style, 50 shades might be a few too many. Mix it up by spray painting one of your cabinetsto add a pop of color. Make a small pegboard to hold up your tools and hang larger items such as bicycles and recreational equipment by pegs. If you have a lot of storage bins that you have to keep, look upward instead of storing them on the floor. Insert a tracking system onto your garage ceiling and slide the bins into place.
For extra credit, get an old locker to use as a coat closet when guests come over.
3. Heat the space.Since you’re not turning the garage into a full-time living space, such as a spare bedroom, you really don’t need to go through the work and additional cost of installing full-blown heating and insulation systems. If you don’t need to use the space when the temperature drops, or if you live in a consistently temperate climate, you might not need to do anything. But if you do want to be able to host people through the winter, a simple garage heater will suffice. Here are some good options for installing garage heating.
Take it one step further, and get a couple patio heaters to help with the next step.
4. Turn your driveway into a patio space. Even the best restaurants and cocktail bars are nothing in the summertime without a solid patio space. Leave the garage door open on warmer nights and invite your guests to go outdoors. Place some stylish folding chairs and a patio table out for comfort. Place a few potted plants here and there to make the space feel more inviting.
For a really lively patio scene, put a portable fire pit out on the driveway or front lawn and surround it with workbenches from your garage.
5. Build your bar. Pick a corner in your garage for the bar, and get started. You can build a bar pretty cheaply and easily with reclaimed pallets, and get some industrial-style barstools. Behind the bar, you’ll have both your tools and your liquor, and there’s no need to build expensive cabinetry. If you’re serving quality, why cover it up? Build shelving or open cubicles to house your liquor. Put out metal buckets filled with ice to chill beers.Be sure to serve up cocktails worthy of the space. The Hemingway Daiquiri served straight up is a unique way to dress down, or industrialize, a traditionally frou-frou cocktail.
To go the extra mile, build a bar with laid brick.Install an extra fridge in the garage so you can avoid having to trek into the kitchen to refill chilled drinks, and you can store dips, vegetables, and other hors d'oeuvres right at your fingertips.
6. Bring on the games. To really turn your hosting space into a fun time, be sure to offer ample play options. For the low on space, a dart board will suffice, whereas if you’ve got a five-car garage and can’t manage to fill the space, put in a couple billiard tables. Ping pong tables are ideal for most because they’re great fun and can easily be folded up and stored.
If you want to keep your guests playing until the wee hours of the morning, get an old pinball machine, a vintage arcade game, or a small Skee-Ball alley.
7. The heart of your space.Build along worktable that doubles as a table for your guests right in the center of your garage. It should be tall enough to be used while standing, although you can place a few barstools along with it. Having a table space for drinks but limited seating will encourage guests to walk around and mingle. Build it out of wood and make sure to maintain a natural finish.
Don’t be afraid to rough up the work table by day. The dings and marks created while you build will only lend authenticity to the piece.
8. Install lighting. Remember, the urban industrial style is all about function and showcasing materials in their raw form. There’s no need to buy expensive floor lamps or install a fancy lighting system. The most popular lighting in these types of spaces is exposed bulb lighting. Just open up the wiring on your current lighting system and drop down some bulbs.
For additional lighting, string up exposed bulb patio lights and place some vintage metal desk lamps on the tables and bar area.
9. Brand your space. Use the designs for the stuff you build by day as wall art. Blow up sketches, blueprints, schematics, and architectural drawings to hang up for decoration. Choose one wall that could use a splash of color, perhaps the wall behind your bar, and get a friend to paint a mural, or whip out the spray paint for a real urban feel.
Splurge a little and get a custom neon sign made of your last name or the word “bar” to hang behind the bar.
10. The garage door. For the finishing touch, and to really wow your guests, get a brand new modern, industrial style garage door installed. Look for the window-paneled types that restaurants use, like this contemporary aluminum and glass beauty. You can leave it half open when you want to utilize your driveway-patio space.
On nights when you have to close it all the way, the glass panels let your guests still look out onto the stars, making it feel like a patio space even when it’s too cold for one.
Once your garage bar is up and running, put on your denim suit and get ready to call yourself the Joneses. No one will be able to keep up with you.

 Bayberry Cottage
This fabulous chandelier is made from vintage silver-plate spoons. While it's stunning and dramatic, it doesn't take itself too seriously, and that makes it the very best sort of statement piece!

 T.A. French - Custom Builder
Example of a mid-sized transitional dark wood floor and brown floor double front door design in Austin with gray walls and a black front door

 Singer Kitchens
Small trendy gender-neutral concrete floor and gray floor reach-in closet photo in New Orleans with open cabinets and gray cabinets

 Ocala Kitchen and Bath, Inc.
Mid-sized urban l-shaped ceramic tile and beige floor open concept kitchen photo in Orlando with an undermount sink, recessed-panel cabinets, brown cabinets, concrete countertops, red backsplash, brick backsplash, stainless steel appliances and an island

 Mkw Surfaces LTD
MKW Surfaces
Home design - large traditional galley home design idea in London with a farmhouse sink, shaker cabinets, gray cabinets, quartz countertops, gray backsplash and an island
Home design - large traditional galley home design idea in London with a farmhouse sink, shaker cabinets, gray cabinets, quartz countertops, gray backsplash and an island

 Siding & Windows Group Ltd
Beautiful Modern Home Remodel, Siding done by Siding & Windows Group Ltd. We installed HardiePanel Vertical 4x8 Smooth Boards in ColorPlus Technology Color Cobble Stone on the sides of the home and Custom Metal trim.
 NSPJ Architects
 / Cathy Kudelko
Home design - transitional home design idea in Kansas City
Home design - transitional home design idea in Kansas City
 User
Detail of Iridescent Venetian plaster finish on all walls in Living Room by Christianson Lee Studios
Example of a transitional home design design in New York
Example of a transitional home design design in New York
 Tile Doctor Ltd
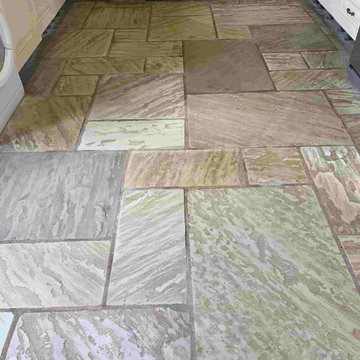
This client at a property in Bamber Bridge was really fed up with his Indian sandstone kitchen floor. The sandstone suited the age of the property but due to its course rough texture he was having issues keeping the stone clean and maintaining it to a decent standard. Ideally, he wanted something long lasting that was easier to keep clean.
Sealers can only help so much on a rough stone like this, in my opinion really rough stone is best sold for use outside in patio’s etc. My client didn’t want to rip it up as it ran underneath the kitchen units and it cost them a lot of money to have it laid, so having been on our website and checked out our previous work they realised we could mill the stone and smooth down the rough texture to a much smoother finish and yet still leave enough texture in the stone for it to look very natural.
We have developed a system at Tile Doctor called “Milling” which is very similar to sanding rough wood to reveal the inner patina. Once done we then we give it one more clean before adding a fresh sealer to add protection. Milling does change the look of the stone as you will see on the before and after pictures on this page, so it is not for everyone. It is however a one-off process so once done it will never need to be milled again. Like all stone floors it will still benefit from a deep clean and re-seal every five years (depending on use) just to keep it looking its best but after milling you will be able to walk on the stone in bare feet or socks and slippers as it really does make a big difference to the finish.
By milling we mainly use coarse-grit burnishing pads that contain segments made from hard industrial diamonds. Working our way up the different grits the pads are applied using a weighted floor buffer which is run over each tile several times to cut the stone back. The process is so effective we often find that the pads are all you need to clean the stone so hardly ever use any chemicals with this process, apart from the sealer which is applied once fully dry.
I should mention that Milling is not something a customer should consider doing themselves as you need invest in a heavy-duty weighted buffing machine which are rarely available for hire.
To seal internal Sandstone floors, I usually use Tile Doctor Colour Grow which brings out the natural colours in the stone. On this occasion however two coats of Tile Doctor Ultra Seal were applied to the stone and grout which results in an invisible natural finish and better matched the clients’ requirements.
My client was really pleased with the new floor and left the following feedback:
“Only finished today but looks so good now. Russell did a great job milling the flags to a much smoother finish. Two coats of sealant applied by Heidi on last day which hopefully will keep it looking that way. Mark F. Bamber Bridge”
For aftercare cleaning I left them with a bottle of Tile Doctor Neutral Cleaner which is specially designed for cleaning sealed floors. You need to be very careful when using supermarket cleaners as many are tool strong and will slowly strip the sealer off the floor, always read the label.
Russell Taylor
Lancashire Tile Doctor

 Bearded Builders
Inspiration for a mid-sized timeless 3/4 white tile and subway tile ceramic tile and white floor alcove shower remodel in Omaha with white walls, a pedestal sink and a hinged shower door
 Tile Doctor Ltd
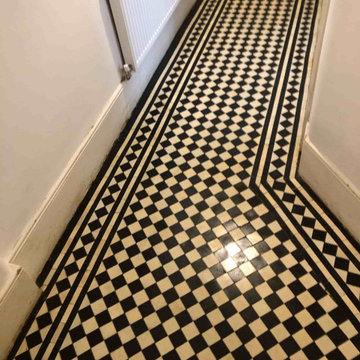
This property was in theLadbroke Grove area of West London near Kensington. The client had found an old and probably original black and white checkered pattern Victorian tiled floor under their cork tiled flooring. They also reported that it was badly damaged so I thought it would be best if I paid them a visit first to see how extensive the damage was and whether it was repairable. The floor was in a quite a state, the tiles were covered in glue from the cork and had several areas had been back filled with cement.
I reassured them that the damage could be rectified, and that it would be possible to completely restore the floor back to a good standard. I would have to remove the glue, remove the cement that had been used to level the floor and replace with reclaimed tiles to match. They were relieved to find out it could be done and happy with my quote I was instructed to go ahead with the work.
We started by taping up the skirting boards to protect the woodwork. With this done attention was turned to the glue which was softened using a strong dilution of Tile Doctor Remove and Go so it could be carefully scraped off. Multiple techniques and tools were needed to remove the glue including hand-held scrappers and a black pad fitted to a buffing machine. For the stubborn areas steam was applied to help lift the adhesive out the tile.
Once all the glue was removed the floor was rinsed and the alkaline cleaner neutralised with Tile Doctor Grout Clean Up which further cleaned the tiles and removed old traces of grout from the floor. Old floors like this generally don’t have a damp proof membrane underneath so the acids in the Grout Clean-up also counter any efflorescent salts trapped in the tile.
Once this was completed the slurry was removed with a wet vacuum and left to fully dry out overnight.
The following day focus turned to repairing the areas of the floor where the tiles were missing or broken. The main issue being the cemented areas, we see this a lot with Victorian Hallways and generally what happens is a heating engineer digs out the floor to install pipework. Not being tilers, your average plumber then repairs the floor with a self-levelling cement that brings the level up to the surface of the tile so it can be covered with lino, carpet of in this case cork.
The sub floor was then rebuilt with rapid setting self-levelling compound but this time to below the level of the tile.
Once the new base was dry it was a just a question of re-tiling with the replacement tiles to match the original checkered pattern. The replacement reproduction tiles were sourced from Original Features in Crouch End North London. After grouting we left the floor to dry out over the weekend.
When we returned to seal the floor our first step was to check the floor was dry using a moisture meter. This is critical as the sealant will not cure correctly if there is too much moisture in the floor. In this case the extra two days we had allowed had done its job and the test had confirmed it was ready to accept a sealer.
The client wanted the floor finish not to be too shiny once sealed so we opted to seal with two coats of Tile Doctor Seal and Go Extra. This is good choice for old Victorian floors such as this example as it’s special acrylic-based formula allows for moisture vapour transmission which as mentioned previously is a concern where no damp proof membrane has been installed.
I’m please to confirm my clients were delighted with the result, as you can see from the pictures the black and white floor restoration makes for a dramatic entrance well in keeping with the style of the property. For aftercare I recommended the use of Tile Doctor Neutral Tile Cleaner which will keep the tiles in good condition going forward without damaging the new sealer.
Jackson Davis
Central London Tile Doctor
17